34 Using WebCenter Portal Administration Console
This chapter provides information about the runtime administration console that is available for WebCenter Portal applications.
This chapter includes the following sections:
-
Section 34.1, "Introduction to WebCenter Portal Administration Console"
-
Section 34.2, "Accessing the WebCenter Portal Administration Console"
-
Section 34.6, "Managing Services, Portlet Producers, and External Applications"
The content of this chapter is intended for users with the Administrator role who are responsible for managing users and roles, resources, and configuring default settings for WebCenter Portal applications.
34.1 Introduction to WebCenter Portal Administration Console
By default, WebCenter Portal applications offer several administration pages (Figure 34-1) that enable authenticated administrators to perform common administrative duties, including:
-
Setting application-level preferences
-
Managing users and granting application roles
-
Managing and configuring application resources
-
Managing content
-
Managing and configuring portlet producers
-
Managing and configuring external applications
-
Creating and managing polls
-
Propagating application updates
Figure 34-1 WebCenter Portal Administration Console

Description of "Figure 34-1 WebCenter Portal Administration Console"
34.2 Accessing the WebCenter Portal Administration Console
To access the administration console for a WebCenter Portal application:
-
Log in to your application as an administrator.
Initially, the WebCenter Portal Administration Console is only available to the system administrator. For information on how to grant the
Administratorrole to others, see Section 34.4.3.3, "Giving a User Administrative Privileges." -
Do one of the following:
-
Click the Administration link (Figure 34-2).
Figure 34-2 WebCenter Portal Administration Console - Administration Link

Description of "Figure 34-2 WebCenter Portal Administration Console - Administration Link"
-
Access the WebCenter Portal Administration Console using the direct URL:
The default direct URL is:
http://www.server:port/context_root/admin
For example:
http://mycompany.com:8888/myapp/adminApplication developers can, however, customize the direct URL using the
web.xmlentry:<servlet-mapping> <servlet-name>PortalAdminServlet</servlet-name> <url-pattern>/admin</url-pattern> </servlet-mapping>
The WebCenter Portal Administration Console displays (see Figure 34-1).
-
34.3 Configuring Application Defaults
On deployment WebCenter Portal applications are pre-configured with various default settings which administrators can customize to suit their audience through the WebCenter Portal Administration Console. From the Configuration tab (Figure 34-3), you can specify a default page template, skin, resource catalog, and navigation model.
Figure 34-3 WebCenter Portal Administration Console - Configuration Tab

Description of "Figure 34-3 WebCenter Portal Administration Console - Configuration Tab"
This section includes the following subsections:
34.3.1 Choosing a Default Page Template
In a WebCenter Portal application, page templates define how individual pages and groups of pages display on a user's screen. Every page displays within a page template. For more information, see "Working with Page Templates" in the Oracle Fusion Middleware Developer's Guide for Oracle WebCenter.
Administrators can define the default page template that is used to display pages.
To select a default page template for the application:
-
Navigate to the Configuration administration tab.
See also, Section 34.2, "Accessing the WebCenter Portal Administration Console".
-
Choose a Default Page Template from the list provided.
The template you select is applied to existing pages and any new pages that are created.
Note:
If users create pages and hard-code links to page templates, the Default Page Template has no effect. -
Click Apply.
34.3.2 Choosing Default Resource Catalogs
In a WebCenter Portal application, the resource catalog specifies a collection of elements, such as layout components, task flows, portlets, documents, and others, that authorized users can add to the application at runtime. For more information, see "Creating and Managing Resource Catalogs" in the Oracle Fusion Middleware Developer's Guide for Oracle WebCenter.
To select a default resource catalog for the application:
-
Navigate to the Configuration administration tab.
See also, Section 34.2, "Accessing the WebCenter Portal Administration Console".
-
Choose a Default Resource Catalog from the list provided.
The catalog you select is offered to users when they add content to pages, page templates, and so on.
-
Click Apply.
34.3.3 Choosing a Default Navigation
Navigations enable users to easily get around your WebCenter Portal application and quickly access the information they need. For more information, see "Building a Navigation Model for Your Portal" in the Oracle Fusion Middleware Developer's Guide for Oracle WebCenter.
Administrators can define the navigation used wherever there is a EL reference to ${navigationContext.defaultNavigation}. This enables administrators to specify a default navigation model once and have it change throughout the system.
To choose a default navigation for the application:
-
Navigate to the Configuration administration tab.
See also, Section 34.2, "Accessing the WebCenter Portal Administration Console".
-
Choose a Default Navigation from the list provided.
The navigation you select is applied wherever there is a EL reference to
${navigationContext.defaultNavigation}.Note:
If users hard-code navigation model references (for example, in a parameter to a task flow), the Default Navigation has no effect. -
Click Apply.
34.3.4 Choosing a Default Skin
Application administrators can customize the default appearance of a WebCenter Portal application by changing its skin. A skin changes the way the user interface appears, but does not change the application's behavior.
To choose a default skin:
-
Navigate to the Configuration administration tab.
See also, Section 34.2, "Accessing the WebCenter Portal Administration Console".
-
Choose a Default Skin from the list provided.
The skin you select is applied to all the pages in your application.
Note:
The Default Skin has no effect on administration pages because the WebCenter Portal Administration Console uses an internal skin that does not change. -
Click Apply.
34.4 Managing Application Members and Roles
Users who are granted the Administrator role, can manage application members and roles through the WebCenter Portal Administration Console. From the Security tab (Figure 34-4), you can add members, define roles, grant and revoke permissions and roles, as well as remove members.
Figure 34-4 WebCenter Portal Administration Console - Security Tab

Description of "Figure 34-4 WebCenter Portal Administration Console - Security Tab"
This section contains the following subsections:
-
Section 34.4.2, "Understanding Application Roles and Permissions"
-
Section 34.4.4, "Managing Application Roles and Permissions"
Note:
The Security tab displays the Role Manager task flow, which can be added independently to any WebCenter Portal application. For more information, see "Using the Role Manager Task Flow" in the Oracle Fusion Middleware Developer's Guide for Oracle WebCenter.34.4.1 Understanding Users
WebCenter Portal application users each require a login account—provisioned directly from an existing identity store. Initially, only the Fusion Middleware Administrator (weblogic by default) can login and this default user has full administrative privileges through the Administrator role (see Table 34-1).
It is the Fusion Middleware Administrator's job to make individual users and user groups, who exist in the identity store, members of the WebCenter Portal and to assign each member an appropriate application role. Default and custom application roles are described in the section on Section 34.4.2.1, "Understanding Application Roles."
Alternatively, the Fusion Middleware Administrator may also choose to assign the application Administrator role to one or more other users and delegate this responsibility to others.
34.4.2 Understanding Application Roles and Permissions
Application roles control the level of access a user has to resources and services in a WebCenter Portal application. This section describes application roles and permissions and includes the following subsections:
34.4.2.1 Understanding Application Roles
Application role assignment is the responsibility of the application administrator. Administrators can assign members a default application role or create additional, custom roles specific to their application. For more detail, see:
Application roles and permissions defined within a WebCenter Portal application are stored in its policy store and, consequently, only apply to the application and do not imply any other permissions within the WebCenter domain or other domains. Enterprise roles are different; enterprise roles are stored within the application's identity store and do not imply any permissions within the application.
34.4.2.1.1 Default Application Roles
WebCenter Portal applications provide several default application roles that cannot be deleted (Table 34-2).
Table 34-2 Default Roles for a WebCenter Portal Application
| Application Role | Description |
|---|---|
|
|
Users with the Administrators can also manage users and roles for the application, and delegate or revoke privileges to/from other users. Initially, the |
|
|
Users with this role can manage (create, update, and delete) portlet producers and external applications through corresponding task flows. Initially, only users with the |
|
|
Users with this role can view portlet producers and external applications through corresponding task flows.. Initially, any user who is logged in (that is, has No direct permissions are granted to the |
|
|
Authenticated users are granted the |
|
|
Anyone who can access the application but is not logged in, is granted the |
34.4.2.1.2 Custom Application Roles
Custom application roles (sometimes known as user-defined roles) are specific to your WebCenter Portal application. When setting up the application, it is the administrator's job to identify which application roles are required, choose suitable role names, and define the responsibilities of each role.
For example, an education environment might require roles such as Teacher, Student, and Guest. While roles such as Finance, Sales, Human Resources, and Support would be more appropriate for a corporate environment.
To learn how to set up applications roles for users, see Section 34.4.4.1, "Defining Application Roles."
34.4.2.2 Understanding Application Permissions
Every application role has specific, defined capabilities known as permissions. These permissions allow individuals to perform specific actions within the application. Note that no permission, inherits privileges from other permissions.
This section contains the following subsections:
34.4.2.2.1 Application Permissions
Permissions are categorized as follows and listed individually in the Table 34-3:
-
Application
-
Mashup Styles
-
Content Presenter Templates
-
Skins
-
Task Flows
-
Resource Catalogs
-
Page Styles
-
Data Controls
-
Navigations
-
Page Templates
-
Pages
-
Links
-
Lists
-
People Connections
No permission, except for Manage, inherits privileges from other permissions.
Table 34-3 Application Permissions in WebCenter Portal Applications
| Category | Application Permissions |
|---|---|
|
Application |
Manage - Enables access to all WebCenter Spaces Administration pages: Resources, Services, Security, Configuration, Propagation. Through these pages, users can manage application security (users/roles), configure application-wide properties and services, manage application resources, create and manage pages, and propagate application changes. Configuration - Enables users to view and perform operations on the Configuration tab. Propagation - Enables users to view and perform operations on the Propagation tab. |
|
Mashup Styles |
Create, Edit, and Delete - Create, edit and delete mashup styles for the application using the WebCenter Portal Administration Console (Resources tab). Create - Create mashup styles for the application. Edit - Edit mashup styles. See also, Chapter 34, "Managing Application Resources". |
|
Content Presenter Templates |
Create, Edit, and Delete - Create, edit and delete content display templates for the application using the WebCenter Portal Administration Console (Resources tab). Create - Create content display templates for the application. Edit - Edit application-level content display templates. See also, Chapter 34, "Managing Application Resources". |
|
Skins |
Create, Edit, and Delete - Create, edit and delete skins using the WebCenter Portal Administration Console (Resources tab). Create - Create skins for the application. Edit - Edit skins. See also, Chapter 34, "Managing Application Resources". |
|
Task Flows |
Create, Edit, and Delete - Create, edit and delete task flows based on a mashup style using the WebCenter Portal Administration Console (Resources tab). Create - Create task flows for the application. Edit - Edit task flows. See also, Chapter 34, "Managing Application Resources". |
|
Resource Catalogs |
Create, Edit, and Delete - Create, edit and delete resource catalogs for the application using the WebCenter Portal Administration Console (Resources tab). Create - Create resource catalogs for the application. Edit - Edit resource catalogs. See also, Chapter 34, "Managing Application Resources". |
|
Page Styles |
Create, Edit, and Delete - Create, edit and delete page styles using the WebCenter Portal Administration Console (Resources tab). Create - Create page styles for the application. Edit - Edit page styles. See also, Chapter 34, "Managing Application Resources". |
|
Data Controls |
Create, Edit, and Delete - Create, edit and delete data controls for the application using the WebCenter Portal Administration Console (Resources tab). Create - Create data controls for the application. Edit - Edit data controls. See also, Chapter 34, "Managing Application Resources". |
|
Navigations |
Create, Edit, and Delete - Create, edit and delete navigations for the application using the WebCenter Portal Administration Console (Resources tab). Create - Create navigations for the application. Edit - Edit navigations. |
|
Page Templates |
Create, Edit, and Delete - Create, edit and delete page templates using the WebCenter Portal Administration Console (Resources tab). Create - Create page templates for the application. Edit - Edit page templates. |
|
Page Service |
Grant Page Access - Manage page security. Edit - Add or edit page content, rearrange content, and set page parameters and properties. Customize - Customize pages for everyone. Personalize - Personalize your view of pages by adding, editing, or removing content. View - View pages. |
|
Links |
Create, and Delete - Create and delete links between objects, and manage link permissions. Delete - Delete a link between two objects. Create - Create links between objects, and delete links that you create. |
|
Lists |
Create, Edit, and Delete - Create, edit, and delete lists and list data. Create Lists - Create lists, and delete lists that you create. Edit Lists - Edit list column definitions. Delete Lists - Delete any list. Edit List Data - Add, edit, and delete list data. View Lists - View lists and list data. |
|
People Connections |
Manage People Connections -Manage application-wide settings for People Connection services. Update People Connections Data -Edit content associated with People Connection services. Connect with People -Share content associated with People Connection services with others. |
34.4.2.2.2 Discussion Server Role Mapping
Some WebCenter services that need access to "remote" (back-end) resources also require role-mapping based authorization. That is, the roles that allow users to work with the Discussions service in a WebCenter Portal application, must be mapped to corresponding roles on the Oracle WebCenter Discussions Server.
A WebCenter Portal application uses application roles to manage user permissions within the application. On the Oracle WebCenter Discussions server, a different set of roles and permissions apply.
Any user assigned the Discussions-Create Edit Delete permission in a WebCenter Portal application is automatically added to Oracle WebCenter Discussions and assigned the Administrator role (on the discussions server) with Category Admin permissions. In WebCenter Portal applications, the Administrator role is granted the Discussions-Create Edit Delete permission by default as shown in Table 34-4.
Table 34-4 Discussions Server Roles and Permissions
| Discussion Server Role | Discussion Server Permissions | WebCenter Portal Application Equivalent Application Permission |
|---|---|---|
|
Administrator |
Category Admin |
Create, read, update and delete sub categories, forums and topics inside the category for which permissions are granted. |
34.4.2.2.3 Understanding Enterprise Group Role Mapping
You can assign individual users or multiple users in the same enterprise group to WebCenter Portal application roles. Subsequent enterprise group updates in the back-end identity store are then automatically reflected in the WebCenter Portal application. Initially, when you assign an enterprise group to a WebCenter Portal application role, everyone in the enterprise group is granted that role. If someone moves out of the group, the role is revoked. If someone joins the group, they are granted the role.
For a WebCenter Portal application to properly maintain enterprise group-to-role mappings, back-end servers, such as the discussions server and content server, must also support enterprise groups. When back-end servers do not support enterprise groups, users belonging to enterprise groups are individually added to WebCenter Portal application roles and subsequent group updates in the identity store are not reflected in the application. This can quickly become a maintenance issue, especially when enterprise groups contain a large number of users. The Oracle WebCenter Discussion Server and Oracle Content Server repository provided with Oracle WebCenter 11.1.1.2.0 and later support enterprise groups, but previous versions may not.
34.4.3 Managing Users
Administrators must ensure that all application users have appropriate permissions. To get permissions, users must be granted membership to the application through an appropriate application role.
This section tells you how to add members and assign roles. It contains the following subsections:
34.4.3.1 Adding Members to Application Roles
You can grant membership to individual users or multiple users in the same enterprise group through the Security tab. Any user or group defined in the identity store is eligible for membership, see also, Section 28.3, "Adding Users to the Embedded LDAP Identity Store."
Updates in your back-end identity store, such as new users or someone leaving an enterprise group, are automatically reflected in the WebCenter Portal application. Initially, when you assign an enterprise group to an application role, everyone in the group is granted that role. If someone moves out of the group, the role is revoked. If someone joins the group, they are granted the role.
Note:
For a WebCenter Portal application to properly maintain enterprise group-to-role mappings, back-end servers, such as the discussions server and content server, must support enterprise groups too. When back-end servers do not support enterprise groups, users belonging to enterprise groups are individually added to application roles and subsequent group updates in the identity store are not reflected in the WebCenter Portal application. This can quickly become a maintenance issue, especially when enterprise groups contain a large number of users. Both versions of Oracle WebCenter Discussion Server and Oracle Universal Content Management provided with Oracle WebCenter Spaces 11.1.1.2.0 and later support enterprise groups but previous versions may not.To grant user membership through an appropriate application role:
-
Navigate to the Security administration tab.
See also, Section 34.2, "Accessing the WebCenter Portal Administration Console".
-
In the Role Name pane, select the role to assign to the user.
Notice that the current list of members assigned to the role you select are listed on the right (in the Members pane).
Only choose Administrator to assign full, administrative privileges for your application. If the role you want is not listed, create a new role that meets your requirements (see Section 34.4.4.1, "Defining Application Roles").
-
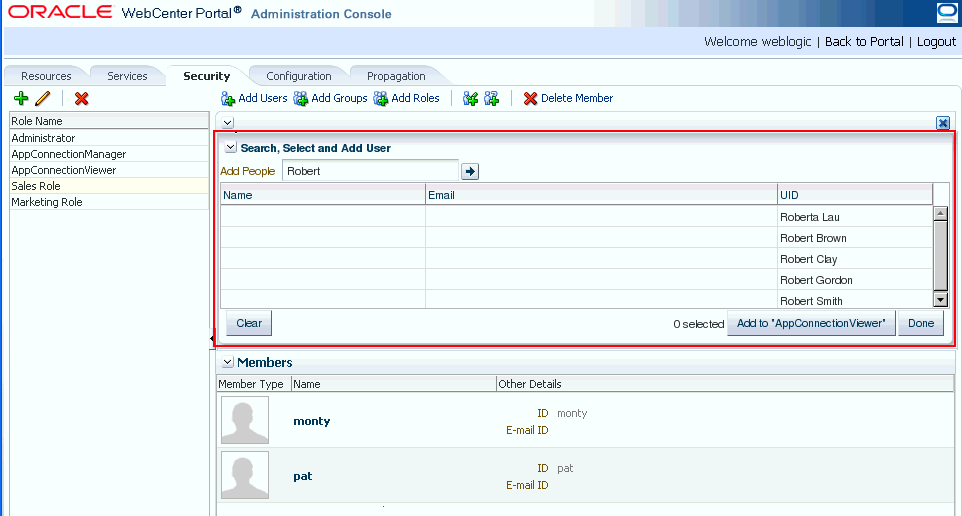
Click Add Users, Add Groups, or Add Roles (Figure 34-5):
Add Users - click to grant membership to individual users
Add Groups - click to grant membership to everyone in a user group
Add Roles - click to grant membership to everyone assigned to a particular application role
Figure 34-5 WebCenter Portal Administration Console - Add Members
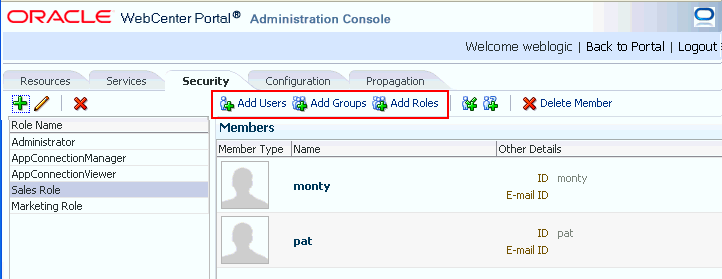
Description of "Figure 34-5 WebCenter Portal Administration Console - Add Members"
-
If you know the exact name of the user, group, or application role, enter the name in the search box (Add People, Add Group or Add Role) and click the arrow icon. If you are not sure of the name you can search your identity store using part of the name as shown below (see Figure 34-6).
-
Select the user, group, or role to whom you want to grant the selected role, and click Add to. Use the Ctrl key to select multiple names.
Note:
If the user, group, or role already has the role, directly or indirectly, the role is not granted; cyclic role assignments are not allowed.The new members display in the Members pane (see Figure 34-7).
Figure 34-7 WebCenter Portal Administration Console - Members Pane
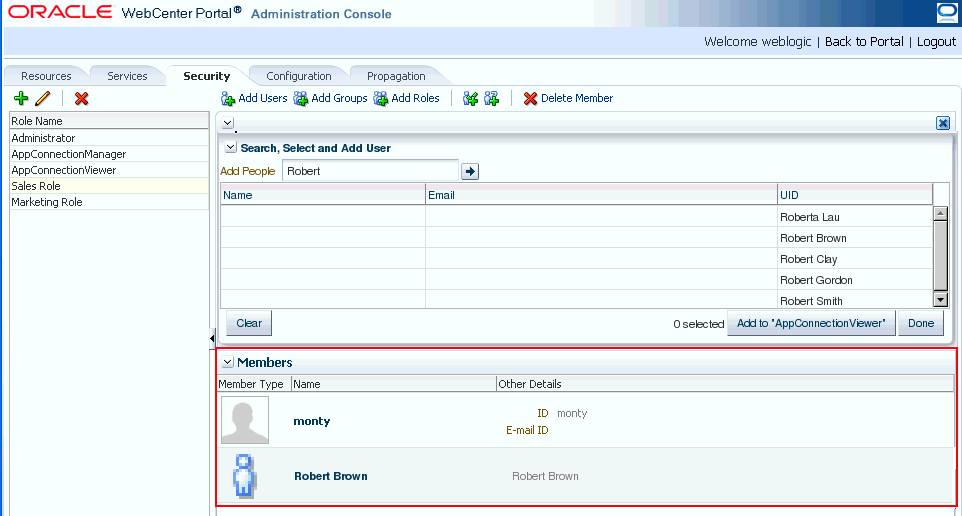
Description of "Figure 34-7 WebCenter Portal Administration Console - Members Pane"
-
Click Done when finished.
34.4.3.2 Assigning a User to a Different Role
From time to time, a user's role in a WebCenter Portal application may change. For example, a user may move out of sales into the finance department and in this instance, the user's role assignment may change from Sales to Finance. To change a user's role, first revoke membership for the user's previous role, then add the user to the new role. For more information see Section 34.4.3.4, "Revoking Application Roles," and Section 34.4.3.1, "Adding Members to Application Roles."
Note:
You cannot modify your own role or the Fusion Middleware Administrator's role. See Section 34.4.2.1, "Understanding Application Roles".34.4.3.3 Giving a User Administrative Privileges
It's easy to give a user full, administrative privileges for your WebCenter Portal application through the Administrator role. Administrators have the highest privilege level and can view and modify anything in the application so take care when assigning the Administrator role.
Most administrative tasks, such as managing users and roles, are exclusive to the Administrator role. See also, Section 34.4.2.1.1, "Default Application Roles".
34.4.3.4 Revoking Application Roles
It's easy to revoke application role assignments that no longer apply. Note, however, that revoking all of a user's application roles does not remove that user from the identity store.
Note:
You cannot revoke your own role assignments or the Fusion Middleware Administrator's role. See Section 34.4.2, "Understanding Application Roles and Permissions".To revoke application roles:
-
Navigate to the Security administration tab.
See also, Section 34.2, "Accessing the WebCenter Portal Administration Console".
-
Select the role from the Role Name pane.
-
Select a user, group, or application role from the Members list.
-
Click Delete Member.
-
When prompted, click Delete to revoke the role for the user.
34.4.3.5 Adding or Removing Users
Administrators cannot add new user data directly to the WebCenter domain identity store or remove user credentials. Identity store management is the responsibility of the systems administrator and takes place through the WLS Administration Console or directly into embedded LDAP identity stores using LDAP commands. See also, Section 28.3, "Adding Users to the Embedded LDAP Identity Store."
34.4.4 Managing Application Roles and Permissions
WebCenter Portal applications use application roles to manage permissions for users within the application. This section tells you how to manage application roles, and their permissions from the Security administration page (Figure 34-8).
WebCenter Portal applications provide several default application roles. You cannot delete default application roles but you can modify the default permission assignments for each role. For more information, see Section 34.4.2, "Understanding Application Roles and Permissions."
This section contains the following subsections:
34.4.4.1 Defining Application Roles
Use roles to characterize groups of application users and determine what they can see and do within their WebCenter Portal application.
When defining application roles, use self-descriptive role names and try to keep the role policy as simple as possible. Choose as few roles as you can, while maintaining an effective policy.
Take care to assign appropriate access rights when assigning permissions for new roles. Do not allow users to perform more actions than are necessary for the role, but at the same time, try not to inadvertently restrict them from activities they must perform. In some cases, users might fall into multiple roles.
To define a new application role:
-
Navigate to the Security administration tab.
See also, Section 34.2, "Accessing the WebCenter Portal Administration Console".
-
Click the Add icon (plus) above the Role Name pane.
The Create Role dialog displays (Figure 34-9).
Figure 34-9 WebCenter Portal Administration Console - Create Role Dialog

Description of "Figure 34-9 WebCenter Portal Administration Console - Create Role Dialog"
-
Enter a name and description for the new role, and click Create Role.
Ensure the role name is self-descriptive. Make it as obvious as possible which users should belong to which roles. Role names can contain alphanumeric characters, blank spaces, @, and underscores.
The new role is listed in the Roles pane (Figure 34-10).
Figure 34-10 WebCenter Portal Administration Console - Roles Pane

Description of "Figure 34-10 WebCenter Portal Administration Console - Roles Pane"
-
Continue by defining the user permissions for the role as described in Section 34.4.4.2, "Modifying Application Role Permissions."
34.4.4.2 Modifying Application Role Permissions
Permissions should always be set after creating a new role, but administrators can modify the permissions associated with an application role at any time.
Application role permissions allow individuals to perform specific actions within their application. Application permissions are described in Section 34.4.2, "Understanding Application Roles and Permissions."
To change the permissions assigned to a role:
-
Navigate to the Security administration tab.
See also, Section 34.2, "Accessing the WebCenter Portal Administration Console".
-
Select the role for which to view or modify permissions, and click the Edit icon (pencil).
The Edit Role dialog displays with the current permissions for the role (Figure 34-11).
Figure 34-11 WebCenter Portal Administration Console - Edit Role Dialog

Description of "Figure 34-11 WebCenter Portal Administration Console - Edit Role Dialog"
-
Select or clear permissions check boxes to enable or disable permissions for the role.
-
Click Apply to save or OK to save and exit.
The new permissions are effective immediately.
34.4.4.3 Granting Roles to Unauthenticated Users
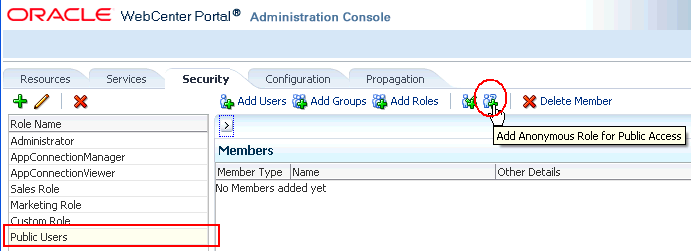
Anyone who is not logged in to a WebCenter Portal application assumes the anonymous-role. Initially, users with the anonymous-role have no privileges and only see public application pages, such as the login or landing page, and also content that individual users choose to make public.
Caution:
Take care when granting privileges to theanonymous-role. Avoid granting administrative privileges, or any permission that might be considered unnecessary. For security reasons, Oracle recommend that you limit what anonymous users can see and do in your application.To grant application roles to the public:
-
Navigate to the Security administration tab.
See also, Section 34.2, "Accessing the WebCenter Portal Administration Console".
-
If you have not done so already, define a role that grants permissions suitable for unauthenticated users.
-
Select the role that defines privileges suitable for unauthenticated users.
-
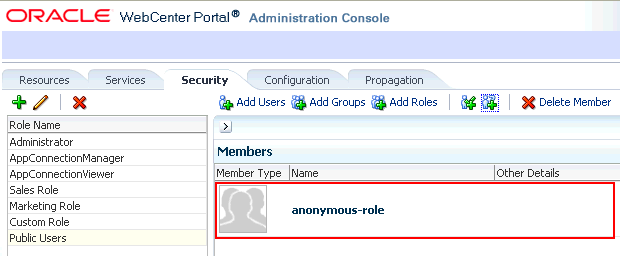
Click Add Anonymous Role for Public Access (Figure 34-12).
The anonymous-role is added to the members list (Figure 34-13).
34.4.4.4 Granting Roles to All Authenticated Users
Anyone who is logged in to a WebCenter Portal application assumes the authenticated-role.
Other important notes:
-
The
authenticated-rolealways inherits permissions from theanonymous-role -
Custom application roles all inherit permissions from the
authenticated-role.
34.4.4.5 Deleting Application Roles
When an application role is no longer required you should remove it from your application. This helps maintain a valid role list, and prevents inappropriate role assignment. You cannot, however, delete a role that is granted to you, directly or indirectly.
Application roles are deleted even when users are still assigned to them.
Note:
Default roles cannot be deleted:Administrator, AppConnectionManager, AppConnectionViewer, authenticated-role, anonymous-role. See also, Section 34.4.2.1.1, "Default Application Roles."As you cannot delete default roles, application users can log in through the authenticated-role, even when all other application roles are revoked.
To delete an application role:
-
Navigate to the Security administration tab.
See also, Section 34.2, "Accessing the WebCenter Portal Administration Console".
-
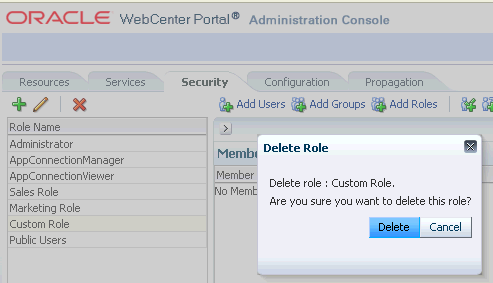
Select the role to delete from the list of roles and click the Delete icon (x).
-
When prompted, click Delete to confirm that you want to delete the role.
The role is removed from the table. Users assigned to only this role can still log in through the
authenticated-userrole.
34.5 Managing Application Resources
By using the Resources page of the WebCenter Portal Administration Console, you can manage your application resources—pages, page templates, navigations, resource catalogs, skins, page styles, content presenter templates, mashup styles, data controls, and task flows (Figure 34-15). You can perform tasks such as create, edit, copy, publish, upload, and download your application resources. For information about various resources, see the section "Introducing Resources" in Oracle Fusion Middleware User's Guide for Oracle WebCenter.
Figure 34-15 WebCenter Portal Administration Console - Resources Page
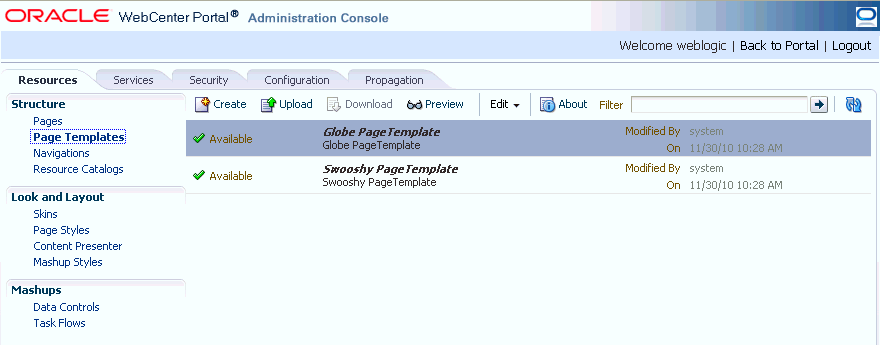
Description of "Figure 34-15 WebCenter Portal Administration Console - Resources Page"
This section includes the following subsections:
34.5.1 Working with Pages
At runtime, you can create and manage application pages.
This section includes the following subsections:
For information about editing, copying, or deleting a page, refer to the generic resource procedures documented later in this chapter.
34.5.1.1 Creating a Page
To create an application page at runtime:
-
Open the Resources tab in WebCenter Portal Administration Console.
See also, Section 34.2, "Accessing the WebCenter Portal Administration Console."
-
In the navigation panel on the left, click Pages.
-
On the menu bar, click Create Page.
-
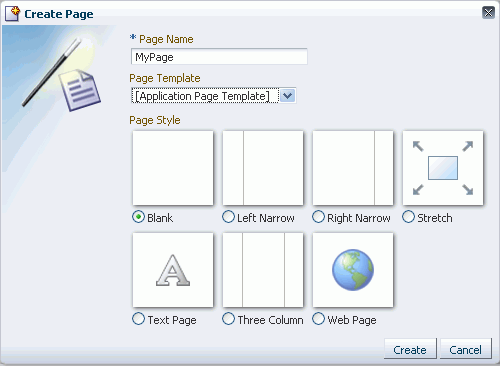
In the Create Page dialog, in the Page Name field, enter the name of the page.
-
From the Page Template list, select the page template on which you want to base your page.
Note:
If you do not specify a page template, the default template is used. It is recommended that you leave the Page Template list blank unless you want to override the default template. -
From the Page Style list, select the style you want to use for your page.
For information about page styles, see the "What You Should Know About Page Styles" section in Oracle Fusion Middleware User's Guide for Oracle WebCenter.
-
Click Create.
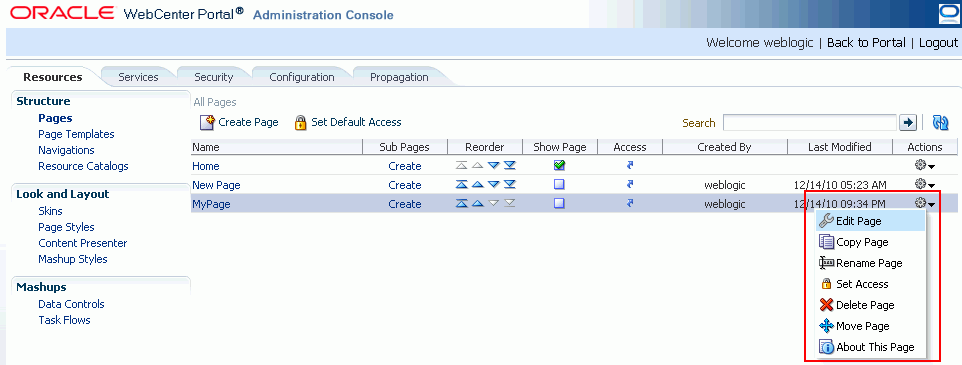
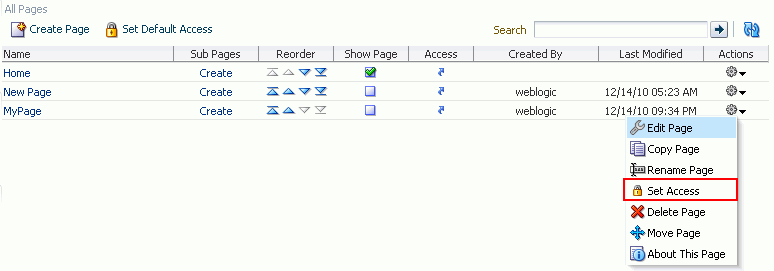
The newly created page is listed on the Resources page. You can mange the page by using the options available on the Actions menu of the page (Figure 34-17).
34.5.1.2 Creating a Sub Page
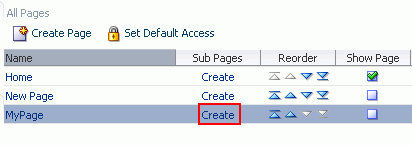
The procedure to create a sub page is similar to creating a main page as described in Section 34.5.1.1, "Creating a Page." On the Resources page, you need to click Create next to the page for which you want to create a sub page (Figure 34-18). By default, sub pages inherit security from their parent page.
34.5.1.3 Setting Page Access
All your application pages reside under the root node, and by default, inherit the permissions defined for the root node. You can define custom permissions for the root node. Further, you can override the default root node permissions, and specify custom permissions for individual pages. By default, sub pages inherit security from their parent page.
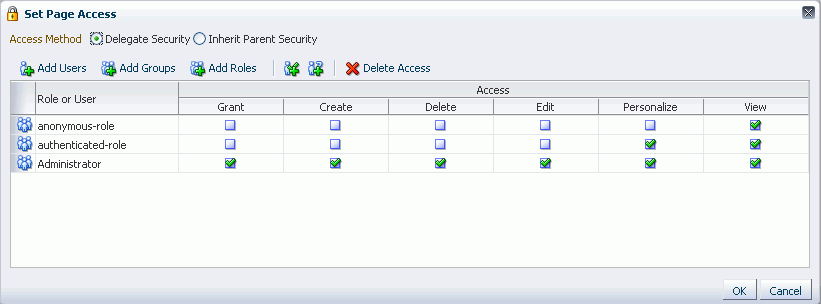
While setting page access, you can choose either of these access methods: Delegate Security or Inherit Parent Security (Figure 34-19).
Choose:
-
Delegate Security - to define who may manage and update a page. When you select this option, all permissions that a page currently inherits from its parent are displayed in the dialog. This effectively is the current security policy applicable on the page. You can further refine the grants by adding new grants or removing the existing ones.
-
Inherit Parent Security - to inherit permissions defined for a page's parent node. When you set this option, any security permissions defined on the page are deleted, and the parent node's security settings take effect.
You can define the following page permission actions:
-
Manage - grants all other page permissions and is typically used for specifying a super administrator type of access. This permission action is available only when defining access on the root node.
-
Grant - allows a user to further grant the access that they already have to other users, groups, or roles. For example, if a user has the Grant and Edit permissions, the user can further grant these two actions only; she cannot grant any other permission, like Delete or Personalize.
-
Create - allows a user to create sub pages under the current page.
-
Delete - allows a user to delete a page along with all its sub pages.
-
Edit - allows a user to edit a page.
-
Personalize - allows a user to personalize a page.
-
View - allows a user to view a page.
All permissions follow one of the two permission models - delegation or containment. Delegation is when an entity has been granted a particular permission on a page, and this is all that is used to evaluate whether the entity has the said permission action or not. All permission actions other than View fall in this category. A permission is of containment type if the permission is granted to an entity on a page, as well as all the nodes up in the hierarchy where security is defined. Only the View permission action falls in this category.
So, to be able to view a page, you need to have the View permission action on the specified page and all nodes up in the hierarchy to the root node. If you do not have the View permission on an intermediate node in the page hierarchy, you cannot view the specified page. For other permission actions (delete, edit, and the like), you just need that particular permission on the page.
This section includes the following subsections:
34.5.1.3.1 Setting Permissions on an Individual Page
To set permissions on a specific page:
-
Navigate to the Resources page, as described in Section 34.2, "Accessing the WebCenter Portal Administration Console."
-
In the left navigation panel, click Pages.
-
From the list of pages, open the Actions menu for the required page, then select Set Access.
-
In the Set Page Access dialog, select an access method (Figure 34-21):
-
Delegate Security—Select this method to define who may manage and update this page node, and all its children in the hierarchy that have not overridden security. Selecting this method shows the default permissions available. You can further refine the permissions by adding new permissions or removing the existing ones.
If you select this option, proceed to step 5.
-
Inherit Parent Security—Select this method to inherit permissions defined for the page's parent node. If you select this method, click OK to save your changes and exit the dialog.
-
-
If you selected Delegate Security, specify the user, group, or role to which you want to grant access to the page.
-
Click Add Users to search for and select individual users included in your identity store. Select the required user(s), and click OK.
-
Click Add Groups to search for and select groups of users included in your identity store. Select the required group(s), and click OK.
-
Click Add Roles to search for and select the application roles to which you want to grant access to the page. Select the required role(s), and click OK.
-
-
For each user, group, or role listed in the Role or User column, specify the level of access you want to grant. You can grant any of the following permissions: Grant, Create, Delete, Edit, Personalize, and View.
-
Optionally, you can click the Add Authenticated Role for Logged in User Access icon to add authenticated-role and define the access for all authenticated users. You can click the Add Anonymous Role for Public Access icon to add anonymous-role and grant the required permissions to all users.
-
If you want to revoke permissions from any user, group, or role, select that entity and click Delete Access.
-
Click OK to save the security settings for the page.
The lock icon in the Access column for a page signifies that Delegate Security access method has been set for the page; the arrow icon signifies that Inherit Parent Security access method has been set for the page (Figure 34-22).
Figure 34-22 Access Methods Specified for Pages

Description of "Figure 34-22 Access Methods Specified for Pages"
34.5.1.3.2 Setting Permissions on the Root Node
All page and sub page nodes that do not have security overridden, derive their access settings from the root node. You can define permissions for the root node by using the Set Default Access option on the Pages page on the Resource tab (Figure 34-23). The rest of the procedure is same as that for setting permissions for a specific page. For information, see Section 34.5.1.3.1, "Setting Permissions on an Individual Page."
When you set permissions for the root node, in addition to other permissions, you can also set the Manage permission. A user with this permission has complete access on the entire pages hierarchy irrespective of the settings on individual pages.
Figure 34-23 Setting Access for the Root Node
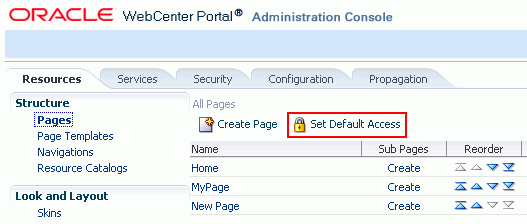
Description of "Figure 34-23 Setting Access for the Root Node"
34.5.1.4 Reordering a Page
You can reorder your pages. This order is used when you include pages in the navigation model through a Page Query.
To change the order of a page:
-
Navigate to the Resources page in WebCenter Portal Administration Console.
See also, Section 34.2, "Accessing the WebCenter Portal Administration Console."
-
In the left navigation panel, click Pages.
-
Drag the page to the required location in the page hierarchy.
To reorder pages, you can also use the icons displayed in the Reorder column (Figure 34-24). Use the icons to move your page to the top of the list, bottom of the list, before the preceding page, or after the page displayed next in the list.
34.5.1.5 Moving a Page in the Page Hierarchy
You can change the level at which a page appears in the page hierarchy—you can move a page to appear as a sub page, appear at the root level, or appear as a parent page.
To move a page in the page hierarchy:
-
Navigate to the Resources page in WebCenter Portal Administration Console.
See also, Section 34.2, "Accessing the WebCenter Portal Administration Console."
-
In the left navigation panel, click Pages.
-
Open the Action menu for the page that you want to move, and choose Move Page (Figure 34-25).
-
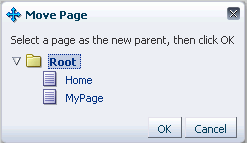
In the Move Page dialog, select the level at which you want to move the page in the page hierarchy.
For example, if you want your page to appear as a sub page of MyPage, click MyPage (Figure 34-26).
-
Click OK.
In Figure 34-27, the sub page icon in the Sub Pages column represents that MyPage now contains a sub page.
Figure 34-27 A Page Updated in the Page Hierarchy

Description of "Figure 34-27 A Page Updated in the Page Hierarchy"
34.5.1.6 Renaming a Page
To rename a page:
-
Navigate to the Resources page in WebCenter Portal Administration Console, as described in Section 34.2, "Accessing the WebCenter Portal Administration Console."
-
In the left navigation panel, click Page.
-
Open the Action menu for the page you want to rename, and choose Rename Page.
-
In the Rename Page dialog, enter the desired name.
-
Click OK.
34.5.2 Creating a Resource
Even after your application has been deployed, as an administrator, you may need to constantly update it to meet your organization's requirements. Oracle WebCenter enables you to create and edit resources at runtime, without requiring you to redeploy your application.
To create a resource:
Note:
The procedure for creating a data control and a page is different than other resources. For information about how to create a data control, navigate to the Resources page in WebCenter Portal Administration Console and then follow the procedure outlined in the chapter "Creating and Managing Data Controls" in Oracle Fusion Middleware User's Guide for Oracle WebCenter. For information about creating a page, see Section 34.5.1.1, "Creating a Page."-
Navigate to the Resources page in WebCenter Portal Administration Console.
See also, Section 34.2, "Accessing the WebCenter Portal Administration Console."
-
In the left navigation panel, select the category of the resource you want to create.
-
On the menu bar, click Create.
-
In the Create dialog, in the Name field, enter the name of the resource.
-
In the Description field, enter a description of the resource.
-
From the Copy from list, select the existing resource that you want to extend for creating a new resource.
Note:
The Copy from list is available for page template, navigation, Resource Catalog, and skin resources. It is not available for a task flow resource.For a task flow resource, you need to select a mashup style. For information, see the section "Creating a Task Flow" in Oracle Fusion Middleware User's Guide for Oracle WebCenter.
-
Click Create.
The newly created resource is listed on the Resources page. The gray icon next to a resource indicates that it is not yet published and hence not available to users for use. For information about publishing resources, see Section 34.5.6, "Showing or Hiding a Resource."
34.5.3 Copying a Resource
You can create a copy of a resource. This feature is useful when you want to create a backup of a resource or update a resource while keeping the original in use. When you create a copy of a resource, the copy is marked as hidden.
To make a copy of a resource:
-
Navigate to the Resources page in WebCenter Portal Administration Console.
See also, Section 34.2, "Accessing the WebCenter Portal Administration Console."
-
In the left navigation panel, select the desired type of resource.
-
From the list of resources, select the resource you want to copy.
-
From the Edit menu, choose Copy.
Note:
To make a copy of a page, select Copy Page from the Actions menu of the page. In the Copy Page dialog, specify the page name and click OK. -
In the Copy dialog, in the Display Name field, enter a name for the resource copy (Figure 34-28).
-
In the Description field, enter a description of the resource copy.
-
Click OK.
34.5.4 Editing Resources
At runtime, you can perform two types of resource editing:
-
Simple editing - provides a simple means of editing a resource's basic settings. Use the Edit dialog to perform simple editing.
-
Source editing - enables you to work with the source code of a resource. Use the Edit Source dialog to perform source editing.
34.5.4.1 Editing the Source Code of a Resource
To get more control over resource editing at runtime, you can edit the underlying source code of any custom resource, except data controls and pages.
To edit the source code of a resource:
-
Navigate to the Resources page in WebCenter Portal Administration Console, as described in Section 34.2, "Accessing the WebCenter Portal Administration Console."
-
From the navigation panel on the left, select the desired type of resource.
-
From the list of resources displayed on the right, select the resource whose code you want to edit.
-
From the Edit menu, choose Edit Source.
The Edit Source dialog displays the resource definition.
-
Edit the code as required (Figure 34-29).
The XML syntax in the code is validated and an error message is displayed if you miss any tags or add them incorrectly. Validation is not performed for non-XML files, such as a CSS file.
Figure 34-29 Editing the Source of a Resource

Description of "Figure 34-29 Editing the Source of a Resource"
-
Click OK.
34.5.4.2 Editing a Resource by Using the Edit Dialog
To edit a resource at runtime:
-
Navigate to the Resources page in WebCenter Portal Administration Console.
See also, Section 34.2, "Accessing the WebCenter Portal Administration Console."
-
In the left navigation panel, select the desired type of resource.
-
From the list of resources, select the resource you want to edit.
-
From the Edit menu, choose Edit.
Note:
To edit a page, select the Edit Page option from the Actions menu of the page. -
Edit the resource as desired.
The properties that you can edit vary from resource to resource. For information about the properties of a resource that can be edited, refer to the relevant resource chapter listed in the table "Resources Available in WebCenter Spaces" in Oracle Fusion Middleware User's Guide for Oracle WebCenter. The procedure to edit a resource in a WebCenter Portal application is similar to that in WebCenter Spaces.
34.5.5 Setting Properties on a Resource
Each resource has certain associated properties that define its display properties and attributes. Authorized users can edit these properties by using the Edit Properties dialog. For information about the properties displayed in the Edit Properties dialog, see the "What You Should Know About a Resource's Properties" section in Oracle Fusion Middleware User's Guide for Oracle WebCenter.
This section describes how to access the Edit Properties dialog and set resource properties. It includes the following subsections:
Note:
The properties described in this section are not applicable to a page resource.-
Section 34.5.5.1, "Accessing the Edit Properties Dialog of a Resource"
-
Section 34.5.5.2, "Renaming, Describing, and Categorizing a Resource"
34.5.5.1 Accessing the Edit Properties Dialog of a Resource
To access the Edit Properties dialog of a resource:
-
Navigate to the Resources page in WebCenter Portal Administration Console, as described in Section 34.2, "Accessing the WebCenter Portal Administration Console."
-
From the left navigation panel, select the type of resource you want to edit.
-
Highlight the relevant resource, and choose Edit Properties from the Edit menu.
The Edit Properties dialog opens (Figure 34-30).
Figure 34-30 Edit Properties Dialog of a Resource
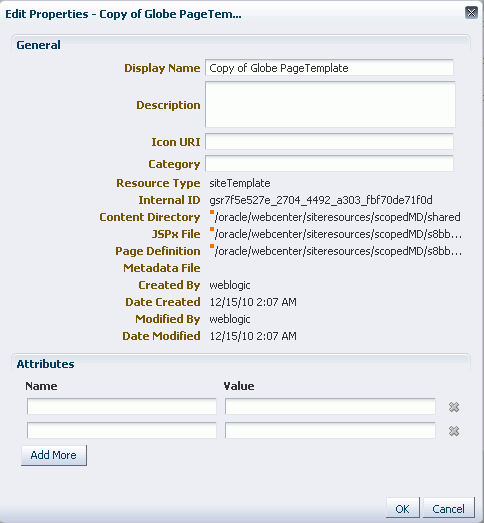
Description of "Figure 34-30 Edit Properties Dialog of a Resource"
See Also:
The next thing you do depends on what you want to accomplish. For more information, see:34.5.5.2 Renaming, Describing, and Categorizing a Resource
Resources are sorted on the Resource page according to their display names. To maintain a well-organized set of resources, consider developing a standard naming scheme and method of description. This is not a required step, but it may be useful in identifying and clarifying your intended purpose for a given resource.
You can classify your resources into relevant groups. For example, all page styles associated with Sales could be categories under a sales category. This value is available and exposed only in the Edit Properties dialog.
To provide a name, description, and category for a resource:
-
Follow the steps outlined in Section 34.5.5.1, "Accessing the Edit Properties Dialog of a Resource."
-
In the Display Name field, edit the display name of the resource, if required.
-
Optionally, in the Description field, enter a description of the resource.
-
Optionally, in the Category field, enter a category name.
-
Click OK to save your changes and exit the dialog.
34.5.5.3 Associating an Icon with a Resource
You can associate an icon with a resource. In the current version of Oracle WebCenter, the associated icon is visible only for page styles when you create a page using the Create Page dialog.
To associate an icon with a resource:
-
Open the Edit Properties dialog as described in Section 34.5.5.1, "Accessing the Edit Properties Dialog of a Resource."
-
In the Icon URI field, enter a standard URI path to the desired icon.
For example, enter:
/mycompany/webcenter/page/images/myimage.png
You can either specify an absolute URL (where the URL should also work if entered in a browser address field), or a relative URL that points to an image located in the
/oracle/webcenter/siteresources/scopedMD/sharedfolder of your application. -
Click OK to save your changes and exit the dialog.
34.5.5.4 Working with Attributes of a Resource
In addition to the default attributes exposed through the Edit Properties dialog (Display Name, Description, and the like), you can expose custom attributes for resources. The Edit Properties dialog provides an Attributes section for entering attribute name/value pairs (Figure 34-31).
Figure 34-31 Attributes Section of a Resource

Description of "Figure 34-31 Attributes Section of a Resource"
For example, you can associate the editPageAfterCreation attribute with a page style resource to control whether a newly created page opens in edit or view mode. The attribute takes a value of true or false. When you associate this attribute with a particular page style, every time a user creates a page based on the selected style, the attribute value is considered and the page functions accordingly.
This section describes how to associate a custom attribute with a resource and how to remove a custom attribute. It contains the following sections:
34.5.5.4.1 Associating an Attribute with a Resource
To associate an attribute with a resource:
-
Open the Edit Properties dialog using the procedure outlined in Section 34.5.5.1, "Accessing the Edit Properties Dialog of a Resource."
-
In the Attributes section, in the Name field, enter the attribute name.
-
In the Value field, enter the value of the attribute.
-
Click Add More if you want to add more attributes.
This adds a new row. You can then enter the required details in the Name and Value fields.
-
Click OK to save your changes and exit the dialog.
34.5.5.4.2 Deleting an Attribute of a Resource
To remove an attribute associated with a resource:
-
Open the Edit Properties dialog using the procedure outlined in Section 34.5.5.1, "Accessing the Edit Properties Dialog of a Resource."
-
In the Attributes section, click the Remove icon corresponding to the attribute you want to delete.
-
Click OK to save your changes and exit the dialog.
34.5.6 Showing or Hiding a Resource
When you create a resource, by default the resource is marked as hidden. A hidden resource is not available for use in the resource picker. For a resource to become available, it must be published.
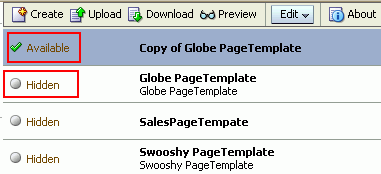
For all resources that are available for use, a green tick mark and the word "Available" appear next to the resource's name on the Resources page. A gray icon and the word "Hidden" next to a resource's name indicate that the resource is marked as hidden, as shown in Figure 34-32.
Figure 34-32 Showing or Hiding a Resource
Description of "Figure 34-32 Showing or Hiding a Resource"
To show or hide a resource:
-
Navigate to the Resources page in WebCenter Portal Administration Console, as described in Section 34.2, "Accessing the WebCenter Portal Administration Console."
-
In the left navigation panel, select the desired type of resource.
-
From the list of resources, select the resource that you want to show or hide.
-
From the Edit menu, choose Show or Hide, depending on the option displayed.
If your resource is hidden, the Show option displays on the Edit menu. When you click Show, a green tick mark and the word "Available" appear next the resource's name, indicating that the resource is now available for use.
If your resource is already published, the Edit menu lists the Hide option. When you click Hide, a gray icon and the word "Hidden" appear next to the resource's name, indicating that the resource is now hidden and is not available to users.
Note:
To mark a page as available, select the Show Page checkbox next to the page's name on the Resources page. If this checkbox is unchecked, the page is marked as hidden.
34.5.7 Setting Resource Security
You can control whether all users or only specific users or groups can access the resources that you created in the application. By default, resource access is controlled by application-level permissions. The Security Settings dialog provides a means of setting aside application-level permissions and defining specific permissions on a selected resource.
For information about setting page access, see Section 34.5.1.3, "Setting Page Access."
To set access permissions on any resource other than a page:
-
Navigate to the Resources page in WebCenter Portal Administration Console, as described in Section 34.2, "Accessing the WebCenter Portal Administration Console."
-
In the left navigation panel, select the desired type of resource.
-
From the list of resources, select the resource on which you want to set access permissions.
-
From the Edit menu, choose Security Settings.
-
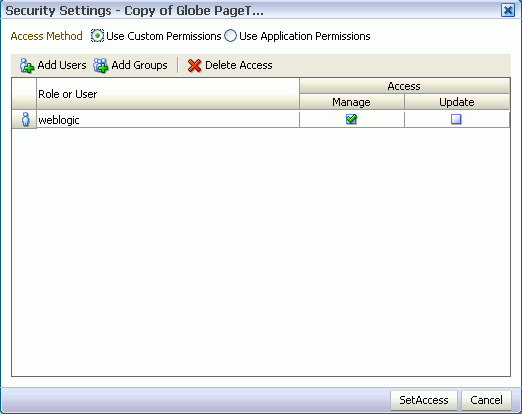
In the Security Settings dialog, specify an access method by selecting either of the following options (Figure 34-33):
-
Use Custom Permissions—Select this option to define who may manage and update the selected resource. If you select this option, the other controls in the dialog become available. Proceed to step 6.
Note:
When you choose Use Custom Permissions, ensure that at least one user or group is granted the Manage access. -
Use Application Permissions—Select this option to inherit the selected resource's access settings from those defined for the application. If you select this option, click OK to save your changes and exit the dialog.
Note:
Selecting Use Application Permissions removes any custom permissions that you may have set.
Figure 34-33 Setting Security on a Resource
Description of "Figure 34-33 Setting Security on a Resource"
-
-
If you selected Use Custom Permissions, specify the user or group to whom you want to grant resource access. In the Security Settings dialog:
-
Click Add Users to open a dialog where you can search for and select individual users included in your identity store. Select the required user(s), and click OK to close the dialog.
-
Click Add Groups to open a dialog that you can use to search for and select groups of users included in your identity store. Select the required group(s), and click OK to close the dialog.
-
-
For each user or group listed in the Role or User column, specify the level of access you want to grant:
-
Select the Manage checkbox to grant full access to the resource. Such users can edit the resource properties and delete the resource.
-
Select the Update checkbox to grant the permission to edit the resource. Such users can edit the resource, but cannot delete it.
-
-
If you want to revoke permissions from any user or group, select that entity and click Delete Access.
-
Click OK.
34.5.8 Downloading and Uploading a Resource
In your deployed application, you can edit resources at runtime. However, for greater control, you may want to edit a resource at design time. For this, you can download the resource created at runtime, edit it at design time in JDeveloper, and then upload the updated resource back into the application without redeploying the application.
Note:
Data controls and pages cannot be downloaded or uploaded at the resource level.The Download and Upload options enable post-deployment, round-trip application development. These actions greatly simplify the process of bringing new or revised resources from JDeveloper into your application and pushing them back into development from your application to JDeveloper as needed.
When you download a resource, the resource configuration is saved into a single export archive (.ear file). You can save an export archive either to your local file system or a remote server file system.
-
Navigate to the Resources page in WebCenter Portal Administration Console, as described in Section 34.2, "Accessing the WebCenter Portal Administration Console."
-
In the left navigation panel, select the desired resource type.
-
From the list of resources, select the resource you want to download as an EAR file.
-
Click Download.
-
In the Download dialog, in the Archive Name field, enter the name of the export archive file.
-
Click Download to download the resource.
-
In the Download dialog, specify the location where you want to save the export archive file. Use either of the following options:
-
Download - Click this if you want to save the export archive file to your local file system. Then, specify the path where you want to save the file.
-
Save to Server - Click this to save the export archive file to a remote server file system. In the Server Location dialog, in the Save to Location field, enter the server path and then click Save.
-
After editing your resources in JDeveloper, you can upload them into your application at runtime. For the resources to be uploaded, they must be in the export archive (.ear file) format.
To upload a resource at runtime:
-
Navigate to the Resources page in WebCenter Portal Administration Console, as described in Section 34.2, "Accessing the WebCenter Portal Administration Console."
-
In the left navigation panel, select the desired resource type.
-
Click Upload.
-
In the Upload dialog, specify the location of the resource archive file. Depending on the location of your EAR file, select either of the following:
-
On Local File System: Select if the archive is located on your local file system. Enter the path to the EAR file or use the Browse button.
-
On Server: Select if the archive is located on a remote server. Enter the path to the EAR file.
-
-
Click Upload.
34.5.9 Previewing a Resource
You can edit resources at runtime, preview the changes, and make further adjustments as needed.
To preview a resource:
-
Navigate to the Resources page in WebCenter Portal Administration Console, as described in Section 34.2, "Accessing the WebCenter Portal Administration Console."
-
In the left navigation panel, select the desired resource category.
-
Select the resource that you want to preview.
-
Click Preview.
Note:
Preview of data controls and pages is not supported. The way you access the Preview option differs for certain resources. For information about a particular resource, refer to the resource-specific chapter listed in the table "Resources Available in WebCenter Spaces" in Oracle Fusion Middleware User's Guide for Oracle WebCenter.
34.5.10 Deleting a Resource
When a resource is no longer required, you may want to remove it from your application.
To delete a resource:
-
Navigate to the Resources page in WebCenter Portal Administration Console, as described in Section 34.2, "Accessing the WebCenter Portal Administration Console."
-
In the left navigation panel, select the desired resource type.
-
From the list of resources, select the resource you want to delete.
-
From the Edit menu, choose Delete.
Note:
To delete a page, select the Delete Page option from the Actions menu of the page. When you delete a page, its sub pages also get deleted. -
In the Delete confirmation dialog, click OK to delete the resource.
34.6 Managing Services, Portlet Producers, and External Applications
You can manage and configure several WebCenter services through the WebCenter Portal Administration Console. From the Services tab (Figure 34-34), you can manage and configure the content repository, polls, portlet producers, and external applications.
Figure 34-34 WebCenter Portal Administration Console - Services Tab

Description of "Figure 34-34 WebCenter Portal Administration Console - Services Tab"
Some services, such as the Analytics, are ready to use out-of-the-box and do not require administrator-level configuration. Other services, such as Polls, require additional configuration by users with administrative privileges to get things up and running.
This chapter includes the following sections:
34.6.1 Managing Content
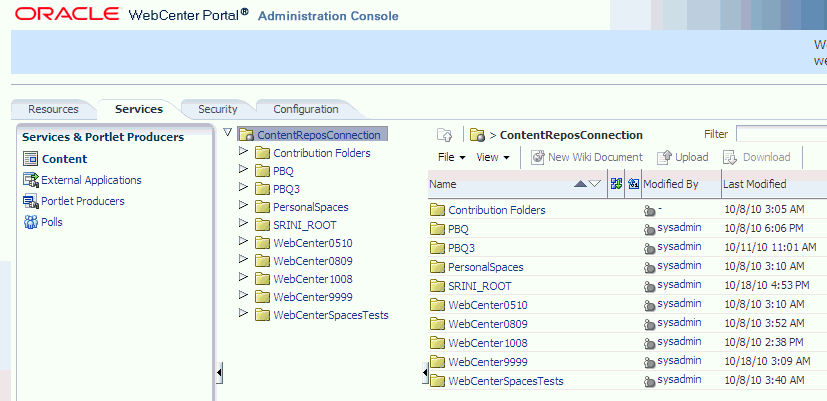
Application administrators can manage content that is stored in the application's primary content repository through the WebCenter Portal Administration Console (Figure 34-35). Administrators can add, edit and update content from here, manage document version history, and also access useful information such as direct URLs and download URLs for files and folders.
Your systems administrator is responsible for registering content repositories for WebCenter Portal applications and determining the primary (or default) content repository. If you expected this administration page to display content from a different content repository, ask your systems administrator to reconfigure the primary (or default) content repository connection. See also, Section 11.7, "Changing the Active (or Default) Content Repository Connection."
Figure 34-35 Contents of a Primary Repository for the Documents Service
Description of "Figure 34-35 Contents of a Primary Repository for the Documents Service"
This section includes the following subsections:
-
Section 34.6.1.7, "Viewing Version History of a Content Item"
-
Section 34.6.1.8, "Getting Direct and Download URLs of a Document"
-
Section 34.6.1.9, "Organizing Columns for the Displayed Content"
-
Section 34.6.1.10, "Setting Up Security on Folders and Documents"
34.6.1.1 Creating a New Folder
To create a new folder:
-
Navigate to the Services administration tab.
See also, Section 34.2, "Accessing the WebCenter Portal Administration Console".
-
Select Contents.
-
Select a directory in which you want to create a new folder.
-
From the File menu, choose New Folder.
-
In the Create Folder dialog, enter a descriptive name in the Folder Name field, and click Create to create the folder in the chosen directory.
Tip:
To rename or delete a folder, choose the appropriate option from the File menu. This menu also provides options to cut, copy, and paste contents in a folder.To hide folders in a directory, from the View menu, choose Hide Folders. To make hidden folders visible, deselect the Hide Folders option.
34.6.1.2 Creating a Wiki Page
To create a wiki document:
-
Navigate to the Services administration tab.
See also, Section 34.2, "Accessing the WebCenter Portal Administration Console".
-
Select Contents.
-
Select a directory in which you want to create your wiki page.
-
Click New Wiki Document. The Rich Text Editor displays.
-
In the Title field, enter a descriptive title, and click Create to create the wiki page in the chosen directory.
34.6.1.3 Editing a File
To edit contents such as a wiki document:
-
Navigate to the Services administration tab.
See also, Section 34.2, "Accessing the WebCenter Portal Administration Console".
-
Select Contents.
-
Select the item you want to edit.
-
From the File menu, choose Edit. The file opens in the Rich Text Editor, as shown in Figure 34-36.
Figure 34-36 A Wiki Page Opened for Editing

Description of "Figure 34-36 A Wiki Page Opened for Editing"
-
Click Save and Close to close the document after saving.
34.6.1.4 Uploading a Document
To upload a document:
-
Navigate to the Services administration tab.
See also, Section 34.2, "Accessing the WebCenter Portal Administration Console".
-
Select Contents.
-
Select a directory in which you want to upload your document.
-
Click Upload Document. The Upload Document to <Folder Name> dialog displays.
-
In the Upload Document section, click Browse and select the required document. In the Description section you can enter a description if you like, and then click Upload. Your document is uploaded in the chosen directory.
Tip:
You can upload multiple documents at a time. You can add more field to upload as many documents as you like by clicking More.To download a document, select it and click Download.
34.6.1.5 Checking Out a Document
To check out a document:
-
Navigate to the Services administration tab.
See also, Section 34.2, "Accessing the WebCenter Portal Administration Console".
-
Select Contents.
-
Select the document you want to check out.
-
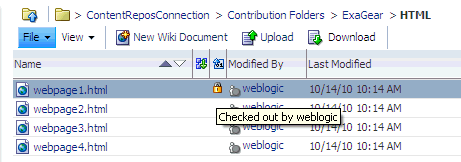
From the File menu, choose Check Out. The document is checked out and the lock icon appears to indicate its checked out status, as shown in Figure 34-37.
Tip:
To cancel check out, select the document in the directory it is located, and from the File menu choose Cancel Check Out.34.6.1.6 Uploading a New Version of a Document
To upload a new version of a document:
-
Navigate to the Services administration tab.
See also, Section 34.2, "Accessing the WebCenter Portal Administration Console".
-
Select Contents.
-
Select the document you want to check out.
-
From the File menu, choose Upload New Version.
-
In the Upload New Version dialog, click Browse to select another version of the document, as shown in Figure 34-38. You can enter a description, if you like, and then click Upload.
Figure 34-38 Upload a New Version of a Document

Description of "Figure 34-38 Upload a New Version of a Document"
34.6.1.7 Viewing Version History of a Content Item
To view the version history of a document such an image or a wiki page:
-
Navigate to the Services administration tab.
See also, Section 34.2, "Accessing the WebCenter Portal Administration Console".
-
Select Contents.
-
Navigate to the directory in which your documents are located.
-
Select a document to view its version history.
-
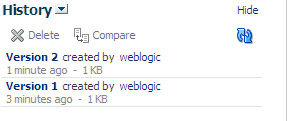
From the View menu, choose Version History. The version history displays, as shown in Figure 34-39.
Figure 34-39 Version History of a Document
Description of "Figure 34-39 Version History of a Document"
Tip:
To view properties of an item, select this item in the directory it is located, and from the View menu, choose Properties.34.6.1.8 Getting Direct and Download URLs of a Document
A direct URL lets you view a document, whereas a download URL lets you download it. To get these URLs:
-
Navigate to the Services administration tab.
See also, Section 34.2, "Accessing the WebCenter Portal Administration Console".
-
Select Contents.
-
Navigate to the directory in which your documents are located.
-
Select a document to get its URLs.
-
From the View menu, choose Get a Link.
-
In the Get a Link dialog, click the Direct URL if you want to view this document. To download this document, click Download URL.
34.6.1.9 Organizing Columns for the Displayed Content
For each item in a primary repository you can choose what associated information you would like to display, such as name of a content item, its last modified date, its check out status, and so on. You can also reorder chosen columns to display the desired information in a specific order.
34.6.1.9.1 Showing Columns
To choose columns that will display the desired information associated with your content items:
-
Navigate to the Services administration tab.
See also, Section 34.2, "Accessing the WebCenter Portal Administration Console".
-
Select Contents.
-
Navigate to the directory in which your documents are located.
-
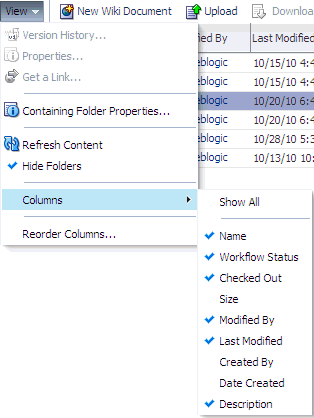
From the View menu, choose Columns and then choose titles that will display the desired information for your content items, as shown in Figure 34-9.
34.6.1.9.2 Reordering Columns
To reorder columns:
-
Navigate to the Services administration tab.
See also, Section 34.2, "Accessing the WebCenter Portal Administration Console".
-
Select Contents.
-
Navigate to the directory in which your documents are located.
-
From the View menu, choose Reorder Columns. The Reorder Columns dialog displays, as shown in Figure 34-42.
34.6.1.10 Setting Up Security on Folders and Documents
Under the Contents tab, in the File menu, the Security menu item for a document or folder is visible when the following conditions are met:
-
Item level security has been enabled in Oracle Content Server, as described in Section 11.2.3.2, "Configuring Oracle Content Server 11g to Support Item Level Security in All WebCenter Applications."
-
If the security group assigned to these documents is listed in the
SpecialAuthGroupssetting at the time when the item level security is enabled in Oracle Content Server, as described in Section 11.2.3.2, "Configuring Oracle Content Server 11g to Support Item Level Security in All WebCenter Applications." -
The user has administrative rights on the document or folder in Oracle Content Server.
For information about using the security feature, see the section "Setting Security Options for a File" in the Oracle Fusion Middleware User's Guide for Oracle WebCenter.
34.6.2 Managing Portlet Producers
To be able to register and manage portlet producers in a WebCenter Portal application, a user must be assigned the AppConnectionManager role. By default, users with the Administrator role have the AppConnectionManager role; and therefore, application administrators can configure portlet producers through the WebCenter Portal Administration Console. See also, Section 34.4.4, "Managing Application Roles and Permissions".
When you register a portlet producer, all the portlets owned by that producer automatically become available through the application's resource catalog. Once registered, users with appropriate edit page privileges, are then able to add the producer's portlets to their pages. Users who want access to a particular portlet but cannot find it in the resource catalog must ask an administrator to register the associated producer.
This section includes the following:
Note:
Fusion Middleware administrators can also register portlet producers for WebCenter Portal applications, using Fusion Middleware Control and WLST commands. For details, see Chapter 23, "Managing Portlet Producers."34.6.2.1 Registering Portlet Producers
To register a portlet producer at runtime for a WebCenter Portal application:
-
Navigate to the Services administration tab.
See also, Section 34.2, "Accessing the WebCenter Portal Administration Console".
-
Select Portlet Producers (Figure 34-43).
-
Click Register.
-
Enter connection details for the portlet producer.
If you need help with one or more fields, refer to the following tables:
WSRP Producers
Oracle PDK Java Producers
Pagelet Producers
-
Click Test to verify your connection details.
-
Click OK to register the portlet producer.
34.6.2.2 Editing and Deleting Portlet Producers
To modify or delete portlet producers at runtime for a WebCenter Portal application:
-
Navigate to the Services administration tab.
See also, Section 34.2, "Accessing the WebCenter Portal Administration Console".
-
Select Portlet Producers (Figure 34-43).
-
Select the portlet producer required, and then click one of the following:
-
Click Edit to update connection details for a portlet producer.
-
Click Deregister to deregister a producer. This removes registration data from both the WebCenter Portal application and the remote producer.
Deregistering does not remove portlet instance from WebCenter Portal application pages. Instead of the portlet, users see a "
Portlet unavailable" message.Consider deleting the external application associated with this portlet producer if the application's sole purpose is to support this producer. See Section 34.6.3.2, "Editing and Deleting External Applications."
-
34.6.3 Managing External Applications
To be able to register and manage external applications in a WebCenter Portal application, a user must be assigned the AppConnectionManager role. By default, users with the Administrator role have the AppConnectionManager role; and therefore, application administrators can configure external applications through the WebCenter Portal Administration Console. See also, Section 34.4.4, "Managing Application Roles and Permissions".
An external application is any application that implements its own authentication process. Specifically, it is an application that does not take part in the WebCenter Portal application's single sign-on process. If your WebCenter Portal application interacts with an application that handles its own authentication, you can register an external application to allow for credential provisioning.
Application administrators can register, edit, and delete external applications for a WebCenter Portal application at runtime, through the WebCenter Portal Administration Console.
This section includes the following subsections:
Note:
Fusion Middleware administrators can also register external applications for WebCenter Portal applications, using Fusion Middleware Control and WLST commands. For details, see Chapter 23, "Managing Portlet Producers."34.6.3.1 Registering External Applications
To register an external application at runtime for a WebCenter Portal application:
-
Navigate to the Services administration tab.
See also, Section 34.2, "Accessing the WebCenter Portal Administration Console".
-
Select External Application (Figure 34-44).
Figure 34-44 WebCenter Portal Administration Console - External Applications
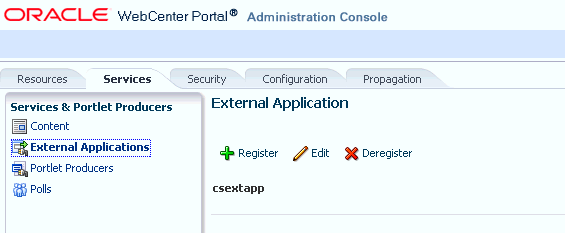
Description of "Figure 34-44 WebCenter Portal Administration Console - External Applications"
-
Click Register.
-
Enter connection details for the external application.
If you need help with one or more fields, refer to the following tables:
-
Click Test to verify your connection details.
-
Click OK to register the application.
34.6.3.2 Editing and Deleting External Applications
To modify or delete external applications at runtime for a WebCenter Portal application:
-
Navigate to the Services administration tab.
See also, Section 34.2, "Accessing the WebCenter Portal Administration Console".
-
Select External Application (Figure 34-44).
-
Select the external application required and then click one of the following:
-
Click Edit to update connection details for an external application.
-
Click Deregister to remove the external application.
Take care when deleting an external application connection as WebCenter application users will no longer have access to that application, and any services dependent on the external application may not function correctly.
-
34.6.4 Creating and Configuring Polls
Application administrators can create and configure online polls for a WebCenter Portal application at runtime through the WebCenter Portal Administration Console. With polls, you can survey your audience (such as their opinions and their experience level), check whether they can recall important information, and gather feedback on the efficacy of presentations.
This section includes the following subsections:
-
Section 34.6.4.1, "What You Should Know About the Polls Service"
-
Section 34.6.4.2, "Creating, Configuring, and Analyzing a Poll"
34.6.4.1 What You Should Know About the Polls Service
With the Polls service, in addition to taking available polls, you can do the following:
-
Create a poll by clicking the Create Poll icon, and then adding section headings and questions to it
-
Schedule the poll for distribution
-
Save the poll as a template for use with new polls
-
Analyze the results of the poll
The Polls service is integrated with many WebCenter services, such as RSS, Search (to search poll text), Instant Messaging and Presence, and Recent Activities.
Figure 34-45 shows an example poll.
Polls must be published and open before they can be completed by users. Users cannot complete unpublished or closed polls.
34.6.4.2 Creating, Configuring, and Analyzing a Poll
From the Polls page (Figure 34-46) you can create polls, and once created, view the status of current polls and perform operations on them, including edit, save (as poll or as a poll template), publish, close, analyze, and delete. You can update poll data on the Polls page at any time by clicking the Refresh icon.
To add a new poll:
-
Navigate to the Services administration tab.
See also, Section 34.2, "Accessing the WebCenter Portal Administration Console".
-
Select Polls (Figure 34-46).
-
Click Create Poll.
The Create Poll dialog displays (Figure 34-47).
-
Enter a Name and Description for the poll and click Create.
The Design tab displays (Figure 34-48).
-
Click Add to populate the poll with an existing template, or with questions and surrounding text.
-
Click Add Section to enter any explanatory text in a rich text editor (Figure 34-49), and click OK when done.
-
Click Add Question to add each poll question (Figure 34-50).
-
Select the Question Type from the dropdown list.
There are four question types:
-
Multiple Choice (Only One Answer)
-
Multiple Choice (Multiple Answer)
-
Matrix of Choices (Only One Answer Per Row)
-
Matrix of Choices (Multiple Answers Per Row)
-
-
Enter the Question text and the Choices (each choice must be on a separate line) and click OK when done.
For this example, the current design looks like Figure 34-52.
-
Open the Schedule tab, and choose the publish and close options for the poll (see Figure 34-53). Polls must be published and open to be taken. Users cannot take unpublished or closed polls.
In Publish Options, choose to keep the poll in draft mode for further editing, publish it immediately, or publish it on a future date. Click the Select Date and Time icon to enter the publishing time through a calendar. Click Edit Introduction Message to customize in the rich text editor the text provided at the beginning of the poll.
In Close Options, choose to close the published poll after it reaches a certain number of responses or on a certain date. If you choose both options, then the poll closes when either condition is first met. Click the Select Date and Time icon to enter the closing time through a calendar. Click Edit Closing Message to customize in the rich text editor the text provided at the end of the poll.
-
Open the Settings tab and choose what to display after the poll is taken, if users can edit responses after entering them, and if an asterisk should mark required questions (see Figure 34-54).
-
After conducting the poll, open the Analyze tab to view the poll data. Use the Questions box on the right to toggle between multiple questions (Figure 34-55).
