28 Configuring the Identity Store
This chapter describes how to reassociate the identity store with an external LDAP rather than the default embedded LDAP identity store. It also describes how to configure an LDAP server for Oracle Content Server and contains the following subsections:
-
Section 28.1, "Reassociating the Identity Store with an External LDAP Server"
-
Section 28.3, "Adding Users to the Embedded LDAP Identity Store"
-
Section 28.5, "Moving the Administrator Account to an External LDAP Server"
-
Section 28.7, "Aggregating Multiple Identity Store LDAP Servers Using libOVD"
-
Section 28.8, "Configuring the REST Service Identity Asserter"
Caution:
Before reassociating the identity store, be sure to back up the relevant configuration files:-
config.xml -
jps-config.xml
As a precaution, you should also back up the boot.properties file for the Administration Server for the domain.
Note that for WebCenter Portal applications, the steps for Granting the WebCenter Spaces Administrator Role and Migrating the WebCenter Discussions Server to Use an External LDAP are not required. For more information about the identity store, see the Oracle Fusion Middleware Security Guide.
The content of this chapter is intended for Fusion Middleware administrators (users granted the Admin role through the Oracle WebLogic Server Administration Console). Users with the Monitor or Operator roles can view security information but cannot make changes. See also, Section 1.8, "Understanding Administrative Operations, Roles, and Tools."
28.1 Reassociating the Identity Store with an External LDAP Server
In almost all cases, you must reassociate the identity store with an external LDAP server rather than using the default embedded LDAP. Although you can use many different types of LDAP servers (see Section 27.2, "Default Security Configuration" for a list of supported LDAPs), this section focuses on how to configure the identity store to use Oracle Internet Directory (OID).
To reassociate the identity store with OID:
-
Log in to the WebLogic Server Administration Console.
For information on logging into the WebLogic Server Administration Console, see Section 1.13.2, "Oracle WebLogic Server Administration Console."
-
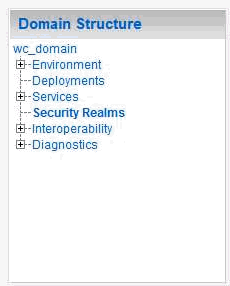
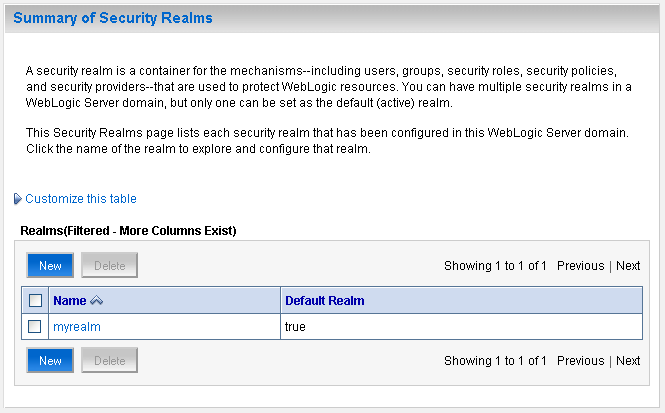
In the Domain Structure pane (see Figure 28-1), click Security Realms.
The Summary of Security Realms pane displays (see Figure 28-10).
Figure 28-2 Summary of Security Realms pane
Description of "Figure 28-2 Summary of Security Realms pane"
-
In the Name column, click the realm for which you want to reassociate the identity store.
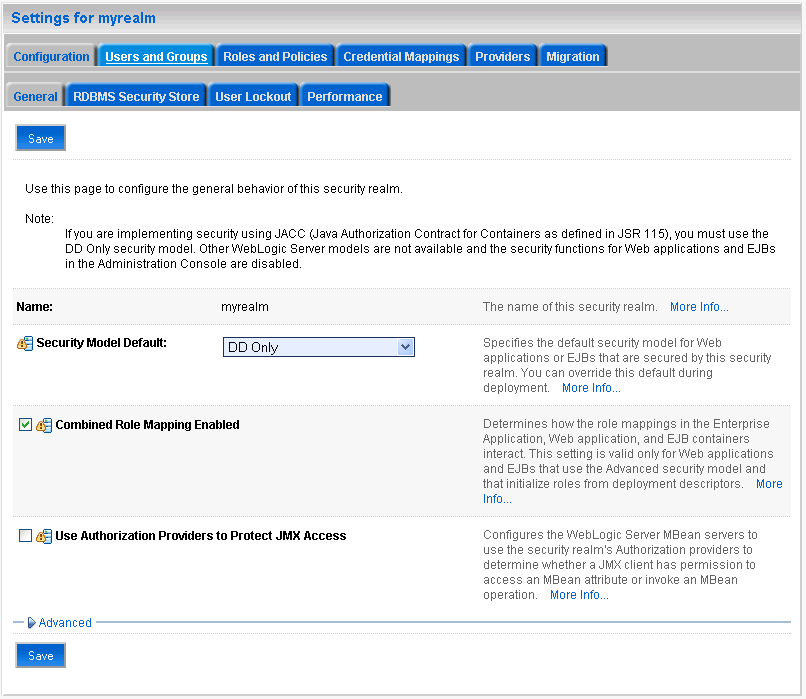
The Realm Settings pane displays (see Figure 28-3).
-
Open the Providers tab.
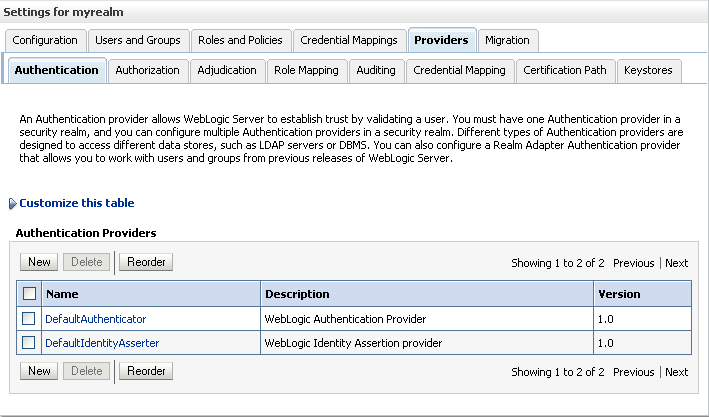
The Providers Settings pane displays (see Figure 28-4).
-
Click New to add a new provider.
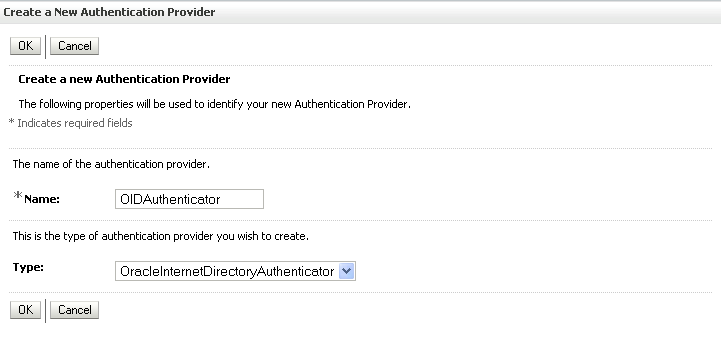
The Create a New Authentication Provider pane displays (see Figure 28-5).
Figure 28-5 Create a New Authentication Provider Pane
Description of "Figure 28-5 Create a New Authentication Provider Pane"
-
Enter a name for the provider (for example
OIDAuthenticatorfor a provider that authenticates the user for the Oracle Internet Directory). -
Select the authenticator appropriate for your LDAP directory from the list of authenticators.
Be sure to select the authenticator associated with the LDAP you are configuring rather than choosing the generic
DefaultAuthenticator. For example, for OID selectOracleInternetDirectoryAuthenticator, or for iPlanet selectIPlanetAuthenticator. -
Click OK to save your settings.
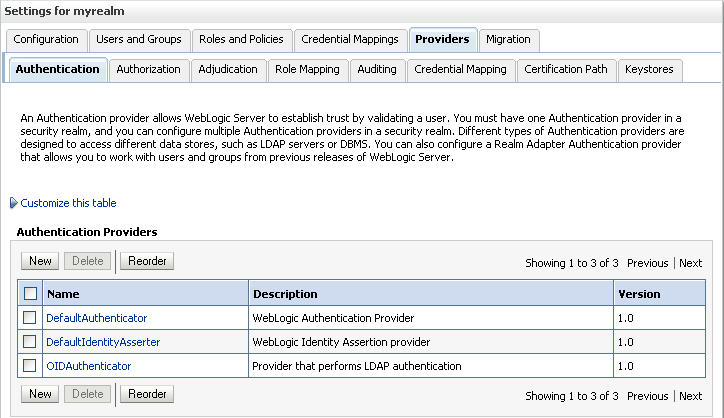
The Settings pane displays with the new authentication provider (see Figure 28-6).
Figure 28-6 Settings Pane - Authentication Providers
Description of "Figure 28-6 Settings Pane - Authentication Providers"
-
In the list of Authentication Providers, click the newly created provider.
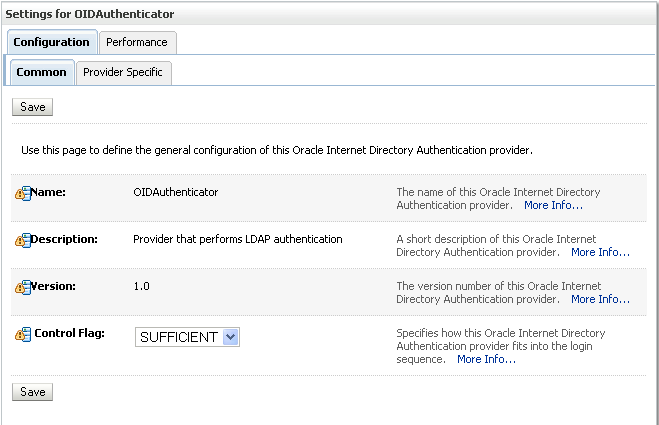
The Settings Pane for the new authentication provider displays (see Figure 28-7).
Figure 28-7 Settings Pane for Authenticator
Description of "Figure 28-7 Settings Pane for Authenticator"
-
Set the Control Flag to
SUFFICIENT.Setting the Control Flag to
SUFFICIENTindicates that if a user can be authenticated successfully by this authenticator, then the authentication provider should accept that authentication and should not invoke any additional authenticators.Note:
If the authentication fails, it falls through to the next authenticator in the chain. Therefore, be sure all subsequent authenticators also have their control flag set toSUFFICIENT. -
Click Save to save this setting.
-
Open the Provider Specific tab to enter the details for the LDAP server.
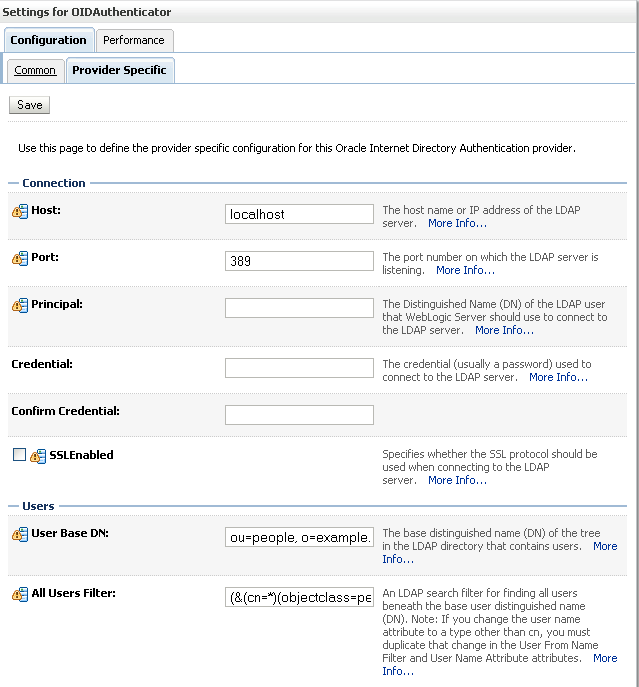
The Provider Specific pane displays (see Figure 28-8).
-
Enter the details specific to your LDAP server.
Note:
The table below shows values appropriate for OID. For the permissible values for other LDAPs, such as Active Directory, see the appendix "OPSS System and Configuration Properties" in the Oracle Fusion Middleware Security Guide.Parameter Value Description Host: The LDAP server's server ID (for example, <ldap_host> example.com)Port: The LDAP server's port number (for example, 3060)Principal: The LDAP user DN used to connect to the LDAP server (for example, cn=orcladmin) Credential: The password used to connect to the LDAP server User Base DN: Specify the DN under which your Users start (for example, cn=users,dc=example,dc=com)Group Base DN: Specify the DN that points to your Groups node (for example, cn=groups,dc=example,dc=com)Use Retrieved User Name as Principal Checked Must be turned on All Users Filter: (&(uid=*)(objectclass=person))Search to find all users under the User Base DN User From Name Filter: (&(uid=%u)(objectclass=person))User Name Attribute: uid -
Click Save.
-
Return to the Providers tab and reorder the providers so that the new authentication provider is on top, followed by any other authenticators with the
DefaultAuthenticatorplaced at the end of the list.All should have their control flags set to
SUFFICIENTso that subsequent authenticators can authenticate identities that fall through from the new provider all the way through to theDefaultAuthenticator(which is used only for the default file-based embedded LDAP). For example, logins such as the default administrator account are not typically created in the LDAP directory, but still need to be authenticated to start up the server. Unless identities are allowed to fall through to theDefaultAuthenticator, the default administrator account will not be authenticated. For more information about theDefaultAuthenticatorand the default administrator account, see Section 28.5, "Moving the Administrator Account to an External LDAP Server."Note:
Do not use the REQUIRED control flag if you are using multiple authenticators. If a REQUIRED control flag is found in the list of authenticators, regardless of its position, no further authenticators will be examined. -
Restart the Administration Server and the managed server for the changes to take effect.
28.2 Tuning the Identity Store for Performance
For OVD, the only object class against which attributes are looked up is inetOrgPerson (and it's parent object classes). Since the Profile Gallery can display attributes not defined in inetOrgPerson, all the additional attributes not covered in inetOrgPerson would require an additional round trip to the identity store.For best performance when using OVD in a production environment, Oracle recommends that you add the following configuration entry (in bold) to the domain-level jps-config.xml file:
        <!-- JPS WLS LDAP Identity Store Service Instance -->
        <serviceInstance name="idstore.ldap"
         provider="idstore.ldap.provider">
            <property name="idstore.config.provider"
value="oracle.security.jps.wls.internal.idstore.WlsLdapIdStoreConfigProvider"/>
            <property name="CONNECTION_POOL_CLASS"
value="oracle.security.idm.providers.stdldap.JNDIPool"/>

          <extendedProperty>
            <name>user.object.classes</name>
            <values>
               <value>top</value>
               <value>person</value>
               <value>inetorgperson</value>
               <value>organizationalperson</value>
               <value>orcluser</value>
               <value>orcluserv2</value>
               <value>ctCalUser</value>
            </values>
          </extendedProperty>
        </serviceInstance>
For best performance when using Active Directory in a production environment, Oracle recommends that you add the following configuration entries (in bold) to the domain-level jps-config.xml file:
        <serviceInstance provider="idstore.ldap.provider"          name="idstore.ldap">
           <property value="oracle.security.jps.wls.internal.idstore.WlsLdapIdStoreConfigProvider"            name="idstore.config.provider"/>
          <property value="oracle.security.idm.providers.stdldap.JNDIPool"            name="CONNECTION_POOL_CLASS"/>
          <property name="PROPERTY_ATTRIBUTE_MAPPING" value="WIRELESS_ACCT_NUMBER=mobile:MIDDLE_NAME=middlename:MAIDEN_NAME=sn:DATE_OF_HIRE=pwdLastSet:NAME_SUFFIX=generationqualifier:DATE_OF_BIRTH=pwdLastSet:DEFAULT_GROUP=primaryGroupID" />
          <property value="sAMAccountName" name="username.attr"/>
          <property value="sAMAccountName" name="user.login.attr"/>
        </serviceInstance>
The People Profile Service queries for all these attributes and there is no default mapping for these attributes in the Active Directory provider. A vanilla Active Directory installation doesn't have any mapping corresponding to DATE_OF_HIRE, DATE_OF_BIRTH.
Note that the two attributes are simply a mapping to some attribute of the correct data type to reduce unnecessary LDAP server calls as Active Directory really doesn't have corresponding attributes with the same semantic meaning.
28.3 Adding Users to the Embedded LDAP Identity Store
You can add users to the embedded LDAP using the WebLogic Server Administration Console, or using an LDIF file and LDAP commands. Using an LDIF file lets you add additional attributes not available through the WebLogic Server Administration Console.
Note:
The embedded LDAP server should only be used for testing or "proof of concept." For production use, Oracle recommends using external identity stores, such as Oracle Internet Directory or Microsoft Active Directory, that are supported by the OPSS user and role APIs.For Oracle Internet Directory, users are typically managed using ODSM (described in the section on "Managing Directory Entries" in the Oracle Fusion Middleware Administrator's Guide for Oracle Internet Directory).
Note:
If you are planning to reassociate your identity store with an external LDAP, perform that step first (as described in Section 28.1, "Reassociating the Identity Store with an External LDAP Server") to avoid having to migrate the users from the embedded LDAP to the newly configured external LDAP.WebCenter Spaces supports self-registration. New users who self-register with WebCenter Spaces are added directly to the identity store. For more information about self-registration, see "Allowing Self-Registration" in Oracle Fusion Middleware User's Guide for Oracle WebCenter.
Note:
Adding users to the identity store is typically a system administrator task and may not be a task for which application-level administrators have the required permissions.This section includes the following subsections:
-
Section 28.3.1, "Adding Users to the Identity Store Using the WLS Administration Console"
-
Section 28.3.2, "Adding Users to the Identity Store Using an LDIF File"
28.3.1 Adding Users to the Identity Store Using the WLS Administration Console
To add users to the embedded LDAP identity store from the WebLogic Server Administration Console:
-
Log in to the WebLogic Server Administration Console.
For information on logging into the WebLogic Server Administration Console, see Section 1.13.2, "Oracle WebLogic Server Administration Console."
-
In the Domain Structure pane (see Figure 28-9), click Security Realms.
The Summary of Security Realms pane displays (see Figure 28-10).
Figure 28-10 Summary of Security Realms pane

Description of "Figure 28-10 Summary of Security Realms pane"
-
In the Name column, click the realm to which you want to add users.
The Realm Settings pane displays (see Figure 28-11).
-
Click the Users and Groups tab to display the list of current users.
-
Click New to add a new user.
-
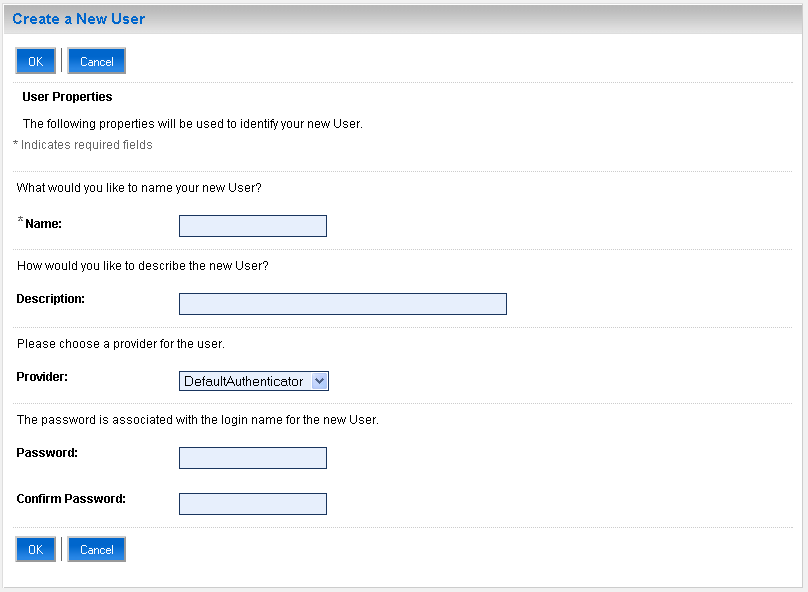
On the Create a New User page, enter the new user login name in the Name field.
User names are case sensitive and must be unique. Do not use commas, tabs or any other characters in the following comma-separated list:
< >, #, |, &, ?, ( ), { }
-
In the Description field, enter a description for the user (for example, the user's full name).
-
From the Provider drop-down menu, select
DefaultAuthenticator. -
In the Password field, enter a password for the user.
The minimum password length for a user defined in the WebLogic Authentication provider is 8 characters (note that other LDAP providers may have different requirements for the password length). Do not use user name/password combinations such as weblogic/weblogic in a production environment.
-
Reenter the password in the Confirm Password field.
-
Click OK to save your changes and add the user.
The user should now appear in the list of users.
28.3.2 Adding Users to the Identity Store Using an LDIF File
You can add users directly to the embedded LDAP identity store using an LDIF file. Using an LDIF file enables you to specify additional user attributes that are not available through the WebLogic Server Administration Console.As the embedded LDAP server is a conformant LDAP server, you can use LDAP commands to add or modify users. You can also search the directory, which is useful when exporting and importing user accounts.
To add users to the embedded LDAP using an LDIF file you must perform the following tasks:
When WebLogic Server is installed, the LDAP access credential is set as a randomized value and encrypted in the config.xml file. To enable external LDAP access, you must reset the access credential for the embedded LDAP.
To reset the access credential for the embedded LDAP:
-
Log in to the WebLogic Server Administration Console.
For information on logging into the WebLogic Server Administration Console, see Section 1.13.2, "Oracle WebLogic Server Administration Console."
-
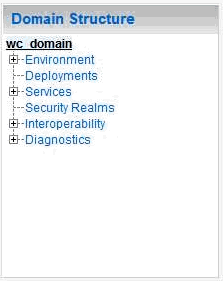
In the Domain Structure pane (see Figure 28-13), click wc_domain.
Figure 28-13 Domain Structure Pane (wc_domain)
Description of "Figure 28-13 Domain Structure Pane (wc_domain)"
-
In the Settings pane for
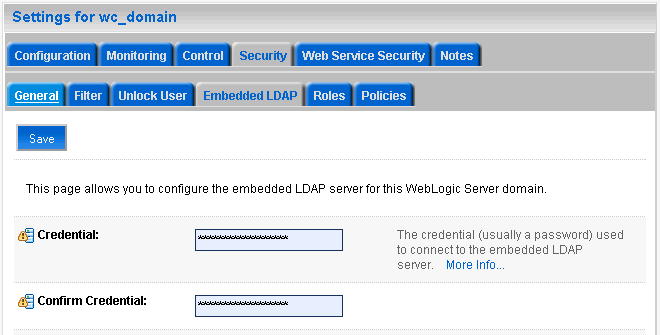
wc_domain, click the Security tab, and then click the Embedded LDAP tab.The Settings Pane for
wc_domaindisplays the embedded LDAP settings (see Figure 28-14).Figure 28-14 Settings Pane with Embedded LDAP Settings
Description of "Figure 28-14 Settings Pane with Embedded LDAP Settings"
-
Enter a new password in the Credential field, and reenter it in the Confirm Credential field.
-
Click Save to save your settings.
-
Restart the WebLogic server.
After this, you are ready to access the LDAP server with the following values:
-
the DN value for admin access is "cn=Admin"
-
the password is the value you entered in the Credential field
-
the port is the same as the admin port, which by default is 7001
-
You can create an LDIF file with any text editor, and can include any attributes appropriate for the embedded LDAP directory. The objectclasses that are supported by default in the embedded LDAP server for WebLogic Server are the following:
-
person -
inetOrgPerson -
organizationalPerson -
wlsUser
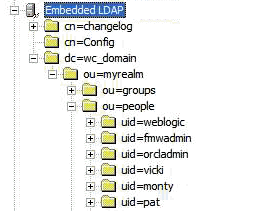
In order to interact successfully with the embedded LDAP server, you should understand the default layout of the directory information tree (DIT). The default layout in the embedded LDAP directory is shown in Figure 28-15.
Figure 28-15 Embedded LDAP Directory Information Tree
Description of "Figure 28-15 Embedded LDAP Directory Information Tree"
Note:
The naming attribute for the user entry in the embedded LDAP directory tree is "uid". This is different from the default configuration for Oracle Internet Directory (OID), where the naming attribute is "cn". Also, the location of the users in this tree is "ou=people,ou=myrealm,dc=wc_domain".The following example shows an LDIF file with the attributes that are displayed in WebCenter Spaces user profile screens:
dn: uid=john.doe,ou=people,ou=myrealm,dc=wc_domain
description: John Doe
cn: john.doe
uid: john.doe
sn: Doe
objectclass: wlsUser
objectclass: organizationalperson
objectclass: inetOrgPerson
objectclass: person
objectclass: top
userpassword: welcome1
displayName: John Doe
employeeNumber: 12345
employeeType: Regular
givenName: John
homePhone: 650-555-1212
mail: john.doe@example.com
title: Manager
manager: uid=mary.jones,ou=people,ou=myrealm,dc=wc_domain
preferredLanguage: en
departmentNumber: tools
facsimiletelephonenumber: 650-555-1200
mobile: 650-500-1200
pager: 650-400-1200
telephoneNumber: 650-506-1212
postaladdress: 200 Oracle Parkway
l: Redwood Shores
homepostaladdress: 123 Main St., Anytown 12345
To create a file with multiple user entries, just replicate the above lines as many times as required, with a blank line between entries.
Note:
WebCenter Spaces user profiles include some attributes that are only available in Oracle Internet Directory. These include the following attributes from theorclUserV2 objectclass:
-
orclTimeZone -
orclDateOfBirth -
maidenName
You cannot add these attributes to an embedded LDAP identity store.
The example below uses the ldappadd command, a part of the LDAP command line utilities provided with the Oracle Internet Directory server. For more information about using the ldappadd command, see "Oracle Internet Directory Data Management Tools" in the Oracle Fusion Middleware User Reference for Oracle Identity Management.
ldapadd -h weblogichost.example.com -p 7001 -D cn=Admin -w password -v -f newuser.ldif

add description:
        John Doe
add cn:
        john.doe
add uid:
        john.doe
add sn:
        Doe
add objectclass:
        wlsUser
        organizationalperson
        inetOrgPerson
        person
        top
add userpassword:
        password
add displayname:
        John Doe
add employeenumber:
        12345
add employeetype:
        Regular
add givenname:
        John
add homephone:
        650-555-1212
add mail:
        john.doe@example.com
add title:
        Manager
add manager:
        uid=mary.jones,ou=people,ou=myrealm,dc=wc_domain
add preferredlanguage:
        en
add departmentnumber:
        tools
add facsimiletelephonenumber:
        650-555-1200
add mobile:
        650-500-1200
add pager:
        650-400-1200
add telephonenumber:
        650-506-1212
add postaladdress:
        200 Oracle Parkway
add l:
        Redwood Shores
add homepostaladdress:
        123 Main St., Anytown 12345
adding new entry uid=john.doe,ou=people,ou=myrealm,dc=wc_domain
modify complete
28.4 Managing Users and Application Roles
This section describes how you can use Fusion Middleware Control, WLST, and the runtime administration pages in WebCenter Spaces and WebCenter Portal applications to manage users and application roles.
This section contains the following subsections:
28.4.1 Granting the WebCenter Spaces Administrator Role
WebCenter Spaces only recognizes users in the identity store that is mapped by the first authenticator. Since the WebCenter Spaces Administrator account is initially created only in the embedded LDAP server, if an external LDAP such as Oracle Internet Directory is configured as the primary authenticator for WebCenter Spaces, you must also create a user in that LDAP and grant that user the WebCenter Spaces Administrator role.
You can grant a user the WebCenter Spaces Administrator role using Fusion Middleware Control or WLST as shown below in the sections on:
-
Section 28.4.1.1, "Granting the WebCenter Spaces Administrator Role Using Fusion Middleware Control"
-
Section 28.4.1.2, "Granting the WebCenter Spaces Administrator Role Using WLST"
28.4.1.1 Granting the WebCenter Spaces Administrator Role Using Fusion Middleware Control
This section describes how to grant the WebCenter Spaces administrator role to a user account other than the default "weblogic" account.
To grant the WebCenter Spaces Administrator role using Fusion Middleware Control:
-
Log into Fusion Middleware Control and navigate to the WebCenter Spaces home page.
For information on logging into Fusion Middleware Control, see Section 6, "Starting Enterprise Manager Fusion Middleware Control."
-
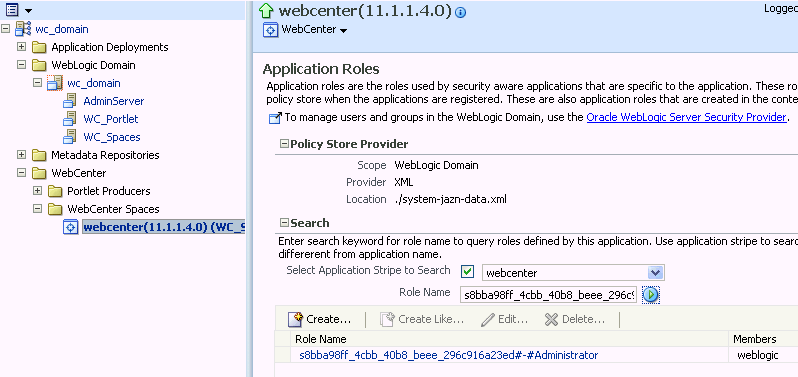
From the WebCenter menu, select Security -> Application Roles.
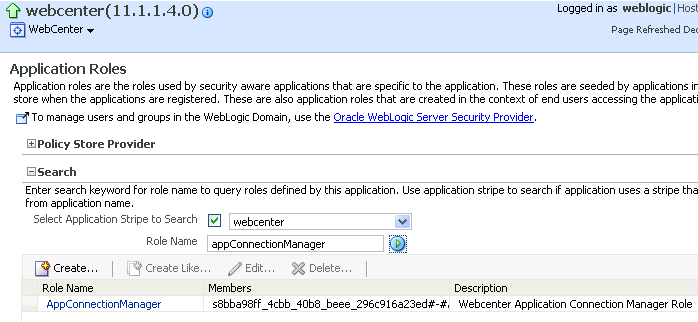
The Application Roles page displays (see Figure 28-16).
-
Search for the WebCenter Spaces Administrator role:
-
Select Select Application Stripe to Search.
-
Select
webcenter. -
In the Role Name field, enter the following internal identifier for the Administrator role, and then click the Search (arrow) icon:
s8bba98ff_4cbb_40b8_beee_296c916a23ed#-#Administrator
The search should return
s8bba98ff_4cbb_40b8_beee_296c916a23ed#-#Administrator, which is the administrator role identifier. -
-
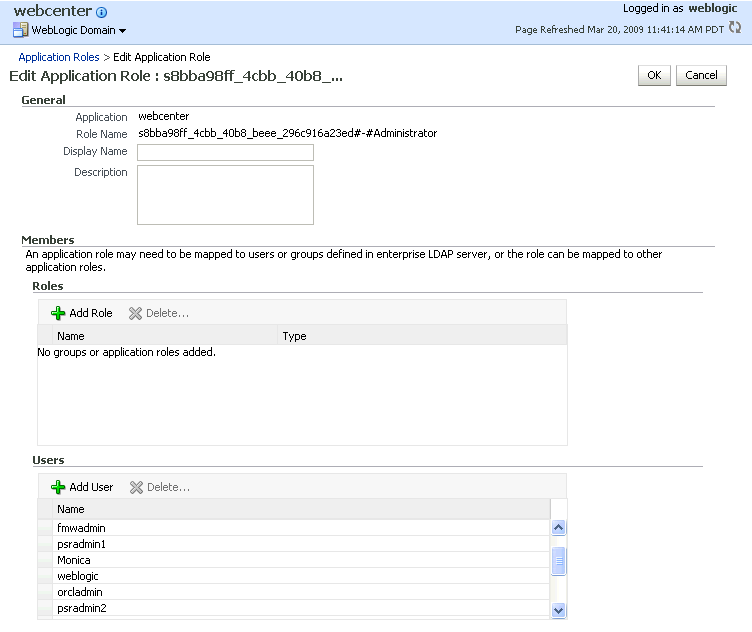
Click the administrator role identifier in the Role Name column.
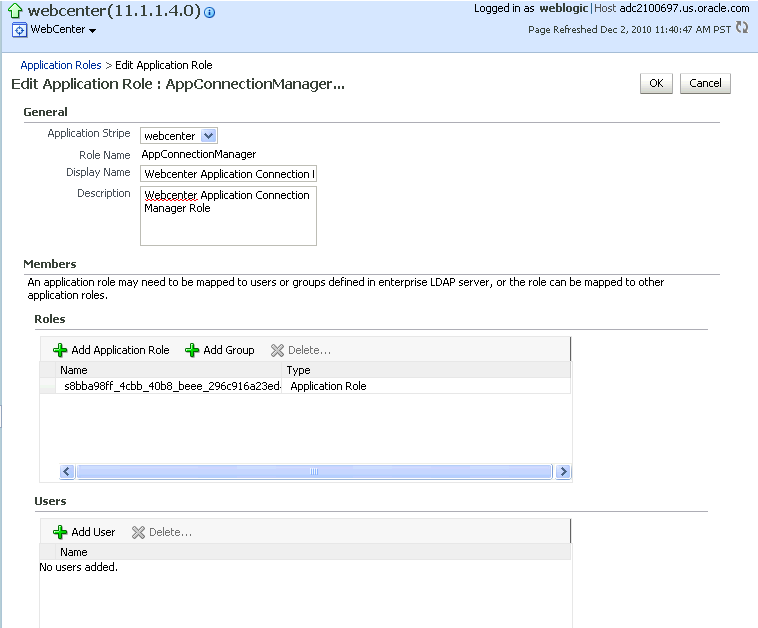
The Edit Application Role page displays (see Figure 28-17).
-
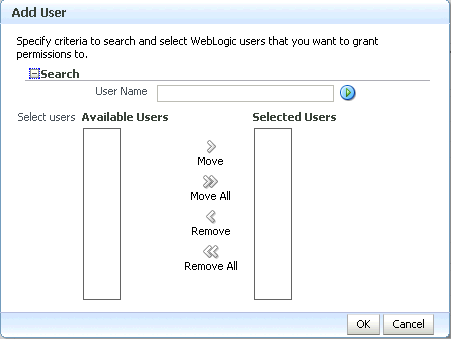
Click Add User.
The Add User pop-up displays (see Figure 28-18).
-
Use the Search function to search for the user to assign the Administrator role to.
-
Use the arrow keys to move the user from the Available Users column to the Selected Users column, and click OK.
-
On the Edit Application Role page, click OK.
-
To remove the weblogic role, on the Edit Application Role page under Users, click
weblogicand the click Delete. -
Restart the
WC_Spacesmanaged server.When you login to WebCenter Spaces, the Administration link should appear and you should be able to perform all administrator operations.
28.4.1.2 Granting the WebCenter Spaces Administrator Role Using WLST
To grant the WebCenter Administrator role to another user using WLST:
-
Start WLST as described in Section 1.13.3.1, "Running Oracle WebLogic Scripting Tool (WLST) Commands."
-
Connect to the WebCenter Spaces Administration Server for the target domain with the following command:
connect('user_name','password, 'host_id:port')Where:
-
user_nameis the name of the user account with which to access the Administration Server (for example,weblogic) -
passwordis the password with which to access the Administration Server -
host_idis the host ID of the Administration Server -
portis the port number of the Administration Server (for example,7001).
-
-
Grant the WebCenter Spaces administrator application role to the user in Oracle Internet Directory using the
grantAppRolecommand as shown below:grantAppRole(appStripe="webcenter", appRoleName="s8bba98ff_4cbb_40b8_beee_296c916a23ed#-#Administrator", principalClass="weblogic.security.principal.WLSUserImpl", principalName="wc_admin")Where
wc_adminis the name of the administrator account to create. -
To test the new account, log into WebCenter Spaces using the new account name.
The Administration link should appear, and you should be able to perform all administrator operations.
-
After granting the WebCenter Spaces Administrator role to new accounts, remove this role from accounts that no longer need or require it using the WLST
revokeAppRolecommand. For example, if WebCenter Spaces was installed with a different administrator user name thanweblogic, the administrator role should be given to that user and should be revoked from the defaultweblogic.revokeAppRole(appStripe="webcenter", appRoleName="s8bba98ff_4cbb_40b8_beee_296c916a23ed#-#Administrator", principalClass="weblogic.security.principal.WLSUserImpl", principalName="weblogic")
28.4.2 Granting Application Roles
This section describes how to add users to application roles using Fusion Middleware Control and WLST commands.
This section contains the following subsections:
28.4.2.1 Granting Application Roles Using Fusion Middleware Control
This section describes how to grant an application role to users using Fusion Middleware Control.
-
Log into Fusion Middleware Control and navigate to the WebCenter Spaces or WebCenter Portal application home page.
For information on logging into Fusion Middleware Control, see Section 6, "Starting Enterprise Manager Fusion Middleware Control."
-
From the WebCenter menu, select Security -> Application Roles.
The Application Roles page displays (see Figure 28-19).
-
Search for the WebCenter Spaces or WebCenter Portal application role:
-
Select Select Application Stripe to Search.
-
Sect the application stripe (
webcenterfor WebCenter Spaces). -
In the Role Name field, enter the name of the role you are looking for (for example,
appConnectionManager), and then click the Search (arrow) icon:If you are not sure of the name, enter a partial search term or leave the field blank to display all the application roles.
-
-
Click the role identifier in the Role Name column.
The Edit Application Role page displays (see Figure 28-20).
-
Click Add User.
The Add User pop-up displays (see Figure 28-21).
-
Use the Search function to search for the user to assign the application role to.
-
Use the arrow keys to move the user from the Available Users column to the Selected Users column, and click OK.
-
On the Edit Application Role page, click OK.
-
Restart the managed server on which the WebCenter application is deployed. For WebCenter Spaces this is always
WC_Spaces.
28.4.2.2 Granting Application Roles Using WLST
Use the grantAppRole command to grant an application role to a user. For syntax and usage information, see "grantAppRole" in the Oracle Fusion Middleware WebLogic Scripting Tool Command Reference.
28.4.3 Using the Runtime Administration Pages
WebCenter Spaces provides a Security tab from which an administrator can define application roles and grant application roles to users defined in the identity store. For information about managing users and application roles in WebCenter Spaces, see "Managing Users and Roles for WebCenter Spaces" in Oracle Fusion Middleware User's Guide for Oracle WebCenter.
Caution:
The "Allow Password Change" property, which specifies whether users can change their passwords within WebCenter Spaces, should be carefully controlled for corporate identity stores. WebCenter Spaces administrators can set this property from the Profile Management Settings page in WebCenter Spaces. For more information, see "Configuring Profiles" in Oracle Fusion Middleware User's Guide for Oracle WebCenter.WebCenter Portal applications can provide a similar Security tab for application administrators. For details, see Section 34.4, "Managing Application Members and Roles."For more information about role-mapping for ADF-security based WebCenter applications, see the section What You May Need to Know About Application Roles and Enterprise Roles in the Oracle Fusion Middleware Fusion Developer's Guide for Oracle Application Development Framework.
28.5 Moving the Administrator Account to an External LDAP Server
When configuring the domain to use an external LDAP server, you can also optionally move the Fusion Middleware administrator account (weblogic by default) to the LDAP server.
If the Fusion Middleware administrator account, or any other appropriate user in LDAP, is in an LDAP group called "Administrators", then this account should be sufficient to manage the server, and the DefaultAuthenticator provider can be removed from the list of authentication providers. In this case, all users, including the administrator account, are authenticated against the external LDAP.
If you cannot create the weblogic (default) user in the external LDAP directory, there are two options. You can:
-
Keep the
DefaultAuthenticatorprovider and use theweblogicaccount with the local embedded LDAP server in WebLogic Server to start and stop servers and do other administrator operations from the WebLogic Server Administration Console. If you keep theDefaultAuthenticator, make sure that the control flag for theDefaultAuthenticationprovider is set toSUFFICIENT. If you choose this option, you must also perform the additional steps described in Section 28.5.1, "Migrating the WebCenter Discussions Server to Use an External LDAP."Note:
If theweblogicuser account is used from theDefaultAuthenticator, this account should not be used to access the WebCenter Spaces application as the application code will not be able to find the user in the external LDAP store. -
Remove the
DefaultAuthenticatorand make sure that any valid user account used for administrator operations, such as starting and stopping servers, is included in an "Administrators" group or other named group that contains the list of users that are allowed to manage your domain in OID or other external LDAP. If a name other than "Administrators" is used, then you must update the group name in the definition of the WebLogic Server Global Administrator role. By default, this is defined as membership in the enterprise group called "Administrators". For information about changing the administrator group name, see Section 28.5.2, "Changing the Administrator Group Name."
28.5.1 Migrating the WebCenter Discussions Server to Use an External LDAP
If you've installed Oracle WebCenter Discussions Server and choose not to move the administrator account to an external LDAP (as described in Section 28.5, "Moving the Administrator Account to an External LDAP Server"), you must perform some additional steps to identify the new administrator account for the discussions server prior to reordering the authenticators on the WebLogic Server:
-
Select a user account from the external LDAP to be the administrator for the discussions server.
-
Create an administrator account in the
DefaultAuthenticator(that is, the embedded LDAP) that matches the one you selected from the external LDAP. The account names in the embedded LDAP and the external LDAP server must be the same.For information about adding users to the embedded LDAP, see Section 28.3, "Adding Users to the Embedded LDAP Identity Store."
-
Log in to the Oracle WebCenter Discussions Server Admin Console with the boot-identity account (that is,
weblogic) at:http://host:port/owc_discussions/admin
Where
hostandportare the host ID and port number of theWLS_Servicesmanaged server. -
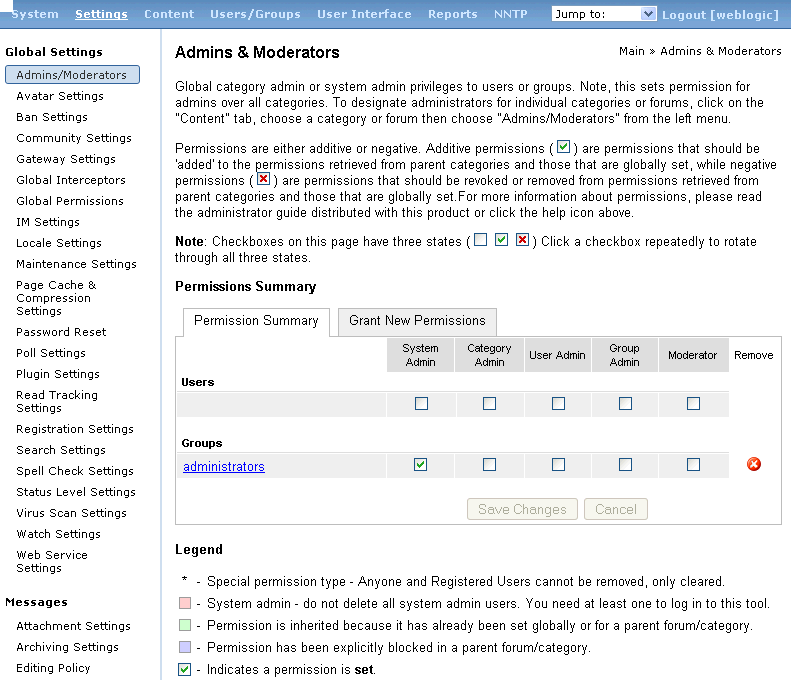
Click Settings > Admins/Moderators.
The Admins & Moderators page displays (see Figure 28-22).
-
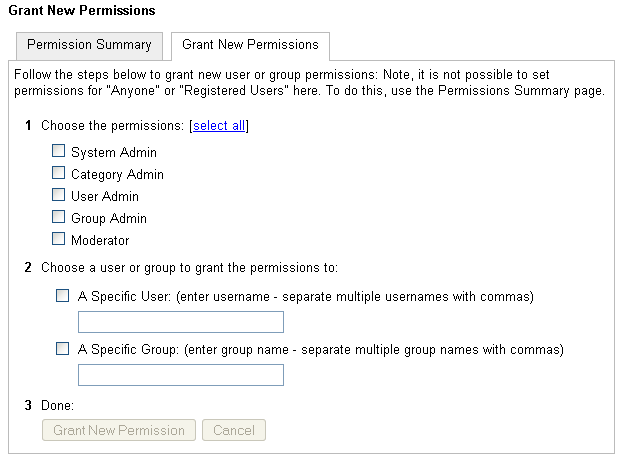
Click Grant New Permissions.
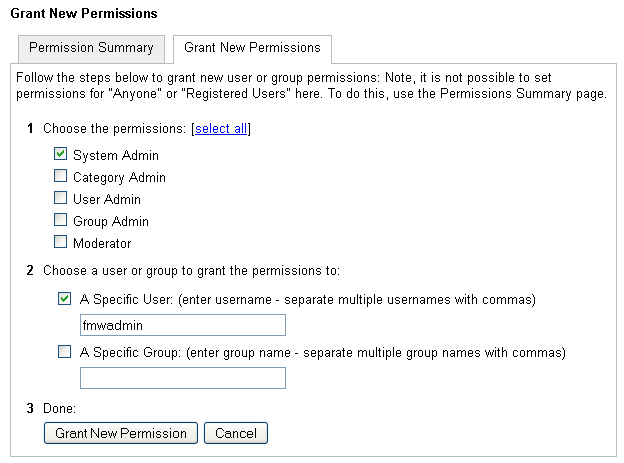
The Grant New Permissions pane displays (see Figure 28-23).
-
Grant System Admin privileges to the user you created, as shown in Figure 28-24.
Figure 28-24 Grant New Permissions Pane with New User
Description of "Figure 28-24 Grant New Permissions Pane with New User"
-
Click System > System Properties.
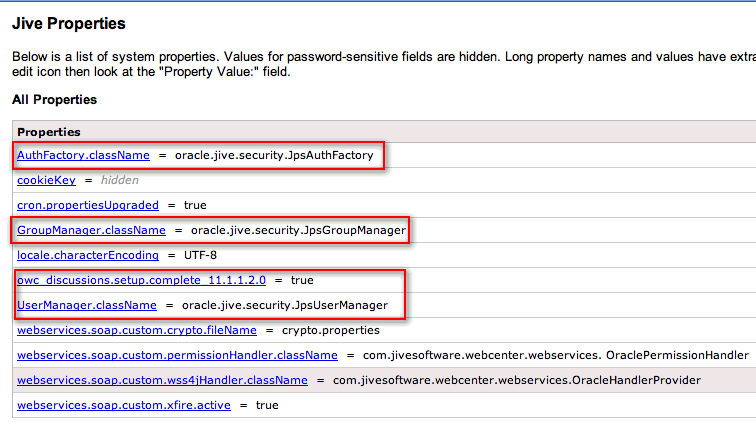
The Jive Properties page displays (see Figure 28-25).
-
Check that the properties marked in red have been added and are set as shown in Figure 28-25.
-
Log in to the WebLogic Server Administration Console.
For information on logging in to the WebLogic Server Administration Console, see Section 1.13.2, "Oracle WebLogic Server Administration Console."
-
In the Domain Structure pane (see Figure 28-26), click Security Realms.
The Summary of Security Realms pane displays (see Figure 28-27).
Figure 28-27 Summary of Security Realms pane

Description of "Figure 28-27 Summary of Security Realms pane"
-
In the Name column, click the realm for which you want to change the administrator group name.
The Realm Settings pane displays (see Figure 28-28).
-
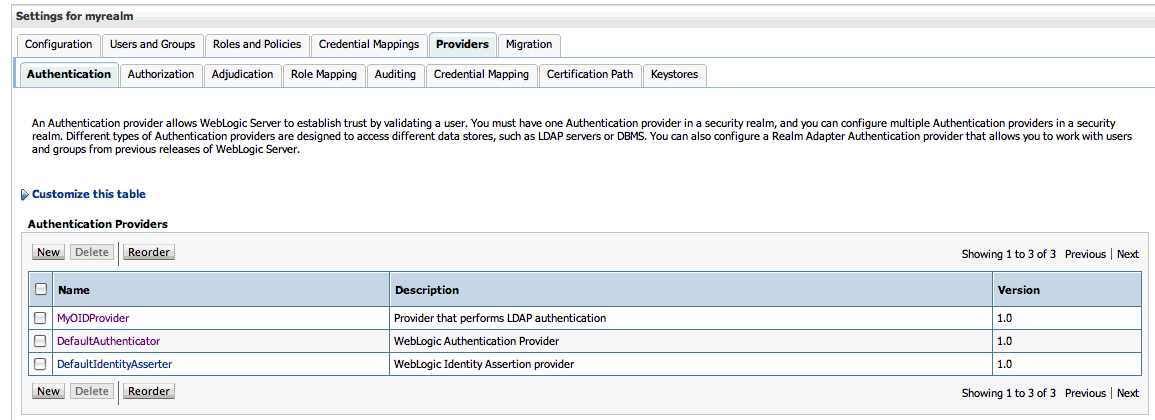
Select the Providers tab and the Authentication sub-tab, and reorder the authentication providers so that the authenticator for the external LDAP appears at the top of the list as shown in the example in Figure 28-29:
Figure 28-29 Providers Tab with Reordered Authentication Providers
Description of "Figure 28-29 Providers Tab with Reordered Authentication Providers"
-
Restart the domain Administration Server and discussions server.
28.5.2 Changing the Administrator Group Name
You can change the group name to any other valid enterprise role in your LDAP server that contains users authorized to manage the domain. This lets you delegate the administration of specific domains in your enterprise. You can create various administration groups in the directory and have the corresponding domains be configured to use the appropriate group for defining its administrators.
The following example LDIF file creates an administrative group in Oracle Internet Directory:
dn: cn=wc_domain_Admin,cn=groups,dc=example,dc=com
cn: wc_domain_Admin
uniquemember: cn=joe.admin,cn=users,dc=example,dc=com
owner: cn=orcladmin
displayname: WebLogic Administrators Group
description: WebLogic Administrators Group
objectclass: orclgroup
objectclass: groupofuniquenames
Once this group is created, you must update the role definition for the WebLogic Server global Admin role using the WebLogic Server Administration Console.
To update the role definition for the WebLogic Server global Admin role:
-
Log in to the WebLogic Server Administration Console.
For information on logging into the WebLogic Server Administration Console, see Section 1.13.2, "Oracle WebLogic Server Administration Console."
-
In the Domain Structure pane (see Figure 28-30), click Security Realms.
The Summary of Security Realms pane displays (see Figure 28-31).
Figure 28-31 Summary of Security Realms pane

Description of "Figure 28-31 Summary of Security Realms pane"
-
In the Name column, click the realm for which you want to change the administrator group name.
The Realm Settings pane displays (see Figure 28-32).
-
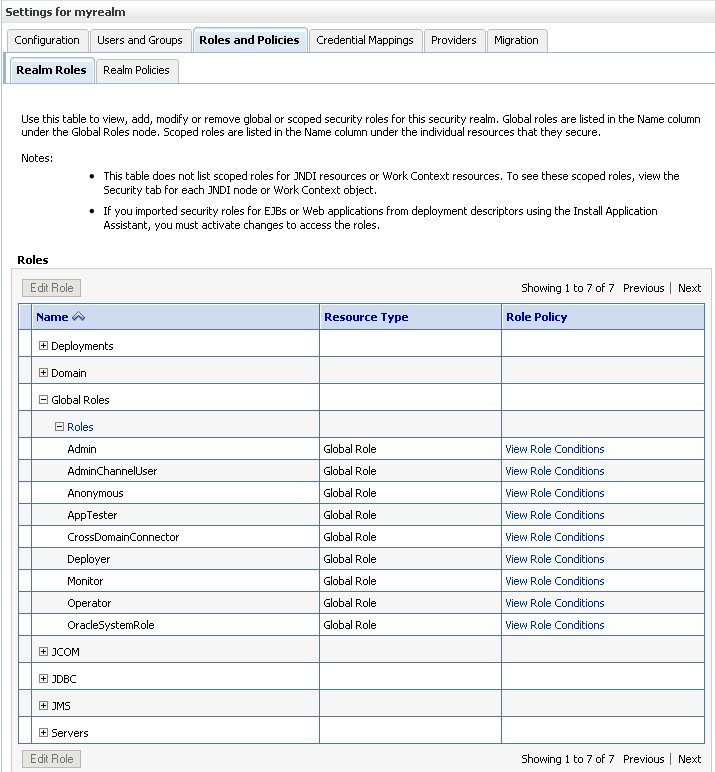
Open the Roles and Policies tab, and then the Realm Roles subtab.
The Realm Roles settings pane displays (see Figure 28-33).
-
Expand the Global Roles node, and then the Roles node.
-
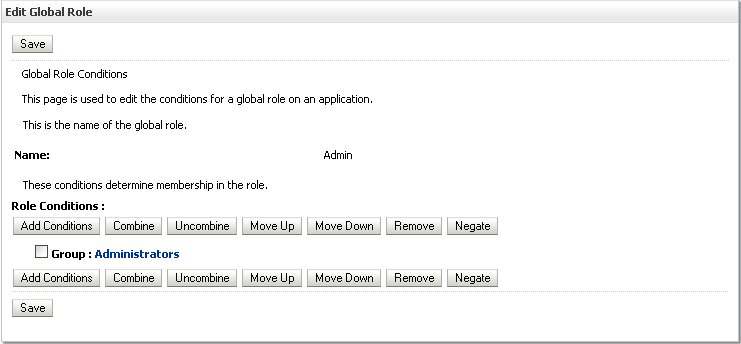
Click View Role Conditions for the
Adminrole.The Edit Global Role page displays (see Figure 28-34).
By default, the
Administratorsgroup in Oracle Internet Directory (or other configured identity store) defines who has the administrator role in WebLogic Server. -
Click Add Conditions to add a different group name.
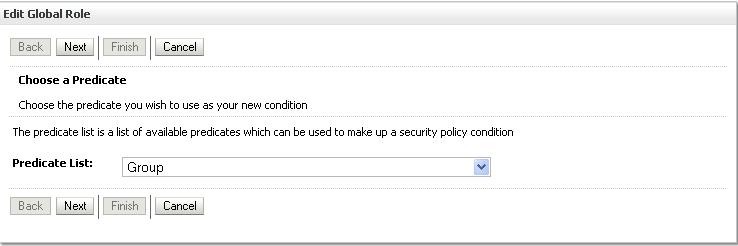
The Edit Global Role - Predicate List page displays (see Figure 28-35).
Figure 28-35 Edit Global Role Page - Predicate List
Description of "Figure 28-35 Edit Global Role Page - Predicate List"
-
Select
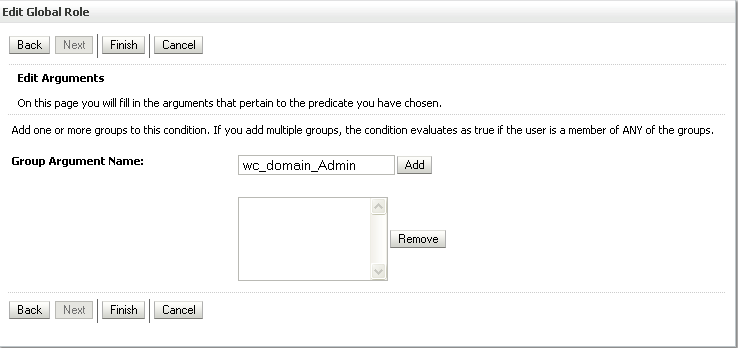
Groupfrom the Predicate List list and click Next.The Edit Global Role - Arguments page displays (see Figure 28-36).
Figure 28-36 Edit Global Role Page - Arguments
Description of "Figure 28-36 Edit Global Role Page - Arguments"
-
Enter the name for the new administrator group and click Add.
-
Select the pre-existing administrator group and click Remove to delete it leaving the new one you've selected in its place.
-
Click Finish to save your changes.
After making this change, any members of the new group specified are authorized to administer WebLogic Server.
28.6 Configuring the Oracle Content Server to Share the WebCenter Spaces Identity Store LDAP Server
Oracle Content Server (OCS) must be configured to use the same identity store LDAP server as Oracle WebCenter Spaces. For more information on configuring the OCS, see Chapter 11, "Managing Content Repositories" and also "Configuring the LDAP Identity Store Service" in the Oracle Fusion Middleware Security Guide.
28.7 Aggregating Multiple Identity Store LDAP Servers Using libOVD
Sites with muliple identity stores can use libOVD to aggregate their user profile information. Two scenarios are covered in the step-by-step configuration instructions below:
-
Users are available in distinct identity stores with complete user profile information available in the respective identity store.
-
The same user is available in both identity stores with some attributes in one store and other attributes in the other store.
Note:
If you are supporting self-registration with Active Directory, be sure to see the troubleshooting note in Section 27.3.3, "Users Cannot Self-Register when WebCenter Spaces Configured with Active Directory."This section contains the following subsections:
-
Section 28.7.1, "Configuring libOVD for Identity Stores with Complete User Profiles"
-
Section 28.7.2, "Configuring libOVD for Identity Stores with Partial User Profiles"
28.7.1 Configuring libOVD for Identity Stores with Complete User Profiles
To configure libOVD where each identity store contains complete user profiles:
-
Create the required authenticators in the WLS Admin Console for the identity stores being configured and restart the Weblogic Admin and Managed Servers for the domain. Alternatively, you can also configure the identity store information in
jps-config.xmlby hand. -
Update the identity store service instance in
jps-config.xmland add a propertyvirtualizewith the valuetrue. You can do this either by editing thejps-config.xmlfile by hand, or using Fusion Middleware Control. -
WebCenter lets users self-register, which creates a new user or group in the identity store. Since multiple identity stores are being used, you also need to explicitly specify the user create bases and group create bases in
jps-config.xml. This step must be done by directly editingjps-config.xml.The
jps-config.xmlfile should look like the example below after the configuration.<serviceInstance provider="idstore.ldap.provider" name="idstore.ldap"> <property value="oracle.security.jps.wls.internal.idstore.WlsLdapIdStoreConfigProvider" name="idstore.config.provider"/> <property value="oracle.security.idm.providers.stdldap.JNDIPool" name="CONNECTION_POOL_CLASS"/> <property value="true" name="virtualize"/> </serviceInstance> <extendedProperty> <name>user.create.bases</name> <values> <value>ou=people,ou=myrealm,dc=wc_domain</value> </values> </extendedProperty> <extendedProperty> <name>group.create.bases</name> <values> <value>ou=groups,ou=myrealm,dc=wc_domain</value> </values> </extendedProperty> </serviceInstance>
Be sure to replace the actual values for the user create base in "
ou=people,ou=myrealm,dc=wc_domain" and group create base "ou=groups,ou=myrealm,dc=wc_domain."
28.7.2 Configuring libOVD for Identity Stores with Partial User Profiles
To configure libOVD where each identity store contains only partial user profiles:
-
Create the required authenticators in the WLS Admin Console for the identity stores being configured and restart the Weblogic Admin and Managed Servers for the domain. Alternatively, you can also configure the identity store information in
jps-config.xmlby hand. -
Update the identity store service instance in
jps-config.xmland add a propertyvirtualizewith the valuetrue. You can do this either by editing thejps-config.xmlfile by hand, or using Fusion Middleware Control. -
WebCenter lets users self-register, which creates a new user or group in the identity store. Since multiple identity stores are being used, you also need to explicitly specify the user create bases and group create bases in
jps-config.xml. This step must be done by directly editingjps-config.xml.The
jps-config.xmlfile should look like the example below after the configuration.<serviceInstance provider="idstore.ldap.provider" name="idstore.ldap"> <property value="oracle.security.jps.wls.internal.idstore.WlsLdapIdStoreConfigProvider" name="idstore.config.provider"/> <property value="oracle.security.idm.providers.stdldap.JNDIPool" name="CONNECTION_POOL_CLASS"/> <property value="true" name="virtualize"/> <extendedProperty> <name>user.create.bases</name> <values> <value>ou=people,ou=myrealm,dc=wc_domain</value> </values> </extendedProperty> <extendedProperty> <name>group.create.bases</name> <values> <value>ou=groups,ou=myrealm,dc=wc_domain</value> </values> </extendedProperty> </serviceInstance>
In the above example "
ou=people,ou=myrealm,dc=wc_domain" and "ou=groups,ou=myrealm,dc=wc_domain" are the user and group create bases respectively. The actual values should be substituted while doing the configuration. -
Run the following OVD WLST commands to configure the Join Adapter for the identity stores. Go to
$MWHOME/oracle_common/common/binand invokewlst.sh(wlst.cmdin windows) and bring up the WLST prompt. Connect to the Weblogic Administration Server and run the following WLST commands.createJoinAdapter(adapterName="<Join Adapter Name>", root="<Namespace>", primaryAdapter="<Primary adapter Name>") addJoinRule(adapterName="<Join Adapter Name>", secondary="<Secondary Adapter Name>", condition="<Join Condition>")
If there are more secondary identity stores, then run the
addJoinRulecommand for each secondary identity store.modifyLDAPAdapter(adapterName="<AuthenticatorName>", attribute="visible", value="Internal")
Run the above
modifyLDAPAdaptercommand for each identity stores that is configured.
Authenticator 1:
In this example, the same user is available in both identity stores with some attributes in one store and some in the other. For this example, AD is the primary store and OID is the secondary store.
Authenticator Name: AD
User Base: cn=users,dc=acme,dc=com
Authenticator 2:
Authenticator Name: OID
User Base: cn=users,dc=oid,dc=com
Perform steps 1 - 3 above, specifying the user.create.bases and group.create.bases corresponding to the primary adapter's namespace.
Perform the following WLST commands:
createJoinAdapter(adapterName="JoinAdapter1", root="dc=acme,dc=com", primaryAdapter="AD")
addJoinRule(adapterName="JoinAdapter1", secondary="OID", condition="uid=cn")
"uid=cn" is the join condition in the above example, which indicates that if the uid value of a user in the secondary identity store (OID) matches with the cn value of the user in the primary identity store (AD), then the attributes will be combined.
modifyLDAPAdapter(adapterName="OID", attribute="visible", value="Internal")
modifyLDAPAdapter(adapterName="AD", attribute="visible", value="Internal")
Restart the WebLogic Administration server and Managed Servers.
28.7.3 Restoring the Single Authenticator
You can restore the single authenticator by removing the Join Adapter rule, thereby backing out the configuration done in Section 28.7.2, "Configuring libOVD for Identity Stores with Partial User Profiles."
To remove the Join Adapter rule, connect to the Weblogic Administration Server and run the following WLST commands:
deleteAdapter(adapterName="JoinAdapter1")
modifyLDAPAdapter(adapterName="oid auth", attribute="Visible", value="Yes")
modifyLDAPAdapter(adapterName="AD", attribute="Visible", value="Yes"
Restart the WebLogic Administration server and Managed Servers and make sure that users from both identity stores are able to log in.
28.8 Configuring the REST Service Identity Asserter
This section describes how to configure an identity asserter for the REST service. For the REST service, including REST service APIs, to be used with WebCenter requires that an identity asserter be configured for it in the WebCenter domain identity store. The following sections show how to configure OPSS Trust Service instances and identity asserters for Oracle WebLogic Server.
This section contains the following subsections:
-
Section 28.8.1, "Understanding the REST Service Instance and Identity Asserter"
-
Section 28.8.3, "Configuring the WLS Trust Service Asserter"
28.8.1 Understanding the REST Service Instance and Identity Asserter
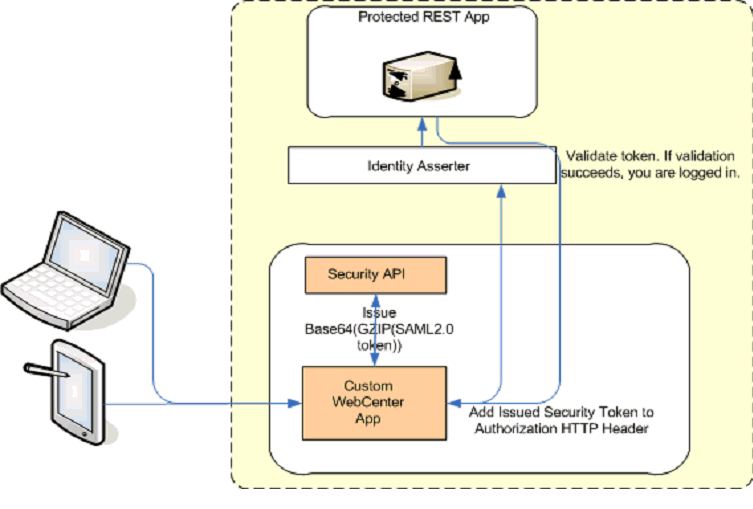
Although WebCenter Portal applications, and other Oracle WebLogic applications, can use REST APIs to display information the way they need to, since such calls originate from the mid-tier, users will be prompted again to provide login credentials. To overcome this, we use perimeter authentication where the user identity is propagated in the HTTP header and asserted using the OPSS Trust Service Asserter.
In order to successfully propagate user identity from one application to another application, these applications must be using correctly configured Trust Service instances. Figure 28-37 shows the different components involved in the identity propagation and assertion.
Figure 28-37 REST Identity Propagation and Assertion
Description of "Figure 28-37 REST Identity Propagation and Assertion"
The following depicts the sequence of events involved in REST identity propagation and assertion:
-
End clients (browsers, smart phone apps) connect to a WebCenter Portal application.
-
The application page queries data from REST APIs and builds its own UI on top and therefore needs to call the REST end point.
-
The WebCenter Portal application calls WebCenter Security API (
WCSecurityUtility.issueTrustServiceSecurityToken) to issue the token used for securely propagating the user identity. The token is generated using the Trust Service Embedded Provider. Generated tokens are compressed to optimize token size and then BASE64-encoded to ensure that the token can be safely transported using an HTTP header. -
The WebCenter Portal application takes the issued token and adds it against the "Authorization" security header. The client then dispatches the token as part of its call to the REST URI.
-
WebLogic Server checks if the identity asserter exists for the given token type.
-
The identity asserter parses and verifies that the token is using OPSS Trust Service APIs.
-
The asserter maps the username to a WLS username, a user Subject is established, and the call ends up on the REST application.
-
The REST application recognizes that the user is already an authenticated user and sends a response. The WebCenter Portal application uses the response and shows the page to the end user.
28.8.2 Setting up the Client Application
This section describes how to configure the client for a REST service identity asserter.
To configure the client for a REST service identity asserter:
-
Using JDeveloper, create the client application.
The client application could be a JSE or a servlet application. The following example shows the skeleton of a sample client application.
// The authenticated username // String user = "weblogic"; // URL of the target application URL url = "http://host:port/destinationApp"; //----------------------------------------- String b64EncodedToken = WCSecurityUtility.issueTrustServiceSecurityToken() HttpURLConnection connection = (HttpURLConnection) url.openConnection(); connection.setRequestMethod("GET"); connection.setDoOutput(true); connection.setReadTimeout(10000); connection.setRequestProperty("Authorization", AUTH_TYPE_NAME + " " + b64tok); connection.connect(); BufferedReader rd = new BufferedReader(new InputStreamReader( connection.getInputStream())); StringBuilder sb = new StringBuilder(); String line = null; while ((line = rd.readLine()) != null) { sb.append(line); } connection.disconnect(); System.out.println(sb.toString()); -
Create and configure the keystore.
Create the keystore for the domain and then configure WebLogic Server for the identity asserter. The keystore is first provisioned for a client certificate and private key. The client certificate is then exported and imported into a trust key store.
-
Create the keystore as shown in Section 32.1.2.1, "Creating the WebCenter Domain Keystore."
-
Configure the keystore as shown in Section 32.1.2.2, "Configuring the Keystore with WLST," or Section 32.1.2.3, "Configuring the Keystore Using Fusion Middleware Control."
-
-
Edit the
jps-config.xmlconfiguration file.-
Navigate to your
domain_home/config/fmwconfigdirectory. -
Open the
jps-config.xmlfile in a text editor. -
Modify the
trust.provider.embeddedpropertySetnode as below:<propertySets> <propertySet name="trust.provider.embedded"> ... existing entries <property value="orakey" name="trust.aliasName"/> <property value="orakey" name="trust.issuerName"/> </propertySet> </propertySets>Where:
trust.aliasNameis the alias looked up by the identity asserter in the configured keystore for a certificate with which the asserter verifies the issued trust token.trust.issuerNameis the alias looked up by the token issuer to look up the private key with which the trust token is issued/signed.
-
-
If the client and REST applications are in different domains, repeat these steps for both domains.
-
Restart all servers.
28.8.3 Configuring the WLS Trust Service Asserter
This section describes how to configure the WebLogic Server Trust Service asserter.
To configure the WebLogic Server Trust Service asserter:
-
Log into the WebLogic Administration Console as an administrator.
-
Navigate to Security Realms -> myrealm.
-
Open the Providers tab, and then the Authentication subtab.
The Create a New Authentication Provider page displays.
-
Enter the Name of the new asserter (for example,
TrustServiceIdAsserter). -
Select
TrustServiceIdentityAsserteras the asserter Type.This asserter calls the Trust Service APIs to decode and validate the token from the incoming request, and pass the username to the WebLogic for establishing the asserted subject.
-
Click OK to save your changes.
