2 Preparing Oracle Database Appliance for Service
This chapter describes how to prepare Oracle Database Appliance for servicing.
It includes the following topics:
-
Preparing Oracle Database Appliance X3-2/X4-2/X5-2 for Service
Preparing Oracle Database Appliance (Original Version) for Service
Preparing Oracle Database Appliance X3-2/X4-2/X5-2 for Service
This section describes preparing Oracle Database Appliance X3-2, Oracle Database Appliance X4-2, and Oracle Database Appliance X5-2 for service. If you have Oracle Database Appliance (original version), go to Preparing Oracle Database Appliance (Original Version) for Service.
Most service procedures are performed on a single appliance component. Service procedures that require a single server node to be powered off can be performed without shutting down the entire appliance. Before powering off any component for service, refer to the Getting Started Guide or Administration and Reference Guide for any special instructions or commands that must be performed on the appliance to prepare it for service.
Note:
The links in the following table take you to instructions outside of the Oracle Database Appliance library to the Sun Server X3-2, Sun Server X4-2, and Oracle Server X5-2 documentation libraries. Use your browser's Back button to return to the Oracle Database Appliance library.| ODA X3-2 | ODA X4-2 | ODA X5-2 |
|---|---|---|
Preparing Oracle Database Appliance (Original Version) for Service
This chapter describes how to prepare Oracle Database Appliance (original version) for servicing. If you have Oracle Database Appliance X3-2, Oracle Database Appliance X4-2, or Oracle Database Appliance X5-2, go to Preparing Oracle Database Appliance X3-2/X4-2/X5-2 for Service.
Component Replacement Policy – CRUs and FRUs
The replaceable components in your Oracle Database Appliance (original version) are designated as either field-replaceable units (FRUs) or customer-replaceable units (CRUs). Some can be replaced with the power on, some require the powering off of a server node, and some require the powering off of the entire system chassis.
A part designated as a FRU must be replaced by Oracle-qualified service technician.
A part designated as a CRU can be replaced by a person who is not an Oracle-qualified service technician.
The following table lists replaceable components, their service designation (CRU or FRU), and the system power policy related to servicing the component.
| Component | Policy |
|---|---|
|
Storage drives and boot drives (CRU)
|
Hot-swappable – Can be removed and replaced when the system is powered on.
|
|
Fan modules (CRU)
|
Hot-swappable – Can be removed and replaced when the system is powered on.
|
|
Power supplies (CRU)
|
Hot-swappable – Can be removed and replaced when the system is powered on.
|
|
Air duct (FRU)
|
Cold service, server node – Can only be removed and replaced when the server node is
powered off. The other server node and the system chassis can remain on.
|
|
DIMMs (CRU)
|
Cold service, server node – Can only be removed and replaced when the server node is
powered off. The other server node and the system chassis can remain on.
|
|
PCIe risers (CRU)
|
Cold service, server node – Can only be removed and replaced when the server node is
powered off. The other server node and the system chassis can remain on.
|
|
PCIe cards (CRU)
|
Cold service, server node – Can only be removed and replaced when the server node is
powered off. The other server node and the system chassis can remain on.
|
|
Boot disk backplane (FRU)
|
Cold service, server node – Can only be removed and replaced when the server node is
powered off. The other server node and the system chassis can remain on.
|
|
Server node battery (CRU)
|
Cold service, server node – Can only be removed and replaced when the server node is
powered off. The other server node and the system chassis can remain on.
|
|
Processors (CPUs) (FRU)
|
Cold service, server node – Can only be removed and replaced when the server node is
powered off. The other server node and the system chassis can remain on.
|
|
Motherboard (FRU)
|
Cold service, server node – Can only be removed and replaced when the server node is
powered off. The other server node and the system chassis can remain on.
|
|
Server node internal cables (FRU)
|
Cold service, server node – Can only be removed and replaced when the server node is
powered off. The other server node and the system chassis can remain on.
|
|
Power distribution board (FRU)
|
Cold service, system chassis – Servicing this component requires that the power be
completely removed from the system chassis (both server nodes powered off).
|
|
Disk midplane module (FRU)
|
Cold service, system chassis – Servicing this component requires that the power be
completely removed from the system chassis (both server nodes powered off).
|
|
Disk midplane module HDD cable (FRU)
|
Cold service, server node – Can only be removed and replaced when the server node is
powered off. The other server node and the system chassis can remain on.
|
|
Front indicator panels (FRU)
|
Cold service, system chassis – Servicing this component requires that the power be
completely removed from the system chassis (both server nodes powered off).
|
Safety Information
This section provides important safety information. Read it before servicing Oracle Database Appliance.
Caution:
Hazardous voltage present. Never run the system with the top cover removed.Caution:
Equipment damage. Install the system top cover properly before starting the system.For your protection, observe the following safety precautions when setting up your equipment:
Follow all cautions, warnings, and instructions marked on the equipment and described in Important Safety Information for Sun Hardware Systems and Oracle Database Appliance Safety and Compliance Guide.
Ensure that the voltage and frequency of your power source match the voltage and frequency inscribed on the equipment's electrical rating label.
Follow the electrostatic discharge safety practices as described in this chapter.
Required Tools
Oracle Database Appliance can be serviced with the following tools:
Antistatic wrist strap
Antistatic mat
No. 2 10-inch Phillips screwdriver (magnetic tip recommended)
Flat blade screwdriver
Stylus or pencil (to press the Clear CMOS button)
Obtaining the Chassis Serial Number
To obtain support for Oracle Database Appliance (original version), you need to report your product serial number. The product serial number is located on an RFID tag on the front of the system and on the Customer Information Sheet that is included with the system.
Shutting Down a Server Node and Powering Off the System
You can shut down either Oracle Database Appliance (original version) server node using the front panel power button, or Oracle ILOM. Each method provides a graceful shutdown and an emergency shutdown option.
Caution:
Data loss. To avoid data loss and file system corruption, always use a graceful shutdown unless it is an emergency.Note:
To use Oracle ILOM to shut down a server node, ensure that you have performed its initial configuration as described in "Connecting and Configuring Oracle ILOM" in the Oracle Database Appliance Getting Started Guide.After you have shut down the server nodes, you can power off the system.
See the following topics in this section to shut down a server node and power off the system chassis:
Shut Down a Server Node
You must shut down the server node before you remove it from the system chassis.
- To shut down a server node using the power button, perform one
of the following:
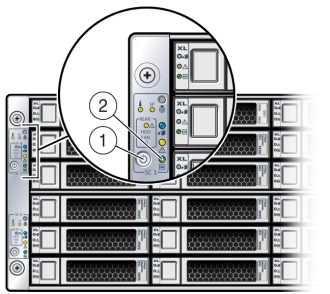
Graceful shutdown: Press and release the recessed Power button on the lower left-hand corner of the server node's front panel (see the following figure [1]). This causes Advanced Configuration and Power Interface (ACPI) to perform an orderly shutdown of the system.
Emergency shutdown: Press and hold the recessed Power button on the lower left-hand corner of the server node's front panel for at least five seconds until the main power is off and the server node enters standby power mode (see the following figure [1]).
Caution:
Data loss. To avoid data loss and file system corruption, always use a graceful shutdown unless it is an emergency.
When the server node is shut down, the Power/OK LED [2] on the server node's front panel flashes, indicating that the server node is in standby power mode.

- To shut down a server node using the Oracle ILOM, perform one of the following:
- Using the Oracle ILOM web interface:
- Open a browser and enter the server node's service processor IP address in the browser's address field.
- At the log in page, type a user name (the account must have Reset and Host Control (r) privileges) and password, and click the Log In button.
- Go to Remote Power Control and do one of the following:
-
Select Graceful Shutdown and Power Off from the Select Action list box and then click Save and OK.
The server node shuts down gracefully.
-
Select Immediate Power Off from the Select Action list box and then click Save and OK.
The server node shuts down immediately.
Caution:
Data loss. To avoid data loss and file system corruption, use graceful shutdown unless it is an emergency.
-
- Using the Oracle ILOM CLI:
- Log in to Oracle ILOM using an ssh client. Type:
$ssh username@sp_ip_address
Where username is a user account name with Reset and Host Control (r) privileges and sp_ip_address is the IP address of the server node service processor.
- When prompted, enter the user account password.
- Enter the command to shut down the server node:
-
For a graceful shutdown, type:
-> stop /SYS
The server node shuts down gracefully.
-
For an emergency shutdown, type:
-> stop -f /SYS
The server node shuts down immediately.
Caution:
Data loss. To avoid data loss and file system corruption, use graceful shutdown unless it is an emergency.
-
- Log in to Oracle ILOM using an ssh client. Type:
- Using the Oracle ILOM web interface:
Power Off the System
The appliance database must be shut down before powering off the system chassis.
- Shut down both server nodes.
Shutting down both server nodes places the system in standby power mode.
- Disconnect the AC power cords from the system.
Disconnecting the power cords from the system removes all power from the system.
Performing Electrostatic Discharge and Antistatic Prevention Measures
Electrostatic discharge (ESD) sensitive devices, such as the motherboards, PCIe cards, storage drives, and memory cards, require special handling.
Caution:
Equipment damage. Follow antistatic precautions and do not touch the components along their connector edges.Attach an antistatic strap to your wrist and then to a metal area on the chassis. Following this practice equalizes the electrical potential between you and the system.
Note:
An antistatic wrist strap is not included in the system Accessory Kit. However, antistatic wrist straps are included with some options and components.Place ESD-sensitive components on an antistatic mat. The following items can be used as an antistatic mat:
Antistatic bag used to wrap a replacement part
ESD mat
Disposable ESD mat (shipped with some replacement parts or optional system components)
When handling components such as storage drive assemblies, circuit boards, or PCIe cards:
Removing Server Nodes From the System Chassis
You must remove the Oracle Database Appliance (original version) server node from the chassis to remove or replace internal server node components.
Remove a Server Node From the System Chassis
The removal procedure is the same for both server nodes. Note that you do not need to remove the entire system chassis from the rack to perform service procedures on a server node.
Note:
Replacing a server node FRU with a new server node is a service activity that must be performed by an Oracle-qualified service technician. The customer may remove the server node to service other CRU components in the server node.- Shut down the server node.
Caution:
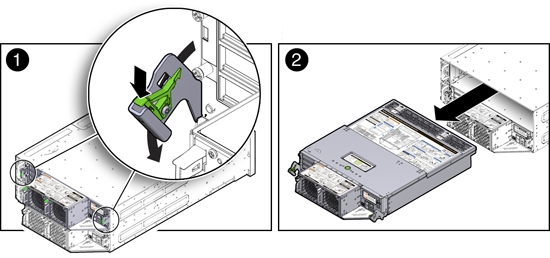
Data loss. To avoid data loss and file system corruption, always use a graceful shutdown unless it is an emergency. - To unseat the server node from the system chassis, pull the two latches on the rear of the
server node down [1].
The latches are marked by green tabs. Pull the latches down and away from the rear to the system.

- Slide the server node to the rear and lift it out of the system [2].
Removing the Server Node Top Cover
To gain access to a most of Oracle Database Appliance (original version) server node's internal components, you must remove the server node's top cover.
Remove the Server Node Top Cover
- Remove the server node from the system chassis.
- Remove the top cover.
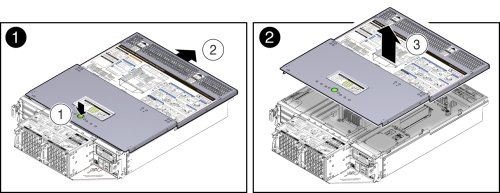
- To unlatch the server node top cover, press and hold the green release button on the top of the server node cover [1].
- Using the indented area near the green release button, slide the cover toward the front of the server node about 0.5 inches (12.7 mm) [1].
- Lift the cover up and remove it [2].

Removing the Middle Section of the System Top Cover
To gain access to the Oracle Database Appliance (original version) power distribution board and the disk midplane board you must remove the middle section of the system's top cover.
Remove the Middle Section of System Top Cover
- Power down the server nodes and remove the power cords from the
power supplies.
For instructions, see Shut Down a Server Node.
Caution:
System fault. Do not remove the middle section of the system cover while the AC power cords are connected. Otherwise the fault LEDs light and a system fault is logged. - Remove the middle section of the system top cover.
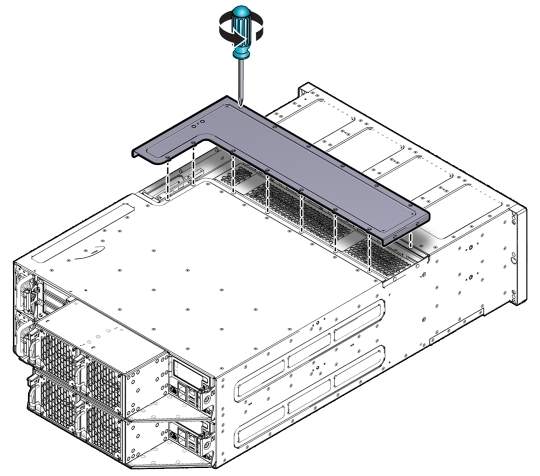
To remove the middle section of the system's top cover, remove the captive Phillips screws that secure it to the system.
Caution:
Hazardous voltage present. Never run the system with the middle section of the system top cover removed.Caution:
Equipment damage. Install the system top cover properly before starting the system.