4 Extending the Functionality of the Connector
Note:
From Oracle Identity Manager Release 11.1.2 onward, lookup queries are not supported. See Managing Lookups in Oracle Fusion Middleware Administering Oracle Identity Manager for information about managing lookups by using the Form Designer in the Oracle Identity Manager System Administration console.
This chapter contains the following sections:
4.1 Adding New Fields for Target Resource Reconciliation
By default, a few fields are mapped for reconciliation between Oracle Identity Manager and the target system. If required, you can map additional fields for reconciliation.
Note:
This section describes an optional procedure. Perform this procedure only if you want to add new single-valued fields for target resource reconciliation. Table C-1 lists the single-valued fields supported by Microsoft Exchange.
To add a new single-valued field for target resource reconciliation:
-
Log in to the Oracle Identity Manager Design Console.
-
Create a new version of the process form as follows:
-
Expand Development Tools.
-
Double-click Form Designer.
-
Search for and open the UD_EXCHANGE process form.
-
Click Create New Version.
On the Create a new version dialog box, enter a new version in the Label field, and then click the save icon.
-
-
Add the new field on the process form as follows:
-
Click Add.
A field is added to the list. Enter the details of the field.
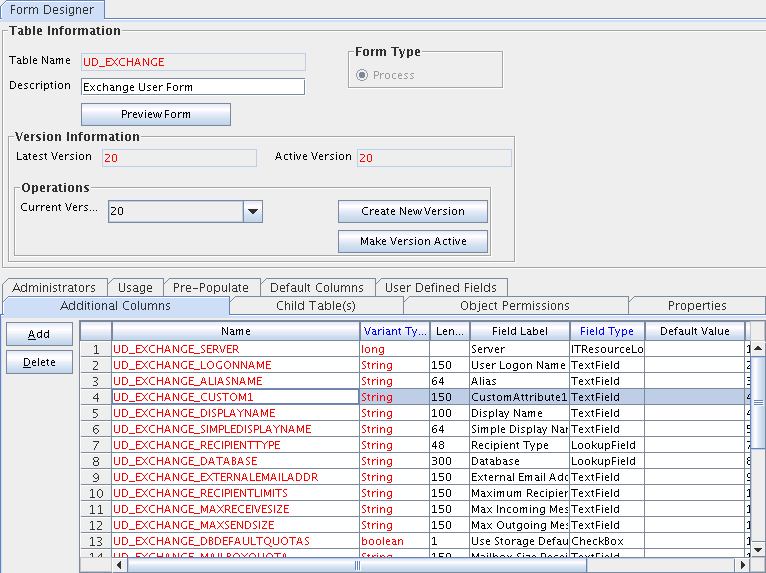
For example, if you are adding the CustomAttribute1 field, enter
UD_EXCHANGE_CUSTOM1in the Name field and then enter the rest of the details of this field. -
Click Save.
-
To activate the newly created form, click Make Version Active.
Figure 4-1 is a sample screenshot of the new version of process form.
Figure 4-1 Adding a New Version of Process Form
Description of "Figure 4-1 Adding a New Version of Process Form"
-
-
Add the new field to the list of reconciliation fields in the resource object as follows:
-
Expand Resource Management.
-
Double-click Resource Objects.
-
Search for and open the Exchange User resource object.
-
On the Object Reconciliation tab, click Add Field.
-
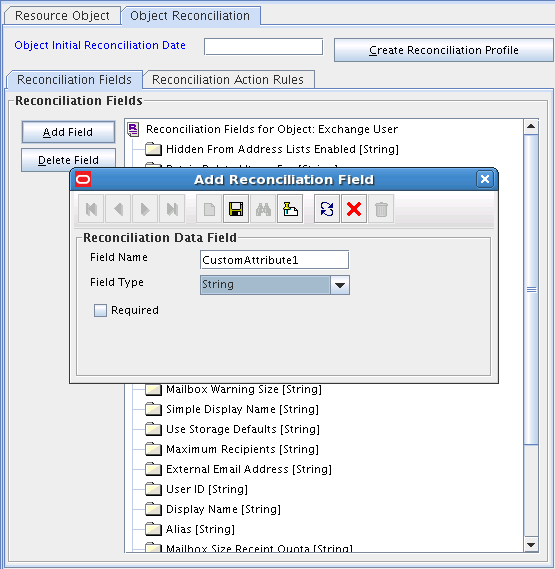
In the Add Reconciliation Field dialog box, enter the details of this field.
For example, enter
CustomAttribute1in the Field Name field and select String from the Field Type list.Later in this procedure, you will enter the field name as the Code Key value of the entry that you create in the Lookup.Exchange.UM.ReconAttrMap lookup definition.
-
Click Create Reconciliation Profile.
This copies changes made to the resource object into the MDS.
-
Click Save.
Figure 4-2 is a sample screenshot of the newly added reconciliation field.
Figure 4-2 Adding a New Reconciliation Field
Description of "Figure 4-2 Adding a New Reconciliation Field"
-
-
Create a reconciliation field mapping for the new field on the process form as follows:
-
Expand Process Management.
-
Double-click Process Definition.
-
From the Process Definition table, select and open the Exchange User resource object.
-
Click Reconciliation Field Mappings and then click Add Field Map.
-
In the Field Name field, select the value for the field that you want to add.
For example, select
CustomAttribute1. -
In the Field Type field, select the type of the field that is prepopulated.
-
Double-click the Process Data Field field.
A list of process data columns is displayed. From the list, select the process data column corresponding to the process data field.
For example, select
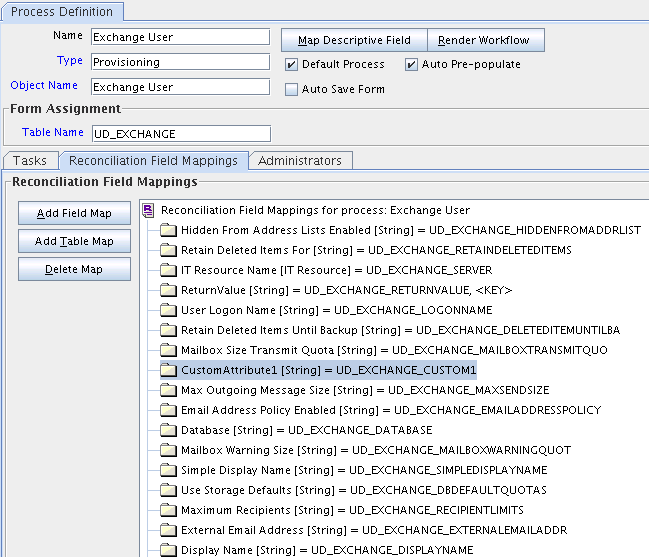
CustomAttribute1 = UD_EXCHANGE_ CUSTOM1.Figure 4-3 is a sample screenshot of the newly added reconciliation field mapping.
Figure 4-3 Adding a Reconciliation Field Mapping
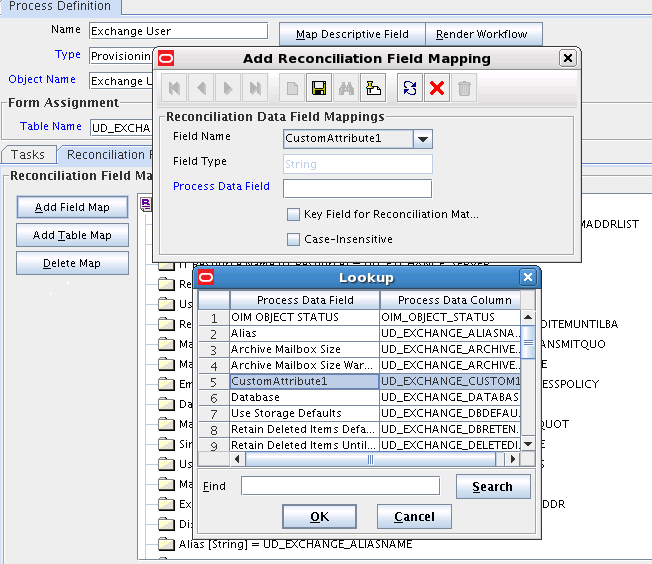
Description of "Figure 4-3 Adding a Reconciliation Field Mapping" -
Click the save icon.
Figure 4-4 is a sample screenshot of the reconciliation field mappings.
-
-
Create an entry for the field in the lookup definition for reconciliation as follows:
-
Expand Administration.
-
Double-click Lookup Definition.
-
Search for and open the Lookup.Exchange.UM.ReconAttrMap lookup definition.
-
Click Add and enter the Code Key and Decode values for the field.
The Code Key value must be the form field name. The Decode value must be the attribute name on the target system.
For example, enter
Custom Attribute 1in the Code Key field and then enterCustomAttribute1in the Decode field. -
Click the save icon.
Figure 4-5 is a sample screenshot of the new entry added to the reconciliation lookup definition.
Figure 4-5 Adding an Entry to Reconciliation Lookup
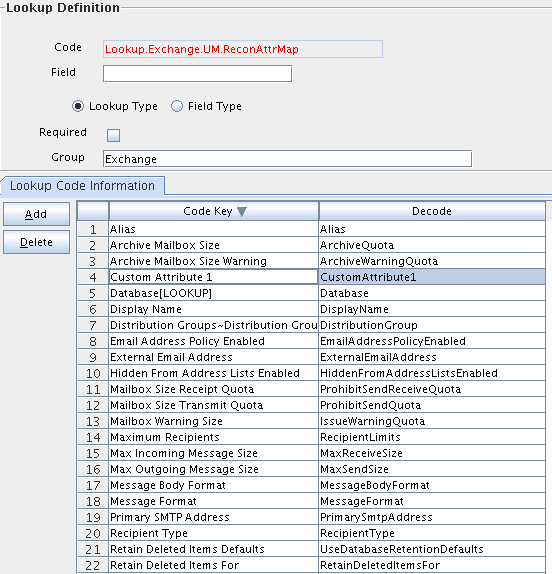
Description of "Figure 4-5 Adding an Entry to Reconciliation Lookup"
-
-
On the Resource Objects form, click Create Reconciliation Profile.
This copies changes made to the resource object into the MDS.
-
If you are using Oracle Identity Manager release 11.1.2.x or later, create a new UI form and attach it to the application instance to make this new attribute visible. See Creating a New UI Form and Updating an Existing Application Instance with a New Form for the procedures.
4.2 Adding New Multivalued Fields for Target Resource Reconciliation
By default, a few fields are mapped for reconciliation between Oracle Identity Manager and the target system. If required, you can map additional fields for reconciliation.
Note:
This section describes an optional procedure. Perform this procedure only if you want to add new multivalued fields for target resource reconciliation. Table C-2 and Table C-3 list the multivalued fields supported by Microsoft Exchange.
See Adding New Fields for Target Resource Reconciliation for sample screenshots of some of the following steps.
If you are using Oracle Identity Manager 11.1.2, see Defining Lookup Definition for Custom Multivalued Attributes in Oracle Identity Manager 11.1.2 for related procedure.
4.2.1 Adding New Multivalued Fields
You can add new multivalued fields by creating new fields on the process form and assigning child tables, adding these new fields to the resource object and creating reconciliation field mapping. Then, create an entry for this new field in the lookup definition for reconciliation.
To add a new multivalued field for target resource reconciliation:
-
Log in to the Oracle Identity Manager Design Console.
-
Create a new version of the process form as follows:
-
Expand Development Tools.
-
Double-click Form Designer.
-
Create a new form, for example,
UD_EX_CH1.
-
-
Add the new field on the process form as follows:
-
Click Add.
A field is added to the list. Enter the details of the field.
For example, if you are adding the AcceptMessagesOnlyFrom field, enter
UD_EX_CH1_ACCEPTin the Name field and then enter the rest of the details of this field. -
Click Save.
-
To activate the newly created form, click Make Version Active.
-
-
Assign UD_EX_CH1 as a child table to the UD_EXCHANGE form as follows:
-
Search for and open the UD_EXCHANGE process form.
-
Click Create New Version.
On the Create a new version dialog box, enter a new version in the Label field, and then click the save icon.
-
Select the new version created from the Current Version dropdown.
-
Click the Child Table(s) tab.
-
Click Assign and select the newly created (active) version of the UD_EX_CH1 form.
-
Click Make Version Active.
-
Click the save icon.
-
-
Add the new field to the list of reconciliation fields in the resource object as follows:
-
Expand Resource Management.
-
Double-click Resource Objects.
-
Search for and open the Exchange User resource object.
-
On the Object Reconciliation tab, click Add Field.
-
In the Add Reconciliation Field dialog box, enter the details of this field.
For example, enter
MultiValuedFormin the Field Name field and select MultiValued Attribute from the Field Type list. -
Right-click MultiValuedForm [Multivalued] and select Define Property Fields.
-
Enter the details of this field.
For example, enter
AcceptMessagesOnlyFromin the Field Name field and select String from the Field Type list.Later in this procedure, you will enter the field name as the Code Key value of the entry that you create in the Lookup.Exchange.UM.ReconAttrMap lookup definition.
-
Click Create Reconciliation Profile.
This copies changes made to the resource object into the MDS.
-
Click Save.
-
-
Create a reconciliation field mapping for the new field on the process form as follows:
-
Expand Process Management.
-
Double-click Process Definition.
-
From the Process Definition table, select and open the Exchange User resource object.
-
Click Reconciliation Field Mappings.
-
Right-click MultiValuedForm [MultiValued] and select Edit Table Map.
-
Select Field Name and Table Name.
For example, select
MultiValuedFormas Field Name andUD_EX_CH1as Table Name. -
Right-click MultiValuedForm [MultiValued] and select Define Property Field Map.
-
Select Field Name and Process Data Field.
For example, select
AcceptMessagesOnlyFromas Field Name andUD_EX_CH1_ACCEPTas Process Data Field. -
Select the Key Field for Reconciliation check box.
-
Click the save icon.
-
-
Create an entry for the field in the lookup definition for reconciliation as follows:
-
Expand Administration.
-
Double-click Lookup Definition.
-
Search for and open the Lookup.Exchange.UM.ReconAttrMap lookup definition.
-
Click Add and enter the Code Key and Decode values for the field.
The Code Key value must be the reconciliation field name as entered in the resource object. The Decode value must be the attribute name on the target system.
For example, enter
MultiValuedForm~AcceptMessagesOnlyFromin the Code Key field. This value indicates that AcceptMessagesOnlyFrom is a field added to the child form represented by MultiValuedForm = UD_EX_CH1.Then, enter
AcceptMessagesOnlyFromin the Decode field. -
Click the save icon.
-
-
On the Resource Objects form, click Create Reconciliation Profile.
This copies changes made to the resource object into the MDS.
-
If you are using Oracle Identity Manager release 11.1.2.x or later, create a new UI form and attach it to the application instance to make this new attribute visible. See Creating a New UI Form and Updating an Existing Application Instance with a New Form for the procedures.
4.2.2 Adding Secondary Email Addresses as Multivalued Fields
This is a sample procedure for adding secondary email addresses as multivalued fields for target resource reconciliation.
-
Log in to Oracle Identity Manager Design Console.
-
Create a new version of the process form as follows:
-
Expand Development Tools.
-
Double-click Form Designer.
-
Create a new form by entering the following values:
Table Name:
UD_EX_PROXYDescription:
Exchange Proxy Address -
Click Save.
-
-
Add the new field on the process form as follows:
-
On the Additional Colums tab, Add.
-
In the newly added row, enter the details of the field.
For example, if you are adding the ProxyAddressForm field, enter
UD_EX_PROXY_ADDRESSin the Name field and then enter the following details of this field:Variant Type:
StringLength:
129Field Label:
Proxy AddressField Type:
textFieldOrder:
1 -
Click Save.
-
To activate the newly created form, click Make Version Active.
-
-
Assign the UD_EX_PROXY form as a child table to the UD_EXCHANGE form as follows:
-
Expand Development Tools.
-
Double-click Form Designer.
-
Search for and open the UD_EXCHANGE process form.
-
Click Create New Version.
In the Create a new version dialog box, enter a new version in the Label field, and then click the Save icon.
-
Select the new version created from the Current Version drop-down list.
-
On the Child Table(s) tab, click Assign and select the newly created (active) version of the UD_EX_PROXY form.
-
Click Make Version Active.
-
Click the Save icon.
-
-
Add the new field to the list of reconciliation fields in the resource object as follows:
-
Expand Resource Management.
-
Double-click Resource Objects.
-
Search for and open the Exchange User resource object.
-
On the Object Reconciliation tab, click Add Field.
-
In the Add Reconciliation Field dialog box, enter the details of this field.
Enter
MultiValuedFormin the Field Name field and select MultiValued Attribute from the Field Type list. -
Right-click MultiValuedForm [Multivalued] and select Define Property Fields.
-
Enter the details of this field.
Enter
ProxyAddressFormin the Field Name field and select String from the Field Type list.Later in this procedure, you will enter the field name as the Code Key value of the entry that you create in the Lookup.Exchange.UM.ReconAttrMap lookup definition.
-
Click Create Reconciliation Profile.
This copies changes made to the resource object into the MDS.
-
Click Save.
-
-
Create a reconciliation field mapping for the new field on the process form as follows:
-
Expand Process Management.
-
Double-click Process Definition.
-
From the Process Definition table, select and open the Exchange User resource object.
-
Click Reconciliation Field Mappings.
-
Right-click MultiValuedForm [MultiValued] and select Edit Table Map.
-
Select Field Name and Table Name.
Select
MultiValuedFormas Field Name andUD_EX_PROXYas Table Name. -
Right-click MultiValuedForm [MultiValued] and select Define Property Field Map.
-
Select Field Name and Process Data Field.
Select
ProxyAddressFormas Field Name andUD_EX_PROXY_ADDRESSas Process Data Field. -
Click the save icon.
-
-
Create an entry for the field in the lookup definition for reconciliation as follows:
-
Expand Administration.
-
Double-click Lookup Definition.
-
Search for and open the Lookup.Exchange.UM.ReconAttrMap lookup definition.
-
Click Add and enter the Code Key and Decode values for the field.
The Code Key value must be the reconciliation field name as entered in the resource object. The Decode value must be the attribute name on the target system.
Enter
MultiValuedForm~ProxyAddressFormin the Code Key field. This value indicates that ProxyAddressForm is a field added to the child form represented by MultiValuedForm = UD_EX_PROXY.Then, enter
EmailAddressesin the Decode field. -
Click the save icon.
-
-
On the Resource Objects form, click Create Reconciliation Profile.
This copies changes made to the resource object into the MDS.
-
If you are using Oracle Identity Manager release 11.1.2.x or later, create a new UI form and attach it to the application instance to make this new attribute visible. See Creating a New UI Form and Updating an Existing Application Instance with a New Form for the procedures.
4.2.3 Defining Lookup Definition for Custom Multivalued Attributes in Oracle Identity Manager 11.1.2
For every new custom multivalued attribute added in the connector on Oracle Identity Manager release 11.1.2.x or later, you must define a lookup definition to enable the attribute to be used as entitlements.
Note:
If custom multivalued attributes need to be handled as entitlements, then perform the following procedure. Otherwise, you can use child forms to directly to specify values for these attributes.
As there are no scheduled tasks to populate values into these lookup definitions, they need to be added manually. To do so:
4.3 Adding New Fields for Provisioning
By default, a few fields are mapped for provisioning between Oracle Identity Manager and the target system. If required, you can map additional fields for provisioning.
Note:
This section describes an optional procedure. Perform this procedure only if you want to add new single-valued fields for provisioning. Table C-1 lists the single-valued fields supported by Microsoft Exchange.
See Adding New Fields for Target Resource Reconciliation for sample screenshots of some of the following steps.
To add a new single-valued field for provisioning:
-
Log into Oracle Identity Manager Design Console.
-
Create a new version of the process form:
-
Expand Development Tools.
-
Double-click Form Designer.
-
Search for and open the UD_EXCHANGE process form.
-
Click Create New Version.
On the Create a new version dialog box, enter a new version in the Label field, and then click the save icon.
-
-
Add the new field on the process form.
If you have added the field on the process form by performing Step 3 of "Adding New Fields for Target Resource Reconciliation", then you need not add the field again. If you have not added the field, then:
-
Click Add.
A field is added to the list. Enter the details of the field.
For example, if you are adding the CustomAttribute1 field, enter
UD_EXCHANGE_CUSTOM1in the Name field and then enter the rest of the details of this field. -
Click Save and then click Make Version Active.
-
-
Create an entry for the field in the lookup definition for provisioning as follows:
-
Expand Administration.
-
Double-click Lookup Definition.
-
Search for and open the Lookup.Exchange.UM.ProvAttrMap lookup definition.
-
Click Add and enter the Code Key and Decode values for the field.
The Code Key value must be the form field name. The Decode value must be the attribute name on the target system.
For example, enter
Custom Attribute 1in the Code Key field and then enterCustomAttribute1in the Decode field. -
Click the save icon.
-
-
Create a process task to update the new field Custom Attribute 1 as follows:
-
Expand Process Management.
-
Double-click Process Definition and open the Exchange User process definition.
-
In the process definition, add a new task for updating the field as follows:
-
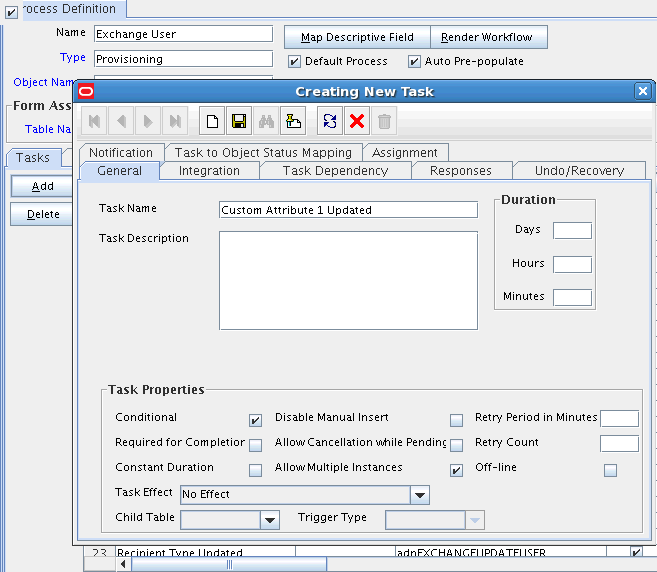
Click Add and enter the task name, for example,
Custom Attribute 1 Updated, and the task description. -
In the Task Properties section, select the following fields:
Conditional
Allow Multiple Instances
-
Click on the Save icon.
Figure 4-6 is a sample screenshot of the new process task.
-
-
On the Integration tab, click Add, and then click Adapter.
-
Select the adpExchangeUpdateUser adapter, click Save, and then click OK in the message that is displayed.
Figure 4-7 is a sample screenshot of the selecting the adapter for the new process task.
Figure 4-7 Selecting an Adapter for New Process Task
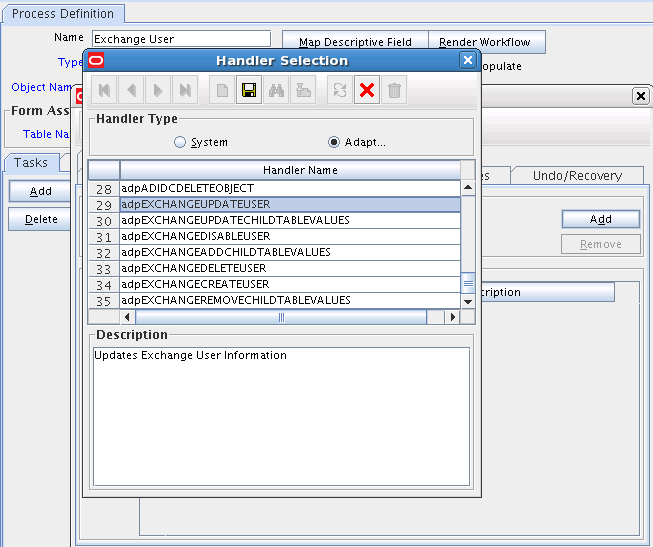
Description of "Figure 4-7 Selecting an Adapter for New Process Task" -
To map the adapter variables listed in this table, select the adapter, click Map, and then specify values similar to values in the following table:
Variable Name Data Type Map To Qualifier Literal Value Adapter return value
Object
Response code
NA
NA
attrFieldName
String
Literal
String
Custom Attribute 1
itResourceFieldName
String
Literal
String
UD_EXCHANGE_SERVER
objectType
String
Literal
String
User
processInstanceKey
Long
Process Data
Process Instance
NA
Figure 4-8 is a sample screenshot of the adapter variables for the new process task.
Figure 4-8 Mapping Adapter Variables for New Process Task
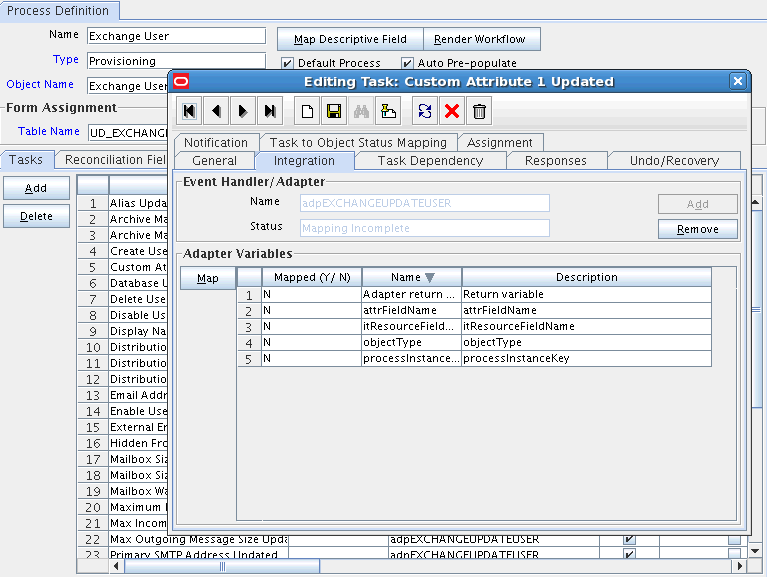
Description of "Figure 4-8 Mapping Adapter Variables for New Process Task" -
On the Responses tab, click Add to add the following response codes:
Code Name Description Status ERROR
Error Occurred
R
UNKNOWN
An unknown response was received
R
SUCCESS
Operation Completed
C
-
Click the Save icon and then close the dialog box.
-
-
If you are using Oracle Identity Manager release 11.1.2.x or later, create a new UI form and attach it to the application instance to make this new attribute visible. See Creating a New UI Form and Updating an Existing Application Instance with a New Form for the procedures.
4.4 Adding New Multivalued Fields for Provisioning
By default, a few fields are mapped for provisioning between Oracle Identity Manager and the target system. If required, you can map additional fields for provisioning.
Note:
This section describes an optional procedure. Perform this procedure only if you want to add new multivalued fields for provisioning. Table C-2 and Table C-3 list the multivalued fields supported by Microsoft Exchange.
See Adding New Fields for Target Resource Reconciliation and Adding New Fields for Provisioning for sample screenshots of some of the following steps.
If you are using Oracle Identity Manager 11.1.2, see Defining Lookup Definition for Custom Multivalued Attributes in Oracle Identity Manager 11.1.2 for related procedure.
To add a new multivalued field for provisioning:
-
Log in to the Oracle Identity Manager Design Console.
-
Create a new version of the process form as follows:
-
Expand Development Tools.
-
Double-click Form Designer.
-
Create a new form, for example,
UD_EX_CH1.
-
-
Add the new field on the process form as follows:
-
Click Add.
A field is added to the list. Enter the details of the field.
For example, if you are adding the AcceptMessagesOnlyFrom field, enter
UD_EX_CH1_ACCEPTin the Name field and then enter the rest of the details of this field. -
Click Save.
-
To activate the newly created form, click Make Version Active.
-
-
Assign UD_EX_CH1 as a child table to the UD_EXCHANGE form as follows:
-
Search for and open the UD_EXCHANGE process form.
-
Click Create New Version.
On the Create a new version dialog box, enter a new version in the Label field, and then click the save icon.
-
Select the new version created from the Current Version dropdown.
-
Click the Child Table(s) tab.
-
Click Assign and select the newly created (active) version of the UD_EX_CH1 form.
-
Click Make Version Active.
-
Click the save icon.
-
-
Create an entry for the field in the lookup definition for reconciliation as follows:
-
Expand Administration.
-
Double-click Lookup Definition.
-
Search for and open the Lookup.Exchange.UM.ProvAttrMap lookup definition.
-
Click Add and enter the Code Key and Decode values for the field.
The Code Key value must be the form field name. The Decode value must be the attribute name on the target system.
For example, enter
UD_EX_CH1~AcceptMessagesOnlyFromin the Code Key field. This value indicates that AcceptMessagesOnlyFrom is a field added to the child form represented by UD_EX_CH1.Then, enter
AcceptMessagesOnlyFromin the Decode field. -
Click the save icon.
-
-
Create process tasks to perform insert, update, and delete operations for the newly created child form, UD_EX_CH1. You can create process tasks similar to the following existing tasks:
-
Distribution Group Insert
-
Distribution Group Update
-
Distribution Group Delete
For example, to create a process task for insert operations:
-
Expand Process Management.
-
Double-click Process Definition and open the Exchange User process definition.
-
In the process definition, add a new task for updating the field as follows:
Click Add and enter the task name, for example,
AcceptMessagesOnlyFrom Insert, and the task description. -
In the Task Properties section, select the following:
-
Conditional
-
Allow cancellation while Pending
-
Allow Multiple Instances
-
UD_EX_CH1, to add the child table from the Child Table list
-
Insert, to add the data from the Trigger Type list
-
-
On the Integration tab, click Add, and then click Adapter.
-
Select the adpEXCHANGEADDCHILDTABLEVALUES adapter, click Save, and then click OK in the message that is displayed.
-
To map the adapter variables listed in this table, select the adapter, click Map, and then specify values similar to values in the following table:
Variable Name Data Type Map To Qualifier Literal Value Adapter return value
Object
Response code
NA
NA
childPrimaryKey
Long
Process Data
Child Primary Key
Exchange User Distribution Group Form
childTableName
String
Literal
String
UD_EX_CH1
objectType
String
Literal
String
User
itResourceFieldName
String
Literal
String
UD_EXCHANGE_SERVER
processInstanceKey
Long
Process Data
Process Instance
NA
-
On the Responses tab, click Add to add the following response codes:
Code Name Description Status CONFIGURATION_ERROR
Connector configuration is wrong
R
CONNECTION_FAILED
Cannot connect to the resource
R
CONNECTOR_EXCEPTION
Child table insertion failed
R
ERROR
Error occurred
R
OBJECT_ALREADY_EXISTS
Object with the same ID already exists
R
UNKNOWN
An unknown response was received
R
UNKNOWN_UID
Object does not exist
R
VALIDATION_FAILED
Custom data validation failed
R
SUCCESS
Operation completed
C
-
Click the Save icon and then close the dialog box.
-
-
If you are using Oracle Identity Manager release 11.1.2.x or later, create a new UI form and attach it to the application instance to make this new attribute visible. See Creating a New UI Form and Updating an Existing Application Instance with a New Form for the procedures.
The following is a sample procedure for adding secondary email addresses as multivalued fields for provisioning:
-
Log in to Oracle Identity Manager Design Console.
-
Create a new version of the process form as follows:
-
Expand Development Tools.
-
Double-click Form Designer.
-
Create a new form by entering the following values:
Table Name:
UD_EX_PROXYDescription:
Exchange proxy addresses -
Click Save.
-
-
Add the new field on the process form as follows:
-
On the Additional Colums tab, Add.
-
In the newly added row, enter the details of the field.
For example, if you are adding the ProxyAddressForm field, enter
UD_EX_PROXYin the Name field and then enter the following details of this field:Variant Type:
StringLength:
129Field Label:
Proxy AddressField Type:
textFieldOrder:
1 -
Click Save.
-
To activate the newly created form, click Make Version Active.
-
-
Assign the UD_EX_PROXY form as a child table to the UD_EXCHANGE form as follows:
-
Expand Development Tools.
-
Double-click Form Designer.
-
Search for and open the UD_EXCHANGE process form.
-
Click Create New Version.
In the Create a new version dialog box, enter a new version in the Label field, and then click the Save icon.
-
Select the new version created from the Current Version drop-down list.
-
On the Child Table(s) tab, click Assign and select the newly created (active) version of the UD_EX_PROXY form.
-
Click Make Version Active.
-
Click the Save icon.
-
-
Create an entry for the field in the lookup definition for provisioning as follows:
-
Expand Administration.
-
Double-click Lookup Definition.
-
Search for and open the Lookup.Exchange.UM.ProvAttrMap lookup definition.
-
Click Add and enter the Code Key and Decode values for the field.
The Code Key format is UD_EX_PROXY~Proxy Address. The Decode value is taken from Table C-3 of Exchange Connector Guide.
Code Key:
UD_EX_PROXY~Proxy AddressDecode:
EmailAddresses -
Click the Save icon.
-
-
Create process tasks to perform insert, update, and delete provisioning operations for the newly created child form, UD_EX_PROXY as follows:
Note:
The steps in this section must be performed 3 times for the following insert, update, and delete provisioning operations:
-
Add task: Proxy Address Insert
-
Add task: Proxy Address Update
-
Add task: Proxy Address Delete
-
Expand Process Management.
-
Double-click Process Definition.
-
Search for and open the Exchange User process definition.
-
On the tasks tab, click Add to add the Proxy Address Insert task for an insert provisioning operation.
A Creating New Task dialog box opens.
-
Click the General tab, and enter the following values:
Task Name:
Proxy Address InsertDescription:
Add a new Exchange proxy address value -
In the Task Properties section, perform the following steps:
-
Select the following options:
Conditional
Allow cancellation while Pending
Allow Multiple Instances
-
From the Child Table list, select UD_EX_PROXY.
-
From the Trigger Type list, select Insert.
-
-
Click Save.
-
On the Integration tab, click Add.
-
From the Handler Selection dialog box that is displayed, click Adapter.
A list of adapters which can be assigned to the process task is displayed in the Handler Name region.
-
Select the adpEXCHANGEADDCHILDTABLEVALUES adapter to configure the Proxy Address Insert provisioning operation.
-
Click Save.
-
In the message that is displayed, click OK and close the dialog box.
-
To map the adapter variables listed in this table, select the adapter, click Map, and then specify values similar to values in the following table:
Variable Name Data Type Map To Qualifier Literal Value Adapter return value
Object
Response Code
NA
NA
childPrimaryKey
Long
Process Data
Child primary Key
Exchange Proxy Address
childTableName
String
Literal
String
UD_EX_PROXY
objectType
String
Literal
String
User
itResourceFieldName
String
Literal
String
UD_EXCHANGE_SERVER
processInstanceKey
Long
Process Data
Process Instance
NA
-
On the Responses tab, click Add to add the following response codes:
Note:
The values specified in the following table are the same for Insert, Update, and Delete process tasks.
Code Name Description Status CONFIGURATION_ERROR
Connector configuration is wrong
R
CONNECTION_FAILED
Cannot connect to the resource
R
CONNECTOR_EXCEPTION
Child table insertion failed
R
ERROR
Error occurred
R
OBJECT_ALREADY_EXISTS
Object with the same ID already exists
R
UNKNOWN
An unknown response was received
R
UNKNOWN_UID
Object does not exist
R
VALIDATION_FAILED
Custom data validation failed
R
SUCESS
Operation complete
C
-
Click Save and close the Creating New Task dialog box.
-
In the process definition, to add the Proxy Address Update task for an update provisioning operation, perform Steps 6.d through 6.k with the following differences:
-
While performing Step 6.d, in the Creating New Task dialog box, enter the following values:
Task Name:
Proxy Address UpdateDescription:
Update an existing Exchange proxy address value -
While performing Step 6.e, in the Task Properties section, from the Trigger Type list, select Update instead of Insert.
-
While performing Step 6.h, in the Handler Name region, select the adpEXCHANGEUPDATECHILDTABLEVALUES adapter instead of the adpEXCHANGEADDCHILDTABLEVALUES adapter.
-
-
In the process definition, to add the Proxy Address Delete task for a delete provisioning operation, perform Steps 6.d through 6.k with the following differences:
-
While performing Step 6.d, in the Creating New Task dialog box, enter the following values:
Task Name:
Proxy Address DeleteDescription:
Delete an Exchange proxy address value -
While performing Step 6.e, in the Task Properties section, from the Trigger Type list, select Delete instead of Insert.
-
While performing Step 6.h, in the Handler Name region, select the adpEXCHANGEREMOVECHILDTABLEVALUES adapter instead of the adpEXCHANGEADDCHILDTABLEVALUES adapter.
-
-
-
Create a new UI form for the Exchange User resource and attach it to the application instance to make the new Proxy Address field visible in the request form as follows:
-
Create a sandbox and activate it as described in Creating and Activating a Sandbox.
-
Create a new UI form for the Exchange User resource as described in Creating a New UI Form.
While creating a new UI form, select Exchange User for the Resource Type field, and enter
ExchangeUser2in the Form Name field. -
Open the existing application instance.
-
In the Form field, select the new UI form that you created.
-
Save the application instance.
-
Publish the sandbox as described in Publishing a Sandbox.
-
4.5 Configuring Validation of Data During Reconciliation and Provisioning
You can configure validation of reconciled and provisioned single-valued data according to your requirements. For example, you can validate data fetched from the First Name attribute to ensure that it does not contain the number sign (#). In addition, you can validate data entered in the First Name field on the process form so that the number sign (#) is not sent to the target system during provisioning operations.
To configure validation of data:
4.6 Configuring Transformation of Data During User Reconciliation
You can configure transformation of reconciled single-valued user data according to your requirements. For example, you can use First Name and Last Name values to create a value for the Full Name field in Oracle Identity Manager.
To configure transformation of single-valued user data fetched during reconciliation:
