8 Configuring the Connector for a JDBC-Based Database

The Database User Management connector is built on a framework designed for JDBC-based connectors. If your target system is a JDBC-based database other than the certified databases listed in connector.htm#GUID-C2D995F1-879C-4568-A002-394B33262D5B__BABEJCJF, then you can create a connector for your target system by following the instructions given in this chapter.

Note:

In this chapter, MyDatabase has been used as the sample JDBC-based database to explain the procedures.

For Oracle Identity Manager hosted on a Microsoft Windows computer, if you have a previously installed connector, then you must extract the connector bundle zip file again before installing a new connector.

The following sections describe the procedure to create each object of the connector:

8.1 Target System Attributes and Queries

This section describes the attributes and the queries of MyDatabase, the sample database used in the procedures in this chapter.

The following table lists the attributes of the database user:

Attribute Type of Attribute

User Name

String

User Password

String

Database ID

String

List of values available in the DBNames table.

Status

String

Sample values: ACTIVE, DISABLED

lastModifiedToken

Long

The database users are stored in the MYDBUsers table, which has read-only access. Stored procedures are used to add or modify the users in this table.

The following stored procedures are used in the provisioning queries:

  • Call CREATE_USER(usrid, passwd, dbid)

  • Call RESET_PASSWD(usrid, passwd)

  • Call ENABLE_USER(usrid)

  • Call DISABLE_USER(usrid)

  • Call DELETE_USER(usrid)

  • Call UPDATE_DBID(usrid, dbid)

The following SQL query used to fetch lookup values:

Select id from DBNames

The following SQL queries are used for reconciliations:

  • Full reconciliation query

    Select USRNAME, DBID, Status, lastModifiedToken from MYDBUsers

  • Incremental reconciliation query

    Select USRNAME, DBID, Status, lastModifiedToken from MYDBUsers where lastModifiedToken > @lastRunToken

  • Limited reconciliation query

    This query is similar to a full or incremental reconciliation query, with the filter converted to the WHERE condition. For example, the query for all users with DBID='master' is as follows:

    Select USRNAME, DBID, Status, lastModifiedToken from MYDBUsers where lastModifiedToken > @lastRunToken AND DBID='master'

8.2 Configuring the Queries

This section describes the MyDatabase queries to be created and configured in the connector bundle.

See Also:

The following sections for information about the syntax and samples of the queries used for the certified databases listed in connector.htm#GUID-C2D995F1-879C-4568-A002-394B33262D5B__BABEJCJF:

  1. Create a new file called Provisioning.queries and add the following queries in the file:
    CREATE_USER {
            Query="call CREATE_USER({__NAME__}, {__PASSWORD__}, {dbid})"
            QueryType="STOREDPROC"
            Parameters=["__NAME__":"Type:String","__PASSWORD__":"Type:GuardedString","dbid":"Type:String"]
            QueryExtensions=[]
    }
     
    DELETE_USER {
        Query="call CREATE_USER({__UID__})"
        QueryType="STOREDPROC"
        Parameters=["__UID__":"Type:String"]
        QueryExtensions=[]
    }
     
    ENABLE_USER {
        Query="call ENABLE_USER({__UID__})"
        QueryType="STOREDPROC"
        Parameters=["__UID__":"Type:String"]
        QueryExtensions=[]
    }
     
    DISABLE_USER {
        Query="call DISABLE_USER({__UID__})"
        QueryType="STOREDPROC"
        Parameters=["__UID__":"Type:String"]
        QueryExtensions=[]
    }
     
    SET_PASSWORD {
        Query="call RESET_PASSWD({__UID__}, {__PASSWORD__})"
        QueryType="STOREDPROC"
        Parameters=["__UID__":"Type:String", "__PASSWORD__":"Type:String"]
        QueryExtensions=[]
    }
    UPDATE_DBID {
       Query="call UPDATE_DBID({__UID__}, {dbid})"
       QueryType="STOREDPROC"
       Parameters=["__UID__":"Type:String","dbid":"Type:String"]
       QueryExtensions=[]
    }
    
  2. Create a new file called LoVSearch.queries and add the following query in the file:
    __DBNAME__=" Select id from DBNames"
    
  3. Create a new file called Search.queries and add the following queries in the file:
    SEARCH_USER {
        Query="SELECT {__UID__}, {dbid}, {status}, {lastModified} FROM MYDBUsers {filter}"
        QueryType="SQL"
        Parameters=["__UID__":"Type:String,Direction:OUT,ColName:USRNAME",
                "dbid":"Type:String,Direction:OUT,ColName:DBID",
                "status":"Type:String,Direction:OUT,ColName:Status",
                "lastModified":"Type:long,Direction:OUT,ColName:lastModifiedToken"]
        QueryExtensions=[]
    }
    

8.3 Updating the Query Files to the Connector Bundle

This section describes the procedure to update the connector bundle with the MyDatabase query files created in the proceeding section.

To update the query files:

  1. If the connector is already installed, run the Oracle Identity Manager Download JARs utility to download the connector bundle JAR file from the Oracle Identity Manager database. This utility is copied into the following location when you install Oracle Identity Manager:

    Note:

    Before you use this utility, verify that the WL_HOME environment variable is set to the directory in which Oracle WebLogic Server is installed.

    For Microsoft Windows:

    OIM_HOME/server/bin/DownloadJars.bat

    For UNIX:

    OIM_HOME/server/bin/DownloadJars.sh

    When you run the utility, you are prompted to enter the login credentials of the Oracle Identity Manager administrator, URL of the Oracle Identity Manager host computer, context factory value, type of JAR file being downloaded, and the location from which the JAR file is to be downloaded. Select ICFBundle as the JAR type.

  2. Run the following command to extract the connector bundle JAR file:
    jar -xvf org.identityconnectors.dbum-1.0.1116.jar
    

    Note:

    You can also run the WinZip or WinRAR utility to extract the contents from the JAR file.

  3. Copy the MyDatabase query files to a new directory in the scripts directory of the bundle.

    For example: scripts/mydb

  4. Create a new bundle JAR file that contains the MyDatabase query files as follows:
    jar uvf org.identityconnectors.dbum-1.0.1116.jar scripts/mydb/*
    
  5. If there are any third-party JAR files, copy the JAR files to a new directory, called lib, in the bundle. Then, run the following command to update the bundle with the JAR files:
    jar uvf org.identityconnectors.dbum-1.0.1116.jar lib/*
    
  6. If the connector is already installed, run the Oracle Identity Manager Update JARs utility to update the JAR file created in Step 6 to the Oracle Identity Manager database. This utility is copied into the following location when you install Oracle Identity Manager:

    Note:

    Before you use this utility, verify that the WL_HOME environment variable is set to the directory in which Oracle WebLogic Server is installed.

    If you have installed both the Oracle and MSSQL connectors on the same Oracle Identity Manager, then ensure that all third-party JAR files are part of the /lib directory.

    For Microsoft Windows:

    OIM_HOME/server/bin/UpdateJars.bat

    For UNIX:

    OIM_HOME/server/bin/UpdateJars.sh

    When you run the utility, you are prompted to enter the login credentials of the Oracle Identity Manager administrator, URL of the Oracle Identity Manager host computer, context factory value, type of JAR file being updated, and the location from which the JAR file is to be updated. Select ICFBundle as the JAR type.

  7. If the connector is not installed, then perform the procedure specified in the following sections to deploy the connector:

    When you deploy the connector, the updated connector bundle will be uploaded to the Oracle Identity Manager database as part of the installation.

  8. Create a clone of the connector.

    This connector clone will be customized for MyDatabase in the following sections.

    See Also:

    Cloning Connectors in Oracle Fusion Middleware Administering Oracle Identity Manager for detailed information about cloning the connector

  9. In the case of a remote connector server, copy the new bundle JAR file in the bundles directory of the remote connector server, instead of posting the JAR file to the Oracle Identity Manager database.

8.4 Configuring the IT Resource

You must specify values for the parameters of the IT resource for MyDatabase as follows:

  1. If you are using Oracle Identity Manager release 11.1.1.x:

    1. Log in to the Administrative and User Console.

    2. On the Welcome to Oracle Identity Manager Self Service page, click Advanced in the upper-right corner of the page.

    3. On the Welcome to Oracle Identity Manager Advanced Administration page, in the Configuration region, click Manage IT Resource.

  2. If you are using Oracle Identity Manager release 11.1.2.x or later:

    1. Log in to Oracle Identity System Administration.

    2. Create and activate a sandbox. For detailed instructions on creating and activating a sandbox, see Managing Sandboxes in Oracle Fusion Middleware Developing and Customizing Applications for Oracle Identity Manager.

    3. In the left pane, under Configuration, click IT Resource.

  3. In the IT Resource Name field on the Manage IT Resource page, enter the name of the IT resource, and then click Search.

    For example: Oracle DB

  4. Click the edit icon for the IT resource.

  5. From the list at the top of the page, select Details and Parameters.

  6. Specify values for the following parameters of the IT resource. All other parameters of the IT resource will remain unchanged.

    configuring-connector-jdbc-based-database.htm#GUID-726C3286-E108-446F-BE32-1E3FC466F105__BABHGGCJ describes the parameters to be updated for MyDatabase.

    Table 8-1 IT Resource Parameters for New Database

    Parameter Description

    DB Type

    This field identifies database type (such as Oracle and MSSQL) and its used for loading respective scripts.

    Sample value: mydb

    JDBC Driver

    Specify the value of the JDBC driver class name for MyDatabase.

    JDBC URL

    Specify the JDBC URL for MyDatabase.

    Login Password

    Enter the password for the user name of the MyDatabase account to be used for connector operations.

    Login User

    Enter the user name of the MyDatabase account to be used for connector operations.

  7. To save the values, click Update.

8.5 Configuring the Process Form

You must update the process form with the attributes of a MyDatabase user. Do not change the IT Resource and Reference ID fields on the process form.

To configure the process form:

  1. Log into Oracle Identity Manager Design Console.

  2. Create a new lookup definition to hold the Database ID attribute mappings as follows:

    1. Expand Administration.

    2. Double-click Lookup Definition.

    3. Create a new lookup definition, Lookup.DBUM.MYDB.DBNames.

      This lookup definition will be empty and will be populated with entries after you run the scheduled jobs for lookup field synchronization.

    4. Click the save icon.

  3. Create a new version of the process form:

    1. Expand Development Tools.

    2. Double-click Form Designer.

    3. Search for and open the UD_DB_ORA_U process form.

    4. Click Create New Version.

      On the Create a new version dialog box, enter a new version in the Label field, and then click the save icon.

  4. Add the new fields for the MyDatabase user attributes on the process form.

    1. Click Add.

      A field is added to the list. Enter the details of the field.

    2. Add details for all other attributes as new fields.

    3. Click the save icon, and then click Make Version Active.

    A sample screenshot of the process form is as follows:
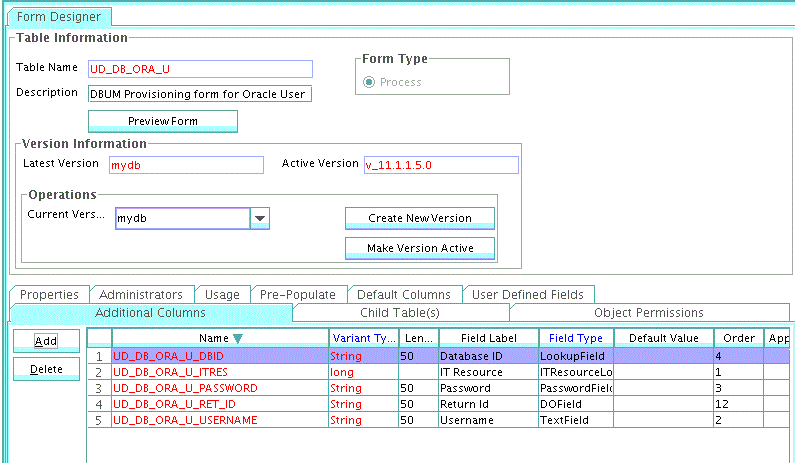
    sample screenshot of the process form

    A sample screenshot for the Database ID attribute is as follows:
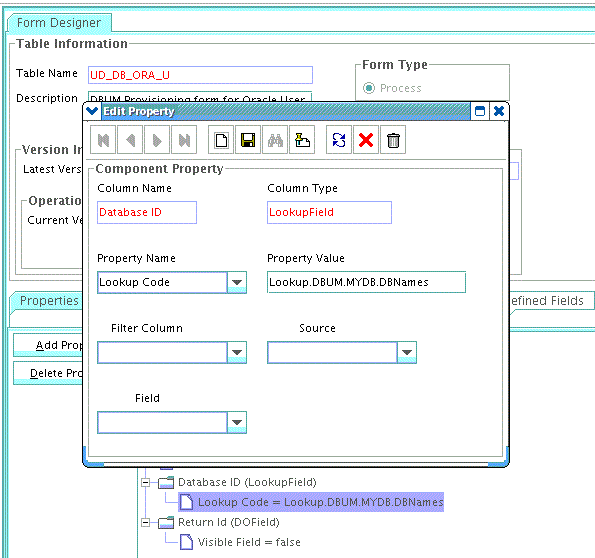
    sample screenshot for the Database ID attribute

8.6 Configuring the Resource Object

You must rename the resource object to MYDB User and modify the reconciliation fields as required for MyDatabase. Do not change the IT Resource and Reference ID fields.

Note:

You must remove the process task mappings before removing the reconciliation fields in the resource object.

To rename the resource object:

  1. Log in to the Design Console.
  2. Expand Resource Management, and then double-click Resource Objects.
  3. Search for and open the resource object of the connector.

    For example: Oracle User

  4. In the Name field, change the name of the resource object to MYDB User.
  5. If required, you can attach a resource form to the resource object. To do this, double-click the Table Name lookup field. From the Lookup dialog box, select the table that represents the form that will be associated with the resource object.
  6. To request the resource object for a user, select Order For User.
  7. Double-click the Type lookup field.

    From the Lookup dialog box that is displayed, select the classification status Application to associate with the resource object.

  8. If you want multiple instances of the resource object to be requested for a user or an organization, select the Allow Multiple option. Otherwise, go to Step 10.
  9. If you want to be able to request the resource object for yourself, select the Self Request Allowed option.
  10. To provision the resource object for all users, regardless of whether the organization to which the user belongs has the resource object assigned to it, select the Allow All check box.
  11. Click the save icon.

    The resource object is created.

A sample screenshot of the updated resource object with reconciliation fields is as follows:
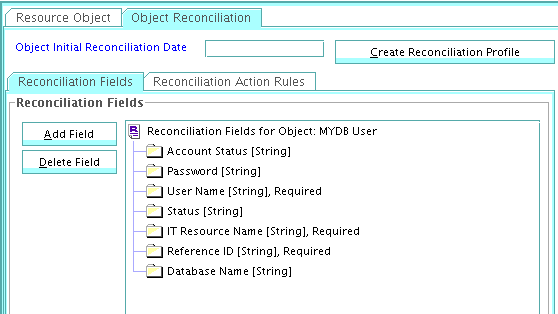
sample screenshot of the updated resource object with reconciliation fields

8.7 Adding Process Tasks, Assigning Adapters, and Mapping Adapter Variables

You must rename the process definition to MY Database User and remove the unused process tasks from the process definition.

To integrate the Create User process task with the adpORACREATESETFORM adapter:

  1. Expand Process Management.
  2. Double-click Process Definition and open the MY Database User process definition.
  3. Double-click the Create User task to open it.
  4. On the Integration tab, click Add, and then click Adapter.
  5. Select the adpORACREATESETFORM adapter, click the save icon, and then click OK in the message that is displayed.
  6. To map the adapter variables listed in this table, select the adapter, click Map, and then specify the data given in the following table:
    Variable Name Data Type Map To Qualifier Literal Value

    Adapter return value

    Object

    Literal

    NA

    Response Code

    itRes

    String

    Literal

    String

    UD_DB_ORA_U_ITRES

    objectType

    String

    Literal

    String

    User

    processInstanceKey

    Long

    Process Data

    Process Instance

    NA

    shouldUpdateFlag

    String

    Literal

    NA

    False

    updateField

    String

    Literal

    NA

    NA

    updateValue

    String

    Literal

    NA

    NA

  7. On the Responses tab, click Add to add the following response codes:
    Code Name Description Status

    ERROR

    Error occurred

    R

    UNKNOWN

    An unknown response was received

    R

    SUCCESS

    Operation completed

    C

  8. Click the save icon and then close the dialog box.
  9. Using the procedure described previously, integrate the Enable User process task with the adpORAENABLEUSERUPDATEFORM adapter and map the following adapter variables:
    Variable Name Data Type Map To Qualifier Literal Value

    Adapter return value

    Object

    Literal

    NA

    Response Code

    itRes

    String

    Literal

    String

    UD_DB_ORA_U_ITRES

    objectType

    String

    Literal

    String

    User

    processInstanceKey

    Long

    Process Data

    Process Instance

    NA

    shouldUpdateFlag

    String

    Literal

    NA

    False

    updateField

    String

    Literal

    NA

    NA

    updateValue

    String

    Literal

    NA

    NA

  10. Using the procedure described previously, integrate the Disable User process task with the adpORADISABLEUPDATEFORM adapter and map the following adapter variables:
    Variable Name Data Type Map To Qualifier Literal Value

    Adapter return value

    Object

    Literal

    NA

    Response Code

    itRes

    String

    Literal

    String

    UD_DB_ORA_U_ITRES

    objectType

    String

    Literal

    String

    User

    processInstanceKey

    Long

    Process Data

    Process Instance

    NA

    shouldUpdateFlag

    String

    Literal

    NA

    False

    updateField

    String

    Literal

    NA

    NA

    updateValue

    String

    Literal

    NA

    NA

  11. Using the procedure described previously, integrate the Delete User process task with the adpORADELETEUSER adapter and map the following adapter variables:
    Variable Name Data Type Map To Qualifier Literal Value

    Adapter return value

    Object

    Literal

    NA

    Response Code

    itResFieldName

    String

    Literal

    String

    UD_DB_ORA_U_ITRES

    objectType

    String

    Literal

    String

    User

    processInstanceKey

    Long

    Process Data

    Process Instance

    NA

  12. Using the procedure described previously, create and integrate the update process task with the adpORAUPDATEWITHREF adapter.

    The update task names should be named as "FIELD_NAME Updated."

    For example, the update task for the password field will be Password Updated. The following adapter variables must be mapped for the Password Updated task:

    Variable Name Data Type Map To Qualifier Literal Value

    Adapter return value

    Object

    Literal

    NA

    Response Code

    attrName

    String

    Literal

    String

    UD_DB_ORA_U_PASSWORD

    ITResField

    String

    Literal

    String

    UD_DB_ORA_U_ITRES

    objectType

    String

    Literal

    String

    User

    processInstanceKey

    Long

    Process Data

    Process Instance

    NA

    oldValue

    String

    Process Data

    NA

    Password (Field with old value box checked)

    newValue

    String

    Process Data

    NA

    Password (Field with old value box unchecked)

  13. Using the procedure described previously, create and integrate the update process task with the adpORAUPDATEWITHREF adapter.

    The update task names should be named as "FIELD_NAME Updated."

    For example, the update task for the Database ID field will be Database ID Updated. The following adapter variables must be mapped for the Database ID Updated task:

    Variable Name Data Type Map To Qualifier Literal Value

    Adapter return value

    Object

    Literal

    NA

    Response Code

    attrName

    String

    Literal

    String

    UD_DB_ORA_U_DBID

    itResFieldName

    String

    Literal

    String

    UD_DB_ORA_U_ITRES

    objectType

    String

    Literal

    String

    User

    processInstanceKey

    Long

    Process Data

    Process Instance

    NA

    oldValue

    Long

    Process Data

    Process Instance

    Database ID

    (Field with old Value box checked)

    newValue

    Long

    Process Data

    Process Instance

    Database ID

    (Field with old Value box unchecked)

A sample screenshot of the updated process task is as follows:
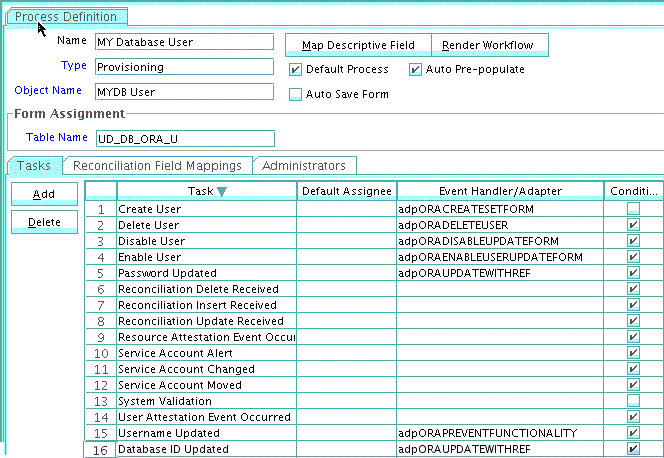
sample screenshot of the updated process task

8.8 Adding Attributes for Reconciliation

After you create the resource object, you must define the attributes on the target resources that must be used for reconciliation. In addition, you must also map these attributes to the corresponding fields on Oracle Identity Manager. Note that the attributes that you add to the resource object are mapped for reconciliation between Oracle Identity Manager and the target system.

A sample screenshot of the attribute mappings for the MY Database User process definition is as follows:
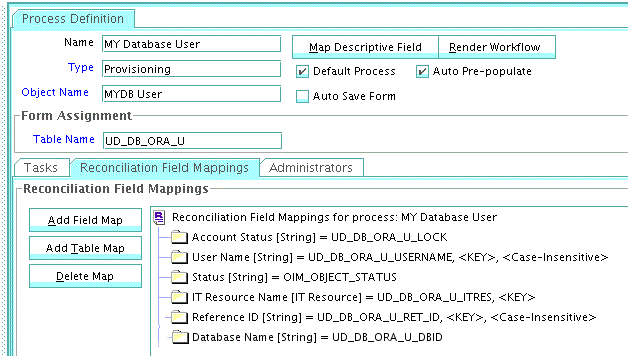
sample screenshot of the attribute mappings for the MY Database User process definition

8.9 Configuring Lookup Definitions Used During Connector Operations

In Oracle Identity Manager, you must configure lookup definitions of the following types that will be used during connector operations:

  • Lookup definitions corresponding to lookup fields on the target system

  • Lookup definitions that store configuration and other generic information

To modify the values of these lookup definitions:

  1. Log in to the Design Console.

  2. Expand Administration, and then double-click Lookup Definition.

  3. Update the Lookup.DBUM.Oracle.Configuration lookup definition as follows:

    1. Search for and open the Lookup.DBUM.Oracle.Configuration lookup definition.

    2. Update the Decode column of disabledValuesSet to Disabled.

    3. Update the Decode column of reservedWordsList and unsupportedChars if you want to add any restrictions on the user inputs.

    A sample screenshot of the updated lookup definition is as follows:
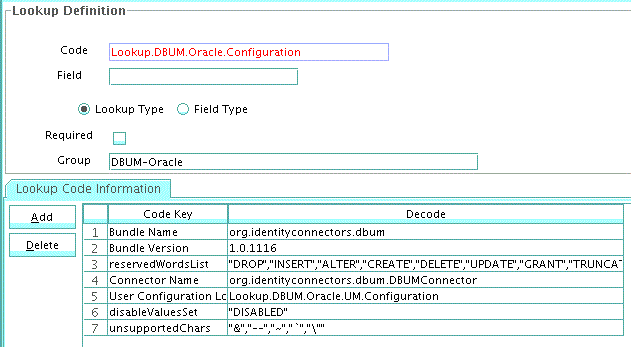
    sample screenshot of the updated lookup definition
  4. Update the Lookup.DBUM.Oracle.UM.ProvAttrMap lookup definition as follows:

    1. Search for and open the Lookup.DBUM.Oracle.UM.ProvAttrMap lookup definition.

    2. Update the provisioning attribute mappings as per MyDatabase. This lookup definition holds user-specific mappings between process form fields (Code Key values) and target system attributes (Decode values) used during provisioning operations (same as the attributes in the Provisioning.queries file).

    3. If an attribute is of type Lookup, then it has to be tagged with [LOOKUP].

    A sample screenshot of the updated lookup definition is as follows:
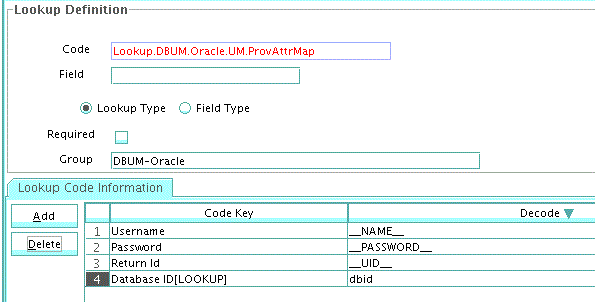
    sample screenshot of the updated lookup definition
  5. Update the Lookup.DBUM.Oracle.UM.ReconAttrMap lookup definition as follows:

    1. Search for and open the Lookup.DBUM.Oracle.UM.ReconAttrMap lookup definition.

    2. Update the reconciliation attribute mappings as per MyDatabase. This lookup definition holds user-specific mappings between reconciliation attribute names as specified in the resource object (Code Key values) and target system attributes (Decode values) used during reconciliation operations.

    3. If an attribute is of type Lookup, then it has to be tagged with [LOOKUP].

      Do not modify the Reference ID mapping.

    A sample screenshot of the updated lookup definition is as follows:
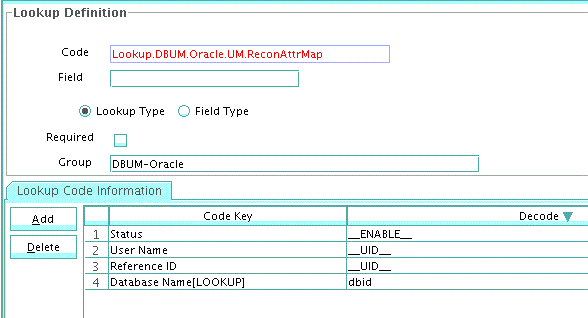
    sample screenshot of the updated lookup definition
  6. Click the save icon.

See Also:

Lookup Definitions Used During Connector Operations for Oracle Database for descriptions of the entries in the lookup definitions

8.10 Configuring Scheduled Jobs

You need scheduled jobs for the following reasons:

8.10.1 Configuring Scheduled Jobs for Lookup Field Synchronization

You need not create scheduled jobs for lookup field synchronization. Instead, you can use the lookup reconciliation scheduled jobs that are shipped with this connector. See Scheduled Jobs for Lookup Field Synchronization for Oracle Database for more information about these scheduled jobs.

For example, to perform Database ID lookup reconciliation, update the DBUM Oracle Roles Lookup Reconciliation scheduled job parameters as follows:

Attribute Description

Code Key Attribute

Enter the name of the connector or target system attribute that is used to populate the Code Key column of the lookup definition (specified as the value of the Lookup Name attribute).

For example: __NAME__

Note: Do not change the value of this attribute.

Decode Attribute

Enter the name of the connector or target system attribute that is used to populate the Decode column of the lookup definition (specified as the value of the Lookup Name attribute).

For example: __NAME__

IT Resource Name

Enter the name of the IT resource for the target system installation from which you want to reconcile user records.

For example: MYDB

Lookup Name

This attribute holds the name of the lookup definition that maps each lookup definition with the data source from which values must be fetched.

For example: Lookup.DBUM.MYDB.DBNames

Object Type

Enter the type of object whose values must be synchronized.

For example: __DBNAME__ (as specified in the LoVSearch.queries file)

Resource Object Name

Enter the name of the resource object that is used for reconciliation.

For example: MYDB User

8.10.2 Configuring Scheduled Jobs for Reconciliation

Configure the scheduled jobs for reconciliation as follows:

  1. To perform target resource reconciliation, update the DBUM Oracle User Target Reconciliation scheduled job as follows:
    Attribute Description

    IT Resource Name

    Enter the name of the IT resource for the target system installation from which you want to reconcile user records.

    For example: MYDB

    Object Type

    Enter the type of object whose values must be synchronized.

    For example: User

    Resource Object Name

    Enter the name of the resource object that is used for reconciliation.

    For example: MYDB User

    Incremental Recon Attribute

    Time-stamp at which the last reconciliation run started

    For example: lastModified

    Note: Do not enter a value for this attribute. The reconciliation engine automatically enters a value for this attribute.

    Note:

    • For incremental reconciliation, the lastModified time-stamp will be automatically updated after full reconciliation and it will be used for incremental reconciliation runs.

    • For limited reconciliation, the filter can be applied in the Filter field. You can apply filters on the search attributes, such as __UID__, dbid, or status.

      For example, the filter equalTo('dbid','master') will add the corresponding WHERE clause in the query. Then, the limited results having dbid='master' are processed.

  2. To perform target resource delete reconciliation, update the DBUM Oracle Delete User Target Reconciliation scheduled job parameters as follows:
    Attribute Description

    IT Resource Name

    Enter the name of the IT resource for the target system installation from which you want to reconcile user records.

    For example: MYDB

    Object Type

    Enter the type of object whose values must be synchronized.

    For example: User

    Resource Object Name

    Enter the name of the resource object that is used for reconciliation.

    For example: MYDB User

8.11 Configuring Oracle Identity Manager for Request-Based Provisioning

Note:

Perform the procedure described in this section only if you are using Oracle Identity Manager release 11.1.1.x and want to configure request-based provisioning.

A request-based provisioning operation involves an end user (a requester) who creates a request for a resource and an approver (an OIM User with the required privileges) who approves the request.

To perform request-based provisioning operations, you must configure a request workflow that suits your requirements. You must update the process form attribute names in request datasets. For complete information on configuring the request workflow.

See Also:

Configuring Request-Based Provisioning for Oracle Database for a similar procedure for the Oracle Database

8.12 Testing the Customized Connector

As a best practice, you must test the connector after completing all customizations for the new database to ensure that it functions as expected.

You can use the testing utility to identify the cause of problems associated with connecting to the target system and performing basic operations on the target system.

To run the testing utility, see Testing the Connector.