3 Using the Connector
This chapter is divided into the following sections:
3.1 Guidelines on Using the Connector
This section discusses the following topics:
3.1.1 Guidelines on Configuring Reconciliation
The following are guidelines that you must apply while configuring reconciliation:
-
Before a target resource reconciliation run is performed, lookup definitions must be synchronized with the lookup fields of the target system. In other words, scheduled jobs for lookup field synchronization must be run before user reconciliation runs.
-
The scheduled job for user reconciliation must be run before the scheduled job for reconciliation of deleted user data.
-
There is no support for group entities in Oracle Identity Manager. Therefore, apply the following guidelines before you run the scheduled job for groups reconciliation:
-
If you are using the default connector configuration, for every group in the target system, create a corresponding organizational unit (with the same group name) in Oracle Identity Manager. This ensures that all groups from the target system are reconciled into their newly created organizational units, respectively.
-
You can also configure the connector to reconcile the groups under one organization. For more information see the following sections:
Reconciling ODSEE Groups and Roles Under One Organization in Oracle Identity Manager
Reconciling OUD Groups Under One Organization in Oracle Identity Manager
Reconciling OID Groups Under One Organization in Oracle Identity Manager
Reconciling eDirectory Groups and Roles Under One Organization in Oracle Identity Manager
-
-
For OUD target systems, the OUD changelog is based on the replication database. By default, the replication keeps changelog entries for only 100 hours. The replication purge delay must be tuned based on your specific requirements. The database size on disk will vary accordingly. For more information, see the changelog documentation for the OUD target system.
-
Reconciliation of roles is supported only for ODSEE and Novell eDirecotory target systems.
-
Run the User Search Reconciliation scheduled job, if only changes with regard to group membership are made to a user. This is because neither the changelog nor modifiedTimestamp attribute is updated. Therefore, performing full reconciliation by running the User Search Reconciliation scheduled job should reconcile such changes.
-
If you are using Oracle Identity Manager release 11.1.2.3 and you are reconciling a large number of records for an OID target system, then you must specify values for the following parameters to optimize performance:
-
For target resource configuration
-
Ensure you have added the readTimeout and connectTimeout entries to the Lookup.OID.Configuration lookup definition. See Setting Up the OID Configuration Lookup Definition for LDAP Operation Timeouts for more information about adding these entries.
-
Change or increase the values of the blockSize and changeLogBlockSize entries of the Lookup.OID.Configuration lookup definition to suit the requirements in your environment.
-
-
For trusted source configuration
Ensure that you set the value of the usePagedResultControl entry in the Lookup.OID.Configuration.Trusted lookup definition to
true.
-
3.1.2 Guidelines on Performing Provisioning Operations
The following are guidelines that you must apply while performing provisioning operations:
-
Before you perform provisioning operations, lookup definitions must be synchronized with the lookup fields of the target system. In other words, scheduled tasks for lookup field synchronization must be run before provisioning operations.
-
If you want to provision a User, Group, Role, or an Organizational Unit directly under base context, then add a new entry in the Lookup.LDAP.Organization lookup definition with both the Code Key and the Decode values set to the base context name.
For OID, use Lookup.OID.Organization and for eDirectory, use Lookup.EDIR.Organization.
Sample value:
Code Key:
281~dc=example,dc=com(where 281 is the IT resource key)Decode:
LDAP_server~dc=example,dc=com(where LDAP_server is the IT resource name)Note:
Provisioning in Non-Organization Containers for an eDirectory Target
To provision an entity in a non-organization container, add that container value manually in the eDirectory container Lookup.EDIR.Organization lookup definition. For example:
Code Key: 8~dc=home
Decode Key: eDirectory~"randomvalue"
-
On the Oracle Internet Directory target system, the Manager Name field accepts only DN values. Therefore, when you set or modify the Manager Name field in Oracle Identity Manager, you must enter the DN value.
For example:
cn=abc,ou=lmn,dc=corp,dc=com -
Provisioning of roles is supported only for ODSEE and Novell eDirecotory target systems.
3.2 Scheduled Jobs for Lookup Field Synchronization
This section contains the following topics:
-
Scheduled Jobs for Lookup Field Synchronization for Oracle Internet Directory
-
Scheduled Jobs for Lookup Field Synchronization for Novell eDirectory
Note:
The procedure to configure these scheduled jobs is described later in the guide.
3.2.1 Scheduled Jobs for Lookup Field Synchronization for ODSEE
The following are the scheduled jobs for lookup field synchronization for ODSEE:
-
LDAP Connector Group Lookup Reconciliation
This scheduled job is used to synchronize group lookup fields in Oracle Identity Manager with group data in the target system.
-
LDAP Connector Role Lookup Recon
This scheduled job is used to synchronize role lookup fields in Oracle Identity Manager with role data in the target system.
Note:
If you are using OUD as the Target System, then you must not run the LDAP Connector Role Lookup Recon scheduled job.
-
LDAP Connector OU Lookup Reconciliation
This scheduled job is used to synchronize organization lookup fields in Oracle Identity Manager with organization data in the target system.
3.2.2 Scheduled Jobs for Lookup Field Synchronization for Oracle Internet Directory
The following are the scheduled jobs for lookup field synchronization for Oracle Internet Directory:
-
OID Connector Group Lookup Reconciliation
This scheduled job is used to synchronize group lookup fields in Oracle Identity Manager with group data in the target system.
-
OID Connector OU Lookup Reconciliation
This scheduled job is used to synchronize organization lookup fields in Oracle Identity Manager with organization data in the target system.
3.2.3 Scheduled Jobs for Lookup Field Synchronization for Novell eDirectory
The following are the scheduled jobs for lookup field synchronization for Novell eDirectory:
-
eDirectory Connector Group Lookup Reconciliation
This scheduled job is used to synchronize group lookup fields in Oracle Identity Manager with group data in the target system.
-
eDirectory Connector Role Lookup Reconciliation
This scheduled job is used to synchronize role lookup fields in Oracle Identity Manager with role data in the target system.
-
eDirectory Connector Org Lookup Reconciliation
This scheduled job is used to synchronize organization lookup fields in Oracle Identity Manager with organization data in the target system.
-
eDirectory Connector Domain Scope Lookup Reconciliation
This scheduled job is used to synchronize organization lookup fields in Oracle Identity Manager with organization data in the target system. These domains are associated with roles as trustee.
-
eDirectory Connector Profile Lookup Reconciliation
This scheduled job is used to synchronize profile lookup fields in Oracle Identity Manager with profile data in the target system.
-
eDirectory Connector Role Container Lookup Reconciliation
This scheduled job is used to synchronize Role Container lookup fields in Oracle Identity Manager with Role Containers on the target system. An eDirectory role can be provisioned only under a Role Container.
3.2.4 Scheduled Job Attributes
Table 3-1 describes the attributes of the scheduled jobs.
Table 3-1 Attributes of the Scheduled Jobs for Lookup Field Synchronization
| Attribute | Description |
|---|---|
|
Code Key Attribute |
Name of the connector or target system attribute that is used to populate the Code Key column of the lookup definition (specified as the value of the Lookup Name attribute). Note: You must not change the value of this attribute. |
|
Decode Attribute |
Enter the name of the connector or target system attribute that is used to populate the Decode column of the lookup definition (specified as the value of the Lookup Name attribute). |
|
Filter |
Enter a filter to filter out records to be stored in the lookup definition. For more information about the Filter attribute, see Limited Reconciliation. |
|
IT Resource Name |
Name of the IT resource for the target system installation from which you reconcile records. Default values are:
|
|
Lookup Name |
Enter the name of the lookup definition in Oracle Identity Manager that must be populated with values fetched from the target system. Note: If the lookup name that you specify as the value of this attribute is not present in Oracle Identity Manager, then this lookup definition is created while the scheduled job is run. |
|
Object Type |
This attribute holds the name of the type of object you want to reconcile. |
3.3 Configuring Reconciliation
When you run the Connector Installer, scheduled jobs for user reconciliation are automatically created in Oracle Identity Manager. Configuring reconciliation involves providing values for the attributes of these scheduled jobs.
The following sections provide information about the attributes of the scheduled jobs:
Note:
Consider this scenario. You provision a user to an organization (org1) and then move the user to a second organization (org2). You run Trusted Reconciliation and Target User Sync reconciliation. As result, two resources are attached to the user: revoked and provisioned.
This behavior is normal for the connector. After moving the user to org2, the target directory considers the user in org1 to be deleted (revoked) even though the user still exists in org1. However, in org2 the user also exists and is considered to be provisioned.
3.3.1 Full Reconciliation and Incremental Reconciliation
Full reconciliation involves reconciling all existing records from the target system into Oracle Identity Manager. After you deploy the connector, you must first perform full reconciliation. In addition, you can switch from incremental reconciliation to full reconciliation whenever you want to ensure that all target system records are reconciled in Oracle Identity Manager.
Full reconciliation: To perform a full reconciliation run, ensure that a value is not specified for the Filter and Latest Token attributes of the search reconciliation scheduled job for users, groups, or roles.
Incremental reconciliation: If the target system supports changelog, Sync reconciliation can be used for performing incremental reconciliation. To perform an incremental reconciliation run, specify a value for the Sync Token attribute in the sync reconciliation scheduled job for users, groups, or roles. From the next run onward, only records created or modified after the value in the Sync Token attribute are considered for reconciliation.
Incremental reconciliation can also be performed by filtered search based on the modifyTimestamp value. The timestamp value is updated in the search reconciliation scheduled task after full reconciliation. From the next run onward, the task runs in incremental reconciliation mode.
Note:
Sync reconciliation is not supported for eDirectory target systems.
3.3.2 Limited Reconciliation
By default, all target system records that are added or modified after the last reconciliation run are reconciled during the current reconciliation run. You can customize this process by specifying the subset of added or modified target system records that must be reconciled. You do this by creating filters for the reconciliation module.
The following are the ways in which limited reconciliation can be achieved:
3.3.2.1 Limited Reconciliation By Using Filters
You can perform limited reconciliation by creating filters for the reconciliation module. This connector provides a Filter attribute (a scheduled task attribute) that allows you to use any of the OID resource attributes to filter the target system records.
For detailed information about ICF Filters, see ICF Filter Syntax of Oracle Fusion Middleware Developing and Customizing Applications for Oracle Identity Manager.
While deploying the connector, follow the instructions in Configuring Scheduled Jobs to specify attribute values.
3.3.2.2 Limited Reconciliation Based on Group Membership
Limited Reconciliation can be performed based on Group Membership. If you wish to reconcile only the users associated with a particular group, configure the filter as follows:
-
For ODSEE and OUD:
In the Lookup.LDAP.Configuration lookup definition, set:
-
ldapGroupFilterBehavior=accept
-
ldapGroupMembershipAttribute=ismemberof
Specify the filter as:
containsAllValues('ldapGroups','cn=grp1,ou=groups,dc=example,dc=com') -
-
For OID:
In the Lookup.OID.Configuration lookup definition, set:
-
ldapGroupFilterBehavior=ignore
-
ldapGroupMembershipAttribute=ismemberof
Specify the filter as:
containsAllValues('ldapGroups','cn=grp1,ou=groups,dc=example,dc=com') -
In these examples, grp1 is the group with which users are associated.
3.3.3 Reconciliation Scheduled Jobs
When you run the Connector Installer, the following reconciliation scheduled tasks are automatically created in Oracle Identity Manager:
3.3.3.1 Scheduled Jobs for Reconciliation of User Records
The following sections describe the scheduled jobs and their attributes for ODSEE/OUD, which are similar for other target systems:
3.3.3.1.1 About Scheduled Jobs for Reconciliation of User Records
Depending on your target system, you must specify values for the attributes of the following user reconciliation scheduled jobs.
For ODSEE/OUD:
-
LDAP Connector User Search Reconciliation
-
LDAP Connector User Sync Reconciliation
-
LDAP Connector Trusted User Reconciliation
For OID:
-
OID Connector User Search Reconciliation
-
OID Connector User Sync Reconciliation
-
OID Connector Trusted User Reconciliation
For eDirectory:
-
eDirectory Connector User Search Reconciliation
-
eDirectory Connector Trusted User Reconciliation
3.3.3.1.2 LDAP Connector User Search Reconciliation
This scheduled job is used to reconcile user data in the target resource (account management) mode of the connector. Use this scheduled job if either of the following conditions is true:
-
You want to perform Full or Incremental Reconciliation.
-
Your target system supports modifyTimestamp.
Note:
Run the User Search Reconciliation scheduled job, if only changes with regard to group membership are made to a user. This is because neither the changelog nor modifiedTimestamp attribute is updated. Therefore, performing full reconciliation by running the User Search Reconciliation scheduled job should reconcile such changes.
The same information has been listed in Guidelines on Configuring Reconciliation.
Table 3-2 describes the attributes of this scheduled job.
Table 3-2 Attributes of the LDAP Connector User Search Reconciliation Scheduled Job
| Attribute | Description |
|---|---|
|
Filter |
Expression for filtering records that must be reconciled by the scheduled job. Sample value: Default value: None See Limited Reconciliation for the syntax of this expression. |
|
Incremental Recon Attribute |
Enter the name of the target system attribute that holds the time stamp at which the last reconciliation run started. The value in this attribute is used during incremental reconciliation to determine the newest or latest record reconciled from the target system. Default value: |
|
IT Resource Name |
Name of the IT resource instance that the connector must use to reconcile data. Values are:
|
|
Latest Token |
This attribute holds the time stamp value of the Incremental Recon Attribute. Note: The reconciliation engine automatically enters a value for this attribute after execution. It is recommended that you do not change the value of this attribute. If you manually specify a value for this attribute, then only user accounts that have been modified after the time stamp specified as the value of this attribute are reconciled. If you want to perform a full reconciliation, clear the value in this field. Sample value: |
|
Object Type |
This attribute holds the type of object you want to reconcile. Default value: |
|
Resource Object Name |
Enter the name of the resource object against which reconciliation runs must be performed. Default value: Can also be |
|
Scheduled Task Name |
This attribute holds the name of the scheduled task. Default value: |
3.3.3.1.3 LDAP Connector User Sync Reconciliation
This scheduled job is used to reconcile user data in the target resource (account management) mode of the connector. Use this scheduled job if either of the following conditions is true:
-
You want to perform incremental reconciliation.
-
Your target system supports the changelog attribute.
Table 3-2 describes the attributes of this scheduled job.
Table 3-3 Attributes of the LDAP Connector User Sync Reconciliation Scheduled Job
| Attribute | Description |
|---|---|
|
IT Resource Name |
Name of the IT resource instance that the connector must use to reconcile data. Values are:
|
|
Object Type |
This attribute holds the type of object you want to reconcile. Default value: |
|
Resource Object Name |
Enter the name of the resource object against which reconciliation runs must be performed. Default value: Can also be |
|
Scheduled Task Name |
This attribute holds the name of the scheduled task. Default value: |
|
Sync Token |
You can manually enter the first Sync Token. To retrieve this token, query cn=changelog on rootDSE on the target system. Then, every time sync reconciliation is run, Sync Token is updated. Browse the changelog attribute of the target system to determine a value from the changelog that must be used to resume a reconciliation run. From the next reconciliation run onward, only data about records that are created or modified since the last reconciliation run ended are fetched into Oracle Identity Manager. Or, you can also leave this field blank, which causes the entire changelog to be read. This attribute stores values in one of the following formats:
|
3.3.3.1.4 LDAP Connector Trusted User Reconciliation
This scheduled job is used to reconcile user data in the trusted resource (identity management) mode of the connector.
Table 3-4 describes the attributes of this scheduled job.
Table 3-4 Attributes of the Scheduled Job for Reconciliation of User Data from a Trusted Source
| Attribute | Description |
|---|---|
|
Filter |
Expression for filtering records that must be reconciled by the scheduled job. Sample value: Default value: None See Limited Reconciliation for the syntax of this expression. |
|
IT Resource Name |
Enter the name of the IT resource instance that the connector must use to reconcile data. Values are:
|
|
Object Type |
This attribute holds the type of object you want to reconcile. Default value: |
|
Resource Object Name |
Enter the name of the resource object against which reconciliation runs must be performed. Default value: Can also be |
|
Scheduled Task Name |
This attribute holds the name of the scheduled task. Default value: |
|
Incremental Recon Attribute |
Enter the name of the target system attribute that holds the time stamp at which the last reconciliation run started. The value in this attribute is used during incremental reconciliation to determine the newest or latest record reconciled from the target system. Default value: |
|
Latest Token |
This attribute holds the time stamp value of the Incremental Recon Attribute. Note:
|
3.3.3.2 Scheduled Jobs for Reconciliation of Deleted User Records
Depending on whether you want to implement trusted source or target resource delete reconciliation, you must specify values for the attributes of one of the following scheduled jobs:
-
LDAP Connector User Search Delete Reconciliation, OID Connector User Search Delete Reconciliation, and eDirectory Connector User Search Reconciliation
These scheduled jobs are used to reconcile data about deleted users in the target resource (account management) mode of the connector. During a reconciliation run, for each deleted user account on the target system, the target system resource is revoked for the corresponding OIM User.
-
LDAP Connector Trusted User Delete Reconciliation, OID Connector Trusted User Delete Reconciliation, and eDirectory Connector Trusted User Reconciliation
These scheduled jobs are used to reconcile data about deleted users in the trusted source (identity management) mode of the connector. During a reconciliation run, for each deleted target system user account, the corresponding OIM User is deleted.
Table 3-5 describes the attributes of these scheduled jobs.
Table 3-5 Attributes of the Scheduled Jobs for Delete User Reconciliation
| Attribute | Description |
|---|---|
|
IT Resource Name |
Enter the name of the IT resource instance that the connector must use to reconcile data. Note. For Trusted Delete Reconciliation, use the Trusted Configuration Lookup in the IT Resource. The default value of this attribute in the LDAP Connector User Search Delete Reconciliation scheduled job is OID target resource: eDirectory target resource: There is no default value for this attribute in the LDAP Connector Trusted User Delete Reconciliation scheduled job. |
|
Object Type |
This attribute holds the type of object you want to reconcile. Default value: |
|
Resource Object Name |
Enter the name of the resource object against which reconciliation runs must be performed. Depending on the scheduled job you are using, the default values are as follows:
|
3.3.3.3 Scheduled Jobs for Reconciliation of Groups, OUs, and Roles
The following sections describe the scheduled jobs and their attributes for ODSEE/OUD, which are similar for other target systems:
3.3.3.3.1 About Scheduled Jobs for Reconciliation of Groups, OUs, and Roles
Depending on your target system, you must specify values for the attributes of the following scheduled jobs.
For ODSEE/OUD:
-
LDAP Connector Group Search Reconciliation
-
LDAP Connector Group Sync Reconciliation
-
LDAP Connector OU Search Reconciliation
-
LDAP Connector OU Sync Reconciliation
-
LDAP Connector Role Search Reconciliation
-
LDAP Connector Role Sync Reconciliation
For OID:
-
OID Connector Group Search Reconciliation
-
OID Connector Group Sync Reconciliation
-
OID Connector OU Search Reconciliation
-
OID Connector OU Sync Reconciliation
For eDirectory:
-
eDirectory Connector Group Search Reconciliation
-
eDirectory Connector Org Search Reconciliation
-
eDirectory Connector Role Search Reconciliation
3.3.3.3.2 LDAP Connector Group Search Reconciliation, LDAP Connector OU Search Reconciliation, and LDAP Connector Role Search Reconciliation Scheduled Jobs
The LDAP Connector Group Search Reconciliation scheduled job is used to reconcile group data from the target system. Similarly, the LDAP Connector OU Search Reconciliation and LDAP Connector Role Search Reconciliation scheduled jobs are used to reconcile OU and role data from the target system. You must use these scheduled jobs if either of the following conditions is true:
-
Your target system does not contain a changelog attribute.
-
You want to reconcile into Oracle Identity Manager changes made to group, OU, or role memberships on the target system.
Table 3-6 describes the attributes of these scheduled jobs.
Table 3-6 Attributes of the LDAP Connector Group Search Reconciliation, LDAP Connector OU Search Reconciliation, and LDAP Connector Role Search Scheduled Jobs
| Attribute | Description |
|---|---|
|
Filter |
Expression for filtering records that must be reconciled by the scheduled job. Sample value: Default value: None See Limited Reconciliation for the syntax of this expression. |
|
Incremental Recon Attribute |
Enter the name of the target system attribute that holds the time stamp at which the last reconciliation run started. The value in this attribute is used during incremental reconciliation to determine the newest or latest record reconciled from the target system. The default value is the same for all Search Recon Tasks: modifyTimestamp |
|
IT Resource Name |
Enter the name of the IT resource for the target system installation from which you want to reconcile group or role data. Values are:
|
|
Latest Token |
This attribute holds the time stamp value of the Incremental Recon Attribute. Note: The reconciliation engine automatically enters a value for this attribute after execution. It is recommended that you do not change the value of this attribute. If you manually specify a value for this attribute, then only user accounts that have been modified after the time stamp specified as the value of this attribute are reconciled. If you want to perform a full reconciliation, clear the value in this field. Sample value: |
|
Object Type |
Type of object to be reconciled. Depending on the scheduled job you are using, the default values are as follows:
|
|
Resource Object Name |
Name of the resource object that is used for reconciliation. Depending on the scheduled job you are using, the default values are as follows:
|
|
Scheduled Task Name |
Name of the scheduled task used for reconciliation. Depending on the scheduled job you are using, the default values are as follows:
|
3.3.3.3.3 LDAP Connector Group Sync Reconciliation, LDAP Connector OU Sync Reconciliation, and LDAP Connector Role Sync Reconciliation Scheduled Jobs
The LDAP Connector Group Sync Reconciliation scheduled job is used to reconcile group data from the target system. Similarly, the LDAP Connector OU Sync Reconciliation, and LDAP Connector Role Sync Reconciliation scheduled job are used to reconcile OU and role data from the target system. You must use these scheduled jobs if your target system supports the changelog attribute.
Table 3-7 describes the attributes these scheduled jobs.
Table 3-7 Attributes of the LDAP Connector Group Sync Reconciliation, LDAP Connector OU Sync Reconciliation, and LDAP Connector Role Sync Reconciliation Scheduled Jobs
| Attribute | Description |
|---|---|
|
IT Resource Name |
Enter the name of the IT resource for the target system installation from which you want to reconcile group or role data. The values are:
|
|
Object Type |
Type of object to be reconciled. Depending on the scheduled job you are using, the default values are as follows:
|
|
Resource Object Name |
Name of the resource object that is used for reconciliation. Depending on the scheduled job you are using, the default values are as follows:
|
|
Scheduled Task Name |
Name of the scheduled task used for reconciliation. Depending on the scheduled job you are using, the default values are as follows:
|
|
Sync Token |
You can manually enter the first Sync Token. To retrieve this token, query cn=changelog on rootDSE on the target system. Then, every time sync reconciliation is run, Sync Token is updated. Browse the changelog attribute of the target system to determine a value from the changelog that must be used to resume a reconciliation run. From the next reconciliation run onward, only data about records that are created or modified since the last reconciliation run ended are fetched into Oracle Identity Manager. Or, you can also leave this field blank, which causes the entire changelog to be read. This attribute stores values in one of the following formats:
|
3.3.3.4 Scheduled Jobs for Reconciliation of Deleted Groups, OUs, and Roles
Depending on your target system, you must specify values for the attributes of the following scheduled jobs.
For ODSEE/OUD:
-
LDAP Connector Group Search Delete Reconciliation
-
LDAP Connector OU Search Delete Reconciliation
-
LDAP Connector Role Search Delete Reconciliation
For OID:
-
OID Connector Group Search Delete Reconciliation
-
OID Connector OU Search Delete Reconciliation
For eDirectory:
-
eDirectory Connector Group Search Delete Reconciliation
-
eDirectory Connector Org Search Delete Reconciliation
-
eDirectory Connector Role Search Delete Reconciliation
Table 3-8 describes the attributes of these scheduled jobs.
Table 3-8 Attributes of the Scheduled Jobs for Deleted Groups, Organizational Units, and Roles Reconciliation
| Attribute | Description |
|---|---|
|
IT Resource Name |
Name of the IT resource instance that the connector must use to reconcile data. Default values are:
|
|
Object Type |
This attribute holds the type of object you want to reconcile. |
|
Resource Object Name |
Enter the name of the resource object against which reconciliation runs must be performed. |
3.4 Configuring Scheduled Jobs
This section describes the procedure to configure scheduled jobs. You can apply this procedure to configure the scheduled jobs for lookup field synchronization and reconciliation. For a list of scheduled jobs and their attributes, see Scheduled Jobs for Lookup Field Synchronization and Reconciliation Scheduled Jobs.
This section also includes Configuring the Search Base and Search Scope in Scheduled Jobs and Tasks.
Note:
If the changelog attribute is configured, use the Sync Reconciliation task for incremental reconciliation and the Search for full and delete reconciliation.
If changelog is not configured and the modifytimestamp attribute is used, use the Search Reconciliation task for incremental, full, and delete reconciliation.
3.4.1 Configuring a Scheduled Job
To configure a scheduled job:
-
If you are using Oracle Identity Manager release 11.1.1.x, then:
-
Log in to the Administrative and User Console.
-
On the Welcome to Oracle Identity Manager Self Service page, click Advanced in the upper-right corner of the page.
-
On the Welcome to Oracle Identity Manager Advanced Administration page, in the System Management region, click Search Scheduled Jobs.
-
-
If you are using Oracle Identity Manager release 11.1.2.x release, then:
-
Log in to Oracle Identity System Administration.
-
In the left pane, under System Management, click Scheduler.
-
-
Search for and open the scheduled task as follows:
-
On the left pane, in the Search field, enter the name of the scheduled job as the search criterion. Alternatively, you can click Advanced Search and specify the search criterion.
-
In the search results table on the left pane, click the scheduled job in the Job Name column.
-
-
On the Job Details tab, you can modify the parameters of the scheduled task:
-
Retries: Enter an integer value in this field. This number represents the number of times the scheduler tries to start the job before assigning the Stopped status to the job.
-
Schedule Type: Depending on the frequency at which you want the job to run, select the appropriate schedule type.
In addition to modifying the job details, you can enable or disable a job.
-
-
On the Job Details tab, in the Parameters region, specify values for the attributes of the scheduled task.
Note:
-
Attribute values are predefined in the connector XML file that you import. Specify values only for those attributes that you want to change.
-
Values (either default or user-defined) must be assigned to all the attributes. If even a single attribute value is left empty, then reconciliation is not performed.
-
The search base and search scope fields are not available in User, Group, Role, or Organizational Unit Lookup Reconciliation scheduled tasks. To add these fields, see Configuring the Search Base and Search Scope in Scheduled Jobs and Tasks.
-
-
Click Apply to save the changes.
Note:
You can use the Scheduler Status page in Identity System Administration to either start, stop, or reinitialize the scheduler.
3.4.2 Configuring the Search Base and Search Scope in Scheduled Jobs and Tasks
Configuring the search base and search scope in scheduled jobs and tasks involves the following steps:
Note:
The Lookup Reconciliation scheduled jobs do not support custom task attributes, such as Search Scope and Search Base.3.4.2.1 Exporting the Scheduled Job and Task
To configure the search base and search scope, first export the desired scheduled job and task:
- Go to Advanced - Export Deployment Manager File.
- Choose Job and search for the scheduled job you want to use.
- Click Select Children.
- Click Select Dependencies.
- Pick the Scheduled Task (the root of the tree shown).
- Click Confirmation.
- Click Add For Export.
- Choose Exit Wizard and show full selection and then click OK.
- Click Export, and enter a description, if needed, and then click Export again.
- Choose the file you want to use and click Save.
3.4.2.2 Adding Additional Parameters to the Job and Task
Add additional parameters to the scheduled job and task:
-
Rename the scheduled task, so that other jobs are not affected by this change:
-
Look for the scheduledTask xml element, and find the xml attribute name. For example:
<scheduledTask repo-type="MDS"
name="LDAP Connector Search Incremental Reconciliation"
mds-path="/db" mds-file="LDAP Connector Search Incremental Reconciliation.xml">
-
Replace all the occurrences of the old name with a new value.
For example, replace all occurrences of "LDAP Connector Search Incremental Reconciliation" with "LDAP Connector Search Incremental Reconciliation Extended".
-
-
Rename the scheduled job:
Look for the Job element.
Change the value of the name xml attribute. For example, change "LDAP Connector OU Search Reconciliation" to "LDAP Connector OU Search Reconciliation Extended".
-
Add additional parameters to the scheduled task:
-
Find the
scheduledTask/completeXml/scheduledTasks/task/parameters element. -
Add the following parameters:
<string-param required="false" encrypted="false" helpText="Search Scope">SCOPE</string-param>
<string-param required="false" encrypted="false" helpText="Search Base">Base Context</string-param>
-
-
Add additional parameters to the scheduled job:
-
Find the
Job/attributeselement. -
Add the following parameters:
<object>
<key>SCOPE</key>
<value type="jobparameter">
<name type="string">SCOPE</name>
<required type="boolean">false</required>
<encrypted type="boolean">false</encrypted>
<helpText type="string">Search Scope</helpText>
<dataType type="string">String</dataType>
<paramKey type="string">30</paramKey>
<paramValue type="string"/>
</value>
</object>
<object>
<key>Base Context</key>
<value type="jobparameter">
<name type="string">Base Context</name>
<required type="boolean">false</required>
<encrypted type="boolean">false</encrypted>
<helpText type="string">Search Base</helpText>
<dataType type="string">String</dataType>
<paramKey type="string">31</paramKey>
<paramValue type="string"/>
</value>
</object>
-
3.5 Performing Provisioning Operations in Oracle Identity Manager Release 11.1.1.x
This section discusses the following topics:
3.5.1 About Provisioning Operation in Oracle Identity Manager
Provisioning a resource for an OIM User involves using Oracle Identity Manager to create target system account for the user.
When you install the connector on Oracle Identity Manager, the direct provisioning feature is automatically enabled. This means that the process form is enabled when you install the connector.
If you configure the connector for request-based provisioning, then the process form is suppressed and the object form is displayed. In other words, direct provisioning is disabled when you configure the connector for request-based provisioning. If you want to revert to direct provisioning, then perform the steps described in Switching Between Request-Based Provisioning and Direct Provisioning.
The following are types of provisioning operations:
-
Direct provisioning
-
Request-based provisioning
See Also:
olink:OMUSG Manually Completing a Task in Oracle Fusion Middleware Performing Self Service Tasks with Oracle Identity Manager for information about the types of provisioning.
3.5.2 Direct Provisioning
Note:
This example is for an LDAPv3 target system. However, to provision another target system such as eDirectory or OID, the steps are similar.
To provision a resource by using the direct provisioning approach:
-
Log in to the Administrative and User Console.
-
If you want to first create an OIM User and then provision a target system account, then:
-
On the Welcome to Identity Administration page, in the Users region, click Create User.
-
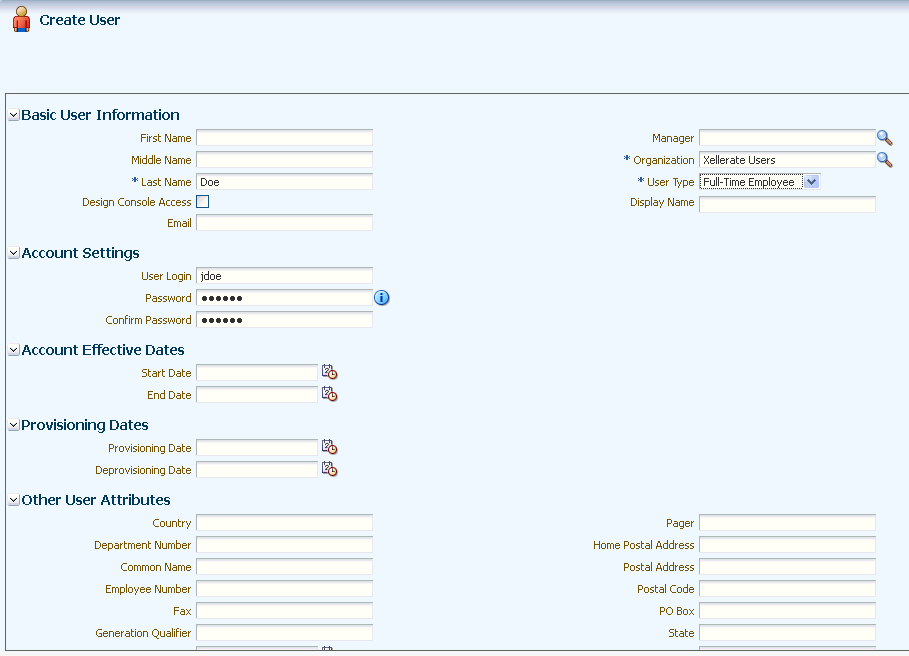
On the user details page, enter values for the OIM User fields, and then click Save. Figure 3-1 shows this page.
-
-
If you want to provision a target system account to an existing OIM User, then:
-
On the Welcome to Identity Administration page, search for the OIM User by selecting Users from the list on the left pane.
-
From the list of users displayed in the search results, select the OIM User. The user details page is displayed on the right pane.
-
-
On the user details page, click the Resources tab.
-
From the Action menu, select Add Resource. Alternatively, you can click the add resource icon with the plus (+) sign. The Provision Resource to User page is displayed in a new window.
-
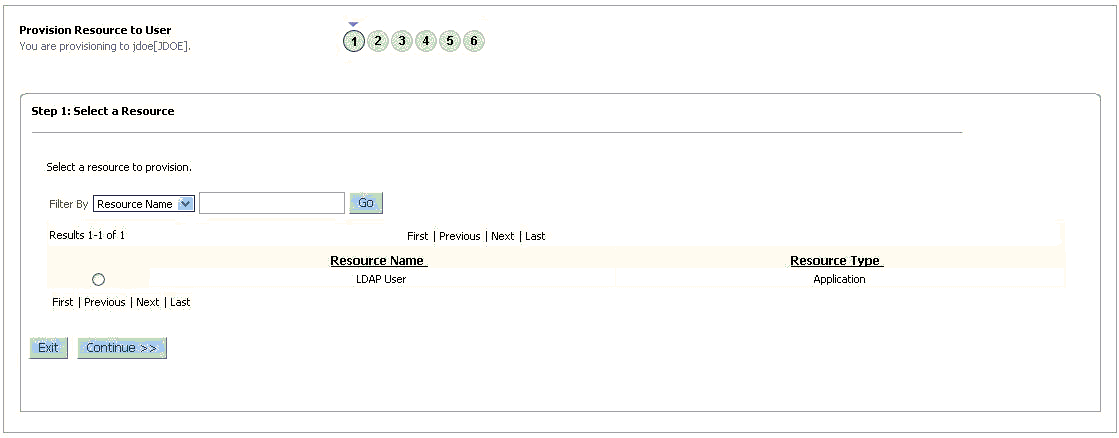
On the Step 1: Select a Resource page, select LDAP User resources from the list and then click Continue.
Figure 3-2 shows the Step 1: Select a Resource page.
Figure 3-2 Step 1: Select a Resource Page
Description of "Figure 3-2 Step 1: Select a Resource Page" -
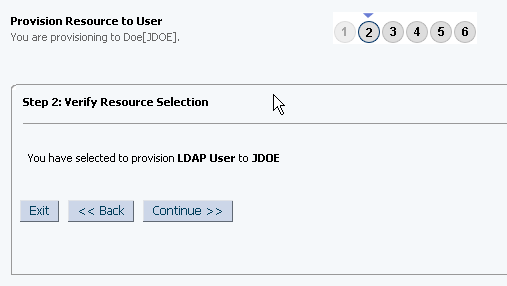
On the Step 2: Verify Resource Selection page, click Continue.
Figure 3-3 shows the Step 2: Verify Resource Selection page.
Figure 3-3 Step 2: Verify Resource Selection Page
Description of "Figure 3-3 Step 2: Verify Resource Selection Page" -
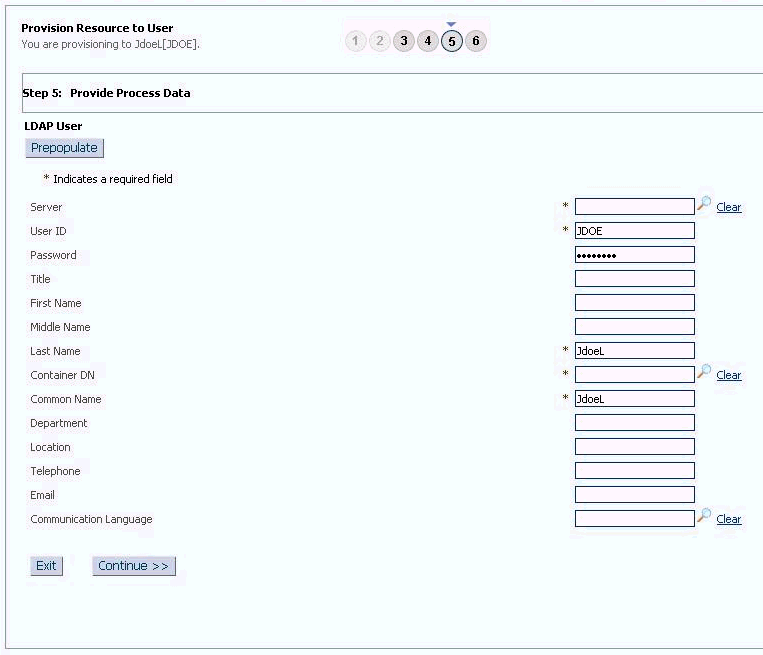
On the Step 5: Provide Process Data for LDAP User Form page, enter the details of the account that you want to create on the target system and then click Continue. Figure 3-4 shows the user details added.
Figure 3-4 Step 5: Provide Process Data for LDAP User Form Page
Description of "Figure 3-4 Step 5: Provide Process Data for LDAP User Form Page" -
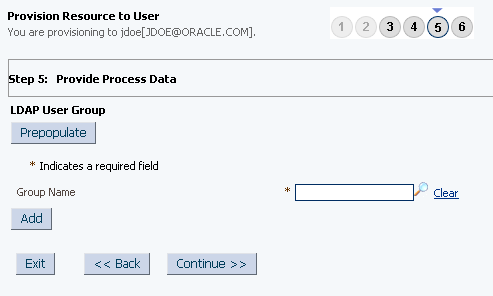
If required, on the Step 5: Provide Process Data for LDAP User Group page, search for and select a group for the user on the target system and then click Continue. Figure 3-5 shows this page.
Figure 3-5 Step 5: Provide Process Data for LDAP User Group Page
Description of "Figure 3-5 Step 5: Provide Process Data for LDAP User Group Page" -
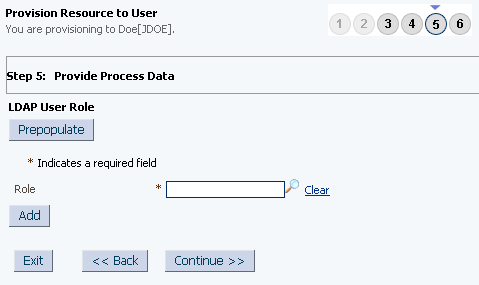
If required, On the Step 5: Provide Process Data for LDAP User Role page, search for and select role, and then click Continue. Figure 3-6 shows this page.
Figure 3-6 Step 5: Provide Process Data for LDAP User Role Page
Description of "Figure 3-6 Step 5: Provide Process Data for LDAP User Role Page" -
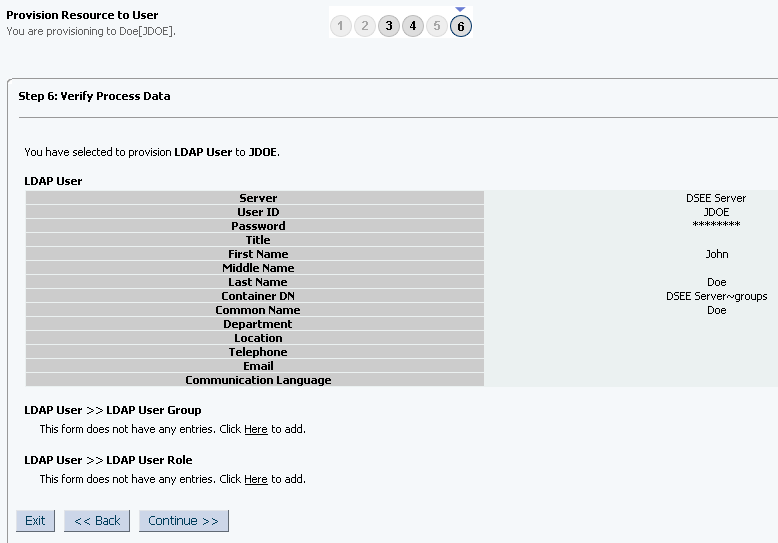
On the Step 6: Verify Process Data page, verify the data that you have provided and then click Continue. Figure 3-7 shows Step 6: Verify Process Data page.
Figure 3-7 Step 6: Verify Process Data Page
Description of "Figure 3-7 Step 6: Verify Process Data Page" -
Close the window displaying the "Provisioning has been initiated" message.
-
On the Resources tab, click Refresh to view the newly provisioned resource.
3.5.3 Direct Provisioning for Groups, Roles, and Organizations
Note:
This example is for an LDAPv3 target system. However, to provision another target system such as eDirectory or OID, the steps are similar.
Groups, Roles, and Organizations of directory can be provisioned to OIM organizations. To provision a resource by using the direct provisioning approach:
-
Log in to the Administrative and User Console.
-
If you want to first create an OIM Organization and then provision a target system account, then:
-
On the Welcome to Identity Administration page, in the Organizations region, click Create Organization.
-
On the organization details page, enter values for the OIM Organization fields, and then click Save.
-
-
If you want to provision a target system account to an existing OIM Organization, then:
-
On the Welcome to Identity Administration page, search for the OIM Organization by selecting Organizations from the list on the left pane.
-
From the list of users displayed in the search results, select the OIM Organization. The user details page is displayed on the right pane.
-
-
On the user details page, click the Resources tab.
-
From the Action menu, select Provision. Alternatively, you can click the add resource icon with the plus (+) sign. The Provision Resource to Organization page is displayed in a new window.
-
On the Step 1: Select a Resource page, select LDAP Group resources from the list and then click Continue.
Note:
If you want to provision Role or Organizational Unit, then select LDAP Role or LDAP Organization Unit respectively.
-
On the Step 2: Verify Resource Selection page, click Continue.
-
On the Step 5: Provide Process Data for LDAP Group Form page, enter the details of the account that you want to create on the target system and then click Continue.
-
On the Step 6: Verify Process Data page, verify the data that you have provided and then click Continue.
-
Close the window displaying the "Provisioning has been initiated" message.
-
On the Resources tab, click Refresh to view the newly provisioned resource.
Note:
OIM created Organizations do not relate to the OU objects on the Directory Resources of OID or Microsoft Active Directory. The OIM connector does not support the creation of any OU objects in OIM which can then be provisioned to OID or Microsoft Active Directory. Instead, OUs can be created directly on the Directory Services of OID or Microsoft Active Directory.
Additionally, as best practice, ensure that all newly created OUs and other objects are imported through Trusted Resource Reconciliation from OID or Microsoft Active Directory into OIM.
3.5.4 Request-Based Provisioning
A request-based provisioning operation involves both end users and approvers. Typically, these approvers are in the management chain of the requesters. The following sections discuss the steps to be performed by end users and approvers during a request-based provisioning operation:
Note:
The procedures described in these sections are built on an example in which the end user raises or creates a request for provisioning a target system account. This request is then approved by the approver.
3.5.4.1 End User's Role in Request-Based Provisioning
The following steps are performed by the end user in a request-based provisioning operation:
3.5.5 Switching Between Request-Based Provisioning and Direct Provisioning
Switching between request-based provisioning and direct provisioning involves the following:
Note:
It is assumed that you have performed the procedure described in Configuring Oracle Identity Manager for Request-Based Provisioning.
3.5.5.1 Switching From Request-Based to Direct Provisioning
If you want to switch from request-based provisioning to direct provisioning, then:
-
Log in to the Design Console.
-
Disable the Auto Save Form feature as follows:
-
Expand Process Management, and then double-click Process Definition.
-
Search for and open the LDAP User process definition.
-
Deselect the Auto Save Form check box.
-
Click the Save icon.
-
-
If the Self Request Allowed feature is enabled, then:
-
Expand Resource Management, and then double-click Resource Objects.
-
Search for and open the LDAP User resource object.
-
Deselect the Self Request Allowed check box.
-
Click the Save icon.
-
3.5.5.2 Switching From DIrect to Request-Based Provisioning
If you want to switch from direct provisioning back to request-based provisioning, then:
-
Log in to the Design Console.
-
Enable the Auto Save Form feature as follows:
-
Expand Process Management, and then double-click Process Definition.
-
Search for and open the LDAP User process definition.
-
Select the Auto Save Form check box.
-
Click the Save icon.
-
-
If you want to enable end users to raise requests for themselves, then:
-
Expand Resource Management, and then double-click Resource Objects.
-
Search for and open the LDAP User resource object.
-
Select the Self Request Allowed check box.
-
Click the Save icon.
-
3.6 Performing Provisioning Operations in Oracle Identity Manager Release 11.1.2 or Later
To perform provisioning operations in Oracle Identity Manager release 11.1.2 or later:
-
Log in to Oracle Identity Administrative and User console.
-
Create a user. See Managing Users in Oracle Fusion Middleware Performing Self Service Tasks with Oracle Identity Manager for more information about creating a user.
-
On the Account tab, click Request Accounts.
-
In the Catalog page, search for and add to cart the application instance created in Step 3, and then click Checkout.
-
Specify value for fields in the application form and then click Ready to Submit.
-
Click Submit.
-
If you want to provision entitlements, then:
-
On the Entitlements tab, click Request Entitlements.
-
In the Catalog page, search for and add to cart the entitlement, and then click Checkout.
-
Click Submit.
-
3.7 Uninstalling the Connector
If you want to uninstall the connector for any reason, see Uninstalling Connectors in Oracle Fusion Middleware Administering Oracle Identity Manager.
