You are here: Security > Application Security > Transaction Security in Admin Explorer
Oracle® Insurance Rules Palette 9.5.0.0 E23638_01
Transaction Security
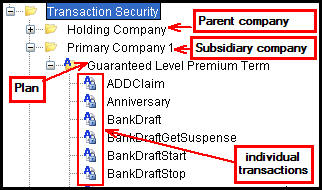
After Company and Plan security have been defined, the transactions
associated with the company and plans are displayed under the Transaction
Security folder. Plan
folders are listed inside the associated company folder.
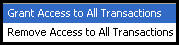
Security can be added to all transactions in a plan by right-clicking
on the plan name and selecting Grant Access to All Transactions. Security can also be assigned
to individual transactions by opening the Plan folder
and selecting a specific transaction.
Transaction Security
Right-Click Options
Security is applied from the top down. Once
Primary Company security is defined in the Company file and the Company pages,
then the Plan Security folder will populate with available plans. Once
plan security is defined, then the Transaction Security folder will populate
with available transactions.
Explanation of Transaction Security
To open a Transaction Security editor, right-click on the transaction and select Check-out.
If the underlying rule has a context that allows state overrides, the Rules Palette will prompt the user to select a state value from a context pop-up window.This state value is used to resolve potential copybooks for their field information.
-
Transaction level security: grants
access to all buttons and fields associated with the transaction
by clicking the checkbox at the top of the Configuration Area to the right
of the transaction's name.
-
Button security: grants
access to individual buttons and actions for the transaction. Button security is activated by clicking the checkbox to the
right of a button. Buttons that are unchecked will
not be visible to the user in OIPA. Override buttons receive security from this section. These override buttons are related to the TransactionTimes business rule .
- ActivityAddOverride: controls the display of the Override option on the Add Activity screen when an activity error occurs due to the TransactionTimes business rule.
- ActivityDelete: When an activity is pending this controls the display of the trash can
 icon to the right of the activity. This icon allows a user to delete an activity.
- ActivityDeleteOverride: controls the ability to override and delete an activity that could not process when a TransactionTimes business rule is attached.
- ActivityDetail; controls the display of activity detail inside the Add Activity window when a new activity is added.
- ActivityError: controls the display of the error
 icon in the Action column on the Activity screen. This icon displays when an activity cannot process due to errors.
- ActivityErrorOkOverride: controls the display of the OK button on the Error Override window when the activity is halted due to the TransactionTimes business rule. A user cannot override the error without this privilege.
- ActivityPostAssignmentError:controls the display of the PostAssignment error icon in the Action column on the Activity screen. This icon displays when an activity cannot process due to a post assignment validation error post assignment validation error.
- ActivityPostAssignmentErrorOkOverride: controls the display of the OK button on the Post Assignment Error Override window. A user cannot override an error without this privilege.
- ActivityProcess: controls the display of the lightning bolt
 icon in the Action column on the Activity screen. This icon allows a user to process an activity.
- ActivityProcessNUVPending: controls the display of the lightning bolt icon to process an activity that is in NUV Pending status.
- ActivityProcessNUVPendingOverride: controls the display of the override option when an activity in NUVPending fails to process.
- ActivityProcessOverride: controls the display of the override option when normal activity processing is interrupted.
- ActivityRecycle: controls the display of the recycle
 icon to the right of the activity. It allows a user to recycle a processed activity.
- ActivityRequirement: controls the display of the requirement
 icon in the Action column on the Activity screen. This icon only applies to activities that have requirements that must be satisfied before the activity can process.
- ActivityRequirementDeleteOverride: controls the display of the Delete option in the Activity Requirements window, when TransactionTimes halts activity processing.
- ActivityRequirementOkOverride: controls the display of the Override option in the Requirement window. This checkbox is accessed by clicking the requirement icon in the Action column on the Activity screen.
- ActivityResult: controls the display of the Activity Detail icon to the left of a processed activity. When clicked, it shows the results of the processed activity.
- ActivityReverse: controls the display of the trash can icon for activities that have already processed.
- ActivityReverseOverride: controls the display of the recycle icon when TransactionTimes halts the processing of an activity.
- ActivityUpdateOverride: controls the display of an update option for an activity in pending status that has not been able to process due to the TransactionTimes business rule.
- Ok: controls the display of the OK button when the Add Activity window is open.
- Quote: controls the display of the Quote button in the Add Activity window when an activity is initially added. This button is only available for Client Financial and Policy Financial transactions.
- RequirementDelete: controls the display of the Delete option when a user right-clicks on a requirement from the Requirement window. Click the requirement icon in the Action column on the Activity screen to reveal a list of requirements with right-click menus.
- RequirementDetail: controls the display of the Requirement.Detail option when a user right-clicks on a requirement from the Requirement window. Click the requirement icon in the Action column on the Activity screen to reveal a list of requirements with right-click menus.
- RequirementOK: controls the display of the OK button when the Requirement window is open.
- Verify: controls the display of the Verify button in the Add Activity window when a new activity is added. This button is only available for Client Financial and Policy Financial transactions.
-
Transaction Comments Button Security: this
section will be enabled for transactions that were configured with Allow
Comments=Yes. Specific
levels of access to activity comments and the buttons in OIPA are set
here.
-
Add: options
are Yes, user can add comments or
No, user cannot add comments. This may be
used in combination with either one of the View options.
-
View: options
are
-
ViewAllComments: This provides access to the
comment icon regardless of who added an entry to the activity. This is
the default selection.
-
ViewUserCommentsOnly: This
provides access to the comment icon only when the comment entries added
or last modified by the user exist.
-
Update: options
are
-
UpdateAllComments: This allows the user to save
modifications to any non-shadowed comment entry. This can only be used
when View All access is granted in the View drop down box. This
is the default selection.
-
UpdateUserCommentsOnly: This
allows the user to save modifications to comment entries. Comment
entries are limited to those created by or last modified by the user.
This may be used in combination with either View option.
-
Delete: options
are
- DeleteAllComments: This allows the user
to delete comment entries, regardless of who added the entry. This can
only be used in combination with View All access. This is the default
selection.
- DeleteUserCommentsOnly: This
allows the user to delete comment entries. Comment
entries are limited to those created by or last modified by the user.
This may be used in combination with either View option.
-
View History: options
are
-
ViewAllCommentsHistory: This provides access
to all history records regardless of who executed the action. This is
the default selection. This selection should only be available when View
All access is granted in the View drop down.
-
ViewUserCommentsOnly: This
provides access to the history records on which the user has executed
an action. This may be used in combination with
either View option.
-
Field security: grant
access to individual fields. There are three options
for field security:
-
Visible and Editable: the
field is both enabled and the value held in the field is visible. This
is the default setting and when selected no database entry will be made.
-
Hide field value: the field
is disabled, but the value held in the field is hidden.
-
Disable field value: the
field is disabled and any values are visible.
-
Requirement Fields: this section will be enabled for transactions that were configured with requirements. Specific levels of access to requirement fields in OIPA are set here.
- Masking: Add
security to the mask applied to a text
field. Security levels are defined in
AsCodeMaskSecurityLevel and AsMaskDetail.
Transaction Security Folder Structure
Copyright © 2009, 2012, Oracle and/or its affiliates. All rights reserved. Legal Notices