6 Managing Oracle WebCenter Content on IBM WebSphere
This chapter contains information about managing Oracle WebCenter Content applications on IBM WebSphere Application Servers. It describes differences in performing some Oracle WebCenter Content installation, configuration, and administration tasks on IBM WebSphere from performing these tasks on Oracle WebLogic Server. It also specifies restrictions for some tasks on IBM WebSphere.
This chapter contains the following sections:
-
Configuring Oracle WebCenter Content Applications on IBM WebSphere
-
Administering Oracle WebCenter Content Applications on IBM WebSphere
6.1 Installing Oracle WebCenter Content on IBM WebSphere
The following sections describe differences for performing some Oracle WebCenter Content installation tasks on IBM WebSphere instead of on Oracle WebLogic Server:
-
Installing Oracle WebCenter Content Products on IBM WebSphere
-
Setting JDBC Driver Environment Variables for a DB2 Database
6.1.1 Changing Java Socket Factories in the IBM JDK
If you are using the IBM JDK with Oracle WebCenter Content and IBM WebSphere, certain functionality will not work correctly unless the Java socket factories are changed. For example, during installation, the check for patches feature would fail to connect to Oracle Support. The IBM JRE has its own Secure Sockets Layer (SSL) socket factories, which you need to change to the default JSSE implementation before installing Oracle WebCenter Content.
To change Java socket factories in the IBM JDK:
-
Open the
WAS_HOME/java/lib/security/java.securityfile in a text editor.Note:
If you are providing the path to a IBM WebSphere on a Windows operating system, and a directory name in the path includes a space, you need to supply a shortened name, with a tilde character (~) followed by a1instead of the character before the space. For example, the default location of a WebSphere Application Server on a Windows operation system is in a subdirectory of Program Files, a directory name that includes a space:C:\Program Files\IBM\WebSphere\Appserver
This location needs to be specified as follows:
C:\Progra~1\IBM\WebSphere\Appserver
If you are browsing to this location, the Browse button incorrectly populates the field with the space rather than
C:\Progra~1. -
Uncomment the default JSSE implementation:
# Default JSSE socket factories
ssl.SocketFactory.provider=com.ibm.jsse2.SSLSocketFactoryImpl
ssl.ServerSocketFactory.provider=com.ibm.jsse2.SSLServerSocketFactoryImpl
-
Comment out the WebSphere SSL implementation:
WebSphere socket factories (in cryptosf.jar)
#ssl.SocketFactory.provider=com.ibm.websphere.ssl.protocol.SSLSocketFactory
#ssl.ServerSocketFactory.provider=com.ibm.websphere.ssl.protocol.SSLServerSocketFactory
-
Save the file.
Alternatively, you can set these properties before a call is made to the Oracle Universal Installer API.
6.1.2 Installing Oracle WebCenter Content Products on IBM WebSphere
Use the Oracle Fusion Middleware 11g WebCenter Content Installer to install the binaries for the following Oracle WebCenter Content products on IBM WebSphere.
-
Oracle WebCenter Content (WebCenter Content, which includes Oracle WebCenter Content Server)
-
Oracle WebCenter Content: Inbound Refinery (Inbound Refinery)
-
Oracle WebCenter Content: Records (Records)
For information about the general installation process on IBM WebSphere, see Chapter 2, "Installing and Configuring Oracle Fusion Middleware on IBM WebSphere." For details about differences that apply to all Oracle Fusion Middleware components, see Section 2.5.2, "Special Instructions When Installing Oracle Fusion Middleware with IBM WebSphere."
Note:
The Middleware home directory must be outside of the IBM WebSphere home directory (WAS_HOME), on the same host, so that updates to the application server do not affect the Middleware home directory.The installation instructions are similar to those provided for Oracle WebLogic Server in the "Installing Oracle WebCenter Content" chapter and "Installation Screens" appendix of the Oracle WebCenter Content Installation Guide.
6.1.3 Setting JDBC Driver Environment Variables for a DB2 Database
If you are using a DB2 database, you must set the following environment variables to include the full paths to db2jcc4.jar, db2jcc_license_cu.jar, and db2jcc_license_cisuz.jar:
-
DB2_JCC_DRIVER_NATIVEPATH
-
DB2_JCC_DRIVER_PATH
Do this immediately after installing Oracle WebCenter Content products. If you do not do this, all DB2 connection tests will fail.
To set JDBC driver environment variables for a DB2 Database:
-
Open the IBM WebSphere Administrative Console, at this URL:
https://host:port/ibm/console
-
Log in as an administrator, expand Environment on the left of the console, and click WebSphere variables.
-
From the Scope list on the WebSphere Variables page, choose the node that contains your Oracle WebCenter Content installation.
-
Locate and set the following JBDC variables:
-
DB2_JCC_DRIVER_NATIVEPATH
-
DB2_JCC_DRIVER_PATH
Specify the location of the required DB2 drivers (
db2jcc4.jar,db2jcc_license_cu.jar, anddb2jcc_license_cisuz.jar). For example:DB2_JCC_DRIVER_NATIVEPATH = WAS_HOME/deploytool/itp/plugins/com.ibm.datatools.db2_2.1.102.v20100709_0407/driver DB2_JCC_DRIVER_PATH WAS_HOME/deploytool/itp/plugins/com.ibm.datatools.db2_2.1.102.v20100709_0407/driver
In the example,
WAS_HOMErefers to the location where IBM WebSphere is installed, as described in Section 2.4.2.3, "About the WAS_HOME Directory Path."Note:
If you are providing the path to a WebSphere Application Server on a Windows operating system, and a directory name in the path includes a space, you need to supply a shortened name, with a tilde character (~) followed by a1instead of the character before the space. For example, the default location of a WebSphere Application Server on a Windows operation system is in a subdirectory of Program Files, a directory name that includes a space:C:\Program Files\IBM\WebSphere\Appserver
This location needs to be specified as follows:
C:\Progra~1\IBM\WebSphere\Appserver
If you are browsing to this location, the Browse button incorrectly populates the field with the space rather than
C:\Progra~1. -
-
Save both settings.
-
If you are using a cluster, repeat these steps for each node in the cluster.
-
To test the DB2 connection:
-
Expand Resources and JDBC on the left of the console, and click Data sources.
-
Select a data source in the table, and click the Test Connection button.
-
6.2 Configuring Oracle WebCenter Content on IBM WebSphere
The following sections describe differences for performing some configuration tasks for configuring Oracle WebCenter Content on IBM WebSphere instead of on Oracle WebLogic Server:
-
Configuring an LDAP Server for Oracle WebCenter Content Users and Groups on IBM WebSphere
-
Increasing the Java VM Heap Size for an Oracle WebCenter Content Application Server
-
Configuring the Report Library for Records Management in Content Server
-
Using Oracle WebCenter Content wsadmin Commands Instead of WLST Commands
6.2.1 Configuring Oracle WebCenter Content on IBM WebSphere
Configuration of Oracle WebCenter Content on IBM WebSphere is largely the same as the configuration of Oracle WebCenter Content described in the Oracle WebCenter Content Installation Guide. After you have successfully run the Oracle Fusion Middleware 11g WebCenter Content Installer and created application schemas, you can deploy and configure WebCenter Content (and Content Server), Inbound Refinery, and Records as applications.
Each Oracle WebCenter Content application is deployed to a WebSphere Application Server Java EE container. The XML files are the same as for Oracle WebLogic Server.
For information about using the Fusion Middleware Configuration Wizard, including information about adding servers and clusters to a cell, see the Oracle Fusion Middleware Configuration Guide for IBM WebSphere Application Server.
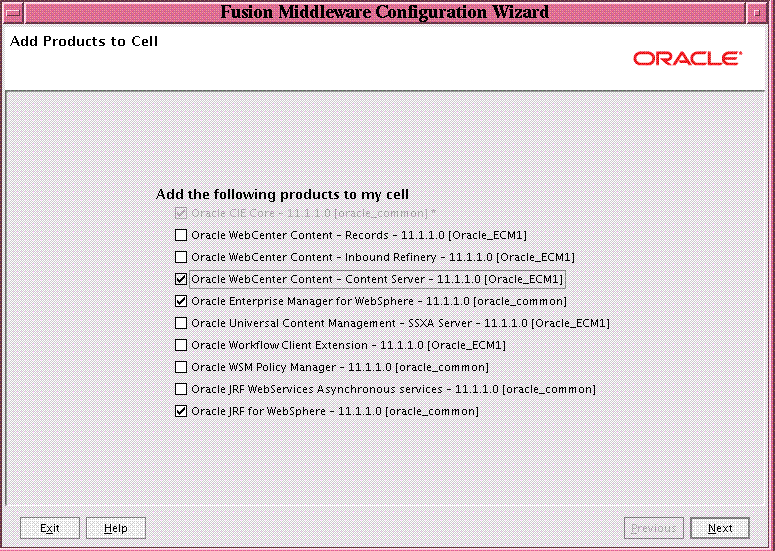
The configuration screen in Figure 6-1 shows templates for Oracle WebCenter Content applications and related templates that you can add to a WebSphere Application Server cell.
6.2.2 Specifying Deployment with SSL
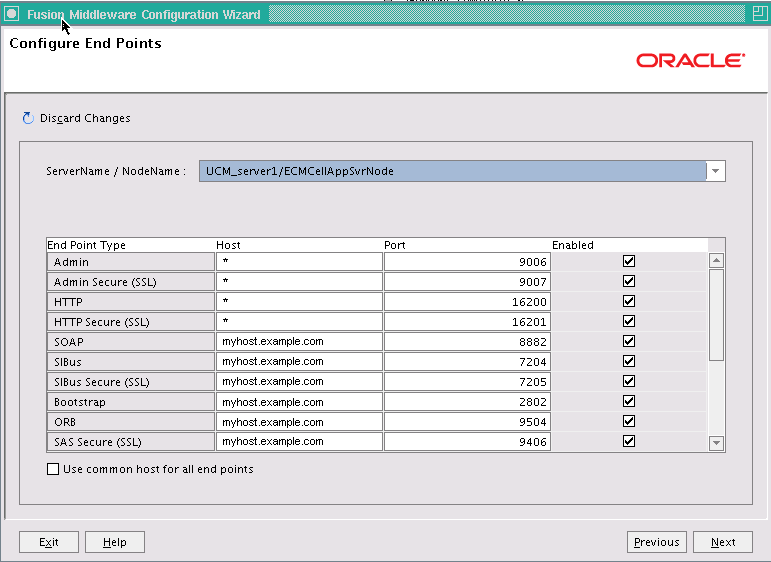
You can configure WebCenter Content, Inbound Refinery, or Records for deployment with or without Secure Socket Layer (SSL). For this configuration on Oracle WebLogic Server, the Fusion Middleware Configuration Wizard provides an SSL Enabled checkbox and SSL listen port field for each server on the Configure Managed Servers screen. For SSL configuration on IBM WebSphere, the Configuration Wizard provides an Enabled checkbox and Port field for each end point on the Configure End Points screen.
All ports, including SSL ports, are enable by default on IBM WebSphere. The End Point Type column on the Configure End Points screen indicates whether a port is for SSL, with "(SSL)" at the end of the column value. Figure 6-2 shows an example of this screen.
6.2.3 Configuring an LDAP Server for Oracle WebCenter Content Users and Groups on IBM WebSphere
When you configure Oracle WebCenter Content on IBM WebSphere, an internal Lightweight Directory Application Protocol (LDAP) server is not automatically configured with users and groups for the WebCenter Content (Content Server), Inbound Refinery, or Records applications. You must manually perform these configuration tasks in an external LDAP server, such as Oracle Internet Directory, after installation and before you start the application servers.
For information about the LDAP servers that Oracle Fusion Middleware supports, see the certification information on the Oracle Technology Network:
http://www.oracle.com/technology/software/products/ias/files/fusion_certification.html
For information about installing and configuring a supported LDAP server, see Section 4.1.2, "Configuring Oracle SOA Suite and Oracle BAM in an External LDAP Server." To switch LDAP authentication providers, follow the instructions in this section.
6.2.4 Configuring an Administration User for WebCenter Content
The WebCenter Content administrator has to have an entry in the LDAP authentication provider and in the Administrators group. You can add a user to the Administrators group through Fusion Middleware Control.
6.2.5 Setting Up Node Manager
After using the Fusion Middleware Configuration Wizard to install and configure Oracle WebCenter Content products on IBM WebSphere, start the IBM WebSphere Deployment Manager, Node Manager, and application servers, as described in Section 2.8, "Task 8: Start the IBM WebSphere Servers."
For Oracle WebCenter Content, you must also run the syncNode script, as follows:
WAS_HOME/bin/syncNode.sh localhost SOAP_CONNECTOR_ADDRESS -profileName profile_name -username was_admin_user -password was_password
The SOAP_CONNECTOR_ADDRESS is the value of Management SOAP connector port in the WAS_HOME/profiles/profile_name/logs/AboutThisProfile.txt or com.ibm.ws.scripting.port in the WAS_HOME/profiles/profile_name/properties/wsadmin.properties file.
Note:
ThesyncNode script should be run only one time, during the first startup sequence. Run it after step 1, "Start the Deployment Manager," in Section 2.8, "Task 8: Start the IBM WebSphere Servers."6.2.6 Launching the IBM WebSphere Administrative Console
The IBM WebSphere Administrative Console provides a web-based interface for managing the WebSphere Application Server environment. The IBM WebSphere Administrative Console is similar to the Oracle WebLogic Server Administration Console. You cannot use the IBM WebSphere Administrative Console to manage the Oracle WebCenter Content applications, but you can use the console to monitor and manage the cell and the servers on which WebCenter Content, Inbound Refinery, and Records are deployed. For more information, see Section 3.1.1, "Using the WebSphere Administrative Console."
6.2.7 Increasing the Java VM Heap Size for an Oracle WebCenter Content Application Server
You need to increase the size of the heap allocated for the Java Virtual Machine (VM) on which each Oracle WebCenter Content application runs to at least 1 GB (1024 MB) for the IBM JDK. If you do not increase the Java VM heap size, then Oracle support and development will not accept escalation of runtime issues, especially out-of-memory issues.
You can use the IBM WebSphere Administrative Console to adjust the heap size for a Java VM. To increase the heap size, you set the values of the JVM startup parameter.
To increase the Java VM heap size for an Oracle WebCenter Content application server with the IBM WebSphere Administrative Console:
-
Log in to the IBM WebSphere Administrative Console as an administrator at
https://hostname:WC_Adminhost_port/ibm/console; for example:https://host42.example.com:9002/ibm/console
-
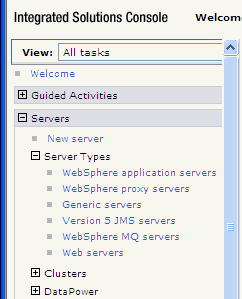
In the navigation tree on the left, shown in Figure 6-3, expand Servers and Server Types, and click WebSphere application servers.
-
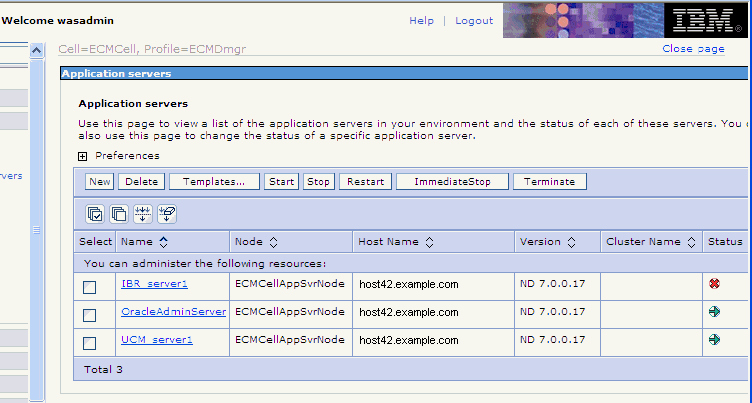
On the Application servers page, shown in Figure 6-4, click an Oracle WebCenter Content application server for which you want to increase the heap size.
-
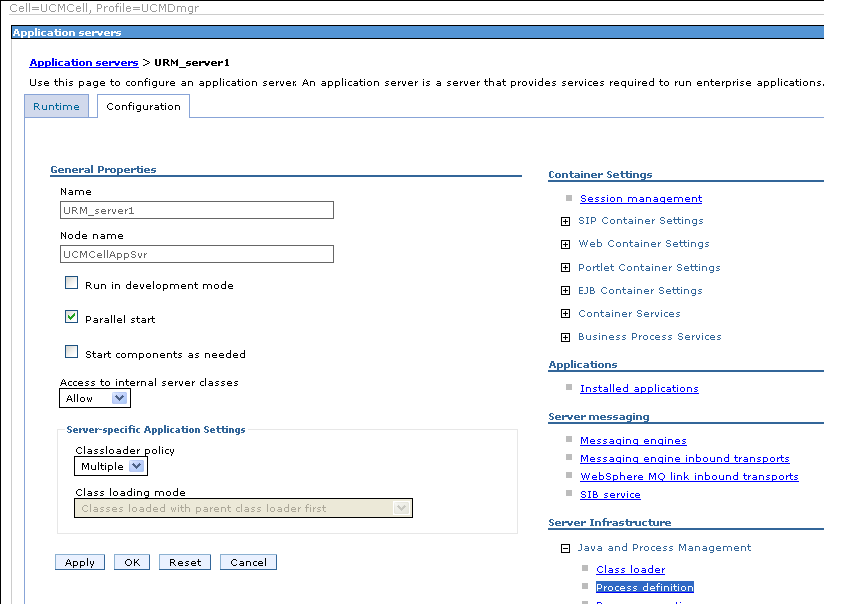
On the General Properties page, shown in Figure 6-5, expand Java Process Management, and click Process Definition.
-
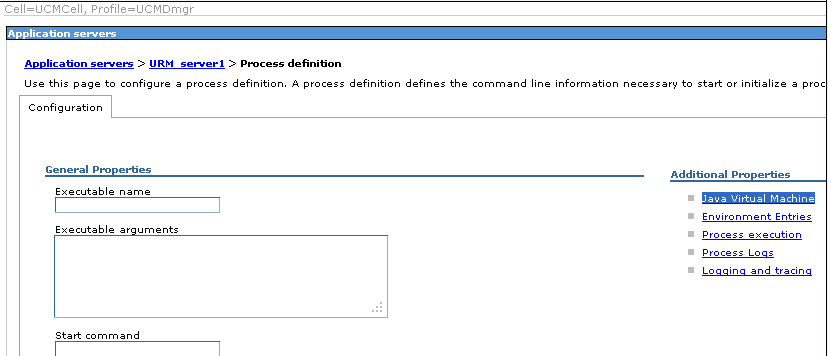
On the Process Definition page, shown in Figure 6-6, click Java Virtual Machine under Additional Properties.
-
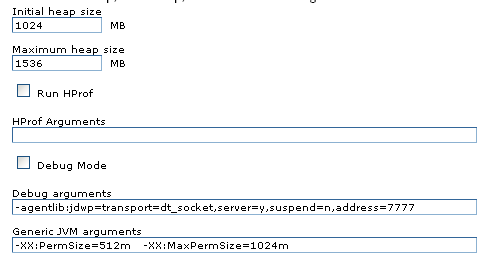
Set the Initial Heap, Max Heap, and Generic JVM Arguments fields to the values shown in Figure 6-7.
The PermSize value in the Generic JVM Arguments section needs to be half of the MaxPermSize value.
-
Repeat steps 3 through 7 for each Oracle WebCenter Content application server.
-
Restart the Oracle WebCenter Content application servers, as described in Section 3.2.2, "Starting and Stopping Servers on IBM WebSphere."
6.2.8 Configuring the Report Library for Records Management in Content Server
If you plan to configure the Records Management feature in Content Server, you need configure the report library for Records Management after the server node is created for WebCenter Content, before starting the server for the first time. Without this library, you cannot check in any templates to Content Server.
To configure the report library, you need to add the oracle.xdo.runtime.ear library manually from the IBM WebSphere Administrative Console.
Note:
This library is not needed for Oracle WebCenter Content: RecordsTo configure the report library for Records Management in Content Server:
-
From the IBM WebSphere Administrative Console, click Shared Libraries under Environment, on the left.
-
In the shared libraries display, select the scope value as the WebCenter Content node that needs the library.
-
If the
oracle.xdo.runtime.earlibrary does not already exist in the Shared Libraries list, click New, and enter these values:Name=oracle.xdo.runtime_1_11.1.1.3.0 Classpath= WC_CONTENT_ORACLE_HOME/ucm/idc/components/ReportPublisher/lib/APP-INF/lib -
Click Apply.
-
In the Servers section on the left, under Server Types, click WebSphere application servers.
-
In the table on the Application servers screen, click Oracle WebCenter Content.
-
In the installed applications display, click WebCenter Content.
-
In the application configuration display, under References, click Shared library references.
-
Select the Oracle WebCenter Content application, and click the Reference Shared Libraries button.
-
In the Shared Library Mapping display, select oracle.xdo.runtime_1_11.1.1.3.0 on the left, move the selection to the right, and click OK.
-
In the Reference Shared Libraries display, click OK.
-
Under Messages at the top, click Save to save the local configuration to the master configuration.
For information about adding the Records Management feature to Content Server, see "Configuring Records Management in Content Server" in the Oracle WebCenter Content Installation Guide.
6.2.9 Configuring Session Persistence in a Clustered Environment
The configuration for session persistence in a clustered environment is different for WebSphere Application Server than for Oracle WebLogic Server, in which the element <persistent-store-type>replicated_if_clustered</persistent-store-type> can be set in the servlet to provide session persistence. In WebSphere Application Server, the web container's session management property for session persistence is sessionPersistenceMode, which is stored in the WAS_HOME/profiles/profile_name/config/cells/cell_name/nodes/node_name/servers/server_name/server.xml file.
You can display the current sessionPersistenceMode value in the IBM WebSphere Administrative Console.
You can set the session persistence mode while creating a cluster through the IBM WebSphere Administrative Console. If you use the Fusion Middleware Configuration Wizard to create a cluster, after the cluster is created, you must configure the session persistence mode manually, through the IBM WebSphere Administrative Console, and then restart the application servers.
To display the session persistence mode in the IBM WebSphere Administrative Console:
-
Log in to the IBM WebSphere Administrative Console as an administrator at
https://hostname:WC_Adminhost_port/ibm/console. -
Expand Servers and Server Types on the left, and click WebSphere application servers.
-
Click an Oracle WebCenter Content application server on the Application Servers page.
-
Expand Web Container Settings, and click Web container, under Container Settings on the Configuration page for the application server.
-
Click Session management, under Additional Properties on the Web container page.
-
Click Distributed environment settings, under Additional Properties on the Session management page.
-
The Configuration page for Distributed environment settings displays the current
sessionPersistenceModevalue under General Properties, as the selected value for Distributed sessions.The value of
sessionPersistenceModecan beNone,Database, orData_Replication(displayed as the Memory-to-memory replication mode on the console.
To set the session persistence mode for a cluster:
-
If you use the IBM WebSphere Administrative Console to create a cluster, you must select the option Configure HTTP session memory-to-memory replication.
When this option is selected, a replication domain is created automatically, and the
sessionPersistenceModeproperty is automatically set to theData_Replicationmode for each member of the new cluster. The createdReplicationdomain, which has the same name as the cluster name, is automatically set for the Replication Domain property. -
If you use the Fusion Middleware Configuration Wizard to create a cluster, the Configuration Wizard does not present any options for cluster creation, and it creates the new cluster without creating a replication domain.
The
sessionPersistenceModeproperty is not set to theData_Replicationmode for each cluster member. In this case, you must configuresessionPersistenceModemanually, as the following procedure describes.
To configure the session persistence mode manually:
-
Log in to the IBM WebSphere Administrative Console as an administrator at
https://hostname:WC_Adminhost_port/ibm/console. -
Create a replication domain (if there is none, or if you want to create a new replication domain for a cluster you created through the Fusion Middleware Configuration Wizard):
-
Expand Environment on the left of the console, and click Replication domains.
-
Click the New button on the Replication domains page.
-
Enter the domain name, and select the option Entire Domain under Number of Replicas.
-
Click the Apply or OK button, and then Save.
-
-
Set the
sessionPersitenceModeproperty value for every server member in the cluster:-
Expand Servers and Server Types on the left, and click WebSphere application servers.
-
Click an Oracle WebCenter Content application server on the Application Servers page.
-
Expand Web Container Settings, and click Web container, under Container Settings on the Configuration page for the application server.
-
Click Session management, under Additional Properties on the Web container page.
-
Click Distributed environment settings, under Additional Properties on the Session management page.
-
Select the Memory-to-memory replication option, under Distributed sessions on the Configuration page for Distributed environment settings (to set
sessionPersistenceModetoData_Replication. -
On the Configuration page for Memory-to-memory replication, select the replication domain you created for this cluster.
-
Select the proper Replication mode for your configuration.
-
Click the Apply or OK button, and then Save.
-
-
Restart the Oracle WebCenter Content application servers, as described in Section 3.2.2, "Starting and Stopping Servers on IBM WebSphere."
6.2.10 Using Oracle WebCenter Content wsadmin Commands Instead of WLST Commands
All Oracle WebCenter Content wsadmin commands supported by WebSphere Application Server have equivalent WebLogic Scripting Tool (WLST) commands. Table 6-1 describes differences between wsadmin and WLST.
Table 6-1 Differences Between wsadmin and WLST Commands
| Issue | WLST | wsadmin |
|---|---|---|
|
Command Names |
Documented in "Oracle WebCenter Content Custom WLST Commands" in the Oracle Fusion Middleware WebLogic Scripting Tool Command Reference |
All UCM.getUCMHttpServerAddress UCM.setUCMServerPort UCM.getUCMMailServer |
|
Boolean Type |
|
|
|
server, applicationVersion |
Valid arguments |
Not used |
|
Offline or Online |
Run WLST commands in offline mode |
Run |
|
Clone command |
Used to clone WebLogic managed servers when setting up a cluster |
n/a |
Note:
Thewsadmin online commands using MBeans may not provide specific error details. Instead, you may see just an MBeanException message.Execute Oracle WebCenter Content wsadmin commands from the /common/bin directory in the WebCenter Content Oracle home:
cd WC_CONTENT_ORACLE_HOME/common/bin
./wsadmin.sh
To invoke online help for Oracle WebCenter Content commands, enter the following command:
wsadmin> print OracleHelp.help('UCM')
To invoke online help for a specific command, enter the following command:
wsadmin> print OracleHelp.help('command_name')
To use the commands, you must be connected to a running WebSphere Application Server instance that has the UCM Config MBeans deployed. The MBeans are typically installed in the server. To connect to a server instance, run the wsadmin.sh script with these options:
./wsadmin.sh -conntype SOAP -port port -user username -password password
For example:
./wsadmin.sh -conntype SOAP -port 8879 -user wasadmin -password password
Table 6-2 shows the wsadmin commands that are available for Oracle WebCenter Content server configuration.
Table 6-2 wsadmin Commands for Oracle WebCenter Content
| wsadmin Command | Description |
|---|---|
|
|
Gets the version of the running instance of Content Server. |
|
|
Returns the Content Server HTTP Server Address. |
|
|
Gets the IP Address Filter Configuration Parameter. |
|
|
Returns the Content Server Mail Server Configuration Value. |
|
|
Gets the Server Port Configuration Parameter from the |
|
|
Gets the amount of time the Content Server instance has been up. |
|
|
Gets the Content Server SMTP Port Value. |
|
|
Gets the Content Server Administrator Mail Address from the |
|
|
Gets the SSL Value from the |
|
|
Sets the Content Server HTTP Server Address. |
|
|
Sets the IP Address Filter Configuration Parameter. |
|
|
Sets the Content Server Mail Server Configuration Value. |
|
|
Sets the Server Port Configuration Parameter. |
|
|
Sets the Content Server SMTP Port Value. |
|
|
Sets the Content Server Administrator Mail Address. |
|
|
Sets the SSL Value to |
Example 6-1 shows the syntax and an example of the UCM.getUCMMailServer command.
Example 6-1 Get the Content Server Mail Server
Syntax:  UCM.getUCMMailServer(AppName)

Example: UCM.getUCMMailServer('Oracle WebCenter Content - Content Server')
Example 6-2 shows the syntax and an example of the UCM.setUCMServerPort command.
Example 6-2 Set the Content Server Port
Syntax:  UCM.setUCMServerPort(value,AppName)

Example: UCM.setUCMServerPort(4444,'Oracle WebCenter Content - Content Server')
Example 6-3 shows the help output and an example for the UCM.setUCMServerPort command.
Example 6-3 Get the Content Server Version
wsadmin>print OracleHelp.help('UCM.getUCMCSVersion')


Gets the value of Content Server Version from the Content Server API's and displays it.


Syntax:

getUCMCSVersion() or getUCMCSVersion(application_name).


Example:

Example Output: 11g.1.1.0
Example Setting: getUCMCSVersion('Oracle WebCenter Content Server')


wsadmin>UCM.getUCMCSVersion()
11gr1-trunk-idcprod1-111007T175404(Build: 7.3.3.183)
wsadmin>
For more information about wsadmin commands, see Section 3.1.3, "Using the Oracle Fusion Middleware wsadmin Commands."
For information about the equivalent Oracle WebCenter Content WLST commands, see "Oracle WebCenter Content Custom WLST Commands" in the Oracle Fusion Middleware WebLogic Scripting Tool Command Reference.
6.3 Configuring Oracle WebCenter Content Applications on IBM WebSphere
For information about the postinstallation configuration of Oracle WebCenter Content applications, see these chapters in the Oracle WebCenter Content Installation Guide:
The following sections describe differences for performing some postinstallation configuration tasks for Oracle WebCenter Content applications on IBM WebSphere instead of on Oracle WebLogic Server:
Important:
The first user to log in to Oracle WebCenter Content Server must be the administrator of the cell, to complete the configuration of Content Server. For more information, see "Completing the Initial WebCenter Content Configuration" in the Oracle WebCenter Content Installation Guide.6.3.1 Mapping the weblayout Directory
The weblayout directory is the directory where WebCenter Content stores all the content checked into the server. This location is also where the content and other web assets are retrieved by the servlet or web server. WebCenter Content configures the mapping of the context root to a file system path at runtime in the servlet initializations. This configuration is done because the administrator can change the file system location of the weblayout directory during the initial configuration of Content Server, which happens the first time it is accessed.
For WebSphere Application Server, the weblayout directory is mapped to the HttpRelativeWebRoot value at runtime by appending the context root for WebCenter Content, /cs/ by default, to the URL for the weblayout directory. You can locate this directory on a network file system to accommodate a large collection of content.
Figure 6-8 shows the postinstallation configuration page for Content Server. Before using Content Server, you need to make sure the context root for WebCenter Content is appended to the path for the weblayout directory, make any other configuration changes, and click SUBMIT to confirm the Content Server configuration. Then you need to and restart Content Server, as described in Section 6.4.1, "Starting or Restarting Content Server on IBM WebSphere."
Figure 6-8 Content Server Postinstallation Configuration
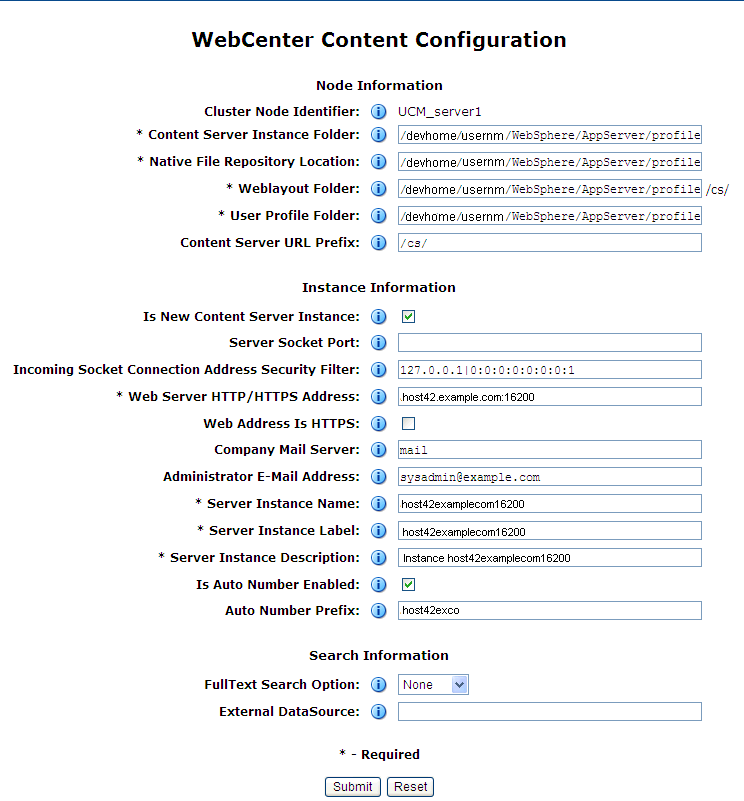
Description of "Figure 6-8 Content Server Postinstallation Configuration"
For information about the other values on the WebCenter Content Configuration page, see "Completing the Initial Configuration of Content Server" in the Oracle WebCenter Content Installation Guide.
6.3.2 Changing the Authentication Method for Oracle WebCenter Content Applications
If you want an Oracle WebCenter Content application to participate in single sign-on, you must specify CLIENT-CERT as the authentication method. By default, Oracle WebCenter Content applications specify FORM their authentication method. Unlike Oracle WebLogic Server, WebSphere Application Server does not support multiple, comma-separated authentication methods. You must change the authentication method to CLIENT-CERT for any Oracle WebCenter Content application to participate in single sign-on.
To change the authentication method for an Oracle WebCenter Content application:
-
Locate the
web.xmlfile for the application.For example, on a UNIX machine where WebSphere Application Server is installed, locate
web.xmlatWAS_HOME/profiles/profile_name/ config/cells/cellName/applications/ Oracle Universal Content Management - Content Server.ear/ deployments/Oracle WebCenter Content - Content Server/cs.war/WEB-INF/web.xml
-
Copy
web.xmlto a temporary location. -
Open
web.xmlin a text editor, and make these changes:-
Remove (or comment out) the following
<login-config>element:<login-config> <auth-method>FORM</auth-method> <realm-name>idcauth</realm-name> <form-login-config> <form-login-page>/login/login.htm</form-login-page> <form-error-page>/login/error.htm</form-error-page> </form-login-config> </login-config> -
Replace it with the following
<login-config>element:<login-config> <auth-method>CLIENT-CERT</auth-method> </login-config> -
Save the changes.
-
-
Redeploy the updated
web.xmlfile:-
Open the IBM WebSphere Administrative Console, at
https://hostname:WC_Adminhost_port/ibm/console; for example:https://host42.example.com:9002/ibm/console
-
Log in as an administrator.
-
Expand Applications and Application Types on the left of the console, and click WebSphere enterprise applications.
-
Select Oracle Universal Content Management - Content Server, and click the Update button.
-
Choose Replace or add a single file.
-
Specify the path to the
web.xmlfile you want to replace, starting with the name of the application's archive file (.war):cs.war/WEB-INF/web.xml -
Click Next.
-
In the section Specify the path to the file, enter the full path to the
web.xmlfile you updated in Step 3. -
Click Next, and follow through until the application is saved.
-
Click OK, and then click Save Changes.
Wait for a couple of minutes for the changes to be propagated.
-
To confirm the changes, navigate to the application's deployment descriptor, and view it.
Under WebSphere Enterprise Applications, choose Oracle Universal Content Management - Content Server, then Manage Modules, then cs.war, and then View Deployment Descriptor.
-
-
Restart the WebCenter Content application server, as described in Section 3.2.2, "Starting and Stopping Servers on IBM WebSphere."
6.4 Administering Oracle WebCenter Content Applications on IBM WebSphere
The following sections describe differences for performing some administration tasks for Oracle WebCenter Content Applications on IBM WebSphere instead of on Oracle WebLogic Server:
-
Managing an Oracle WebCenter Content Cell and Servers from the IBM WebSphere Administrative Console
-
Managing an Oracle WebCenter Content Cell, Servers, and Applications from Fusion Middleware Control
For information about Oracle Fusion Middleware administration on IBM WebSphere, see Chapter 3, "Managing Oracle Fusion Middleware on IBM WebSphere".
For information about administering Content Server in a WebCenter Content application server, see the Oracle WebCenter Content System Administrator's Guide for Content Server.
For information about administering an Inbound Refinery application server, see the Oracle WebCenter Content Administrator's Guide for Conversion.
For information about administering a Records application server, see the Oracle WebCenter Content Administrator's Guide for Records.
6.4.1 Starting or Restarting Content Server on IBM WebSphere
The Oracle WebCenter Content application (WebCenter Content), includes Oracle WebCenter Content Server (Content Server). You can start the WebCenter Content application server on IBM WebSphere with a profile or with Fusion Middleware Control. Then you can start a web browser and log in to Content Server. After you start the WebCenter Content application server, Content Server does not start until you access it for the first time.
To start Content Server on IBM WebSphere:
-
Start the WebCenter Content application server, as described in Section 3.2.2, "Starting and Stopping Servers on IBM WebSphere."
-
Go to the Content Server web interface, which is at this URL by default:
http://hostname:16200/csIn the URL,
hostnameis the name of the machine (or host) on which Oracle WebCenter Content Server is running.If a different port was configured for the WebCenter Content application server, specify that port instead of
16200. The default SSL port is16201. For WebCenter Content, and Content Server, you can configure any port in the range16200-16299. -
Log in to Content Server with the user name and password that you used to start the WebCenter Content application server.
To restart Content Server on IBM WebSphere:
-
Log out from the Content Server web interface.
-
Shut down the WebCenter Content application server, as described in Section 3.2.2, "Starting and Stopping Servers on IBM WebSphere."
-
Start the WebCenter Content application server, as described in Section 3.2.2, "Starting and Stopping Servers on IBM WebSphere."
-
Go to the Content Server web interface, which is at this URL by default:
http://hostname:16200/csIn the URL,
hostnameis the name of the machine (or host) on which Oracle WebCenter Content Server is running.If a different port was configured for the WebCenter Content application server, specify that port instead of
16200. The default SSL port is16201. For WebCenter Content, and Content Server, you can configure any port in the range16200-16299. -
Log in to Content Server with the user name and password that you used to start the WebCenter Content application server.
6.4.2 Logging In to WebCenter Content Server and Records
Logging in to the Content Server web interface also logs you in to the Records web interface if WebCenter Content and Records are deployed to the same WebSphere cell. If you log in to Content Server from a browser and then go to the Records URL from another browser tab, you will not be prompted to log in to Records. The login credentials pass from Content Server to Records.
Logging out from Content Server also logs you out from Records.
This is different from logging in to Content Server and Records configured in the same Oracle WebLogic Server domain, where you need to log in to the web interface for each Managed Server separately.
6.4.3 Managing an Oracle WebCenter Content Cell and Servers from the IBM WebSphere Administrative Console
You can manage an Oracle WebCenter Content cell and its servers from the IBM WebSphere Administrative Console, which provides a web-based interface for managing the WebSphere Application Server environment. For more information, see Section 3.1.1, "Using the WebSphere Administrative Console."
6.4.4 Managing an Oracle WebCenter Content Cell, Servers, and Applications from Fusion Middleware Control
You can manage Oracle WebCenter Content applications (components) as well as their cell and servers from Oracle Enterprise Manager Fusion Middleware Control, which provides a web-based interface for monitoring and administering Oracle Fusion Middleware. For more information, see Section 3.1.2, "Using Oracle Enterprise Manager Fusion Middleware Control."
