 Understanding File Layouts
This chapter provides an overview of file layouts and discusses how to:
Construct file layouts.
Specify file layout, record, and field properties.
Perform data interchanges.
Produce sample file layouts.
Understanding File Layouts
This section discusses:
File layouts.
Field formats in a flat file.
Fixed-position (FIXED) format files.
Comma-separated value (CSV) format files.
XML-tagged (XML) format files.
 File Layouts
A file layout is a definition that represents the data structure of a flat (text) file to be processed. When reading from or writing to a flat file, PeopleCode can use a file layout as a template to identify and correctly process the records and fields of the file. File layouts work with hierarchical and nonhierarchical data, and they can handle files that combine data records with nondata (audit or control) records.
To access data in a file, you do not have to create a file layout. PeopleTools supports reading and writing to plain text files, as well as to files that have a format based on a file layout:
If the file is a plain text file, you use text strings to read or write data.
If the file is based on a file layout, you can use text strings, rowsets, or record objects.
Using a file layout greatly simplifies reading, writing, and manipulating hierarchical transaction data with PeopleCode. It can facilitate transactions between a PeopleSoft application and a third-party system when the third-party system does not support PeopleSoft Integration Broker or component interfaces.
Note. Do not create or save files in Microsoft Excel and
then use those files for file processing.
File layouts do not have any related-language processing abilities.
Applying File Layouts to Data Interchanges
In addition to manipulating transaction data, you can employ file layouts to move data between a PeopleSoft database and external systems (data interchange) by using flat files as the transmission medium. File layouts enable you to:
Export hierarchical PeopleSoft data to several flat file formats.
Map incoming hierarchical file data directly to PeopleSoft tables.
Preview and troubleshoot the input data and its formatting before importing it.
Automatically generate the Application Engine and PeopleCode programs that are needed to perform data import.
Use batch processes to perform large-volume data imports and exports.
See Also
Field Formats in a Flat File
A flat file, in the simplest sense, is a collection of fields in text format. The file must be formatted in a way that enables the PeopleCode to locate each field. PeopleSoft file layouts support three formats:
FIXED: Each field has a starting position and a length that together specify its location in the file.
This format is the default for new file layouts.
CSV: Fields are located in the file by their sequence, separated by commas.
XML: Fields are located by the named XML tags that surrounding them, not by their position or sequence within a record.
To preserve relationships between fields, you group fields into logical collections. In relational databases, these collections are records. Each line within a file is a collection of fields.
Note. With some file formats, the logical concept of a record may actually span multiple physical lines, but the concept of field collections remains.
The conceptual structure of all three file formats is represented in a file layout as follows:
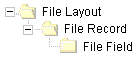
File layout structure
A file layout is a collection of file records, which in turn is a collection of fields, each of which has a describable location.
Note. To avoid confusion with the standard terms record and field, when working with a file layout we refer to a collection of fields as a file record and to fields as file fields.
FIXED Format Files
FIXED format files are the most common type of flat file that is currently processed by PeopleSoft EDI Manager. Almost all electronic data interchange (EDI) type processing uses this file type where each data element is oriented by a fixed, or column-dependent, position within the file.
The following table describes the properties of FIXED format files:
|
Property |
Description |
PeopleSoft EDI Manager Equivalent |
|
File Layout Format |
File format (FIXED). |
None. |
|
File Record ID |
A group of numbers that can be used to identify the file record. |
RowID. |
|
ID Start Position |
The column starting position of the file record ID. |
Treated as a field within each map. |
|
(Record) ID Length |
The length of the file record ID. |
Treated as a field within each map. |
|
File Record Name |
A user-specified name for the file record. |
PeopleSoft record name. |
|
File Field |
A user-specified name for the file field. |
PeopleSoft record field name. |
|
(Field) Start Position |
The column starting position of the file field. |
Starting position. |
|
Field Length |
The length of the file field. |
Length of the field. |
|
Field Format |
The formatting options for both inbound and outbound field processing. |
Based on the field type. |
Considerations for FIXED Format Files
Consider the following points when working with FIXED format files:
Be careful when you change the length or starting position of any file fields or when you insert a new file field between two existing ones.
You might overlay fields, with unpredictable results.
When you insert a record into a file layout, fields of the Long type are converted to the Character type with a length of 0.
You must set the field length to a number greater than 0 before you can save the file layout.
CSV Format Files
In this type of file, each data element is surrounded with a separator, a delimiter, or both. You can use file record IDs to determine the source table and the target table; however, in most cases this type of file contains homogenous records.
In the following example, the qualifier is a double quote (") and the delimiter is a comma (,):
"NAME","ADDRESS","PHONE"
File layout definitions store the file record ID (when used) and the relative sequence number of the field. In the preceding example, "PHONE" is sequence number 3.
The following table describes the properties of CSV format files:
|
Property |
Description |
EDI Manager Equivalent |
|
File Format |
File format (CSV). |
None. |
|
File Record ID |
A group of numbers that can be used to identify the file record. |
RowID. |
|
ID Sequence Number |
The sequence number of the field that contains the file record ID. |
Treated as a field within each map. |
|
Qualifier |
The character that surrounds a field to mark its extent. This character can be set at the file layout, file record, or file field level. |
Delimiter. |
|
Delimiter |
The character used to separate fields from each other. This character can be set at the file layout or file record level. |
Separator. |
|
File Record Name |
A user-specified name for the file record. |
None. |
|
File Record Field |
A user-specified name for the file field. |
None. |
|
Field Format |
The formatting options for both inbound and outbound field processing. |
Based on the field type. |
Considerations for CSV Format Files
Consider the following points when working with CSV format files:
Both the qualifier and the delimiter accept a blank as a valid value.
If a field is null, you do not have to use qualifiers.
In the following example, Field2 is null:
Field1,,Field3,Field4. . .
The system automatically pads the decimal places with zeros when amounts do not have values beyond the decimal point.
For example, 100 is automatically written as 100.00.
Parsing Support for CSV Format Files
The following list summarizes parsing support in preview and runtime for all CSV file types:
All blank lines are ignored.
In the past, blank lines came in as empty records.
All empty fields are returned as empty strings or zeros.
Fields, including commas or new lines, are surrounded in quotes.
When a field is in quotes, any embedded quotes must be escaped by two quotes.
When non-Microsoft Excel format backslashes are embedded within a string, they must be double backslashes to be interpreted as a backslash; otherwise, they are interpreted as an escape character.
Parsing Support for Microsoft Excel CSV Format
The following table summarizes the differences between Microsoft Excel CSV parsing and non-Microsoft Excel CSV parsing:
|
Item |
Microsoft Excel CSV Parsing |
Non-Microsoft Excel CSV Parsing |
|
White space |
Leading and trailing white space is significant for strings. |
Leading and trailing whites paces are ignored, including converted tabs. |
|
Backslash |
Not interpreted as special characters except for new lines. |
Interpreted. |
|
Quotes inside quoted string |
Double quoted. |
Escaped. |
|
Tab |
Converted to a single space. |
Interpreted as tabs and ignored. |
XML Format FilesThis type of file contains data that is represented in a hierarchical or tree-type structure. A tag surrounds each data element. A file record tag might group multiple entries.
File layout definitions tie the identifier, along with parent and child relationships, to the file record and file field.
PeopleSoft EDI Manager has no equivalent format.
The following table describes the properties of XML format files:
|
Property |
Description |
|
File Format |
The XML file format. |
|
File Record ID |
The tag name representing the file record. |
|
Field Identifier |
The tag name representing the file field. |
|
Field Format |
The formatting options for both inbound and outbound field processing. |
|
File Record Name |
A user-specified name for the file record. |
|
Field Name |
A user-specified name for the file field. |
Considerations for XML Format Files
Consider the following points when working with XML format files:
The XML input file must contain at least the fields that are specified in the file layout definition that you use.
If the file is missing any fields, the input rowset does not contain any data.
If the XML input file contains extra fields that are not specified in the file layout definition, then the ReadRowset method ignores the extra fields.
When you insert a record into a file layout, fields of the Long type are converted to the Character type, with a length of 0.
You must set the field length to a number greater than 0 before you can save the file layout.
The system automatically pads the decimal places with zeros when amounts do not have values beyond the decimal point.
For example, 100 is automatically written as 100.00.
When importing XML files, the longest tag name supported is 30 characters. This restriction is only an issue when importing XML files because PeopleSoft Application Designer automatically enforces the limit .
Constructing File LayoutsThis section discusses how to:
Create new file layout definitions.
Add file records and file fields.
Reorder file layout nodes.
Name file layouts, records, and fields.
Apply field formats.
Creating New File Layout Definitions
In PeopleSoft Application Designer, select File, New, File Layout.
A new file layout contains only one element, the root node to which file records are attached. The default root node name is NEW FILE.
Save the new file layout definition. You are prompted to name the file layout, which also becomes the name of the root node.
Note. The default file layout format is FIXED.
See Also
Specifying File Layout Properties
Adding File Records and File Fields
You can add file records and file fields to your file layout in two ways:
Base them on existing record and field definitions in the database.
Construct them directly in the file layout without reference to any database records or fields.
A file record that you construct in this way is added as a segment, but the result is an ordinary file record.
You can use both methods in any combination when creating file records and file fields in a file layout definition. Each file record and file field is generically referred to as a node.
Important! Regardless of the method that you use, file records
and file fields exist only as definitions within a file layout and have no
connection with any database record or field. Even with file records based
on records in the database, a change to the database record definition is not reflected
in the file layout.
After any update to PeopleTools, you should regenerate all file layout
definitions.
Using a Segment Instead of a Record
Suppose that in the file that is provided to you, some of the file records contain new data and must be inserted, while others contain data that updates existing data. You can add a segment with a single field (like AUDIT_ACTION) that indicates whether the file record is new or changed. When you process the file, you can use PeopleCode to look at this field and, based on its value, perform the appropriate action.
As another example, suppose that you want to include only two fields from the PERSONAL_DATA table in the file. You have two choices: insert the PERSONAL_DATA table and manually delete all of the unwanted fields or insert a segment, name it PERSONAL_DATA, and then insert the two fields that you want.
Using Segments in Data Interchanges
If you create a file layout for a data interchange, you can use segments, but each file record must correspond to a record with the same name in the PeopleSoft database, and its file fields must have the same names and data formats as the fields of the database record. The file record can contain a subset of the fields in the corresponding database record. It can also contain a subset or a superset of the fields that are provided in the corresponding file data.
To add a file record to the file layout definition, use one of the following methods:
Drag and drop a database record.
Drag a record definition from the Project window into the Definition window of the file layout, dropping it on the root node or on any existing file record or file field. The new file record appears at the same level as the node that you dropped it on, following all of the other file records at that level. The system inserts all of the constituent fields of the record as well.
Insert a database record.
With the root node or a file record highlighted, select Insert, Record. When you select a record, the new file record appears following the highlighted file record and at the same level. The system automatically inserts all of the constituent fields of the record as well.
With the root node or a file record highlighted, select Insert, Segment, and enter a file record name. When you click OK, the new file record appears following the highlighted file record and at the same level.
Insert a child segment.
With a file record highlighted, select Insert, ChildSegment, and enter a file record name. When you click OK, the new file record appears one level below the highlighted file record but before any others at that level.
Note. When you add a file record at the root level, it appears immediately below the root node, before all of the other file records.
To add a file field to the file layout definition, use one of the following methods:
Drag and drop a database field.
Drag a field definition from the Project window into the Definition window of the file layout, dropping it on any existing file record or file field. Confirm the field name or enter a different one, and click OK. The new file field appears following the node that you dropped it on.
Insert a database field.
With a file record or file field highlighted, select Insert, Database Field. Confirm the field name or enter a different one and click OK. The new file field appears following the highlighted node.
Insert a file field.
With a file record or file field highlighted, select Insert, FileField, and enter a file field name. When you click OK, the new file field appears following the highlighted node.
Note. Each file field must have a unique name within its parent file record, but file fields in different file records can have the same name.
Reordering File Layout Nodes
The file layout definition provides a set of directional arrow buttons in the toolbar, which you can use to reposition any file record within the hierarchy of the file layout or any file field within its parent file record.
The up and down arrows do not change the level of the selected item, just its order among other items at that level. The right and left arrows move the selected item lower and higher in the file layout hierarchy.
Note. When you reposition a file record in the file layout, its child records are also repositioned, and their child records are repositioned, and so on.
Naming File Layouts, Records, and Fields
File layout names can be 30 characters in length, and file record and file field names can be 15 characters in length. All names should follow PeopleSoft naming standards.
Each file record within a file layout must have a unique name, but one file record can have the same name as the file layout. Each file field within a given file record must have a unique name, but file fields in different file records can have the same name.
Using WriteRecord, ReadRowset, and WriteRowset
If you use the WriteRecord, ReadRowset, or WriteRowset file layout methods for writing to or reading from records, the application record and the file record must have the same name, and the application record fields and the file fields must have the same names. These methods write only to like-named records and like-named fields within a given record. If you rename a record or a field after you use it to create a file layout definition, you must rename the file record or file field to the exact same name.
In a file layout definition containing more than one record, the system ignores records and fields that are not like-named. Like-named records do not have to contain all of the same fields, and like-named fields do not have to be the same length. Like-named fields should, however, be of the same type.
See Also
Applying Field Formats
The following topics discuss issues you must consider when specifying field formats.
When you write numeric data to a FIXED format flat file, all numbers are right-justified in the file field. Numbers with decimal places specified are written with zeros padding the unused decimal places.
For example, a sequence of records with numbers of varying precision is written this way:
001    53.2700BUY
002  2174.0933SELL
003   108.0000SELL
Date, Time, and Datetime Field Lengths
In accordance with the International Organization for Standardization (ISO) 8601 standards, the field lengths for date, time, and datetime fields are fixed in the file layout, regardless of the file format:
Date fields have a fixed length of 10.
Time fields have a fixed length of 20.
Datetime fields have a fixed length of 31.
Datetime fields must use one of these formats.
CCYY-MM-DD HH:MM:SS
CCYY-MM-DDTHH:MM:SS (with time separator)
CCYY-MM-DD HH:MM:SS.ssssss (with fraction of seconds)
CCYY-MM-DDTHH:MM:SS.ssssss (with time separator and fraction of seconds)
CCYY-MM-DD HH:MM:SS.ssssss+hhmm or CCYY-MM-DD HH:MM:SS.ssssss-hhmm (with fraction of seconds and universal time zone offset)
CCYY-MM-DDTHH:MM:SS.ssssss+hhmm or CCYY-MM-DDTHH:MM:SS.ssssss-hhmm (with time separator, fraction of seconds, and universal time zone offset)
Note. PeopleSoft applications comply with ISO 8601 guidelines for representing date field data. Refer to the ISO 8601 guidelines for more information.
See http://www.w3.org/TR/NOTE-datetime
Date Format with the ReadRowset Method
Single digits in dates in the form MMDDYY or MMDDYYYY must be padded with zeros. That is, if the date in the data is February 3, 2002, then the format must be:
02/03/2002
02/03/02
The format 2/3/02 is not valid.
When using the date format DDMMYY, single digits should also be padded with zeros, and the month value should be all uppercase letters. For example, if the date in the data is February 2, 2003, then the format must be 02-FEB-03. The format 2-Feb-03 is not valid.
See Also
Specifying File Layout, Record, and Field PropertiesThis section discusses how to:
Specify file layout properties.
Specify file record properties.
Specify file field properties.
Note. Some properties are available only for a specific file layout format. For example, a file definition tag is available only for an XML format file. When a property is available only for a particular format, the format is noted in parentheses after the name of the property (such as File Definition Tag [XML]).
Note. Each property that appears in the Preview tab of the File Layout Designer is only another view of the corresponding property of the same name that appears in the Properties dialog box when working with the Definition tab. Changing any property value in one view changes the same property value in another view.
Specifying File Layout Properties
The File Layout Definition Properties dialog box contains all of the information that is stored at the file layout (root) level.
Access the dialog box by using one of the following methods:
Select File, Object Properties.
Press the Alt+Enter keys.
Double-click the topmost (root) node of a file layout definition.
Right-click an open file layout and select Data Object Properties.
The General tab of the dialog box contains description information for the file layout. The Use tab contains specific information for the file layout:
|
Displays the type of file layout. Values are FIXED, CSV, and XML. |
|
|
Enter the XML tag name that is associated with this layout (or transaction). This tag can be 30 characters in length. This tag must be unique in the file layout. This field is active when the file layout format is XML. Note. If you leave this field blank, the system inserts <start> into the file as the default tag value. Enter any value to prevent the system from inserting the default <start> tag into the file. |
|
|
Displays the size of the input buffer that is used at runtime. This field is active when the file layout format is XML. Note. Do not edit this value directly. |
|
|
Select to automatically add a decimal place based on the decimal value that is specified in the field definition when you import a file into a PeopleSoft database and no decimal place is specified for numeric values in the file. If you select this option, make sure that the length that you specify for the Number field includes a decimal point, even though it is not visible. In this case, the decimal point is counted as a space. For each occurrence of numeric data that is missing a decimal point character in the input file, a space character is also required in the input file; locate the space character either immediately before the numeric characters or immediately after them. This field is active when the file layout format is FIXED. |
|
|
Select to parse the field by using Microsoft Excel CSV specifications. This field is active when the file layout format is CSV. |
|
|
Qualifier Optional |
Select to parse the field based on delimiters. When a qualifier exists, the field is parsed by using a closing matched qualifier. The system ignores all characters before and after the qualifier. This field is active when the file layout format is CSV. If you do not select this check box, the field must have qualifier pairs. The system ignores all characters before and after the qualifier. |
|
Select to convert all tabs within the field to spaces. If you do not select this option, the system ignores all tabs. This field is active when the file layout format is CSV. Note. If the Strip White Space option is also selected, the system removes trailing and leading tabs. |
|
|
Select to interpret backslashes within field data as escape characters. The following characters have special meanings:
If you do not select this check box, the system considers backslashes to be regular text data. This field is active when the file layout format is CSV. |
|
|
Strip White Space |
Select to remove all leading and trailing white space within field data from the output data. This field is active when the file layout format is CSV. Note. If you select this option, the system removes trailing and leading tabs, regardless of whether you selected the Convert Tabs to Spaces option. |
|
Select to interpret two double quotes (" "), as one double quote (") in output data. For example, if you enable this option, abc""def" is interpreted as abc"def. This field is active when the file layout format is CSV. |
|
|
Select to interpret backslash quotes (\") as one double quote (") in output data. For example, if you enable this option, "abc\"def" is interpreted as abc"def. This field is active when the file layout format is CSV. |
See Also
Specifying File Record Properties
The File Layout Segment Properties dialog box contains information that is stored at the file record level:
Access the dialog box using one of the following methods:
Double-click the file record node.
Right-click the file record node and select Selected Node Properties.
|
Enter a file record name that is associated with this file record. This name is used to access the file record from PeopleCode. Every file record in a file layout must have a unique name. |
|
|
Enter a sequence number for the field that contains the file record ID. |
|
|
Displays the default maximum length of the combined field sizes of the record. This value is automatically updated. Warning! Any inbound or outbound data is truncated beyond this value. |
|
|
Enter a number that uniquely identifies the file record in the file layout. You can use this number for processing the file. This number is automatically written to the file if you use the WriteRecord or WriteRowset methods and if the file type is FIXED or CSV. |
|
|
ID Start Position (FIXED) |
Enter the column or starting position in the file record where the file record ID starts. |
|
ID Length (FIXED, CSV) |
Displays the length of the file record ID. This number is automatically generated when you enter the file record ID. Note. Do not edit this value directly. |
|
Enter a qualifier that is used for the file record ID and as the default for fields when no field qualifier is specified. This value overrides the definition qualifier that is specified in the File Layout Definition Properties dialog box. When you first create a file layout, this property is blank. |
|
|
Enter characters to be placed at the end of each segment when the layout is written to a file. |
|
|
Enter a delimiter that is used for all fields in the file record. This value overwrites the definition delimiter that is specified on the File Layout Definition Properties dialog box. |
|
|
Enter an XML tag name for this file record. The default value is the file record name. Note. Although each record name in a file layout must be unique, record tags do not have to be unique. |
|
|
Enter a description of the record for documentation purposes only. |
Specifying File Field Properties
The File Layout Field Properties dialog box contains information that is stored at the file field level:
Access the dialog box using one of the following methods:
Double-click the file field node.
Right-click the file field node and select Selected Node Properties.
Most individual properties are usable by all field types. However, some are specific to a particular field type, for example, the Upper Case check box is applicable to character fields only, the Date Separator field is applicable to date fields only, and so on. The preceding dialog box shows the properties for a character type of field. The following descriptions include all possible properties.
|
Select a date format, such as MMDDYY, DDYYMM, and so on. |
|
|
Date Separator (Date) |
Enter a character that is used to separate date values. The default value is /. |
|
Enter the number of decimal positions to the right of the decimal point. This property is valid only for fields that are defined as number or signed number. Note. Only 31 characters plus a decimal point are allowed. |
|
|
Enter the default value to be used by a call to ReadRowset when the corresponding data is imported from a file via a file layout definition.
Note. You cannot use the system variables related to date
and time (for example, %DATE, %TIME, %DATETIME) to specify the value of the
default-value property of a file layout field. |
|
|
Enter a description of the field for documentation purposes only. |
|
|
Optionally select a parent file record and field from which the current field value is to be inherited. If you write to a file, the value is written only in the parent file record, not in the child (inheriting) file record; the value is not written more than once to a file. If no value is present in the parent field, then the system uses the default value that is specified here. For example, the following file sample shows both the EMPLID (8113) and EFFDT (08/06/1999) written only once to a file, though these fields are repeated in the third file record (with a file record ID of 102):
|
|
|
Enter the name that is associated with this file field. Use this name when accessing the file field from PeopleCode. Every field within a file record must have a unique name; however, two different file records can contain the same file field. |
|
|
Enter an XML tag name to be used around the field. The default value is the name of the field. Note. Although each field name in a file record must be unique, each field tag does not have to be unique. |
|
|
Select the data type of the file field. |
|
|
Enter the maximum number of characters in this field.
Note. You are allowed only 32-character precision for number
and signed number fields; that is, a total of 32 characters both to the right
and left of the decimal. Other fields, such as character fields, can be longer. |
|
|
Select to enable field padding. The field will be padded with space characters up to the value of the length property. Character data will be left justified, numeric data right justified. |
|
|
Propagate (FIXED) |
If a field position or length is changed, enter an amount here to increment (positive number) or decrement (negative number) the current field and all fields before it (<<<) or after it (>>>). |
|
Enter a qualifier for the field, that is, the character that surrounds this field, separating it from other fields. Specifying this value overwrites the value that is specified in the file layout properties and file record properties. |
|
|
Start Position (FIXED) |
Enter the starting position (column) of the field within the file record. Important! If you specify a start position for a field that overwrites a previous field, no data is written to the file. Use Propagate to change the start positions for your file fields. |
|
Specify any characters to be removed from the input buffer. Use this field to preprocess input strings. For example, if a field in the input file contains hyphens but you want to remove the hyphens before processing the field, you can enter a hyphen here and it will be stripped out while being read. You can specify more than one character to be stripped out. Be sure to not separate the strip characters. For example, the following code strips out all semicolons and hyphens:
The following code strips out all semicolons, hyphens, and spaces:
|
|
|
Select to remove trailing spaces only from an input string. This option is active only for FIXED and CSV formats. This option is different from the Strip Characters field, which removes all spaces from the entire input field if you specify a space. |
|
|
Select to convert lowercase text to uppercase during inbound processing. Use this option primarily when customer data is in lowercase and the PeopleSoft software requires the data to be in uppercase. |
Note. PeopleSoft applications do not accept numbers that contain thousand separators, as in "," or ".". For example, if you exchange data with Microsoft Excel, you need to disable the "Use 1000 Separator (,)" property.
See Also
Performing Data Interchanges
This section provides an overview of the import process and discusses how to:
Preview input data.
Generate and run the import program.
Export data.
Understanding the Import Process
To help you troubleshoot and import flat file data, the file layout definition provides a data preview page. It can also generate an Application Engine program with the associated PeopleCode that is necessary to import the data.
Note. The Application Engine program that the system automatically generates should be viewed as containing sample PeopleCode that you need to review and modify, especially when a single file layout involves multiple records.
Data Import Activities
Importing data by using a file layout requires the following sequence of activities:
Provide the import data in a properly formatted flat file.
Each record in the file must correspond to a record with the same name in the PeopleSoft database, and its fields must have the same names and data formats as the fields in the database record. Each record in the file must end with a new line character.
Create a file layout definition to match the record and field structure of the data.
Insert the appropriate record definitions into the file layout, and then reposition the file records and file fields to match the record and field positions in the file.
Preview and troubleshoot the input data format and content.
Generate the data import Application Engine program and PeopleCode.
Run the Application Engine program to import the data.
The fields in the records of the data file can be a subset of the fields in the database record. Define your file layout with only the file fields that you expect to receive.
The fields in the records of the data file can be a superset of the fields in the database record; you must define your file layout to suppress or ignore the extra fields. For FIXED files, do not define a field at the corresponding position in the file layout definition. For CSV files, the file layout must have the same number of fields in each record as there are in the corresponding file record; for each field that you do not want to import, define a field in the file layout at that position that does not correspond to any field in that database record. For XML files, the system automatically ignores any extra fields.
Your data file can contain a subset or a superset of the records that are defined in the file layout. The system imports only a file record with a matching file record ID in the file layout.
In theory, you can ignore rowset hierarchy when importing file data, because the PeopleSoft database stores each record independently of the others, and the import process does not use rowsets. However, many records are designed with hierarchical dependencies in mind. The input file might omit inherited field values or order the data records in a way that reflects such dependencies.
If the input file omits inherited field values, make sure that the records in the file layout of the inheriting fields are children of the ones from which they inherit their values and set up Field Inheritance appropriately.
If the records to be imported contain key fields that reflect a rowset hierarchy, they might be in an order in the file that also reflects the hierarchy. Make sure your file layout reflects that hierarchy as well.
Important! The completed file layout must have exactly one file record at the root level; all other file records must be below that level.
See Also
Previewing Input Data
In PeopleSoft Application Designer, select File, New, File Layout, Preview.
The Preview tab displays no information initially.
Note. With an XML file, you cannot preview the data, although you can generate and run an import program.
To preview input data:
Click Browse and select the import file.
The name of the import file appears in the Default File Name text box.
Select a file layout segment from the Segment Name drop-down list box.
The file layout fields corresponding to the selected segment appear in the list below the segment name. This list comes from the file layout definition, and it does not depend on your selecting a valid import file.
Click the Refresh button on the toolbar to refresh the preview data.
At the bottom of the window, the first five rows of the selected segment in the selected import file are available for preview in the grid.
You can also select View, Automatically Read Preview Data. While this menu item is selected, the file layout refreshes the preview automatically; when it is cleared, you need to click the Refresh Preview Data button to see the effects of changes you make to the property settings or data.
Note. Preview file data is available only for FIXED and CSV file layouts. The preview data appears only if you selected an import file, if the file format matches the format specified for the file layout definition, and if it contains a file record ID that matches the file record ID of the selected segment.
Select one of the fields in the Field Name list box.
The properties of the field that you select appear in the appropriate display fields. These properties are actually the file layout field properties of the field; you can change all field property settings from this view.
Note. Only the field properties that are appropriate to the file layout format that you specified in the File Layout Definition Properties dialog box are visible in this view. For example, the Start Position and Field Length fields are available only for a FIXED format file layout.
Examining the Input Data for Errors
The following table shows examples of input data errors:
|
Symptom |
Possible Reason |
Solution |
|
The preview grid does not appear. |
The input file format does not match the file layout format that you specified in the File Layout Definition Properties dialog box. A CSV file does not use the definition qualifier you specified in the File Layout Definition Properties dialog box. |
Change the file layout format to match the input file format. Change the definition qualifier to match the one used in the input file. |
|
Only the first column of the preview grid is populated. |
A CSV file does not use the definition delimiter you specified in the File Layout Definition Properties dialog box. |
Change the definition delimiter to match the one used in the input file. |
|
The preview grid appears for some records but not for others. |
The record IDs of the file for the missing records do not match the file record IDs specified in the File Layout Segment Properties dialog box. |
Specify file record IDs that match the input file records. |
|
Data for a field appears truncated in the preview grid. |
With a FIXED file, the field length that you specified in the File Layout Field Properties dialog box is too short to accommodate the field data. |
Increase the field length to accommodate the input data. |
|
A field appears to start in the middle of the data. |
With a FIXED file, the start position that you specified in the File Layout Field Properties dialog box is too great to include the start of the field data. |
Decrease the start position and adjust the field length to match the input data start position and length. |
Generating and Running the Import Program
This part of the process imports the file data.
To generate and run the import program:
After you preview the file layout and review the input data, click the AE button on the toolbar.
The system generates the Application Engine import program with its associated import PeopleCode.
Enter a name for the Application Engine program and click OK.
The system automatically saves the program, which is ready to run as soon as its definition appears in PeopleSoft Application Designer.
Click the Run Program button on the toolbar.
The database imports the file data.
Exporting Data
The method that you use to export data from the PeopleSoft system depends on the requirements of the target application. To export data to a flat file, you create a file layout definition and then write PeopleCode to transfer the data to a file. You can initiate the PeopleCode from the Application Engine or from any event. It should populate text strings, rowset objects, or record objects, and it should apply the WriteRecord or WriteRowset method from the File class to transfer the data to the file by using the file layout definition to position the records and fields as required by the target application.
Note. To generate valid XML files, be sure to use the Close method in the File class when you finish writing to the file.
See Also
Producing Sample File Layouts
This section discusses how to:
Create file layout definitions.
Adjust file layout properties.
Insert segments and fields.
Creating File Layout Definitions
The following example shows how to create a file layout to be used with the QE_ABSENCE_HIST record:
For simplicity, suppose that each row in the FIXED format file has the following structure:
888 A
000 8001 VAC  1981-09-12 1981-09-26 14  .0                     P Y
888 A
000 8001 VAC  1983-03-02 1983-03-07 5   .0                     P Y
888 A
000 8001 VAC  1983-08-26 1983-09-10 13  .0                     P Y
888 A
000 8516 MAT  1986-06-06 1986-08-01 56  .0                     P Y
888 C
000 8516 SCK  1988-08-06 1988-08-07 1   .0                     P Y
888 A
000 8516 VAC  1987-07-14 1987-07-28 14  .0                     P Y
888 A
000 8553 JUR  1990-12-12 1990-12-17 5   .0  Local Jury Duty    P N
888 A
000 8553 MAT  1992-02-20 1992-10-01 224 .0  Maternity Leave    U N
888 A
000 8553 MAT  1994-08-19 1995-03-01 194 .0  Maternity          U Y
888 A
000 8553 PER  1993-04-15 1993-04-19 4   .0                     U N Personal
Day required
888 C
000 8553 SCK  1987-01-28 1987-01-30 2   .0  Hong Kong Flu      P N
888 A
000 8553 SCK  1988-08-02 1988-08-03 1   .0  Sick               P N
888 A
000 8553 SCK  1995-09-12 1995-09-13 1   .0                     P N
888 C
000 G001 MAT  1991-07-02 1991-09-28 88  .0  3-month Maternity  P Y Maternity will
be paid as 80% of Claudia's current salary.
000 is the file record ID for ABSENCE_HIST, and each field appears in the same order as in the ABSENCE_HIST database record. 888 is the file record ID for an extra segment called CHANGE_ACTION, which contains an AUDIT_ACTION field with the following meanings:
A: Row inserted.
C: Row updated, but no key fields changed.
Note. The end of file (EOF) character must be on a separate line and not on a line containing data for any incoming file, regardless of the file type. Each data line needs to be terminated with an end of line (EOL) character, which is different than an EOF character.
To create a file layout definition:
Use the QE_ABSENCE_HIST record definition as the template for the file layout.
Create a new file layout and then drag the QE_ABSENCE_HIST record into the open file layout.
Save the file layout with the name ABS_HIST.
The name of the first node changes from NEW FILE to ABS_HIST.
Adjusting File Layout Properties
In the file layout definition, open the file layout, record, or field properties as appropriate for each step in the following procedure.
To adjust file layout, record, and field properties:
Change the file layout properties.
Double-click the topmost node in the file layout, ABS_HIST, to display the file layout properties.
Enter a short and long description of the file layout you are creating. For this example, you are creating a FIXED file layout, so you do not need to make any changes on the Use tab.
Change the file record properties.
Double-click the QE_ABSENCE_HIST file record to display its properties. Enter a record ID of 000, and a starting position of 1. The ID length is automatically set.
When you click OK, you see a message asking if you want to increment the start positions for all fields.
Click Yes to automatically increment the start position numbers for every field to take the length of the file record ID that you just added into account. If you do not click Yes, you must manually increment the start position for all fields.
You just created the file record ID for the QE_ABSENCE_HIST record:
000 8001       VAC  1981-09-12 1981-09-26 14  .0                     P Y
000 8001       VAC  1983-03-02 1983-03-07 5   .0                     P Y
Change the file field properties.
When a record definition is used as a template for a file layout, the default starting position for each field is based on the order in which it appears in the record as well as its length.
Double-click the QE_EMPLID file field to display its properties.
The start position is automatically incremented to 4 because the file record ID is 3 characters long. However, in the example, an extra space is between the end of the file record ID and the first field. Therefore, you need to change the start position of this field and all of the fields that follow this field to increment the starting position of this field and all fields following this field by 1. To do this:
Click the up arrow under Propagate to change that number from 0 to 1.
Click the button with the arrows pointing right (>>>).
(Optional) Adjust other fields.
The last field (QE_COMMENTS) has a length of 0 because it is based on a Long field type.
Note. When a Long field type is inserted into a file layout, the system converts it to a Character field type with a length of 0.
Because the format for this file layout is FIXED, you have to change the field length of that file field so that it is long enough to accommodate the data that you expect from the file.
You do not have to propagate this change because this is the last field in the record.
Inserting Segments and Fields
Open the file layout definition based on the ABS_HIST record:
Note. You will insert a segment that is a sibling, that is, it has the same level as the QE_ABSENCE_HIST record.
To insert a segment and then a field into that segment:
Select Insert Segment from the pop-up menu or select Insert, Segment to insert a segment.
The Insert New Segment dialog box appears. This dialog box is identical to the File Layout Segment Properties dialog box.
On the Insert New Segment dialog box:
Enter the file record name, file record ID, and ID start position.
Click the OK button to insert the segment.
Note. If you provide a Record File ID when adding a segment to a file layout that is either CSV or FIXED, the system prepends this Record File Id to every row of data that is written.
Insert a file field.
Select Insert FileField from the pop-up menu.
The Insert New Field dialog box appears. It is identical to the File Layout Field Properties dialog box.
Enter a field name, start position, and field length, and then click the OK button.
Note. The start position is not automatically set when you add a file field to the file record. For this example, the AUDIT_ACTION field requires a start position of 5.
Select File, Save, or click the save icon in the toolbar to save your changes to the file layout.
Now that you have created and saved a file layout, you must use PeopleCode to access the data. File layouts rely solely on PeopleCode as the engine behind the actual data access and movement.
See Also