 Understanding Securing Integration Environments
This chapter provides an overview of securing integration environments, outbound PeopleSoft Integration Broker security processing, and outbound PeopleSoft Integration Broker security processing, and discusses how to:
Install application server-based digital certificates.
Install integration gateway-based digital certificates.
Install web server-based digital certificates.
Implement web server SSL/TLS encryption.
Implement WS-Security.
Implement client authentication.
Implement nonrepudiation.
Manage user authentication.
Implement node authentication.
Secure service operations with permission lists.
Validate security on inbound service operations.
Understanding Securing Integration EnvironmentsThis section discusses types of integration security and provides an overview of security terminology used in conjunction with PeopleSoft Integration Broker.
 Web Server SSL/TLS Encryption
Encryption supports data privacy. When encryption is implemented, the sender translates the content of a transaction into a secret code that only the receiver can decrypt. PeopleSoft Integration Broker supports the Secure Sockets Layer (SSL) protocol and Transport Layer Security (TLS) protocol for data encryption.
Note. The TLS security protocol is the successor to the SSL security protocol. The steps for setting up SSL and TLS are similar, and hence are referenced as “SSL/TLS” in this chapter. However, it's important to note that while these protocols are similar, they do not interoperate.
You can employ SSL/TLS encryption at the web server level to secure data sent between your web server and that of your integration partners.
You can implement web server SSL/TLS encryption with integration partners running on all PeopleTools 8.4x systems and third-party systems.
You use digital certificates to implement SSL/TLS encryption.
WS-Security
Web services security (WS-Security) is implemented on the integration gateway for inbound and outbound integrations with third-party systems.
You can implement WS-Security using username tokens or Security Assertion Markup Language (SAML) tokens .
You can implement WS-Security with integration partners running on PeopleTools 8.48 and later systems and third-party systems.
WS-Security using Username Token Profile
The WS-Security Username Token Profile defines a standard way of identifying the requestor by “username”, and optionally using a password (or shared secret, or password equivalent) to authenticate that identity to the web service producer.
On outbound request processing, PeopleSoft Integration Broker generates a WS-Security UsernameToken, which may include a password. The WS-Security information is added to the SOAP request on the integration gateway prior to sending to the integration partner.
On inbound processing, PeopleSoft Integration Broker can process requests received from integration partners that contain WS-Security UsernameToken and password in the SOAP header of the inbound SOAP request.
WS-Security using SAML Token Profile
The SAML Token Profile uses assertions to define a standard way to associate common information such as issuer ID, assertion ID, subject and so on.
On outbound request processing, PeopleSoft Integration Broker adds a WS-Security SOAP header to the service operation that contains SAML credentials defined in the node definition for the node.
On inbound processing, the PeopleSoft system checks for the existence of a WS-Security SOAP header. If it exists, the integration gateway decrypts the SAML token (if it has been encrypted) to restore the user ID information to clear text format.
See Also
Working with Web Service Security (WS-Security)
Client Authentication
Outbound requests connect from the application server to the integration gateway using an MIME over HTTP connection. To secure the connection you can employ client authentication. This option is typically implemented when the application server and integration gateway reside on separate machines. Client authentication is used only on outbound transactions, since inbound transactions connect between the integration gateway and application server are made using Jolt connection strings.
Note. If you implement client authentication you must also implement web server SSL encryption.
You can implement client authentication with integration partners running on all PeopleSoft 8.4x systems and third-party systems.
Nonrepudiation
Nonrepudiation is a form a digital security that ensures that a transferred message has been sent and received by the parties claiming to have sent and received the message. It is also a method of guaranteeing that the sender of a message cannot later deny having sent the message and that the recipient cannot deny having received the message.
You can implement nonrepudiation with integration partners running on all PeopleSoft 8.4x systems and third-party systems.
User Authentication
Service operations are secured at the user level. On an outbound transaction, user authentication sets the user ID to assign to the service operation.
When user authentication is implemented a user ID or user ID and password are required.
For inbound transactions, user authentication determines the user ID associated with the inbound service operation. If a user ID and password are required to invoke a service operation, the system validates the user ID to see if it is a member of the permission list to which the service operation is assigned.
You can implement user authentication with integration partners running on PeopleSoft 8.48 and later systems and third-party systems.
Node Authentication
Use node-level security for integrations with nodes running on earlier PeopleTools 8.4x releases.
To implement node-level security you define an authentication option for the node using the Nodes page. You can use a node certificate or a password as authentication options.
Node-level security pertains to inbound and outbound processing and authentication is performed on the application server.
You can implement node authentication with integration partners running on all PeopleSoft 8.4x systems and third-party systems.
Service Operation Permission Lists
The user ID that is authenticated during user authentication is validated against the permission list to which the service operation is assigned.
Understanding PeopleSoft Integration Broker Security ProcessingThis section discusses:
Outbound PeopleSoft Integration Broker security processing.
Inbound PeopleSoft Integration Broker security processing.
Outbound Integration Broker Security Processing
The following diagram illustrates security processing for outbound integrations from PeopleSoft Integration Broker:
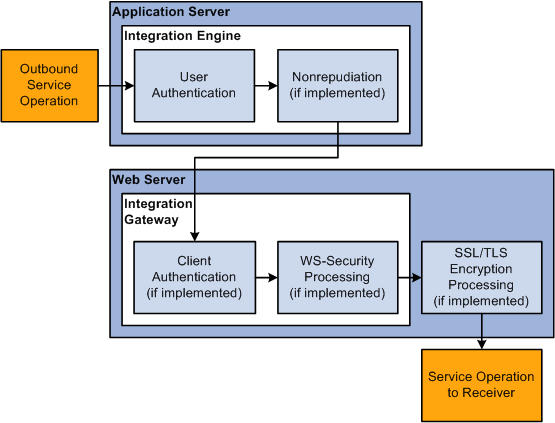
Outbound PeopleSoft Integration Broker Security Processing
PeopleSoft Integration Broker applies the following security elements to outbound integrations:
Note. The elements are discussed in the order in which the system applies them.
|
User authentication |
If the outbound service operation originates from a PeopleSoft (PIA) node, the user authentication process attaches the PeopleSoft authentication token to the service operation. If the service operation originates from an external (External) node, the model determines the user ID for the service operation and passes the information to the WS-Security framework so it can generate the UsernameToken for the outbound transaction. |
|
Nonrepudiation |
Nonrepudiation processing is performed. |
|
Client authentication |
Client authentication secures the connection between the PeopleSoft application server and the integration gateway on outbound transactions. You use digital certificates to secure this connection. |
|
WS-Security |
Outbound WS-Security processing includes generating the UsernameToken for the WS-Security SOAP header. This process may also involve encrypting and digitally signing the data, if specified in the WS-Security parameters on the node. |
|
SSL/TLS encryption |
SSL/TLS encryption on outbound integrations establishes a secure web server connection with an integration partner. |
Inbound Integration Broker Security Processing
The following diagram illustrates security processing for inbound integrations to PeopleSoft Integration Broker:
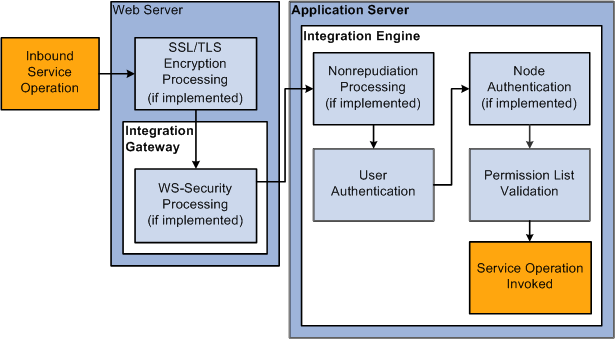
Inbound PeopleSoft Integration Broker Security Processing
PeopleSoft Integration Broker applies the following security elements to inbound integrations:
Note. The elements are discussed in the order in which the system applies them.
|
SSL/TLS encryption |
If the inbound service operation is encrypted, the integration gateway decrypts the data. |
|
WS-Security |
On inbound transactions, WS-Security processing includes validating a digital signature (if required), decrypting user information (if required), and passing the extracted user information to the integration engine for authentication. |
|
Nonrepudiation |
Nonrepudiation processing is performed. |
|
User authentication |
The system determines and validates the user ID associated with the inbound service operation. |
|
Node authentication |
If a node password is employed, the system validates that the inbound service operation contains the node password. If certificate authentication is employed, the system authenticates the node certificate. |
|
Permission list validation |
The system matches the user ID passed in with the service operation to the appropriate permission list. |
Understanding Digital Certificates
This section provides an overview of :
Digital certificates.
Digital certificate authorities.
Digital certificate installation elements.
Digital CertificatesA digital certificate is a form of electronic ID card that supports public key encryption technology. Each messaging participant generates a matched pair of encryption keys—a private key, which is never revealed or transmitted, and a public key, which is freely available to other participants. These keys are stored in a local file or repository called a keystore, and the public key is stored as part of a digital certificate. The certificate can be attached to a service operation to verify the sender's identity and to provide the recipient with the means to encode a response.
The following table lists the security technologies that require digital certificates and the digital certificate installation location for each of them. The table also lists the section in this chapter that discusses installing digital certificates for each of the technologies:
|
Security Technology |
Digital Certificate Installation Location |
Section Describing How to Install Digital Certificates |
Comments |
|
SSL/TLS encryption |
Web server. |
Setting Up Web Server SSL/TLS Encryption |
Secures web server-to-web server connections. |
|
WS-Security |
Integration gateway. |
Installing Integration Gateway-Based Digital Certificates |
Secures web server-to-web server connections. |
|
Client authentication |
Integration gateway. |
Installing Integration Gateway-Based Digital Certificates |
Secures application server-to-integration connections. |
|
Nonrepudiation |
Application server. |
Installing Application Server-Based Digital Certificates |
Authenticates sender and receiver. |
|
Certificated-based node authentication |
Application server. |
Installing Application Server-Based Digital Certificates |
Authenticates sender. |
Digital Certificate Authorities
A certificate authority (CA) is a trusted third-party organization or company that issues digital certificates used to create digital signatures and encryption keys. The role of the CA in this process is to guarantee the identity of the party granted the certificate. Usually, this means that the CA has an arrangement with a financial institution that provides information to validate the grantee's identity.
To install digital certificates for secure messaging, you must select a CA from whom to obtain the certificates. There are many CAs to choose from, and most of them do business on the World Wide Web. Some of the best known are:
Verisign, Inc.
Entrust Technologies.
Baltimore Technologies.
Thawte.
There are also numerous lesser known CAs, which might be appropriate if they are well known in a particular geographical region or industry. One of the systems participating in a secure integration might even serve as CA for the other participants. Each CA provides a unique set of security services and has its own way of handling digital certificates.
Before you implement secure messaging with PeopleSoft Integration Broker, investigate the available CAs, select one or more from whom you will obtain digital certificates, and familiarize yourself with their policies and procedures.
Digital Certificate Installation Elements
Whether you implement digital signature authentication, nonrepudiation, or SSL encryption, you need to use digital certificates. Although these security features require you to use a variety of programs and procedures, some characteristics of digital certificates—including the process of obtaining, installing, and configuring them—are common to all three features.
Depending on the security feature, you might install digital certificates in the keystore of an application server, a web server, or an integration gateway. An implementation of digital certificates on each of these entities involves the following elements:
The entity's private and public encryption keys.
A distinguished name (DN) for the entity.
A certificate signing request (CSR).
A certificate containing the entity's public encryption key, signed by a trusted CA.
A root certificate from the trusted CA.
The following sections discuss these elements in more detail.
Public and Private Encryption Keys
For a given keystore, you generate private and public encryption keys simultaneously as a matching pair with software provided by the entity.
A DN is a property commonly used in security environments to uniquely identify a person, system, or network node. The DN is usually stored as a string of name-value attribute pairs separated by commas and spaces. You must provide the DN attribute values to generate a private key. These attributes include:
|
Common name (CN) |
The name of the entity, expressed as a machine name, domain name, node name, or a name that you create, depending on the environment; for example, QE_LOCAL. |
|
Organization unit (OU) |
The part of the organization to which the entity belongs; for example, Accounts Receivable. |
|
Organization (O) |
The name of the organization or company; for example, PeopleSoft. |
|
Locality (L) |
The city or equivalent locality of the organization; for example, Pleasanton. |
|
State (ST) |
The state, province, or equivalent region of the locality; for example, California. |
|
Country (C) |
The country of the locality; for example, US. |
A certificate signing request, or CSR, is a document that contains the entity's public key. The CSR is typically generated in Privacy Enhanced Mail (PEM) format, which is base64–encoded binary data. PEM is a standard text-based format for storing and transmitting digital certificates. You use the same software to generate the CSR that you use to generate the private-public key pair. The following example shows a CSR:
-----BEGIN NEW CERTIFICATE REQUEST-----
MIIBkTCB+wIBADBSMQswCQYDVQQGEwJ1czELMAkGA1UECBMCY2ExDTALBgNVBAcTBGhlcmUxCzAJ
BgNVBAoTAndlMQ0wCwYDVQQLEwR1bml0MQswCQYDVQQDEwJtZTCBnzANBgkqhkiG9w0BAQEFAAOB
jQAwgYkCgYEApaGAHNBjuByh8qXFCz33TgLzUjRm8S6tijit7fw23rKWyipQ0VgqeAD6eHr0pini
lyJPPOiJJ5fY0h2h78hOr8o+nJosTcqZL3jP+rSVick7qPPyXjcxP1UCGz/8RNykFDnbwjziwi+p
MesoWa8hfBss0ga2zZsmlV8Q4SyYE3UCAwEAAaAAMA0GCSqGSIb3DQEBBAUAA4GBACt0owTCngrU
/HAMAZgT/2O6hiZaD4OVBrgLYzmRvUiVhKOyTUzUv57ks7U6DQYt+rnWwNJtVbeAqO5eZiT7hXbj
Pwl8lGj+Adb6FGYOt4OhicZ0gNMHtURVop6iNJ9scxOmVcpkO0yX5f1rWFdZ0KZrWZSFGI6Lwdud
Hvbyvbpz
-----END NEW CERTIFICATE REQUEST-----
Signed Public Encryption Key From CA
The process of obtaining a signed public key certificate from a CA depends on the CA that you select. Typically, it requires you to paste the content of the PEM-formatted CSR into a form that you submit online. The CA then creates, digitally signs and returns a public key certificate to you. The CA will either email you the certificate or require you to download it from a specified web page. The certificate can be either PEM or the binary Distinguished Encoding Rules (DER) format. Following is an example of a PEM-formatted certificate:
-----BEGIN CERTIFICATE-----
MIICIDCCAcqgAwIBAgIQrDVQJKAAKLQR0/bIDJMSVDANBgkqhkiG9w0BAQQFADBy
MQswCQYDVQQGEwJVUzELMAkGA1UECBMCQ0ExEzARBgNVBAcTClBsZWFzYW50b24x
FzAVBgNVBAoTDlBlb3BsZVNvZnQgSW5jMRMwEQYDVQQLEwpQZW9wbGVUb29sMRMw
EQYDVQQDEwpQZW9wbGVUb29sMB4XDTAwMDMxMDIxMTIzNVoXDTA1MDMxMDIxMTIz
NVowcjELMAkGA1UEBhMCVVMxCzAJBgNVBAgTAkNBMRMwEQYDVQQHEwpQbGVhc2Fu
dG9uMRcwFQYDVQQKEw5QZW9wbGVTb2Z0IEluYzETMBEGA1UECxMKUGVvcGxlVG9v
bDETMBEGA1UEAxMKUGVvcGxlVG9vbDBcMA0GCSqGSIb3DQEBAQUAA0sAMEgCQQCy
o44wplb57M272GRP3sC4TtLm/MD1G9osRjG9BWnsjjTij9GNi6Rnf9cNxkj+AGQY
gnE3P7lp9rYN6GQxPldNAgMBAAGjPDA6MAsGA1UdDwQEAwIBxDAMBgNVHRMEBTAD
AQH/MB0GA1UdDgQWBBSkFZJ1Dtt5uE6muLRN3rwRPsUCsTANBgkqhkiG9w0BAQQF
AANBAJec3hFPS2SLSDtfLI9mSA7UL1Vgbxr5zZ4Sj9y4I2rncrTWcBqj7EBp9n/Z
U/EwDEljVbE8SSDYr1Emgoxsr4Y=
-----END CERTIFICATE-----
The root certificate contains the CA's digitally signed public key. It's also known as a chain file or a signer certificate. The process of obtaining a root certificate from a CA depends on the CA. The CA typically sends an email with the certificate or requires you to download it from a specified page.
The signed public key certificate also contains an embedded copy of the CA's root certificate, which you can export.
Installing Application Server-Based Digital Certificates
This section discusses how to:
Install application server-based digital certificates.
Access certificate properties.
Export and convert certificates.
Understanding Installing Application Server-Based Digital CertificatesThis section discusses how to install digital application server-based digital certificates.
Use the procedures discussed in this section for generating and installing digital certificates for use with nonrepudiation and certificated-based node authentication. Installing digital certificates for these security technologies requires that you install digital certificates in the application server keystore on each system participating in an integration.
However, while the process for generating application server-based digital certificates is the same for nonrepudiation and certificate-based node authentication technologies, generate and install separate certificates for each technology.
To install application server-based digital certificates on the PeopleSoft system use the Digital Certificates page (ADMINISTER_CERTS). This page enables you to:
Install root certificates.
Install signed public key certificates.
Install a remote certificate.
Export a certificate.
To obtain and import a local node certificate, use the Request New Certificate page (CERT_REQ_SBP).
Each node requires three types of certificates:
One root certificate from a trusted CA.
This certificate contains the CA's digitally signed public key. Each root certificate is stored in a record of type Root CA in the keystore.
One certificate containing the default local node's public key, signed by the same trusted CA.
The CA's root certificate must be installed before you install the default local node's certificate, which is stored in a record of type Local Node in the keystore.
One or more certificates containing the public keys of the remote nodes that participate in nonrepudiation or certificate-based node authenticated messaging.
Each of these certificates is stored in a record of type Remote.
Any participating third-party system must have a set of certificates complementary to those installed at the PeopleSoft nodes.
Installing Application Server-Based Digital Certificates
This section discusses how to:
Add CA authorities and install root certificates.
Install signed public key certificates.
Resolve root certificate mismatches.
Install remote certificates.
Adding CA Authorities and Installing Root Certificates
PeopleSoft delivers a number of root certificates. Before you begin this process, check to see if your root certificate already exists. If it does, there is no need to perform this step.
If your root certificate does not exist, contact your CA for information on how to obtain the root certificate for importing into PeopleSoft.
To install a new root CA certificate:
Select PeopleTools, Security, Security Objects, Digital Certificates. The Digital Certificates page displays.
Add a CA authority:
Click the plus button (+). A new row appears.
From the Type drop-down list, select Root CA.
In the Alias field, enter the alias name for the certificate.
In the Issuer Alias field, enter an alias for the issuer. Click the Lookup button to select the certificate alias as the issuer alias.
Add the root certificate.
Click the Add Root link near the plus button (+). The Add Root Certificate page displays.
Copy the contents of the certificate into the text box.
You must include the begin section (-----BEGIN CERTIFICATE-----) and end section (-----END CERTIFICATE -----).
Click the OK button.
Click the Refresh button.
Install Signed Public Key Certificates for Application Server-Based Digital Certificates
To section discusses how to:
Add local node certificates to the PeopleSoft system and generate CSRs.
Submit local node certificates to CAs for signing.
Import signed local node certificates into the PeopleSoft system.
To install a signed public key certificate, you must define a local node certificate row in the keystore, then obtain the signed certificate from a CA whose root certificate is installed. To do this, you generate a CSR, submit the CSR to the CA, then retrieve and import the content of the signed certificate into your certificate row.
To add a local node certificate and generate a CSR:
Select PeopleTools, Security, Security Objects, Digital Certificates. The Digital Certificates page displays.
Click the plus button (+). A new row appears.
From the Type drop-down list, select Local Node.
In the Alias field, enter the name of the local node.
Note. The name you enter must exactly match the name of the local node.
In the Issuer Alias field, click the Lookup button to select the issuer alias.
At the end of the row, click the Request link. The Request New Certificate page displays.
In the Subject Information section, enter the following information:
These fields represent attributes of the default local node's DN. The CA to whom you submit the CSR might require values for any or all of the fields. The DN is also stored on the Detail page of the local node certificate. For the common name, enter the name of the PeopleSoft Integration Broker default local node.
|
Company Name. |
Enter the default local node name (with no underscore). |
|
Org Unit(organizational unit) |
Enter the name of the organizational unit. |
|
Organization |
Enter the name of the organization. |
|
Locality |
Enter the location of the organization. |
|
State/Province |
Enter the state or province name. |
|
Country |
Enter the two-character country code. |
In the Key Pair Information section, enter the following information:
From the Algorithm drop-down list, select MD5 with RSA Encryption.
From the Key Size drop-down list, select 1024.
Click the OK button.
In addition to generating the CSR, which contains the default local node's public key, this step also creates the matching private key, which is automatically installed in the same row of the node's keystore.
To submit a local node certificate for signing:
After you click the OK button as described in the previous section, the CSR is generated. Copy the CSR and submit it to your CA for signing.
The process of obtaining digital certificates varies, depending on the CA. Typically, a CA requires you to paste the content of the PEM-formatted CSR into a form that you submit online.
The CA may send you the signed public key certificate by email or require you to download it from a specified web page.
When you submit the CSR for signing, you must include the begin section (-----BEGIN NEW CERTIFICATE REQUEST-----) and the end section (-----END NEW CERTIFICATE REQUEST-----).
When you receive the signed certificate back, copy it to a temporary directory. For example:
c:\temp\newcert.cer
After you generate a CSR for the local node certificate and obtain a signature, you import the signed certificate into PeopleSoft.
To import signed local node certificates into a PeopleSoft system:
Select PeopleTools, Security, Security Objects, Digital Certificates. The Digital Certificates page displays.
Locate the row that contains the local certificate.
At the end of the row, click the Import link. The Import Certificate page displays.
Open the signed certificate you received back from the CA, copy it and paste it into the text box. The content you paste must include the begin section (-----BEGIN CERTIFICATE-----) and end section (-----END CERTIFICATE-----).
Click the OK button.
Click the Refresh button.
Three outcomes are possible:
The Digital Certificates page appears and the new certificate's row now contains a Detail link. In this case, the certificate has been successfully installed, and you can proceed to install remote certificates for the node.
Note. The new certificate's row may contain a different issuer alias than the one that you selected for it. This indicates that the keystore contains a root certificate signed by the same CA that signed the new certificate, but it wasn't the one with the issuer alias that you selected (the issuer alias of a root certificate doesn't always reflect which CA actually signed the certificate). PeopleSoft Integration Broker has changed the issuer alias for the new certificate to correctly reflect which root certificate is its parent.
The following message may appear: Could not decode PEM-formatted certificate data. This indicates either that the pasted content isn't formatted properly as a certificate, or that the certificate is not yet valid.
Every signed digital certificate has a period of time during which it can be used, specified by its internal timestamp fields, Valid From and Valid To, which are set by the signing CA. The timestamps were inserted by the CA's certificate server. You can't import the certificate content until the Valid From time has passed on your default local node's application server, which may lag by several minutes, depending on the relative clock accuracy of the two servers. Note that time zones are automatically accounted for and have no effect on this issue. You must examine theValid From field in the certificate's properties dialog box to determine when the certificate can be imported.
The following message may appear: The certificate signature is not valid. The certificate is corrupt or has been modified. This indicates either that the certificate has been tampered with, or that the keystore contains no root certificate signed by the same CA.
The issuer alias of a root certificate doesn't always reflect which CA actually signed the certificate. Therefore it's possible that the CA to which you submitted your CSR didn't sign any of your installed root certificates. The local certificate in your keystore must be accompanied by a root CA certificate signed by the same CA.
Resolving Root Certificate Mismatches
To import a signed public key certificate to the application server keystore as a row of type Local Node on the Digital Certificates page, a root certificate signed by the same CA that signed the public key certificate must already exist as a Root CA row on that page.
If you cannot import a signed public key certificate because no matching root certificate exists, you can resolve the deficiency by installing the root certificate of the CA that did sign your public key certificate. Then you obtain a new signed public key certificate from that CA.
To resolve a root certificate mismatch:
Export the embedded root certificate from the signed public key certificate file.
Define a new root CA certificate in the keystore.
Refer to the previous procedure for establishing a root certificate.
Delete the local node row from the keystore's Digital Certificates page.
Add a new local node certificate to the keystore using the same issuer alias as the new root CA certificate.
Refer to the previous steps for installing a signed public key certificate.
Installing Remote Certificates for Application Server-Based Digital Certificates
To section discusses setting up remote certificates for nonrepudiation and certificated-based node authentication and describes how to:
Export remote node certificates.
Add remote node CAs and import remote node certificates into the local node system.
To establish two-way authentication or nonrepudiation, each node must possess copies of the other participating nodes' public keys. You accomplish this with a certificate row of type Remote in the default local node's application server keystore, which contains a certificate exported from the row defined as Local Node in a remote node's keystore. You define one remote certificate for each participating remote node.
Note. Each remote certificate is a copy of the local node certificate and is installed on the remote node that it represents. As a result, you must first establish a root CA certificate and install a local node certificate on node A before you can export a copy of that certificate to node B. The simplest approach is to first install a certificate of type Root CA and a certificate of type Local Node on each of the participating nodes. Then you can export each of the local node certificates and import them to the other nodes as type Remote.
The following requirements apply:
The remote system's local node certificate must already be installed.
Refer to the previous steps for installing a signed public key certificate.
The local system must have a root certificate installed with the same issuer alias (and actual issuer) as the remote system's local node certificate.
Refer to the previous steps for establishing a root certificate.
Note. For the purposes of this discussion, assume that both local and remote nodes are PeopleSoft applications. If the remote node is a third-party system, the same requirements must still be satisfied—the third-party system must provide a copy of its signed public key certificate to the PeopleSoft node.
To export a remote node certificate:
On the remote node system, select PeopleTools, Security, Security Objects, Certificates. The Digital Certificates page displays.
Locate the row that contains the default local node, and click the Detail link at the end of the row. The Certificate Details page displays.
Click the Export button and copy the content in the edit box.
Click Cancel.
To add a remote node CA and import a remote node certificate into the local node system:
On the local node system, select PeopleTools, Security, Security Objects, Certificates. The Digital Certificates page displays.
Click the plus button (+). A new row appears.
From the Type drop-down list, select Remote Node.
In the Alias field, enter the name of the remote node.
Note. The name you enter must exactly match the name of the remote node.
In the Issuer Alias field, click the Lookup button to select the issuer alias.
Click the Refresh button.
At the end of the remote node row, click the Import link. The Import Certificate page displays.
Paste the certificate that you exported in the previous section into the text box. You must include the begin section (-----BEGIN CERTIFICATE-----) and the end section (-----END CERTIFICATE-----).
Click the OK button.
Click the Refresh button.
Accessing Certificate Properties
When you need to install a signed public key certificate in a keystore, you need the issuing CA's root certificate in the keystore as well. Your public key certificate is more than a single certificate; the same file contains the issuing CA's root certificate as well. If you do not receive a separate root certificate from the CA, you can access it from the public key certificate properties.
When you need to export a root certificate or examine the certificate's valid dates—or when you need to convert a certificate between DER and PEM formats—use the security extensions on a Windows machine to access the certificate properties dialog box .
To access certificate properties:
Double-click any certificate file with a .DER (binary format) extension or a .CER (PEM format) extension.
This invokes the Windows extensions for security management, which open a dialog box so you can inspect the certificate properties.
(Optional.) Access the properties of the embedded root certificate.
Select Certification Path.
A tree structure appears, showing the hierarchical chain of trust between the public key certificate and its issuer root certificate. Your certificate has the common name that you supplied for it, and the issuer root certificate (its parent) has the name of its issuing CA.
Select the root certificate, and click View Certificate.
A dialog box display the properties of the root certificate.
(Optional.) Select Details.
A list of fields appears. Click a field name to examine its value. This is especially useful for determining the certificate's Valid From and Valid To date and time.
Exporting and Converting Certificates
You might need to export an embedded root certificate or convert an existing certificate from DER format to PEM format. You can export certificates from:
DER or PEM formatted certificate files.
Certificate rows in a PeopleSoft application server keystore.
To export or convert a certificate from a file:
Access the properties dialog box of the certificate to export or convert.
In the certificate properties, select Details, then click Copy to File.
The Certificate Export Wizard launches.
Click Next, then select a format.
Base64-encoded X.509 (.CER) is the PEM format option, which is recommended. The DER encoded binary X.509 (.CER) option may also work, depending on the environment.
Click Next, and then browse to select a location and file name for the new certificate file.
Specify the same location as the certificate. Ideally, you should give an exported root certificate file the same name as the issuing CA.
Click Next, then Finish to save the root certificate file.
A message indicates when the export is successful.
To export a certificate from an application server keystore:
In the PeopleSoft Pure Internet Architecture, sign on to the application database and select PeopleTools, Security, Security Objects, Digital Certificates.
The Digital Certificates page appears.
Click the Detail link of the desired certificate, then click Export.
The Export Certificate page appears, containing the exportable certificate content in a long edit box.
Copy the entire certificate content and sign out of the database.
Note. Save this certificate content to a file with a .CER extension.
Installing Integration Gateway-Based Digital Certificates
This section provides an overview of integration gateway-based digital certificates and discusses how to:
Generate private and public key pairs.
Generate CSRs.
Obtain signed root certificates.
Import signed root certificates.
Specifying the keystore location for WS-Security.
Encrypting keystore passwords for WS-Security.
Understanding Integration Gateway-Based Digital Certificates
Use the procedures discussed in this section for generating and installing digital certificates for use with client authentication and WS-Security.
Installing digital certificates for these security technologies requires that you install digital certificates in integration gateway keystores. However, the keystore locations where you install these certificates is different for each technology.
Also note that while the process for generating integration gateway-based digital certificates is the same for client authentication and WS-Security technologies, generate and install separate certificates for each technology.
Elements of Integration Gateway-Based Digital Certificates
To set up integration gateway-based digital certificates, you use a Java-based Keytool command line utility provided with PeopleSoft Integration Broker to install digital certificates in the integration gateway keystore.
The integration gateway requires the following elements:
The gateway's private key.
A certificate containing the gateway's public key, digitally signed by a trusted CA.
A root certificate from the CA that signed the gateway's public key.
With Keytool, you generate a private-public key pair, which is automatically inserted in a gateway keystore that in created with the PeopleSoft Pure Internet Architecture installation in the web server directory structure.
The location of Keytool is <PIA_HOME>\webserv\<DOMAIN>\keystore\.
You generate a PEM-formatted CSR that contains the gateway's public key. You submit the CSR to the selected CA. The CA creates, digitally signs, and returns your gateway's public key certificate to you. This certificate also contains a signed copy of the CA's root certificate. These certificates may be in standard DER-encoded binary format, or they can be converted to PEM format if necessary.
You then install both signed certificates in the gateway keystore. In addition, you register them and the private key with the web server so that it can recognize and use them.
You may have previously installed software on the gateway server machine that included a distribution of the Keytool utility. To install digital certificates for client authentication SSL and WS-Security, be sure to use a copy of Keytool that was provided as part of the Java Runtime Environment (JRE). Use the copy of Keytool that was installed with either the PeopleTools application server or the web server. You can find Keytool in <PS_HOME>\jre\bin. You can also find it in the web server directory structure by searching for Keytool.exe (Windows) or keytool.sh (UNIX).
The basic syntax of Keytool is as follows:
keytool -command
Each command can be followed by a variety of options. Both the command and the keyword for each option that you invoke with it must be preceded by a hyphen, and most options must be followed by a value. If you enter keytool and hit Enter, , a list of all commands and their options is displayed. Keytool provides more than a dozen commands, but you'll use only a few for this task:
keytool -genkey
keytool -certreq
keytool -import
This section outlines only the basic steps required to install the certificates and keys that you need. You can obtain complete documentation for Keytool from Sun Microsystems.
The wss.properties file stores keystore location information and password information for WS-Security digital certificates.
When installing digital certificates for WS-Security, you must specify the location of the keystore in this file.
You can also store an encrypted copy of the keystore password in this file.
The location of the file is <PIA_HOME>\webserv\<DOMAIN>\peoplesoft\applications\PSIGW.war\WEB-INF\classes.
Generating Private and Public Key Pairs
To generate a key pair:
Open a command prompt and navigate to the location of the gateway keystore file.
The location is <PIA_HOME>\webserv\<DOMAIN>\keystore.
Issue the following command (substituting the appropriate path for Keytool, if necessary):
PeopleTools_home\jre\bin\keytool -genkey -alias key_alias -keyalg RSA
-keysize keysize -dname "CN=cName, OU=orgUnit, O=org, L=locality,
ST=state, C=country" -keypass key_password -keystore pskey
-storepass password
Provide values for the options as follows:
|
alias |
Specify the name of the local default node. The private key associated with this alias is used for generating digital signatures. Note. The value you enter must exactly match the name of the local default node. |
|
key_alias |
Specify a name for the key pair. For example:
You also enter this value in the integrationGateway.properties file. |
|
keysize |
Specify one of the following values for the key size:
|
|
dname "CN=cName, OU=orgUnit, O=org, L=locality, ST=state, C=country" |
Specify the gateway's DN attributes. The DN attributes are name-value pairs separated by commas and spaces, and they are enclosed in quotes as a single string. If a value includes a comma, you must precede the comma with a backslash escape character; for example:
You must supply the DN attributes in the order shown. Although their values can be arbitrary, you should supply the appropriate real-world information. |
|
key_password |
Enter a password of your choice for the key pair. It must be at least six characters long. You also enter this value in the integrationGateway.properties file. |
The key pair is generated and must be imported into the keystore.
Generating CSRs
While you are at the command line in the gateway keystore directory, issue the following command:
PeopleTools_home\jre\bin\keytool -certreq -alias key_alias
-file csr_filename -keypass key_password -keystore pskey
-storepass password
Provide values for the options as follows:
|
alias |
Specify the name of the local default node. The private key associated with this alias is used for generating digital signatures. Note. The value you enter must exactly match the name of the local default node. |
|
key_alias |
Enter the name of the key pair that you created previously; for example:
|
|
csr_filename |
Specify the name of the file that contain the CSR; for example:
You can also include a path for the file to create it in a different location than the keystore. |
|
key_password |
Enter the password that you specified when you created the key pair. |
The CSR file appears in the location and with the name that you specified.
Obtaining Signed Root Certificates
You need to obtain a signed certificate from the selected CA. The signed certificate contains your gateway's public key. The process of obtaining digital certificates varies, depending on the certificate authority that you select. Typically, a CA requires you to paste the content of the PEM-formatted CSR into a form that you submit online. The CA may send you the signed public key certificate by email, or it may require you to download the certificate from a specified page. The CA may also provide its root certificate or instructions for retrieving it.
Use the appropriate method for submitting a CSR for signing as determined by your CA.
When you do submit the CSR for signing the content you provide must include the begin section (-----BEGIN NEW CERTIFICATE REQUEST-----) and end section (-----END NEW CERTIFICATE REQUEST-----) of the CSR.
The CA will return the signed certificate to you.
Save the certificates to the location of the keystore file.
The location is <PIA_HOME>\webserv\<DOMAIN>\keystore.
Importing Signed Root Certificates
The public key certificate includes more than a single client certificate; the same file contains the issuing CA's root certificate as well. If you do not receive a separate root certificate from the CA, you must export it from the public key certificate.
To import signed root certificates:
Open a command prompt and navigate to the gateway keystore file.
The location is <PIA_HOME>\webserv\<DOMAIN>\keystore.
Issue the following command (substituting the appropriate path for Keytool, if necessary):
<PS_HOME>\jre\bin\keytool -import -trustcacerts -alias root_cert_alias
-file root_cert_filename -keystore pskey -storepass password
This command imports the signed root certificate into the gateway keystore. Provide values for the options as follows:
|
root_cert_alias |
Specify the alias to use on your gateway to refer to the root certificate; for example:
|
|
root_cert_filename |
Enter the name of the root certificate file that you received from the CA or exported from the public key certificate; for example:
|
While at the command line in the gateway keystore directory, issue the following command:
<PS_HOME>\jre\bin\keytool -import -alias key_alias
-file client_cert_filename -keypass key_password -keystore pskey
-storepass password
This command imports the signed public key certificate into the gateway keystore. Provide values for the options as follows:
|
alias |
Specify the name of the local default node. The private key associated with this alias is used for generating digital signatures. Note. The value you enter must exactly match the name of the local default node. |
|
key_alias |
Enter the name of the key pair that you created previously, for example:
|
|
client_cert_filename |
Specify the name of the newly received public key certificate; for example:
|
|
key_password |
Enter the password that you specified when you created the key pair. |
Specifying the Keystore Location for WS-Security
After you install digital certificates for WS-Security, you must specify the keystore location in the wss.properties file.
To specify the keystore location for WS-Security:
Open the wss.properties file.
The location of the file is <PIA_HOME>\webserv\<DOMAIN>\peoplesoft\applications\PSIGW.war\WEB-INF\classes.
Set the following property equal to the location and file name of the keystore where you installed the integration gateway-based digital certificates.
org.apache.ws.security.crypto.merlin.file
For example:
org.apache.ws.security.crypto.merlin.file=c:/<PIA_HOME>/<webserv>/
<DOMAIN>/keystore/pskey
Note. When entering the path to the keystore, use you must use either double-backslashes (“\\”) or forward slashes (“/”) as path separators. Do not use backslashes (“\”) as path separators for directory names in the wss.properties file. Backslashes are misinterpreted as escape characters by the Java processes that access the file.
Save the changes.
Encrypting Keystore Passwords for WS-SecurityThis section discusses how to encrypt the password for the keystore that contains digital certificates for WS-Security.
Understanding Encrypting Keystore Passwords for WS-Security
When working with the WS-Security digital certificates, PeopleSoft recommends that you encrypt the keystore password in the wss.properties file using the PSCipher utility.
Encrypting the WS-Security Keystore Password
To encrypt the WS-Security keystore password, making sure to write down the encrypted output.
Encrypt the WS-Security keystore password using the PSCipher utility.
Access the wss.properties file.
The location is <PIA_HOME>\webserv\<DOMAIN>\peoplesoft\applications\PSIGW.war\WEB-INF\classes.
Set the following property equal to the encrypted password you created using the PSCipher utility:
org.apache.ws.security.crypto.merlin.keystore.password
The following example shows an encrypted password entered for this property:
org.apache.ws.security.crypto.merlin.keystore.password=UWZzB57U6SE=
Save the changes.
Installing Web Server-Based Digital Certificates
This section discusses how to:
Install digital certificates on Oracle WebLogic web servers.
Install digital certificates on IBM WebSphere web servers.
Understanding Installing Web Server-Based Digital Certificates
You must install web server-based digital certificates to implement web server SSL encryption.
You use utilities provided with the Oracle WebLogic or IBM WebSphere software to install web server-based certificates for SSL encryption. This authentication secures inbound messages. The web server requires three elements:
The web server's private key.
A certificate containing the web server's public key, digitally signed by a trusted certificate authority (CA).
A root certificate from the CA that signed the web server's public key.
The information in section outlines the basic steps required to obtain and install the certificates and keys that you need. Oracle WebLogic and IBM WebSphere provide their own interface and methodology for establishing SSL encryption—you should refer to the documentation supplied with the web server software for detailed information about this process. In addition, refer to the information supplied by the selected CA.
Note. PeopleSoft delivers a number of certificate authorities and root certificates. If your certificate authority or root certificate is not listed, you need to add it to the PeopleSoft system.
You use the web server software to generate its own private key. At the same time, it also generates a certificate signing request (CSR), which contains the web server's public key. You submit the CSR to the selected CA, which creates, digitally signs, and returns your web server's public key certificate to you. This certificate might be in standard DER-encoded binary format; however, it can be converted to PEM format if necessary. You then install both signed certificates, and you register them and your private key with your web server, so that the web server recognizes and uses them.
Installing Digital Certificates for SSL/TLS Encryption on Oracle WebLogic
This section describes how to install digital certificates for SSL/TLS encryption for the Oracle WebLogic environment and discusses how to:
Generate and import public keys.
Generate private keys and CSRs.
Submit CSRs to CAs for signing.
Import signed private keys into keystores.
Set up gateway private keys.
Set up Oracle WebLogic Console for SSL.
Generating and Importing Public Keys (WebLogic)
Before you can generate and import public keys into PeopleSoft, you must access and download the signed public key from your CA. The process for accessing and downloading the signed public key varies, depending on your CA. Contact your CA for information on how to perform these tasks.
To generate and import public keys:
Place the public key from your CA in the keystore. The location of the keystore is:
<PIA_HOME>\webserv\peoplesoft\keystore
Open PSKeyManager.
Open a command prompt and navigate to <PIA_HOME>\webserv\<DOMAIN>.
Enter the following at the prompt:
pskeymanager -import
At the Enter current keystore password prompt, enter the password and press Enter.
At the Specify an alias for this certificate prompt, enter the alias name and press Enter.
The alias name you enter must be the same one you entered when you generated the private key.
At the Enter the name of the certificate file to import prompt, enter the path and name of the certificate to import, and press Enter.
At the Trust this certificate prompt, enter Yes and press Enter.
Generating Private Keys and CSRs (WebLogic)
You use PSKeyManager to generate private keys. PSKeyManager is a wrapper to Sun Microsystem's Keytool for managing keys and certificates.
While using PSKeyManager, press the Enter key to select any of the default values presented.
To generate the private key and the CSR on Oracle WebLogic:
Start PSKeyManager.
Open a command prompt and navigate to <PIA_HOME>\webserv\<DOMAIN>.
Enter the following at the prompt:
pskeymanager -create
PSKeyManager opens.
Enter the current keystore password and press Enter.
The default password is password.
At the Specify an Alias for this Certificate <host_name>? prompt, enter the certificate alias and press Enter.
The default certificate alias is the local machine name.
At the What is the common name for this certificate <host_name>? prompt, enter the host name for the certificate. For example:
<host_name>.corp.peoplesoft.com
Press Enter.
Enter the appropriate information at the following prompts. Press Enter after each entry.
Organization unit.
Organization.
City of locality.
State or province.
You must spell out the entire state name. Do not enter an abbreviation.
Country code.
Number of days the certificate should be valid.
The default value is 90.
Key size to use.
The default value is 1024.
Key algorithm.
The default value is RSA.
Signing algorithm.
The default value is MD5withRSA.
At the Enter a private key password prompt, enter the password or press Enter to use the keystore password.
Verify that the values you entered are correct, and press Enter. To go back and change any values, enter No and press Enter.
PSKeyManager generates a private key and provides the certificate signing request (CSR) that you will provide to the CA for signing. The following example shows a sample CSR.
-----BEGIN NEW CERTIFICATE REQUEST----- MIIBtDCCAR0CAQAwdDELMAk
GA1UEBhMCVVMxEDAOBgNVBAgTB0FyaXpvbmExEDAOBgNVBAcTB1Bob2VuaXgxFD
ASBgNVBAoTC1Blb3BsZVRvb2xzMRMwEQYDVQQLEwpQZW9wbGVzb2Z0MRYwFAYDV
QQDEw1NREFXU09OMDUxNTAzMIGfMA0GCSqGSIb3DQEBAQUAA4GNADCBiQKBgQC43
lCZWxrsyxven5QethAdsLIEEPhhhl7TjA0r8pxpO+ukD8LI7TlTntPOMU535qMGfk
/jYtG0QbvpwHDYePyNMtVou6wAs2yr1B+wJSp6Zm42m8PPihfMUXYLG9RiIqcmp2F
zdIUi4M07J8ob8rf0W+Ni1bGW2dmXZ0jGvBmNHQIDAQABoAAwDQYJKoZIhvcNAQEE
BQADgYEAKx/ugTt0soNVmiH0YcI8FyW8b81FWGIR0f1Cr2MeDiOQ2pty24dKKLUqI
hogTZdFAN0ed6Ktc82/5xBoH1gv7YeqyPBJvAxW6ekMsgOEzLq9OU3ESezZorYFdrQT
qsEXUp1A+cZdfo0eKwZTFmjNAsh1kis+HOLoQQwyjgaxYI=
-----END NEW CERTIFICATE REQUEST-----
The CSR is written in as a text file to the <PIA_HOME>\webserv\peoplesoft directory. The file name is <host_name>_certreq.txt.
Submitting CSRs to CAs for Signing (WebLogic)
After you generate the private key and a certificate signing request (CSR), you must submit the CSR to the certificate authority (CA) for signing.
The process of obtaining the signature varies, depending on the CA that you select. Typically, a CA requires you to paste the content of the PEM-formatted CSR into a form that you submit online. However, the CA may send the signed public key (root) certificate to you by email or require you to download it from a specified web page. The CA may also provide its root certificate or instructions for retrieving it.
Use the appropriate method to submit a CSR for signing as determined by your CA.
When you do submit the CSR for signing the content you provide must
include the begin section
(-----BEGIN NEW CERTIFICATE REQUEST-----)
and the end section (-----END NEW CERTIFICATE REQUEST-----) of the CSR.
The CA will return the signed certificate to you that you must import into the keystore.
Importing Signed Private Keys into Keystores (WebLogic)
You use PSKeyManager to import a server-side private key into the keystore.
Open PSKeyManager.
Open a command prompt and navigate to <PIA_HOME>\webserv\<domain>.
Enter the following at the prompt:
pskeymanager -import
At the Enter current keystore password prompt, enter the password and press Enter.
At the Specify an alias for this certificate prompt, enter the alias name and press Enter.
The alias name you enter must be the same one you entered when you generated the private key.
At the Enter the name of the certificate file to import prompt, enter the path and name of the certificate to import, and press Enter.
At the Trust this certificate prompt, enter Yes and press Enter.
Setting Up Gateway Private Keys (WebLogic)
To set up private keys for gateways, follow the procedures outlined in the following topics presented earlier in this section:
Generating Private Keys and CSRs.
Submitting CSRs to CAs for Signing.
Importing Server-Side Private Keys into Keystores.
The only difference is that for the following prompts you enter names that are gateway-specific:
|
Prompt |
Sample Values |
|
Certificate alias. |
Enter an alias, such as PT851GATEWAY. |
|
Common name for this certificate. |
Enter a name, such as PT851GATEWAY. |
Setting Up Oracle WebLogic for SSL/TLS Encryption
This section describes how to set up Oracle WebLogic for SSL/TLS encryption.
Note. Several pages and fields mentioned in this section reference only SSL. These pages and fields are also used for setting up TLS.
To set up Oracle WebLogic for SSL/TLS:
Login to WebLogic Console.
Open a web browser.
In the URL or address field, enter http://localhost/index.html and press Enter. The Web Server Index Page displays.
Click Access WebLogic Server Console. The signon page for WebLogic Server Administration Console appears.
Enter the Username and Password and click Sign In. WebLogic Administration Console displays.
The username and password are those that you specified when you installed PeopleSoft Pure Internet Architecture.
Navigate to the PIA server Configuration page.
In the WebLogic Server Console In the left navigation area, navigate to PeopleSoft, Servers, PIA. Or,
In the WebLogic Server Console, in the Domain Configuration section, click Servers. The Servers page displays. In the table that appears on the page, click the PIA link.
Click the Keystores and SSL tab.
In the Keystore Configuration section, on the right side of the page, click the Change link. The Specify Keystore Type page displays.
From the Keystores drop-down list, select Custom Identity and Custom Trust.
Click the Continue button. The Configure Keystore Properties page displays.
In the Custom Identity section complete the following fields:
In the Custom Identity Key Store File Name field, enter keystore/pskey.
In the Custom Identity Key Store Type field, enter JKS.
In the Custom Identity Key Store Pass Phrase field, enter password.
In the Confirm Custom Identity Key Store Pass Phrase field, enter password again.
Click the Continue button. The Review SSL Private Key Settings page displays.
In the Review SSL Private Key Setting page, review the information and click the Continue button.
Click the Finish button. You will restart the web server at a later time. You are returned to the Keystore Configuration tab.
Scroll down the page to the Advanced Options section and click the Show link.
In the Server Attributes section, from the Two Way Client Cert Behavior drop-down list box, select Client Certs Requested and Enforced.
Note. Set this option only if the node is setup for certificate-based authentication or non-repudiation, or if required for two-way SSL.
Click the Apply button.
Restart the web server.
Installing Digital Certificates for SSL/TLS Encryption on IBM WebSphere
This section describes how to install digital certificates for SSL/TLS encryption for the IBM WebSphere environment and discusses how to:
Generate and import public keys.
Generate private keys and CSRs.
Submit CSRs to CAs for signing.
Import signed private keys into keystores.
Set up gateway private keys.
Set up IBM WebSphere for web server SSL encryption.
Generating and Importing Public Keys (WebSphere)
Before you can generate and import public keys into PeopleSoft, you must access and download the signed public key from your CA. The process for accessing and downloading the signed public key varies, depending on your CA. Contact your CA for information on how to perform these tasks.
To generate and import a root certificate:
From the Key Database File menu, select Open PSKEY. The location is:
<PIA_HOME>\webserv\<cell_name>_<node_name>_<server_name>\peoplesoft.ear\keystore⇒
\pskey
Click the Download button and load the file to <PIA_HOME>\webserv\<DOMAIN>. For example:
<PIA_HOME>\webserv\<DOMAIN>\<host_name>_PeopleTools.cer
In the Password field, enter password.
In the Key Database Content section, from the drop-down list select Signer Certificates.
Click the Add button to add a CA certificate.
Enter the following values:
In the Data Type field, select or enter Binary DER data.
In the Certificate File Name field, enter <host_name>_PeopleTools.cer.
In the Location field, specify <WAS_HOME>\ssl.
Click the OK button and select a label.
Generating Private Keys and CSRs (WebSphere)
To generate private keys in IBM WebSphere you use IBM Key Management.
To generate server-side private keys and CSRs:
Open IBM Key Management.
Open a command prompt and navigate to <WEBSPHERE_HOME>\appserver\bin.
At the prompt, enter the following:
Ikeyman
Press the Enter key. IBM Key Management opens.
Select Key Database File, Open PSKEY.
The location is:
<PIA_HOME>\webserv\<cell_name>_<node_name>_<server_name>\peoplesoft.ear\
keystore\pskey
Enter the password.
In the Key Database Content section, from the drop-down list select Personal Certificate Requests.
Click the New button. The Create New Key Certificate Request window opens.
Enter the appropriate information in the following required fields:
|
Key Label |
Enter the host name. |
|
Key Size |
From the drop-down list select 1024. |
|
Common Name |
Enter the host name for the certificate. For example:
|
|
Organization |
Enter the organization name. |
In the Enter the name of a file in which to store the certificate request field, enter the location in Step 2.
Click the OK button. The window closes.
In the Key Database Content section, the key label appears under the Personal Certificate Requests section.
IBM Key Management generates and writes the private key to <WAS_HOME>\ssl\certreq.arm.
Submitting CSRs to CAs for Signing (WebSphere)
After you generate the private key and a certificate signing request (CSR), you must submit the CSR to the certificate authority (CA) for signing.
The process of obtaining the signature varies, depending on the CA that you select. Typically, a CA requires you to paste the content of the PEM-formatted CSR into a form that you submit online. However, the CA may send the signed public key certificate to you by email or require you to download it from a specified web page. The CA may also provide its root certificate or instructions for retrieving it.
Use the appropriate method for submitting a CSR for signing as determined by your CA.
When you do submit the CSR for signing the content you provide must
include the begin section
(-----BEGIN NEW CERTIFICATE REQUEST-----)
and end section (-----END NEW CERTIFICATE REQUEST-----) of the CSR.
The CA will return the signed certificate to you.
Importing Signed Public Keys into Keystores (WebSphere)
After you receive a signed certificate back from the CA, you must import it into the keystore.
To import server-side public keys into keystores:
Open IBM Key Management.
Open a command prompt and navigate to <WEBSPHERE_HOME>\appserver\bin.
At the prompt, enter the following:
Ikeyman
Press the Enter key. IBM Key Management opens.
In the Key Database Content section, from the drop-down list select Personal Certificates.
Click the Receive button. The Receive Certificate from a File box displays.
From the Data Type drop-down list, select Base64-encoded ASCII Data.
In the Certificate File Name field enter the name of the certificate to import or click the Browse button to locate the file.
In the Location field, enter the path to the certificate file.
Click the OK button.
The Receive Certificate from a File box closes and the name of the certificate appears in the Personal Certificates section in IBM Key Management.
Setting Up Gateway Private Keys (WebSphere)
To set up private keys for gateways, follow the procedures outlined in the following topics presented earlier in this section:
Generating Private Keys and CSRs.
Submitting CSRs to CAs for Signing.
Importing Server-Side Private Keys into Keystores.
The only difference is that for the following prompts you enter names that are gateway-specific:
|
Prompt |
Sample Values |
|
Certificate alias. |
Enter an alias, such as PT851GATEWAY. |
|
Common name for this certificate. |
Enter a name, such as PT851GATEWAY. |
Setting Up IBM WebSphere for Web Server SSL Encryption
Setting up IBM WebSphere for web server SSL/TLS encryption requires that you perform the following tasks:
Note. Several pages and fields mentioned in this section reference only SSL. These pages and fields are also used for setting up TLS.
Configure SSL/TLS repertoires.
Set up WebSphere servers for SSL/TLS encryption.
Set up inbound Common Secure Interoperability (CSI) authentication.
To configure an SSL/TLS repertoire:
1. Start the WebSphere Administration Console.
The URL is http://localhost:9090/admin/.
2. In the left navigation area, navigate to Security, SSL. The SSL Repertories page displays.
Click the New button. The SSL Configuration Repertoires page displays.
On the Configuration tab, enter values for the following fields:
In the Alias field enter Web Container SSL.
In the Key File Name field enter the location of the JKS file or the location of PSKey. For example:
<PIA_HOME>\webserv\<cell_name>_<node_name>_<server_name>\peoplesoft.ear\
keystore\pskey
In the Key File Password field, enter the keystore password.
In the Key File Format field, enter JKS.
In the Trust File Name field, enter the location of the location of the JKS file or the location of PSKey.
In the Trust File Password field, enter the certificate password.
In the Trust File Format field, enter JKS.
Clear the Client Authentication box, if selected.
In the Security Level field, select High.
Click OK.
Save the configuration.
To set up a WebSphere server for SSL/TLS encryption:
Open the WebSphere Administration Console, if it is not already open.
The URL is http://localhost:9090/admin/.
In the left navigation area, select Servers, Application Servers and select the server with which you would like to work. The Application Servers page displays.
Click the name of the server that appears as a hyperlink on the page.
Click the Configuration tab.
In the Additional Properties section, click Web Container. The Web Container page displays.
In the Additional Properties section, click the HTTP Transports link.
Check the box of the row that contains the entry for the transfer you want to secure.
In the Hosts column click the asterisk (*). The HTTP Transports page displays.
In the Configuration panel in the General Properties section, for the SSL Enabled property check the Enable SSL box.
From the SSL drop-down list, select the desired SSL entry from the repertoire.
Click the OK button and save the changes.
To set up CSI authentication:
Open the WebSphere Administration Console, if it is not already open.
The URL is http://localhost:9090/admin/.
In the left navigation area, navigate to Security, Authentication Protocol, CSIV2InboundAuthentication. The CSI Authentication ->Inbound page displays.
For Basic Authentication, select Supported.
For Client Certificate Authentication, select Required.
Save the changes and reboot the web server.
Implementing Web Server SSL/TLS Encryption
This section provides an overview of web server SSL/TLS encryption and discusses how to:
Configure web server SSL/TLS encryption.
Implement web server SSL/TLS encryption.
Understanding Web Server SSL/TLS EncryptionThis section discusses:
Outbound web server SSL/TLS encryption.
Inbound web server SSL/TLS encryption.
Outbound Web Server SSL/TLS Encryption
The following diagram shows the processing that occurs on outbound transactions when web server SSL/TLS encryption is implemented:
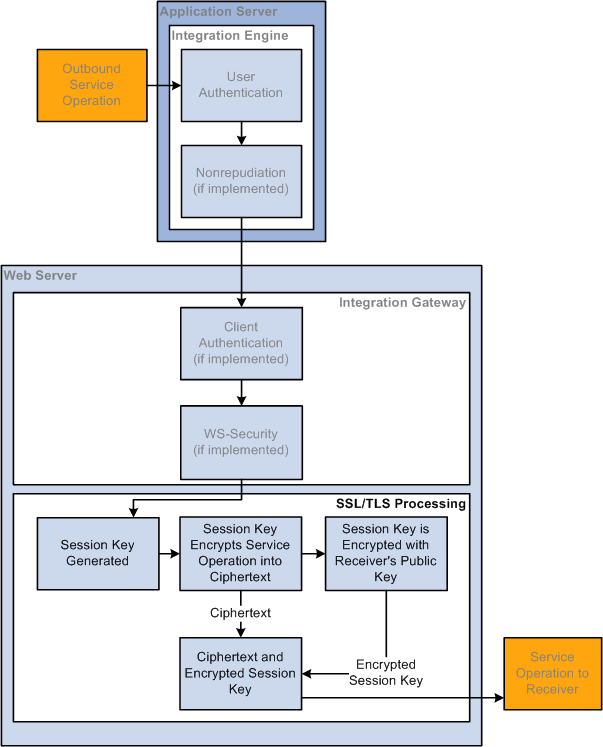
Outbound Web Server SSL/TLS Encryption Processing
Before the integration starts, your integration partner generates a key pair that consists of a private key and a public key. The private key is placed in its web server keystore. The public key is placed in a digital certificate.
You contact the integration partner's site using a secured URL that begins with HTTPS. The integration partner's site responds by sending you its web server digital certificate, which contains the public key of the key pair it generated prior to initiating the integration.
Your web server generates a session key to encrypt the plain text outbound request contents into ciphertext. Then the web server encrypts the ciphertext and session key using your integration partner's public key that was sent to you in the digital certificate.
The session is now secure and all communication is encrypted and can only be decrypted by you and your integration partner.
When the request arrives at your integration partner's web server, the integration partner's web server uses its private key to decrypt the ciphertext and session key. It then uses the session key to decrypt the ciphertext and extract the service operation contents in plain text.
Inbound Web Server SSL/TLS Encryption
The following diagram shows the processing that occurs on inbound transactions when web server SSL/TLS encryption is implemented.
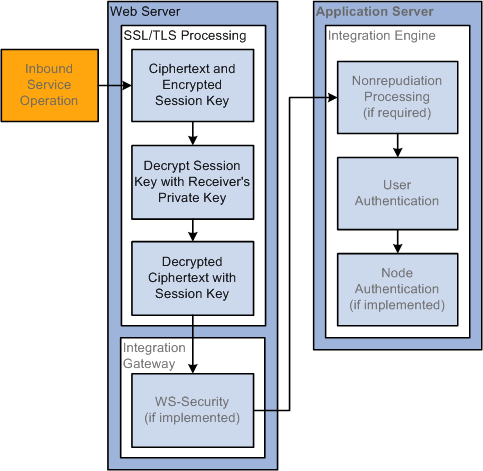
Inbound Web Server SSL Encryption Processing
Before the integration starts, you generate a key pair that consists of a private key and a public key. You place the private key in your web server keystore and the public key gets placed in a digital certificate.
For inbound web server SSL/TLS encryption processing, your integration partner contacts you using a secured HTTPS URL. Your web server responds by sending the integration partner a web server digital certificate that contains your public key. The integration partner's web server goes through the outbound processing described in the previous section.
When the service operation arrives on your web server, it is one package that contains the ciphertext (encrypted service operation contents) and the encrypted session key that decrypts the ciphertext.
Your web server uses its private key to decrypt the ciphertext and session key. It then uses the session key to decrypt the ciphertext into a plain text service operation.
Prerequisites for Implementing Web Server SSL/TLS Encryption
You must set up web server-based digital certificates to implement web server SSL/TLS encryption.
Configuring Web Server SSL/TLS Encryption
Configuring web server SSL/TLS encryption involves the following tasks:
Supply the digital certificates containing the public and private keys required for encrypted transactions. You install these certificates in the web server keystore. You configure the web server to recognize and use its installed certificates for SSL/TLS transactions.
Edit the Integration Gateway Certificates section of the integrationGateway.properties file to convey parameters for the web server certificates that you installed in the gateway keystore.
|
Integration Gateway Properties File Parameter |
Description |
|
ig.certificateAlias |
Certificate alias. |
|
ig.certificatePassword |
Certificate alias password. |
Implementing Web Server SSL/TLS Encryption
For outbound transactions you must change the value of the HTTP target connector's PRIMARYURL;URL property to start with https:// instead of http://. You can apply this setting on a node-by-node basis, or apply it to the gateway as a whole, which will use it as the default setting for all nodes. The HTTP target connector makes the necessary SSL/TLS connection at runtime.
Receipt of HTTPS requests is nearly automatic. When the integration gateway's HTTP listening connector receives an HTTPS request, it is forwarded to the default local node for authentication.
Implementing Web Services Security
This section provides and overview of WS-Security and WS-Security processing in PeopleSoft Integration Broker. It also discusses prerequisites for implementing WS-Security in PeopleSoft Integration Broker and discusses how to:
Implement WS-Security for inbound integration (Username Tokens).
Implement WS-Security for inbound integration (SAML Tokens).
Implement WS-Security for outbound integration (Username and SAML Tokens).
Override node-level WS-Security settings on routing definitions.
Implement WS-Security on services consumed using the Consume Web Services wizard.
This section also describes WS-Security configuration options for outbound integrations and provides examples for WS-Security SOAP message headers.
Understanding Implementing WS-Security in PeopleSoft Integration BrokerThis section provides an overview of implementing WS-Security in PeopleSoft Integration Broker.
WS-Security Standard Supported
PeopleSoft implements WS-Security in accordance with Oasis standards.
Within this framework, PeopleSoft implements:
Username tokens.
SAML tokens.
The PeopleSoft implementation of WS-Security supports:
Clear-text username token. (Password is optional.)
Digitally signed username token.
Digital signatures apply to the SOAP message header and SOAP message body.
Encrypted username token.
You specify to encrypt the SOAP header only, SOAP header and message body, or the message body only
Encrypted SAML assertion token.
You specify to encrypt the SOAP header only, SOAP header and message body, or the message body only
Please visit the MyOracle Support website for information about the current versions of the WS-Security standards, profiles, and namespaces supported by PeopleTools.
See http://www.oracle.com/support/index.html
A UsernameToken is the means of identifying a requestor by user name to authenticate the user's identity to the web service provider. A password may also be used in conjunction with the user name.
The UsernameToken is supplied in the <UsernameToken> element in the WS-Security SOAP header that gets added to an inbound or outbound service operation when WS-Security is implemented. The elements included in the credential are discussed in the following section.
On outbound service operations, the values that the PeopleSoft system populates in the UsernameToken profile can be derived from an external user ID that you specify on the node definition for the external node. It can also be derived from the default user ID specified on the external node definition. In addition, you can choose to digitally sign and encrypt this information.
The Security Assertion Markup Language (SAML) is an XML-based framework for exchanging security information. All SAML tokens include the following common information as defined by Oasis standards:
Issuer ID.
Subject.
Name.
Subject confirmation.
Conditions under which the assertion is valid.
Example of these conditions are NotBefore and NotOnOrAfter.
This security information is expressed in the form of assertions about subjects, where a subject is an entity that has an identity in some security domain.
The following pseudocode shows an example of a SAML token:
<Assertion AssertionID="d9aeaa4c1126df5ee0c6df64fdf961b1" IssueInstant="2008-05-
  14T18:18:47.246Z" Issuer=".peoplesoft.com" MajorVersion="1" MinorVersion="1"
  xmlns="urn:oasis:names:tc:SAML:1.0:assertion" xmlns:saml="urn:oasis:names:tc:
  SAML:1.0:assertion" xmlns:samlp="urn:oasis:names:tc:SAML:1.0:protocol">
  <Conditions NotBefore="2008-05-14T18:18:47.184Z" NotOnOrAfter="2008-05-14T18:
   28:47.184Z"/>
   <AuthenticationStatement AuthenticationInstant="2008-05-14T18:18:47.215Z"⇒
    AuthenticationMethod="urn:oasis:names:tc:SAML:1.0:am:password">
      <Subject>
        <NameIdentifier NameQualifier=".peoplesoft.com">QEDMO</NameIdentifier>
         <SubjectConfirmation>
           <ConfirmationMethod>urn:oasis:names:tc:SAML:1.0:cm:sender-vouches
           </ConfirmationMethod>
         </SubjectConfirmation>
      </Subject>
   </AuthenticationStatement>
</Assertion>
Note these points about PeopleSoft SAML assertions:
The PeopleSoft SAML token is concerned with the authentication statement only.
The PeopleSoft SAML token supports SAML with digital signature and encryption. SAML tokens without digital signatures are not supported.
The PeopleSoft SAML profile of WSS: SOAP Message Security requires that systems support sender-voucher methods of subject confirmation.
The SAML Assertion validity or condition by default is set to 10 minutes. However, you can override the default time by adding org.apache.ws.security.saml.AssertValidMins=15 in the wssSAML.properties file which is located in the \\WEB-INF\classes\wssSAML.properties directory.
Inbound and outbound transactions that are secured with WS-Security pass the security credentials in a WS-Security SOAP header that is added to the service operation.
The following elements can appear in the WS-Security SOAP header generated by the integration gateway:
|
Element |
Description |
|
<wsse:UsernameToken> |
Username and optional password to authenticate. |
|
<wsse:Username> |
Username to use for authentication. On outbound integrations this name can be generated using the External User ID or Default User ID values that you define on the node definition. In addition, you can select to digitally sign and encrypt this value. |
|
<wsse:Password> |
(Optional.) Password for the authentication username. On outbound integrations this password matches that specified for the External User Id or Default User ID used to generate the username. If you select to digitally sign or encrypt the username, this password is digitally signed or encrypted as well. |
|
<saml:Assertion> |
SAML assertion token to use for authentication. You can encrypt this value. |
The following example shows a WS-Security SOAP header for an outbound service operation generated by the PeopleSoft system:
<soapenv:Header>
        <wsse:Security soapenv:mustUnderstand="1" xmlns:wsse=
          "http://docs.oasis-open.org/wss/2004/01/oasis-200401-
            wss-wssecurity-secext-1.0.xsd">
            <wsse:UsernameToken>
                <wsse:Username>PTDMO</wsse:Username>
                <wsse:Password Type="http://docs.oasis-open.org/
                  wss/2004/01/oasis-200401-wss-username-token-profile-
                   1.0#PasswordText">PTDMO</wsse:Password>
            </wsse:UsernameToken>
        </wsse:Security>
    </soapenv:Header>
SAML assertions and references to assertion identifiers are contained in the <wsse:Security> element, which in turn is included in the <SOAP-ENV:Header> element. The following example shows SAML assertions conveyed within a WS-Security header as part of a SOAP message:
<SOAP-ENV:Envelope>
   <SOAP-ENV:Header>
     <wsse:Security>
       <saml:Assertion> - - - </saml:Assertion>
     </wsse:Security>
   </SOAP-ENV:Header>
  <SOAP-ENV:Body> - - - </SOAP-ENV:Body>
</SOAP-ENV:Envelope>
Understanding WS-Security Processing using Username TokensThis section provides overviews of:
Inbound WS-Security processing using Username tokens.
Outbound WS-Security processing using Username tokens.
Inbound WS-Security Processing using Username Tokens
The inbound processing of service operations that are WS-Security-compliant using Username tokens occurs on the integration gateway. The following diagram illustrates inbound WS-Security processing in PeopleSoft Integration Broker:
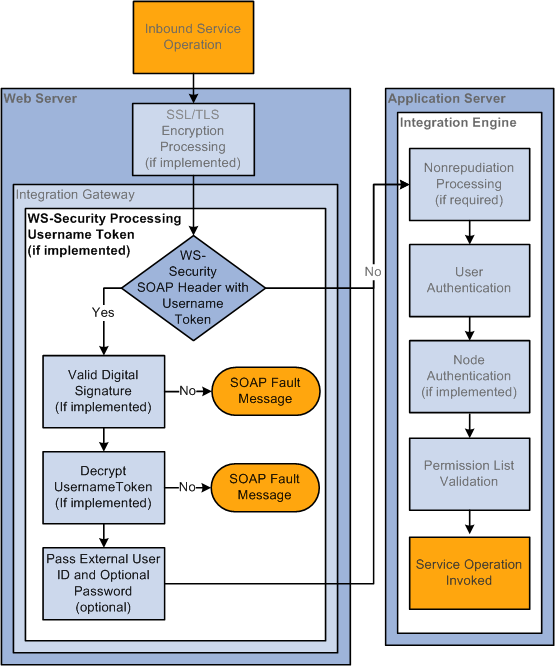
Inbound WS-Security Processing using Username Tokens
When any transaction arrives at the integration gateway, the PeopleSoft system checks for the existence of a WS-Security SOAP header. If it exists, the integration gateway validates the digital signature if it exists, and decrypts the UsernameToken and optional password to restore the user ID information to clear text format.
The integration gateway then passes the user ID information, and UsernameToken password if provided by the sender, to the application server, where additional security processing is performed.
Outbound WS-Security Processing using Username Tokens
The following diagram illustrates WS-Security processing using Username tokens by PeopleSoft Integration Broker on outbound integrations:
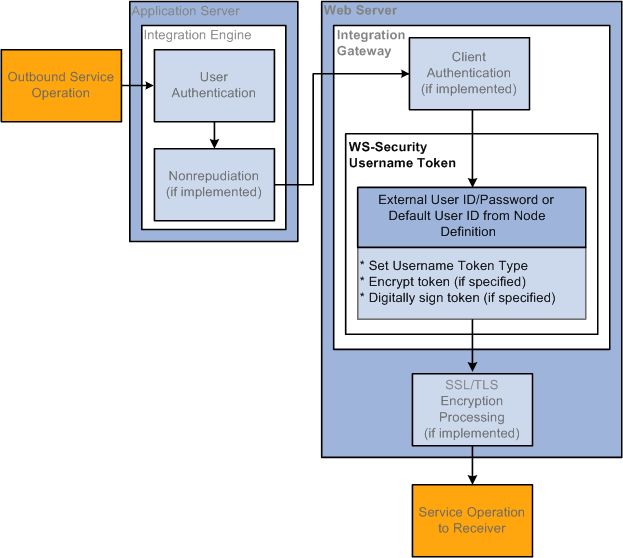
Outbound WS-Security Processing using Username Tokens
When WS-Security is implemented for an outbound service operation, the integration gateway adds a WS-Security SOAP header to the service operation that contains UsernameToken credentials defined in the node definition for the node. The UsernameToken credentials can be comprised of any of the following from the node definition: External User ID, External Password, or Default User ID. Additionally, you can choose to encrypt and digitally sign the UsernameToken credentials.
See Implementing WS-Security for Outbound Integrations (Username and SAML Tokens), Describing WS-Security Configuration Options for Outbound Integrations (Username Tokens).
Understanding WS-Security Processing using SAML TokensThis section provides overviews of:
Inbound WS-Security processing using SAML tokens.
Outbound WS-Security processing using SAML tokens.
Inbound WS-Security Processing Using SAML Tokens
The inbound processing of service operations that are WS-Security-compliant using SAML tokens occurs on the integration gateway. The following diagram illustrates inbound WS-Security processing using SAML tokens in PeopleSoft Integration Broker:
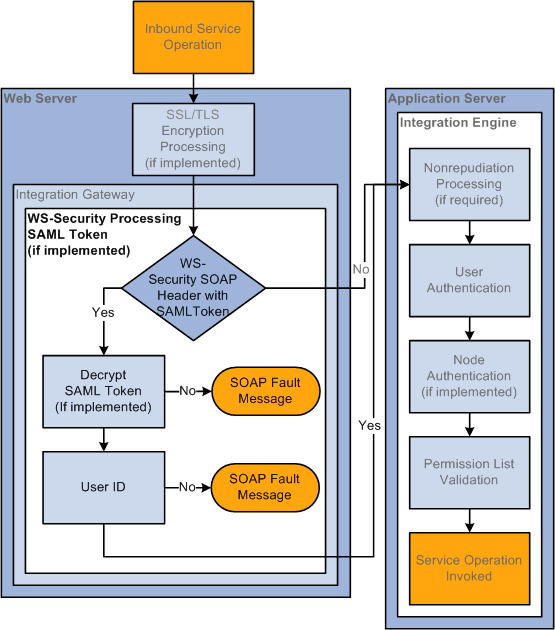
Inbound WS-Security Processing using SAML Tokens
When any transaction arrives at the integration gateway, the PeopleSoft system checks for the existence of a WS-Security SOAP header. If it exists, the integration gateway decrypts the SAML token (if it has been encrypted) to restore the user ID information to clear text format.
The integration gateway then passes the user ID information to the application server, where additional security processing is performed.
Outbound WS-Security Processing Using SAML Tokens
The following diagram illustrates WS-Security processing using SAML tokens by PeopleSoft Integration Broker on outbound integrations:
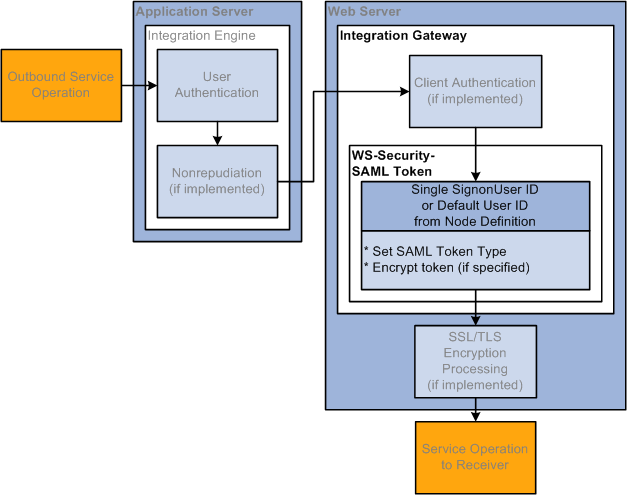
Outbound WS-Security Processing using SAML Tokens
When WS-Security is implemented for an outbound service operation, the integration gateway adds a WS-Security SOAP header to the service operation that contains SAML credentials defined in the node definition for the node. The SAML credentials can be comprised of any of the following from the node definition: Default User ID or PeopleSoft/Single Signon User ID. Additionally, you can choose to encrypt SAML credentials.
Warning! An any-to-local routing must be used on the sending system for outbound integrations using WS-Security processing and SAML tokens. Integrations will fail using any other routing type.
Prerequisites for Implementing WS-Security in PeopleSoft Integration
Broker
To implement WS-Security in PeopleSoft Integration Broker you must install digital certificates.
It is also helpful to set the integration gateway logging to 5 as doing so enables you to see the WS-Security tags in the logs.
See Installing Integration Gateway-Based Digital Certificates, Managing Integration Gateway Message and Error Logging.
Implementing WS-Security for Inbound Integrations (Username Tokens)
There is no set up required for implementing WS-Security on inbound integrations. The integration gateway handles all inbound processing.
Implementing WS-Security for Inbound Integrations (SAML Tokens)
This section discusses how to:
Set up the PeopleSoft system for handling SAML tokens.
Set up and configure digital certificates.
Setting Up the PeopleSoft System for Handling SAML Tokens
There is some overlap of the steps to set up the PeopleSoft system to handle SAML tokens for integrations using PeopleSoft Integration with those for integrations using WSRP.
The following list describes the steps to set up the PeopleSoft system to handle SAML tokens. Some of the documentation that describes how to perform these steps is located in the PeopleTools 8.51 PeopleBook: PeopleTools Internet Technologies, as many of the same set-up steps are required to use SAML tokens with WSRP.
Create the SAML administrator user ID.
Set up application server and integration gateway digital certificates.
See Installing Application Server-Based Digital Certificates, Installing Integration Gateway-Based Digital Certificates.
Set SAML assertion data.
Implementing WS-Security for Outbound Integrations (Username and SAML
Tokens)
This section discusses how to:
Specify an authentication token.
Specify a default user ID.
Specify an external user ID and password.
Specifying Authentication Tokens
Use the WS-Security page in the Nodes component (IB_NODE) to set up WS-Security for outbound integrations. The following example shows the page that displays:
The previous example shows the WS Security page that appears by default. The options that appear on this page vary, depending on the authentication token type with which you are working.
To set up WS-Security for Outbound Integrations:
Select PeopleTools, Integration Broker, Integration Setup, Nodes.
The Nodes search page appears.
Select the external remote node with which you are integrating.
The Node Definitions page appears.
Click the WS-Security tab.
The WS-Security page appears.
From the Authentication Token Type drop-down list box select an authentication type. The options are:
SAML Token.
Username Token.
To include additional security options, choose any of the following:
Additional information about the possible configuration combinations using these options is discussed elsewhere in this section.
See Describing WS-Security Configuration Options for Outbound Integrations (Username Tokens).
|
Encrypt |
(Optional.) When you check this box, an Encryption Level drop-down list box appears which allows you to choose the level of encryption. |
|
Digitally Signed |
This option appears only when you select Username Token. (Optional.) Check the box to digitally sign the token information, including the username and password. |
|
Use Default User ID |
This option appears only when you select SAML Token. (Optional.) Check the box to use the Default User ID specified on the Node Definitions page. If this option is not selected the user ID used is the PeopleSoft single signon user ID. |
|
Use External User ID |
This option appears only when you select Username Token. (Optional.) Check the box to use an external user ID for the username. If you select this option, you specify the external user ID and optional password (recommended) on the Node Definitions page. Note. If you do not select this option, the Default User ID specified on the Node Definition page is used as the username in the UsernameToken credential. See the following Specifying External User IDs and Passwords section. |
Click the Save button.
Click the Node Definitions tab.
The Node Definitions page appears.
If you chose to use an external user ID, a dialog box appears indicating that you need to specify the external user ID and optional password. Information on performing that task is described in the Specifying External User IDs and Passwords section.
When you choose to encrypt messages in an outbound service operation, you have the option to encrypt the entire message, the message body only, or the message header only.
Use the Nodes - WS Security page (IB_NODESECURITY) to work with any of these options. The following example shows the page:
When working with an external node type and you select the Encrypt box, the Nodes — WS Security page displays an Encrypt Level drop-down list box from which you can choose an encryption level.
The encryption level options are:
All. This option encrypts the entire message including the message header and body.
Body. Encrypts the message body only.
Header. (Default) Encrypts the message header only.
Specifying Default User IDs
When using the SAML token type to implement WS-Security, you have the option to use the default user ID for processing. You set the default user ID on the external remote node definition using the Node Definitions page.
When you create a node definition, you must supply a value for the Default User ID. However, you a free to change the value at any time.
See Configuring Nodes.
If you do not check the Default User ID option, the system uses the PeopleSoft User ID/Single Signon User ID for the transaction.
Specifying External User IDs and Passwords
When using the Username token type to implement WS-Security, you have the option to specify an External User ID. You define the external user ID on the Node Definitions page shown in the following example:
When specifying an external user ID, specifying an external user ID password is recommended.
Note. The Confirm External Password field appears after you specify the external password and tab out of the field.
To specify the External User ID and Password:
On the Node Definitions page, in the External User ID field, enter an external user ID.
(Optional.) In the External Password field, enter the password for the external user ID.
Tab out of the field. A Confirm External Password field appears.
In the Confirm External Password field, re-enter the external user ID password.
Click the Save button.
Development Considerations for Implementing WS-Security in Asynchronous
Request/Response Service Operations
This section discusses development considerations for implementing WS-Security in asynchronous request/response service operations and discusses how to:
Digitally sign responses in asynchronous request/response service operations.
Secure responses in asynchronous request/response service operations.
Digitally Signing Responses in Asynchronous Request/Response Service Operations
This section applies to inbound asynchronous request/response service operations defined with any-to-local routing definitions.
In any-to-local routing definitions, no requesting node is present. As a result no digital certificate information that is normally defined at the node level is included with the request. However, the request does contain a RequestAliasName parameter that is populated with the certificate issuer’s credentials that the integration gateway uses to process the request.
To digitally sign a response for an asynchronous request/response service operation, in the response set the RequestAliasName parameter equal to the same value that was set for the parameter on the request message. The integration gateway reads that value and can then determine the certificate to use in the response.
The following example shows how to code a digitally-signed response for an asynchronous request/response service operation:
import PS_PT:Integration:INotificationHandler;

class FLIGHTDATA_RETURN implements PS_PT:Integration:INotificationHandler
   method FLIGHTDATA_RETURN();
   method OnNotify(&MSG As Message);
end-class;

/* constructor */
method FLIGHTDATA_RETURN
end-method;

method OnNotify
   /+ &MSG as Message +/
   /+ Extends/implements PS_PT:Integration:INotificationHandler.OnNotify +/
   /* Variable Declaration */


   Local string &str, &value;
   Local Rowset &rs;
   Local integer #

   Local Message &MSG_resp;
   Local Record &FLIGHTDATA, &REC;

   &rs = &MSG.GetPartRowset(1);
   /* process request data */

   &MSG_resp = CreateMessage(Operation.FLIGHTPLAN_ARR, %IntBroker_Response);
   &rs = &MSG_resp.GetPartRowset(1);
   /* popualate response data */

   If &MSG.IsSourceNodeExternal Then

      /* set WS Addressing information and WS_RequestAliasName
   if security to be added to response message */

      &MSG_resp.IBInfo.WSA_MessageID = &MSG.IBInfo.WSA_MessageID;
      &MSG_resp.IBInfo.WSA_ReplyTo = &MSG.IBInfo.WSA_ReplyTo;
      &MSG_resp.IBInfo.WS_RequestAliasName = &MSG.IBInfo.WS_RequestAliasName;

   Else
      /* request from PSFT system */
      &MSG_resp.IBInfo.WSA_ReplyTo = &MSG.TransactionId;

   End-If;

   %IntBroker.Publish(&MSG_resp);
end-method;
Securing Responses in Asynchronous Request/Response Service Operations
PeopleSoft Integration Broker sends responses for asynchronous request/response service operations to the URL set in the Target Location field in on the Service Configuration page. The URL specified on this page is typically not secure, as it is the URL used for all WSDL, schemas, and web transactions.
When providing asynchronous request/responses, you can dynamically override the URL using the IBInfo object property WSA_ReplyTo. For example:
&MSG.IBINFO.WSA_ReplyTo
You set this property typically before the publish or during the OnSend event.
Overriding Node-Level WS-Security Settings on Routing Definitions
This section discusses how to:
Override WS-Security settings on routing definitions (General).
Override WS-Security settings on routing definitions (Synchronous Responses).
Override WS-Security settings on routing definitions (Asynchronous Requests/Responses).
Understanding Overriding Node-Level WS-Security Settings on Routing Definitions
You can override node-level WS-Security settings on individual routing definitions for outbound request and response messages. The security settings that you can override are the same as those that appear on the Nodes-WS Security page.
When overriding WS-Security settings for synchronous request messages and asynchronous request/response messages, there are PeopleCode considerations of which you should be aware. In addition, the outbound security overrides on the routing definition for these transaction types work in concert with inbound security validation set on the service operation. These considerations and options are discussed in this section.
Overriding WS-Security Settings on Routing Definitions (General)
When you are working with an outbound routing definition to a external node, the Routing Definitions- Parameters page features a WS-Security link, as shown in the following example:
When you click the WS Security link the Routing Security page (IB_ROUTINGDEFN_SEC) appears as shown in the following example:
When you check the Security Override box on the Routing Security page, the WS-Security options that you can override appear on the page, as shown in the following example:
The WS-Security options that appear and that you can set and override in a routing definition, depend on the authentication type and encryption option, if any, set.
To override WS-Security options on a routing definition:
Select PeopleTools, Integration Broker, Integration Setup, Routings, and select or add a routing definition.
Click the Parameters tab.
A WS Security link appears for the outbound request or response message, depending on whether the external node is the sending or receiving node.
Click the WS Security link.
The Routing Security page appears.
Select the Security Override box.
The Authentication Token Type drop-down list box appears.
From the Authentication Token Type drop-down list box, choose an authentication token type with which to work. The options are:
None. (Default.)
SAML Token.
Username Token.
If you choose SAML token or Username token, additional security options appear with which to work. SAML token and Username token security options for outbound messages are discussed elsewhere in this chapter.
See Implementing WS-Security for Outbound Integrations (Username and SAML Tokens).
Overriding WS-Security Options on Routing Definitions (Synchronous Responses)
To override the security for a synchronous response, on the Routing Definitions-Parmeters page, select the WS Security link on the Outbound Response Parameter:
If the Encrypted check box is selected then the response message sent from the consumer must be digitally signed if the routing is an any-to-local type routing.
In addition, you can reject a request message that is not digitally signed. To do so, on the Service Operations-General page, from the Security Verification drop-down list select Digitally Signed.
Overriding WS-Security Options on Routing Definitions (Asynchronous Request/ Response)
You can use the Routing Security page to encrypt and/or digitally sign outbound responses in asynchronous request/response transactions.
If you select the Encrypted box for the outbound response message, then the message sent from the consumer must be digitally signed if the routing is an any-to-local type routing.
You can then select the Digitally Signed option for Security Verification on the service operation to reject a non-signed request message.
To successfully use WS-Security on a response, within the PeopleCode the RequestAliasName must also be populated on the response Message object from the request Message object. Here is an example in PeopleCode:
&MSG_resp = CreateMessage(Operation.FLIGHTPLAN_DOC_ARR, %IntBroker_
Response);
&MSG_resp.IBInfo.WSA_MessageID = &MSG.IBInfo.WSA_MessageID;
&MSG_resp.IBInfo.WSA_ReplyTo = &MSG.IBInfo.WSA_ReplyTo;
&MSG_resp.IBInfo.WS_RequestAliasName = &MSG.IBInfo.WS_RequestAliasName;
The system validates proper encryption based on the request verification selected on the service operation. Select the desired security validation. If the security on the actual request message does not match the value specified in the Security Verification field, an error is sent back to the client.
Implementing WS-Security on Services Consumed Using the Consume Web
Service Wizard
You can implement WS-Security on service operations you consume using the Consume Web Service Wizard.
When using the Consume Services wizard, there is an option to use the default pre-defined WSDL_NODE node or use another existing node as the receiving node for the consumed service operations. The action to take to implement WS-Security on consumed services depends on which of these nodes you are using.
Using the Default WSDL Node
If you choose the default WSDL_NODE node as the receiving node, then you should add/override the node-level WS-Security settings by using the Routing Security page on the routing definition for the created service operation.
If you are using the WSDL_NODE node as the receiving node and the message is to be encrypted, the WS_RequestAliasName must be populated on the request message with the alias name used when adding the provider certificate to the gateway keystore. In addition, in PeopleCode after the message is created add this alias as follows:
&MSG.IBinfo.WS_RequestAliasName = "the alias name from the gateway keystore";
Using an Existing Node
If you use a node other than the WSDL_NODE as the receiving node then you can specify the security settings at the node level on the Nodes- WS Security page or on the Routing Security page on the routing definition.
Describing WS-Security Configuration Options for Outbound Integrations
(Username Tokens)
This section discusses:
Recommended WS-Security configurations for outbound integrations.
Supported WS-Security configurations for outbound integrations.
Non-secure WS-Security configurations for outbound integrations.
Recommended WS-Security Configurations for Outbound Integrations (Username Token)
The following table highlights recommended WS-Security configurations on the PeopleSoft system for outbound integrations using Username tokens. Note that the configuration is always performed on the remote node and that the node type is always External.
|
External User ID and Password |
Authentication Type |
With SSL Encryption |
Results |
|
Both |
Username Token with the External User ID option. |
Yes |
The system uses the external user ID and password to generate the username token. The token is generated in clear text. |
|
Both |
Username Token with the following other options:
|
No |
The system uses the external user ID and password to generate the username token. The token is encrypted and digitally signed. |
|
Both |
Username Token with the Digitally signed option. |
Yes |
The system uses the external user ID and password to generate the username token. The token is digitally signed. |
|
External User ID only. |
Username Token with the External User ID option. |
Yes |
The system uses the external user ID to generate the username token. The token is generated in clear text. |
|
External User ID only. |
Username Token with the following other options:
|
No |
The system uses the external user ID to generate the username token. The token is encrypted and digitally signed. |
|
External User ID only. |
Username Token with the following other options:
|
No |
The system uses the external user ID to generate the username token. The token is digitally signed. |
Supported WS-Security Configurations for Outbound Integrations (Username Token)
The following table highlights supported WS-Security configurations on the PeopleSoft system for outbound integrations using Username tokens. Note that the configuration is always performed on the remote node and that the node type is always External.
|
External User ID and Password |
Authentication Type |
With SSL Encryption |
Results |
|
None. |
Username Token option only. |
Yes. |
The system uses the default user ID defined on the node definition to generate the username token. The token is generated in clear text. |
|
None. |
Username Token with the following other options:
|
No. |
The system uses the default user ID defined on the node definition to generate the username token. The token is encrypted and digitally signed. |
|
None |
Username Token with the Digitally Signed option. |
No. |
The system uses the default user ID defined on the node definition to generate the username token. The token is digitally signed. |
Non-Secure WS-Security Configurations for Outbound Integrations (Username Token)
The following table highlights non-secure WS-Security configurations on the PeopleSoft system for outbound integrations using Username tokens. Note that the configuration is always performed on the remote node and that the node type is always External.
Warning! The following configurations are not secure! This information is provided to advise you about configurations that can lead to breaches in security. Use the recommended or supported configurations discussed in the previous sections for configuring your system .
|
External User ID and Password |
Authentication Type |
With SSL Encryption |
Results |
|
Both |
Username Token with the External user ID option. |
No. |
The system uses the external user ID and password to generate the username token. The token is generated in clear text. |
|
None. |
Username Token option only. |
No. |
The system uses the default user ID defined on the node definition to generate the username token. The token is generated in clear text. |
|
Both |
Username Token with the following options:
|
No. |
The system uses the external user ID and password to generate the username token. The token is encrypted. |
|
None. |
Username Token with the following options:
|
No. |
The system uses the default user ID and password to generate the username token. The token generated is encrypted. |
WS-Security SOAP Header Examples (Username Token)
This section provides the following WS-Security code examples:
WS-Security UsernameToken in ciphertext and digitally signed.
WS-Security UsernameToken with clear text user name and password.
WS-Security UsernameToken with clear text with user name only.
Example 1: WS-Security UsernameToken in Ciphertext and Digitally Signed
The following code example shows a WS-Security SOAP header that contains a UsernameToken in cipher text and that is digitally signed. This is the most secure configuration for WS-Security in PeopleSoft Integration Broker.
   <soapenv:Header>
      <wsse:Security soapenv:mustUnderstand="1" xmlns:wsse="http://docs.
        oasis-open.org/wss/2004/01/oasis-200401-wss-wssecurity-secext-1.0
         .xsd">
         <xenc:EncryptedKey>
           <xenc:EncryptionMethod Algorithm="http://www.w3.org/2001/04/
              xmlenc#rsa-1_5"/>
            <ds:KeyInfo xmlns:ds="http://www.w3.org/2000/09/xmldsig#">
               <wsse:SecurityTokenReference>
                  <ds:X509Data>
                     <ds:X509IssuerSerial>
                        <ds:X509IssuerName>CN=PeopleTools TEST root CA,
                          DC=peoplesoft,DC=com,OU=PeopleTools Development,
                          O=PeopleSoft Inc,L=Pleasanton,ST=CA,C=US</ds:
                          X509IssuerName>
                        <ds:X509SerialNumber>174697022083003580418117</ds:
                          X509SerialNumber>
                     </ds:X509IssuerSerial>
                  </ds:X509Data>
               </wsse:SecurityTokenReference>
            </ds:KeyInfo>
            <xenc:CipherData>
               <xenc:CipherValue>q8ytyn0kRisc3i7GwGtoQuU6NSXfvSNoJg76PWpppt
                4b4DoH8bRObvht8GLu904OExYBrNDB26qqOlKVpIzGrCJFgetlhikGghH/u2
                9GC96+YfFdxSFqcJo5PpJR1KnVZP0sKO4IHVIEcuxp7MonoV6dm5kd0d8atVw
                KXhJe5Yk=</xenc:CipherValue>
            </xenc:CipherData>
            <xenc:ReferenceList>
               <xenc:DataReference URI="#EncDataId-13925529"/>
            </xenc:ReferenceList>
         </xenc:EncryptedKey>
         <ds:Signature xmlns:ds="http://www.w3.org/2000/09/xmldsig#">
            <ds:SignedInfo>
               <ds:CanonicalizationMethod Algorithm="http://www.w3.org/
                2001/10/xml-exc-c14n#"/>
               <ds:SignatureMethod Algorithm="http://www.w3.org/2000/09/
                xmldsig#rsa-sha1"/>
               <ds:Reference URI="#id-763474">
                  <ds:Transforms>
                     <ds:Transform Algorithm="http://www.w3.org/2001/10/
                      xml-exc-c14n#"/>
                  </ds:Transforms>
                  <ds:DigestMethod Algorithm="http://www.w3.org/2000/09/
                    xmldsig#sha1"/>
                  <ds:DigestValue>cNBCuvnSP5MMlsJvaHMrZm9CsK0=</ds:
                 DigestValue>
               </ds:Reference>
               <ds:Reference URI="#id-13925529">
                  <ds:Transforms>
                     <ds:Transform Algorithm="http://www.w3.org/2001/10/
                      xml-exc-c14n#"/>
                  </ds:Transforms>
                  <ds:DigestMethod Algorithm="http://www.w3.org/2000/09/
                    xmldsig#sha1"/>
                  <ds:DigestValue>p+IodojBA2QzX6p9xe6PKJyUKSg=</ds:
                 DigestValue>
               </ds:Reference>
            </ds:SignedInfo>
            <ds:SignatureValue>D/kTMJZvxnv7fjWzmvKC1xe8VSDiSz4lZDzFrf8q
              FFoXux+C2xD47TLWnD7m8ejp/Un3mzjWkVN8S4FpwRr/ymrxWTKWLrjCO
              zmjSW+ZbjGvs5UfpFyzEH7PWrXt+LnTeMKKJWYjzOi7HCHCVK9aC/RZCt
              7PkCbSZ7DJoOQO/lU=
            </ds:SignatureValue>
            <ds:KeyInfo Id="KeyId-28705465">
               <wsse:SecurityTokenReference wsu:Id="STRId-7131385" xmlns:wsu=
                 "http://docs.oasis-open.org/wss/2004/01/oasis-200401-wss-
                  wssecurity-utility-1.0.xsd">
                  <ds:X509Data>
                     <ds:X509IssuerSerial>
                        <ds:X509IssuerName>CN=PeopleTools TEST root CA,DC=
                          peoplesoft,DC=com,OU=PeopleTools Development,
                           O=PeopleSoft Inc,L=Pleasanton,ST=CA,C=US
                         </ds:X509IssuerName>
                        <ds:X509SerialNumber>174332155640842765207620
                        </ds:X509SerialNumber>
                     </ds:X509IssuerSerial>
                  </ds:X509Data>
               </wsse:SecurityTokenReference>
            </ds:KeyInfo>
         </ds:Signature>
         <xenc:EncryptedData Id="EncDataId-13925529" Type="http://www.w3.
           org/2001/04/xmlenc#Element">
            <xenc:EncryptionMethod Algorithm="http://www.w3.org/2001/04/
              xmlenc#tripledes-cbc"/>
            <xenc:CipherData>
               <xenc:CipherValue>wqrOr/efBcghEdcTPZMPqbrUu9mF+iCSLf2UhLYjOc
                Vg30+58TX3FCKXJhExi3iEdbuVrYt60mq3Maka6cg6+0JXw0Qmbjbl5qG8p
                sHajRtenvZc3dJeLRDclplbqUw65cDvBqQz+3+K5DBMh+tIlutf+0j3D9MiO
                3ht4Ni4bJ9Zk/h+DY9y05px2xtOMsXSrEhn4STGz4SdaOwFYHDUTT+y+D6zj
                GYxpRAexVQxAkjehW1JEGhyaqqdDmIYPJxCSy8JBc7xL/CaUng98ak8hAr38I
                obBt1qjlYjGo9VybfrX5j9lqn6pcrWX6x3o/9JYXeiaY36qHj+jVm0STq1fPr
                DDfh6ZI0/aeks83MnesMrX9bB7aKOo67DPjJstRvW/qfbIo3wYgv+3Jl68sHv
                u6p6GZEujaLIYIosJ+HtDzmZ2Q9aOtkk7+zFwDohkljAwmNSe3bt9e2i60pgF
                fVYcxg1Pwfz03MyKm83m5cLT9INb8LHK/GsKOl+9GvQ49nsJ6EYuAcPO4Q8Sr
                BvLVVPY3Qljw+4ZOZOEcndxVw+vU9n7cAMyeYa7p5Jpl6l2naeC4J98MIa16D
                CuVdvLIkipurkn2lbVYe5/m0SYbVibvTWE3BIQlWzF/mRHKkOhBhTaKg/Y/Q7
                sRlKcxKHtjnsjX2d4hTqTRYOoKFEH5sVi+gtyhgogiXRjg8wCAS68cYVwAFre
                W9xf2/ojGJFcO354Sk5rWt3GZzK8yRG5Jcgf5pgxnKC3LVgvvGPQM2Q/yGy1N
                OrXDhtzc80zM2SIOjv3A90Gzj9RGKzrWm+bw4QlhveY+rwyZGZRu3ibVUm+mi
                Ul7CdBBbrLOfz9xY45w3H2c6mtu98OwhuoiYHeVS/FkdpL+ztLmZi7gINIAQi
                sCZudpyKsZIcEhTPbTjQcdCVPZim1v9HFft00cSOE1u1CVEYNOSuCisrLJIch
                zAtE7gfa86/NcyEGmUBtvRsGVPkPq81cw1AosV8x4+KPCpTjxxeuMKGrowC2h
                Y/7DY+IYn4
               </xenc:CipherValue>
            </xenc:CipherData>
         </xenc:EncryptedData>
      </wsse:Security>
   </soapenv:Header>
Example 2: WS-Security UsernameToken with Clear Text Username and Password
The following code example shows a WS-Security SOAP header that contains a clear-text UsernameToken credential that contains a user name and a password.
<soapenv:Header>
  <wsse:Security soapenv:mustUnderstand="1" xmlns:wsse="http://docs.oasis-
    open.org/wss/2004/01/oasis-200401-wss-wssecurity-secext-1.0.xsd">
     <wsse:UsernameToken>
         <wsse:Username>IBUSER</wsse:Username>
         <wsse:Password Type="http://docs.oasis-open.org/wss/2004/01/
           oasis-200401-wss-username-token-profile-1.0#PasswordText">IBUSER1
         </wsse:Password>
     </wsse:UsernameToken>
  </wsse:Security>
</soapenv:Header>
Example 3: WS-Security UsernameToken with Clear Text User Name Only
The following code example shows a WS-Security SOAP header that contains a clear-text UsernameToken credential that contains only a user name. No password is specified.
<soapenv:Header>
  <wsse:Security soapenv:mustUnderstand="1" xmlns:wsse="http://docs.
    oasis-open.org/wss/2004/01/oasis-200401-wss-wssecurity-secext-1.0.xsd">
     <wsse:UsernameToken>
        <wsse:Username>QEMGR</wsse:Username>
        <wsse:Password/>
     </wsse:UsernameToken>
  </wsse:Security>
</soapenv:Header>
Implementing Client Authentication
This section provides an overview of client SSL authentication, prerequisites, and discusses how to implement client authentication.
Understanding Client AuthenticationAs mentioned previously in this chapter, outbound transactions connect from the PeopleSoft application server to the integration gateway using an HTTP over MIME connection. Client SSL encryption allows you to secure this connection. Client SSL encryption is not implemented on inbound transactions from the integration gateway to the application server, since this connection is made using a Jolt connection.
Client SSL encryption is typically implemented when the application server and integration gateway each reside on separate machines.
Client SSL encryption is implemented using digital certificates and you must have them installed on the integration gateway.
Note. You must have web server SSL encryption set up and implemented to use client SSL authentication. With web server SSL set up and implemented, client SSL authentication will fail.
After digital certificates are installed, there are no other steps required to implement client SSL authentication.
See Also
Installing Integration Gateway-Based Digital Certificates
Implementing Nonrepudiation
This section provides and overview of nonrepudiation and discusses how to configure nonrepudiation.
Understanding Nonrepudiation
PeopleSoft Integration Broker applies nonrepudiation to cross-node messaging by digitally signing service operation requests and their responses.
Nonrepudiation Processing Overview
In PeopleSoft applications, nonrepudiation provides two-way protection; both the request and its response are nonrepudiated. PeopleSoft Integration Broker uses PKI technology to implement nonrepudiation for integrations. Each participating node’s keystore contains its own private key and the public keys of the nodes with which it exchanges nonrepudiation service operations.
Nonrepudiation works in the following manner:
Node A generates a number, known as a digest, which uniquely identifies its service operation request.
Node A uses its private key to generate a signature based on the digest, and inserts the signature into the nonrepudiation service operation request.
Node A sends the nonrepudiation request to Node B.
When it receives the nonrepudiation request, Node B uses Node A’s public key in its keystore to confirm the integrity of the digest.
It then separately recreates the digest from the service operation, and compares it to the received digest to confirm the integrity of the service operation.
Node B generates a digest that uniquely identifies its response.
Node B uses its private key to generate a signature based on the digest, and it inserts the signature into the nonrepudiation response to confirm receipt of the nonrepudiation request.
Node B sends the nonrepudiation response to Node A.
When the nonrepudiation response is received, Node A uses Node B’s public key in its keystore to confirm the integrity of the digest.
It then separately re-creates the digest from the service operation and compares it to the received digest to confirm the integrity of the service operation content.
Nonrepudiation produces the following results:
The sending node cannot repudiate that the service operation was sent, because the receiving node has a copy of the request signed by the sender.
The receiving node cannot repudiate that the service operation was received and processed, because the sending node has a copy of the response signed by the receiver.
The service operation integrity is verified, because the validated signature of each nonrepudiated service operation assures that the service operation content as received, exactly matches the content as sent.
Inbound Nonrepudiation Processing
The following diagram illustrates inbound nonrepudiation processing:
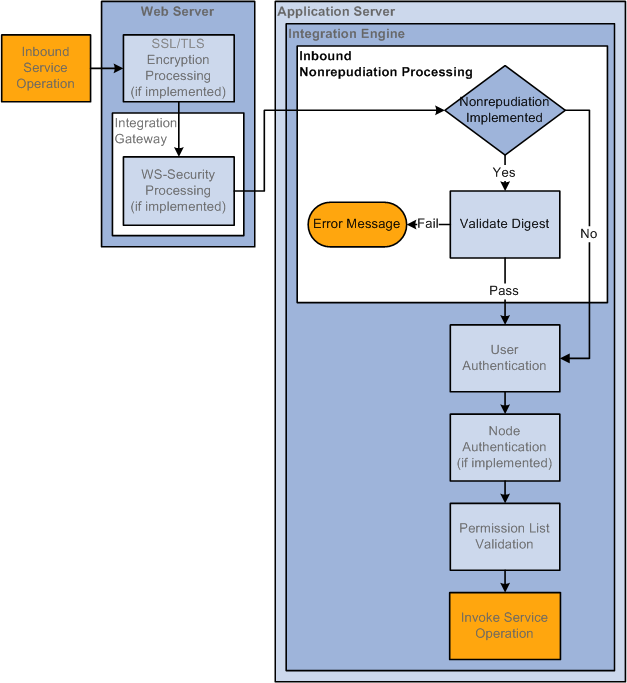
Inbound Nonrepudiation Processing
In inbound nonrepudiation processing, the system uses the integration partner's public key to validate the digest attached to the inbound service operation. It then uses its private key to recreate the digest on the service operation to validate the integrity of the service operation content.
If the system is able to validate the integrity of the digest and the service operation content, the service operation then goes through the user authentication process. If the system is unable to validate the digest or the service operation content, the transaction fails.
Outbound Nonrepudiation Processing
The following diagram illustrates outbound nonrepudiation processing:
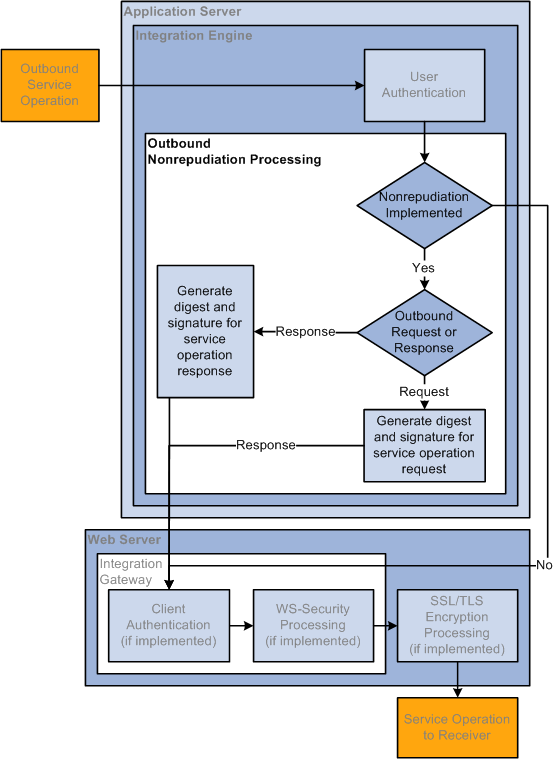
Outbound Nonrepudiation Processing
On outbound service operations, the system determines if the service operation is a request or a response.
When the service operation is a request, the system uses its private key to generate a digest and signature, and attaches those items to the request.
When the service operation is an outbound response, the system uses its private key to generate a signature and response and inserts them into the service operation.
Prerequisites for Implementing Nonrepudiation
You must install application server-based digital certificates on both sending and target systems to implement nonrepudiation.
See Installing Application Server-Based Digital Certificates.
Configuring Nonrepudiation
This section discusses nonrepudiation configuration tasks on sending and target PeopleSoft systems using PeopleSoft Integration Broker.
If a participating node doesn’t use PeopleSoft Integration Broker, that node is still responsible for managing the appropriate private and public keys, inserting properly formatted signatures in the nonrepudiation service operation it sends, and properly handling signatures in the service operations that it receives.
With both archived and active nonrepudiation service operations, you can regenerate the digest in the Service Operations Monitor to reconfirm that it matches the attached digest.
See Viewing Service Operation Nonrepudiation Signature Information.
Configuring Nonrepudiation on Sending PeopleSoft Systems
This section discusses configuring nonrepudiation on sending systems for asynchronous or synchronous transactions.
Prerequisites for configuring nonrepudiation are discussed elsewhere in this section.
See Prerequisites for Implementing Nonrepudiation.
To configure nonrepudiation for service operations on the source system you must:
Select the Non-Repudiation check box on the service operation that will be invoked.
Select the Non-Repudiation check box on the remote node definition that represents the target system.
Configuring Nonrepudiation on Target PeopleSoft Systems
You must supply the digital certificates containing the private and public keys required for nonrepudiation transactions.
No additional configuration is required on target PeopleSoft systems to handle nonrepudiated service operations. A nonrepudiated service operation received by a target PeopleSoft system will attempt to validate the service operation regardless if the local node and service operation are set for nonrepudiation.
Saving Nonrepudiated Service Operations
To save nonrepudiation service operations for future reference, you must archive them.
See Archiving Service Operation Instances.
Managing User Authentication
This section provides overviews of user authentication, outbound user authentication, inbound user authentication, and discusses how to:
Activate user authentication on service operations.
Set up user authentication on sending systems.
Exclude Peoplesoft authentication tokens in outbound requests to PeopleSoft nodes.
Understanding User Authentication
In PeopleTools 8.48 and later releases, access to invoke service operations is enforced at the user level.
When integrating with other PeopleSoft systems, user authentication determines the user ID to set on outbound integrations. The receiving system extracts this information and uses the user ID to validate against the permission list to which a service operation is assigned. If the user ID is assigned to the permission list, the sender can invoke the service operation.
When using Integration Broker for integrations with other PeopleSoft systems, you do not need to set up the remote/target node as a trusted node or implement single signon for user authentication to be validated. Instead you can simply define the source system user ID(s) on the target system. The user IDs from the source system can be provisioned on the target system by Oracle Identity Manager (OIM) or another third-party provisioning application.
Note. User authentication can be implemented on PeopleTools 8.48 and later systems only.
The PeopleSoft system can use the following methods to set the user ID in an outbound transaction:
|
When the node is a PeopleSoft (PIA) node type, the PeopleSoft system automatically generates an authentication token and includes the token in the outbound transaction. The authentication token sets the user ID in the outbound transaction to the user ID that created the service operation. |
|
|
The Node Definition page contains a Default User ID field. This is the user ID to which the node defaults, when no other user ID described in this section is set. |
|
|
You can programmatically set an external name and external password in the outbound SOAP message header or query string. |
|
|
The Node Definitions page contains an External User ID and an External Password field. These fields are used in conjunction with WS-Security and are used for user authentication and to set the UsernameToken credentials for WS-Security processing. The External Passwordvalue is optional. |
On inbound integrations from a PeopleSoft node, the PeopleSoft system looks for a user ID to associate with the permission list set for a service operation in the following order:
Authentication token.
Default User ID.
On inbound integrations not from a PeopleSoft node (External nodes and third-party systems), the PeopleSoft system looks for a user ID to associate with the permission list set for a service operation in the following order:
External Name/External Password.
Default User ID.
Understanding Outbound User Authentication
The outbound user authentication process determines the user ID to identify and attach to the outbound service operation. If the receiving system is a PeopleSoft system, the system validates the user ID and if the user ID belongs to the permission list to which the service operation is assigned, the service operation can be invoked.
The PeopleSoft system sets the user ID based on whether the sending node type is a PeopleSoft node (PIA) and by user ID information that may be defined in the SOAP message included with the service operation.
Outbound User Authentication: Sending Node is PeopleSoft Node Type
The following diagram illustrates the user authentication process when the local sending node is a PeopleSoft node:

Outbound User Authentication Processing when the Sending Node is a PeopleSoft Node
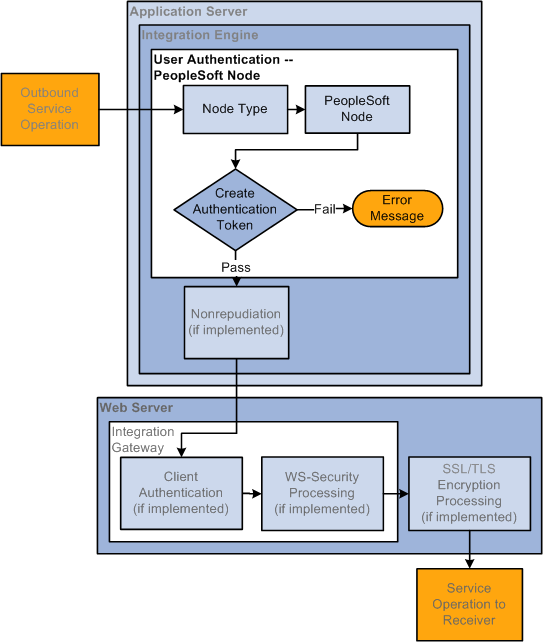
Outbound User Authentication Processing when the Sending Node is a PeopleSoft Node
When the sending node is a PeopleSoft node, the user authentication process creates an authentication token to include in the transaction. The token is used on the receiving system to identify the sending node.
Note that the sending node does not need to be defined as trusted node on the receiving system for the PeopleSoft authentication token to be validated.
See Understanding User Authentication.
Outbound User Authentication: Sending Node is not PeopleSoft Node Type
The following diagram illustrates the user authentication process when the local sending node is not a PeopleSoft node type:

Outbound User Authentication Processing when the Sending Node is Not a PeopleSoft Node
When the sending node is not a PeopleSoft node, the system first looks at the SOAP message associated with the service operation to see if an external user ID or external user ID and password have been provided programmatically in the outbound SOAP message header. If so, the system uses that user ID/password and the service operation passes user authentication.
If an external user ID or external user ID and password are not specified programmatically in the SOAP message header, the system looks on the external node definition for user ID and password information. The system first looks for user ID and password information in the External User ID and External Password fields on the Node Definition page. If no External User ID or no External User ID/External Password is set, the system uses the Default User ID set on the Node Definitions page.
To summarize, when the sending node is not a PeopleSoft node type, the system follows this precedence for setting the user ID in the outbound service operation:
User ID/password set in SOAP message header.
User ID and password set in External User ID and External Password fields on the local external node definition.
User ID set in the External User ID field on the local external node definition.
User ID set in the Default User ID field on the local external node definition.
Understanding Inbound User Authentication
The inbound user authentication process determines the user ID that has been sent with an inbound service operation and determines if the sender is able to invoke the service operation.
The inbound user authentication process depends on whether the sender is a PeopleSoft node, the sender is an external node, or if the sender is not associated with any node. This section discuss user authentication processing for each of these situations.
Inbound User Authentication: PeopleSoft Node is the Sending Node
The following diagram illustrates the inbound user authentication process when a PeopleSoft node type is the sending node:
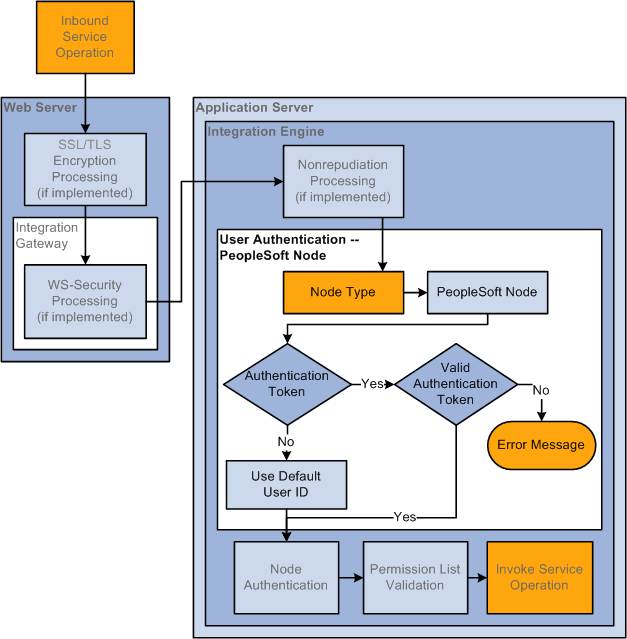
Inbound User Authentication Processing when the Sending Node is a PeopleSoft Node
If the sending node is a PeopleSoft node, the system determines if an authentication token has been sent with the transaction. The system uses the authentication token to verify the sending node.
Note that the sending node does not need to be defined as trusted node on the receiving system for the PeopleSoft authentication token to be validated.
See Understanding User Authentication.
If authentication passes, the service operation has passed user authentication. If the authentication cannot be validated an error message is generated.
If no authentication token is included with the service operation, the system uses the default user ID on the external PeopleSoft node as the user ID.
Inbound User Authentication: External Node is the Sending Node
The following diagram illustrates user authentication processing when the sending node is an external node:
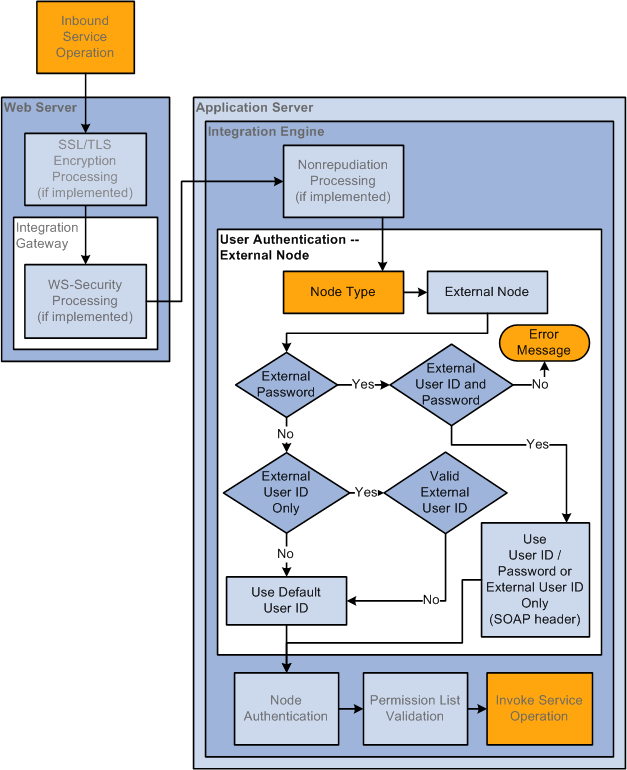
Inbound User Authentication Processing when the Sending Node is an External Node
If the sending node is an external node type, the system first looks for a user ID and password set in the SOAP message header included with the inbound service operation. If both a user ID and password are not found, the system looks in the SOAP message header for a user ID only. If no user ID/password or no user ID are found in the SOAP message header, the system uses the user ID set in the Default User ID field in the remote node definition.
Inbound User Authentication: Third–Party System Sending the Service Operation
The following diagram illustrates user authentication processing when a third-party system sends a service operation:
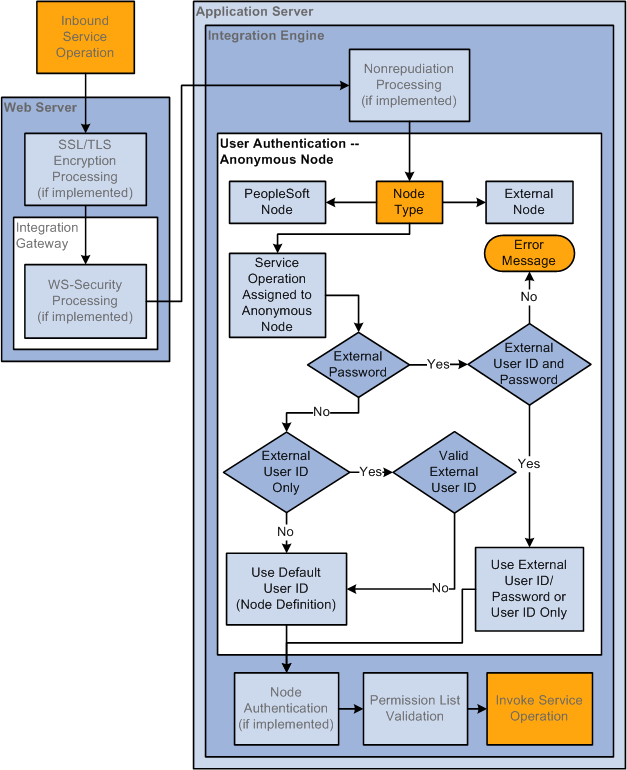
Inbound User Authentication Processing when the Sending Node is a Third-Party System
Because third-party systems do not understand the concept of a node as defined and used within the context of PeopleSoft systems, PeopleSoft assigns transactions that have no node specified to a PeopleSoft-delivered Anonymous node.
If the PeopleSoft system first checks the SOAP message header for an external name and password set programmatically.
If none is found or if the system cannot validate the user ID or password that was set programmatically, it uses the Default User ID set on the Node Definitions page on the remote Anonymous node definition.
Activating User Authentication on Service Operations
To activate user authentication on a service operation:
Access the Service Operations-General page (PeopleTools, Integration Broker, Integration Setup, Service Operations. Click the General tab.
Check the User/Password Required check box.
Save the changes.
Setting Up User Authentication on Sending Systems
This section discusses how to:
Set up user authentication on remote PeopleSoft nodes.
Set up user authentication on remote External nodes.
Set up user authentication for third-party systems.
Understanding Setting Up User Authentication on Sending Systems
To set up user authentication on a sending system you must define the user ID on the remote node for the outbound transaction.
Setting Up User Authentication on Remote PeopleSoft Nodes
No set up is required to set up user authentication on a remote PeopleSoft (PIA) node type. An authentication token is automatically included in the outbound transaction. If the receiving system fails to authenticate the token an error message is returned. .
Setting Up User Authentication on Remote External Nodes
You can set the user ID for user authentication in any of the following ways on an external node:
External Name/Password. Set programmatically in the SOAP message header or query string.
External User ID and External Password. Set using the Node Definitions page.
Default User ID. Set on the Node Definitions page.
Note. The user ID you specify must have access to the permission list to which a service operation is assigned to invoke the operation on the receiving system.
To access the Node Definitions page select PeopleTools, Integration Broker, Integration Setup, Nodes.
Setting Up User Authentication for Third-Party Systems
As discussed previously in this section, all inbound transactions that do not have PeopleSoft (PIA) node or external (External) node type specified are assigned to an Anonymous node.
You can set the user ID in requests from third-party systems programmatically in the external name/password elements in the outbound SOAP message header.
If the system does not find an external name or password in these locations, it uses the Default User ID field that you define on the remote Anonymous node.
See Also
Excluding PeopleSoft Authentication Tokens in Outbound Requests to
PeopleSoft Nodes
This section discuss how to exclude PeopleSoft authentication tokens in outbound requests to PeopleSoft nodes.
Understanding Excluding PeopleSoft Authentication Tokens in Outbound Requests to PeopleSoft Nodes
A PeopleSoft authentication token in an outbound request to a PeopleSoft target node signifies to the target PeopleSoft target system that the sender is a valid user on its system.
However, for some integrations there can be many users or validating users may not be warranted. In such cases you can exclude the PeopleSoft authentication token from inclusion in outbound requests to PeopleSoft target nodes.
When the PeopleSoft authentication token is excluded in a request, the default user ID for the sending node on the target system is the user ID used for integration authentication.
Viewing Service Operations where PeopleSoft Authentication Tokens Have Been Excluded
Use the Exclude PSFT Auth Token page (IB_SVCSETUP5) shown in the following example to view service operations where PeopleSoft authentication tokens have been excluded:
To view service operation where PeopleSoft authentication tokens have been excluded:
Access the Exclude PSFT Auth Token page (PeopleTools, Integration Broker, Configuration, Service Configuration, Exclude PSFT Auth Token).
Select the Exclude PSFT Auth Token box under the Operation field.
Click the Search button.
The system displays all service operations where the PeopleSoft authentication token has been excluded and will not be included in the service operation transaction.
Excluding PeopleSoft Authentication Tokens in Outbound Requests
Use the Exclude PSFT Auth Token page (IB_SVCSETUP5) shown in the following example to exclude authentication tokens in outbound requests:
In the example shown, a search was performed on the service QE_PO. The QE_ROUTE_ARR and QE_ROUTE_SYNC service operations have been selected, and therefore the PeopleSoft authentication token will be excluded from those service operations. Scrolling to the right would reveal a Results column that indicates the selection was successful.
To exclude a PeopleSoft authentication token in an outbound request:
Access the Exclude PSFT Auth Token page (PeopleTools, Integration Broker, Configuration, Service Configuration, Exclude PSFT Auth Token).
Select one or more service operations from which to exclude the PeopleSoft authentication token:
To select one service operation, click the Service and Operation lookup buttons to locate the service operation. Click the Exclude PSFT Auth Token box.
To select multiple service operations, enter all or part of the service name or service operation name. Click the Search button. A list of results displays in the Service Operations section. Check the Exclude Token box next to each service operation that should not include a PeopleSoft authentication token.
Note that you can also click the Search button to display all service operations in the database.
Click the Save button.
Implementing Node Authentication
This section discusses how to:
Set up password-based node authentication.
Set up certificate-based node authentication.
Understanding Node Authentication
You can implement node authentication with a password or digital certificates.
Setting Up Password-Based Node Authentication
To implement password authentication, you select the Password option from the Authentication drop-down list in a node definition, and enter a password. When you do this for a default local node definition, you must enter the same password in any remote node definition that represents the same node on the other participating systems.
Setting Up Certificate-Based Node Authentication
Certificate-based node authentication involves the following tasks:
You must supply the digital certificates containing the private and public keys required for authenticated transactions.
These elements are required at every node that participates in an authenticated transaction; PeopleSoft Integration Broker handles the mechanics of applying the keys.
See Installing Application Server-Based Digital Certificates.
You must select the Certificate option from the Authentication drop-down list in a node definition.
When you do this in a default local node definition, you must select the same option in any remote node definition that represents the same node on the other participating systems.
Securing Service Operations with Permission Lists
Securing service operations with permission lists is discussed elsewhere in PeopleBooks.
See Setting Permissions to Service Operations.
Validating Security on Inbound Integrations
PeopleSoft Integration Broker can validate that inbound service operations from integration partners are transmitted with a level of security as determined by your organization. If they do not pass validation based on the parameters you set, the integrations are rejected.
The Service Operation page (IB_SERVICE) features a Security Verification drop-down list box that enables you to set the required level of security on inbound integrations.
The following example shows the portion of the Service Operations page that contains the Security Verification drop-down list box:
The valid options are:
Digital Sign or SSL. The integration partner must digitally sign the service operation or transmit it using SLL encryption.
Digitally Sign. The integration partner must digitally sign the service operation.
Encrypt. The integration partner must employ WS-Security encryption on the service operation.
Encrypt and Digitally Sign. The integration partner must employ WS-Security encryption and digitally sign the service operation.
Encrypt or SSL. The integration partner must employ WS-Security encryption on the service operation the service operation or transmit it using SLL encryption.
Encrypt/Digitally Sign or SSL. The integration partner must employ WS-Security encryption and digitally sign the service operation, or transmit it using SLL encryption.
None. (Default.) The integration partner is not required to set any specific security options on the service operation
SSL. The integration partner must transmit the service operation using SLL encryption.
See Also
Installing Web Server-Based Digital Certificates
Implementing Web Services Security