 Determining Security Requirements
This chapter provides overviews of determining security requirements and WS-Security, and discusses how to:
Set up WSRP security options.
Set up SAML.
Configure WS-Security For WSRP Producers.
Define Nodes with WS-Security.
Important! The procedures for configuring WSRP consumption and production must be performed in the order set out in this chapter.
Determining Security Requirements
Before implementing WSRP, it is important that you first determine the level of security you require. If you are consuming remote portlets, the level you select must be the same as the producer. If you are producing portlets, consider whether you need to secure only the transmission channel, or the transmission channel and the messages. You should also consider how security will affect the performance of your servers.
Including the No Security option, there are six types of token security options for WS-Security (set in the server-config.wsdd file):
None. No security token required.
Username Token. The Username Token is in clear text format.
Important! If you require a secure channel between the producer and consumer, the .HTTPS protocol must be used.
Authentication Token as Username Token with full security. Username Token is encrypted and messages are digitally signed.
Note. For this option, either the HTTP or HTTPS protocol can be used to communicate between the producer and consumer.
Username token with no password and digital signature.
Authentication Token as SAML Token. The SAML token messages are digitally signed.
Note. Security Assertion Markup Language (SAML) Token messages are digitally signed by default.
Authentication Token as SAML Token with full security. The SAML token is encrypted and messages are digitally signed.
Important! The security option used by the producer must be an exact match to the security option used by the consumer.
Understanding the PeopleSoft WS-Security for WSRP
WSRP involves passing of SOAP messages between the WSRP consumer and producer. To safely utilize WSRP, PeopleSoft provides message-level security between the consumer and the producer by incorporating WS-Security.
WS-Security is an extension to the concept of the SOAP envelope header that enables applications to construct secure SOAP message exchanges. It also provides a means for associating security tokens with messages.
WS-Security provides three main mechanisms:
Integration solution between the WSRP consumer and producer: The consumer passes their identification to the producer as part of the SOAP message so that the producer can verify the identity and produce WSRP content without requiring the user to log in.
Message integrity: Ensures that messages have not been tampered with.
Message confidentiality: Guarantees that messages are protected.
This figure shows the SOAP envelope, SOAP header and SOAP body and how WS-Security embeds the security token in the SOAP messages:
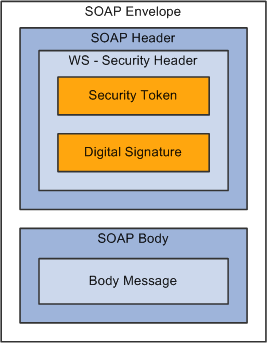
WS-Security SOAP Message Structure
When the PeopleSoft portal is a WSRP consumer, the user ID and password of the user signed into the portal is placed into a Username or SAML Token in the SOAP header, and the WSRP portlet consumes it. It is presented to each portlet during the initial markup request. The security handler performs WS-Security token generation, digital signature generation, and token encryption, before the PeopleSoft system sends the SOAP request message and the WS-Security SOAP header.
Important! The PeopleSoft portal authentication information (both the user ID and password), must be the same as the producer's.
When PeopleSoft is the producing system, the consuming system sends PeopleSoft the SOAP request message and the WS-Security SOAP header. The portal accepts the Username Token in the WS-Security header from the remote portal, assuming that the ID and password are acceptable to PeopleSoft. The receiver security handler decrypts the SOAP header, validates the digital signature, verifies the WS-Security token, and generates a PS_TOKEN cookie, the PeopleSoft authentication token.
This diagram shows PeopleSoft as both WSRP consumer and WSRP producer.
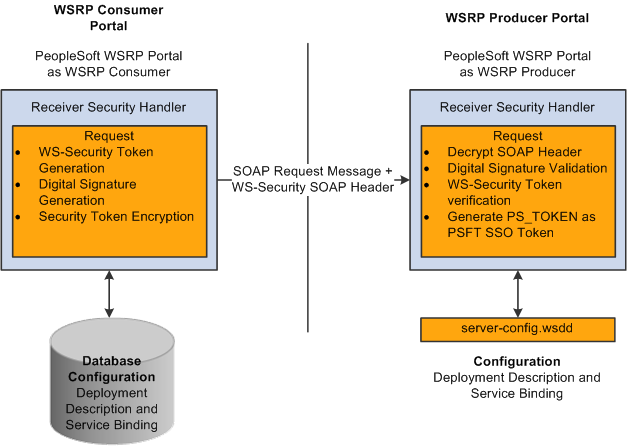
PeopleSoft Portal as WSRP Consumer and Producer
The WS-Security support provided by PeopleSoft applications includes
Username Token Profile.
Security Assertion Markup Language (SAML) Token Profile.
Note. PeopleSoft applications support SAML 1.1.
UserNameToken Security
With Username Token support, a consumer can supply a UsernameToken as a means of identifying the requestor by username, and optionally using a password to authenticate that identity to the web service provider.
This is an XML example of a UserName Token with password:
Note. The password is in cleartext.
<soapenv:Header>
	<wsse:Security soapenv:mustUnderstand="1" xmlns:wsse="http://docs.oasis-open.org⇒
/wss/2004/01/oasis-200401-wss-wssecurity-secext-1.0.xsd">
		<wsse:UsernameToken>
			<wsse:Username>QEDMO</wsse:Username>
			<wsse:Password Type="http://docs.oasis-open.org/wss/2004/01/oasis-200401-wss-⇒
username-token-profile-1.0#PasswordText">QEDMO</wsse:Password>
		</wsse:UsernameToken>
	</wsse:Security>
</soapenv:Header>
This is an XML example of a UserName Token with Digital Signature:
<soapenv:Envelope xmlns:soapenv="http://schemas.xmlsoap.org/soap/envelope/">
<soapenv:Header>
<wsse:Security soapenv:mustUnderstand="1" xmlns:wsse="http://docs.oasis-open.org⇒
/wss/2004/01/oasis-200401-wss-wssecurity-secext-1.0.xsd"><ds:Signature xmlns:ds=⇒
"http://www.w3.org/2000/09/xmldsig#">
<ds:SignedInfo>
<ds:CanonicalizationMethod Algorithm="http://www.w3.org/2001/10/xml-exc-c14n#"/>
<ds:SignatureMethod Algorithm="http://www.w3.org/2000/09/xmldsig#rsa-sha1"/>
<ds:Reference URI="#id-18871350">
<ds:Transforms>
<ds:Transform Algorithm="http://www.w3.org/2001/10/xml-exc-c14n#"/>
</ds:Transforms>
<ds:DigestMethod Algorithm="http://www.w3.org/2000/09/xmldsig#sha1"/>
<ds:DigestValue>Do+wViC4mSHBWYmRMWKaRDF8xmU=</ds:DigestValue>
</ds:Reference>
<ds:Reference URI="#id-11549664">
<ds:Transforms>
<ds:Transform Algorithm="http://www.w3.org/2001/10/xml-exc-c14n#"/>
</ds:Transforms>
<ds:DigestMethod Algorithm="http://www.w3.org/2000/09/xmldsig#sha1"/>
<ds:DigestValue>4NVgNpjX16B4+Wrmw+7bnGfeJSs=</ds:DigestValue>
</ds:Reference>
</ds:SignedInfo>
<ds:SignatureValue>
QFXQuStu8sLAvsDIgNaZHuVWBIes9GpgY6fGb9KLP209hzNi+cPp3NahsF1mVxcXzCjrui2Vc3vq
wLtYA9kaFsM7EMY8TdJC9cmiepr07pR2iXXMmDYYp01dOQkz+3SeBg9F2qPOBAg/jTrWgppys2rS
ES9pV6OIKRk0try8BcU=
</ds:SignatureValue>
<ds:KeyInfo Id="KeyId-1049443">
<wsse:SecurityTokenReference wsu:Id="STRId-14721926" xmlns:wsu="http://docs.oasis-⇒
open.org/wss/2004/01/oasis-200401-wss-wssecurity-utility-1.0.xsd"><ds:X509Data>
<ds:X509IssuerSerial>
<ds:X509IssuerName>CN=PeopleTools TEST root CA,DC=peoplesoft,DC=com,OU=PeopleTools⇒
 Development,O=PeopleSoft Inc,L=Pleasanton,ST=CA,C=US</ds:X509IssuerName>

<ds:X509SerialNumber>566474176348341487536757</ds:X509SerialNumber>
</ds:X509IssuerSerial>
</ds:X509Data></wsse:SecurityTokenReference>
</ds:KeyInfo>
</ds:Signature>
<wsse:UsernameToken wsu:Id="id-11549664" xmlns:wsu="http://docs.oasis-open.org/wss⇒
/2004/01/oasis-200401-wss-wssecurity-utility-1.0.xsd"><wsse:Username>QEDMO</wsse:⇒
Username><wsse:Password Type="http://docs.oasis-open.org/wss/2004/01/oasis-200401-⇒
wss-username-token-profile-1.0#PasswordText">QEDMO</wsse:Password></wsse:Username⇒
Token></wsse:Security></soapenv:Header>   <soapenv:Body wsu:Id="id-18871350" xmlns:⇒
⇒
⇒
⇒
⇒
⇒
⇒
⇒
wsu="http://docs.oasis-open.org/wss/2004/01/oasis-200401-wss-wssecurity-utility-⇒
1.0.xsd">      <ns1:testMethod xmlns:ns1="http://axis/service/security/test9/Log⇒
TestService9"/>   </soapenv:Body></soapenv:Envelope>
Security Assertion Markup Language (SAML) Token Security
A SAML Token makes statements about a principal. All SAML tokens include the following common information:
Issuer ID
Issuance timestamp
NotBefore or NotOnOfAfter conditions
Subject
Name
Subject confirmation
Conditions under which the assertion is valid
This is an XML example of a SAML token:
<Assertion AssertionID="d9aeaa4c1126df5ee0c6df64fdf961b1" IssueInstant="2008-05-⇒
14T18:18:47.246Z" Issuer=".peoplesoft.com" MajorVersion="1" MinorVersion="1"⇒
 xmlns="urn:oasis:names:tc:SAML:1.0:assertion" xmlns:saml="urn:oasis:names:tc:SAML:⇒
⇒
⇒
⇒
⇒
⇒
⇒
⇒
1.0:assertion" xmlns:samlp="urn:oasis:names:tc:SAML:1.0:protocol">
	<Conditions NotBefore="2008-05-14T18:18:47.184Z" NotOnOrAfter="2008-05-14T18:28:⇒
47.184Z"/>
		<AuthenticationStatement AuthenticationInstant="2008-05-14T18:18:47.215Z"⇒
 AuthenticationMethod="urn:oasis:names:tc:SAML:1.0:am:password">
			<Subject>
			 <NameIdentifier NameQualifier=".peoplesoft.com">QEDMO</NameIdentifier>
				 <SubjectConfirmation>
			  		<ConfirmationMethod>urn:oasis:names:tc:SAML:1.0:cm:sender-vouches<⇒
/ConfirmationMethod>
				 </SubjectConfirmation>
			 </Subject>
		</AuthenticationStatement>
</Assertion>
This is an XML example of a SAML token with Digital Signature
- <soapenv:Envelope xmlns:soapenv="http://schemas.xmlsoap.org/soap/envelope/">
- <soapenv:Header>
- <wsse:Security soapenv:mustUnderstand="1" xmlns:wsse="http://docs.oasis-open.org⇒
/wss/2004/01/oasis-200401-wss-wssecurity-secext-1.0.xsd">
- <Assertion AssertionID="ede14876b3389b653824f0456e07676d" IssueInstant="2008-05-⇒
13T22:54:17.417Z" Issuer=".peoplesoft.com" MajorVersion="1" MinorVersion="1"⇒
 xmlns="urn:oasis:names:tc:SAML:1.0:assertion" xmlns:saml="urn:oasis:names:tc:SAML:⇒
⇒
⇒
⇒
⇒
⇒
1.0:assertion" xmlns:samlp="urn:oasis:names:tc:SAML:1.0:protocol">
  <Conditions NotBefore="2008-05-13T22:54:17.386Z" NotOnOrAfter="2008-05-13T23:04:⇒
17.386Z" />
- <AuthenticationStatement AuthenticationInstant="2008-05-13T22:54:17.401Z"⇒
 AuthenticationMethod="urn:oasis:names:tc:SAML:1.0:am:password">
- <Subject>
  <NameIdentifier NameQualifier=".peoplesoft.com">QEDMO</NameIdentifier>
- <SubjectConfirmation>
  <ConfirmationMethod>urn:oasis:names:tc:SAML:1.0:cm:sender-vouches</Confirmation⇒
Method>
  </SubjectConfirmation>
  </Subject>
  </AuthenticationStatement>
  </Assertion>
- <wsse:SecurityTokenReference wsu:Id="STRSAMLId-11733267" xmlns:wsu="http:⇒
//docs.oasis-open.org/wss/2004/01/oasis-200401-wss-wssecurity-utility-1.0.xsd">
  <wsse:Reference URI="#ede14876b3389b653824f0456e07676d" ValueType="http:⇒
//docs.oasis-open.org/wss/2004/XX/oasis-2004XX-wss-saml-token-profile-⇒
1.0#SAMLAssertion-1.1" />
  </wsse:SecurityTokenReference>
  <wsse:BinarySecurityToken EncodingType="http://docs.oasis-open.org/wss/2004/01⇒
/oasis-200401-wss-soap-message-security-1.0#Base64Binary" ValueType="http:⇒
//docs.oasis-open.org/wss/2004/01/oasis-200401-wss-x509-token-profile-1.0#X509v3"⇒
 wsu:Id="CertId-28365241" xmlns:wsu="http://docs.oasis-open.org/wss/2004/01/oasis-⇒
200401-wss-wssecurity-utility-1.0.xsd">MIIElzCCBACgAwIBAgIKQrSKy⇒
QAAAAAL+DANBgkqhkiG9w0BAQUFADCBvjELMAkGA1UEBhMCVVMxCzAJBgNVBAgTAkNBMRMwEQYDVQQHEwp⇒
QbGVhc2FudG9uMRcwFQYDVQQKEw5QZW9wbGVTb2Z0IEluYzEgMB4GA1UECxMXUGVvcGxlVG9vbHMg⇒
RGV2ZWxvcG1lbnQxEzARBgoJkiaJk/IsZAEZFgNjb20xGjAYBgoJkiaJk/IsZAEZFgpwZW9wb⇒
GVzb2Z0MSEwHwYDVQQDExhQZW9wbGVUb29scyBURVNUIHJvb3QgQ0EwHhcNMDcwODE2MTc1MDIzWhc⇒
NMDgwODE2MTgwMDIzWjBxMQswCQYDVQQGEwJVUzETMBEGA1UECBMKQ2FsaWZvcm5pYTETMBEGA1UEBx⇒
MKUGxlYXNhbnRvbjEPMA0GA1UEChMGT3JhY2xlMRQwEgYDVQQLEwtQZW9wbGVUb29sczERMA8GA1UEAww⇒
IcWVfaWJ0Z3QwgZ8wDQYJKoZIhvcNAQEBBQADgY0AMIGJAoGBAMrvvgIBLkotkSm+tnbxjyNQl⇒
Ti3h3p8h44WhIJ1Ikdvhgtwk890doxdF1HkDaX0Zz7/9IcW4wc5l3z/C/r0kchcq95ToRxKZ5UC50Sx2wb⇒
T9/GL6GVUP/EBtGqcaZSeE4G9OHiVmeXxe7opb3InyyAxU/dbuLj/bMpOvABgbmdhAgMBAAGjggHm⇒
MIIB4jAdBgNVHQ4EFgQUZ1KpPrdYQY+mEdNk/YWKe4Iqn+wwHwYDVR0jBBgwFoAU/jeXdgwdjCBw⇒
IIOg3c+t5n06BswwgawGA1UdHwSBpDCBoTCBnqCBm6CBmIZMaHR0cDovL3B0bnRhczEyLnBlb3BsZXNvZn⇒
QuY29tL0NlcnRFbnJvbGwvUGVvcGxlVG9vbHMlMjBURVNUJTIwcm9vdCUyMENBLmNybIZIZmlsZTov⇒
L1xccHRudGFzMTIucGVvcGxlc29mdC5jb21cQ2VydEVucm9sbFxQZW9wbGVUb29scyBURVNUIHJvb3Qg⇒
Q0EuY3JsMIHwBggrBgEFBQcBAQSB4zCB4DBwBggrBgEFBQcwAoZkaHR0cDovL3B0bnRhczEyLnBlb3Bs⇒
ZXNvZnQuY29tL0NlcnRFbnJvbGwvcHRudGFzMTIucGVvcGxlc29mdC5jb21fUGVvcGxlVG9vbHMlMj⇒
BURVNUJTIwcm9vdCUyMENBLmNydDBsBggrBgEFBQcwAoZgZmlsZTovL1xccHRudGFzMTIucGVvc⇒
Gxlc29mdC5jb21cQ2VydEVucm9sbFxwdG50YXMxMi5wZW9wbGVzb2Z0LmNvbV9QZW9wbGVUb29scy⇒
BURVNUIHJvb3QgQ0EuY3J0MA0GCSqGSIb3DQEBBQUAA4GBABaZwo6xhKZFRbESi3ICewrBTKFjtDbmJvVq⇒
BaB0pConBMRGDJ0bQf9Rwo6/Ucm/BoUEEP/dzBkLYM0NEuEqoQvF4ZHRD73qwNV9CCUHU3nlwfn⇒
L5K54qrda4V2CoBvgpHEU7EVdt47YV2E8HUAUfyDaXZ0prRMB6I2KtKaaYBNI</wsse:BinarySecurity⇒
Token>
- <ds:Signature Id="Signature-22949069" xmlns:ds="http://www.w3.org/2000/09⇒
/xmldsig#">
- <ds:SignedInfo>
  <ds:CanonicalizationMethod Algorithm="http://www.w3.org/2001/10/xml-exc-c14n#" ⇒
/>
  <ds:SignatureMethod Algorithm="http://www.w3.org/2000/09/xmldsig#rsa-sha1" />
- <ds:Reference URI="#STRSAMLId-11733267">
- <ds:Transforms>
- <ds:Transform Algorithm="http://docs.oasis-open.org/wss/2004/01/oasis-200401-wss-⇒
⇒
⇒
⇒
⇒
⇒
⇒
⇒
soap-message-security-1.0#STR-Transform">
- <wsse:TransformationParameters>
  <ds:CanonicalizationMethod Algorithm="http://www.w3.org/2001/10/xml-exc-c14n#" ⇒
/>
  </wsse:TransformationParameters>
  </ds:Transform>
  </ds:Transforms>
  <ds:DigestMethod Algorithm="http://www.w3.org/2000/09/xmldsig#sha1" />
  <ds:DigestValue>TK2a7xf+ldF9MkI1XYut8g5RG+A=</ds:DigestValue>
  </ds:Reference>
- <ds:Reference URI="#id-78219">
- <ds:Transforms>
  <ds:Transform Algorithm="http://www.w3.org/2001/10/xml-exc-c14n#" />
  </ds:Transforms>
  <ds:DigestMethod Algorithm="http://www.w3.org/2000/09/xmldsig#sha1" />
  <ds:DigestValue>wTVh0pHi6NrTKDWnyXbX/WNCw68=</ds:DigestValue>
  </ds:Reference>
  </ds:SignedInfo>
  <ds:SignatureValue>LGWmXxak++duS8IfY+/4BphfPJW+Ka6a8DxUfYmUGUZ57d1HOmTs0fLR0Roqd⇒
IOKJtSD33qRyU6p 7lufZXsRoiJD5iEUJr+El7KgBEmFPFV5hDx2a+dnHN8Zd9A1DRh7qzr1ewKcRpd⇒
BDdoS2mJnqjcz mlLOU6aPQqKAjgRtZtg=</ds:SignatureValue>
- <ds:KeyInfo Id="KeyId-15595312">
- <wsse:SecurityTokenReference wsu:Id="STRId-24840600" xmlns:wsu="http:⇒
//docs.oasis-open.org/wss/2004/01/oasis-200401-wss-wssecurity-utility-1.0.xsd">
  <wsse:Reference URI="#CertId-28365241" ValueType="http://docs.oasis-open.org/wss⇒
/2004/01/oasis-200401-wss-x509-token-profile-1.0#X509v3" />
  </wsse:SecurityTokenReference>
  </ds:KeyInfo>
  </ds:Signature>
  </wsse:Security>
  </soapenv:Header>
- <soapenv:Body wsu:Id="id-78219" xmlns:wsu="http://docs.oasis-open.org/wss/2004⇒
/01/oasis-200401-wss-wssecurity-utility-1.0.xsd">
  <ns1:testMethod xmlns:ns1="http://axis/service/security/test9/LogTestService9" ⇒
/>
  </soapenv:Body>
  </soapenv:Envelope>
Note these points about PeopleSoft SAML assertions
The PeopleSoft SAML token is concerned with the authentication statement only.
The PeopleSoft SAML token supports SAML with digital signature and encryption. SAML tokens without digital signatures are not supported.
The PeopleSoft SAML profile of WSS: SOAP Message Security requires that systems support sender-voucher methods of subject confirmation.
The SAML Assertion validity or condition by default is set to 10 minutes. However, you can override the default time by adding org.apache.ws.security.saml.AssertValidMins=15 in the wssSAML.properties file which is located in the \\WEB-INF\classes\wssSAML.properties directory.
Setting Up WSRP Security Options
This section discusses how to:
Use HTTPS protocol to communicate between producer and consumer.
Install certificates for encryption and signature.
 Using HTTPS Protocol to Communicate Between Producer and Consumer
If you choose the security option “Authentication token as Username token in clear text format”, it is recommended to use HTTPS to protect the username and password. To use HTTPS protocol both the producer and consumer must first configure and enable SSL for HTTPS on their web servers.
Before the consumer imports the producer \pspc\wsdl\wsrp4j_service.wsdl, the producer must modify the file by setting it to HTTPS mode and changing the port number from the HTTP port number to the HTTPS port.
Note. The system automatically inserts the hostname and port number using the values entered during installation.
Example:
<?xml version="1.0" encoding="UTF-8"?>
<wsdl:definitions targetNamespace="urn:oasis:names:tc:wsrp:v1:wsdl"
       xmlns:bind="urn:oasis:names:tc:wsrp:v1:bind"
       xmlns="http://schemas.xmlsoap.org/wsdl/"
       xmlns:wsdl="http://schemas.xmlsoap.org/wsdl/"
       xmlns:soap="http://schemas.xmlsoap.org/wsdl/soap/">

 <import namespace="urn:oasis:names:tc:wsrp:v1:bind"
       	  location="wsrp_v1_bindings.wsdl"/>

  	<wsdl:service name="WSRPService">
    		<wsdl:port binding="bind:WSRP_v1_Markup_Binding_SOAP"⇒
 name="WSRPBaseService">
      		<soap:address location=⇒
"https://<Producer Hostname>:<SSL⇒
 port>/pspc/wsrp4j/WSRPBaseService"/>
    		</wsdl:port>
    		<wsdl:port binding="bind:⇒
WSRP_v1_ServiceDescription_Binding_SOAP"⇒
 name="WSRPServiceDescriptionService">
    	<soap:address location="https://<Producer Hostname>⇒
:<SSL port>/pspc/wsrp4j/WSRPServiceDescriptionService"/>
    		</wsdl:port>
    		 	</wsdl:service>
       </wsdl:definitions>
Note. Where <Producer Hostname> is the hostname of the Producer web server, <SSL port> is the SSL port number of the Producer web server.
If you are using an SSL accelerator in your PeopleSoft system, and you want to use the HTTPS protocol for WSRP to communicate with PeopleSoft Pure Internet Architecture, you need to use the following properties file:
<PIA_HOME>\webserv\peoplesoft\applications\peoplesoft\pspc\WEB-INF\config\services\PIAService.properties.
Note. This is similar to using Web Profile's Default Addressing fields.
In this properties file, specify the default protocol, host, and port to override the incoming request protocol, host and port. The settings WSRP checks in the PIAService.properties file are:
|
usePIAConfig = true |
Flag to check if settings in the PIAService.properties file should be used or not. If you set usePIAConfig to be true, the incoming request is overriden by values set in the PIAService.properties file. Otherwise, the system uses the incoming request values for protocol (scheme), host, and port. |
|
portalHost=<your webserver host> |
The default host to use instead. |
|
portalPort=<your port> |
The default port to use instead. |
|
SSLToPIA=true |
If you set SSLToPIA to be true, the system will use HTTPS, otherwise it will use the HTTP scheme. |
See Also
Implementing WebLogic SSL Keys and Certificates
Installing Certificates For Encryption and Signature
When you select the Authentication token as Username token with full security security option, both the producer and the consumer must install the certificates that are used to enable the encryption and signature.
This diagram illustrates the process flow for installing certificates and enabling encryption and signature.
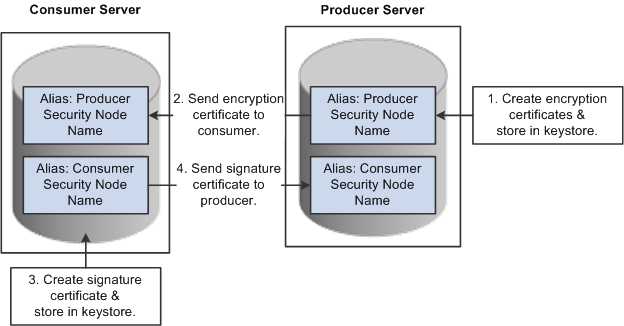
Process for installing certificates and enabling encryption and signature
First use the following reference for instructions on how to create and request your encryption and signature certificates.
See Implementing WebLogic SSL Keys and Certificates, Setting Up SSL For WebSphere.
Producer:
The encryption key and certificate are created on the producer and stored in the web server predefined keystore.
Note. Make sure when you create the entry to hold your encryption keys and certificate in your keystore, the entry's alias name must be the security node name of your Producer server.
Send the encryption certificate to the consumer. This can be done using an out-of-band method, such as file copy or email.
Consumer:
Install the encryption certificate on the Consumer server by running pskeymanager.cmd -import.
Note. Make sure when you import the certificate, the entry's alias name must be the security node name of your Producer server.
Consumer:
Create the signature key and certificate on the consumer and store in the web server predefined keystore.
Note. Make sure when you create the entry to hold your signature keys and certificate in your keystore, the entry's alias name must be the security node name of your Consumer server.
Send the signature certificate to the producer. This can be done using an out-of-band method, such as file copy or email.
Producer:
Install the signature certificate on the Producer server by running pskeymanager.cmd -import.
Note. Make sure when you import the certificate, the entry's alias name must be the security node name of your Producer server.
Encrypting Keystore Password Using PSCipher
A copy of the wss.properties file, which contains PKI java keystore information, such as keystore file location and password for the keystore can be found on both the Consumer and Producer servers.
The location of the wss.properties file on the Consumer web server is:
...\PORTAL\WEB-INF\classes
The location of the wss.properties file on the Producer web server is:
....\pspc\WEB-INF\classes
The following is the sample wss.properties file:
org.apache.ws.security.crypto.provider=
org.apache.ws.security.components.crypto.Merlin
org.apache.ws.security.crypto.merlin.keystore.type=jks
org.apache.ws.security.crypto.merlin.keystore.password=UWZzB57U6SE=
org.apache.ws.security.crypto.merlin.file=keystore/pskey
To define the location of the keystore file, the Portal Administrator needs to define the proper keystore file to replace above org.apache.ws.security.crypto.merlin.file property.
To encrypt the keystore password using Java program PSCipher:
Run PSCipher.bat (.sh for UNIX) to encrypt the password.
% PSCipher.bat <password>
For example, PSCipher interop provides output as UWZzB57U6SE=
Write down the output of PSCipher and then update the encrypted password in the wss.properties file for org.apache.ws.security.crypto.merlin.keystore.password
See Encrypting Text With PSCipher.
Setting Up SAML This section discusses how to:
Create the SAML administrator.
Import digital certificates.
Configure the SAML inbound setup
Run the RedeployWSRP.cmd executable.
Note. You must perform all of the tasks in the order presented to correctly implement the use of the SAML token.
Creating the SAML AdministratorThe SAML administrator must have access to the SAML pages. You grant access to the SAML pages through the PTPT1000 permission list.
To create the SAML administrator:
Access the User Profile page (PeopleTools, Security, User Profiles, User Profiles).
Add a new user or select an existing user who will be the SAML administrator.
Access the Roles page and insert a role that contains the PTPT1000 permission list.
Save the user profile.
See Also
Importing Digital CertificatesTo implement SAML, you must import the digital certificate of the sender and store it in the keystore of participating PeopleSoft applications.
See Configuring Digital Certificates.
Configuring the SAML Inbound SetupThe SAML Inbound Setup page creates an InBound web service in the producer site that maps the one PeopleSoft user ID to one SAML assertion subject and links the subject with the sender's digital certificate (public key). The SAML administrator sets up a web service for each external user who accesses the PeopleSoft system who is using the SAML security option. This information should be configured by the SAML administrator—someone who understands the external requirements and how these requirements map to the component permissions necessary for the user to accomplish the business task.
Access the Security Assertion MarkUp Language [SAML] Inbound Setup page (PeopleTools, Security, SAML Administration Setup, SAML Inbound Setup).
|
Certificate Alias |
Enter the sender's public key, which you imported in the previous step (Importing Digital Certificates). Note. This key must be base 64 encoded. |
|
Issuer |
Enter the domain name of the issuing entity. |
|
SubjectName |
Enter a user ID or email address. |
|
QualifierName |
Enter the domain name of the issuing entity. |
|
Mapping PeopleSoft UserID |
Enter the UserID to map to the SubjectName. This field sets the PeopleSoft internal permissions for the external user and prevents cross-site vulnerability. Note. This userID does not have to be the user ID of the sender, but must be a valid PeopleSoft user in the PSOPRDEFN table. Note. This field is internal to the PeopleSoft application and is hidden from all consumer sites and third party systems. |
Running the RedeployWSRP.cmd ExecutableTo run the RedeployWSRP.cmd executable:
Navigate to the producer web server folder, for example PSHOME/Webserver/bin.
Double-click the file to launch the program.
Select Option 5: Redeploy WSRPBaseService with SAMLToken Security Option.
Configuring WS-Security For PeopleSoft as a WSRP Producer
The ...peoplesoft\pspc\WEB-INF\ directory on the producer web server contains a server-config.wsdd file, which contains the WSRPBaseService definition plus the following variations. Each one of the variations is associated with a security option:
|
Security Option |
Filename |
|
1. None |
server-config.wsdd.none |
|
2. UsernameToken in ClearText |
server-config.wsdd.usernametoken |
|
3. Authentication Token as Username Token with full security |
server-config.wsdd.fullsecurity |
|
4. Username Token with no password and digital signature |
server-config.wsdd.untnp |
|
5. SAML Token either with digital signature only or with digital signature and encryption. |
server-config.wsdd.samltoken |
PeopleSoft applications provide two options for modifying the security constraint on the WSRPBaseService. Which option you should use depends on whether your web server is currently running. If your web server is running, you can modify WSRPBaseService without rebooting the server.
Note. The PIA_HOME\webserv\%DOMAIN_NAME%\ directory contains the redeployWSRP batch file.
Modifying WSRPBaseService Without Rebooting
To modify WSRPBaseService without having to reboot the web server:
Using the Command Prompt, change to the directory containing the redeployWSRP file:
cd %PIA_HOME%\webserv\%DOMAIN_NAME%\
Enter the command: redeployWS <option #>
For example:
redeployWSRP 2
This will redeploy WSRPBaseService using UsernameToken in clear text security option. The web service is removed and redeployed dynamically without having to reboot the web server.
Modifying WSRPBaseService and Rebooting
To modify WSRPBaseService if the web server is not up and running:
Using the Command Prompt, change to the ...\peoplesoft\pspc\WEB-INF directory:
For example:
cd %PIA_HOME%\webserv\%DOMAIN_NAME%\applications\peoplesoft\pspc\WEB-INF\
Copy <desired server-config.wsdd.option> to replace server-config.wsdd file.
Reboot the WSRP Producer Portal web server to allow the newly installed server-config.wsdd file to deploy web services for the producer.
Defining Nodes With WS-Security
This section discusses how to set up nodes for WS-Security.
Pages Used to Define Nodes With WS-Security|
Page Name |
Definition Name |
Navigation |
Usage |
|
Portal |
IB_NODEURI |
PeopleTools, Portal, Node Definitions, Portal |
Enter required information for the WS-Security node. |
|
WS Security |
IB_NODESECURITY |
Click the WS Security tab from the Portal page. |
To enable secure access based on WS-Security for remote producers. Note. Secure access is optional. You must be an administrator to access this page. |
Configuring WS-Security For WSRP Consumers
Access the WS Security page (PeopleTools, Portal, Node Definitions).
Select Authentication Token Type options based on the options specified in the server-config.wsdd file.
|
Security Option |
Authentication Token Options |
|
None |
Select None as the Authentication Token Type, and clear all check boxes. |
|
Authentication Token as Username Token |
Select Username Token as the Authentication Token Type, and clear all check boxes. |
|
Authentication Token as Username Token with full security |
Select Username Token as the Authentication Token Type,.and select both the Encrypted and Digitally Signed check boxes. Note. With this setting, the Username Token is encrypted and messages are digitally signed. |
|
Authentication Token as Username Token with no password and digital signature |
Select Username Token, no password as the Authentication Token Type, and select the Digitally Signed check box. |
|
Authentication Token as SAML Token with digital signature |
Select SAML Token as the Authentication Token Type . Note. By default, SAML Tokens are digitally signed. |
|
Authentication Token as SAML Token with digital signature and encryption. |
Select SAML Token and select the Encrypted check box. Note. With this setting, the SAML Token is encrypted and by default messages are digitally signed. |
See Also
Importing Producer Information
Determining Security Requirements