 Understanding the Authentication Domain
This chapter provides an overview of the authentication domain and discusses how to:
Configure web profiles.
Define portal nodes.
Implement single signon functionality.
Redirect pages with sensitive data.
Override page encoding.
Import menu groups into the portal registry.
Improve same-server performance under Secure Sockets Layer (SSL).
Use SSL accelerators.
Use reverse proxy servers.
Use firewalls with reverse proxy servers.
Use reverse proxy servers with SSL accelerators.
Apply load balancing.
Important! The PeopleSoft portal configuration environment has moved to a PeopleSoft Pure Internet Architecture interface, the web profile. Web profiles are documented in this chapter. A complete listing that maps PeopleTools release 8.43 and earlier portal settings to current web profile settings is documented at the end of this PeopleBook.
See Also
Understanding Changes in Portal Configuration Settings
Understanding the Authentication Domain
The portal authentication domain is the domain in which the portal is running and across which the single signon authentication token is valid. It's specified as a web server property and is used extensively throughout the PeopleSoft Pure Internet Architecture and portal runtime systems. An authentication domain is expressed as a string that completes the domain portion of an HTTP address, for example, .peoplesoft.com.
Note. The leading period is required. The correct string is, for example, .peoplesoft.com, and not peoplesoft.com.
The authentication domain supports the following functionality:
Cross-frame JavaScript updates between the PeopleSoft Pure Internet Architecture and the portal.
Failure to set the authentication domain correctly for the portal and PeopleSoft Pure Internet Architecture applications causes JavaScript security errors to appear in the browser when PeopleSoft Pure Internet Architecture pages are accessed through a portal frame-based template. (The default template through which all PeopleSoft Pure Internet Architecture pages are displayed is frame-based.) The authentication domain must be set for both the portal web server and other PeopleSoft content web servers.
PeopleCode global variable sharing between components on the homepage and components within a frame.
Failure to set the authentication domain correctly for the portal and PeopleSoft Pure Internet Architecture applications that use different web servers causes a new, incompatible session to be created on the PeopleSoft Pure Internet Architecture web server when the user accesses a PeopleSoft Pure Internet Architecture component through a frame-based template.
Single signon functionality between PeopleSoft applications.
Failure to specify the authentication domain correctly prevents the PeopleSoft authentication cookie from being passed to the target PeopleSoft application and forces the target system to reauthenticate the user.
Cookie sharing between the portal and third-party web applications.
If cookies need to be shared between web applications, then each web application must be accessed over a common domain name.
To share cookies, specify the authentication domain as the Cookies Passed to Server (forwarding domain ) property in the portal's web profile. You specify this property on the web Profile Configuration - Cookie Rules page.
Base-Level and Extended Authentication Domains
You can define the portal authentication domain as a base-level authentication domain and as an extended authentication domain.
You define the base-level authentication domain during the PeopleSoft Pure Internet Architecture setup. This domain is stored as part of your web server configuration. It enables PeopleCode global variable sharing, which is required for initial access to the portal. The portal uses the base-level domain if you don't define an extended authentication domain.
Important! You must supply a base-level authentication domain at setup for every PeopleSoft application with which the portal interacts. This value is stored on each application's web server and must be identical for each application.
See the PeopleTools installation guide for your database platform.
You can define an optional extended authentication domain in your portal's web profile. An extended authentication domain overrides, but must be compatible with, the base-level authentication domain. For example, if you entered .customer.com during the PeopleSoft Pure Internet Architecture setup, only values such as .enterprise.customer.com and .individual.customer.com are valid.
Note. If you defined a base-level or extended authentication domain, you must use it in all URLs that you specify in your portal. For example, if your authentication domain is .mydomain.com, then instead of using the URL http://mymachine:8080/pshome/signon.html, you must use the URL http://mymachine.mydomain.com:8080/pshome/signon.html.
You specify the extended authentication domain on the Web Profile Configuration - General page.
See Configuring General Portal Properties.
An Example of Multiple Applications on a Portal
In the following example, the CRM and HRMS web profiles need to be defined with Domain Name Server (DNS) names that include the same authentication domain as the DNS name of the portal web server. They also each need the Authentication Domain property in their web profiles set to this value.
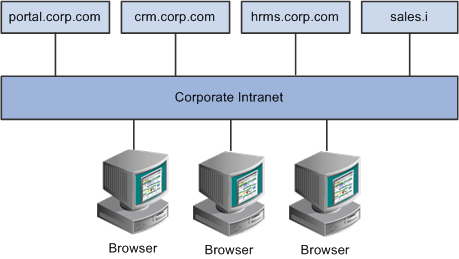
Example of the portal interacting with several different PeopleSoft applications
Web servers that don't have the same server domain as the portal (such as sales.i) can still be used to serve content to the portal. However, cookies set by the portal are not forwarded to these servers. The sales.i server in the example can provide pages and applications to the portal, but it cannot host a PeopleSoft application that supports single signon functionality with the portal.
See Also
Configuring Web ProfilesThis section provides an overview of web profiles and discusses how to:
Configure general portal properties.
Configure portal security.
Configure virtual addressing.
Configure cookie rules.
Configure caching.
Configure trace and debug options.
Configure look and feel.
Configure custom properties.
Viewing web profile histories.
 Understanding Web Profiles
A web profile is a named group of configuration property settings that the portal applies throughout your PeopleSoft system to control all portal-related behavior. The following web profiles are predefined and delivered with the PeopleTools base portal:
The DEV web profile provides basic portal functionality for development, including trace and debug settings that are appropriate for development.
Important! Never run your production system with the DEV web profile. This profile is for development environments and is not tuned for performance.
The TEST web profile uses the same settings as the DEV web profile, except that fewer trace and debug properties are enabled.
The PROD web profile uses the settings that are most commonly needed in a production environment that authenticates users.
The KIOSK web profile uses the same settings as the PROD web profile, except that public user access is enabled for the Guest user, and all options for storing caching or persistent cookies on the browser are disabled.
Additional web profiles may be delivered as part of PeopleSoft Enterprise Portal or an application portal pack. You can modify the property settings of any web profile by using the Web Profile Configuration component (WEB_PROFILE), which includes pages for these types of properties:
General
Portal security
Virtual addressing
Cookie rule
Caching
Debug options
Look and feel
Specifying an Initial Web Profile
As you perform the PeopleSoft Pure Internet Architecture setup procedure for your system, you're prompted to specify which web profile to apply to your portal. You're also prompted for an existing user ID and password. This information is saved in encrypted form where the portal servlet can use it to gain secure access to the web profile.
The default web profile is DEV.
The default web profile user ID and password are both PTWEBSERVER.
The PTWEBSERVER account provides the portal servlet with minimal security access, sufficient only to launch the portal environment, but without access to any pages or other PeopleSoft Pure Internet Architecture objects. This account uses the PTPT1500 permission list, which is set to never time out, and provides necessary access for 24 hours a day, seven days a week.
Note. Your PeopleSoft application might be delivered
with the account that you specify here locked. You must unlock it before you
can access and configure the web profile, or you receive an error message
about incorrect site configuration on the sign-in page.
You can unlock the web profile account by clearing the Account
Locked Out check box on the User Profile - General page. You
can alternatively issue the following SQL command against your database (this
example uses the PTWEBSERVER account):
update PSOPRDEFN set ACCTLOCK=0 where OPRID='PTWEBSERVER'
See Setting General User Profile Attributes.
You can specify any of the delivered profiles, or you can enter a different profile name. In that case, the portal is set up to use a profile by that name. If a profile by the name that you specify doesn't exist in the database, internal default settings are used until you sign in to the portal and create a profile with that name. The portal then automatically configures itself according to those settings.
As long as there's no profile by the name that you specified during the PeopleSoft Pure Internet Architecture setup, the internal default settings remain in effect, which is indicated on the site's sign-in page. When the site is in this mode, every browser request triggers an attempt to load the named profile. Therefore, you shouldn't use the site for extended periods like this.
Once you complete the PeopleSoft Pure Internet Architecture setup, you can then use the Web Profile Configuration component to modify the properties to reflect your settings.
Note. The default internal settings are not the same as the DEV profile. Don't modify any of the delivered profiles, so that you always have access to unmodified reference versions. You can make a copy of any profile and modify it, or you can define a new profile instead.
Copying and Deleting Web Profiles
To copy a web profile:
Select PeopleTools, Web Profile, Copy Web Profile.
Enter or select a web profile name.
On the Web Profile Save As page enter a new name for the web profile in the To edit box.
To delete a web profile:
Select PeopleTools, Web Profile, Delete Web Profile.
Enter or select a web profile name.
On the Delete Web Profile page, click Delete Web Profile.
Changing the Web Profile After the PeopleSoft Pure Internet Architecture Setup
After the PeopleSoft Pure Internet Architecture setup, to select a different web profile, you must edit the text file that stores this information, called configuration.properties. Each PeopleSoft portal that you set up has its own copy of configuration.properties, located in this directory:
PIA_HOME\webserv\web_server\applications\peoplesoft\PORTAL\WEB-INF\psftdocs\sitename
The configuration.properties file includes these properties:
WebProfile
Change the value of this property to the name of the web profile that you want to apply to the portal, for example, WebProfile=MYPROFILE.
You can specify a different user ID and password for the portal servlet to use to access the web profile, but you must encrypt the password by using a Java encryption utility that you launch from a provided script called PSCipher.
To encrypt the user ID or password:
At a command prompt, change to the location of the encryption script file:
PIA_HOME\webserv\peoplesoft
On a UNIX machine, change the PSCipher.sh script file permissions so you can run it.
Run the script file with your password as an argument. For example:
pscipher MYPASSWORD
The utility returns the encrypted password as a string. For example:
VOBN5KcQZMg=
Copy the encrypted string and paste it into the configuration.properties file, for example:
WebPassword=VOBN5KcQZMg=
Important! Make sure that the entire encrypted string, (including all symbol characters), is copied.
After you save the configuration.properties file, restart your web server and the new profile takes effect.
See Also
Using the integrationGateway.properties File
Pages Used to Configure Web Profiles|
Page Name |
Definition Name |
Navigation |
Usage |
|
Web Profile Configuration - General |
WEB_PROF_GENERAL |
PeopleTools, Web Profile, Web Profile Configuration, General |
Configure general portal properties. |
|
Web Profile Configuration - Security |
WEB_PROF_SECURITY |
PeopleTools, Web Profile, Web Profile Configuration, General, Security |
Configure portal security. |
|
Web Profile Configuration - Virtual Addressing |
WEB_PROF_PROXIES |
PeopleTools, Web Profile, Web Profile Configuration, General, Virtual Addressing |
Configure transfer protocols for proxy servers. |
|
Web Profile Configuration - Cookie Rules |
WEB_PROF_COOKIES |
PeopleTools, Web Profile, Web Profile Configuration, General, Cookie Rules |
Define rules that determine how the portal passes cookies to servers in the same domain. |
|
Web Profile Configuration - Caching |
WEB_PROF_CACHING |
PeopleTools, Web Profile, Web Profile Configuration, General, Caching |
Configure caching rules for browsers and web servers. |
|
Web Profile Configuration - Debugging |
WEB_PROF_DEBUGGING |
PeopleTools, Web Profile, Web Profile Configuration, General, Debugging |
Determine the type of information to include in logs. |
|
Web Profile Configuration - Look and Feel |
WEB_PROF_LOOKFEEL |
PeopleTools, Web Profile, Web Profile Configuration, General, Look and Feel |
Determine the pages to be used in situations such as start, errors, expiration, signon, and language support. |
|
Web Profile Configuration - Custom Properties |
WEB_PROF_CUST_PROP |
PeopleTools, Web Profile, Web Profile Configuration, General, Custom Properties |
Configure properties that have been added since the current release of PeopleTools was shipped or that are needed only for backward compatibility. |
|
Web Profile History |
WEB_PROF_HISTORY |
|
Review the current portal attributes of a web server, website, and web profile. |
Configuring General Portal Properties
Access the Web Profile Configuration - General page (PeopleTools, Web Profile, Web Profile Configuration).
See Viewing Web Profile Histories, Understanding the Authentication Domain, Configuring Caching, Configuring Virtual Addressing, Working with Performance Monitor Web Profile Properties.
See the PeopleTools 8.51 installation guide for your database platform.
|
Enable Report Repository |
Select to enable users to view the report repository. When this check box is cleared, no report files can be viewed by users. This check box is selected by default. |
|
Report Repository Path |
(Optional) Specify a drive and directory path to indicate where the site that is served by this web profile should look for generated reports. This value overrides the location that is specified during the PeopleSoft Pure Internet Architecture setup; you can leave this field blank to use the original value. Note. Changing the report repository path prevents you from viewing existing reports, unless the old subdirectory structure is moved to the new location. Be careful when editing this field.
Note. (For Windows only) If the report repository resides
on a different machine than the web server, specify the report repository
path in UNC format instead of mapped drive format. For example, if the report
repository is on MachineX in folderY, the Report Repository Path should be
specified as: |
|
Compress Report Output |
Specify how reports should be compressed: All Browsers: Reports are always compressed. This is the default value. Exclude Netscape: Reports are compressed, except for users who are using Netscape Navigator. Do Not Compress: Reports are never compressed. |
See Also
Configuring Portal Security
Access the Web Profile Configuration - Security page (PeopleTools, Web Profile, Web Profile Configuration).
|
Secured Access Only |
Select to enforce SSL if the entire website requires the SSL protocol. This prevents users from using non-SSL protocols to access any link within this website or application. If only some pages require SSL access, clear this check box (the default setting). |
|
Select to prevent the single signon token from traveling over an insecure network. If you select this check box and the scheme of the current request is HTTPS (an SSL server), the system sets the secure attribute of the single signon cookie (PS_TOKEN) to True. PeopleSoft single signon functionality also applies at the web server level. For example, suppose that you have two web servers: server X and server Y. Web server X is an SSL site, and web server Y is not. In these situations, many sites want server Y to trust the authentication token, PS_TOKEN, issued by server X. This requires that you set the PS_TOKEN to be secure. If the PS_TOKEN is not secure, when a user signs in through server Y, the browser sends PS_TOKEN to server Y over the unencrypted, non-SSL link. This is typical behavior for browsers when dealing with cookies that aren't secure. Potentially, in this situation, a hacker could obtain this token from the clear network and use it to sign in to the SSL-secure server X. Another important use of this property relates specifically to the PeopleSoft portal. When the portal proxies content with an HTML template, it should forward only PS_TOKEN cookies that are marked secure over SSL connections. Note. By selecting this check box, you effectively disable single signon functionality with any non-SSL servers. If, at your site, you want users to sign in to an HTTPS server, and then want to use single signon functionality with HTTP servers, clear this check box to enable single signon functionality between HTTPS and HTTP servers. Note. Before you clear this check box, make sure that you are aware of all the security implications, such as the security of the HTTPS server being compromised. This check box is selected by default. |
|
Inactivity Warning |
Specify the number of seconds that the portal should wait before warning users that the browser session will expire. Users can continue with the current session by clicking the OK button in the warning message, which resets the inactivity timer. If a user doesn't respond within the inactivity logout interval, the session ends and the expired connection page appears. The default value is 1080 seconds (18 minutes). |
|
HTTP Session Inactivity |
Specify the number of seconds of inactivity after which the HTTP session times out for authenticated users. When the interval passes with no user activity, the web server discards all session information, including cached page states. The next time the user submits a request, the web server creates a new HTTP session. From the user experience, the user may be put in a search page or home page because the previous session state is lost at this point. This property is unaffected by any permission list setting. When this property isn't specified, the HTTP session timeout interval is the same value as the authenticated user inactivity logout property that is specified on this page. This property is similar to the public users HTTP Session Inactivity property that is specified on this page. Use this property with caution. Please don't use this property if you don't understand its usage. |
|
Inactivity Logout |
Specify the value in seconds of the inactivity timeout interval that applies to PeopleSoft applications to which a user is signed in. When the interval passes with no user activity, the user's browser displays the page that is specified by the Expire Page - Page field on the Web Profile Configuration - Look and Feel page. The web server applies this value in JavaScript. Note. The inactivity logout can be overridden by a permission list inactivity timeout setting. The default value is 1200 seconds.
Note. Depending on the application implementation, authenticated
users might also experience an HTTP session inactivity timeout, which by default
is the same as the inactivity logout value that you specify here. |
|
Displays the name of the timeout warning script that is currently in effect. The default value is WEBLIB_TIMEOUT.PT_TIMEOUTWARNING.FieldFormula.IScript_TIMEOUTWARNING. |
|
|
Override |
Click to change the timeout warning script. The Override Timeout Warning Script page appears, with these fields:
The values of these fields are concatenated to produce the value in the Timeout Warning Script field. |
See Setting General Permissions.
Public users are PeopleSoft application users who are not required to go through a PeopleSoft signon page. As a result, public users are neither identified nor authenticated by their own user ID and password. Public users also are not forwarded to the signon page after any period of inactivity.
Because they access sites without credentials, public users should be limited to informational websites where sensitive data is not accessible.
You should enable public user access under these conditions:
When you provide users with direct links to non-secure pages.
Note. If a user clicks a direct link that accesses a page for which the public User ID is not authorized, the system displays the signon page prompting the user to supply her PeopleSoft credentials.
When you use an external authentication method.
Important! If you are using an external authentication method in conjunction with the PeopleCode SwitchUser function, then the Inactivity Warning and Inactivity Logout values specified for authenticated users are restored.
See SwitchUser.
When you want crawlers to search your PeopleSoft site and need to provide access to the portal.
|
Allow Public Access |
Select so that the system bypasses the user sign on page when users click a direct link to a page. The system uses the values that you specify in the User ID and Password fields for authentication. This check box is cleared by default. When you select this check box, the system enables the User ID, Password, and HTTP Session Inactivity fields. |
|
Enter the account that the system uses to authenticate public users. This field is enabled when you select the Allow Public Access check box. Note. This is not the same as the WebUserId property in the configuration.properties file, which you specify during the PeopleSoft Pure Internet Architecture installation for accessing the web profile. |
|
|
Enter the password for the account that you entered in the User ID field. This field is enabled when you select the Allow Public Access check box Note. This is not the same as the WebPassword property in the configuration.properties file, which you specified during the PeopleSoft Pure Internet Architecture installation for accessing the web profile. |
|
|
Specify the value in seconds of the inactivity period that applies to public users. When the period passes with no user activity, the web server discards all session information, including cached page states. The next time the user submits a request, the web server creates a new HTTP session. This field is enabled when you select the Allow Public Access check box. Note. If you are using an external authentication method in conjunction with the SetAuthenticationResult() function in Signon PeopleCode or the SwitchUser() function in Non-Signon PeopleCode, you are logged out if you are inactive. The default value is 1200 seconds. See SwitchUser. |
|
Specify the amount of time to wait while disconnecting the Oracle Jolt connection. A value of 0 means no limit. The default value is 0 seconds. |
|
|
Specify the maximum number of seconds that the servlet allows for a request to be sent to the application server. This setting does not indicate a maximum amount of time for the service to finish; it indicates only the maximum amount of time to send the request to the application server. The default value is 50 seconds. |
|
|
Receive Timeout |
Specify the maximum number of seconds that the servlet should wait for a response from the application server. Make sure that the value of this field is greater than your application server service timeouts, such as the Service Timeout setting for PSAPPSRV that appears in the PSAPPSRV.CFG configuration file on the application server. The default value is 600 seconds. |
|
User ID |
Enter an account name to authenticate users for XML Link technology. |
|
Enter the password for the account name that you entered in the User ID field. |
|
|
XML Link Use HTTP Same Server |
Select to indicate that the portal should use the HTTP protocol instead of HTTPS for requests that are issued by the xmllink servlet for content that is hosted on the same server as the xmllink servlet. This check box is selected by default. |
See Also
Improving Same-Server Performance Under SSL
Configuring Virtual Addressing
Access the Web Profile Configuration - Virtual Addressing page (PeopleTools, Web Profile, Web Profile Configuration).
|
Select to generate relative URLs. This setting is for use with proxy server implementations. This check box is selected by default. |
|
Specify the default protocol—HTTP or HTTPS—to override the protocol that is used by the PeopleSoft Pure Internet Architecture and the portal to construct URL references. When this property is left blank, the protocol of the incoming request to the PeopleSoft Pure Internet Architecture servlet is used. You must set this property when the browser makes an SSL connection and SSL is terminated before the PeopleSoft Pure Internet Architecture servlet, using a device such as an SSL accelerator or a reverse proxy server, or when you select the PIA use HTTP Same Server property on the Web Profile Configuration - Security page. In this situation, the protocol of the request to the PeopleSoft Pure Internet Architecture servlet is HTTP, but the PeopleSoft Pure Internet Architecture must generate URL references with an HTTPS protocol. |
|
|
Enter a default server name to override the server name that is used by the PeopleSoft Pure Internet Architecture and the portal to construct URL references. When this property is left blank, the server name of the incoming request to the PeopleSoft Pure Internet Architecture servlet is used to construct URL references. You must set this property when the server on which the PeopleSoft Pure Internet Architecture servlet resides is different from the server to which the browser is connected. This can occur when a reverse proxy server or load balancer is configured in front of the web server. In these situations, the PeopleSoft Pure Internet Architecture must generate URL references with the server that is used by the browser for its initial connection. Note. If you specified an authentication domain on the Web Profile Configuration - General page, it must be part of the server name that you specify here. The value that you enter in this field is automatically forced to lowercase. |
|
|
Port |
Enter a default port to override the port that is used by the PeopleSoft Pure Internet Architecture and the portal to construct URL references. When this property is left blank, the port of the incoming request to the PeopleSoft Pure Internet Architecture servlet is used to construct links on a PeopleSoft Pure Internet Architecture or portal page. You must set this property when the port through which the PeopleSoft Pure Internet Architecture servlet is accessed is different from the port to which the browser is connected. This can occur when an SSL accelerator is used or when a reverse proxy server is configured in front of the web server, and the reverse proxy server or load balancer listens on a different port from the web server, or when you select the PeopleSoft Pure Internet Architecture use HTTP Same Serverproperty on the Web Profile Configuration - Security page. In these situations, the PeopleSoft Pure Internet Architecture must generate URL references with the port that is used by the browser for its initial connection. |
Use this grid to specify the reverse proxy servers through which the portal can expect to retrieve content. External content that is retrieved from these sources that contains relative references is rewritten by the portal to contain relative references instead of absolute references to preserve reverse proxy server requirements.
For each reverse proxy server on the list, you specify:
The protocol to use.
The server's host or machine name.
The server's HTTP port number.
The server's HTTPS port number.
Configuring Cookie Rules
Access the Web Profile Configuration - Cookie Rules page (PeopleTools, Web Profile, Web Profile Configuration).
This page defines rules that determine how the portal passes cookies to servers in the same domain.
Oracle WebLogic and IBM WebSphere web servers use browser cookies (containing the server path and domain) to establish session identity. These cookies have a default name that's used to retrieve the cookie on each request to the web server. In an environment where multiple web servers are in use with the portal, it is necessary to define unique session cookie names between web servers to prevent one cookie from overwriting another cookie of the same name set by a different web server. The path or domain of the cookie must be different to prevent overwriting.
Note. Use the first three fields to specify patterns to
match, where the asterisk ( * ) is treated as a wildcard, matching zero or
more characters.
The portal knows its own domain (from the authentication domain), and
the first default rule instructs it to pass portal servlet cookies to any
server in the same domain, over both secure and insecure connections. All
other cookies can continue to be passed to any server on any domain.
In WebSphere, for webmodules, Portal and PeopleSoft Portlet Container, the cookie names are set as follows:
|
WAR Name |
WebSphere Session Cookie Name |
|
Portal |
%MACHINE_NAME%-%WEB_SERVER_HTTP_PORT%-PORTAL-WASPSJSESSIONID |
|
pspc |
%MACHINE_NAME%-%WEB_SERVER_HTTP_PORT%-PORTLET-WASPSJSESSIONID |
Configuring Caching
Access the Web Profile Configuration - Caching page (PeopleTools, Web Profile, Web Profile Configuration).
|
Select to indicate that PeopleSoft application pages should be cached by the user's browser. For security reasons, clear this check box in kiosk environments. This check box is selected by default. Note. When using menu navigation, the back button will work even if this option is non-selected because menu navigation does not generate the "No-Cache" directive. |
|
|
Specify how many browser states the portal should support when accessing PeopleSoft application pages. Note. If you have applications that make numerous server requests, you may want to increase this value. This increases the virtual machine's memory requirements, so be prepared to allocate more memory accordingly. The default value is 5 states. |
|
|
When a user signs out (either explicitly or because of a session timeout), the system normally clears all application states for the user's session. This property enables clearing of application states for individual windows instead. If your users have a long session timeout and many browser windows open, use this property to force the portal web server to release cached states for windows that a user has closed. Every time a user clicks the New Window link on a portal page, or when transfer PeopleCode opens a new window, the portal web server creates and maintains a state cache for that new browser window. Even if the user closes the window, the web server continues to maintain the cache during the interval that is specified by the Inactivity Logout field on the Web Profile Configuration - Security page. If users open many application browser windows simultaneously, then close most of them while still continuing to work actively in one or two remaining windows, you might be using more web server memory than is required and unnecessarily degrading its performance. You can improve performance by using this property to specify an independent timeout interval that applies to individual browser windows, which forces the portal web server to release cached states for windows that users have closed. When a user clicks the New Window link, and each time user activity in a window produces a request for data from the web server, the portal applies a current timestamp to its corresponding state cache. The next time the user clicks the New Window link, the portal examines the timestamp for each state cache. For any timestamp that's older than the status block timeout, the portal web server discards the associated window state cache on the assumption that the window must have been closed. Note. The portal performs this comparison only when the user clicks the New Window link. Specify a value in seconds that represents the inactivity timeout per window. This timeout should be as short as possible, but still long enough to avoid discarding the state cache of any window that's still in use. A good starting value is the same value as the inactivity logout. If you don't specify this property, or if you specify a value of 0,status blocks are tracked per session—all status blocks are deleted when the user signs out or when the inactivity logout interval expires. Note. A potential inconvenience with this property is that users might be inactive in a window without closing it, then return to it after the interval that you specify here has expired. In that case they're presented with the application's search page. |
|
|
Select to apply homepage caching on the browser. When selected, the Homepage Stale Interval field and the Browsers grid become available. This check box is selected by default. |
|
|
Homepage Stale Interval |
Enter the number of seconds that the browser should wait before requesting an updated homepage from the portal server. The default value is 1200 seconds (20 minutes). |
See Implementing Homepage Caching, Implementing PeopleSoft Page Caching.
Browsers
Use this grid to identify the browsers that you don't want to cache the homepage. For each browser make, model, and version, supply the identifying user agent ID and clear the Cache Home Page check box. To re-enable caching for a listed browser, select the browser's Cache Home Page check box.
Any browser that is not listed caches the homepage if the global Cache Homepage check box is selected.
Note. If the global Cache Homepage check box is cleared, you can't enable homepage caching for individual browsers.
See Implementing Homepage Caching.
|
Select to enable caching of proxied JavaScripts on the portal server. This check box is selected by default. |
|
|
Select to enable metadata caching. This check box is selected by default. |
|
|
Cache Stale Interval |
Enter the number of seconds that should pass before the portal refreshes the metadata cache. The default value of this property is 86400 seconds (24 hours). Note. This property competes for effect with Cache Purge All Hit Count. |
|
Select to cache all target content HTML that has an appropriately defined Cache element. This check box is selected by default. |
|
|
Select this check box to enable web server-based navigation caching. For the DEV and TEST web profiles, the default value is True. For all other profiles, including those that are newly created, the default value is False. |
|
|
Cache Purge All Hit Count |
Specify the maximum total number of HTTP requests that the web server should receive for metadata objects before it purges the metadata cache, forcing the portal to refresh the cache. The default value is 1000 requests. Set this property to 0 to disable the feature. Note. This property competes for effect with Cache Stale Interval. |
See Implementing Target Content Caching, Implementing Metadata Caching, Implementing Proxied JavaScript Caching, Administering Web Server-Based Navigation Caching.
|
Enter the image file cache directory. The default value is /cache. |
|
|
Image Web Directory |
Enter the image file web cache directory. The default value is /cache. |
|
Enter the cascading style sheet (CSS) cache directory. The default value is /cache. |
|
|
CSS Web Directory |
Enter the CSS web cache directory. The default value of this field is /cache. |
|
Copy Image/CSS (No Versioning) |
Select to have the system write a copy of the image and CSS cache with no version number. This is provided in case an external reference to the PeopleSoft stylesheet is needed. Warning! Enable this setting with care. In a production environment, it can double the number of files that are stored in the site's cache directory. Unless there's a clear need to use a custom solution to access style sheets and the like, this should be disabled. This check box is cleared by default. |
|
Chart Directory |
Enter the chart image file cache directory. The default value is /cache/chart. |
|
Chart Web Directory |
Enter the chart image file web cache directory. The default value is /cache/chart. |
|
Enter the Java Script cache directory. The default value is /cache. |
|
|
JavaScript Web Directory |
Enter the JavaScript web cache directory. The default value is /cache. |
|
Enable Caching |
Select to temporarily store recent (persistent) search results on the browser and web server. If you clear this setting, it suppresses all search persistence property settings that you configure in PeopleSoft Application Designer definitions. The default value is unchecked. |
|
Enable Caching on Web Browser |
Select to temporarily store recent (persistent) search results on the web server. If you clear this setting, it suppresses all search persistence property settings that you configure in PeopleSoft Application Designer definitions. This property applies only when you use either Internet Explorer 7 or Safari 3 as your browser. This option does not affect Internet Explorer 8, Firefox 3.5, or Safari 4. The default value is unchecked. |
See Setting Record Field Use Properties.
Configuring Trace and Debug Options
Access the Web Profile Configuration - Debugging page (PeopleTools, Web Profile, Web Profile Configuration).
See Configuring Custom Properties, Working with Performance Monitor Web Profile Properties.
Configuring Look and Feel
Access the Web Profile Configuration - Look and Feel page (PeopleTools, Web Profile, Web Profile Configuration).
|
Page |
Displays the page to which the system redirects users after a successful sign-in. This value references the iScripts that build the PeopleSoft navigation. Do not change this setting. The default value is start.html,start.wml. |
|
Script |
Displays the name of the start page iScript that is currently used for opening a new window. The default value isWEBLIB_MENU.ISCRIPT3.FieldFormula.IScript_StartHtml. |
|
Override |
Click to change the start page script. The Override Start Page Script page appears with these fields:
The values of these fields are concatenated to produce the value in the Script field. |
|
Page |
Displays the HTML page containing text variables that are defined in text.properties. This page appears when user inactivity exceeds the limit that is specified by the Inactivity Logout field in the Authenticated Usersregion of the Web Profile Configuration - Security page. Do not change this setting. The default value is expire.html,expire.wml. |
|
Content Name |
Enter the content name that is stored in the HTML catalog. It appears when a page has expired due to reaching the limit that is specified by the Number of States Supported field in the On the Browser region of the Web Profile Configuration - Caching page. Change this value with caution. The default value is PT_EXPIRE,PT_EXPIRE_WML. |
See Configuring Portal Security, Configuring Caching.
Because your PeopleSoft portal can aggregate its content from many different sources, errors can occur for a variety of reasons. An error might occur if:
A content server is down.
An invalid URL is specified.
A portal node from which content is being requested is inactive.
A portal node fails to deliver requested content within the timeout interval that you specify by using the PSTIMEOUT content reference attribute.
See Configuring Pagelet Time-outs.
For practical purposes, all of these reasons result in the requested content being unavailable.
The values that you specify for the pagelet error page, portal target error page, and portal detail error page are the names of HTML pages that present customizable, translatable error messages. The default pages are delivered with the PeopleSoft system and provide useful error messages without any modification.
You can use the delivered error pages, modify them, or create your own. You can choose additional error message information to be displayed by using bind-type variables of two types in your error pages:
These map to strings that are predefined in the following file:
PIA_HOME\webserv\peoplesoft\applications\peoplesoft\PORTAL\WEB-INF\psftdocs\sitename\text.properties
For example, the numeric variable 5006 maps to the phrase “The portal was unable to retrieve the page you are looking for.”
These map to system information that depends on the current page and activity.
Session variables have values that are dynamically resolved by the portal engine at runtime. Available session variables include:
ErrorTitle
ErrorDescription
ErrorURL
AccessedURL
OriginalURL
TargetPage
StackTrace
DetailError
DetailError is the name of the page that is specified by the Portal Detail Error Page field. This can be used to specify a link target.
To invoke a numeric or session variable, you insert it between the strings <%= and %> in your HTML. For example: <%=5009%> or <%=ErrorDescription%>. Examine the delivered error pages for examples of how to use the numeric and session variables within your HTML.
|
Enter the name of the page to be displayed when the site being accessed is configured with an authentication domain (or web server session cookie domain), and the URL from the browser doesn't include the domain. This page contains a link to a sign-in page that produces the correct URL for the site. You can modify the content interface and design, but do not change the internal meta tags that generate the correct URL. The default value is authtokenenabled.html. |
|
|
Enter the name of the page to be used to set trace parameters. If you enable tracing, this page appears before the sign-in page, so that you can set the trace parameters and then sign in to the system. The default value is signintrace.html. |
|
|
Enter the name of a page to be displayed when the browser does not accept cookies. You should configure browsers to accept cookies. The default value is cookiesrequired.html. |
|
|
Displays the name of the page that should appear if the Secured Access Only check box is selected in the SSL region of the Web Profile Configuration - Security page, and the user is unable to proceed without SSL. Do not change this setting. The default value is sslrequired.html. |
|
|
Displays the name of the page that appears when the user clicks the link from a password-expired page. Do not change this setting. The default value is userprofile.html. |
See Configuring General Portal Properties.
|
Password Expired Page |
Displays the name of the page that should appear when the user password is expired. Do not change this setting. The default value is passwordexpired.html. |
|
Password Warning Page |
Displays the name of the page that should appear when the user's password is about to expire in the number of days specified in PeopleSoft security. Do not change this setting. The default value is passwordwarning.html. |
|
Change Password on Expire |
Displays the change password page content ID. The system uses the value in passwordexpired.html to take the user to the password change page when a password is expired. The default value is MAINTAIN_SECURITY.EXPIRE_CHANGE_PSWD.GBL. |
|
Override |
Click to override the expired password change page. The Override Change Password on Expire Page page appears.
|
|
Change Password On Warning |
Displays the content ID for the change password page. The system uses the value that you enter in passwordwarning.html to take the user to the password change page when a password warning is required. The default value is MAINTAIN_SECURITY.CHANGE_PASSWORD.GBL. |
|
Override |
Click to override the password change warning page. The Override Change Password on Warning Page page appears.
|
Specify additional mappings from International Organization for Standardization (ISO) locale codes to PeopleSoft language codes, using one line per entry.
The PeopleSoft system uses proprietary codes to represent user languages, and the PeopleSoft Pure Internet Architecture sign-in page appears in the PeopleSoft language corresponding to the user's browser language setting (an ISO locale code). This field enables you to provide mappings from additional ISO locale codes to PeopleSoft language codes to support a wider range of browser-specific language settings.
For example, the entry zh_HK=ZHT maps the ISO locale code zh_HK (Hong Kong Chinese) to the PeopleSoft language code ZHT (traditional Chinese), so that traditional Chinese is the default sign-in language for browsers with the preferred language set to Hong Kong Chinese.
Your PeopleSoft application is delivered with default mappings, shown on the Manage Installed Languages page. The default mappings don't require entries in this field.
See Also
Configuring Custom Properties
Access the Web Profile Configuration - Custom Properties page (PeopleTools, Web Profile, Web Profile Configuration).
This page enables the use of web profile properties that have been added since the current release of PeopleTools was shipped, or that are needed only for backward compatibility. For each property, you enter the property name, select its validation type, and provide the appropriate property value. The validation type ensures that the property value that you enter is the correct format. The currently available custom properties are:
|
AJAX |
This property, although not displayed, enables AJAX features associated with page processing, such as Modal dialog boxes. The default value is True. |
|
AJAXConsole |
This property, although not displayed, enables you to launch an interface for viewing diagnostic information related to AJAX parameters that are required by PeopleSoft support personnel, who will provide you with the correct values when necessary. |
|
auditPWD |
This property enables certain debug and control settings that are required by PeopleSoft support personnel, who will provide you with the correct values when necessary. Never set this property in a production environment unless directed to do so. |
|
Duplicate cookies occur when all of the following are true:
When these conditions are met, the browser presents multiple cookies to each application, which produces unpredictable browser behavior, such as displaying the sign-in page or a page expiration message. For this property, specify a validation type of boolean and enter one of these property values: True: The portal checks for sets of duplicate cookies. When a duplicate is found, the user is taken back to the sign-in page with this message: “Your browser sent multiple sets of cookies.” You can change the text of this message by editing number 107 in the errors.properties file of the portal site. False: The portal doesn't check for sets of duplicate cookies. This is the default setting, which applies when this property isn't specified. To avoid this issue altogether with applications that don't use single signon functionality, make sure that you specify authentication domains that aren't subsets of each other, such as .user.mycompany.com and .corp.mycompany.com. |
|
|
This property, although not displayed, enables AJAX features associated with autocomplete. For this property, specify a validation type of Boolean and enter False as property value to disable autocomplete at the system level. Note. If this property is not set to false, you can control autocomplete through personalizations. |
|
|
This property, although not displayed, controls whether your environment is set up for mutual authentication. The default value is True. Note. If you are using Lightweight Directory Access Protocol (LDAP) authentication, you must use the default setting. If you are not using LDAP authentication, a Java exception error caused by a failure to retrieve a certificate property may appear in your webserver log. If this occurs, you must change this value to False to disable the authentication from trying to retrieve the certificate property. |
|
|
PPMConsole |
This property, although not displayed, enables you to launch an interface for viewing diagnostic information related to agents and PPMI clients. The default value is False. |
|
noDefaultSignon ForWorkflow |
Use the Web Profile Custom Property, noDefaultSignonForWorkflow to control whether a user sees the default signon page after clicking a workflow link. When set to true, the system disables Public Access for workflow notification URLs. By default, noDefaultSignonForWorkflow is set to false. See the following table for information related to the behavior of this setting. Note. This property applies to worklist URLs, not all workflow URLs. Only the URLs which contain a /w/ use this property. |
|
unauthSessionInterval |
Use the Web Profile Custom Property to set session timeout (in seconds) during the authentication process. The default value is 120 seconds. The purpose is to limit the effectiveness of DOS attacks on failed authentications. To determine the proper time for this property, check the time in seconds that it takes to send an HTTP(S) request from the browser to the web server and multiply the result by 2. |
This table describes the behavior of the system based on the noDefaultSignonForWorkflow setting.
|
Configuration |
User Session |
User Action |
System Behavior |
|
Public user access (default signon) is enabled and the custom web property “noDefaultSignonForWorkflow” is set to true. |
The user has no session with the system. |
The user clicks on a workflow notification URL in the email. |
The user will be presented with the signon page. Once the user logs in to the system with a valid user ID and password, the system takes the user to the workflow notification based on the user profile privileges. |
|
Public user access (default signon) is enabled and the custom web property “noDefaultSignonForWorkflow” is set to true. |
The user already holds a valid session with the system through the public access. |
The user clicks on a workflow notification URL in the email. |
Since the user already has a valid session, the system takes the user to the workflow notification. If the public access user profile does not have workflow privileges, the user will be presented with an authorization failure page. |
|
Public user access (default signon) is enabled and the custom web property “noDefaultSignonForWorkflow” is set to true. |
The user is already signed into the system with a valid user ID and password. (Other than default signon) |
The user clicks on a workflow notification URL in the email. |
The system takes the user to the workflow notification based on the user profile privileges. |
|
When the public user access (default signon) is enabled and the custom web property “noDefaultSignonForWorkflow” is set to false. |
Any |
Any |
The system behaves as configured. |
|
When the public user access (default signon) is disabled and the custom web property “noDefaultSignonForWorkflow” is set to false/true. |
Any |
Any |
The system behaves as configured. |
Note. If the public user does not have workflow privileges, then close the existing public user session (browser) before clicking the workflow link.
See Implementing Single Signon, Viewing Monitor Servlet Diagnostics.
Viewing Web Profile Histories
Access the Web Profile History page.
Use this page to review the current portal attributes of a web server, website, and web profile, including the web server's HTTP and HTTPS listen ports, the web profile that was last loaded, and the current HTTP session's cookie name and authentication domain.
In addition, the Properties field displays the relevant settings of the web server instance at the time it was loaded by the portal.
Defining Portal NodesThis section provides an overview of portal nodes and discusses how to:
Set portal nodes.
Specify the node type.
Understanding Portal Nodes
You can create and maintain a node definition in the Node Definitions component (IB_NODE). A node is defined once but can be used for multiple purposes. Several pages in the Node Definitions component are used purely for integration purposes by PeopleSoft Integration Broker. For portal purposes, define a portal by using the Node Definitions and Portal pages.
Nodes must be blank for external content references.
Note. You cannot delete a node that is in use by a content reference when the Save button is clicked. If the node is in use, the node name is not deleted.
Pages Used to Define Portal Nodes|
Page Name |
Definition Name |
Navigation |
Usage |
|
Portal |
IB_NODEURI |
PeopleTools, Portal, Node Definitions, Node Definitions, Portal |
Define portal content information for the selected node definition. |
|
Node Definitions |
IB_NODE |
PeopleTools, Portal, Node Definitions, Node Node Definitions |
Specify the node type to designate the URL format for the selected node definition. |
Setting Portal Nodes
Access the Portal page. (PeopleTools, Portal, Node Definitions.)
|
Node Name |
Displays the node name, description, and local node check box status from the Node Info page. |
|
Tools Release |
Enter the version of PeopleTools that is running. This is a free form field. You can enter any information that you like, however, it is recommended that you use the same Tools release that is available when you press Ctrl + J. |
|
Application Release |
Enter the version of the PeopleSoft application that you are running. This is a free form field. You can enter any information that you like, however, it is recommended that you use the same Application name release that are available when you press Ctrl + J. |
|
Content URI Text (content uniform resource identifier text) and Portal URI Text (portal uniform resource identifier text) |
Enter the uniform resource identifier (URI) of the pscontent (iclient) servlet for the node and the URI text for the portal. These values must be unique when a message node is created or updated. Important! The server name and port in these URIs must not exceed 30 characters in length. For example, http://mybiglongservername.peoplesoft.com:8080, not including the http:// prefix, is 39 characters—9 characters too long. Note. The value that you enter in these fields is automatically forced to lowercase. |
See Also
Specifying the Node Type
Most of the options on the Node Definitions page apply only to Integration Broker nodes, except for the Node Type. A node type designates the URL format for the node.
|
Node Type |
External: Select if this node represents a non-PeopleSoft system, such as an external website, like www.yahoo.com. ICType: Select if this node represents a PeopleTools database prior to PeopleTools 8.4. This allows compatibility between pre-PeopleTools 8.4 databases and PeopleTools 8.4 portal databases. PIA (PeopleSoft Pure Internet Architecture): Select if this node represents a PeopleTools database that is using release 8.4. This is the default setting. |
See Also
PeopleTools 8.51 PeopleBook: PeopleSoft Integration Broker
Implementing Single Signon Functionality
This section provides an overview of single signon functionality and discusses how to sign in to a non-default portal.
Understanding Single Signon FunctionalityPeopleSoft supports single signon functionality for use with the PeopleSoft Pure Internet Architecture. Within the context of your PeopleSoft system, single signon means that after a user has been authenticated by one PeopleSoft application server, that user can access additional PeopleSoft application servers without entering a user ID or password. Although the user is actually accessing a different application server and database, the user navigates seamlessly through the system.
The single signon authentication service is shared by all PeopleTools web services and involves these steps:
The first application server (node) checks the HTTP request for a PeopleSoft authentication cookie.
If an authentication cookie is not found, then the server returns a language-specific sign-in page.
The user fills out the sign-in page, entering a user ID and password.
The server authenticates the user based on the user ID and password.
A web browser cookie stores a unique access token for the user after the initial authentication.
An httpSession object is created for the newly authenticated session.
When the user connects to another PeopleSoft application server (node), the second application server uses the token in the browser cookie to reauthenticate the user without an additional sign-in process.
Because the portal integrates content from various data sources and application servers into a unified interface, you need to configure single signon functionality before deploying the portal. Users sign in once and then can navigate freely without encountering numerous sign-in pages.
However, when frame-based content is accessed across different machines, single signon functionality does not work when accessing content on another web server. If the web servers are on the same internet domain, such as .corp.peoplesoft.com, single signon functionality remains effective and a sign-in page does not appear.
See Also
Employing Signon PeopleCode and User Exits
Signing In to a Non-Default Portal
To sign in to a portal other than the default, use a URL like this: http://portalserver/psp/ps/MY_PORTAL?cmd=login.
To create a sign-in page that signs in to a non-default portal, change signon.html like this:
<meta HTTP-EQUIV='Refresh' CONTENT='1; URL=../psp/ps/MY_PORTAL/?cmd=login'>
If you are a portal administrator and want to sign in to a database to work with PeopleTools-specific menus, replace the existing portal name with the site template name in the URL to make sure that you are administering your local PeopleTools menu and not inadvertently altering the database. Replace this:
http://../psp/ps/EMPLOYEE/
Instead, use this:
http://../psp/ps/PS_SITETEMPLATE
See Also
PeopleTools 8.51 PeopleBook: Security Administration
Redirecting Pages with Sensitive Data
If you have a page that contains sensitive data, and you want to redirect the user to it, you should use the provided template HOMEPAGE_DESIGNER_TEMPLATE. For the content reference for the component, specify this as the template name. You should also use PeopleCode to redirect the user instead of using an HTML area on the page.
The following is an example of the type of PeopleCode that you could use:
&Res = SwitchUser(QE_SWITCHUSER.QE_SWITCH_USER, QE_SWITCHUSER.QE_SWITCH_USER_PWD,⇒
 QE_SWITCHUSER.QE_SWITCHUSERAUTHT, QE_SWITCHUSER.QE_SWITCHUSERINFO);

If (&Res = True) Then
   Transfer( False, MenuName.PROCESSMONITOR, BarName."INQUIRE", Item⇒
Name."PROCESSMONITOR", Panel."PMN_PRCSLIST", "U");
Else
   QE_SWITCHUSER.QE_SWITCHRES = "N";
   QE_SWITCHUSER.QE_PPCAUTHTOKEN = %AuthenticationToken;
   QE_SWITCHUSER.QE_RESULTDOC = %ResultDocument;

   Record.QE_SWITCH_SRCH.QE_CUR_USER.Value = %UserId;
End-If;
Overriding Page Encoding
You can override the character set encoding for any page that is registered in the portal. You define a content reference attribute called PORTAL_ENCODING_OVERRIDE with a value that specifies the character set to use when processing a page. The portal servlet then overrides all other indicators for encoding, including headers and meta tags.
The standard encoding for PeopleSoft pages is UTF-8. The portal can usually determine the encoding of a page; however, if an external, non-UTF-8 page is not displayed correctly, overriding the page encoding may help.
See Also
Selecting and Configuring Character Sets and Language Input and Output
Importing Menu Groups into the Portal Registry
This section provides an overview of menu group importing and discusses how to:
Import menu groups.
Select components to include in portal navigation.
Understanding Menu Group Importing
The Menu Import Application Engine process (PORTAL_MENU) imports menu groups from the menu definition into a portal registry.
Important! Only System Administrators should perform this process. If the user does not have security to the menus and pages, just a folder titled Label gets created.
The process creates folders and content references that reflect the menu definition hierarchy. The folder hierarchy imported is:
|
Level |
Menu Item |
|
Folder level one |
Menu group |
|
Folder level two |
Menu name |
|
Folder level three |
Bar name |
|
Content reference |
Component name |
Note. Use the Menu Import process to migrate custom menus only. The navigational menus that are delivered with your PeopleSoft application have already been added to the appropriate portal registry. The Menu Import process has no effect on components that are already registered. However, you can use the process to pick up additional components that are not delivered with the PeopleSoft system.
Before you use the Menu Import process, keep in mind these points:
Object names that are assigned by the Menu Import process are autogenerated.
If a folder name or content reference name already exists, the system appends a number to the generated object name. Consequently, you may have folder objects names such as, USE, USE1, USE2, and USE3. As a result, use the registration wizard if you plan to copy the application database registry structures into PeopleSoft Enterprise Portal. When you use the registration wizard, you can control the object naming, and you can ensure the uniqueness of object names across databases.
If a component resides in multiple menus, the process creates a separate content reference for each menu and component combination.
The navigation hierarchy created by the Menu Import process does not match the delivered PeopleSoft hierarchy.
To keep the navigation consistent, consider putting all custom menus into a common menu group and generating the registry structures for that menu group. Then, once the registry structures are generated, manually move the content references to an appropriate folder in the existing navigation hierarchy.
To create a common menu group, open the custom menu in PeopleSoft Application Designer. On the Use tab of the Menu properties dialog box, enter a unique name in the Menu Group field. After you save the menu, it is available for other menus to use.
Using the Menu Import Process with PeopleSoft Enterprise Portal
If you run the Menu Import process against multiple application databases and merge multiple registries into PeopleSoft Enterprise Portal, bar names (level three folders) can be overwritten because they frequently have duplicate names. The last folder that is copied takes precedence over all previous folders.
The autogenerated object names are based upon the current database portal registry. The Menu Import process cannot check external databases for existing object names, but it does check the current database.
If you run this process on different databases, there is a good chance that the different databases contain identical folder or content reference object names that refer to different objects. This can become problematic if you decide to copy these portal registry structures into PeopleSoft Enterprise Portal. The same-named objects overwrite each other. You might need to delete the generated folders and content references to make them unique in the future.
Use the registration wizard to register menus and components into the portal registry. Although, with the registration wizard, you must register items one by one, you can control folder and object names at the time of the import.
See Using the Registration Wizard.
Page Used to Import Menu Groups|
Page Name |
Definition Name |
Navigation |
Usage |
|
Menu Import |
PORTAL_MENU_EXPORT |
PeopleTools, Portal, Menu Import |
Migrate custom menus. |
Importing Menu Groups
Access the Menu Import page (PeopleTools, Portal, Menu Import).
The Menu Import process creates content references for all components that belong to the menu group. This should be used only to migrate custom menus.
|
Node Name |
Select the node of the content provider where the registry structure resides. The default value is the currently running node. Note. Never select the local node for an application database. If you copy the generated content references to a PeopleSoft Enterprise Portal database, the content reference assumes that the component resides in the Enterprise Portal database, when it does not. |
|
(Optional). Specify the name of a template for the portal servlet to use. If you leave this field blank, the servlet uses the template that is associated with the selected node. If a template is not associated with the node, the default template is used for all content references that are created by the import process. The default value is the portal's default template. Note. It is best to not specify a template, so that you can perform a mass template change at the content provider node level instead of having to change each content reference template individually. |
|
|
All Menu Groups |
Select to import all menu groups. |
|
Menu Group |
Select a menu group to import. |
|
Valid from date and Valid to date |
Specify dates to make visible content references and folders that are associated with the menu that you are importing. In general, use January 1, 1900, for the valid from date and leave the valid to date blank, unless you need to limit the time frame. |
|
Product |
Enter a unique, 4-character identifier for the menu. If you perform queries against the database, you can use this identifier to identify items that are associated with the menu. |
|
Click to begin the import process. PeopleSoft Process Scheduler launches an Application Engine program that imports the selected menu group definitions into the portal registry. This process typically takes several minutes, but can require more time depending on the number of items to be processed. Permission list settings are initially set to conform with the corresponding permissions set for the menu groups being imported. Once the menu group definitions are imported into the portal registry, there is no dynamic connection between the menu group definition in PeopleSoft Application Designer and the portal registry. If you change the security for the menu or component, the registry security is synchronized, as long as the menu or component is in the same database as the registry structure. If you change the menu or component name, you must manually update the registry structure. |
|
|
Click to view the status of the menu import. |
After you run the process, click the Home button in the universal navigation header and verify that the menu group has been imported into the portal registry. The new menu group should now appear along with the other folders at the top level.
Note. If the menu group does not appear, open the folder definition for the menu group and define a label for the folder.
Selecting Components to Include in Portal Navigation
During the menu import process, you can control which components are included in your portal navigation system.
To select components to include in portal navigation:
From PeopleSoft Application Designer, open the appropriate component.
Select File, Component Properties, and select the Use tab.
Select the Include in Navigation check box.
After a menu import, the component is visible to users with appropriate permissions. (You can still change the permissions for any content reference after the menu import as necessary.)
If you clear the Include in Navigation check box, the component is not imported into the portal registry during the Menu Import process. You can also set this option at the menu level.
Click OK.
Changes that you make to the component in PeopleSoft Application Designer are not reflected in the portal until you do another menu import.
See Also
Using PeopleSoft Application Designer
Improving Same-Server Performance Under SSL
You might run portal and PeopleSoft Pure Internet Architecture applications over SSL connections to secure the transmissions between the browser and the web server. However, defining each homepage pagelet as an HTTPS request can cause portal performance to degrade significantly. To achieve secure transmissions between the browser and the server and to achieve acceptable homepage performance, configure the portal to use HTTP connections whenever it needs to talk to a PeopleSoft Pure Internet Architecture application that is hosted on the same server as the portal. This diagram shows this setup:
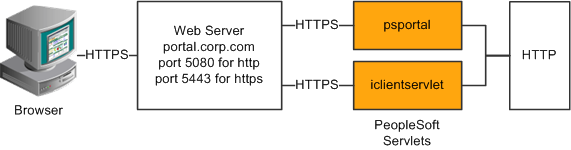
Example of the portal running under SSL by using HTTP connections to the PeopleSoft Pure Internet Architecture on the same server
This configuration requires changes to the PeopleTools web configuration properties file. It also requires that a WebServer filter be set up to block non-SSL connections, except those from the portal. The portal does not need to use HTTP or HTTPS to connect to the PeopleSoft Pure Internet Architecture servlet hosting the same website. This configuration is needed only when multiple sites are used on the same web server.
You must tell the portal to use HTTP for all connections that it makes back to the same server on which it is hosted. To do so, modify the web profile configuration for the portal. Change these properties:
|
Web Profile Page |
Field Name |
Field Value |
|
Security |
PIA use HTTP Same Server |
Selected. |
|
Virtual Addressing |
Protocol(in the Default Addressing region of the page) |
HTTPS. |
|
Virtual Addressing |
Port(in the Default Addressing region of the page) |
The port on which the web server is listening for HTTPS requests, for example, 5443. You can leave this field blank if you use the default SSL portal of 443. |
See Also
Proxy Architecture and Relative URLs
Using SSL Accelerators
You can improve SSL performance by adding an SSL accelerator in front of the web server. You need to have the portal use HTTP for requests to the PeopleSoft Pure Internet Architecture to prevent the portal connection to the PeopleSoft Pure Internet Architecture from going back through the accelerator. This diagram shows this setup:
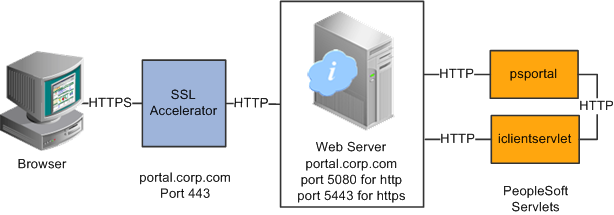
Using an SSL accelerator
The configuration is similar to that for configuring a portal running under SSL to use HTTP connections to the PeopleSoft Pure Internet Architecture on the same server; however, you must change the default port to point to the port on which the SSL accelerator is configured to listen.
Important! You must continue to configure Web Server to listen for HTTPS requests, even though the accelerator intercepts all SSL connections. Failure to do so causes the portal to function incorrectly.
Change these properties:
|
Web Profile Page |
Field Name |
Field Value |
|
Security |
PIA use HTTP Same Server |
Selected. (This might reduce the amount of time it takes to make an HTTP request to the portal.) |
|
Virtual Addressing |
Protocol(in the Default Addressing region of the page) |
HTTPS. |
|
Virtual Addressing |
Port(in the Default Addressing region of the page) |
The port on which the SSL accelerator is listening for HTTPS requests; for example, 443. |
See Also
Using Reverse Proxy Servers
This section provides an overview of reverse proxy servers and discusses how to:
Make reverse proxy settings.
Issue requests by using a proxy server.
Specify hosts that should not be proxied.
Understanding Reverse Proxy ServersA reverse proxy server accepts requests from client browsers on behalf of another web server and then relays those requests to the web server. The reverse proxy server checks web requests and responses to ensure that they adhere to network security policies. For example, a reverse proxy server validates that a command intended for the target web server is a valid command for that server. In this diagram, the human resources PeopleSoft Pure Internet Architecture web server, corp.hr, is behind a reverse proxy server, www.pshr.com:
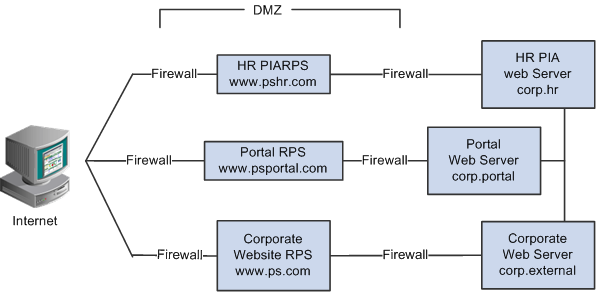
Example of the reverse proxy architecture
All internet requests for the human resources web server are relayed by www.pshr.com to corp.hr. The site URL routes the client to the proxy as if it were a web server. Replicated content is delivered from the proxy cache to the external client without exposing the origin server or the network residing safely behind the firewall. You can balance the load of an overtaxed web server by installing multiple instances of the web server.
Any external content must come from a node that's registered in the portal database, so that the portal servlet can look up the node name based on the URL of the content. The external content HTML is rewritten to use that proxied format.
See Also
Using Firewalls with Reverse Proxy Servers
Using Reverse Proxy Servers with SSL Accelerators
Making Reverse Proxy Settings
On the Web Profile - Virtual Addressing page, specify the reverse proxy server to use by entering it in the Reverse Proxy Server Listgrid. Include the protocol, the host name, the HTTP port, and the HTTPS port.
See Also
Configuring Virtual Addressing
Issuing Requests by Using a Proxy Server
To make a portal issue requests by using a proxy server, the proxy server settings are controlled by these Java system properties:
http.proxyHost
http.proxyPort
https.proxyHost
https.proxyPort
To use a proxy server for the HTTP protocol, set these properties:
http.proxyHost=http_proxy_server_host_name
http.proxyPort=http_proxy_server_port
To use a proxy server for the HTTPS protocol, set these properties:
https.proxyHost=https_proxy_server_host_name
https.proxyPort=https_proxy_server_port
The method for setting the Java system parameters varies by web server (Oracle WebLogic or IBM WebSphere). The properties must be passed to the Java interpreter as command-line directives.
Alter the setEnv.cmd or setEnv.sh file located in WebLogic domain’s (PIA Install) bin folder. Define the properties on the command line that starts the Java Virtual Machine like this:
set PROXY=-Dhttp.proxyHost=proxyhostname -Dhttp.proxyPort=proxy_port⇒
 -Dhttps.proxyHost=proxyhostname -Dhttps.proxyPort=proxy_port
Later add the above property in startPIA.cmd or startPIA.sh with in the Java command which starts the WebLogic server domain.
%JAVA_HOME%\bin\java -ms64m -mx64m -classpath %JAVA_CLASSPATH% %PROXY% -⇒
Dweblogic.class.path=%WEBLOGIC_CLASSPATH% -Dweblogic.home=. -⇒
Djava.security.manager⇒
 -Djava.security.policy==.\weblogic.policy weblogic.Server

goto finish
All the Java Virtual Machine settings for IBM WebSphere are set in <was_home>\profileTemplates\default\documents\config\templates\servertypes\APPLICATION_SERVER\servers\default.
Note. Here, the profile type is “default” and WebSphere has four types of profiles viz: cell, default, dmgr, and managed. The above path varies based on the type of profile.
Java Virtual Machine properties are embedded within the <jvmEntries> and </jvmEntries> elements.
<jvmEntries xmi:id="JavaVirtualMachine_1164791211226" verboseModeClass="false"⇒
 verboseModeGarbageCollection="false" verboseModeJNI="false" runHProf="false"⇒
 hprofArguments="" debugMode="false" debugArgs="-Djava.compiler=NONE -Xdebug -⇒
Xnoagent -Xrunjdwp:transport=dt_socket,server=y,suspend=n,address=7785" generic⇒
JvmArguments="-Dprofile.name=peoplesoft_auth">
      <systemProperties xmi:id="Property_1164791897101" name="ps_vault" value="c:⇒
/pt849-802-r2-debug/webserv/peoplesoft_auth/installedApps/peoplesoft_authNodeCell⇒
/peoplesoft_auth.ear/psvault" description="Vault location"/>
      <systemProperties xmi:id="Property_1164791897102" name="HttpSessionIdReuse"⇒
 value="false" description="HttpSessionIdReuse"/>
    </jvmEntries>
Specifying Hosts That Should Not Be Proxied
If your portal implementation retrieves content from both an intranet and the internet, you might encounter a problem retrieving both internal and external content if the proxy server is not aware of the address of the intranet content. You can avoid this situation by specifying that certain hosts (such as your intranet hosts) should not be accessed through the proxy server.
For Oracle WebLogic, specify the hosts not to be proxied in the HTTP_PROXY_NONPROXY_HTTPHOSTS and HTTP_PROXY_NONPROXY_HTTPSHOSTS environment variables with the setEnv.cmd (setEnv.sh in Unix) script. Refer to comments in setEnv for specific syntax.
For IBM WebSphere, specify the hosts not to be proxied in the Java system variables http.nonProxyHosts and https.nonProxyHosts in the IBM WebSphere console:
Access the IBM WebSphere administration console.
Select Application Servers, server_name, Process Definition, Java Virtual Machine, Custom Properties.
Click New.
Set the property: http.nonProxyHosts - List the internal machines for which authentication is not required for routing through the proxy. Separate each machine name in the list with a vertical bar ("|").
Save the configuration, then log out and restart IBM WebSphere.
For all the web server platforms, you can list a set of patterns that should not be accessed through proxies, with each one separated by the pipe character ( | ). This example shows a setting that makes all HTTP connections to the eng domain bypass the proxy settings:
*.eng|*.eng.peoplesoft.com
Using Firewalls with Reverse Proxy Servers
You can set up a buffer zone in front of the portal web server to prevent unauthorized access to the portal web server and create a more secure environment. A buffer zone is typically configured with a firewall that allows access to a reverse proxy server, which relays incoming requests through a second firewall to the portal web server. This diagram shows this setup:
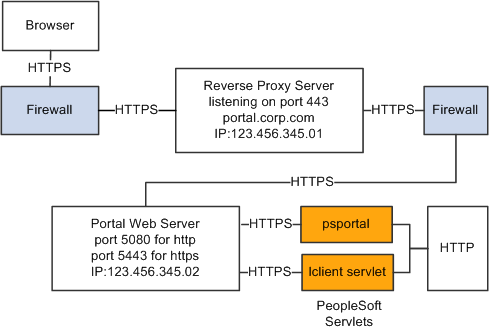
Firewall and reverse proxy setup
The configuration is similar to that for configuring a portal running under SSL to use HTTP connections to the PeopleSoft Pure Internet Architecture on the same server; however, you must make these adjustments in the web profile:
|
Web Profile Page |
Field Name |
Field Value |
|
Security |
PIA use HTTP Same Server |
Selected. |
|
Virtual Addressing |
Protocol(in the Default Addressing region of the page) |
HTTPS. |
|
Virtual Addressing |
Name(in the Default Addressing region of the page) |
The DNS name of the reverse proxy server, for example, portal.corp.com. |
|
Virtual Addressing |
Port(in the Default Addressing region of the page) |
The port on which the reverse proxy server is listening for HTTPS requests, if it's different from the port on which the web server is listening. |
The hosts file on the portal web server must have an entry that directs DNS requests for the content provider server name (the reverse proxy server in the previous example) to the portal web server, for example, 123.456.345.02. This enables the portal to make requests for content that is hosted on the same server directly without going back through the reverse proxy server.
For example:
123.456.345.02 portal.corp.com
See Also
Using Reverse Proxy Servers with SSL Accelerators
You can combine an SSL accelerator with a reverse proxy server, as illustrated in this diagram:
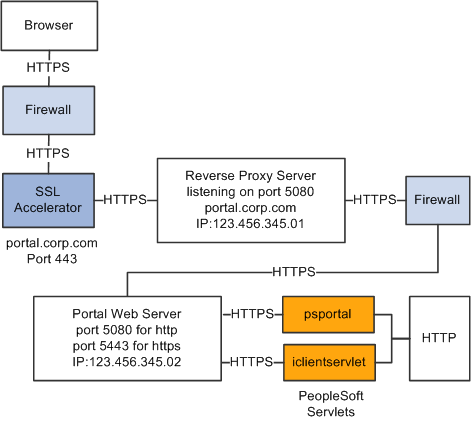
Reverse proxy server with an SSL accelerator
The configuration is similar to that for configuring a portal running under SSL to use HTTP connections to the PeopleSoft Pure Internet Architecture on the same server; however, you must make these adjustments in the web profile
|
Web Profile Page |
Field Name |
Field Value |
|
Security |
PIA use HTTP Same Server |
Selected. |
|
Virtual Addressing |
Protocol(in the Default Addressing region of the page) |
Set to HTTPS. |
|
Virtual Addressing |
Name(in the Default Addressing region of the page) |
The DNS name of the reverse proxy server, for example, portal.corp.com. |
|
Virtual Addressing |
Port(in the Default Addressing region of the page) |
The port on which the SSL accelerator is listening for HTTPS requests, for example, 443. |
The hosts file on the portal web server must have an entry that directs DNS requests for the content provider server name (portal.corp.com) to the portal web server, for example, 123.456.345.02. This enables the portal to make requests for content that is hosted on the same server directly without going back through the reverse proxy server.
For example:
123.456.321.02 portal.corp.com
See Also
Applying Load Balancing
You can apply load balancing to a portal by using a hardware load-balancing solution to distribute load across multiple instances of the web server on multiple web server machines. Many of today’s hardware load balancers have SSL accelerating options that you should also consider. The number and size of web server machines and the number of web server instances per machine vary and determine load-balancing requirements and hardware selection. This diagram shows a possible load-balancing setup:
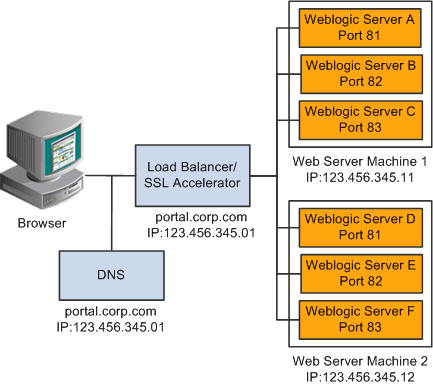
Example of load balancing
The hardware load balancing solution must be configured to enable sticky sessions, which ensures that all requests from a user’s browser session are delivered to the same web server session. In the example previous diagram, if the initial request from the browser was directed to WebLogic Server F, then all subsequent requests from that browser session must be directed to the same instance of WebLogic.
Keep multiple web server sessions on a single machine to keep the heap size of the Java Virtual Machine manageable and to allow the Java garbage collection to work optimally.
The hosts file on the portal web server machines in the previous diagram—which we'll call portalws1 and portalws2—must have an entry that directs DNS requests for the portal content provider server name (portal.corp.com) to the portal web server (123.456.345.11 on portalws1). This allows the portal to request content hosted on the same server directly without going back through the load balancer.
This is an example hosts file on portalws1.corp.com:
123.456.345.11 portal.corp.com
123.456.345.11 portalws1.corp.com