 Understanding the PeopleSoft Integration Broker Connector SDK
This chapter provides an overview of the PeopleSoft Integration Broker connector software development kit (SDK) and discusses how to:
Develop connectors.
Develop connectors based on the document object model (DOM).
Develop and implement connectors in the C/C++ environment.
Reuse connector code.
Understanding the PeopleSoft Integration Broker Connector SDKThis section discusses:
The PeopleSoft Integration Broker Connector SDK.
SDK contents.
SDK location.
SDK application programming interface (API) documentation.
 The PeopleSoft Integration Broker Connector SDK
Target connectors generate message requests, send them to integration participants, wait for responses from participants, and deliver the responses back to the gateway manager. Listening connectors receive message requests from integration participants, send them to the gateway manager, and deliver responses back to the integration participants.
PeopleSoft Integration Broker is bundled with connectors for use with PeopleSoft, HTTP, Java Messaging Service (JMS), PeopleSoft 8.1x, File Transfer Protocol (FTP), and Simple Mail Transfer Protocol (SMTP) communication formats. You can use the PeopleSoft Integration Broker Connector SDK to build and implement connectors for other communication formats and application requirements.
For example, you could develop a connector for integrations between a PeopleSoft Human Resources system and an SAP Financials system. You could also develop a connector for integrations between a PeopleSoft Supply Chain system and a supplier by using a RosettaNet system or for integrations between a PeopleSoft eProcurement system and a Commerce One Marketsite by using an XML Common Business Library (XCBL) or SAdt eXplain (SAX) system.
SDK Contents
The PeopleSoft Integration Broker Connector SDK includes:
Instructions for setting up the development environment.
Java classes that are required for creating connectors (including IBResponse and IBRequest objects).
API documentation.
Sample code for listening and target connector classes.
A Send Master utility to test connectors.
A Simple Post utility that enables third-party systems to post messages to the integration gateway.
SDK Location
The following table lists the location of the SDK and its contents.
|
Item |
Location |
|
SDK |
<PIA_HOME>\webserv\<DOMAIN>\applications\peoplesoft\PSIGW.war\SDK |
|
Java classes |
<PIA_HOME>\webserv\<DOMAIN>\applications\peoplesoft\PSIGW.war\WEB-INF\classes |
|
API documentation |
<PIA_HOME>\webserv\<DOMAIN>\applications\peoplesoft\PSIGW.war\SDK\docs\index.html |
|
Sample code for listening and target connector classes |
<PIA_HOME>\webserv\<DOMAIN>\applications\peoplesoft\PSIGW.war\SDK\src |
|
Send Master utility |
<PIA_HOME>\webserv\<DOMAIN>\StartSendMaster.bat, or <PIA_HOME>\webserv |
|
Simple Post utility |
<PIA_HOME>\webserv\<DOMAIN>\applications\peoplesoft\PSIGW.war\WEB-INF\classes |
SDK API Documentation
The PeopleSoft Integration Broker Connector SDK includes API documentation in HTML format.
The documentation lists and describes Java packages that you can use to develop custom connectors and includes information about package classes, inner classes, interfaces, constructors, methods, and fields.
Access the Connector API documentation in the connector SDK directory, <PIA_HOME>\webserv\<DOMAIN>\applications\peoplesoft\PSIGW.war\SDK\docs\index.html.
Developing Connectors
This section provides overviews of connector development and implementation and general connector class development considerations and discusses how to:
Develop target connector classes.
Develop listening connector classes.
Install connector classes.
Register connectors.
Use connector templates.
Understanding Connector Development and Implementation
You can produce new connectors in different ways, based on whether you want to create a listening connector or a target connector.
Listening connectors use standard connector interface and gateway services to link to the integration gateway. Although a Java interface object is not used for listening connectors, the listening connectors still must adhere to a standard scheme of logic to drive requests to, and to process responses from, the integration gateway.
Target connectors must implement a Java interface to become valid target connectors in the integration gateway. This ensures a standard interface for the gateway manager so that it can manage each target connector in a streamlined way.
To develop connectors, you:
Develop a connector class.
Install the connector class.
Register the connector (target connectors only).
Target and listening connector templates are provided at the end of this chapter for you to use as a starting point for connector development.
Following are various scenarios for the target connector development infrastructure.
Message Send Scenario for the Target Connector Development Infrastructure
You develop target connectors to generate and send message requests to integration participants and return responses. This diagram shows how the connector code accomplishes these tasks:

Message send scenario
Ping Scenario for the Target Connector Development Infrastructure
You can develop functionality in target connectors to ping external systems. This diagram shows how the connector code accomplishes this task:
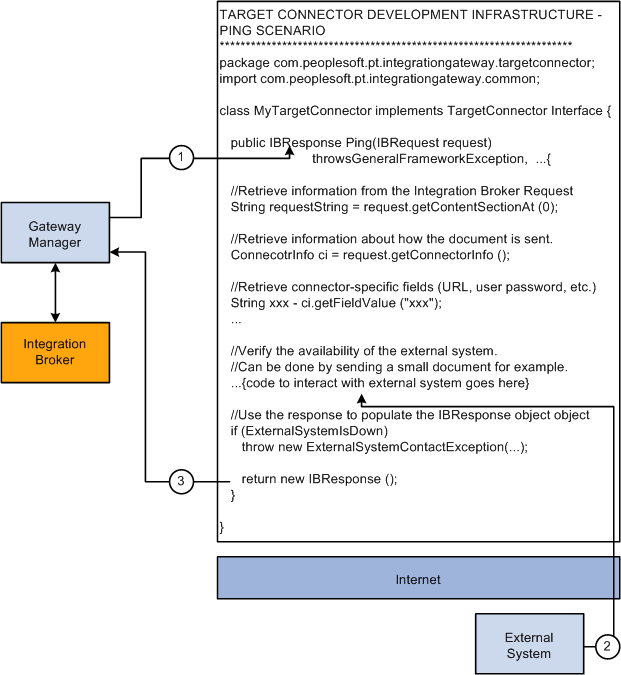
Ping scenario
Introspection Scenario for the Target Connector Development Infrastructure
You can develop functionality within target connectors to handle connector introspection. This diagram shows how the connector code accomplishes this task:
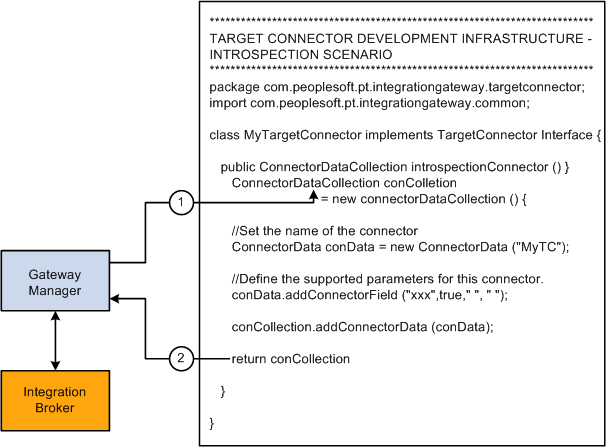
Introspection scenario
Understanding General Connector Class Development Considerations
While implementations vary greatly, when you develop connector classes, you should incorporate specific functionality.
Input and Output Formats That Are Exchanged Through Connectors
For a target connector to handle input and output formats that are exchanged with its intended recipient, it must transform the PeopleSoft Integration Broker request (IBRequest) into a message that is formatted for the intended external system.
For instance, the HTTP target connector that is delivered with PeopleSoft Integration Broker gathers HTTP headers and cookies from the IBRequest and formulates the appropriate HTTP message, complete with the actual message content, so that it can be delivered to its destination. When the response comes back, the connector creates a PeopleSoft Integration Broker response (IBResponse) by using the response string.
For a listening connector to handle input and output formats that are exchanged with its requestor, it must transform the incoming message into an IBRequest. For example, the HTTP listening connector that is delivered with PeopleSoft Integration Broker recognizes SOAP messages and retrieves query string arguments, HTTP headers, and cookies. It then formats all of this information to create the IBRequest so that PeopleSoft Integration Broker can converse with it. When the response comes back, the HTTP listening connector reads the IBResponse and sends its output message content back to the requesting system.
Interaction Between Local and External Systems
A target connector interacts with an external system by sending it information and by retrieving the response.
For example, to accomplish this interaction, the HTTP target connector that is delivered with PeopleSoft Integration Broker uses various HTTP-specific classes to send messages through HTTP and to handle the external system being down, security (through HTTPS), and so forth.
A listening connector interacts with an external system by receiving requests from the external system and returning responses that the external system understands. For example, to accomplish this interaction, the HTTP listening connector that is delivered with PeopleSoft Integration Broker uses a servlet to receive and reply to incoming HTTP messages.
Developing Target Connector Classes
This section discusses target connector class development issues to consider when creating custom target connectors.
Using the Target Connector Interface
As with PeopleSoft-provided target connectors, the integration gateway dynamically invokes custom target connectors through the gateway manager.
Target connectors must adhere to a standard structure as defined in the target connector interface.
public interface TargetConnector { IBResponse send(IBRequest request) throws GeneralFrameworkException, DuplicateMessageException, InvalidMessageException, ExternalSystemContactException, ExternalApplicationException, MessageMarshallingException, MessageUnmarshallingException; IBResponse ping(IBRequest request) throws GeneralFrameworkException, DuplicateMessageException, InvalidMessageException, ExternalSystemContactException, ExternalApplicationException, MessageMarshallingException, MessageUnmarshallingException; ConnectorDataCollection introspectConnector();
Use the Send method to send a request to an external system and to retrieve its response. The gateway manager passes the request to this method and expects a response to be returned.
The Ping method enables PeopleSoft Integration Broker to verify the availability of a site. The Integration Broker Monitor can also invoke the Ping method explicitly.
ConnectorDataCollection invokes introspection.
Use gateway services, such as XMLDoc, for document access and mutation. You also have access to the IBResponse and IBRequest objects from the integration gateway.
Building Introspection into Target Connectors
PeopleSoft Integration Broker can introspect (query) the capabilities of target connectors that are installed on a local or remote integration gateway by using introspection. Load all target connectors that are delivered with PeopleSoft Integration Broker by clicking the Load button on the Connectors page in the Gateways component.
You can build introspection into custom-built connectors. When you do so, you can load the connector and its properties with the click of a button.
For the introspection process to gather information about a custom target connector, you must implement the IntrospectConnector method.
The following example from the SMTP target connector sends messages through email:
public ConnectorDataCollection introspectConnector() {
   //Creates the ConnectorDataCollection that will be returned
   //by this method. This object will contain all the
   //necessary information about this Connector's properties.

      ConnectorDataCollection conCollection = new ConnectorDataCollection();

      //Create ConnectorData Object and stipulating the name of
      //the connector as seen from the Gateway Component.

      ConnectorData conData = new ConnectorData("SMTPTARGET");

      conData.addConnectorField("DestEmailAddress", true, "", "");
      conData.addConnectorField("SourceEmailAddress", true, "", "");
      conData.addConnectorField("CC", false, "", "");
      conData.addConnectorField("BCC", false, "", "");
      conData.addConnectorField("HEADER", Content-type”, false,
         "", "text/plain|text/html");
      conData.addConnectorField("HEADER","sendUncompressed",true,
         "Y","Y|N");

      //Add the ConnectorData to your ConnectorDataCollection
      //Object. Typically, you would only
      //add one ConnectorData into your ConnectorDataCollection.
      conCollection.addConnectorData(conData);

   return conCollection;
}
Use the addConnectorField method to add connector fields:
addConnectorField ([PropertyID] PropertyName, Required, DefaultValue, Possible⇒ Values)
Use the following parameters for this method:
|
Parameter |
Description |
|
Property ID |
Identifies different property types, such as HEADER for HTTP or SMTP. PeopleSoft software also uses the HEADER property ID to allow a message to be sent in either compressed or clear format through the sendUncompressed property. If this parameter is not supplied, the property ID is the connector name. |
|
Property Name |
Identifies the name of the connector property. |
|
Required |
Determines whether the information is required for the target connector to deliver its message. Values are:
|
|
Default Value |
Identifies the default value for the property. Typically, you set the Required parameter to True when you specify a default value so that this information carries to the node configuration in the integration engine. |
|
Possible Values |
Identifies a list of the possible values that the property can take, separated by the | character. |
The following definition shows how these properties function:
conData.addConnectorField("HEADER","sendUncompressed",true,"Y, "Y|N");
In this case, the property name is sendUncompressed and its property ID is HEADER. The sendUncompressed property is required (the third parameter is set to true), so that whenever you create a node in the node definition component and specify SMTPTARGET as the target connector, this property appears on the page automatically. Further, because the default value is set to Y, this is the default value. Possible values have been identified as Y or N. If you click the list box (search box) for this property on the Connectors tab in the Node Definition component, you can select from those two values.
Building Error Handling and Logging into Target Connectors
The following code example demonstrates how to build error handling and logging into target connectors:
package com.peoplesoft.pt.integrationgateway.targetconnector;

import ...

public class SampleTargetConnector implements TargetConnector {
         public IBResponse ping(IBRequest request)

         public IBResponse send(IBRequest request)throws
                     GeneralFrameworkException,
                     InvalidMessageException,
                     ExternalSystemContactException,
                     ExternalApplicationException,
                     MessageMarshallingException,
                     MessageUnmarshallingException,
                     DuplicateMessageException  {

      PSHttp httpObj = null;
      try {

      // Get handle on rootnode
      XmlNode root = dom.GetDocumentElement();

      // Cast the IBRequest back to an InternalIBRequest
      InternalIBRequest request = (InternalIBRequest)requestOrig;

      // Populate App Msg XML  Dom Object from IBRequest

      ...

      // Get the URL from either the IBRequest or from the
      //prop file (default)

      String URL = request.getConnectorInfo().getFieldValue("URL");

      // Log the request
      Logger.logMessage("SampleTargetConnector:
      Application Message Request", dom.GenerateXmlString(),
      Logger.STANDARD_INFORMATION);

      // Send the request DOM Document
      httpObj.setRequestProperty("content-type", "text/plain");
      httpObj.send(dom.GenerateXmlString().getBytes());

      // Get the response and convert to a String
      responseString = new String(httpObj.getContent());

      // Log the response
      Logger.logMessage("SampleTargetConnector:
      Application Message Response", responseString,
      Logger.STANDARD_INFORMATION);

      // Construct the IBResponse
      response = new IBResponse();

      ...

      // Return the successful IBResponse
      return response;

   } catch (XmlException xe) {
      httpObj.disconnect();
      throw new GeneralFrameworkException ("SampleTargetConnector:Failed
         while parsing XML");

   } catch (org.w3c.www.protocol.http.HttpException httpe) {
      throw new ("SampleTargetConnector:HTTP Protocol
         exception",httpe);

   } catch (java.io.IOException ioe) {
      throw new ExternalSystemContactException
         ("SampleTargetConnector:I/O Exception",ioe);

   } finally {
      httpObj.disconnect();
   }
   } // end send()
}
Developing Listening Connector Classes
This section discusses listening connector class development issues.
Building Servlet-Based and Nonservlet-Based Listening Connectors
If you require a listening connector that services HTTP requests, build a servlet-based listening connector. A servlet-based listening connector runs in the Servlet container on the web server.
See Using Connector Templates.
This PeopleBook does not discuss how to install servlets on web servers.
See The servlet documentation for your web server.
Listening connectors must invoke PeopleSoft Integration Broker through the gateway manager Connect method.
IBResponse connect(IBRequest) throws GeneralFrameworkException DuplicateMessageException InvalidMessageException MessageMarshallingException MessageUnmarshallingException ExternalSystemContactException ExternalApplicationException
By accessing and modifying key information on the IBRequest, you can control the behavior of transactions as they flow through the integration gateway.
This section describes several dispatching features that you can use to control message routing by modifying the IBRequest from the listening connector, including routing messages to:
Other (remote) integration gateways.
Specific target connectors.
Other PeopleSoft systems.
You can control the routing of a message to another integration gateway by specifying the uniform resource locator (URL) of the gateway in the IBRequest. You might need to forward messages to another gateway so that they can be processed by a remote PeopleSoft Integration Broker system. To do so, specify the URL of this integration gateway as follows:
. . .
IBRequest ibRequest = new IBRequest();
IbRequest.setOperationName("RemoteRoutingTest");
IbRequest.setRequestingNode("SourceSystem");
IbRequest.setPassword("myPassword");
. . .

//Specify the processing of the message to occur from
//anotherIntegration Gateway.
ibRequest.setRemoteFrameworkURL("https://hostName/PSIGW/
PeopleSoftListeningConnector");
You can also route a message to a specific target connector by modifying the request's ConnectorInfo object as follows:
. . .
IBRequest ibRequest = new IBRequest();
. . .

// Send a message through the HttpTargetConnector for example.
ConnectorInfo connectorInfo = ibRequest.getConnectorInfo();

connectorInfo.setConnectorClassName("HttpTargetConnector");
connectorInfo.setField("URL","http://www.externalsite.com");
connectorInfo.setField("Method","POST");
. . .
You can control the routing of messages to PeopleSoft Integration Broker systems by setting the destination node for messages and by configuring the integrationGateway.properties file. For example, suppose that you currently have PeopleSoft Human Resources, Financials, and Customer Relationship Management (PeopleSoft CRM) systems installed, and you have built a listening connector to listen to events on an SAP MRP system. A method called getDestinationSystem() on the listening connector lets you know the destination of each message. To call getDestinationSystem(), set the application server settings in the integrationGateway.properties file as follows:
. . .
//Default PeopleSoft System
ig.isc.serverURL=//HRSERVER:9000
ig.isc.userid=HRUSERID
ig.isc.password=HRPASSWORD
ig.isc.toolsRel=8.51

#
## JOLT connect string settings for Application Server(s) with known NODENAMEs.
#
ig.isc.FINANCIALS.serverURL=//FINSERVER:9000
ig.isc.FINANCIALS.userid=FINUSERID
ig.isc.FINANCIALS.password=FINPASSWORD
ig.isc.FINANCIALS.toolsRel=8.51

ig.isc.CRM.serverURL=//CRMSERVER:9000
ig.isc.CRM.userid=CRMUSERID
ig.isc.CRM.password=CRMPASSWORD
ig.isc.CRM.toolsRel=8.51
Make the following modifications to the listening connector:
. . . IBRequest ibRequest = new IBRequest(); IbRequest.setOperationName("RoutingTest"); IbRequest.setRequestingNode("SourceSystem"); IbRequest.setPassword("myPassword"); . . . // Get the name of the DestinationSystem from your proprietary //method. This method would return one of the following //("HR", //"FINANCIALS", "CRM"). String destinationSystem = getDestinationSystem(); ibRequest.setDestinationNode(destinationSystem); . . . // Create a GatewayManager instance. GatewayManager gm = new GatewayManager(); // Invoke the Connector Framework Manager. ibResponse = gm.connect(ibRequest); . . .
Building Error Handling and Logging into Listening Connectors
This is sample code for building error handling and logging into listening connectors:
package com.peoplesoft.pt.integrationgateway.listeningconnector;

import ...

public class HttpListeningConnector extends HttpServlet {
      public void doGet(HttpServletRequest req,
      HttpServletResponse resp) throws ServletException, IOException {
      }

      public void doPost(HttpServletRequest req,
      HttpServletResponse resp) throws ServletException, IOException {

         String actualResponse ="";
         IBRequest request = null;
         IBResponse response = null;

      try {

         String inputString = MiscUtil.readerToString(new
         InputStreamReader(req.getInputStream()));

         // Log the actual Input String
         Logger.logMessage("HttpListeningConnector: HTTP
         Request", inputString, Logger.STANDARD_INFORMATION);

         HttpListeningConnectorUtility util = new
         HttpListeningConnectorUtility();
         request = util.createIBRequest("XML", req, inputString);

         // Use the GatewayManager to invoke the Integration
         // Server and return its response.
         GatewayManager conMgr = new GatewayManager();
         response = conMgr.connect(request);

         // Need to get the actual response from the
         //IBResponse
         actualResponse = response.getContentSectionAt(0);

   } catch (InvalidMessageException ime) {
         ime.printStackTrace();
         actualResponse = getErrorXml(ime);
         Logger.logError("HTTPListeningConnector:
         InvalidMessageException", request, response,
         Logger.STANDARD_GATEWAY_EXCEPTION, ime);

   } catch (ExternalSystemContactException esce) {
         esce.printStackTrace();
         actualResponse = getErrorXml(esce);
         Logger.logError("HTTPListeningConnector:
         ExternalSystemContactException", request, response,
         Logger.STANDARD_GATEWAY_EXCEPTION, esce);

   } catch (ExternalApplicationException esee) {
      esee.printStackTrace();
      actualResponse = getErrorXml(esee);
      Logger.logError("HTTPListeningConnector:
      ExternalApplicationException", request, response,
      Logger.STANDARD_GATEWAY_EXCEPTION, esee);

   } catch (MessageMarshallingException mme) {
      mme.printStackTrace();
      actualResponse = getErrorXml(mme);
      Logger.logError("HTTPListeningConnector:
      MessageMarshallingException", request, response,
      Logger.STANDARD_GATEWAY_EXCEPTION, mme);

   } catch (MessageUnmarshallingException mue) {
      mue.printStackTrace();
      actualResponse = getErrorXml(mue);
      Logger.logError("HTTPListeningConnector:
      MessageUnmarshallingException", request, response,
      Logger.STANDARD_GATEWAY_EXCEPTION, mue);

   } catch (GeneralFrameworkException gfe)  {
      gfe.printStackTrace();
      actualResponse = getErrorXml(gfe);
      Logger.logError("HTTPListeningConnector:
      GeneralFrameworkException", request, response,
      Logger.STANDARD_GATEWAY_EXCEPTION, gfe);
   }

   // Return the message to the original requestor that
   //invoked the Servlet
   HttpListeningConnectorUtility.
         sendResponseBackToRequestor(actualResponse, resp);

   // Log the actual output String
   Logger.logMessage("HttpListeningConnector:
      HTTP Response", actualResponse, Logger.STANDARD_INFORMATION);

   }   // end doPost()
}
Installing Connector Classes
Install connector classes on the local web server.
To install a target connector class, copy the class from the Java Classes directory to the following location on the local web server:
<PIA_HOME>\webserv\<DOMAIN>\applications\peoplesoft\PSIGW.war\WEB-INF\classes\com\peoplesoft\pt\integrationgateway\targetconnector
To install a listening connector class, copy the class to the following location on the local web server:
<PIA_HOME>\webserv\<DOMAIN>\applications\peoplesoft\PSIGW.war\WEB-INF\classes\com\peoplesoft\pt\integrationgateway\listeningconnector
Registering Connectors
Before you can use a target connector, you must register it on the integration engine. To register a connector, load the connector information in the Gateways component by using the Load button. Loading the connector makes its capabilities known to PeopleSoft Integration Broker.
Then, assign the connector to the intended node on the Connector page in the Node Definition component. Enter the connector ID that corresponds to the new connector and edit the properties, as needed.
See Also
Using Connector Templates
This section contains the following generic connector templates to use as a starting point for connector development:
Target connector template.
Listening connector template (servlet).
Listening connector template (nonservlet).
Use the following example as a target connector template:
package com.peoplesoft.pt.integrationgateway.targetconnector; import com.peoplesoft.pt.integrationgateway.common; class MyTargetConnector implements TargetConnector Interface { public IBResponse send(IBRequest request) throws GeneralFrameworkException DuplicateMessageException InvalidMessageException ExternalSystemContactException ExternalApplicationException MessageMarshallingException MessageUnmarshallingException { //Retrieve information from the Integration Broker //Request. String requestString = request.getContentSectionAt(0); //Retrieve Information about how the document is sent. ConnectorInfo ci = request.getConnectorInfo(); //Retrieve Connector specific fields (URL, user, password //for example). String xxx = ci.getFieldValue("xxx"); ... // Send document to its destination returning a //responseString. ...{code to interact with external system goes here} // Use the response to populate the ISResponse object IBResponse resp = new IBResponse() resp.addContentSection(null,responseString); return resp; } public IBResponse ping(IBRequest request) throws GeneralFrameworkException DuplicateMessageException InvalidMessageException ExternalSystemContactException ExternalApplicationException MessageMarshallingException MessageUnmarshallingException { //Retrieve Information about how the document is sent. ConnectorInfo ci = request.getConnectorInfo(); //Retrieve Connector specific fields (URL, user, password //for example). String xxx = ci.getFieldValue("xxx"); ... // Send a simple document to its destination just to see if //the destination is up. ...{code to interact with external system goes here. Throw exceptions as needed.} // Return an empty IBResponse object return new IBResponse(); } public ConnectorDataCollection introspectConnector() { ConnectorDataCollection conCollection = new ConnectorDataCollection(); // Set the name of the connector. ConnectorData conData = new ConnectorData("MyTC"); // Define the supported parameters for this Connector. conData.addConnectorField("xxx",true,"",""); ... conCollection.addConnectorData(conData); return conCollection; } }
Listening Connector Template (Servlet)
Use the following example as a template for a servlet-based listening connector:
package com.peoplesoft.pt.integrationgateway.listeningconnector;
import com.peoplesoft.pt.integrationgateway.common;

//This is an example of using a Servlet when receiving the //External Request.
public class MyListeningConnector extends HttpServlet {

   public void service (HttpServletRequest request,
   HttpServletResponse response)
            throws ServletException, IOException {

   //Developer retrieves the request and gets key information
   //here (such as UserName, password, operationName and
   //messageContent)
   ...

   //Developer creates the IBRequest object
   IBRequest request = new IBRequest();

   //Required information for an Integration Broker Request.
   request.setRequestingNode(UserName);
   request.setPassword(password);
   request.setOperationName(integrationService);
   request.addContentSection(null,messageContent);

   // Keep populating the IBRequest as needed (other set
   //methods are available)

   GatewayManager gatewayManager = new GatewayManager();
   try {
      //Send the request into the Integration Broker.
      IBResponse response = gatewayManager.connect(request);

      //Hand back your response to the requestor.
      out.println(response.getContentSectionAt(0));
   } catch(MashallingException me) {

      // Handle Marshalling errors here. For example :
      out.println("<?xml version=\"1.0\"?>"+
            "<MyResponse>"+
               "<Status>"+
               "<Code>1001</Code>"+
               "<Description>
               MarshallingException Occurred
               </Description>"+
               "</Status>"+
            "</MyResponse>");
   } catch(UnmarshallingException ume) {
      // Handle UnmarshallingException  here.
   } catch(. . . ) {
      // Handle all other Integration Broker Exceptions.
   } finally  {
      //Cleanup work here.  For example:
      out.close();
   }
}
Listening Connector Template (Non-servlet)
Use the following example as a template for non-servlet-based listening connector:
package com.peoplesoft.pt.integrationgateway.listeningconnector;
import com.peoplesoft.pt.integrationgateway.common;

//This is an example of a regular class used to receive the //External Request.
public class MyListeningConnector {

   //Somehow the external system makes a method call to this
   //method. Of course the Class and Method Name is entirely up
   //to the developer.

   public String callMyListeningConnector (String Request) {

   //Developer retrieves the request and gets key information
   //here (such as UserName, password, operationName and
   //messageContent)

   //Developer creates the IBRequest object
   IBRequest request = new IBRequest();

   //Required information for an Integration Broker Request.
   request.setRequestingNode(UserName);
   request.setPassword(password);
   request.setOperationName(integrationService);
   request.addContentSection(null,messageContent);

   //Keep populating the IBRequest as needed (other set
   //methods are available)

   GatewayManager gatewayManager = new GatewayManager();
   try {
   //Send the request into the Integration Broker.
   IBResponse response = gatewayManager.connect(request);

   //Hand back your response to the requestor.
   return response.getContentSectionAt(0);
   } catch(MashallingException me) {

      // Handle Marshalling errors here. For example :
      return ("<?xml version=\"1.0\"?>"+
         "<MyResponse>"+
            "<Status>"+
               "<Code>1001</Code>"+
               "<Description>
               MarshallingException Occurred
               </Description>"+
            "</Status>"+
         "</MyResponse>");
   } catch(UnmarshallingException ume) {

      // Handle UnmarshallingException  here.
   } catch(. . . ) {

      // Handle all other Integration Broker Exceptions.
   } finally  {
      //Cleanup work here (if any). . .
   }
}
Developing Connectors Based on DOM
PeopleSoft provides a Java XML DOM wrapper that enables you to manipulate message objects with PeopleCode instead of with a standard XML parser.
The section provides an overview of the Java XML DOM wrapper and discusses how to use Java XML DOM wrapper classes.
Understanding the Java XML DOM WrapperThe Java XML DOM wrapper is an abstraction layer over XML parsers that enables you to interpret, create, or modify XML messages before you send them into or out of the integration gateway. The XML DOM wrapper provides an API that is equivalent to the PeopleCode API to support composing and transforming XML documents.
For example, suppose that you need to send incoming XML messages to PeopleSoft Integration Broker over HTTP and that you need to read the content of the messages as they come in. Rather than parse each message on a character-by-character basis or use a parser, you can use the Java XML DOM wrapper to read the XML messages as they come into the integration gateway, add information to them as necessary, and pass the messages on to the integration engine.
You can also use the Java XML DOM wrapper to refine XML messages before they are sent, for example, by changing tag names, verifying information in non-XML format, and so forth.
Use the Java XML DOM wrapper to:
Navigate through XML documents by using methods, such as GetParentNode, GetChild, and getSibling.
Control the order of elements within XML documents.
Support additional XML features, such as namespaces and processing instructions.
Using Java XML DOM Wrapper Classes
The following table lists the Java XML DOM wrapper classes. The objects in these classes provide the basic methods for accessing and modifying DOM objects.
|
Class |
Description |
|
XmlDocument |
Contains the DOM that supports serialization and deserialization. Provides equivalent methods for dealing with XML documents as PeopleCode does on the application server side. |
|
XmlNode |
Provides equivalent methods for dealing with XML nodes as PeopleCode does on the application server side. |
|
XmlNodeList |
Provides equivalent methods for dealing with XMLNodeList as PeopleCode does on the application server side. |
|
XmlException |
Reports errors that occur while handling the Java XML DOM wrapper classes. These are thrown when an XML DOMException is caught in DOM level. Most of XmlDocument/XmlNode methods throw the XmlException. |
Java XML DOM Code Example
The following is a Java XML DOM code example.
public String simulateSendingMessage(String message) throws
                        GeneralFrameworkException,
                        DuplicateMessageException,
                        InvalidMessageException,
                        ExternalSystemContactException,
                        ExternalApplicationException,
                        MessageMarshallingException,
                        MessageUnmarshallingException,
                        XmlException {

//Create an XmlDocument object.

//Instantiate a XmlDocument object first. This step is mandatory.
XmlDocument xmlDoc = new XmlDocument();
XmlNode rootNode = null;

//Parse the string into the XmlDocument object.
try {

   //Fill in the XML structure/data with the real XML string
   xmlDoc.ParseXmlFromString(message);

   //Get the root XmlNode
   rootNode = xmlDoc.GetDocumentElement();
   } catch (XmlException xe) {
   throw new InvalidMessageException
   ("ExampleTargetConnector:InvalidMessageException",xe);
}

//Gather credentials from the Xml Document.
XmlNode itemNode;
XmlNode tmpNode;
float price;
float totalPrice = 0;

//Read all Message Items and calculate the totalPrice.
//Get the count of root XmlNode's immediate child XmlNode
for(int i=0; i < rootNode.GetChildNodeCount(); i++) {

//Get the number i child XmlNode
itemNode = rootNode.GetChildNode(i);

// Only process the Item nodes (any other tag will not be //processed).

//Get current XmlNode name
if (!itemNode.GetNodeName().equals("Item")) {
   continue;
}

if (itemNode == null) {
   String[] parms = {"Item"};
   throw new InvalidMessageException("ExampleTargetConnector:
     InvalidMessageException", new MessageCatalogEntry(10503,parms),null);
}

tmpNode = itemNode.FindNode("Price");

   price = Float.parseFloat(tmpNode.GetNodeValue());

   totalPrice += price * quantity;
}

return "<?xml version=\"1.0\"?>"+
   "<ExampleResponse>"+
   "<Status>"+
      "<Code>0</Code>"+
   "</Status>"+
   "<ResponseBody>"+
      "<TotalPrice>"+totalPrice+"</TotalPrice>"+
   "</ResponseBody>"+
   "</ExampleResponse>";
}
See Also
Developing and Implementing Connectors in the C/C++ Environment
You should use Java for connector development. However, the PeopleSoft system also provides an environment for developing connectors using C/C++ through the Java Native Interface (JNI).
This section provides an overview of the development process and discusses how to create target connectors for the C/C++ environment.
Understanding the Development Process
To develop connectors for the C/C++ environment, you typically use Xalan and Xerces by Apache, Inc.
Xalan is an XSLT processor that transforms XML documents into HTML, text, or other XML document types. Xalan uses two jar files: xalan.jar and xerces.jar. Xerces is a Java parser to parse XML.
To develop connectors and not use Xalan and Xerces, you can call a PeopleSoft-delivered Java connector, copy what you need from the message, and pass the information to the C/C++ environment.
To develop connectors for C/C++ environments:
Create a Java target connector class.
Create a JNI header file.
Implement JNI header functions.
Build a dynamic-link library (DLL) for the native library.
Register the DLL.
Building and implementing a connector in the C/C++ environment includes building a thin Java target connector to enable the gateway manager to load the connector the same way that it loads Java connectors, by parsing the IBRequest object.
The thin Java connector is also a gateway to the C/C++ connector. It is responsible for loading the connector and passing the XML string with business logic to one or more native C/C++ methods.
This diagram illustrates the architecture for implementing target connectors in the C/C++ environment for communication with the PeopleSoft Integration Broker gateway:
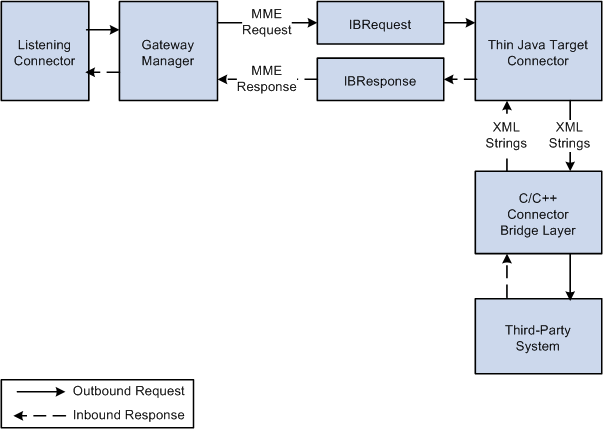
Architecture for implementing target connectors in the C/C++ environment
The XML string contains the body from the MIME request string.
The IBResponse object is completely transparent to the native connector. All of the information that the native side needs goes through the XML string or by strings that come from the IBRequest.
PeopleSoft provides a template that you can use as a starting point for developing the connector. In most cases you do not need to make any additions to the code because the IBRequest provides the IBInfo and content body XML strings. However, you can modify the IBInfo and content body XML strings in the C/C++ connector library and declare additional native methods as necessary in the psnativeconnector section of the template.
After you create a Java connector, you must create a JNI header file by using the javah command. The javah command creates a C/C++ declaration. The JNI header file serves as a bridge between native methods that you call within the Java target connector and those in the C/C++ environment.
JNI Header Functions
When you implement the JNI Header functions, you pass the IBInfo by using a native C/C++ functional call from the Java environment to the third-party system. In doing so, you pass the business logic to the C/C++ system.
To build a DLL for the native library, compile the C/C++ functions that are generated by the previous steps.
Register the DLL that you built for the native library by adding it to the system variables or by adding it to the web server path.
Creating Target Connectors for the C/C++ Environment
To create a target connector for the C/C++ environment:
Create a Java target connector.
Copy the code from the following Java target connector template into a text editor:
public class CPlusPlusTargetConnector implements TargetConnector {
      // Native method Declaration
      public native String native_simple(String IBReqString,
      String[] xmlStringArray);

      public IBResponse send(IBRequest request)  {

      IBResponse response = null;

      try {
         String ibReqString = request.getIBInfoString();
         String requestXml1 = request.getContentSectionAt(0);
         String requestXml2 = request.getContentSectionAt(1);
         . . .

         // Assign to String[] xmlStringArray
         // Load native lib that implements the connector
         System.loadLibrary("psnativeconnector");

         responseStr = native_simple(ibReqString,
         xmlStringArray);

         response = new IBResponse();
         response.addContentSection(null, responseStr);
   }
   catch (Exception ioe) {
         throw new GeneralFrameworkException(ioe.getMessage());
   }
   return response;
}
Compile the code.
By using a Java compiler, compile the CPlusPlusTargetConnector.java file into a CPlusPlusTargetConnector.class file. Then copy the class file into the target connector directory on the web server. The CLASSPATH environment variable should point to the Integration Broker.jar file.
Install the connector.
Register the connector.
Create a JNI header file.
At a DOS prompt or UNIX shell command prompt, enter the following command and press Enter:
hisdir>javah −jni com.peoplesoft.peoplesoft.pt.integrationgateway.
  targetconnector.CplusPlusTargetConnector
Implement the JNI header file.
Copy the method declaration output from the previous step to a C++ file.
The following code shows sample method declaration output from the javah command:
JNIEXPORT jstring JNICALL Java_com_peoplesoft_pt_
integrationgateway_targetconnector_CPlusPlusTargetConnector_
native_1simple (JNIEnv *env, jobject obj, jstring ibInfo,
jobjectArray contentArr):
Convert the jstring to an ANSII string or to a Unicode string.
To convert the jstring to ANSII, follow this example:
Const char* string;
string = env->GetStringCharsUTF(jstrXml, NULL);
To convert the jstring to Unicode, follow this example:
const TCHAR * tStr;
tStr = env->GetStringChars(jstrXml, NULL);
You can now parse the XML as necessary.
Build the PSNativeConnector DLL.
Compile the C++ functions from the previous step into a DLL file.
Save the file.
You do not have to use PSNativeConnector.DLL as the name for the file, however the name that you use mustmatch the connector name in the connector class file. If you use another name for the DLL, enter the new name for the connector in the following line of the connector class file:
System.loadLibrary("psnativeconnector");
Register the DLL.
Register the DLL by adding it to the system variables or by adding it to the path of the web server environment.
To add the DLL path to the system variables, select Control Panel, System, Environment.
To add the DLL path to the web server environment, follow the instructions for the web server that you are using:
For Oracle WebLogic, open a command prompt or shell command and append the path to the library at the end of the following line:
:runWebLogic
echo on
set PATH=.\bin;%PATH%;%PATH_TO_YOUR_NATIVE_LIBRARY%
For IBM WebSphere, open a command prompt or shell command, type the following, and press Enter:
C:\Apps\WebSphere\AppServer\bin\startServer.bat
Then, append the path to the library in this line:
SET PATH=;%PATH_TO_YOUR_NATIVE_LIBRARY%;%WAS_HOME%/
bin;%JAVA_HOME%/bin;%JAVA_HOME%/jre/bin;%PATH%
See Also
Reusing Connector Code
This section discusses how to:
Reuse connector code through inheritance.
Reuse connector code through delegation.
Reusing Connector Code Through Inheritance
Use inheritance to extend an existing connector and provide additional behavior.
public Class MyHttpTargetConnector extends HttpTargetConnector { public IBResponse send(IBRequest request) throws GeneralFrameworkException, InvalidMessageException, ExternalSystemContactException, ExternalApplicationException, MessageMarshallingException, MessageUnmarshallingException, DuplicateMessageException { // Do connector specific logic here possibly modifying the // request . . . IBResponse response = super.send(request); // Do connector specific logic here possibly modifying the // response . . . } }
Reusing Connector Code Through Delegation
By using delegation, you can reuse the code from an existing connector to create a new connector, as shown in this example:
public Class MyHttpTargetConnector implements TargetConnector { public IBResponse ping(IBRequest request) throws GeneralFrameworkException, InvalidMessageException, ExternalSystemContactException, ExternalApplicationException, MessageMarshallingException, MessageUnmarshallingException, DuplicateMessageException { HttpTargetConnector httpTargetConnector = new HttpTargetConnector(); return httpTargetConnector.ping(request); } public IBResponse send(IBRequest request) throws GeneralFrameworkException, InvalidMessageException, ExternalSystemContactException, ExternalApplicationException, MessageMarshallingException, MessageUnmarshallingException, DuplicateMessageException { // Do connector specific logic here possibly modifying the // request . . . HttpTargetConnector httpTargetConnector = new HttpTargetConnector(); IBResponse response = httpTargetConnector.send(request); // Do connector specific logic here possibly modifying the // response . . . } public ConnectorDataCollection introspectConnector() { HttpTargetConnector httpTargetConnector = new HttpTargetConnector(); ConnectorDataCollection cdc = httpTargetConnector.introspectConnector(); // Possibly add specific fields here . . . Return cdc; } }