 Working with Tree Concepts
This chapter discusses how to:
Work with tree concepts.
Define types of trees.
Work with effective dates and trees.
Associate trees with additional setIDs.
Work with the multiuser environment.
Working with Tree Concepts
This section provides an overview of tree concepts and discusses how to:
Use nodes.
Use detail values (leaves).
 Understanding Tree Concepts
This section discusses general concepts used by PeopleSoft Tree Manager, such as levels, effective dates, and setIDs.
Levels provide a way to organize tree nodes. In most trees, all nodes at the same level represent the same kind of information. For example, in a tree that reflects the organizational hierarchy, all division nodes appear on one level and all department nodes on another. Similarly, in a tree that organizes your product catalog, the nodes representing individual products might appear on one level and the nodes representing product lines on the next higher level.
Sometimes you want to be able to identify all of the nodes on the same level as a group, even when they do not share the same parent. For example, you might create a PeopleSoft nVision layout that summarizes the data for a division, then define a PeopleSoft nVision scope that creates one report instance for each division, regardless of what company it is in. To allow you to refer to all the nodes at a level, PeopleSoft Tree Manager enables you to name each level. You will use the level name when you define the scope for your PeopleSoft nVision report (rather than identifying all the nodes individually). Naming your levels gives you another way to “slice” the data in the tree. Level names can appear next to the node description.
The following example shows a tree with levels:

Example of a tree with levels
For each tree structure, you can determine how trees use levels:
When levels are not used the nodes in the tree have no real hierarchy or reporting structure but do form a logical summarization structure.
Strictly enforced levels mean that the named levels describe each node’s position in the tree.
This is natural for most hierarchies. Strict levels have the following advantages:
You can skip a level if a portion of the hierarchy does not have a node at that level.
The appearance of your tree more precisely matches the real-life hierarchy.
If you use summary ledgers in PeopleSoft General Ledger, you can also create summary trees, which are based on levels in the corresponding detail tree.
If you decide later that you need to change a tree from strict levels to loose levels, you can do so.
You cannot change a loose level tree to strict levels, because the level names are not connected to specific positions in the tree.
Loosely enforced levels mean that the nodes at the same visual level of indentation do not all represent the same kind of information, or nodes representing the same kind of information appear at multiple levels.
With loosely enforced levels, you assign a level to each node individually; the level is not tied to a particular visual position.
The following diagram shows an example of loosely enforced levels:
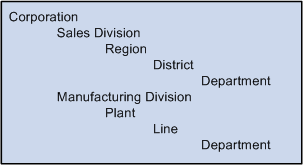
Example of loosely enforced levels
In the above example, the first two levels are clear: Corporation and Division. However, within the Sales and Manufacturing divisions, the structure is different. This tree could be created with strict levels, but would become distorted because the Plant and Line levels would need to appear either "above" or "below" the Region and District levels when in fact they are parallel. You could define a strict level tree with a level name such asPlant/Region or even Level3, but this makes it harder to identify just the regions, districts, and so on for reporting or other purposes. With loose levels, the plants within the Manufacturing division can be referred to as a level independent of the regions in the Sales division.
In a loose level tree, the level is an attribute of the node and is only loosely related to its position. The level becomes a way of identifying a group of nodes that serve a common function within the organization.
For most trees, you will want to use levels. Consider the following reasons before selecting the Level Not Used option:
If you use summary trees (generally used with PeopleSoft General Ledger), levels are required.
PeopleSoft nVision enables you to build a report by nPloding the tree from a specified node to a specified level.
This makes levels very useful on account hierarchies, for example.
Using effective dates with trees enables you to specify new objects, departments, reporting relationships, or organizational structures in advance and have them take effect automatically. You can also use trees with past, present, or future effective dates when reporting on current or historic data.
Using Effective Date is required for all types of trees.
Most data in control tables is stored by setID. Trees can be identified by four key values: setID, user key value, tree name, and effective date.
When using a setID as a key value for your tree, you should assign the same setID as the record on which your tree is built.
Note. You should not user key value for a newly created trees.
See Also
Understanding Steps to Create Trees
Working with Effective Dates and Trees
Associating Trees with Additional SetIDs
Using Nodes
Nodes define the hierarchical relationship within the tree. Nodes can be either categories (as in a group of assets) or items that need to be placed in a relationship with other items, such as an item in a catalog.
Each detail value reports to a tree node at the next higher level of the organization. Each tree node represents the group of detail values that report to it. Referring to the node is a shorthand way of referring to the group of detail values under it. For example, if a report refers to the Office of the President, it includes data from all the detail values under the Office of the President node — including the detail values under the Human Resources department, because Human Resources reports to the Office of the President.
In turn, each tree node reports to another tree node at a higher level of organization until you reach the top level of the hierarchy, called the root node.
Terminology derived from the idea of a family tree is used when talking about trees. The nodes that report to the root node are called its children. They are also called child nodes. The root node is their parent. Nodes that have the same parent are called siblings.
Using Detail Values (Leaves)
Detail values, or leaves, link a roll-up structure to the supporting detail. For example, the nodes in an account tree are not the actual accounts but categories of accounts. Using this example, the account tree has a node called Assets, with detail values specifying a range of accounts from 1000 to 1999 rolling up to it.
The tree illustrated below shows summarization rules for the PERSONAL_DATA field. In other words, it is an organizational chart for the offices in a company’s headquarters. Individual offices, such as 8200, represent the lowest level of organization and appear at the far right of the tree. The leaves representing the offices are called detail values. Detail values have leaf icons and square brackets [ ] surrounding their names.
The following example shows a personal data tree with detail values:
See Also
Understanding Types of Trees
This section discusses how to:
Understand standard detail trees.
Understand dynamic detail trees.
Understand node-oriented trees.
Understand summary trees.
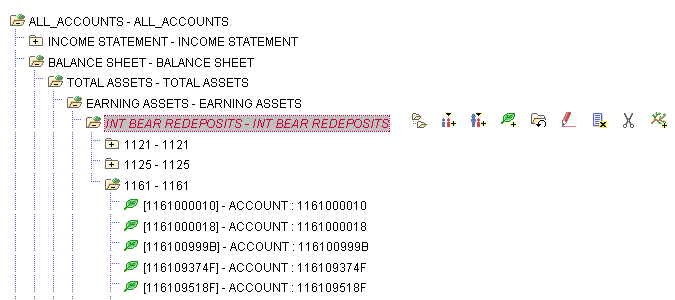
Understanding Standard Detail Trees
In the most basic type of tree, the lowest level – that is, the level farthest to the right in the tree – holds detail values. The next level is made up of tree nodes that group together the detail values, and each subsequent level defines a higher-level grouping of the tree nodes. This kind of tree is called a detail tree.
In a detail tree, the lowest level in the hierarchy consists of the detail values, which are represented by leaves. (Because of this, such trees are sometimes called summer trees.) You can use a detail tree to represent account hierarchies, product hierarchies, business unit hierarchies, and so on.
Detail trees are used most often for nVision reporting from the General Ledger.
The following example shows a detail tree:

Example of detail tree
In this example, the Corporate Headquarters node is at the highest level and it has details such as Albright, Vincent, Walters, and so on. These details are at the lowest level of hierarchy and in this case denote individual employees in the Corporate Headquarters. Apart from details, this tree also has nodes such as Office of the President and Office of the President (CDN), which itself contains details.
Understanding Dynamic Detail Trees
In a normal detail tree, the detail values that fall under each node are defined by a specific value or range of values. With a dynamic detail tree, detail values are determined by matching the node name with a field on the detail value table. The system dynamically determines appropriate values from the detail value table at the time it uses the tree. Instead of specific or range of values, the detail values appear as blank on the PeopleSoft Tree Manager display.
Note. Do not create trees that contain a combination of dynamic details and range details if the tree is used by PeopleSoft Query or PeopleSoft nVision. Trees with this combination of details may yield incorrect reporting results when used with these reporting tools.
For dynamic detail trees, the parent node value defines part of the primary key for the detail values.
The following example shows a dynamic detail tree:
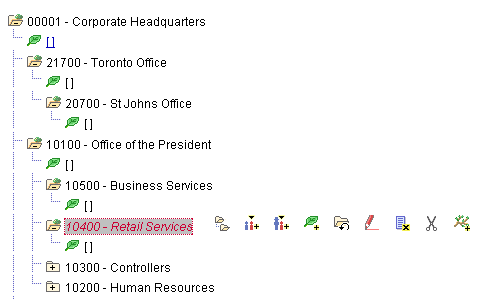
Example of a dynamic detail tree
In the preceding illustration, each node represents a value of the DEPARTMENT_ID field. The structure of the tree determines the relationships between departments and their groups, so that your reports can roll up department data. Departments are not the lowest level of detail, though. Each department consists of employees, and when you assign a department cost, you assign it to a particular department and an employee. These two fields, DEPARTMENT_ID and EMPLID, are both key fields for the department data. So to capture these costs, the department tree needs to group the employees for each department. That is where the detail values come in.
The detail values in this tree represent values for EMPLID. Rather than listing each EMPLID value separately, however, you tell PeopleSoft Tree Manager to use all of the employees associated with the parent DEPARTMENT_ID. For example, if you ask for a report on the RETAIL SERVICES department, the system will roll up the data whose DEPARTMENT_ID is RETAIL SERVICES and whose EMPLID is any value.
You can select to display all detail values for a selected node or to display detail values based on the tree’s current effective date.
See Defining Summary Tree Details.
Understanding Node-Oriented Trees
In standard detail trees, the detail values represent data values from a database field, and the tree nodes represent roll-up points for detail values. The nodes have no meaning outside the context of the tree. However, you can also create node-oriented trees.
Node-oriented trees are based on a detail structure, but the detail values are not used. For this type of tree, the tree nodes represent the data values from the database field. The system uses node-oriented trees for special purposes. For example, PeopleSoft HRMS applications use the Departmental Security tree to give users access to information only about employees in their departments.
The following example shows a node-oriented tree:
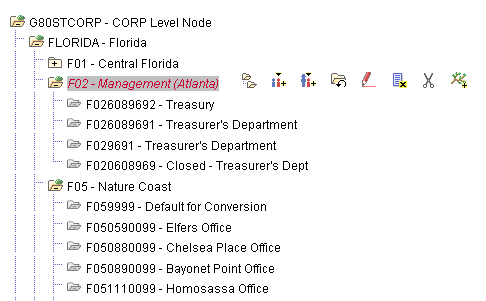
Example of node-oriented tree
Note. In this example, Florida is a node at the top level which has subnodes of Central Florida, Atlanta, Nature Coast, and so on. These nodes in turn have nodes such as Treasury, Treasurers Department, and so on. None of the nodes have leaves.
Node-oriented trees have no leaves. (Because of this, such trees are sometimes called winter trees.) Instead, each node is a possible value of the DEPTID field.
Understanding Summary Trees
Summary trees are generally used for General Ledger reporting. A summary tree provides an alternative grouping of the nodes from a detail tree without duplicating its entire structure. In a summary tree, the detail values are tree nodes from an existing detail tree rather than values from a database field. The tree groups the nodes from a specific level in the detail tree differently from the way it groups the higher levels in the detail tree itself.
For example, suppose you want to roll up your departmental hierarchy differently for two reports. The first report shows the reporting structure, so you want to group your departments according to the division to which they report. The second report is a financial report, showing profit centers, overhead centers, and production centers. From the group level down, the two hierarchies are the same.
You have two options:
Create two complete detail trees that are identical from the group level down.
Create one complete detail tree, then create a summary tree whose detail values are the group-level nodes on the first tree.
The following example shows a summary tree:
Example of summary tree
When you use a node from a summary tree in a report or summary ledger, the system refers back to the detail tree to determine which detail values report to that node. For example, suppose you want to report on production centers. You have created a summary tree that shows which groups are production centers, and you pick the Production Center node. The summary tree shows that the Engineering group and the Manufacturing group (among others) are production centers, but it does not show which departments are in these groups. The system uses the detail tree to determine the departments in the group.
Summary trees make it easier to maintain trees. If you change the lower part of the tree, you need to update only one tree.
The most common use of summary trees is to create summary ledgers in PeopleSoft Financial Data Management applications. You create summary trees based on your basic ChartFields to create alternative roll-ups. You create reports based on the various summary trees to view your financial data from a variety of perspectives.
Working with Effective Dates and Trees
This section provides an overview of interactions between tree and user data effective dates and discusses how to:
Use effective-dated user records.
Use effective-dated trees.
Understanding Interactions Between Tree and User Data Effective Dates
User data are information collected from customers. When user data also has an effective date on key record, PeopleSoft Tree Manager checks that date to determine which dated record item belongs in the current dated tree. When only one dated item is in the user table, then the date determines whether that item is available for use in the tree at all.
Trees and user data differ in how effective dates are considered in respect to the current date and when the tree and the data come into scope. The rules are:
The tree’s effective date is the good through date for the tree’s representative organization.
The user data item’s effective date is the good from date for the user data.
Therefore, in a particular tree, the nodes and details valid for that tree must have an effective date on the user data record earlier or the same as the effective date on the tree.
The following table presents an example of an effective-dated tree with a user table that has three effective-dated records for the same item:
|
Tree Effective Date |
User Item Effective Date |
User Data Available to Tree? |
|
12-31-2005 |
12-01-2005 |
Yes |
|
12-31-2005 |
01-01-2006 |
No |
|
12-31-2005 |
01-31-2006 |
No |
|
12-31-2005 |
04-01-2006 |
No |
This table shows what happens if the tree is copied to a new effective date, with the same user data records:
|
Tree Effective Date |
User Item Effective Date |
User Data Available to Tree? |
|
02-28-2006 |
12-01-2005 |
Yes |
|
02-28-2006 |
01-01-2006 |
Yes |
|
02-28-2006 |
01-31-2006 |
Yes |
|
02-28-2006 |
04-01-2006 |
No |
This diagram illustrates a graphical representation of user data and tree effective dates:
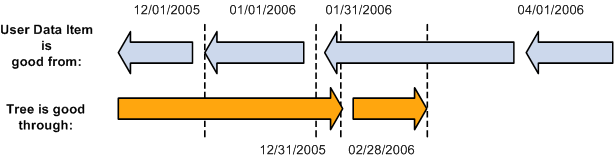
Graphical representation of user data and tree effective dates
Using Effective-Dated User Records
PeopleSoft trees are a hierarchical structure made up of the tree’s definition along with the nodes and details (leaves) that form the parent-child relationships in the tree. The nodes and details are tied in to a user record as defined in the tree structure.
When the user record has an effective date as a part of the record’s key, then that effective date determines the criteria used for details and nodes available for use in the tree.
See Also
Using Effective-Dated Trees
Trees must have an effective date. Effective dates on trees show planned changes in the hierarchy the tree represents.
For example, in the HR Department tree, you want to add a new Hardware department effective 09/01/2001. You do this by copying the current HR Department tree to a new effective date of 09/01/2001, opening the new tree, and adding the Department node for Hardware.
When the current date reaches 09/01/2001, then the HR Department tree with the Hardware department will become effective for application and reporting purposes, and the previous effective date version of the HR Department tree will be a copy for historical purposes.
Associating Trees with Additional SetIDs
This section discusses how to share trees across setIDs.
PeopleSoft applications store information in two types of tables: transaction tables and control tables. Information in transaction tables is typically stored by business unit, while control table information is stored by a set identifier, commonly called the setID.
Transaction tables store data about day-to-day business activities. As such, these tables are updated frequently.
Control tables store information that defines the accounting and organizational structures and processing rules that are used when business transactions are entered into PeopleSoft applications. Control tables include master lists, such as customers, vendors, products, items, and charts of accounts. These tables are generally static, and many are effective-dated.
A tableset is a subset of data within the control tables that defines the accounting structure and processing rules for a particular business unit or group of business units.
Trees are typically hierarchies built on top of control tables, and so you usually will want to key your tree by setID if the underlying control table is keyed by setID.
Note. Because PeopleSoft Projects data is stored in tables keyed in by business unit rather than setID, PeopleSoft Project trees may be keyed by either setID or business unit, depending on the tree’s function.
See Also
Your PeopleSoft Application Fundamentals book.
Sharing Trees Across SetIDs
Access the Tree page by selecting PeopleTools, Utilities, Administration, TableSet Control, Tree.
This is an example of the Tree page:
Use the Tree page to associate a specific tree with a given set control value.
PeopleSoft applications use the default setID on the tableset Record Group page to determine which trees a business unit can access. This default setID is established when the business unit is created. However, if you want a business unit to be able to access a particular tree created under a setID other than the default setID, you can specify the tree on this page.
The setID you define for a tree should typically match the setID defined for the underlying record.
The Record Group page of the TableSet Controls component defines which setID is used for a specific record group.
For example, if the PRODUCT_TBL record is part of REC_GROUPA, and on the Record Group page you have associated BU = CCB, Rec. Group = REC_GROUPA, and SetID = FS, then you should also set up any trees based on PRODCT_TBL so that BU = CCB and uses SetID = FS.
Working with the Multiuser Environment
When the multiuser environment is enabled, PeopleSoft Tree Manager enables multiple users to work in the same environment and on the same tree or branch without the risk of losing individual work due to version control.
Note. PeopleSoft delivers PeopleSoft Tree Manager with the multiuser environment disabled. When you enable the multiuser environment for PeopleSoft Tree Manager, you also enable the multiuser environment for Query Access Manager.
See Building Query Access Group Trees.
See Using Query Access Group Trees.
The following example explains how PeopleSoft Tree Manager works when the multiuser environment is enabled:
User A, User B, and User C open the QE_ACCOUNTS tree at around the same time and can view only the tree without making any changes. During this time, Mode: Display appears at the top of the tree's page for all users, notifying them that the tree is in display mode. If User A wants to make changes to the tree, she must reserve the tree for editing. After she reserves the tree, Mode: Edit appears at the top of her QE_ACCOUNTS tree page, confirming that the tree is in edit mode for herself only. However, Mode: Display (Checked Out by User A) appears at the top of User B's and User C's QE_ACCOUNTS tree page, notifying these users that the QE_ACCOUNTS tree page is currently being edited by User A.
While User A has the tree in edit mode, only User A can edit the tree. Although User B and User C cannot edit the tree, they can still perform many actions. The following table describes the actions users can perform on trees in the multiuser environment, using this example. The first column lists the action. The second column denotes whether the action is available to User A while she has the QE_ACCOUNTS tree reserved. The third column denotes whether User B and User C can perform the action on the QE_ACCOUNTS tree while User A is editing the tree:
|
Action |
Available to User A |
Available to User B and User C |
|
Edit the tree definition. |
Yes |
No |
|
View the tree definition. |
Yes |
Yes |
|
Edit the application data. |
Yes |
Yes |
|
Edit the tree. |
Yes |
No |
|
Display the tree. |
Yes |
Yes |
|
Navigate around the tree. |
Yes |
Yes |
|
Change navigation options. |
Yes |
Yes |
|
Change display options. |
Yes |
Yes |
|
Save the tree. |
Yes |
No |
|
Save the tree with different keys (tree name, effective date, and so on). |
Yes |
Yes |
After User A releases the tree, it reverts to display mode for all users. It also reverts to display mode if User A does not perform any action on the tree for the length of time as defined in the time-out setting.
Note. When the multiuser environment is enabled, the display of the checkout mode and editing user will not be visible to users with view-only access. It will also not be visible to users working in the Tree Viewer module or to users accessing Tree Viewer pages through other applications.
Performing an Update or Cancel Due to a System Prompt
During the time a user has a tree in edit mode, other users who have the same tree in display mode will be required to either reload the tree or cancel out of the tree if the editing user performs any of the following:
Branches a tree without existing branches.
Deletes the last remaining branch of a tree.
Deletes the branch that has been opened by one of the other users (for example, User B or user C).
Saves the tree and releases it after performing the save.
If the user selects to reload a tree, PeopleSoft Tree Manager tries to open the tree at the node or leaf on which the user worked. If this is not possible, PeopleSoft application opens the tree at the first page of the tree.
Adding New Levels or Modifying Tree Definitions
When the multiuser environment is enabled, users can only add new levels or perform modifications to a tree definition when the root branch is checked out and the tree has no other checked out branches.
Note. When the multiuser environment is enabled, a user
cannot check out a tree branch if another user working with a different branch
of the same tree has modified the tree definition and either has or has
not saved the changes.
If users edit specific branches without modifying the tree definition,
other users can still edit different branches of the same tree at the same
time.
Enabling the Multiuser Environment
Before enabling the multiuser environment, you must assign a unique user ID to each user. If you are not using the multiuser environment, you can use a shared user ID; however, this is not required.
To enable the multiuser environment:
Select PeopleTools, Utilities, Administration, PeopleTools Options.
In the Tree Manager Options group box, select the Use Tree Update Reservation option.
In the Max Tree Inactivity Period, min field, enter the number of minutes allowable for a user to remain inactive during edit mode.
In PeopleSoft Tree Manager, inactivity is defined as not performing any operation. Minimal actions including navigation and clicking on tree entries or action images are considered to be active. If the user is inactive for the set number of minutes, the tree or branch reverts to display mode.
Note. PeopleSoft recommends that you set the inactivity period at less than or equal to the browser time-out settings – 20 minutes for Internet Explorer.
Reboot the application server.
Note. You must reboot the application server after enabling
or disabling the multiuser environment and after changing the inactivity period
in order for these changes to take effect.
If a tree is opened in display mode, the user can still modify user
data such as node or leaf descriptions.
If a tree is branched, users can check out different branches independently.
See Building Query Access Group Trees.
See Using Query Access Group Trees.