7 Partitioning the Library
Library partitioning reserves library resources (drives, slots, and bulk CAPs) for the exclusive use of a specified host. Partitioning is included with a new library purchase. You no longer need to purchase the feature separately. However, partitioning is still enabled with a hardware activation file (see "Activating Optional Features").
As you allocate slots to a partition, the library controller automatically activates these slots. Ensure there is enough purchased capacity for your partitioning design. Partitions can be non-contiguous.
Note:
Rotational CAPs are a shared library resource, so you cannot assign them to a partition (see "Sharing CAPs in a Partitioned Library").Partitioning the Library Using SLC
Note:
No partitioning changes occur until you apply the changes with the Commit tab. To discard uncommitted changes, click Refresh.Adding a Partition ID
-
Stop all host operations.
-
Select Tools > Partitions > Summary (Step 2) tab.
-
In the Partition Allocation Summary area, click Add Partition.
-
Select a partition ID from the drop-down list and enter a partition name. Partition IDs do not need to be consecutive.
-
Click OK.
-
For a single library, proceed to "Allocating Resources in a Partition for a Single Library".
For a library complex, proceed to "Allocating Resources in a Partition for a Library Complex".
Deleting a Partition
When you delete a partition, all resources allocated to the partition are marked available, all host connections for the partition are deleted, and the partition ID is deleted.
-
Move valid data cartridges out of the partition that you will delete (see "Moving Cartridges (Recovery Moves)").
-
Stop all host operations.
-
Select the Tools > Partitions > Summary (Step 2) tab.
-
In the Partition Allocation Summary table, select the partition to delete.
-
Click Delete Partition.
-
For a single library, click the Design by Library (Step 3) tab. Then, click Verify.
Caution:
If there are warnings, click Details >> and perform recovery moves on the orphaned cartridges (see "Moving Cartridges (Recovery Moves)"). The re-verify the design.For a library complex, verification is automatic.
-
If there are no warnings, proceed to "Committing Partitioning Changes".
Changing the Name of a Partition
-
Select Tools > Partitions > Summary (Step 2) tab.
-
In the Partition Allocation Summary table, select partition to modify.
-
Click Modify Partition.
-
Enter the partition name. Click OK.
-
Proceed to "Committing Partitioning Changes".
Allocating Resources in a Partition for a Single Library
-
Select the Tools > Partitions > Design by Library (Step 3) tab.
-
Select a partition ID from the drop-down list.
-
Select the areas of the library using the drop-down lists. Click Add (to allocate) or Remove (to unallocated).
Note:
You can assign bulk CAPs to a partition. Bulk CAPs are the larger rectangles on the ends of each rail. An S indicates a shared CAP. -
To refine the partition, select Remove Array or Add Array from the second drop-down list. Then, click the drives, arrays, or bulk CAPs to modify.
-
Repeat steps 2 - 4 for each partition ID.
Note:
To re-assign a resource from one partition to another, you must remove the resource from the initial partition before re-allocating it. -
When you complete the partition design, click Verify.
Caution:
If there are warnings, click Details >> and perform recovery moves on the orphaned cartridges (see "Moving Cartridges (Recovery Moves)"). Then re-verify the design. -
If there are no warnings, proceed to "Committing Partitioning Changes".
Specifications for Single Library Partitioning
-
Up to eight partitions.
-
Smallest slot increment is one array.
-
Smallest drive increment is one drive.
Allocating Resources in a Partition for a Library Complex
-
Select the Tools > Partitions > Design (Step 3) tab.
-
Select a partition from the options in the upper left (if there are no partitions, see "Adding a Partition ID").
-
Select resources of the library. You can click the Rail or Library buttons, or click individual areas.
Note:
You can assign bulk CAPs to a partition. Bulk CAPs are the larger rectangles on the ends of each rail. An S indicates a shared CAP. -
Click Add (to allocate) or Delete (to unallocate).
-
Repeat steps 2-5 for each partition.
Note:
To re-assign a resource from one partition to another, you must remove the resource from the initial partition before re-allocating it. -
Proceed to "Committing Partitioning Changes".
Specifications of Library Complex Partitioning
-
Up to 16 partitions total, with a maximum of eight per library.
-
Smallest slot increment is a quarter rail (for example: the inner wall of rail 1 on the right side of the library)
-
Smallest drive increment is one drive.
-
Partition boundaries can span across pass-thru ports (PTPs).
Committing Partitioning Changes
No changes are made to the partitioning configuration until you complete these procedures.
-
To prevent configuration conflicts, you should make the library unavailable to other users and stop all host operations before committing partitioning changes.
-
Select the Commit (Step 4) tab.
-
Click Apply.
Caution:
If there are warnings, DO NOT commit the changes. Click Details >>. Then, perform recovery moves on the orphaned cartridges (see "Moving Cartridges (Recovery Moves)"). -
Update any affected host applications to recognize the changes (see the host software documentation).
Meaning of the SLC Partitioning Icons
Table 7-1 Library Partitioning Icons
| Icon | Description |
|---|---|
|
|
Available — area of rail not yet assigned to a partition |
|
|
Allocated — area of rail assigned to a partition |
|
|
Shared Bulk CAP |
|
Library complex partitioning only
|
Selected — area chosen for modification. Clicking Add assigns the area to a partition. Clicking Delete makes the area available to other partitions. |
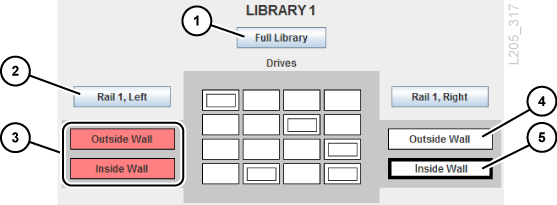
Figure Legend:
-
Selects the full library
-
Selects a half rail
-
Allocated half rail to red partition
-
Available quarter rail
-
Selected quarter rail (indicated by the thick black border)
Sharing CAPs in a Partitioned Library
In a partitioned library, hosts can share CAPs. Each host can reserve the CAP when needed, and then release the CAP when it is no longer required. A host can reserve a CAP if the CAP is empty, closed, locked, and not already reserved by another partition. CAP auto enter mode is disabled in partitioned libraries, because it interferes with the reservation system (see "Auto Enter Mode").
If the partition does not release the CAP reservation and you cannot terminate the enter or eject command in ACSLS or ELS, a library administrator must override the reservation (see "Overriding a CAP Reservation of a Partition").
Resolving Orphaned Cartridges Caused by Partitioning Changes
In partitioned libraries, an orphaned cartridge is in a slot not allocated to the original host. Orphaned cartridges can occur when you change the size of a partition, delete a partition, or move a cartridge to a slot or drive that is not allocated to a partition.
In a partitioned library, orphaned cartridges can cause data loss. A host that finds an orphaned cartridge in its partition may treat the cartridge as a scratch volume and overwrite the data.
SLC will warn you when it identifies orphaned cartridges. To resolve orphaned cartridges:
-
Generate a report of orphaned cartridges (see "Generating Active Capacity Reports" )
-
Audit the library (see "Auditing the Library")
-
Perform a recovery move on the cartridge (see "Moving Cartridges (Recovery Moves)")
Maximizing Library Performance when Partitioning
-
Partition storage slots in the largest blocks possible (rails, library sides, or library walls). Partition complete library rails to minimize the use of elevators. In a library complex, keep a partition contained within a library to minimize the use of PTPs.
-
For best access to drives, activate inner and outer library walls together.
-
Avoid partitioning individual drives and storage slot arrays. Individually select and deselect resources only when you need to fine-tune a capacity that has already been broadly defined in larger blocks.
-
For quicker enter and ejects, partition storage slots close to the CAPs. For quicker access to stored data, partition storage slots close to the drives.