29 Internationalizing and Localizing Pages
This chapter describes how to configure JSF pages or an application to display text in the correct language of a user's browser.
This chapter includes the following sections:
-
Section 29.1, "About Internationalizing and Localizing ADF Faces Pages"
-
Section 29.2, "Using Automatic Resource Bundle Integration in JDeveloper"
-
Section 29.3, "Manually Defining Resource Bundles and Locales"
-
Section 29.4, "Configuring Pages for an End User to Specify Locale at Runtime"
-
Section 29.5, "Configuring Optional ADF Faces Localization Properties"
29.1 About Internationalizing and Localizing ADF Faces Pages
Internationalization is the process of designing and developing products for easy adaptation to specific local languages and cultures. Localization is the process of adapting a product for a specific local language or culture by translating text and adding locale-specific components. A successfully localized application will appear to have been developed within the local culture. JDeveloper supports easy localization of ADF Faces components using the abstract class java.util.ResourceBundle to provide locale-specific resources.
When your application will be viewed by users in more than one country, you can configure your JSF page or application to use different locales so that it displays the correct language for the language setting of a user's browser. For example, if you know your page will be viewed in Italy, you can localize your page so that when a user's browser is set to use the Italian language, text strings in the browser page appear in Italian.
ADF Faces components may include text that is part of the component, for example the af:table component uses the resource string af_table.LABEL_FETCHING for the message text that displays in the browser while the af:table component fetches data during the initial load of data or while the user scrolls the table. JDeveloper provides automatic translation of these text resources into 28 languages. These text resources are referenced in a resource bundle. You must enable support for each language that you want your application to support by specifying the <supported-locale> element in the faces-config.xml file. For example, if you set the browser to use the language in Italy, and you add <supported-locale>it</supported-locale> to the faces-config.xml file, any text contained within the components will automatically be displayed in Italian. For more information, see Section 29.3.3, "How to Register Locales and Resource Bundles in Your Application."
For any text you add to a component, for example if you define the label of an af:commandButton component by setting the text attribute, you must provide a resource bundle that holds the actual text, create a version of the resource bundle for each locale, and add a <locale-config> element to define default and support locales in the application's faces-config.xml file. You must also add a <resource-bundle> element to your application's faces-config.xml file in order to make the resource bundles available to all the pages in your application. Once you have configured and registered a resource bundle, the Expression Language (EL) editor will display the key from the bundle, making it easier to reference the bundle in application pages.
To simplify the process of creating text resources for text you add to ADF components, JDeveloper supports automatic resource bundle synchronization for any translatable string in the visual editor. When you edit components directly in the visual editor or in the Property Inspector, text resources are automatically created in the base resource bundle. For more information, see Section 29.2, "Using Automatic Resource Bundle Integration in JDeveloper."
Note:
Any text retrieved from the database is not translated. This document explains how to localize static text, not text that is stored in the database.29.1.1 Internationalizing and Localizing Pages Use Cases and Examples
Assume, for example, that you have a page with a title of My Purchase Requests. Rather than set the literal string, My Purchase Requests, as the value of the af:panelPage component's title attribute, you bind the value of the title attribute to a key in the UIResources resource bundle. The UIResources resource bundle is registered in the faces-config.xml file for the application, as shown in Example 29-1.
Example 29-1 Resource Bundle Element in JSF Configuration File
<resource-bundle>
  <var>res</var>
  <base-name>resources.UIResources</base-name>
</resource-bundle>
The resource bundle is given a variable name (in this case, res) that can then be used in EL expressions. On the page, the title attribute of the af:panelPage component is then bound to the myDemo.pageTitle key in that resource bundle, as shown in Example 29-2.
Example 29-2 Component Text Referencing Resource Bundle
<af:panelPage text="#{res['myDemo.pageTitle']}
The UIResources resource bundle has an entry in the English language for all static text displayed on each page in the application, as well as for text for messages and global text, such as generic labels. Example 29-3 shows the keys for the myDemo page.
Example 29-3 Resource Bundle Keys for the myDemo Page Displayed in English
#myDemo Screen
myDemo.pageTitle=My Purchase Requests
myDemo.menubar.openLink=Open Requests
myDemo.menubar.pendingLink=Requests Awaiting customer
myDemo.menubar.closedLink=Closed Requests
myDemo.menubar.allRequests=All Requests
myDemo.menubar.newLink=Create New Purchase Request
myDemo.selectAnd=Select and
myDemo.buttonbar.view=View
myDemo.buttonbar.edit=Edit
Note that text in the banner image and data retrieved from the database are not translated.
Example 29-4 shows the resource bundle version for the Italian (Italy) locale, UIResources_it. Note that there is not an entry for the selection facet's title, yet it was translated from Select to Seleziona automatically. That is because this text is part of the ADF Faces table component's selection facet.
Example 29-4 Resource Bundle Keys for the myDemo Page Displayed in Italian
#myDemo Screen
myDemo.pageTitle=Miei Ticket
myDemo.menubar.openLink=Ticket Aperti
myDemo.menubar.pendingLink=Ticket in Attesa del Cliente
myDemo.menubar.closedLink=Ticket Risolti
myDemo.menubar.allRequests=Tutti i Ticket
myDemo.menubar.newLink=Creare Nuovo Ticket
myDemo.selectAnd=Seleziona e
myDemo.buttonbar.view=Vedere Dettagli
myDemo.buttonbar.edit=Aggiorna
29.1.2 Additional Functionality for Internationalizing and Localizing Pages
You may find it helpful to understand other ADF Faces features before you internationalize or localize your application. Additionally, once you have internationalized or localized your application, you may find that you need to add functionality such as accessibility or render ADF Faces components from right to left. Following are links to other functionality that you can use.
-
Using parameters in text: You can use the ADF Faces EL format tags if you want the text displayed in a component to contain parameters that will resolve at runtime. For more information, see Section 3.5.2, "How to Use the EL Format Tags."
-
Pseudo-classes: ADF skins support a number of pseudo-classes that you can use to change how an application renders in a particular locale. For example, the
:rtlpseudo-class renders ADF Faces components from right to left. This may be useful if your application is localized into languages, such as Arabic and Hebrew, that read from right to left. For more information, see Chapter 28, "Customizing the Appearance Using Styles and Skins." -
Accessibility: You can make the pages in your application accessible. For more information, see Chapter 30, "Developing Accessible ADF Faces Pages."
-
Global resource strings: The default resource bundle stores the global resource strings that ADF Faces components support and the resource strings that are specific to individual components. For information about these resource strings, see the Oracle Fusion Middleware Tag Reference for Oracle ADF Faces Skin Selectors.
29.2 Using Automatic Resource Bundle Integration in JDeveloper
By default, JDeveloper supports the automatic creation of text resources in the default resource bundle when editing ADF Faces components in the visual editor. To treat user-defined strings as static values, disable Automatically Synchronize Bundle in the Project Properties dialog, as described in Section 29.2.1, "How to Set Resource Bundle Options".
Automatic resource bundle integration can be configured to support one resource bundle per page or project, or multiple shared bundles.
You can edit translatable text strings using any one of the following methods:
-
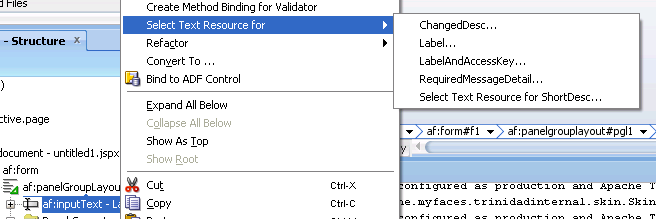
In the Structure window, right-click the component for which you want to enter translatable text strings. Choose Select Text Resource for followed by the translatable item for which you want to enter text. For example, Figure 29-1 shows the context menu that appears when you right-click an
af:inputTextcomponent. -
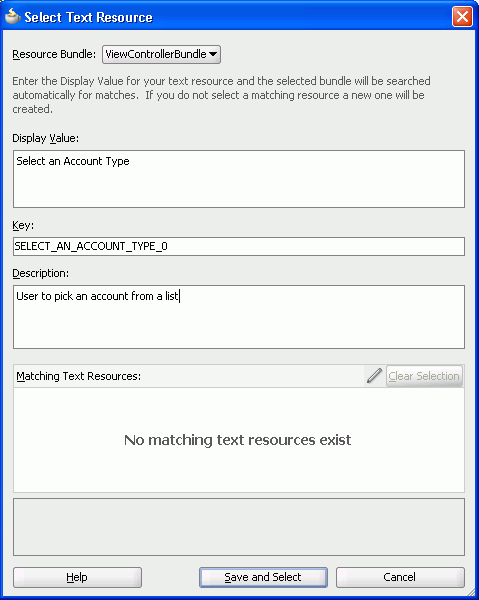
From the text input window, choose Select Text Resource to launch the Select Text Resource dialog, as shown in Figure 29-2. The dialog can also be accessed by right-clicking the component and choosing Select Text Resource for, or from the Property Inspector, by clicking the icon to the right of a translatable property and selecting Select Text Resource.
-
From the text input window, select Expression Builder to launch the Expression Builder dialog. The dialog can also be accessed from the Property Inspector by clicking the icon to the right of a translatable property and selecting Expression Builder.
-
In the Property Inspector, enter a valid expression language string for a translatable property.
Note:
JDeveloper only writes strings to a resource bundle that you enter using one of the previously-listed methods.
29.2.1 How to Set Resource Bundle Options
After you have created a project, you can set resource bundle options in the Project Properties dialog.
It may help to understand how JDeveloper manages resource bundles. For more information, see Section 29.2, "Using Automatic Resource Bundle Integration in JDeveloper."
You may also find it helpful to understand functionality that can be added using other Oracle ADF features. For more information, see Section 29.1.2, "Additional Functionality for Internationalizing and Localizing Pages."
To set resource bundle options for a project:
-
In the Application Navigator, double-click the project.
-
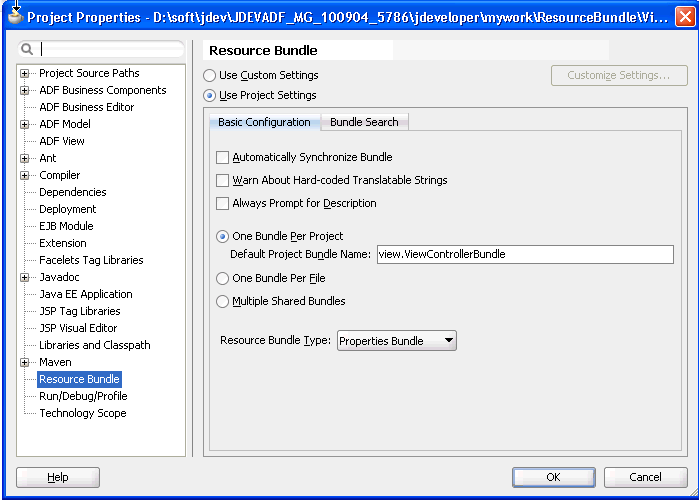
In the Project Properties dialog, select Resource Bundle to display the resource bundle options, as shown in Figure 29-3.
-
If you want JDeveloper to automatically generate a default resource file, select Automatically Synchronize Bundle.
-
Select one of the following resource bundle file options:
-
One Bundle Per Project - configured in a file named
<ProjectName>.properties. -
One Bundle Per File - configured in a file
named <FileName>.properties. -
Multiple Shared Bundles.
-
-
Select the resource bundle type from the dropdown list:
-
XML Localization Interchange File Format (XLIFF) Bundle
-
List Resource Bundle
-
Properties Bundle
-
-
Click OK.
29.2.2 What Happens When You Set Resource Bundle Options
JDeveloper generates one or more resource bundles of a particular type based on the selections that you make in the resource bundle options part of the Project Properties dialog, as illustrated in Figure 29-3. It generates a resource bundle the first time that you invoke the Select Text Resource dialog illustrated in Figure 29-2.
Assume, for example, that you select the One Bundle Per Project checkbox and the List Resource Bundle value from the Resource Bundle Type dropdown list. The first time that you invoke the Select Text Resource dialog, JDeveloper generates one resource bundle for the project. The generated resource bundle is a Java class named after the default project bundle name in the Project Properties dialog (for example, ViewControllerBundle.java).
JDeveloper generates a resource bundle as an .xlf file if you select the XML Localization Interchange File Format (XLIFF) Bundle option and a .properties file if you select the Properties Bundle option.
By default, JDeveloper creates the generated resource bundle in the view subdirectory of the project's Application Sources directory.
29.2.3 How to Create an Entry in a JDeveloper-Generated Resource Bundle
JDeveloper generates one or more resource bundles based on the values you select in the resource bundle options part of the Project Properties dialog. It generates a resource bundle the first time that you invoke the Select Text Resource dialog from a component property in the Property Inspector.
JDeveloper writes key-value pairs to the resource bundle based on the values that you enter in the Select Text Resource dialog. It also allows you to select an existing key-value pair from a resource bundle to render a runtime display value for a component.
It may help to understand how JDeveloper manages resource bundles. For more information, see Section 29.2, "Using Automatic Resource Bundle Integration in JDeveloper."
You may also find it helpful to understand functionality that can be added using other Oracle ADF features. For more information, see Section 29.1.2, "Additional Functionality for Internationalizing and Localizing Pages."
To create an entry in the resource bundle generated by JDeveloper:
-
In the JSF page, select the component for which you want to write a runtime value.
For example, select an
af:inputTextcomponent. -
In the Property Inspector, use a property's dropdown list to select Select Text Resource to create a new entry in the resource bundle.
The Select Text Resource entry in the dropdown list only appears for properties that support text resources. For example, the Label property of an
af:inputTextcomponent. -
Write the value that you want to appear at runtime in the Display Value input field, as illustrated in Figure 29-2.
JDeveloper generates a value in the Key input field.
-
Optionally, write a description in the Description input field.
Note:
JDeveloper displays a matching text resource in the Matching Text Resource field if a text resource exists that matches the value you entered in the Display Value input field exists. -
Click Save and Select.
29.2.4 What Happens When You Create an Entry in a JDeveloper-Generated Resource Bundle
JDeveloper writes the key-value pair that you define in the Select Text Resource dialog to the resource bundle. The options that you select in the resource bundle options part of the Project Properties dialog determine what type of resource bundle JDeveloper writes the key-value pair to. For more information, see Section 29.2.2, "What Happens When You Set Resource Bundle Options".
The component property for which you define the resource bundle entry uses an EL expression to retrieve the value from the resource bundle at runtime. For example, an af:inputText component's Label property may reference an EL expression similar to the following:
#{viewcontrollerBundle.NAME}
where viewcontrollerBundle references the resource bundle and NAME is the key for the runtime value.
29.3 Manually Defining Resource Bundles and Locales
A resource bundle contains a number of named resources, where the data type of the named resources is String. A bundle may have a parent bundle. When a resource is not found in a bundle, the parent bundle is searched for the resource. Resource bundles can be either Java classes, property files, or XLIFF files. The abstract class java.util.ResourceBundle has two subclasses: java.util.PropertyResourceBundle and java.util.ListResourceBundle. A java.util.PropertyResourceBundle is stored in a property file, which is a plain-text file containing translatable text. Property files can contain values only for String objects. If you need to store other types of objects, you must use a java.util.ListResourceBundle class instead.
For more information about using XLIFF, see http://docs.oasis-open.org/xliff/xliff-core/xliff-core.html
To add support for an additional locale, replace the values for the keys with localized values and save the property file, appending a language code (mandatory) and an optional country code and variant as identifiers to the name, for example, UIResources_it.properties.
The java.util.ListResourceBundle class manages resources in a name and value array. Each java.util.ListResourceBundle class is contained within a Java class file. You can store any locale-specific object in a java.util.ListResourceBundle class. To add support for an additional locale, you create a subclass from the base class, save it to a file with a locale or language extension, translate it, and compile it into a class file.
The ResourceBundle class is flexible. If you first put your locale-specific String objects in a java.util.PropertyResourceBundle file, you can still move them to a ListResourceBundle class later. There is no impact on your code, because any call to find your key will look in both the java.util.ListResourceBundle class and the java.util.PropertyResourceBundle file.
The precedence order is class before properties. So if a key exists for the same language in both a class file and a property file, the value in the class file will be the value presented to you. Additionally, the search algorithm for determining which bundle to load is as follows:
-
(baseclass)+(specific language)+(specific country)+(specific variant)
-
(baseclass)+(specific language)+(specific country)
-
(baseclass)+(specific language)
-
(baseclass)+(default language)+(default country)+(default variant)
-
(baseclass)+(default language)+(default country)
-
(baseclass)+(default language)
For example, if your browser is set to the Italian (Italy) locale and the default locale of the application is US English, the application attempts to find the closest match, looking in the following order:
-
it_IT
-
it
-
en_US
-
en
-
The base class bundle
Tip:
ThegetBundle method used to load the bundle looks for the default locale classes before it returns the base class bundle. If it fails to find a match, it throws a MissingResourceException error. A base class with no suffixes should always exist as a default. Otherwise, it may not find a match and the exception is thrown.29.3.1 How to Define the Base Resource Bundle
You must create a base resource bundle that contains all the text strings that are not part of the components themselves. This bundle should be in the default language of the application. You can create a resource bundle as a property file, as an XLIFF file, or as a Java class. After a resource bundle file has been created, you can edit the file using the Edit Resource Bundles dialog.
It may help to understand what types of resource bundle you can create. For more information, see Section 29.3, "Manually Defining Resource Bundles and Locales."
You may also find it helpful to understand functionality that can be added using other Oracle ADF features. For more information, see Section 29.1.2, "Additional Functionality for Internationalizing and Localizing Pages."
To create a resource bundle as a property file or an XLIFF file:
-
In JDeveloper, create a new file.
-
In the Application Navigator, right-click where you want the file to be placed and choose New from the context menu to open the New Gallery.
Note:
If you are creating a localized version of the base resource bundle, save the file to the same directory as the base file. -
In the Categories tree, select General, and in the Items list, select File. Click OK.
-
In the Create File dialog, enter a name for the file using the convention
<name><_lang>.propertiesfor the using the properties file or <name><_lang>.xlf for using the XLIFF file, where the<_lang>suffix is provided for translated files, as in_defor German, and omitted for the base language.Note:
If you are creating a localized version of a base resource bundle, you must append the ISO 639 lowercase language code to the name of the file. For example, the Italian version of theUIResourcesbundle isUIResources_it.properties. You can add the ISO 3166 uppercase country code (for example it_CH, for Switzerland) if one language is used by more than one country. You can also add an optional nonstandard variant (for example, to provide platform or region information).If you are creating the base resource bundle, do not append any codes.
-
-
Enter the content for the file. You can enter the content manually by entering the key-value pairs. You can use the Edit Resource Bundle dialog to enter the key-value pairs, as described in Section 29.3.2, "How to Edit a Resource Bundle File".
-
If you are creating a property file, create a key and value for each string of static text for this bundle. The key is a unique identifier for the string. The value is the string of text in the language for the bundle. If you are creating a localized version of the base resource bundle, any key not found in this version will inherit the values from the base class.
Note:
All non-ASCII characters must be UNICODE-escaped or the encoding must be explicitly specified when compiling, for example:javac -encoding ISO8859_5 UIResources_it.java
For example, the key and the value for the title of the myDemo page is:
myDemo.pageTitle=My Purchase Requests
-
If you are creating an XLIFF file, enter the proper tags for each key-value pair. For example:
<?xml version="1.0" encoding="windows-1252" ?>
<xliff version="1.1" xmlns="urn:oasis:names:tc:xliff:document:1.1">
  <file source-language="en" original="myResources" datatype="xml">
    <body>
      <trans-unit id="NAME">
        <source>Name</source>
        <target/>
        <note>Name of employee</note>
      </trans-unit>
      <trans-unit id="HOME_ADDRESS">
        <source>Home Address</source>
        <target/>
        <note>Adress of employee</note>
      </trans-unit>
      <trans-unit id="OFFICE_ADDRESS">
        <source>Office Address</source>
        <target/>
        <note>Office building </note>
      </trans-unit>
    </body>
  </file>
</xliff>
-
-
After you have entered all the values, click OK.
To create a resource bundle as a Java class:
-
In JDeveloper, create a new Java class:
-
In the Application Navigator, right-click where you want the file to be placed and choose New to open the New Gallery.
Note:
If you are creating a localized version of the base resource bundle, it must reside in the same directory as the base file. -
In the Categories tree, select General, and in the Items list, select Java Class. Click OK.
-
In the Create Java Class dialog, enter a name and package for the class. The class must extend
java.util.ListResourceBundle.Note:
If you are creating a localized version of a base resource bundle, you must append the ISO 639 lowercase language code to the name of the class. For example, the Italian version of theUIResourcesbundle might beUIResources_it.java. You can add the ISO 3166 uppercase country code (for example it_CH, for Switzerland) if one language is used by more than one country. You can also add an optional nonstandard variant (for example, to provide platform or region information).If you are creating the base resource bundle, do not append any codes.
-
-
Implement the
getContents()method, which simply returns an array of key-value pairs. Create the array of keys for the bundle with the appropriate values. Or use the Edit Resource Bundles dialog to automatically generate the code, as described in Section 29.3.2, "How to Edit a Resource Bundle File". Example 29-5 shows a base resource bundle Java class.Note:
Keys must beStringobjects. If you are creating a localized version of the base resource bundle, any key not found in this version will inherit the values from the base class.
29.3.2 How to Edit a Resource Bundle File
After you have created a resource bundle property file, XLIFF file, or Java class file, you can edit it using the source editor.
It may help to understand what types of resource bundles you can define and edit. For more information, see Section 29.3, "Manually Defining Resource Bundles and Locales."
You may also find it helpful to understand functionality that can be added using other Oracle ADF features. For more information, see Section 29.1.2, "Additional Functionality for Internationalizing and Localizing Pages."
To edit a resource bundle after it has been created:
-
In JDeveloper, choose Application > Edit Resource Bundles from the main menu.
-
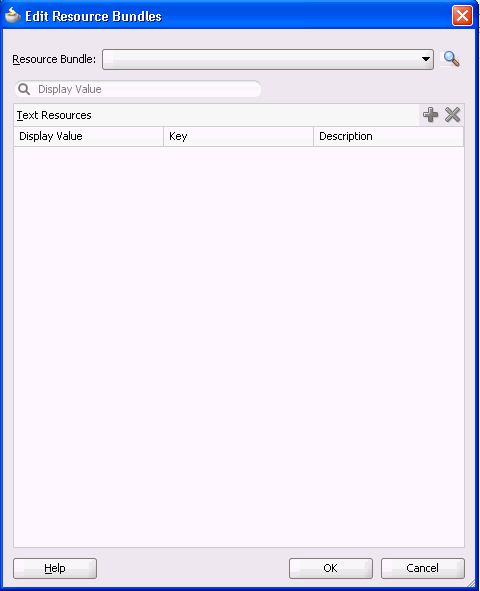
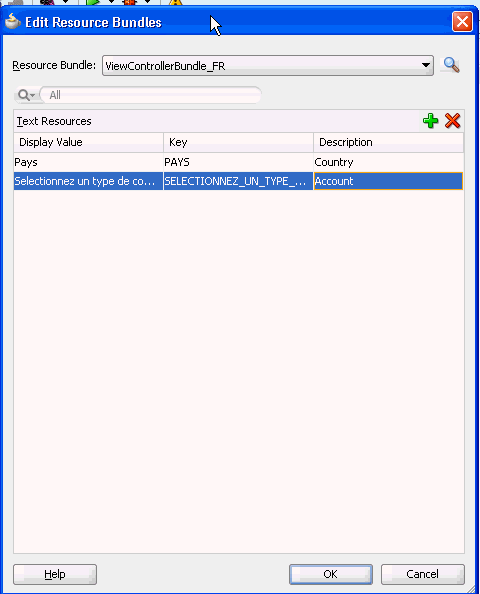
In the Edit Resource Bundles dialog, select the resource bundle file you want to edit from the Resource Bundle dropdown list, as shown in Figure 29-4, or click the Search icon to launch the Select Resource Bundle dialog.
-
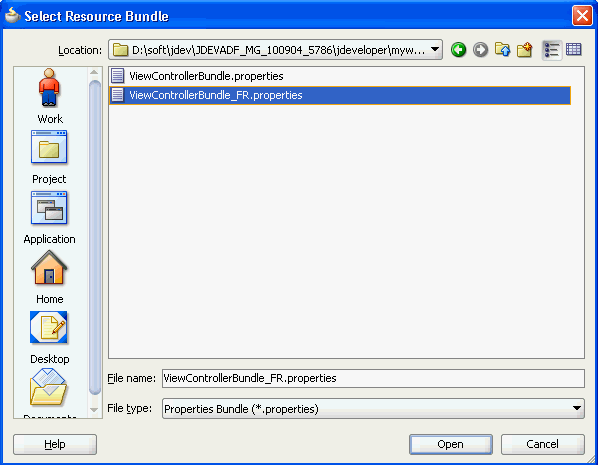
In the Select Resource Bundle dialog, select the file type from the File type dropdown list. Navigate to the resource bundle you want to edit, as shown in Figure 29-5. Click OK.
-
In the Edit Resource Bundles dialog, click the Add icon to add a key-value pair, as shown in Figure 29-6. When you have finished, click OK.
29.3.3 How to Register Locales and Resource Bundles in Your Application
You must register the locales and resource bundles used in your application in the faces-config.xml file.
It may help to understand how you can manually manage resource bundles. For more information, see Section 29.3, "Manually Defining Resource Bundles and Locales."
You may also find it helpful to understand functionality that can be added using other Oracle ADF features. For more information, see Section 29.1.2, "Additional Functionality for Internationalizing and Localizing Pages."
To register a locale for your application:
-
Open the
faces-config.xmlfile and click the Overview tab in the editor window. Thefaces-config.xmlfile is located in the<View_Project>/WEB-INFdirectory. -
In the editor window, select Application.
-
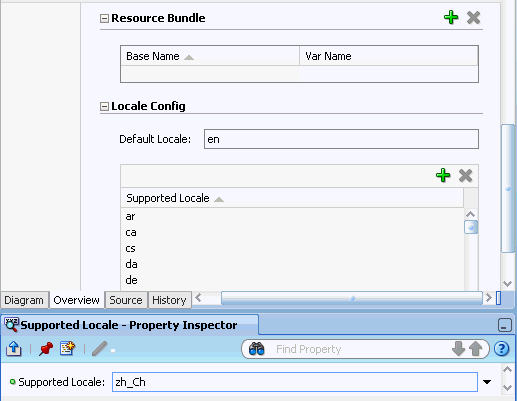
In the Locale Config area, click Add to open the Property Inspector to add the code for the locale, as shown in Figure 29-7.
After you have added the locales, the
faces-config.xmlfile should have code similar to the following:<locale-config> <default-locale>en</default-locale> <supported-locale>ar</supported-locale> <supported-locale>ca</supported-locale> <supported-locale>cs</supported-locale> <supported-locale>da</supported-locale> <supported-locale>de</supported-locale> <supported-locale>zh_Ch</supported-locale> </locale-config>
To register the resource bundle:
-
Open the
faces-config.xmlfile and click the Overview tab in the editor window. Thefaces-config.xmlfile is located in the<View_Project>/WEB-INFdirectory. -
In the editor window, select Application.
-
In the Resource Bundle section, click Add to enable editor input. Enter the fully qualified name of the base bundle that contains messages to be used by the application and a variable name that can be used to reference the bundle in an EL expression, as shown in Figure 29-8.
After you have added the resource bundle, the
faces-config.xmlfile should have code similar to the following:<resource-bundle> <base-name>oracle.fodemo.storefront.StoreFrontUIBundle</base-name> <var>res</var> </resource-bundle>
29.3.4 How to Use Resource Bundles in Your Application
You set your page encoding and response encoding to all supported languages and you bind to the resource bundle.
It may help to understand how you can manually manage resource bundles. For more information, see Section 29.3, "Manually Defining Resource Bundles and Locales."
You may also find it helpful to understand functionality that can be added using other Oracle ADF features. For more information, see Section 29.1.2, "Additional Functionality for Internationalizing and Localizing Pages."
To use a base resource bundle on your page:
-
Set your page encoding and response encoding to be a superset of all supported languages. If no encoding is set, the page encoding defaults to the value of the response encoding set using the
contentTypeattribute of the page directive. Example 29-6 shows the encoding for a sample page.Example 29-6 Page and Response Encoding
<?xml version='1.0' encoding='UTF-8'?>
<jsp:root xmlns:jsp="http://java.sun.com/JSP/Page" version="2.1"
          xmlns:f="http://java.sun.com/jsf/core"
          xmlns:h="http://java.sun.com/jsf/html"
          xmlns:af="http://xmlns.oracle.com/adf/faces/rich">
    <jsp:directive.page contentType="text/html;charset=UTF-8"/>
    <f:view>
-
Bind all attributes that represent strings of static text displayed on the page to the appropriate key in the resource bundle, using the variable defined in the
faces-config.xmlfile for the<resource-bundle>element. Example 29-7 shows the code for the View button on the myDemo page.Example 29-7 Binding to a Resource Bundle
<af:commandButton text="#{res['myDemo.buttonbar.view']}"
                  . . . />
Tip:
If you type the following syntax in the source editor, JDeveloper displays a dropdown list of the keys that resolve to strings in the resource bundle:<af:commandButton text="#{res.JDeveloper completes the EL expression when you select a key from the dropdown list.
-
You can also use the
adfBundlekeyword to resolve resource strings from specific resource bundles as EL expressions in the JSF page.The usage format is
#{adfBundle[bundleID] [resource_Key]}, wherebundleIDis the fully qualified bundle ID, such asproject.EmpMsgBundle, andresource_Keyis the resource key in the bundle, such asDeptno_LABEL. Example 29-8 shows howadfBundleis used to provide the button text with a resource strings from a specific resource bundle.
29.3.5 What You May Need to Know About ADF Skins and Control Hints
If you use an ADF skin and have created a custom resource bundle for the skin, you must also create localized versions of the resource bundle. Similarly, if your application uses control hints to set any text, you must create localized versions of the generated resource bundles for that text.
29.3.6 What You May Need to Know About Overriding a Resource Bundle in a Customizable Application
If you are developing a customizable application using the Oracle Metadata Services (MDS) framework and you create a resource bundle (an override bundle) that overrides key-value pairs from the base resource bundle, you need to configure your application's adf-config.xml file to support the overriding of the base resource bundle. An override bundle is a resource bundle that contains the key-value pairs that differ from the base resource bundle that you want to use in your customizable application. If, for example, you have a base bundle with the name oracle.demo.CustAppUIBundle, you configure an entry in your application's adf-config.xml file as shown in Example 29-9 to make it overrideable. Once it is marked as overriden, any customizations of that bundle will be stored in your application's override bundle.
Example 29-9 Entry for Override Bundle in adf-config.xml File
<adf-resourcebundle-config xmlns="http://xmlns.oracle.com/adf/resourcebundle/config">
  <applicationBundleName>oracle/app.../xliffBundle/FusionAppsOverrideBundle</applicationBundleName>
  <bundleList>
    <bundleId override="true">oracle.demo.CustAppUIBundle</bundleId>
  </bundleList>
</adf-resourcebundle-config>
For more information about the adf-config.xml file, see Section A.4, "Configuration in adf-config.xml." For more information about creating customizable applications using MDS, see the "Customizing Applications with MDS" chapter of the Oracle Fusion Middleware Fusion Developer's Guide for Oracle Application Development Framework.
29.4 Configuring Pages for an End User to Specify Locale at Runtime
You can configure an application so end users can specify the locale at runtime rather than the default behavior where the locale settings of the end user's browser determine the runtime locale. Implement this functionality if you want your application to allow end users to specify their preferred locale and save their preference.
29.4.1 How to Configure a Page for an End User to Specify Locale
Create a new page or open an existing page. Configure it so that:
-
It references a backing bean to store locale information
-
An end user can invoke a control at runtime to update the locale information in the backing bean
-
The
localeattribute of thef:viewtag references the backing bean
It may help to understand the configuration options available to you. For more information, see Section 29.4, "Configuring Pages for an End User to Specify Locale at Runtime."
You may also find it helpful to understand functionality that can be added using other Oracle ADF features. For more information, see Section 29.1.2, "Additional Functionality for Internationalizing and Localizing Pages."
To configure a page for an end user to specify locale:
-
Create a page with a backing bean to store locale information.
For more information, see Section 3.4.1, "How to Create JSF Pages".
-
Provide a control (for example, a
selectOneChoicecomponent) that an end user can use to change locale.For example, in the ADF Faces page of the Component Palette, from the Text and Selection panel, drag a Choice component and drop it on the page.
-
Bind the control to a backing bean that stores the locale value, as illustrated in the following example.
<af:selectOneChoice label="Select Locale" binding="#{backingBeanScope.backing_changeLocale.soc1}" id="soc1"> <af:selectItem label="French" value="FR" binding="#{backingBeanScope.backing_changeLocale.si1}" id="si1"/> ... </af:selectOneChoice> -
Bind the
localeattribute of thef:viewtag to the locale value in the backing bean.-
In the Structure window for the JSF page, right-click the
f:viewtag and choose Go to Properties. -
In the Property Inspector, use the dropdown menu next to the locale attribute to open the Expression Builder.
-
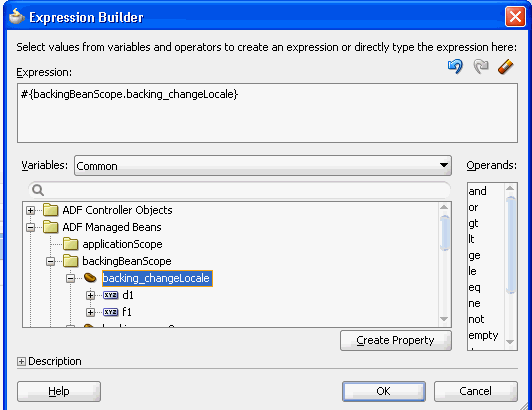
Use the Expression Builder to bind to the locale value in the backing bean, as shown in Figure 29-9.
-
-
Save the page.
29.4.2 What Happens When You Configure a Page to Specify Locale
JDeveloper generates a reference to the backing bean for the command component that you use to change the locale. Example 29-10 shows an example using the selectOneChoice component.
Example 29-10 selectOneChoice Component Referencing a Backing Bean
<af:selectOneChoice label="Select Locale"
    binding="#{backingBeanScope.backing_changeLocale.soc1}"
    id="soc1">
          <af:selectItem label="French" value="FR"
                 binding="#{backingBeanScope.backing_changeLocale.si1}"
                 id="si1"/>
          ...
</af:selectOneChoice>
JDeveloper also generates the required methods in the backing bean for the page. Example 29-11 shows extracts for the backing bean that correspond to Example 29-10.
Example 29-11 Backing Bean Methods to Change Locale
package view.backing;

...
import oracle.adf.view.rich.component.rich.input.RichSelectOneChoice;

public class ChangeLocale {
    ...
    ...
    private RichSelectOneChoice soc1;
        ...

    ...

    ...
    public void setD2(RichDocument d2) {
        this.d2 = d2;
    }

    ...

    public void setSoc1(RichSelectOneChoice soc1) {
        this.soc1 = soc1;
    }

    public RichSelectOneChoice getSoc1() {
        return soc1;
    }

    public void setSi1(RichSelectItem si1) {
        this.si1 = si1;
    }
...
}
29.4.3 What Happens at Runtime When an End User Specifies a Locale
At runtime, an end user invokes the command component you configured to change the locale of the application. The backing bean stores the updated locale information. Pages where the locale attribute of the f:view tag reference the backing bean render using the locale specified by the end user.
The locale specified by the end user must be registered with your application. For more information about specifying a locale and associated resource bundles, see Section 29.3.3, "How to Register Locales and Resource Bundles in Your Application".
29.5 Configuring Optional ADF Faces Localization Properties
Along with providing text translation, ADF Faces also automatically provides other types of translation, such as currency codes and support for bidirectional rendering (also known as BiDi support). The application will automatically be displayed appropriately, based on the user's selected locale. However, you can also manually set the following localization settings for an application in the trinidad-config.xml file:
-
<currency-code>: Defines the default ISO 4217 currency code used byoracle.adf.view.faces.converter.NumberConverterto format currency fields that do not specify a currency code in their own converter. -
<number-grouping-separator>: Defines the separator used for groups of numbers (for example, a comma). ADF Faces automatically derives the separator from the current locale, but you can override this default by specifying a value in this element. If set, this value is used byoracle.adf.view.faces.converter.NumberConverterwhile it parses and formats. -
<decimal-separator>: Defines the separator used for the decimal point (for example, a period or a comma). ADF Faces automatically derives the separator from the current locale, but you can override this default by specifying a value in this element. If set, this value is used byoracle.adf.view.faces.converter.NumberConverterwhile it parses and formats. -
<right-to-left>: Defines the direction in which text appears in a page. ADF Faces supports bidirectional rendering and automatically derives the rendering direction from the current locale, but you can explicitly set the default page rendering direction by using the valuestrueorfalse. -
<time-zone>: Defines the time zone appropriate to the selected locale. ADF Faces automatically uses the time zone used by the client browser. This value is used byoracle.adf.view.faces.converter.DateTimeConverterwhen it convertsStringtoDate. -
<formatting-locale>: Defines the date and number format appropriate to the selected locale. ADF Faces and Trinidad, will by default, format dates and numbers in the same locale used for localized text. If you want dates and numbers formatted in a different locale, you can use an IANA-formatted locale (for example, ja, fr-CA). The contents of this element can also be an EL expression pointing at an IANA string or ajava.util.Localeobject.
29.5.1 How to Configure Optional Localization Properties
You can configure optional localization properties by entering elements in the trinidad-config.xml file.
It may help to understand what optional localization properties you can modify. For more information, see Section 29.3, "Manually Defining Resource Bundles and Locales."
You may also find it helpful to understand functionality that can be added using other Oracle ADF features. For more information, see Section 29.1.2, "Additional Functionality for Internationalizing and Localizing Pages."
To configure optional localization properties:
-
Open the
trinidad-config.xmlfile. The file is located in the<View_Project>/WEB-INFdirectory. -
From the Component Palette, drag the element you wish to add to the file into the Structure window. An empty element is added to the page.
-
Enter the desired value.
Example 29-12 shows a sample trinidad-config.xml file with all the optional localization elements set.
Example 29-12 Configuring Currency Code and Separators for Numbers and Decimal Point
<!-- Set the currency code to US dollars. -->
<currency-code>USD</currency-code>

<!-- Set the number grouping separator to period for German -->
<!-- and comma for all other languages -->
<number-grouping-separator>
 #{view.locale.language=='de' ? '.' : ','}
</number-grouping-separator>

<!-- Set the decimal separator to comma for German -->
<!-- and period for all other languages -->
<decimal-separator>
 #{view.locale.language=='de' ? ',' : '.'}
</decimal-separator>

<!-- Render the page right-to-left for Arabic -->
<!-- and left-to-right for all other languages -->
<right-to-left>
 #{view.locale.language=='ar' ? 'true' : 'false'}
</right-to-left>

<formatting-locale>
 #{request.locale}
</formatting-locale>

<!-- Set the time zone to Pacific Daylight Savings Time -->
<time-zone>PDT</time-zone>
