24 Configuring and Using Services
This chapter provides an overview of services and describes the procedures to configure and monitor services with Enterprise Manager. It contains the following sections:
24.1 Introduction to Services
The critical and complex nature of today's business applications has made it very important for IT organizations to monitor and manage application service levels at high standards of availability. Problems faced in an enterprise include service failures and performance degradation. Since these services form an important type of business delivery, monitoring these services and quickly correcting problems before they can impact business operations is crucial in any enterprise.
Enterprise Manager provides a comprehensive monitoring solution that helps you to effectively manage services from the overview level to the individual component level. When a service fails or performs poorly, Enterprise Manager provides diagnostics tools that help to resolve problems quickly and efficiently, significantly reducing administrative costs spent on problem identification and resolution. Finally, customized reports offer a valuable mechanism to analyze the behavior of the applications over time.Enterprise Manager monitors not only individual components in the IT infrastructure, but also the applications hosted by those components, allowing you to model and monitor business functions using a top-down approach, or from an end-user perspective. If modeled correctly, services can provide an accurate measure of the availability, performance, and usage of the function or application they are modeling.
24.1.1 Defining Services in Enterprise Manager
A service is defined as an entity that provides a useful function to its users. Some examples of services include CRM applications, online banking, and e-mail services. Some simpler forms of services are business functions that are supported by protocols such as DNS, LDAP, POP, FTP or SMTP.
Enterprise Manager allows you to define one or more services that represent the business functions or applications that run in your enterprise. You can define these services by creating one or more tests that simulate common end-user functionality. You can also define services based on system targets, or on both system and service tests.
You can create service tests to proactively monitor your services. Using these tests, you can measure the performance and availability of critical business functions, receive notifications when there is a problem, identify common issues, and diagnose causes of failures.
You can define different types of service models based on your requirement. Some of the types of service models that you can create are:
-
Generic Service: A Generic Service is the simple service model you can create in Enterprise Manager. You can define one or more service models by associating service tests and/or associating relevant system targets that represent a critical business function.
-
Aggregate Service: A number of services can be combined together to form an Aggregate Service. Within the context of an Aggregate Service, the individual services are referred to as sub-services. An Aggregate Service can also be used as a sub-service to create other Aggregate Services.
An aggregate service must contain at least one of the following: member service, system, or test. The metrics can be promoted from a member service, or a system, or a test.
You can define other service models based on your requirement.
24.2 Creating a Service
Before you create a service, you must be familiar with the concepts of service management. You must also perform the following tasks:
-
Identify the locations where the Management Agents must be available to monitor the services using the appropriate service tests and protocols. For example, if your service includes HTTP based service tests or IMAP based service tests, ensure that the location of the Management Agent within your network architecture allows these tests. You must ensure that the Management Agents are installed at appropriate locations according to the network security (firewalls) and network routing guidelines.
Note that the beacon targets must already be created on the Management Agents before creating the service.
-
Discover all the components for your service so that they can be listed as Enterprise Manager targets.
-
Define systems on which the service is based.
You can create:
-
Generic Service - Test Based: You can create a service that is based on a type of service test such as ATS, CalDAV, DNS, FTP, and so on.
-
Generic Service - System Based: You can create a service that is based on a system or one or more system components.
-
Aggregate Service: An aggregate service consists of one or more sub services which can either test based or system based generic services.
24.2.1 Creating a Generic Service - Test Based
To create a test based generic service, follow these steps:
-
From the Targets menu, select Services. The Services main page is displayed.
-
From the Create menu, select Generic Service - Test Based. The Create Generic Service: General page appears.
-
Enter a name for the service and select a time zone in which the service has to be monitored. The availability of the service and the SLA computation is based on the time zone you select here. Click Next.
-
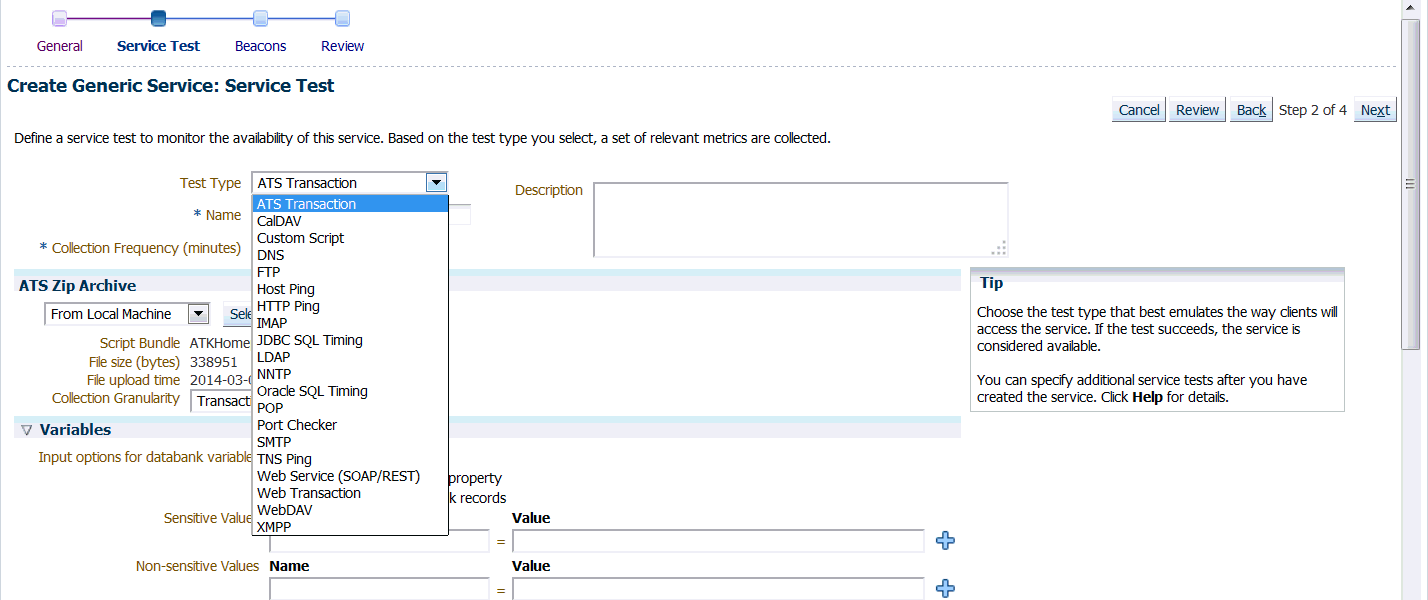
The Create Generic Service: Service Test page appears. Select a test from the Test Type drop down list.
Note:
If you select ATS Transaction test type, then in the ATS Zip Archive section you can import the files either from your local machine or from test repository. However, to use the latter, ensure that you have uploaded the test script to the test repository. For information on how to use the Test Repository, see Section 24.8. -
Depending on the test type you selected, enter the other parameters on this page and click Next. The Create Generic Service: Beacons page appears.
-
Click Add to add one or more beacons for monitoring the service. It is recommended that you use beacons that are strategically located in your key user communities in order for them to pro-actively test the availability of the service from those locations. If no beacons exist, you must create a new beacon. See Deploying and Using Beacons for details.
Notes:
-
Only a single beacon should be added from a Management Agent to monitor service tests. Adding multiple beacons from the same Management Agent to a service test is not recommended.
Beacons are targets that are used to monitor service tests, primarily to measure performance of the service or business function from a different geographic location. Thus, adding multiple beacons from the same Management Agent does not add any value.
-
Beacons marked as key beacons will be used to determine the availability of the service. The service is available if one or more service tests can be successfully executed from at least one key beacon.
-
It is recommended that you create the beacons before you create the service.
-
-
Click Next. The Create Generic Service: Review page appears. Review the information entered so far and click Finish to create the service. The newly created service appears on the main Services page.
24.2.2 Creating a Generic Service - System Based
To create a system based generic service, follow these steps:
-
From the Targets menu, select Services. The Services main page is displayed.
-
From the Create menu, select Generic Service - System Based. The Create Generic Service: General page appears.
-
Enter a name for the service and select a time zone for the service. Click Next. The Create Generic Service: System page appears. Select a system on which the service is to be based. A system refers to the infrastructure used to host the service. A system can consist of components such as hosts, databases, and other targets.
-
Click Next. The Create Generic Service: Review page appears. Review the information entered so far and click Submit to create the service. The newly created service appears on the main Services page.
24.2.3 Creating an Aggregate Service
Aggregate services consist of one or more services, called sub services or member services. A subservice is any service created in Enterprise Manager Cloud Control. The availability, performance, and usage for the aggregate service depend on the availability, performance, and usage for the individual sub services comprising the service. When creating an aggregate service, at the very least, either a system or one or more sub services must be associated. You can include both sub services and a system if required.
To create an aggregate service, follow these steps:
-
From the Targets menu, select Services. The Services main page is displayed.
-
From the Create menu, select Aggregate Service. The Create Aggregate Service: General page appears.
-
Enter a name for the aggregate service and select a time zone in which the service is to be monitored. The monitored data will be displayed in the selected time zone. Click Next.
-
The Create Aggregate Service: Services page appears. Click Add and select one or more member services (sub services) that are to be part of the aggregate service. You can add one or more test based, system based generic services, and one or more aggregate services. Click Next.
-
The Create Aggregate Service: System page appears. Select a system target on which the service is to be based. Associating a system with a service is not mandatory but is recommended. Features like Root Cause Analysis depend on key system components being correctly defined.
After you have created an aggregate service, you can add or remove its constituent sub services, modify the availability definition and add or delete performance or usage metrics.
WARNING:
If you delete or remove a subservice from an aggregate service, the aggregate service performance, usage, and business metrics may be affected if they are based on a deleted subservice's metrics.
24.3 Monitoring a Service
After a service has been defined, you can monitor the status of the service, view the availability history, performance, enabled SLAs, topology, and so on. This section describes the following:
-
Generic / Aggregate Service Home Page
-
Performance Incidents Page
-
SLA Dashboard
-
Test Summary
-
Topology
24.3.1 Viewing the Generic / Aggregate Service Home Page
To view the overview of the performance, availability, and usage of your service, click on a selected service in the main service pages. The Home page of the selected service appears. It contains the following regions:
-
General: In this region, you can view the current status of the service and the availability (%) over the last 24 hours. You can also view whether the availability is based on the service test, or the system. In the case of aggregate services, availability can also be based on the sub services. The Availability History chart shows the period of time for which the service was available, when it was down, in a blackout status, and so on.
-
Component Availability: This region shows the availability of the service tests or system components on which the service is based. Select the Show Only Key Tests check box to view only the key components or tests.
24.3.2 Viewing the Performance / Incidents Page
On this page, you can view charts for the performance and usage metrics defined for the service and drill down to view additional metric details.
Performance metrics to help you identify how well the service test is performing for each of the remote beacons. In general, the local beacon should have a very efficient and consistent response time because it is local to the Web application host. Remote beacons provide data to reflect the response time experienced by your application end users.
Usage metrics are used to measure the user demand or workload for the service. Usage metrics are collected based on the usage of the underlying system components on which the service is hosted. You can monitor the usage of a specific component or statistically calculate the average, minimum and maximum value from a set of components.
In the Incidents and Problems region, you can view any incidents or problems associated with the service.
24.3.3 Viewing the SLA Dashboard
This page displays the list of enabled SLAs for this service. For each SLA, you can see the following:
-
The current status of the SLA and its SLOs along with the service level value for the current SLA period.
-
The History column shows the SLA status for the last seven days.
-
The Violations column shows the actual, remaining, and total allowable SLA violation times for that SLO.
24.3.4 Viewing the Test Summary
The Test Reporting Dashboard shows the list of all the enabled tests for that particular service. Apart from the execution history of the tests over the last 24 hours, the most failed step of the test information is also displayed, both at the beacon level and at the test (aggregate) level.
The trend of the total time taken by the transaction is also displayed over the last 24 hours. Also, the breakdown of the step metrics are displayed for a particular transaction execution.
Use this page to see an overview of all the tests, by performance and issues, and to drill down to individual executions per beacon and drill down to transaction results with an execution.
How to Use This Page
By default, on arriving at this page, all the enabled tests are shown at the overall level. The most failed step information is displayed which shows the most failing step of the test across all executing beacons.
On expanding any test node in the tree-table, the beacon level execution summary is displayed showing the test execution history (last 24 hours) along with the information of the most failed step.
On clicking on the test node in the tree table, the transaction diagnostics region shows up in the lower part of page. If the parent node, that is the test (overall) node, is selected, then the diagnostics regions in the lower part show the aggregated data across all successfully executing beacons.
The left part of this region shows the transaction total time trend (last 24 hours) and has a time selector slider. The intention of this slider is to select the transaction/transaction period to see the step diagnostics region which occupies the right part of the lower region.
24.3.5 Viewing the Service Topology
The topology viewer provides a graphical representation of the components of your service. The topology viewer shows all dependent components and sub services, represented as icons, as well as the relationships between them, represented as links. For system components, only key components are displayed.
You can do the following:
-
View the relationship between the service and its dependencies, including other services, and system key components. All determinants for your service's availability are displayed in the Enterprise Manager Cloud Control Topology Viewer.
-
View the causes of service failure, as identified by Root Cause Analysis. Potential root causes and down targets are highlighted. Select highlighted links between components to view details on the cause of service failure. For more information, see About Root Cause Analysis. If you have installed and configured the SMARTS Network Adapter, the topology page shows the status of the network for your failed service as well. For more information on Network Manager Adapter plug-ins, refer to About the SMARTS Network Adapter.
For more details on the topology viewer, refer to the Enterprise Manager Online Help.
24.3.6 Sub Services
Aggregate services consist of one or more services, called sub services or member services. A subservice is any generic test based on system based service The availability, performance, and usage for the aggregate service depend on the availability, performance, and usage for the individual sub services comprising the service.
This page lists all the sub services that are part of the aggregate service. For each sub service, the status of the service, key components, incidents, and so on are displayed.
24.4 Configuring a Service
After you have created a service, you can define the service availability, associate a system with the service, define performance and usage metrics, and so on. This section describes the following:
-
Availability Definition
-
Root Cause Analysis Configuration
-
System Association
-
Service Tests and Beacons
-
Test Summary
-
Monitoring Settings for Tests
-
Usage Metrics
-
Performance Metrics
-
Edit Service Level Rule
24.4.1 Availability Definition (Generic and Aggregate Service)
The availability of a service indicates whether the service is available to the users at any given point in time. The rules for what constitutes availability may differ from one application to another. For example, for a Customer Relationship Management (CRM) application, availability may mean that a user can successfully log onto the application and access a sales report. For an e-mail application, it may be mean that the user can access the application, send and receive e-mails.
Click on the service for which you want to define the availability and navigate to the Service Home page. From the Generic Service menu, select Administration, then select Availability. The availability of a service can be based on:
-
Service Tests: Choose this option if the availability of your service is determined by the availability of a critical functionality to your end users. Examples of critical functions include accessing e-mail, generating a sales report, performing online banking transactions, and so on. While defining a service test, choose the protocol that most closely matches the critical functionality of your business process, and beacon locations that match the locations of your user communities.
You can define one or more service tests using standard protocols and designate one or more service tests as Key Tests. These key tests can be executed by one or more Key Beacons in different user communities. You can also indicate whether the service test is a key test by enabling the Key Service Test checkbox. Only key service tests are used to compute the availability of the service. You can then select the beacons that will be used to execute the key tests and determine the availability of the service. Depending on the definition, a service is considered available if all key service tests are successful or at least one key service test is successful. See Deploying and Using Beacons for details on beacons and how to create them.
You can specify whether the service should be available when:
-
All key service tests are successful (Default). This option is recommended.
-
At least one key service test is successful
Note:
A service test is considered available if it can be executed by at least one key beacon. If there are no key beacons, the service test will have an unknown status. -
-
System: The availability of a service can alternatively be based on the underlying system that hosts the service or selected components of the system. If availability is based on selected system components, you must select the components that are critical to running your service and designate one or more components as Key Components, which are used to determine the availability of the service. The service is considered available as long as at least one or all key components are up and running, depending on your availability definition.
You can specify whether the service should be available when:
-
All key components are up (Default)
-
At least one key component is up
You can also mark one or more components as key system components that will be used to compute the availability of the service. Key system components are used to determine the possible root cause of a service failure. For more information, refer to "Root Cause Analysis Configuration".
-
-
Sub Service: For an aggregate service, availability can also be based on the availability of the sub services. You can specify if availability should be determined based on the availability of all sub services or a single sub service.
24.4.2 Root Cause Analysis Configuration
You can use Root Cause Analysis (RCA) to filter a set of events to determine the cause of a higher level system, service, or application problem. RCA can help you to eliminate apparent performance problems that may otherwise appear to be root causes but which are only side effects or symptoms of the actual root cause of the problem, allowing you to quickly identify problem areas. You can view the RCA results on the Home page or Topology page of any service that is currently down. The Topology page gives you a graphical representation of the service, along with the system and component dependencies. Targets that have caused the service failure are highlighted in the Topology page.
Before running RCA, you can choose to:
-
Configure the tool to run automatically whenever a service fails.
-
Disable RCA by changing the default Analysis Mode to Manual.
-
Define component tests for the service and thresholds for individual tests.
To configure Root Cause Analysis, follow these steps:
-
From the Service Home page, click Monitoring Configuration.
-
From the Monitoring Configuration page, click Root Cause Analysis Configuration.
-
If the current mode is set to Automatic, click Set Mode Manual to disable RCA. If you choose to perform the analysis manually, you can perform the analysis from the Service home page at anytime by choosing Perform Analysis if the service is down. If the current mode is set for Manual, click Set Mode Automatic to enable RCA when the state of the service and its components change
-
Click the link in the Component Tests column of the table for the key component you want to manage. You can then manage the key components for the service on the Component Tests page by adding, removing, or editing component tests. When a service is down, you can drill down to the key components to verify the underlying issue. Refer to the Enterprise Manager Online Help for details on defining component tests.
Note:
When you disable RCA and set it back to automatic mode, RCA does not store the previous history results for you, thus providing no history for later reference.
24.4.2.1 Getting the Most From Root Cause Analysis
Root Cause Analysis (RCA) can provide you with great value by filtering through large amounts of data related to your services and identifying the most significant events that have occurred that are affecting your service's availability. If you are constructing your own services to manage in Enterprise Manager it is important that the services are defined with some thought and planning in order to get the most out of RCA.
The first item to consider in getting the most from RCA is the set of dependencies that your service has on other services or system components. Be sure to identify all of the system components that your service utilizes in order to accomplish its task. If you omit a key component and the service fails, RCA will not be able to identify that component as a possible cause. Conversely, if you include components in the service definition that the service does not actually depend on, RCA may erroneously identify the component as a cause of service failures.
When building service dependencies, keep in mind that you can take advantage of the aggregate service concept that is supported by Enterprise Manager. This allows you to break your service into smaller sub-services, each with its own set of dependencies. RCA considers the status of a sub-service (a service that you depend on) as well the system components or service on which the sub-service depends.
The second item to consider in getting the most from RCA is the use of component tests. As you define the system components that your service depends on, consider that there may be aspects of these components that may result in your service failure without the component itself failing. Component tests allow RCA to test the status not only of the target itself but also the status of its key aspects.
The RCA system allows you to create component tests based on any metric that is available for the key component. Remember, this includes any user-defined metrics that you have created for the component, allowing you great flexibility in how RCA tests the aspects of that component should your service fail. RCA can be configured to run in two modes. It can run automatically based on the failure of a service or can be configured to run manually. You can decide the mode based on the Expected Service Level Agreement % of the service being monitored. If the Expected Service Level Agreement % is high, you must select the automatic mode to ensure that that possible errors and the root cause of the failure is easily detected.
24.4.3 System Association
A system is the set of infrastructure components (hosts, databases, application servers, etc.) that work together to host your applications. For example, an e-mail application can be hosted by a database, listener, application server, and the hosts on which these components reside.
After you create a service, you can specify the associations between the components in the system to logically represent the connections or interactions between them. For example, you can define an association between the database and the listener to indicate the relationship between them. These associations are displayed in the topology viewer for the system. Some data centers have systems dedicated to one application or service. Alternatively, others have systems that host multiple services. You can associate single or multiple services to a System, based on how the data center is set up.
Use this page to select the Enterprise Manager system that will be used to host this service. You can do the following:
-
Add or select a system
-
Change or remove a selected system
After you have selected the system, mark one or more system components as key components that are critical for running the service. These key components are used to determine service availability or identify causes of service failure.
24.4.4 Monitoring Settings
For each service, you can define the frequency (which determines how often the service will be triggered against your application) and the performance thresholds. When a service exceeds its performance thresholds, an alert is generated.
To define metrics and thresholds, from the Generic Service menu, select Administration, then select Monitoring Settings for Tests. The Metric and Policy Settings page is displayed. Click the Monitoring Settings link. The Monitoring Settings - Thresholds page appears.
-
View By Metric, Beacon - In this view, you can click Add Beacon Overrides to override the default threshold values for one or more beacons. In this case, the default thresholds will only be used for beacons without any overrides. Any new beacons added to the service will use the default thresholds. Click Add Metric to add one or more metrics.
-
View By Beacon, Metric - In this view, you can click on the Default icon to toggle between Edit and View modes for a specific metric. In the Edit mode, you can modify the parameters of the metric. You can also modify the parameters of the metric for a specific beacon. In the View mode, the default parameters of the metric will be used.
Apart from these procedures, you can also define metrics at the step, and step group level for Web transactions. You can choose either of the following views:
-
View By Step, Metric, Beacon: In this view, you can click Add Beacon Overrides to override the default threshold values for one or more beacons. In this case, the default thresholds will only be used for beacons without any overrides. Any new beacons added to the Web transaction will use the default thresholds. Click Add Metric to define thresholds for one or more metrics. Incidents are generated only if the value of the Data Granularity property is set to 'Transaction' for the service tests. For more information on the Web transaction properties, refer to the Create / Edit Service Test - Web Transaction help page in the Enterprise Manager Online Help.
-
View By Step, Beacon, Metric: In this view, you can click on the Default icon to toggle between Edit and View modes for a specific metric. In the Edit mode, you can modify the parameters of the metric for a specific beacon. In the View mode, the default parameters of the metric will be used. Incidents are generated only if the value of the Data Granularity property is set to ' Step'.
-
To define the default collection frequency and collection properties, click the Collection Settings tab on the Monitoring Settings page. You can do the following:
-
Specify the default collection frequency for all the beacons. To override the collection frequency for a specific beacon, click Add Beacon Overrides.
-
Specify the collection properties and their corresponding values for one or more beacons.
Refer to the Enterprise Manager Online Help for more details on the defining the collection intervals and performance thresholds.
24.4.5 Service Tests and Beacons
You can add additional service tests and specify one or more beacons that will execute these service tests. To add a service test or modify an existing service test, click the Service Test and Beacons link in the Monitoring Configuration page. The Service Tests and Beacons page appears. You can select a test type from the drop down list and create a service test.
24.4.5.1 Defining Additional Service Tests
You can create different types of service tests based on the protocol and the location of the beacons. From the Service Tests and Beacons page, you can do the following:
-
Add one or more service tests for your service. Select the Test Type and click Add. Some of the test types that can be defined are ATS, FTP, Web Transaction, DNS, SOAP and others.
-
After you have created the service test, you must enable it. If your service test is not enabled, it will not be executed by any of the beacons. You can define one or more service tests as key tests. These key tests are used to monitor the availability and performance of your service. Only service tests that are enabled can be designated as key tests. To set up a service test as a key test, click the Availability Definition link at the bottom of the page.
-
Create, add, or remove a beacon. When you identify the beacon locations, select locations on your internal network or on the Internet that are important to your e-business. These are typical locations where your end users are located. For example, if your business is hosted in Canada and you have customers in the United States, use a beacon installed on a host computer in the United States to measure the availability and performance of your applications.
-
After you have created the service test, you can verify it by clicking Verify Service Test. The Status icon indicates the status of the service test i.e. whether it can be successfully executed by the key beacons. If there are no key beacons defined for the service, the status will be unknown even if there are other beacons executing the service test. Click Status to go to the Status History page.
Note:
-
While defining a SOAP (Simple Object Access Protocol) service test, if the WSDL URL to be accessed is outside the company's intranet, proxy settings need to be added to the
$OMS_HOME/sysman/config/emoms.propertiesfile.For example, to set up
www-myproxy.myco.comas proxy, specify the values as follows:proxyHost=www-myproxy.myco.comproxyPort=80dontProxyFor=myco.com,mycorp.comThe
proxyUser,proxyPwd,proxyRealm,andproxyPropsEncryptedproperties are used to configure an authenticated proxy. After you have modified the proxy settings, you must restart all the OMSes for the changes to be effective. -
The Forms Transaction test type has been deprecated in Enterprise Manager 12c. Forms transactions created in earlier releases can still be used but you cannot create new Forms Transaction test types. You must create a Generic Service target and create an ATS Transaction using OATS EBS/Forms Load test scripts. This ATS test type is used to monitor Oracle Forms applications.
-
The Web Transaction test type is in maintenance mode only. To monitor Web applications, we recommend that you create an ATS load script and use the ATS Transaction test type to monitor Web applications. See Creating an ATS Service Test Using OATS Load Script for details.
The creation of different types of service tests is covered in detail in the Enterprise Manager Online Help. In this chapter, we have covered the creation of the ATS test type as an example.
-
24.4.5.2 Deploying and Using Beacons
A beacon is a target that allows the Management Agent to remotely monitor services. A beacon can monitor one or more services at any point in time.
Note:
Before you create a beacon, you must ensure that the Oracle Beacon 12.1.0.2 or higher plug-in has been deployed.To create a beacon to run one or more service tests, follow these steps:
-
From the Setup menu, select Add Targets, then select Add Targets Manually.
-
In the Add Targets Manually page, select Add Non-Host Targets by Specifying Target Monitoring Properties option.
-
Select Beacon from the Target Type drop down list, select a Monitoring Agent and click Add Manually.
-
The Create Beacon page appears.
-
Enter the following details:
-
Name: Name of the beacon being created.
-
Agent: Select the Management Agent on which the beacon will be running.
-
Proxy Information: If the beacon is accessing the service through a firewall, you must specify the proxy server settings as follows:
-
Proxy Host and Port: The name of the proxy server host and through which the beacon communicates.
-
Proxy Authentication Realm: The authentication realm (used for Basic and Digest authentication schemes) that is used to verify the credentials on the proxy server.
-
Proxy Authentication Username: The (fully qualified) username to be used for proxy server authentication.
-
Proxy Authentication Password: The accompanying password to be used for proxy server authentication.
-
-
Enable Message ID Request Header: Select the checkbox to include an additional header in HTTP requests issued when Web Transactions and HTTP Ping service tests are executed. This allows Real User Experience Insight (RUEI) monitoring of Web Transactions and HTTP Ping tests.
-
Web Transaction: For Windows agents, specify the account credentials to be used when launching a browser to playback a Web transaction.
Note:
You can launch the Create Beacon option from the Services menu. From the Services Features menu, select Beacons and click Add to launch the Create Beacon page. -
-
Click Create to create the beacon and return to the Beacon Home page. You can now use the beacon to monitor service tests.
-
From the Generic Service menu, select Administration, then select Service Tests and Beacons. You will see a list of service tests that have been enabled along with a list of beacons.
-
Select the service test to be monitored, then from the Beacons table, select the beacon that you have created. Indicate if it is a key beacon.
-
Click Verify Service Test to execute the service test by the selected beacon.
24.4.5.3 Configuring the Beacons
This section lists additional beacon related configuration tasks.
-
Configuring SSL Certificates for the Beacon: When a beacon is used to monitor a URL over Secure Sockets Layer (SSL) HTTPS URL, the beacon must be configured to recognize the Certificate Authority that has been used by the Website where that URL resides.
To use the SSL option with the Port Checker test, you may need to add additional certificates to the Management Agent's monitoring wallet. To add an additional certificate, follow these steps:
-
Obtain the certificate, which is in
Base64encoded X.509 (.CER)format, in theb64SiteCertificate.txtfile. (The file name may be different in your configuration.) An example of the contents of the file is given below:------BEGIN CERTIFICATE-------------- MIIDBzCCAnCgAw... ...... base 64 certificate content ..... ------END CERTIFICATE-----------------
This file is stored in the Home directory of the Management Agent as
<AGENT_BASE>/agent_inst/sysman/config/b64InternetCertificate.txtfile. -
Create the
b64InternetCertificate.txtfile in the agent core and instance directory if it does not exist.<AGENT_BASE>/agent_inst/sysman/config/b64InternetCertificate.txt <AGENT_BASE>/core/12.1.0.2.0/sysman/config/b64InternetCertificate.txt
-
Append the
Base64encoded X.509certificate to the end of bothb64InternetCertificate.txtfiles. Include both theBEGINandEND CERTIFICATElines. -
Restart the Management Agent.
-
-
Configuring Dedicated Beacons: Beacon functionality on an agent requires the the use of an internal Java VM. The use of a Java VM can increase the virtual memory size of the agent by several hundred megabytes. Because of memory constraints, it is preferable to create beacons only on agents that run on dedicated hosts. If you are running large numbers of tests (e.g., several hundred per minute) on a given beacon, you may also wish to install that beacon's agent on a dedicated host. To take full advantage of dedicated hardware, edit the agent's
$ORACLE_HOME/sysman/config/emd.propertiesfile. as follows:applicationmetadataquota: the disk quota in bytes for each application area
-
Set the property,
ThreadPoolModel=LARGE. This allows the agent to simultaneously run many threads. -
Set the property,
useAllCPUs=TRUE. This allows the agent to run on multiple CPUs simultaneously. -
The
applicationMetadataQuota_BEACONproperty determines the total size that can be used to store ATS zip files. If you are using a ATS zip file or need to configure a large number of small ATS zip files on the beacon, you must specify a higher value for theapplicationMetadataQuota_BEACONproperty. -
@ This property determines the total size that the beacon can consume to store
@ ATS zip files. If the user intends to use large ATS zip files or wishes to
@ configure large number of small ATS zip files on a beacon then this property
@ should be appropriately increased.
-
Append
-Xms512m -Xmx1024mto theagentJavaDefinesproperty. This increases the Java VM heap size to 1024 MB.
-
-
Configuring a Web Proxy for a Beacon: Depending on your network configuration, the beacon may need to be configured to use a Web proxy. To configure the Web proxy for a beacon, search for the beacon in the All Targets page. Select the beacon you wish to configure and click Configure. Enter the properties for the Web proxy. For example, to set up
www-proxy.example.comas the beacon's Web proxy, specify the values as the following:Proxy Host: www-proxy.example.com Proxy Port: 80 Don't use Proxy for: .example.com,.example1.com
Note:
You cannot play Siebel service tests and Web Transaction (Browser) service tests on the same machine.
24.4.5.4 Creating an ATS Service Test Using OATS Load Script
You can use the Oracle Application Test Suite (OATS) to define an Openscript Transaction Service Test. This test is used to enable beacon application transaction monitoring using Openscript load testing scripts. Openscript is a component of OATS and provides advanced capabilities to record and play back various types of Web transactions, such as web/HTTP, Oracle EBS/Forms, Oracle Fusion/ADF, Siebel, Adobe Flex, and so on.
By using ATS load scripts, you can:
-
Reuse ATS testing scripts for production application transaction monitoring as part of application lifecycle management.
-
Expand the beacon capabilities by:
-
Supporting complex application flows with mixed application types and protocols such as HTTP and Oracle Forms application in one flow.
-
Supporting protocol based Siebel application monitoring.
-
Providing Databank support.
-
Incorporating enhanced scripting and debugging features from Openscript.
-
Adding the latest script modules and features without updating Enterprise Manager.
-
Creating an ATS service test involves the following:
-
Visit http://www.oracle.com/technetwork/oem/app-test/index-084446.html to download Openscript.
-
Launch the installer and follow the steps to install Openscript.
-
Record a new ATS transaction script by following these steps:
-
Launch Openscript and from the File menu, select New.
-
Select the type of script to be created and click Next. Some of the script types you can create are Adobe Flex, Oracle Fusion / ADF, Siebel, Database, Java Code Script, Web/HTTP and so on.
-
Select the location where the script is to be stored, enter a script name, and click Finish.
-
From the View menu, select Openscript Preferences to set the recording preferences.
-
Select Record Category and then select HTTP Preferences. Change the Record Mode from Web to HTTP. This ensures that scripts are played back correctly.
-
Select Record from the Script menu. The browser automatically opens when you start recording.
-
Load the web page where you want to start recording into the browser. Navigate the web site to record page objects, actions, and navigations. When you have finished navigating pages, close the browser and click Stop.
-
Select Playback from the Script menu to verify that the script has been properly recorded. Watch the application flow being played back in the play pane. Make sure the message log pane does not have any errors or failures. Save the script.
-
-
After the script has been recorded, from the File menu, select Export Script.
-
Specify the location in which the script is to be saved. You can save the script in a repository or workspace.
-
Enter a name for the script and click Finish. A script bundle (.zip) is created. Make sure that the script bundle is self contained. See Creating a Self Contained Zip File.
Note:
If the script file is very large, uncheck the Recorded Data option. -
-
Log into Enterprise Manager, upload the script bundle, and create an ATS service test. See Creating an ATS Service Test for details.
For more details on OATS, please refer to Oracle® Functional Testing OpenScript User's Guide.
24.4.5.4.1 Creating a Self Contained Zip File
You must ensure that the zip file is self contained and contains the following:
-
<txn name>.jwg: The archive file that contains the compiled script executable to be run by Execution Engine.
-
script.java: The actual script Java source file.
-
<script name>-descriptor.xml – Describes the step hierarchy
-
script.xml: Describes the variables in the databank.
-
modules.properties: Describes which internal modules are required for the engine.
-
Assets.xml: Describes the dependent resources used by the root scripts including databank files, sub scripts, object libraries, and so on.
-
Databank Files: The databank files used by the script while substituting different variable values.
-
Object Libraries: The libraries that contain user-defined object identification rules and names. This is only applicable for functional testing scripts
-
Dependent Scripts: A script can call out to other script.
24.4.5.4.2 Creating an ATS Service Test
To create an ATS service test, follow these steps:
Note:
To use the command line utility (EM CLI) to create and customize an ATS Test instance using the service test available in the repository, see Oracle Enterprise Manager Lifecycle Management Administrator's Guide.-
From the Targets menu, select Services, then from the Create menu, select Generic Service - Test Based.
-
Enter a name for the service and select a time zone.
-
Click Next. In the Create Generic Service: Availability page, select Service Test.
-
In the Create Generic Service: Service Test, select the Test Type as ATS Transaction.
-
Enter a name, description, and collection frequency for the service test.
-
In the ATS Zip Archive region, you can specify the location from which the ATS zip archive is to be imported. It can be imported from:
-
From Local Machine: Click Browse to select the zip file to be uploaded from your local machine.
-
From Test Repository: Select a zip file that is present in the test repository and click Continue. See Using the Test Repository for details.
Click Continue. Based on the zip file uploaded, the ATS ZIP Archive section and Variables section are populated.
-
-
You will return to the ATS Service Test page where you can specify the following:
-
Usage Options: You can configure the script variable values by selecting the required usage option. You can either use the values recorded during the transaction or use the databank. A databank is an external CSV file that ATS scripts can refer to supply different input values over multiple iterations of the same script. For example, a login script can use a databank file, named
login_credential.csv, to supply different login credentials during iteration.You can select:
-
Use Recorded Values: While playing back the transaction, the beacon uses the recorded values in the script.
-
Use Values From EM Test Property: You can specify values in the databank columns. These values are used by the beacon while playing back the script. This is useful if the same value is to be used for each variable. If variables defined as test properties, the value can be easily modified without having to modify script bundle or databank files.
-
Loop Through All Databank Records: While playing back the transaction, the beacon will go through each row in the script. For example, the first iteration will use the first rows of all the databanks. The second iteration will use the second rows of data and so on.
-
-
Encryption Password: If you have configured ATS Openscript to encrypt script data (using the Openscript View File > Openscript Preferences > Generic > Encryption) option, when you create the scripts, you need to enter the same encryption password as specified in the ATS openscript, so that beacon can play back the script properly.
-
Default Playback Options: The default playback options the beacon uses to play back the ATS Script.
-
Additional Playback Options: If additional playback options have to be specified, you can specify them here.
-
24.4.5.4.3 Troubleshooting ATS Service Test Playback Issues
If the space quota for the beacon has been exhausted, the beacon cannot playback the recorded values in the ATS script and you may see the following error:
Beacon synchronization did not transfer the needed files to the agent. Please check the agent log. File at: <directory>
To address this issue, the applicationMetadataQuota agent property must be set to a higher value in the emd.properties file. The default value is 500 MB but if there are several large files to be uploaded, this must be increased. After the property value has bee changed, you must restart the Management Agent.
Notes:
-
The ATS files are present in the
/EMSTATE/sysman/ApplicationState/beacondirectory. -
File names have following naming convention
<Txn guid>_<beacon guid>.zip. -
ATS related logs
(gcagent.log,gcagent_error.log,emagent.nohup) are available in theEMSTATE/sysman/logfolder
24.4.5.4.4 Databanking and Parameterization
You can parameterize recorded script inputs to perform data driven testing. Examples of inputs that can be parameterized include user name, password on the login page, data entered in the search field, recorded navigations or user actions, and so on.
You can use databanks as the data source for parameterizing script inputs. Databanks are one or more external comma-separated value (CSV) or text (TXT) files that provide inputs to script parameters. Multiple Databank files can be attached to a single script and users can specify how OpenScript assigns data during script playback.
You can select data input values from an external.csv file and substitute the variable values with the values from the Databank. The field names are on the first line of the file separated by commas (no spaces). The field data is on subsequent lines separated by commas (different line for each record, no spaces around commas). An example is shown below:
FirstName,LastName,Mail,Phone
John,Smith,JohnS@company.com,x993
Mary,Ellen,MaryE@company.com,x742
To use the databank records, follow these steps:
-
Open or create a script project.
-
Configure the Databank to use with a script in the Assets Script Properties.
-
Select the script node where you want to use the Databank record.
-
Select the Script menu and then select Other from the Add sub menu.
-
Expand the General node and select Get Next Databank Record. Click OK.
-
Select Databank avitek alias to specify the Databank file from which the records are to be retrieved.
-
Click OK. A GetNextDatabankRecord: databank alias node will be added to the script. In the Java Code view, the
getDatabank("databank alias").getNextDataBankRecord()method will be added to the script code as follows:getDatabank("avitek").getNextDatabankRecord();
After you have configured the databank for use with a script, you can map the databank files to specific script parameters. To map databank fields to script parameters, follow these steps:
-
Expand the [4] Oracle WebLogic Server - Medical Record Sample Application script tree node.
-
Right-click the usernameInput parameter and select Substitute Variable. The Substitute Variable window opens with the databank field names listed.
-
Select the Username field and click Finish. The parameter value changes to a databank variable in double braces
{{db.avitek.Username,fred#@golf.com}} -
Right-click the passwordInput parameter and select Substitute Variable. The Substitute Variable window opens with the databank field names listed.
-
Select the Password field and click Finish. The parameter value changes to a databank variable in double braces
{{db.avitek.Password,weblogic}} -
Save the script.
For more details on setting up the Databank, see the Oracle® Functional Testing OpenScript User's Guide.
Adding a Beacon Specific Databank File
You can use the upload_ats_test_databank_file emcli command to add a beacon specific databank file. The format of this command is given below:
emcli upload_ats_test_databank_file -name=<service_name> -type=<service_type> -testname=<test_name> -testtype=<test_type> -databankAlias=<databank alias> -input_file=databank:<input_file> -beaconName=<beacon_name>
24.4.5.4.5 Parameterizing URLs
You can create variables to use for URLs in a script. If you need to change the base URL of a script, parametrizing the URLs provides a quick way to re-baseline a script to use a new URL.
To parameterize URLs, follow these steps:
-
After you have recorded your script, from the Tools menu, select Parameterize URLs.
-
Select the URL to parameterize and enter a variable name to use for the URL. Click Next.
-
Select or unselect the checkbox to specify the instances of the URL that are to be changed. Click Finish.
-
In the Java Code view, the getVariables().set("variable name", "value",scope); method will be added to the script code in the initialize() section as follows:
getVariables().set("myServerVar", "http://myServer.com", Variables.Scope.GLOBAL); -
Repeat these steps to parameterize other URLs in the script.
24.4.5.4.6 Success or Failure Validation
You can perform text matching from TreeView and CodeView. For example, if you enter a string "hello" in a Google search window, the text matching is as follows:
web.document("/web:window[@index='0' or @title='Google']/web:document[@index='0']").assertText("MatchText", "hello", Source.DisplayContent, TextPresence.PassIfPresent, MatchOption.Exact);
Source - enum - (Html,Display Content)
Html - Raw Html including Tags
Display Content - Html without tags
MatchOption - Not Case Sensitive
-
Exact - sensitive: Matches any part of source string. For example, if the text entered is abcdef, if you enter abc, the string will match.
-
ExactEntireString: Matches the exact source string.
-
RegEx - Not Case Sensitive: Matches source string and sub-string. For example, if the text entered is abcdef, you can enter a.*d.
-
RegExEntireString: Matches the entire source string only. For example, if the text entered is abcdef, you can enter a.*f.
-
Wildcard - wildcard pattern: Matches source string and substring. For example, if the text entered is abcdefghijklm, you can enter a?c*f.
-
WildcardEntireString: Matches the entire source string. For example, if the text entered is abcdefghijklm, you can enter a*m.
24.4.5.4.7 Using Beacon Override
You can use the beacon override feature to specify different variable values for a test running on a different beacon. To do so, follow these steps:
-
Databank a script.
-
Select Use EM Test Property option.
-
Define beacon by specifying the sensitive and non-sensitive values as follows:
Databank_Alias>."<COLUMN_NAME>"="VALUE",<Databank_Alias>."<COLUMN_NAME>"="VALUE",...
For example:
FusionCredentials."host"="fs-aufsn4x0cxf",FusionCredentials."hostlogin"="login-aufsn4x0cxf",FusionCredentials."username"="faadmin",FusionCredentials."password"="fusionfa1"
24.4.5.4.8 Updating the Databank File
To update the ATS test script, follow these steps:
-
From the Generic Service menu, select Administration, then select Service Tests and Beacons.
-
From the Service Tests table, select ATS Transaction test type, and click Edit.
-
In the ATS Zip Archive region, click Download. Select the location where it is to be downloaded and click OK.
-
Edit the
.csvfile using a spreadsheet editor and save the changes. -
Log into Enterprise Manager and navigate to the ATS Transaction Test page.
-
In the ATS Zip Archive region, click Upload to upload the updated file.
24.4.5.4.9 Using SLM Header for RUEI Integration
If the ATS service test data is to be monitored by RUEI, you must specify the x-oracle-slm-message-id request header in the Additional Playback Options field. The format is in the form: name1:value1;name2:value2;name3:value3.
For example, x-oracle-slm-message-id: bcn=<beacon_name>; svc=<service_name>;test=<test_name>;step={{@getTopLevelStepName())}}
24.4.6 Performance Metrics
Performance metrics are used to measure the performance of the service. If a service test has been defined for this service, then the response time measurements as a result of executing that service test can be used as a basis for the service's performance metrics. Alternatively, performance metrics from the underlying system components can also be used to determine the performance of the service.
Performance metrics to help you identify how well the service test is performing for each of the remote beacons. In general, the local beacon should have a very efficient and consistent response time because it is local to the Web application host. Remote beacons provide data to reflect the response time experienced by your application end users.
You can do the following:
-
Add a performance metric for a service test. After selecting a metric, you can choose to:
-
Use the metric values from one beacon. Choose this option if you want the performance of the service to be based on the performance of one specific location.
-
Aggregate the metric across multiple beacons. Choose this option if you want to consider the performance from different locations. If you choose this option, you need to select the appropriate aggregation function:
Table 24-1 Beacon Aggregation Functions
Function Description The maximum value of the metric from data collected across all beacons will be used. Use this function if you want to measure the worst performance across all beacons.
The minimum value of the metric from data collected across all beacons will be used. Use this function if you want to measure the best performance across all beacons.
The average value of the metric will be used. Use this function if you want to measure the 'average performance' across all beacons.
The sum of the metric values will be calculated. Use this function if you want to measure the sum of all response times across each beacon.
-
-
Add a performance metric for the underlying system components on which the service is hosted. After selecting a metric for a target, you can choose to:
-
Use the metric from a specific component. Choose this option if you want the performance of the service to be based on the performance of one specific system component. If you select this option, you can choose the Rule Based Target List.
-
Aggregate the metric across multiple components. Choose this option if you want to consider the performance from multiple components. If you choose this option, you need to select the appropriate aggregation function.
Table 24-2 System Aggregation Functions
Function Description The maximum value of the metric across all components will be used as the value of this performance metric for the service.
The minimum value of the metric across all components will be used as the value of this performance metric for the service.
The average value of the metric across all components will be used.
The sum of values of metrics across all components will be calculated.
Note:
When a system is deleted, performance metrics associated with the system will not be collected.
-
-
Edit a performance metric that has been defined. For service test-based performance metrics, you can modify the beacon function that should be used to calculate the metric values. For system-based performance metrics, you can modify the target type, metric, and whether the aggregation function should be used. You can also modify the Critical and Warning thresholds for the metric.
-
Delete a performance metric that has been defined.
Note:
If you are defining performance metrics for an aggregate service, you can:-
Add performance metrics from a single sub service.
-
Specify statistical aggregations of more than one metric.
After selecting the metrics, you can set the thresholds to be used to trigger incidents, or remove metrics that are no longer required.
24.4.6.1 Rule Based Target List
The Rule Based Target List is applicable for system based performance metrics and direct members of system. You can define a rule that matches a system component you have selected. System components that match the user-provided rule will participate in the metric evaluation process. Later if any system component is added that matches this rule, this component will also participate in the metric evaluation process. If any system component that matches the rule is removed, that component will not participate in the metric evaluation process. The rule you define can be based on:
-
All (All system components)
-
Contains (Any system component that contains given criteria'
-
Starts With (Any system component that starts with given criteria)
-
Ends With (Any system component that ends with given criteria)
-
Equals (Any system component that matches with given criteria)
24.4.7 Usage Metrics
Usage metrics are used to measure the user demand for the service. Usage metrics are collected based on the usage of the underlying system components on which the service is hosted. You can monitor the usage of a specific component or statistically calculate the average, minimum and maximum value from a set of components. For example, if you are defining an email service, which depends on an IMAP server, then you can use the 'Total Client Connections' metric of the IMAP server to represent usage of this email service. You can define usage metrics only for services that are associated with a system. You can do the following:
-
Add a usage metric. After selecting a metric for a target, you can choose to:
-
Use the metric from a specific component. Use this option if you want to monitor the usage of a specific component.
-
Aggregate the metric across multiple components. Use this option if you want to statistically calculate the usage across multiple components. If you choose this option, you need select the appropriate aggregation function.
Table 24-3 Aggregation Functions - Usage Metrics
Function Description The maximum value of the metric across all components will be used as the value of this usage metric for the service.
The minimum value of the metric across all components will be used as the value of this usage metric for the service.
The average value of the metric across all components will be used.
The sum of the values of metrics across all components will be calculated.
-
-
Edit a usage metric that has been defined.
-
Delete a usage metric that has been defined.
Note that only metrics from system targets can be added as usage metrics. Metrics from tests are not indicative of usage, and therefore cannot be added as usage metrics.
Note:
If you are defining usage metrics for an aggregate service, you can-
Add usage metric from a single sub service.
-
Specify statistical aggregations of more than one metric.
After selecting the usage metrics, you can set the threshold to be used to trigger incidents or remove metrics that are no longer required.
Rule Based Target List
The Rule Based Target List is applicable for system based performance metrics and direct members of system. You can define a rule that matches a system component you have selected. This enables you to promote performance metrics for evaluation. System components that match the user-provided rule will participate in the metric evaluation process. Later if any system component is added that matches this rule, this component will also participate in the metric evaluation process. If any system component that matches the rule is removed, that component will not participate in the metric evaluation process. The rule you define can be based on:
-
All (All system components)
-
Contains (Any system component that contains given criteria'
-
Starts With (Any system component that starts with given criteria)
-
Ends With (Any system component that ends with given criteria)
-
Equals (Any system component that matches with given criteria)
24.5 Using the Transaction Recorder
You can record a transaction using an intuitive playback recorder that automatically records a series of user actions and navigation paths. You can play back transactions interactively, know whether it is internal or external to the data center, and understand the in-depth break-out of response times across all tiers of the Web application for quick diagnosis.
You must install the transaction recorder in your computer to record transactions. The transaction recorder is also used for playing back and tracing transactions. The transaction recorder is downloaded from the Enterprise Manager Cloud Control server the first time any of these actions is performed. The transaction recorder requires some Microsoft libraries to be installed in your computer. If these libraries are not present during installation, they are automatically downloaded and installed from the Microsoft site. Make sure that your computer has access to the Internet to download these files. After the installation has been completed, you may need to restart your computer to make the changes effective.
24.6 Setting Up and Using Service Level Agreements
A service level agreement (SLA) is a contract between a service provider and a customer on the expected quality of service for a specified business period. An SLA consists of one or more service level objectives (SLOs) for different business calendars and different service periods for which define the service levels to be provided. Whether an SLA is satisfied or not is based on the evaluation of the underlying SLOs. Service level indicators (SLIs) allow SLOs to be quantified and measured. An SLO can have one or more SLIs.
SLOs define the service level objectives to be provided. An SLO is a logical grouping of individual measurable Service Level Indicators (SLIs). For example, an SLO can define the percentage of time a service is available to the user, how well the service is performing in terms of response time or volume, and so on. Service Level Indicators (SLIs) are quantifiable performance and usage metrics that can be used to evaluate the quality of a service.
To create an SLA, follow these steps:
-
Log in to Enterprise Manager as a user with
EM_ADMINISTRATORrole. -
From the Targets menu, select Services.
-
Click on a Generic Service target on the list. The Service Home page is displayed.
-
From the Generic Service menu, select Service Level Agreement, then select Configuration. The Service Level Agreement Configuration page appears.
-
On this page, you will see a list of all the SLAs defined for the selected service. Select an SLA from the list to view the details in the Service Level Agreement Details table. You can create an SLA or make a copy of an existing SLA (Create Like).
-
In the Service Level Agreement region, click Create. The Configure Service Level Agreement page appears.
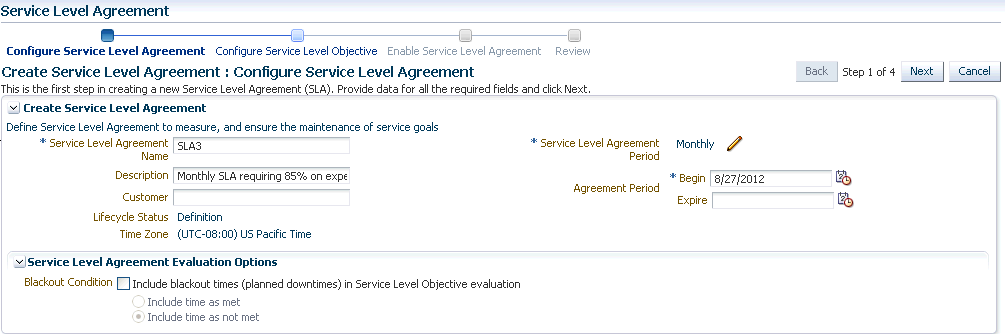
Enter the following details:
-
Name and description of the SLA.
-
Name of the customer for whom the SLA is being created.
-
The Lifecycle Status of the SLA. When an SLA is being created, it will be in the Definition Stage. For more details on the Lifecycle Status, see Lifecycle of an SLA.
-
Specify the SLA Period. This is the contractual time period for which the SLA is determined and/or evaluated for compliance. (ie. quarterly, monthly, weekly SLA). Click the Select icon and select Monthly, Weekly, or Daily. Enter the Frequency which the SLA is to be evaluated and the date from which the SLA is to be evaluated. The SLA goals are reset when the SLA is evaluated.
For example, if you specify the SLA Evaluation Period as Monthly, Frequency as 12 and the date as 09/01/12, the SLA will be evaluated on that date followed 11 consecutive evaluations in the months of October, November, and so on.
-
Specify the SLA Agreement Period. This is the From and To Date for which the recurring SLA periods are in effect. If you do not specify the To Date here, the SLA will have an Indefinite expiry date.
-
An SLO may sometimes not be evaluated due to planned downtime or blackouts that have been scheduled for a service. In the Service Level Agreement Evaluation Options region, select the Include blackout times (planned downtimes) in Service Level Objective evaluation checkbox and specify whether the blackout times are to be included in the SLO evaluation. You can choose to:
-
Include time as met
-
Include time as not met
-
Exclude the blackout time during the overall computation of the SLO.
For example, if the blackout or planned downtime for the week is 1 day, then the weekly availability is (7-1) / (7-1) days which is still 100% availability.
By default, the Include blackout times (planned downtimes) in Service Level Objective evaluation option is not selected.
-
-
-
Click Next. In the Service Level Objectives page, define one or more SLOs that are to be part of the SLA. You can select the Evaluation Condition for the SLA which can be:
-
All Service Level Objectives must be met.
-
At least one Service Level Objective must be met.
An SLA must have at least one SLO. More than one SLO can be active at any given time. You can either specify if all SLOs or at least one SLO should be met.
-
-
Click Create to define a new SLO. See Creating a Service Level Objective for details.
-
You can add more SLOs or edit the SLO you have defined. Click Next. In the Enable Service Level Agreement page, you can specify when the SLA is to be enabled. You can select:
-
Do Not Enable: If the SLA is not enabled, it will be in the Definition state and can be modified if required.
-
Enable Now: If the SLA is enabled, it cannot be modified as it will be in an Active state.
-
Enable Later: The SLA can be enabled later on a specified date.
-
-
Click Next , review details of the SLA, and click Submit. The SLA will be enabled on the specified date and you will return to the Service Level Agreement Configuration page.
24.6.1 Actionable Item Rules for SLAs
The table below shows a list of actions that can be performed on an SLA based on its status.
| Status of SLA | Create Like | Edit | Enable | Disable | Delete |
|---|---|---|---|---|---|
| Definition | Yes | Yes | Yes | No | Yes |
| Scheduled | Yes | Yes | No | Yes | No |
| Active | Yes | No | No | Yes | No |
| Retired | Yes | No | No | No | Yes |
-
An SLA in a Scheduled or Active state cannot be directly deleted. You have to disable the SLA before you can delete it.
-
When you edit an SLA in a Scheduled state, the status of the SLA changes to Definition.
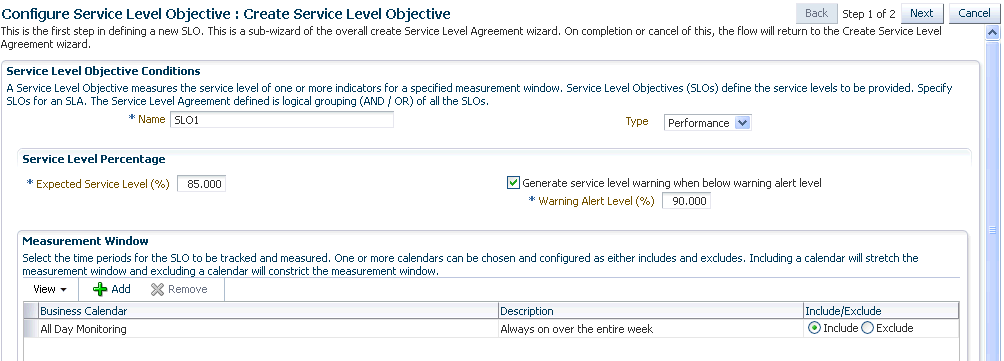
24.6.2 Creating a Service Level Objective
A Service Level Objective measures the service level of one or more indicators for a specified measurement window. Service Level Objectives (SLOs) define the service levels to be provided. You can specify if the SLA is considered to be satisfied if:
-
All Service Level Objectives are met.
-
At least one Service Level Objective is met.
To create an SLO, follow these steps:
-
Click Create in the Configure Service Level Objective page. The Create Service Level Objective page appears.
-
Enter the following details:
-
Name of the SLO being defined.
-
Type of SLO: The SLO can be based on Availability or Performance metrics.
-
Expected Service Level%: This indicates the percentage of time the SLO conditions are met to ensure that the SLA is satisfied.
-
Warning Alert Level%: If the SLO conditions do not meet the specified threshold, a critical alert is generated.
For example, if the Expected Service Level% is 90% and the Actual Service Level% is in the range of 90 to 99%, a Warning Alert is generated. If the Actual Service Level% is lesser than 90%, a Critical Alert is generated. This indicates that the SLA has been breached. If the Actual Service Level% is greater than 99%, it indicates that the SLA conditions have been satisfactorily met.
-
Measurement Window: The time periods during which the SLO is in effect. A measurement window can have more than one time period assigned. For example, a measurement window can be configured as weekday peak hours which are Monday to Friday, from 9AM to 6PM and the weekend peak hours as 10AM to 2PM.
While creating an SLO, you can choose more than one Business Calendar for an SLO. For example, suppose you want to evaluate each SLO from 8AM to 5PM except at lunch time (12PM to 1PM). You can create two measurement windows and exclude the lunch time from being measured.
Another example of merging two measurement windows is when you want to combine weekly evaluation with calendar evaluation. If you want to evaluate an SLO every Monday and on the 15th of every month, you can create two monitoring windows and include these conditions in both the windows.
By default, there are 3 predefined business calendars. You can also create your own calendar. See Defining Custom SLA Business Calendars for details.
-
-
Click Next. In the Create Service Level Indicators page, you can add one or more SLIs or conditions that allow the SLO to be measured.
For example, if you are adding a performance SLI, you can specify that the Page Load Time should be less than or equal to 3 seconds. If this condition is not met, the SLI is considered to be violated. Specify the Evaluation Condition for the SLI:
-
All Service Level Indicators must be met.
-
At least one Service Level Indicator must be met.
-
-
Click Add to add one or more metrics and specify the value and the evaluation condition. Click Submit to return to the Configure Service Level Objective page.

24.6.3 Lifecycle of an SLA
The following diagram shows the lifecycle of an SLA.
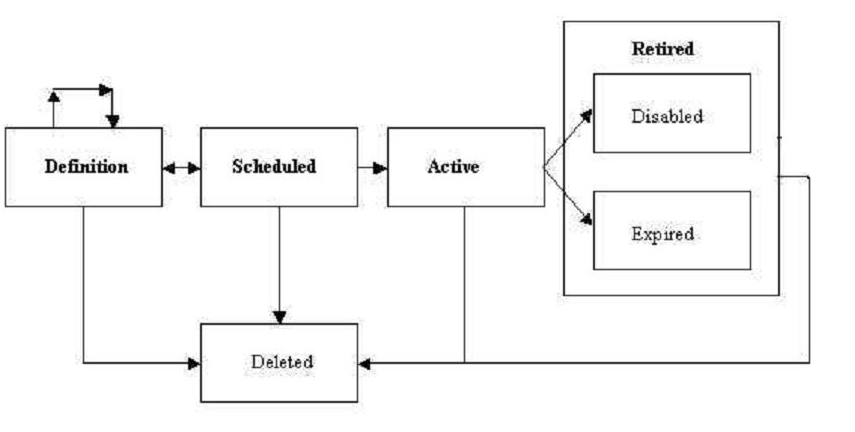
The SLA lifecycle consists of the following phases:
-
Definition: This is the stage where the SLA is created and the SLOs are defined. You can configure or edit the SLA definition till the SLA is activated.
-
Scheduled: This stage represents the period before the SLA is scheduled to go into effect at a future date.
-
Active: This is the stage where the start date of a scheduled SLA is reached, or when the SLA is manually enabled.
-
Retired: This is the stage when the SLA reaches the Expiry Date or the SLA is manually disabled.
-
Disabled: An SLA can be manually disabled before it reaches the Expiry Date. Once an SLA is disabled, it cannot be reactivated. You must use the Create Like option to create a similar SLA and enable it.
-
Expired: This is the stage where the SLA has reached the Expiry Date and is no longer active.
-
Deleted: An SLA can be deleted if it is the Definition or Retired stage. An SLA that is an Active or Scheduled stage cannot be deleted.
24.6.4 Viewing the Status of SLAs for a Service
You can view the status of all SLAs for a service. To view the current status of the SLAs for a service, follow these steps:
-
From the Targets menu, select Services.
-
Click on a Generic Service target on the list. The Service Home page is displayed.
-
From the Generic Service menu, select Service Level Agreement, then select Current Status. The Service Level Agreement Current Status page appears.
-
This page shows a list of all the active SLAs that have been defined for this service. For each SLA, the SLA Status, SLA Evaluation Period, and the Service Level Objectives are displayed.
-
Select an SLA to view detailed information in the SLA. The following details are displayed:
-
Tracking Status: This is the instant status of the SLI. For an Availability SLO, it is the status of the target. For a Performance SLO, it is the value of the Performance or Usage metric at a specific point in time.
-
Service Level (%) : The percentage of time (from the beginning of the current evaluation period till the current date) the SLO conditions are met or the Tracking Status is true. If the Actual Service Level % is lesser than the Expected Service Level %, or the SLO conditions are met, the Service Level % graph is green.
-
Type: This is the type of SLOs that have been defined for the SLA. This can be based on Availability or Performance metrics. An Availability SLO is based on the Response Metric [ Service Target Availability]. It is specified in terms of the amount or percentage of time when the availability objective should be met. A Performance SLO gauges how well a service is performing. It includes measurements of speed and/or volume such as throughput or workload (ie. response times, transactions/hour). A Performance SLO can either be specified in terms of a set of SLIs, SLO conditions, and the amount or percentage of time when the objective should be met.
-
SLO Violation: The violation allowances for each SLA evaluation period.
-
Total: The duration of the Evaluation Period * ( Expected Service Level).
-
Actual: The time when the SLO is not met during the Evaluation Period.
-
Remaining: The time when the SLO could not be met without breaching the SLA. If the SLO is always met during the Evaluation Period, it indicates that there are no used allowances and the value in the Actual field will be 0.
-
-
24.6.5 Defining Custom SLA Business Calendars
Business Calendars are measurement windows that define a specific window of time in which the Service Level Objectives (SLO) are being measured. Out-of-the-box predefined business calendars are available. Apart from these, you can create custom business calendars. To create a custom business calendar, from the Targets menu, select Services. From the Services Features menu, select Business Calendars.
A list of business calendars that have been defined is displayed here. You can:
-
Create: Click Create to set up a business calendar. The Add / Edit Business Calendar page is appears.
-
Create Like: Select a calendar and click Create Like to make a copy of this calendar.
-
Edit: Select a calendar, click Edit and make the necessary changes in the Add / Edit Business Calendar page.
-
Delete: Select a calendar and click Delete to delete it. You cannot edit or delete a business calendar that is associated with one or more SLAs.
-
View Associated Service Level Agreements: A business calendar can be used by one or more SLAs. Select a business calendar and click View Associated Service Level Agreements to view the SLAs that are associated with this calendar.
24.7 Using the Services Dashboard
The services dashboard provides a brief summary of all service related information in a single place. It provides a consolidated view of critical aspects of a service such as availability, performance, SLAs associated with the service, status of key system components, and so on.
24.7.1 Viewing the All Dashboards Page
To view the All Dashboards page, follow these steps:
-
From the Targets menu, select Services.
-
From the Services Features menu, select Dashboards.
-
The All Dashboards page appears where you can see a list of all dashboards that have been created.
-
From the All Dashboards page, you can do the following:
-
Create Dashboard: Enter a unique name in the Dashboard Name field and a description, and click Create Dashboard. The newly added dashboard appears in the table. To create a dashboard, you must have an
EM_ADMINISTRATORrole with Create Services Dashboard privilege. -
Customize Dashboard: Select a dashboard from the list and click Customize and make the changes in the Edit Services Dashboard page. The dashboard can be customized only by the user who has created it.
-
Delete: Select a dashboard from the list and click Delete. The selected dashboard is deleted. The dashboard can be deleted only by the user who has created it.
-
-
Click on a Dashboard Name link to drill down to the Dashboard Details page.
24.7.2 Viewing the Dashboard Details Page
This page displays the following details:
-
Service Name: Click on the link to drill down to the Service Details page.
-
Incidents: Any incidents that have occurred.
-
Performance / Usage Metric: The name of the performance and usage metrics available for the service and the latest value of each metric is displayed. The Trend charts show the metric trend over the last 24 hours. Click on the Trend chart to see a detailed view over the trend.
-
SLA: Shows the number of enabled SLAs that are in Active, Critical or Warning state.
-
Key Components: Shows the key targets that are up or available for this service.
-
System Incidents: Any incidents that have occurred for the underlying systems of the service are displayed.

You can filter the list of services that are listed in the dashboard. Specify a value in the Filter By field and click Filter. The filter will be applied on each row in all the services and the resulting list is displayed.
You can email a dashboard to one or more email addresses. Click Email and enter the email address and the subject of the dashboard. Click Send. This feature works only the htttp mode.
24.7.3 Customizing and Personalizing the Dashboard
You can customize a dashboard and make the changes available to all users. To customize a dashboard, select a row on the All Dashboards page and click Customize.
Note:
The following privileges are required to crTo add one or more services to the dashboard, click the Wrench icon. The Component Properties: Services Dashboard window appears. Select the type of service that you want to add to the dashboard and click Search. A list of services is displayed in the Available Targets table. Select one or more services that you want to add, move them to the Selected Targets table and click Apply. To add metrics to the respective services click on the Metrics tab and select the respective services to add metrics and click OK. The selected services and metrics now appear in the Services Dashboard table.
To delete a service target from the dashboard, select the row and click the Wrench icon. The Component Properties: Services Dashboard window appears. Deselect the services and metrics that are to be removed from the dashboard, click Apply and then click OK. To reset the changes you have made to the dashboard, click Reset Page. Any changes that have been made to the dashboard will be removed permanently. Click Close to exit the Edit mode.
You can make specific changes to a dashboard to suit your requirements. Click the Personalize icon and add or delete one ore more services from the dashboard. The changes that you make will be visible only to you and the other users cannot see the changes.
24.7.4 Viewing the Dashboard Service Details Page
This page shows detailed information for the selected service.

It contains the following tabs:
-
Overview: This tab provides a brief overview of the selected service. Click on the Service link to drill down to the Service Home page. It contains the following regions.
-
General: This region shows the name of the service, status, date from which the service is available, availability percentage, type of service (test or system based), down time, and error time. Click on the service name to drill down to the Service Home page.
-
Component Availability: This region shows the status of the components in the service. It shows the status of the component and the date from which the service has been Up. Select the Show Only Key Tests check box to view only the key service tests
-
-
SLA: Shows a list of SLAs that have been enabled for this service. The name, status and the date from which the SLA is applicable is displayed. The SLA history over the last 7 days is also displayed.
-
Metrics: This tab shows the performance and metrics charts that have been defined for this service. It also shows the incidents that have occured for the service and the underlying systems on which the service is based.
24.8 Using the Test Repository
A test repository is a centralized location where you can maintain all the test scripts. To use the Test Repository, you should have pre-configured the OMS Software Library location. For more information, see Section 17.7.
The advantages of using a Test Repository include:
-
Previously, a test could be created only in the context of a service. However, now, you have the flexibility of creating any number of test scripts outside the context of a service, and storing them in this centralized location called Test Repository. Uploading Test Scripts and Creating Services are now independent events. Once the test scripts are available in the repository, you can use them while creating your service.
-
Previously, only the owner of the test script had the copy of the script. Now, with introduction of Test Repository, the scripts are maintained in a centralized location which allows all the users to access the scripts. At the time of creating a service, you can just import your scripts from the repository with the click of a button, thereby making the whole experience very user-friendly and quick.
Note:
Currently, there is support to store only the ATS test scripts in the central repository.
24.8.1 Viewing the Test Repository
To view the test scripts uploaded to the test repository, follow these steps:
-
From the Targets menu, select Services.
-
From the Services Features menu, select Test Repository.
-
The Test Repository page appears where you can see a list of all the tests that have been created.
-
From the Test Repository page, you can do the following:
-
Adding Tests: Click Add. In the Generic Information section, enter a unique test name. In the ATS Information section, click Browse to upload a test script from your local machine. Once you select a relevant file, the file name along with the step and module details are displayed. Click Save to save the script.
-
Editing Tests: Select the test, and click Edit. The ATS script cannot be modified within the Enterprise Manager Console. But you can download a previously uploaded script and import the zip file to ATS OpenScript. For more information on how to download and edit an ATS script, see Section 24.8.2.
-
Removing Tests: Select the test, and click Delete to delete the test script.
-
-
Click on a Test Name to view the details of the test in the Test Details table.
24.8.2 Editing an ATS Script
To download the script bundle and edit them, follow these steps:
-
Click Download and save the zip file at the prompt.
-
Launch OpenScript and from select File menu select Import Script to import the zip file to ATS OpenScript.
-
After you have edited the script in ATS OpenScript, select File, then select Export Script to export the new script and save the zip file.
-
Log into to Cloud Control, and navigate to the ATS Service Test page. Click Upload to upload the updated script file to Enterprise Manager.
24.9 Configuring Service Levels
A service level rule is defined as an assessment criteria used to determine service quality. It allows you to specify availability and performance criteria that your service must meet during business hours as defined in your Service Level Agreement. For example, e-mail service must be 99.99% available between 8am and 8pm, Monday through Friday.
A service level rule specifies the percentage of time a service meets the performance and availability criteria as defined in the Service Level Rule. By default, a service is expected to meet the specified criteria 85% of the time during defined business hours. You may raise or lower this percentage level according to service expectations. A service level rule is based on the following:
-
Business Hours: Time range during which the service level should be calculated as specified in your Service Level Agreement.
-
Availability: Allows you to specify when the service should be considered available. This will only affect the service level calculations and not the actual availability state displayed in the console. You can choose a service to be considered up when it is one or more of the following states:
-
Up: By default the service is considered to be Up or available.
-
Under Blackout: This option allows you to specify service blackout time (planned activity that renders the service as technically unavailable) as available service time.
-
Unknown: This option allows you to specify time that a service is unmonitored because the Management Agent is unavailable be counted as available service time.
-
-
Performance Criteria: You can optionally designate poor performance of a service as a Service Level violation. For example, if your Website is up, but it takes 10 seconds to load a single page, your service may be considered unavailable.
-
Business Criteria: Business criteria are useful in determining in the health of the business processes for a particular service. You can optionally define business metrics that can affect the Service Level. A Service Level violation occurs when a critical alert is generated for a specified business metric.
Note:
The Business Criteria column is displayed only if one or more key business indicators are associated with the service. Refer to Oracle Enterprise Manager Integration Guide. -
Actual Service Level: This is calculated as percentage of time during business hours that your service meets the specified availability, performance, and business criteria.
-
Expected Service Level: Denotes a minimum acceptable service level that your service must meet over any relevant evaluation period.
You can define only one service level rule for each service. The service level rule will be used to evaluate the Actual Service Level over a time period and compare it against the Expected Service Level.
24.9.1 Defining Service Level Rules
A Service Level Rule is defined as assessment criteria to measure Service quality. A Service Level Rule is based on the following:
-
Time range for which the rule is applicable.
-
Metrics that define the rule.
-
The user expectation on these metrics values
The Expected Service Level is the expected quality for the service and is defined based on the time range and metrics of the Service Level Rule. For example, the Expected Service Level can be that the service is available 99% of the time during business hours.
When you create a service, the default service rule is applied to the service. However, you must edit the service level rule for each service to accurately define the assessment criteria that is appropriate for your service. To define a service level rule:
-
Click the Targets tab and Services subtab. The Services main page is displayed.
-
Click the service name link to go to the Service Home page.
-
In the Related Links section, click Edit Service Level Rule.
-
On the Edit Service Level Rule page, specify the expected service level and the actual service level and click OK. The expected service level specifies the percentage of time a service meets the performance, usage, availability, and business criteria defined in the Service Level Rule. The actual service level defines the baseline criteria used to define service quality and includes business hours, availability, performance criteria, usage criteria, and business criteria.
Note:
Any Super Administrator, owner of the service, or Enterprise Manager administrator with OPERATOR_TARGET target privileges can define or update the Service Level Rule.24.9.2 Viewing Service Level Details
You can view service level information directly from the either of the following:
-
Enterprise Manager Cloud Control Console -From any Service Home page, you can click on the Actual Service Level to drill down to the Service Level Details page. This page displays what Actual Service Level is achieved by the service over the last 24 hours/ 7 days / 31 days, compared to the Expected Service Level. In addition, details on service violation and time of each violation are presented in both graphical and textual formats.
-
Information Publisher - Information Publisher provides an out-of-box report definition called the Services Dashboard that provides a comprehensive view of any service. From the Report Definition page, click on the Services Monitoring Dashboard report definition to generate a comprehensive view of an existing service. By default, the availability, performance, status, usage, business, and Service Level of the service are displayed. The Information Publisher also provides service-specific report elements that allow you to create your own custom report definitions. The following report elements are available:
-
Service Level Details: Displays Actual Service Level achieved over a time-period and violations that affected it.
-
Service Level Summary: Displays service level violations that occurred over selected time-period for a set of services.
-
Services Monitoring Dashboard: Displays status, performance, usage, business, and service level information for a set of services.
-
Services Status Summary: Information on one or more services' current status, performance, usage, business, and component statuses.
Refer to the Online Help for more details on the report elements.
-
24.10 Configuring a Service Using the Command Line Interface
Using the Command Line Interface, you can define service targets, templates and set up incidents. EMCLI is intended for use by enterprise or system administrators writing scripts (shell/batch file, perl, tcl, php, etc.) that provide workflow in the customer's business process. EMCLI can also be used by administrators interactively, and directly from an operating system console. Refer to Enterprise Manager Command Line Interface Guide for details.
Samples EMCLI templates to create a Web transaction and an ATS service test are shown below.
Example 24-1 Web Transaction Service Test Template
<?xml version = '1.0' encoding = 'UTF-8'?> <transaction-template
template_type="generic_service" xmlns="template">
   <variables>
      <variable name="HOST1" value="linuxserver26.myco.com"/>
      <variable name="PORT1" value="5416"/>
      <variable name="PROTOCOL1" value="https"/>
   </variables>
   <transactions>
      <mgmt_bcn_transaction>
         <mgmt_bcn_txn_with_props>
            <mgmt_bcn_txn description="Test for checking the availability of EM Console/Website" is_representative="true"
                          name="EM Console Service Test" monitoring="true" txn_type="HTTP"/>
            <properties>
               <property name="readTimeout" num_value="120000.0" prop_type="2" encrypt="false"/>
               <property name="Collection Interval" num_value="5.0" prop_type="2" encrypt="false"/>
               <property name="certValidationMode" string_value="1" prop_type="1" encrypt="false"/>
               <property name="maxDownloadSize" num_value="1.0E8" prop_type="2" encrypt="false"/>
               <property name="sensitiveValuesProtection" string_value="0" prop_type="1" encrypt="false"/>
               <property name="failureStringModes" string_value="regularText" prop_type="1" encrypt="false"/>
               <property name="UserAgent" string_value="Mozilla/4.0 (compatible;MSIE 6.0; Windows NT 5.1) OracleEMAgentURLTiming/3.0" prop_type="1" encrypt="false"/>
               <property name="successStringModes" string_value="regularText" prop_type="1" encrypt="false"/>
               <property name="variablesModes" string_value="urlEncode" prop_type="1" encrypt="false"/>
               <property name="content" string_value="0" prop_type="1"encrypt="false"/>
               <property name="AcceptLanguage" string_value="en" prop_type="1" encrypt="false"/>
               <property name="connectionTimeout" num_value="120000.0" prop_type="2" encrypt="false"/>
               <property name="useCache" string_value="yes" prop_type="1"encrypt="false"/>
               <property name="stringValidationMode" string_value="1" prop_type="1" encrypt="false"/>
               <property name="granularity" string_value="transaction" prop_type="1" encrypt="false"/>
               <property name="numThreads" num_value="4.0" prop_type="2" encrypt="false"/>
               <property name="retries" num_value="1.0" prop_type="2" encrypt="false"/>
               <property name="timeout" num_value="300000.0" prop_type="2" encrypt="false"/>
               <property name="retryInterval" num_value="5000.0" prop_type="2" encrypt="false"/>
            </properties>
            <per_bcn_properties/>
         </mgmt_bcn_txn_with_props>
         <steps_defn_with_props>
            <mgmt_bcn_step_with_props>
               <mgmt_bcn_step step_number="1" name="1.Access Logout page" step_type="HTTP"/>
               <properties>
                  <property name="req_mode" num_value="1.0" prop_type="2" encrypt="false"/>
                  <property name="http_method" string_value="G" prop_type="1" encrypt="false"/>
                  <property name="url" string_value="{PROTOCOL1}://{HOST1}:{PORT1}/em/console/logon/logoff?event=load" prop_type="1" encrypt="false"/>
               </properties>
            </mgmt_bcn_step_with_props>
         </steps_defn_with_props>
         <stepgroups_defn/>
         <txn_thresholds>
            <mgmt_bcn_threshold warning_threshold="6000.0" warning_operator="0" critical_threshold="12000.0" critical_operator="0" num_occurrences="1">
               <mgmt_bcn_threshold_key metric_name="http_response" metric_column="avg_response_time"/>
            </mgmt_bcn_threshold>
            <mgmt_bcn_threshold warning_threshold="0.0" warning_operator="1" critical_threshold="0.0" critical_operator="1" num_occurrences="1">
               <mgmt_bcn_threshold_key metric_name="http_response" metric_column="status"/>
            </mgmt_bcn_threshold>
         </txn_thresholds>
         <step_thresholds/>
         <stepgroup_thresholds/>
      </mgmt_bcn_transaction>
   </transactions>
</transaction-template>
Example 24-2 ATS Service Test Template
<?xml version = '1.0' encoding = 'UTF-8'?>
<transaction-template template_type="generic_service" xmlns="template">
<variables/>
<transactions>
<mgmt_bcn_transaction>
<mgmt_bcn_txn_with_props>
<mgmt_bcn_txn is_representative="true" name="ATS Page" monitoring="true" txn_type="OATS"/>
<properties>
<property name="Collection Interval" num_value="5.0" prop_type="2" encrypt="false"/>
<property name="scriptDescription" string_value="[1] SignIn
[2] Welcome
[3] Single Sign-Off
[4] Sign In" prop_type="1"encrypt="false"/>
<property name="fileUploadTime" string_value="2012-08-0908:47:22.0" prop_type="1" encrypt="false"/>
<property name="OpenScriptJwgName" string_value="ATKHomepage.zip" prop_type="1" encrypt="false"/>
<property name="usageOptions" string_value="userDefined" prop_type="1" encrypt="false"/>
<property name="fileSize" string_value="41368" prop_type="1" encrypt="false"/>
<property name="beaconDistributionOverride" string_value="AtsCredentials=1" prop_type="1" encrypt="false"/>
<property name="FilePropertyValue" prop_type="7" encrypt="false"/>
<property name="databankFilesJar" prop_type="7" encrypt="false"/>
<property name="databankFiles" string_value="AtsCredentials,AtsCredentials.csv,3;" prop_type="1" encrypt="false"/>
<property name="granularity" string_value="transaction" prop_type="1" encrypt="false"/>
<property name="databankValues" string_value="people.firstname=yang.,people.lastName=wang,middle.middlename_col=x." prop_type="1" encrypt="false"/>
<property name="modules" string_value="oracle.oats.scripting.modules.utilities;version=2.4.0
oracle.oats.scripting.modules.http;version=2.4.0
"
prop_type="1" encrypt="false"/>
<property name="databankAliasMapping" string_value="AtsCredentials=AtsCredentials.csv" prop_type="1" encrypt="false"/>
<property name="defaultCLIOptions" string_value="-dboptions*:1:FIRST_RECORD_ONLY -jwg ATKHomepage.jwg -noReport true" prop_type="1"
encrypt="false"/>
</properties>
<per_bcn_properties/>
</mgmt_bcn_txn_with_props>
<steps_defn_with_props>
<mgmt_bcn_step_with_props>
<mgmt_bcn_step step_number="1" name="[1] Sign In" step_type="OATS"/>
<properties>
<property name="url" string_value="http:://www.test.com/test1" prop_type="1" encrypt="false"/>
</properties>
</mgmt_bcn_step_with_props>
<mgmt_bcn_step_with_props>
<mgmt_bcn_step step_number="2" name="[2] Welcome" step_type="OATS"/>
<properties>
<property name="url" string_value="http:://www.test.com/test2" prop_type="1" encrypt="false"/>
</properties>
</mgmt_bcn_step_with_props>
<mgmt_bcn_step_with_props>
<mgmt_bcn_step step_number="3" name="[3] Single Sign-Off" step_type="OATS"/>
<properties>
<property name="url" string_value="http:://www.test.com/test3" prop_type="1" encrypt="false"/>
</properties>
</mgmt_bcn_step_with_props>
<mgmt_bcn_step_with_props>
<mgmt_bcn_step step_number="4" name="[4] Sign In" step_type="OATS"/>
<properties>
<property name="url" string_value="http:://www.test.com/test4" prop_type="1" encrypt="false"/>
</properties>
</mgmt_bcn_step_with_props>
</steps_defn_with_props>
<stepgroups_defn/>
<txn_thresholds>
<mgmt_bcn_threshold warning_threshold="0.0" warning_operator="1" critical_threshold="0.0" critical_operator="1" num_occurrences="1">
<mgmt_bcn_threshold_key metric_name="openscript_response" metric_column="status"/>
</mgmt_bcn_threshold>
</txn_thresholds>
<step_thresholds/>
<stepgroup_thresholds/>
</mgmt_bcn_transaction>
</transactions>
</transaction-template>
24.11 Troubleshooting Service Tests
This section lists some of the common errors you may encounter while using the Forms and the Web Transaction test type. The following topics are covered here:
24.11.1 Verifying and Troubleshooting Forms Transactions
The section covers the following:
24.11.1.1 Troubleshooting Forms Transaction Playback
This section lists some of the common errors you may encounter while playing back a Forms transaction and provides suggestions to resolve these errors.
-
Error Message: Connection to Forms Server is lost. Possible version mismatch between
agentjarsandformsjars.Possible Cause: The transaction was recorded using an out-of-the-box Forms version.
Solution: Verify the version of the Forms Application that you are running by checking the version number in the About Oracle Forms Online Help. If this version is not supported, follow the steps listed under Error Message 2.
-
Error Message: Version Not Supported <
forms_version>Possible Cause: The machine on which the beacon has been installed does not contain the necessary forms jar files.
Solution: To resolve this error, follow these steps:
-
Login to the system on which the Forms server has been installed. Locate the
frmall.jar(if you are using Forms 10.1 or later) orf90all.jar(if are using Forms 9.0.4 or later) under the$FORMS_HOME/forms/javadirectory. -
Login to the system on which the beacon has been deployed and copy the jar file to the
$ORACLE_HOME/jlib/forms/<version>/directory. The version you specify here should be the same as the version string in the error message. Make sure that the directory is empty before you copy over the jar file.
If you are using Oracle Applications R12 and you encounter this error, follow these steps to resolve the error:
-
Login to the system in which the Oracle Application server has been deployed. Locate the following files:
$JAVA_TOP/oracle/apps/fnd/jar/fndforms.jar
$JAVA_TOP/oracle/apps/fnd/jar/fndewt.jar
-
Login to the system on which the beacon has been deployed and copy these files to the
$ORACLE_HOME/jlib/forms/apps/directory. Make sure that the directory is empty before you copy over the jar files.Note:
You cannot monitor two deployments of Oracle Applications from the same beacon if different versions of Oracle Applications have been used.
-
-
Error Message: Forms URL is not pointing to the forms servlet.
Possible Cause: When the Forms transaction was recorded, the location of the forms servlet could not be determined.
Solution: Make sure that the Forms URL Parameter is pointing to the forms servlet. It should be
http://<hostname>:<port>/forms/frmservletfor Forms10g orhttp://<hostname>:<port>/forms/f90servletfor Forms 9i. This parameter is automatically set by the Forms Transaction Recorder. But if it has not been set, you can locate the URL by following these steps:-
Launch the Forms application.
-
View the source HTML file in the Forms launcher window.
-
Locate the
xsurlvariable. The URL is stored in this variable.
-
-
Error Message: Could not connect to <
machine name>.Possible Cause: The machine on which the beacon has been installed cannot access the Forms Application.
Solution: Make sure the machine on which the beacon has been installed can access the Forms Application and firewalls have been properly configured. Support for playing back Forms transactions through proxy server is not available in this release.
-
Error Message: Invalid module path in the initial message.
Possible Cause: The transaction may have been incorrectly recorded or may be corrupt.
Solution: Try to record the transaction again.
-
Error Message: Cannot connect to login server.
Possible Cause: This error may occur due the following reasons:
-
The Login URL that you have specified may be incorrect.
-
An invalid HTTPS certificate may have been provided for the login server.
Solution:
-
Verify that the Login URL is correct.
-
If you are using HTTPS to connect to login server, make sure the certificate on the server is written for the login server machine itself. Make sure the SSL Certificate is imported into Agent and the CN of the certificate matches the host name of the login Server URL.
-
24.11.1.2 Troubleshooting Forms Transaction Recording
This section lists some troubleshooting steps that you can use when the Forms transaction cannot be recorded successfully.
-
Make sure that all your Internet Explorer instances are closed and no java runtime programs are open.
-
Start recording again with the java console open. You can view any exceptions or error messages displayed on the console.
-
You should now see the text "
Forms Transaction Recorder Version: <version number>"on the console. If this text is displayed, proceed to step 5. If you do not see the text, check if theformsRecorder.jarhas been copied to the Forms archive directory. You can perform this check using either of the following methods:-
Navigate to the Forms archive directory and check if the
formsRecorder.jarfile is present in the directory. -
Navigate to the Enable Forms Transaction Monitoring page, select the corresponding Forms server target and click Configure. Enter the host credentials to see if the Forms Transaction Recorder has already been configured on this Forms server. If the
formsRecorder.jaris not present in the Forms archive directory, you need to configure your Forms server for transaction monitoring. After ensuring that theformsRecorder.jaris present in the archive directory of the Forms server, go back to Step 1 and try recording again.
-
-
If you see an exception related to the java .policy file displayed on the java console, check the file to ensure that it has the required content and is in the right location. If any errors are found, you must fix these errors and try recording again.
-
If the recording still fails, check if the Enterprise Manager Certificate has been imported to the secure site.f the certificate has not been imported, you must import it and try recording again.
24.11.2 Verifying and Troubleshooting Web Transactions
This section lists some of the common errors you may encounter while recording and playing back Web Transactions.
-
Scenario: Verify Service Test displays:
Connection establishment timed out -- http://..../Possible Cause: The beacon can only access that URL via a proxy server and it has not been configured.
Solution: From the All Targets page, select the beacon, click Configure and set the beacon proxy setting.
-
Scenario: Verify Service Test displays:
Authorization Required -- https://...../Possible Cause: The Basic Authentication information is not recorded automatically.
Solution: To resolve this error, follow these steps:
-
From the Service Tests and Beacons page, select the service test, click Edit.
-
Make sure you enter all the Basic Authentication information: Username, Password, and Realm.
Note:
Realm usually appears above the Username label in the Browser's authorization dialog box.
-
-
Scenario: Verify Service Test displays
sun.security.validator.ValidatorException:No trusted certificate found -- https://....../.Possible Cause: The beacon does not know about this SSL Certificate.
Possible Solution: From the Service Tests and Beacons page, select the service test, and click Edit. Under Advanced Properties, and set Authenticate SSL Certificates to No.
-
Scenario: Verify Service Test displays:
Timeout of 300000 exceeded for https://....../ Response time = 3000000Possible Cause: The test may be too complex to complete within the allotted time. Or, this may be an actual performance issue with the server.
Possible Solution: From the Service Tests and Beacons page, select the service test, and click Edit. If this is not a server performance issue, under Advanced Properties, increase the Timeout Value.
-
Scenario: The Verify Service Test option reports that the service as down, but the Web application is up and you can successfully play back the Web transaction.
Possible Cause: The Web application is only compatible with Internet Explorer or Mozilla-based browsers.
Possible Solution: From the Service Tests and Beacons page, select the service test, and click Edit. Under Advanced Properties, set the User Agent Header as
Mozilla/4.0 (compatible; MSIE 6.0; Windows NT 5.1) OracleEMAgentURLTiming/3.0.Note:
For Enterprise Manager 10.2.0.4 and beyond, this User Agent Header is set automatically during Web transaction recording. -
Scenario: Test Performance Page does not show any step metrics.
Possible Cause: By default, only transaction-level metrics are collected.
Possible Solution: From the Service Tests and Beacons page, select the service test, click Edit, and set Data Granularity to Step.