28 Creating Usage Tracking Reports
Usage Tracking Reports provides an overview of the Database features that are identified as being used by your organization.
Important:
Usage Tracking Reports are intended for informational purposes only and do not represent your license entitlements or requirements. To understand your license requirements, contact the License Management Services representative at:http://www.oracle.com/us/corporate/license-management-services/index.html
This chapter covers the following topics:
28.1 Usage Tracking Reports
Usage Tracking Reports are Oracle-supplied reports that are available with Oracle Business Intelligence Publisher (BI Publisher), the primary reporting system that provides a single, Web-based platform for authoring, managing, and delivering interactive reports and all types of highly formatted documents. The procedures detailed in this chapter assume that you have already integrated BI Publisher into Enterprise Manager. For instructions on integrating BI Publisher with Enterprise Manager, see "Integrating BI Publisher with Enterprise Manager" in the Oracle® Enterprise Manager Cloud Control Advanced Installation and Configuration Guide.
There are two Usage Tracking Reports:
-
Database Usage Tracking Summary Report is a high level summary of the Database Version, Edition, licensable Options and Enterprise Management Pack usage.
This report can be run and viewed online. The output report can be exported to PDF, RTF, Excel formats.
-
Database Usage Tracking Report provides the above usage data in an exportable (csv) format. The exported data can be sent to Oracle License Management Services for further analysis to determine licensing requirements. Please contact the License Management Services representative at http://www.oracle.com/us/corporate/license-management-services/index.html to initiate an engagement.
This report cannot be run online and can only be scheduled. A single file for each database instance will be generated each time the report is scheduled to run. The format of the output files is comma separated values (CSV).
Creating Usage Tracking Reports consists of the following high-level tasks:
-
Setting up Database Usage Tracking credentials. (Required for both Database Usage Tracking Summary Report and Database Usage Tracking Report.)
-
Enabling the metric collection (via monitoring templates. (Required for both Database Usage Tracking Summary Report and Database Usage Tracking Report.)
-
Configuring the FTP Server (where reports are to be generated) in BI Publisher. (Not required for the Database Usage Tracking Summary Report.)
-
Generating the Usage Tracking Reports.
28.2 Collecting Data for Database Usage Tracking
Prior to producing the Database Usage Tracking Report, corresponding Metric Collections must be configured and enabled. This includes the following steps:
-
Setting Database Usage Tracking Credentials
-
Enabling or disabling (when the collection is finished) the Metric Collection. Depending on the preferences and available licensing, this can be done:
-
Using Monitoring Templates, from the OEM console, for the database targets which are licensed with Diagnostics Pack.
-
Using EM Command Line Interface (EM CLI), for any database target, regardless of the licensing.
-
There are two types of metric collections:
-
Weekly metrics - to be collected once in 7 days: lms_wk_ci and lms_wk_ci_cdb
-
Hourly metrics - to be collected every hour: lms_hr_ci and lms_hr_ci_cdb
This collection must me enabled only when session information is needed, and should be carefully monitored because of the amount of data that can be generated.
For each of these two types, there are two different metric collections:
-
For standard traditional database targets: lms_wk_ci and lms_hr_ci
-
For Container Database (CDB) targets: lms_wk_ci_cdb and lms_hr_ci_cdb, which collect data from CDB$ROOT container and also from all the Pluggable Databases (PDBs)
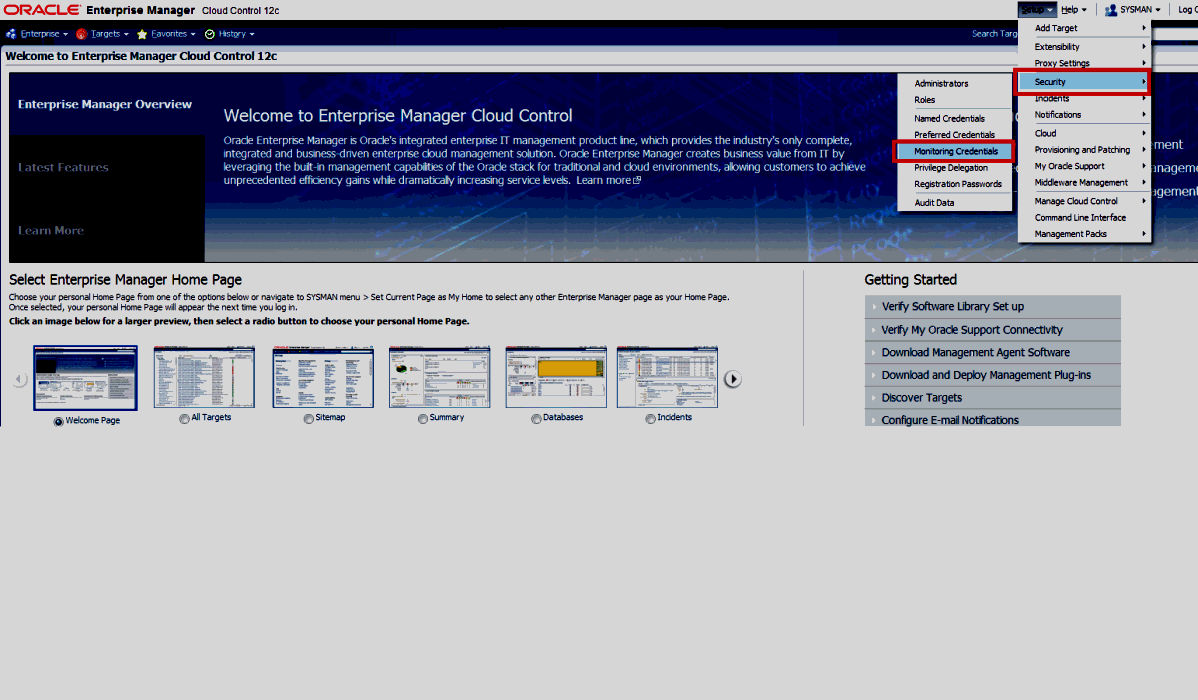
28.2.1 Setting Database Usage Tracking Credentials
-
Log in to Enterprise Manager. From the Setup menu, select Security and then Monitoring Credentials.
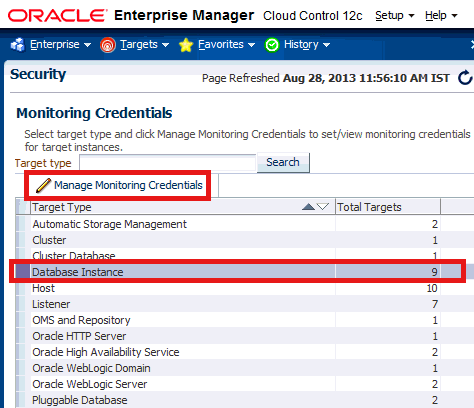
-
Choose the desired database target from the list and click Manage Monitoring Credentials. The target Credential page displays.
-
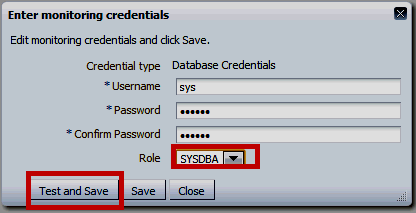
Choose the target name from the list and click Set Credentials. The Enter Monitoring Credentials dialog displays.
-
Enter the requisite monitoring credentials and click Save.
28.2.2 Enabling/Disabling the Metric Collection using Monitoring Templates
This method uses Monitoring Templates, a Diagnostics Pack feature, therefore can be used only on the database targets licensed with Diagnostics Pack.
Note:
The use of monitoring templates for database targets is licensed under the Oracle Diagnostics Pack. You can also use the Enterprise Manager command line interface (EM CLI) to enable/disable metric collections which do not require an extra license.Enabling the weekly metric collection:
-
From the Enterprise menu, select Monitoring, and then Monitoring Templates.
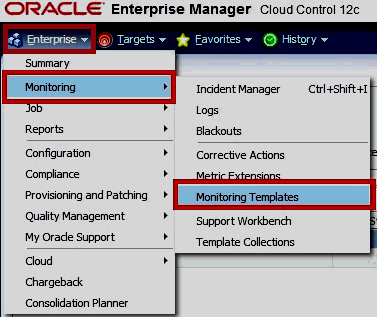
-
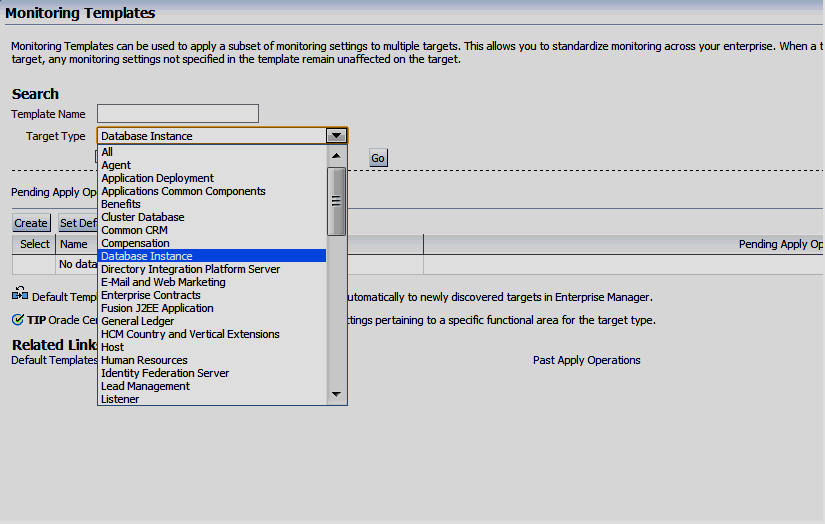
Choose Database Instance as target type, check Display Oracle Certified Templates and then click Go.
-
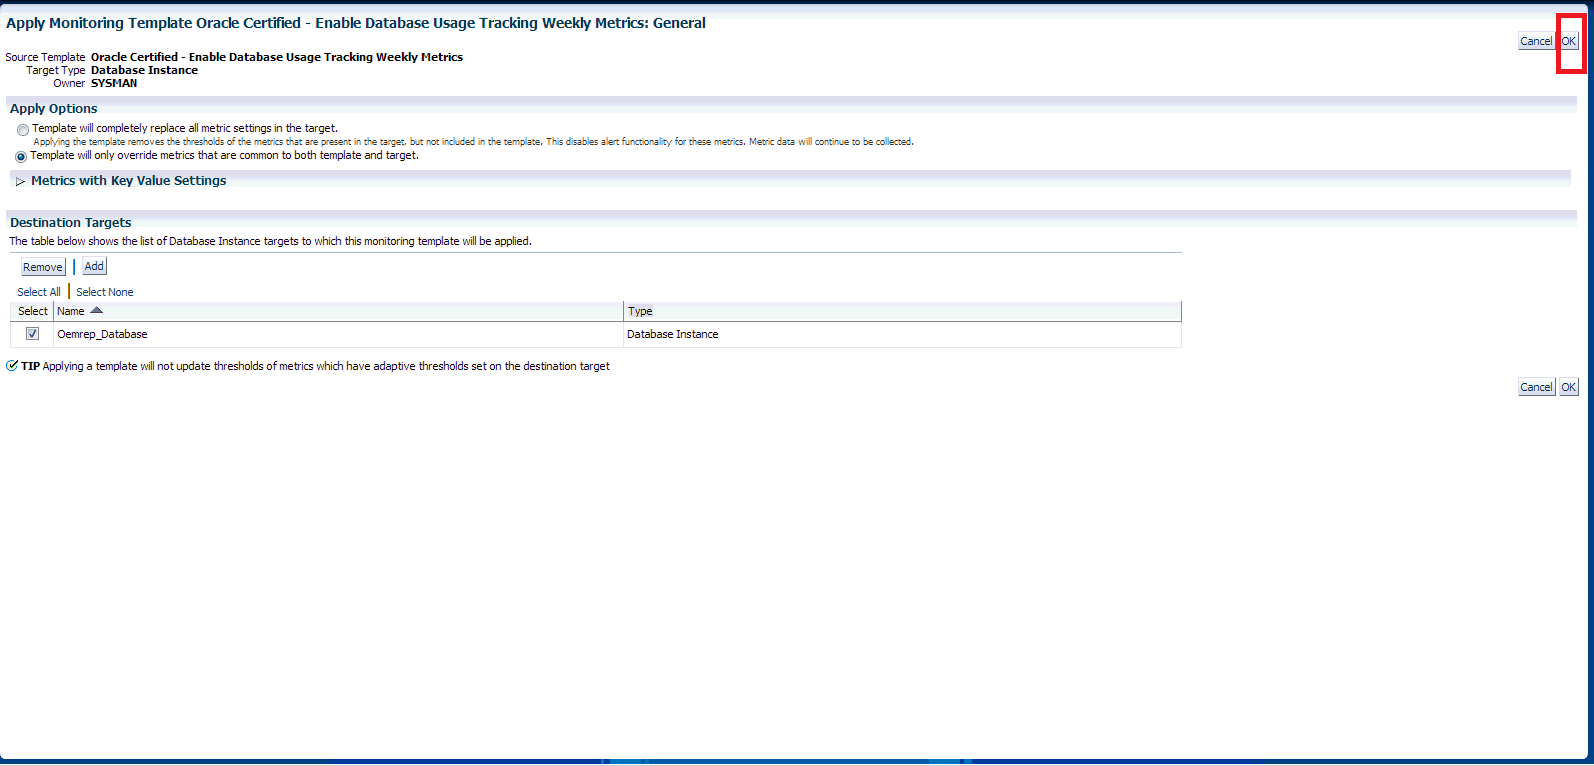
Chose Oracle Certified - Enable Database Usage Tracking Weekly Metrics, then click Apply.
-
From the new page, click Add. Choose the desired targets using check boxes and then click Select.
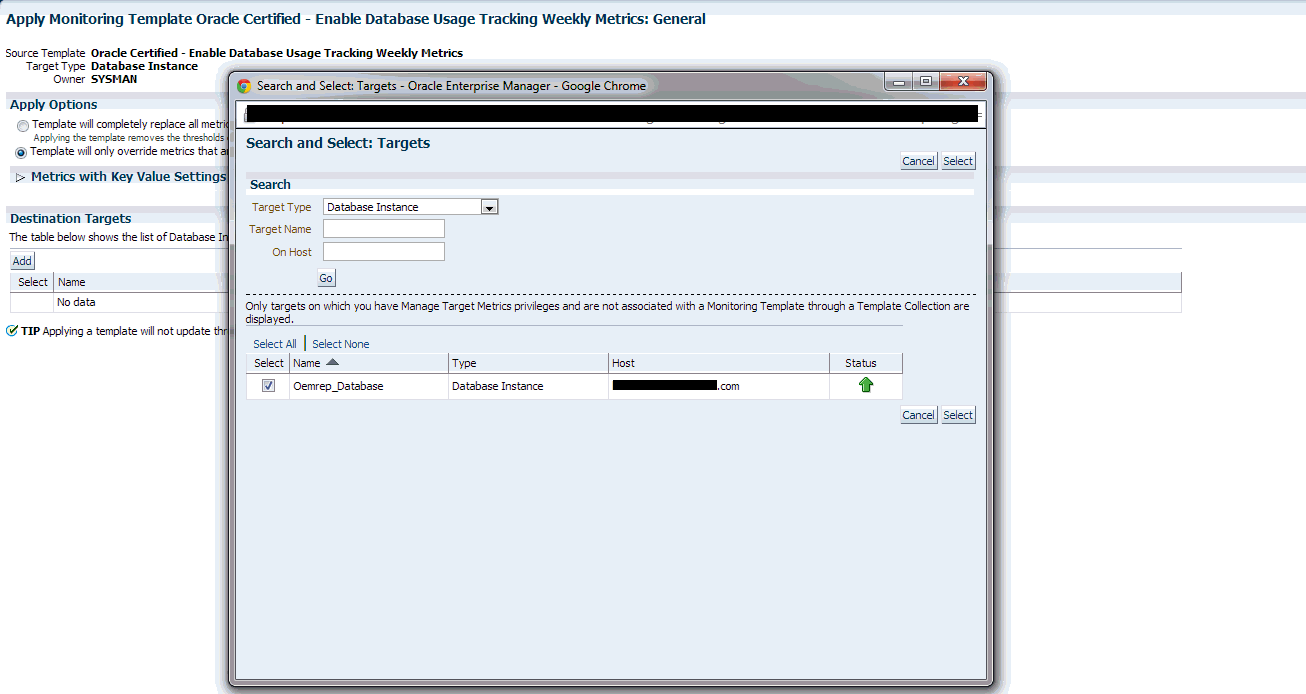
-
Click OK to finalize the changes.
-
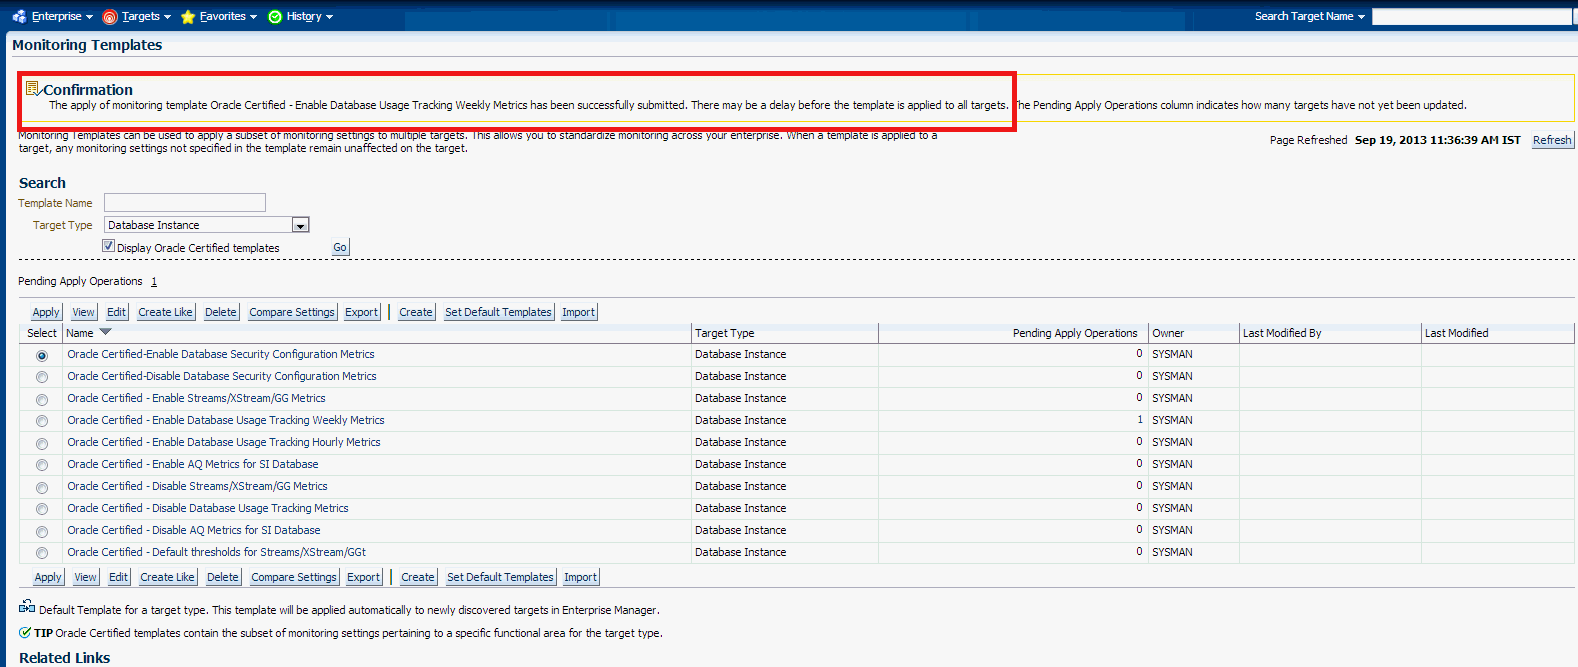
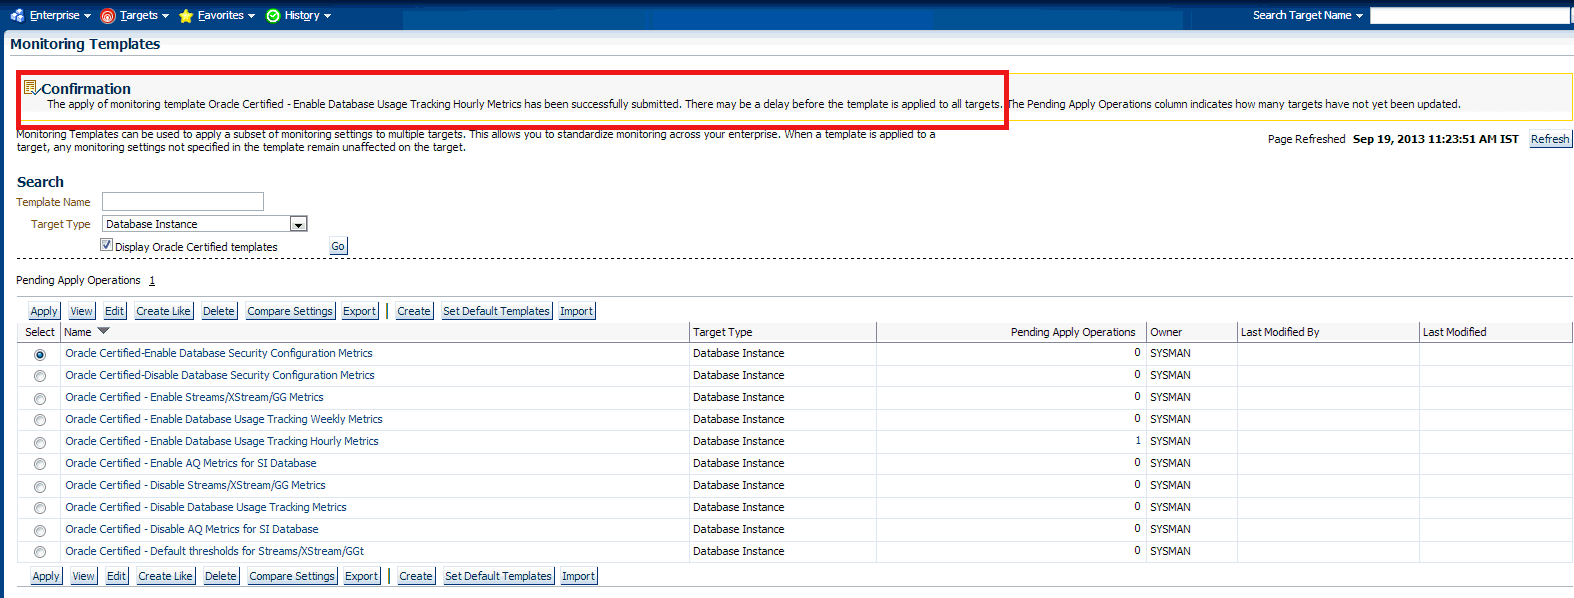
Verify the confirmation message and Pending Apply Operations column that shows the number of targets that have not yet been updated. Make sure there are no ("0") pending apply operations.
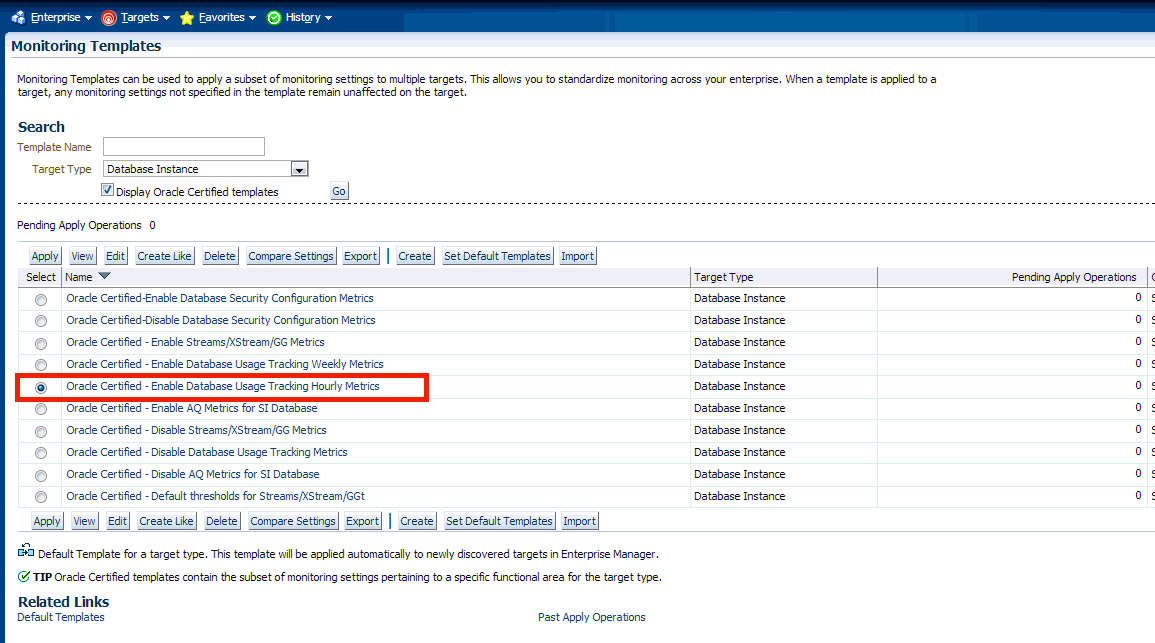
Enabling the hourly metric collection:
-
From the Enterprise menu, select Monitoring, and then Monitoring Templates.

-
Choose Database Instance as the target type, check Display Oracle Certified Templates and click Go.
-
Choose Oracle Certified - Enable Database Usage Tracking Hourly Metrics, then click Apply.
-
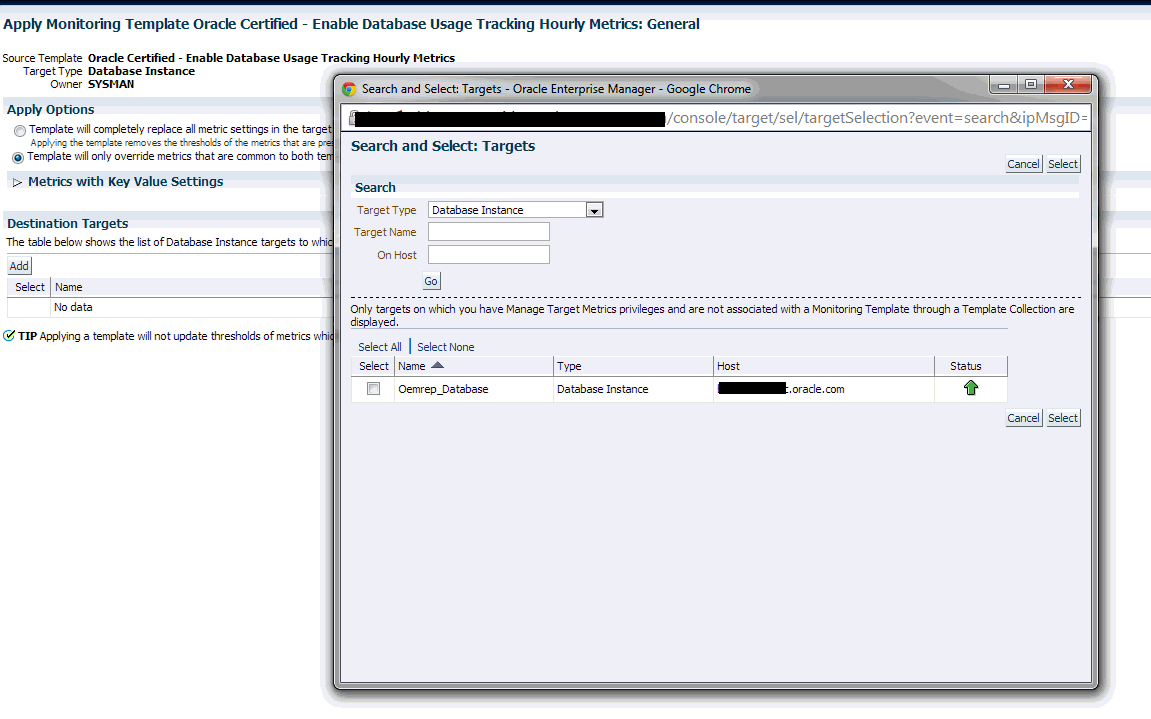
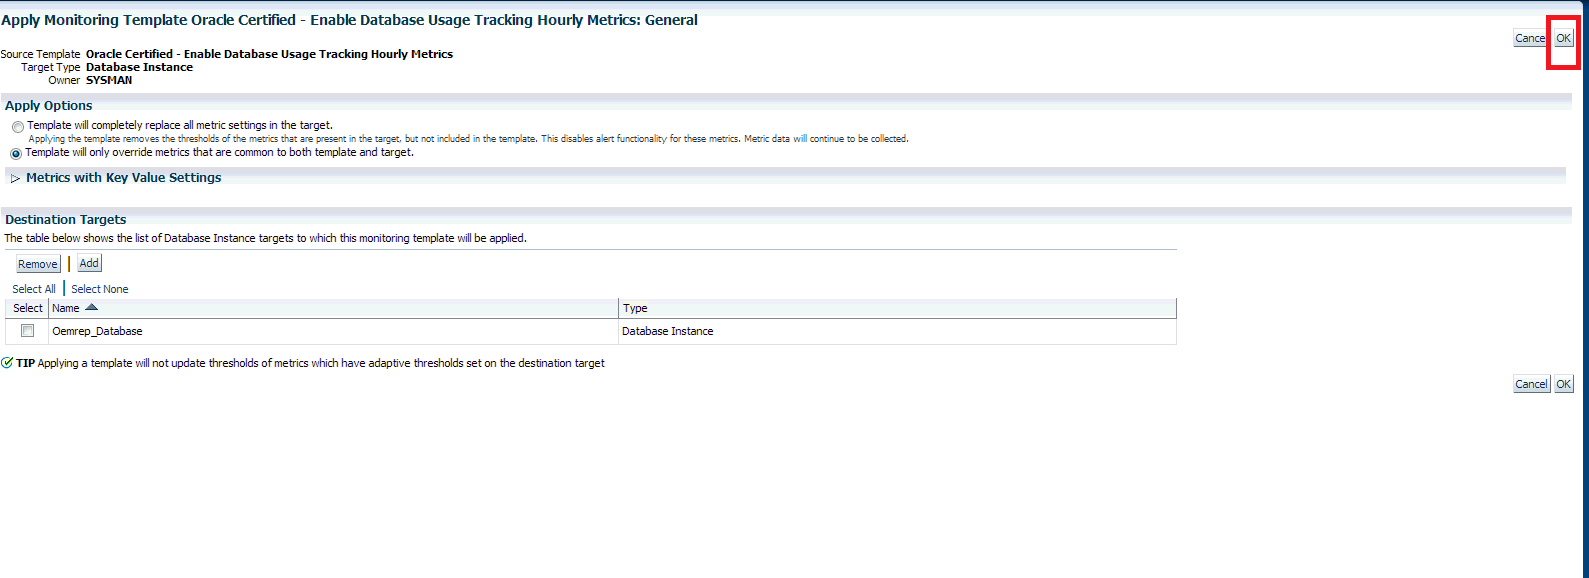
Click Add and then choose the desired targets.
-
Click OK to finalize the changes.
-
A confirmation message displays at the top of the page.
Disabling Usage Tracking Metric Collection:
-
Follow the steps 1 and 2 as show in the previous section.
-
In Step 3, choose Oracle Certified - Disable Database Usage Tracking Metrics, which disables both hourly and weekly collections.
-
Follow steps 4 to 6 from the previous section.
28.2.3 Enabling/Disabling the Metric Collection using the Command Line Interface
In the previous section, "Enabling/Disabling the Metric Collection using Monitoring Templates," you performed these actions using the Enterprise Manager Cloud Control console for database targets licensed with Diagnostics Pack. However, you can also use the Enterprise Manager command line interface (EM CLI) to enable/disable metric collection from the operating system command line, in which case no extra licensing is required.
The following topics are covered in this section:
28.2.3.1 Setting up EM CLI login
Before running the EM CLI commands to enable/disable metric collection, the EM CLI login must be configured.This is typically done by specifying the URL, username, and password as shown in the following example:
emcli setup -url="https://jupiter.solarsystem.com:7799/em" -username=sysman -password=manager -trustall
28.2.3.2 Enabling/disabling the metric collection
Metric collection is enabled/disabled using the EM CLI modify_collection_schedule verb. This verb is fully documented in the Oracle Enterprise Manager Command Line Interface Guide.
The following syntax must be use for Database Usage Tracking purposes:
emcli modify_collection_schedule
        -targetType="oracle_database"
        -targetNames="tname1;tname2;tname3;..."
        -collectionName="lms_wk_ci_cdb|lms_hr_ci_cdb|lms_wk_ci|lms_hr_ci"
        -freqType="HOUR|DAY|WEEKLY"
        -freqValue="1|7| MON|TUE|WED|THU|FRI|SAT|SUN"
        -collectionStatus="ENABLED|DISABLED"
        -preview="N"
-
targetNames
The target name should be the same as exists in the repository. All of the targets should be the same target type you specified in the targetType parameter. Use a semicolon ( ; ) to separate the names. Changes to the collection schedule will be executed for only valid target name and target type combinations. For example:
tname1;tname2;tname3 -
collectionName
Name of one of the four metric collections predefined for Database Usage Tracking. "wk" indicates weekly collection while "hr" indicates the hourly collection. "_cdb" suffix indicates that the collection is to be applied only to CDB database targets.
-
lms_hr_ci_cdb and lms_wk_ci_cdb - must be applied to all CDB database targets (with PDBs)
-
lms_hr_ci and lms_wk_ci - must be applied to all the rest of database targets
-
-
freqType and freqValue
Indicate the frequency. These two parameters are not needed or ignored (if provided) in the case of collectionStatus="DISABLED".
These parameters can be one of the following:
-
freqType=HOUR freqValue=1
-
freqType= DAYS freqValue=7
-
freqType=WEEKLY freqValue=MON (or any other weekday)
-
-
collectionStatus
Enables or disables the collection. The default is Enabled. If Disabled, freqType and freqValue are ignored.
-
Enabling weekly metrics on a CDB database target.
emcli modify_collection_schedule \ -targetType="oracle_database" \ -targetNames="targetdb3" \ -collectionName="lms_wk_ci_cdb" \ -freqType="DAY" \ -freqValue="7" \ -collectionStatus="ENABLED" \ -preview="N"Note: On MS Windows, replace "\" with the Windows-specific command line continuation character: "^".
-
Enabling weekly metrics on a multiple non-CDB database targets.
emcli modify_collection_schedule \ -targetType="oracle_database" \ -targetNames="targetdb1;targetdb2" \ -collectionName="lms_wk_ci" \ -freqType="WEEKLY" \ -freqValue="SUN" \ -collectionStatus="ENABLED" \ -preview="N" -
Disabling weekly metrics on a CDB database target.
emcli modify_collection_schedule \ -targetType="oracle_database" \ -targetNames="targetdb3" \ -collectionName="lms_wk_ci_cdb" \ -collectionStatus="DISABLED" \ -preview="N" -
Disabling weekly metrics on multiple non-CDB database targets.
emcli modify_collection_schedule \ -targetType="oracle_database" \ -targetNames="targetdb1;targetdb2" \ -collectionName="lms_wk_ci" \ -collectionStatus="DISABLED" \ -preview="N" -
Enabling hourly metrics on a CDB database target.
emcli modify_collection_schedule \ -targetType="oracle_database" \ -targetNames="targetdb3" \ -collectionName="lms_hr_ci_cdb" \ -freqType="DAY" \ -freqValue="7" \ -collectionStatus="ENABLED" \ -preview="N" -
Enabling hourly metrics on a multiple non-CDB database targets.
emcli modify_collection_schedule \ -targetType="oracle_database" \ -targetNames="targetdb1;targetdb2" \ -collectionName="lms_hr_ci" \ -freqType="WEEKLY" \ -freqValue="SUN" \ -collectionStatus="ENABLED" \ -preview="N" -
Disabling hourly metrics on a CDB database target.
emcli modify_collection_schedule \ -targetType="oracle_database" \ -targetNames="targetdb3" \ -collectionName="lms_hr_ci_cdb" \ -collectionStatus="DISABLED" \ -preview="N" -
Disabling hourly metrics on multiple non-CDB database targets.
emcli modify_collection_schedule \
        -targetType="oracle_database" \
        -targetNames="targetdb1;targetdb2" \
        -collectionName="lms_hr_ci" \
        -collectionStatus="DISABLED" \
        -preview="N"
28.2.3.3 Using EM CLI to list all the database targets
During the configuration process, it might be useful to list all the database targets in order to make sure that none are missed.
To list all database targets, run the following EM CLI command:
emcli get_targets -targets="oracle_database"
28.2.3.4 Using SQL to verify collection status
The following SQL query can be run on OEM Repository to list the collection status and schedules assigned to the database targets.
select
       t.TARGET_NAME,
       c.COLL_NAME,
       c.IS_ENABLED,
       c.SCHEDULE_EX
  from      SYSMAN.MGMT_TARGETS          t
  left join SYSMAN.MGMT_COLLECTIONS c on t.TARGET_GUID = c.OBJECT_GUID and c.COLL_NAME like 'lms_%_ci%'
  where t.target_type = 'oracle_database'
  order by t.TARGET_NAME, c.COLL_NAME;
28.2.4 Creating a Database Usage Tracking Report
-
Log in to Enterprise Manager. From the Setup menu, select Security and then Monitoring Credentials.
-
Choose the Database Instance target type and click Manage Monitoring Credentials.
-
Select Database Usage Tracking Credentials entry in the Credential Set list and click Search.
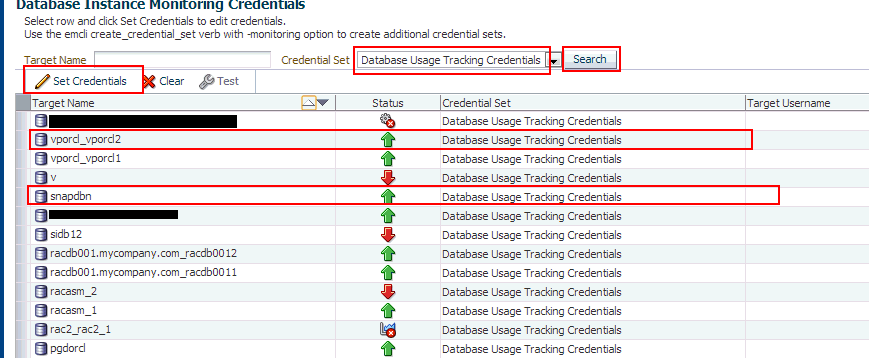
Click on the row for the desired target and then click Set Credentials.
Important:
This operation needs to be performed for all the Database Instances. -
Enter the username and password for a database user with SYSDBA privilege.
-
Alternate method: Use the Enterprise Manager command line utility (EM CLI) to make the above settings as shown in the following examples.
emcli set_monitoring_credential -target_names="testdb1;testdb2" -target_type=oracle_database -set_name=DBCredsLMSMonitoring -cred_type=DBCreds -attributes="DBUserName:<USERNAME>;DBPassword:<PASSWORD>;DBRole:SYSDBA"
28.3 Generating Database Usage Tracking Report
Generating Database Usage Tracking Report consists of the following two steps:
-
Configuring Business Intelligence Publisher (BI Publisher) - setup the delivery destination of the output files (FTP server and folder)
-
Running Usage Tracking Report - produce the CSV files after the data is collected
28.3.1 Configuring Business Intelligence Publisher (BI Publisher)
-
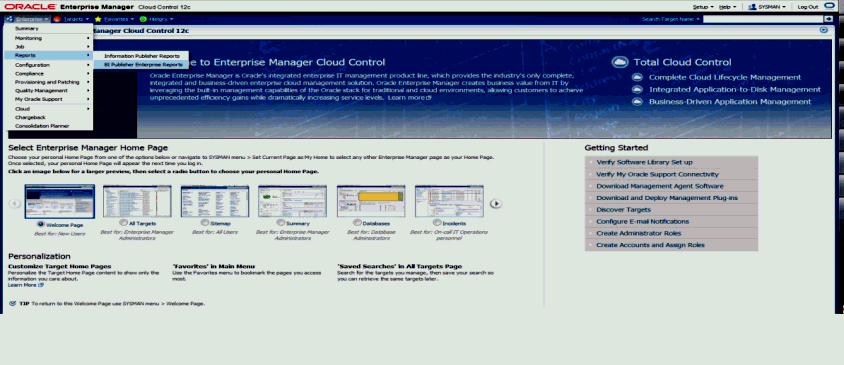
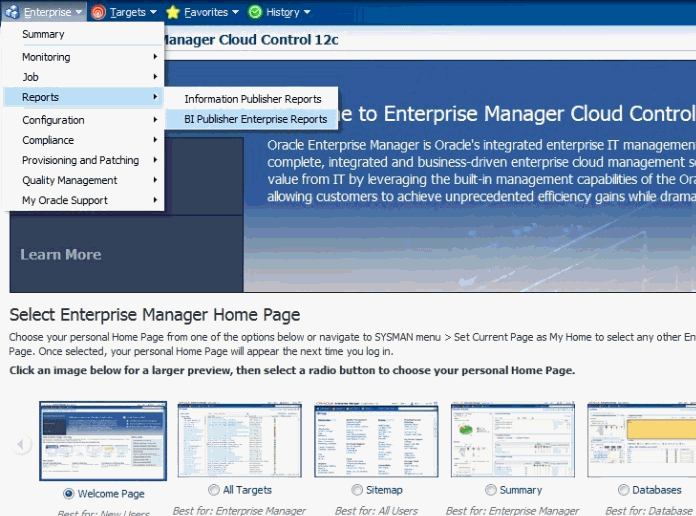
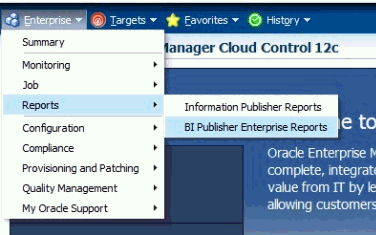
From the Enterprise menu, select Reports and then BI Publisher Enterprise Reports.
-
Click on BI Publisher Enterprise Reports Web Application to navigate to the Oracle BI Publisher URL. Log in to BI Publisher using the same credentials used to Log in to Enterprise Manager.
Important:
Do NOT click on the Database Usage Tracking Report shown at the bottom of the page. The online execution of this Usage Tracking Report has been disabled.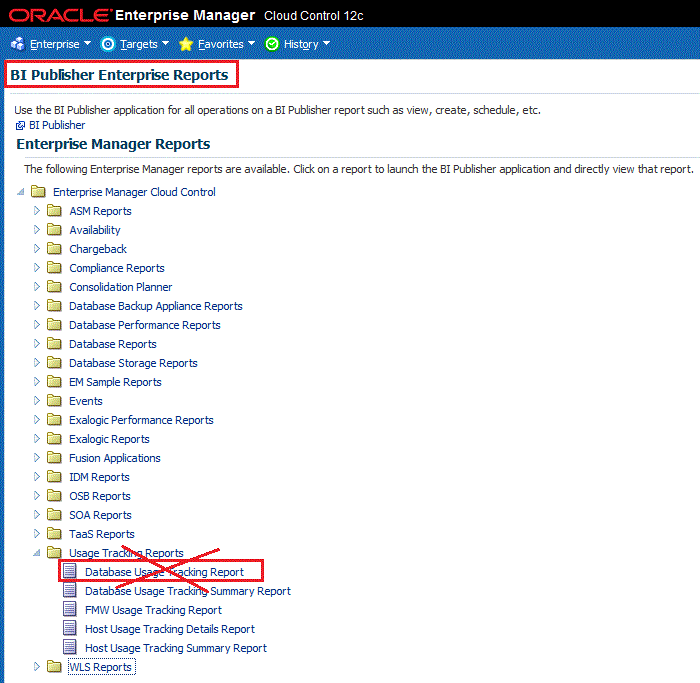
-
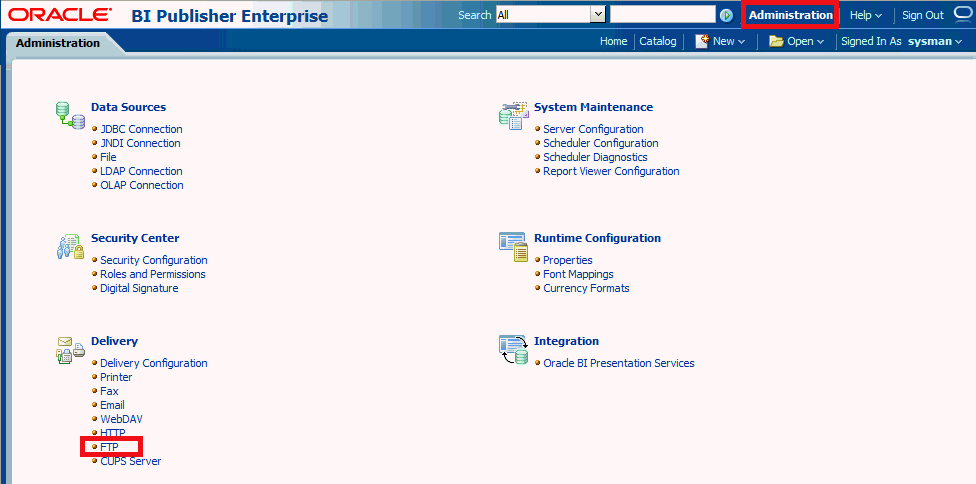
Set up the delivery destination.
Click on the Administration tab on the top right corner of the page. Then select FTP under Delivery as shown below:
-
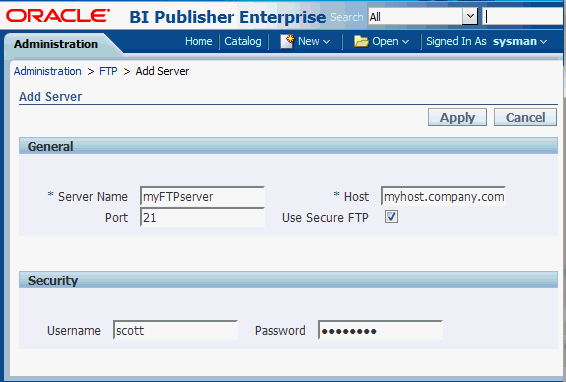
Add an FTP Server:
Click Add Server.
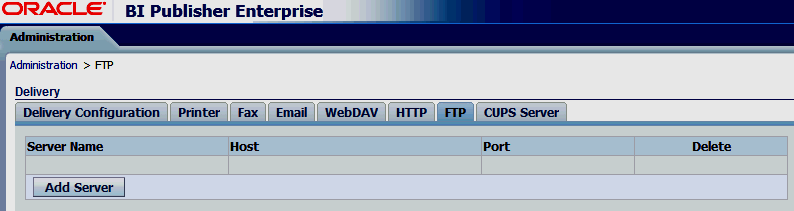
Enter the following fields for the FTP server:
Server Name - Example : myFTPserver (any name of your choice)
Host - Example : myhost.company.com
Port - Example : 22
Select "Use Secure FTP" check box to enable secure FTP (SFTP)
Enter a username and password to connect to the host
-
Configure the data model with the FTP server configured above in step 4.
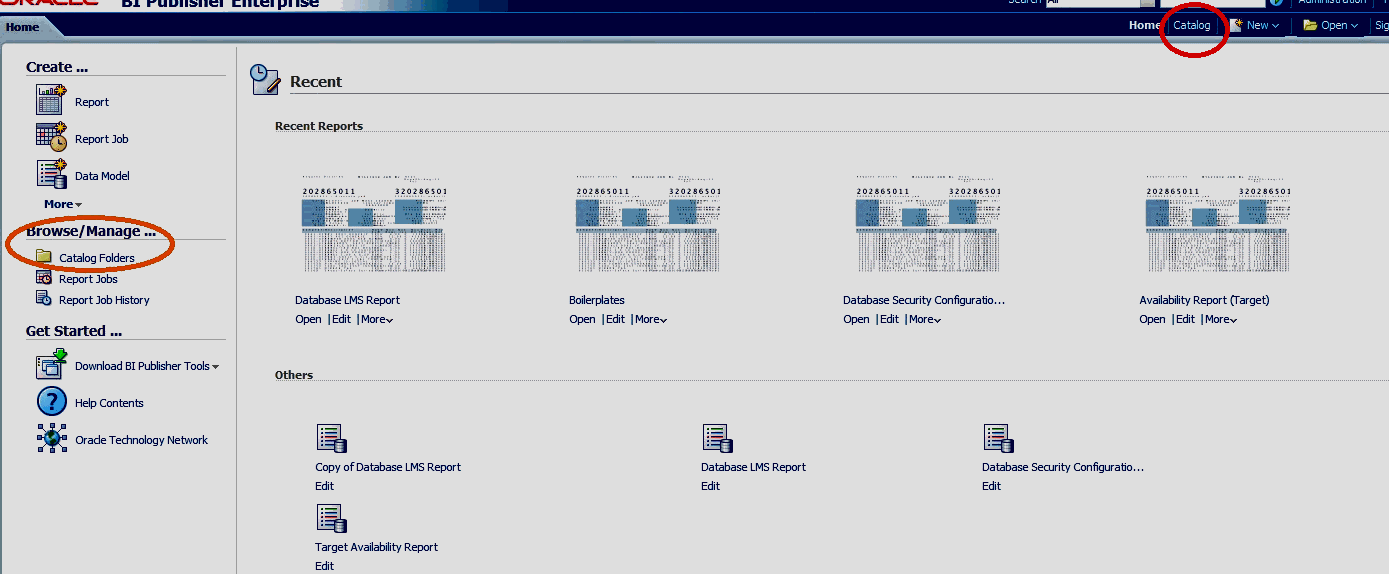
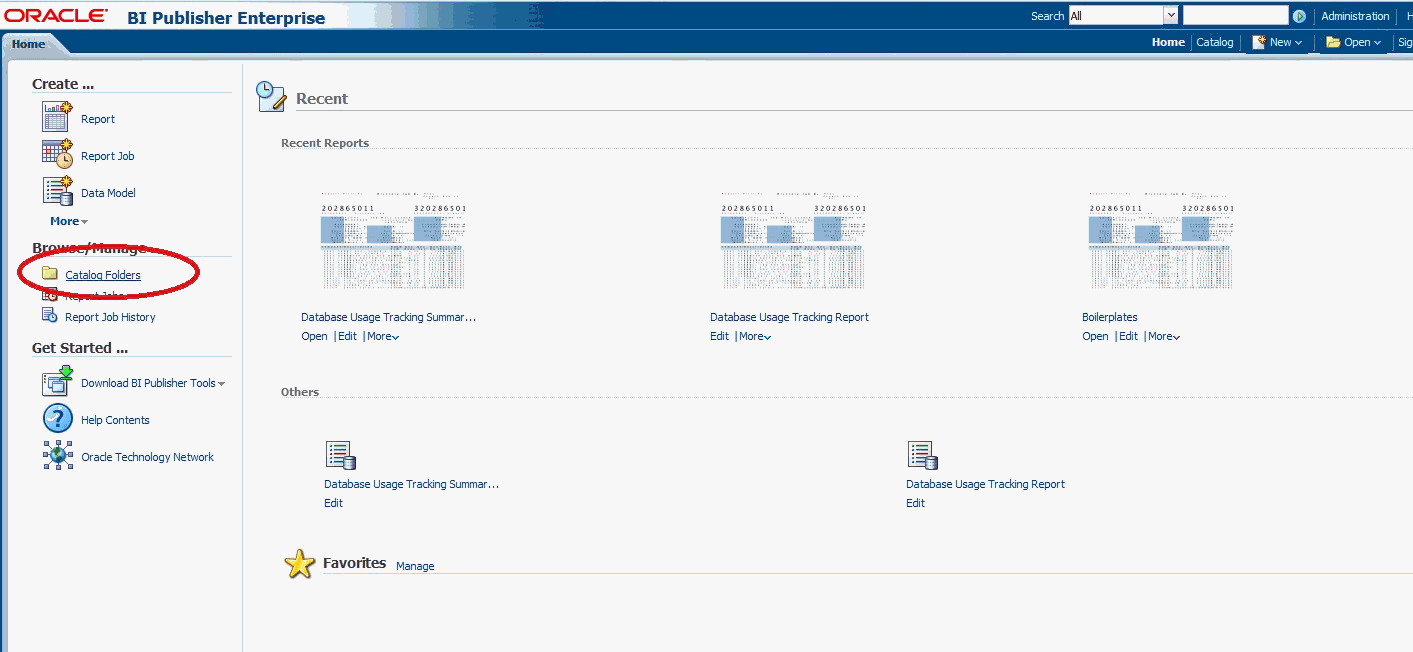
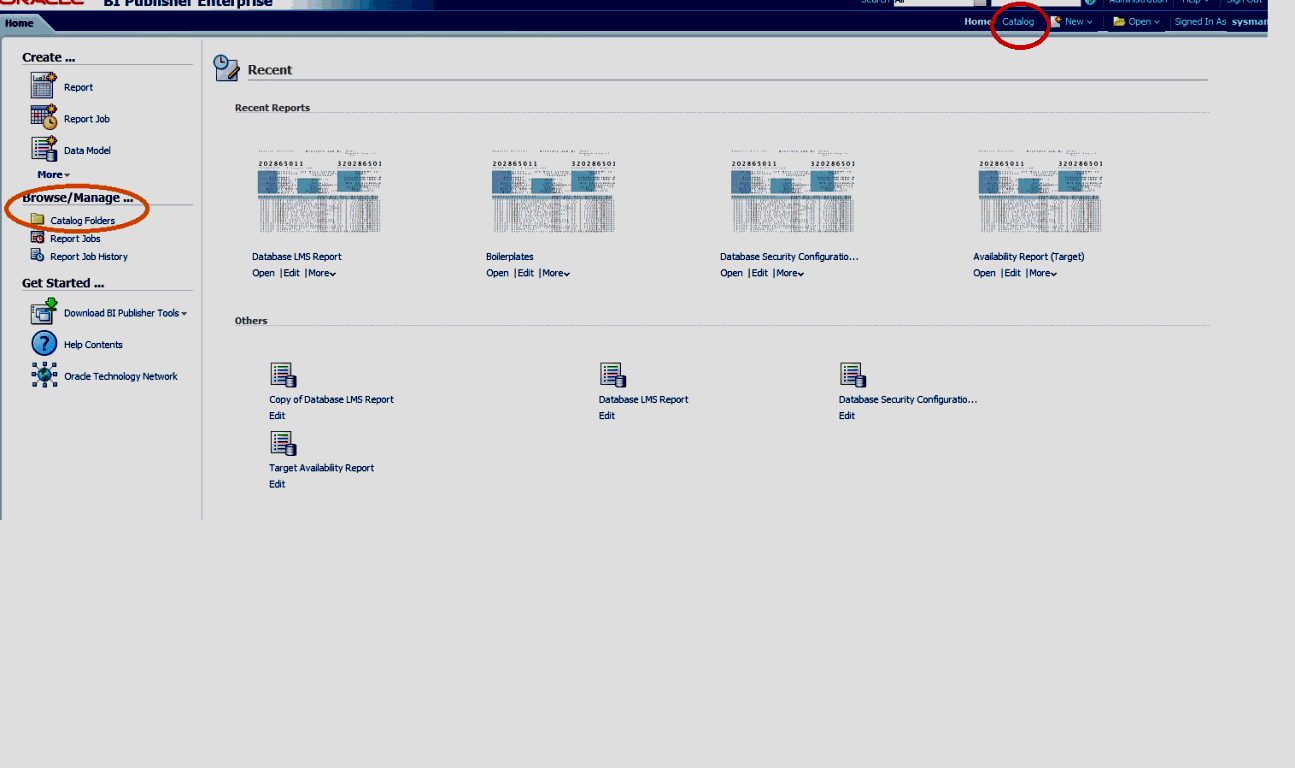
Click on Catalog Folders or alternatively the Catalog menu as shown in the following graphic.
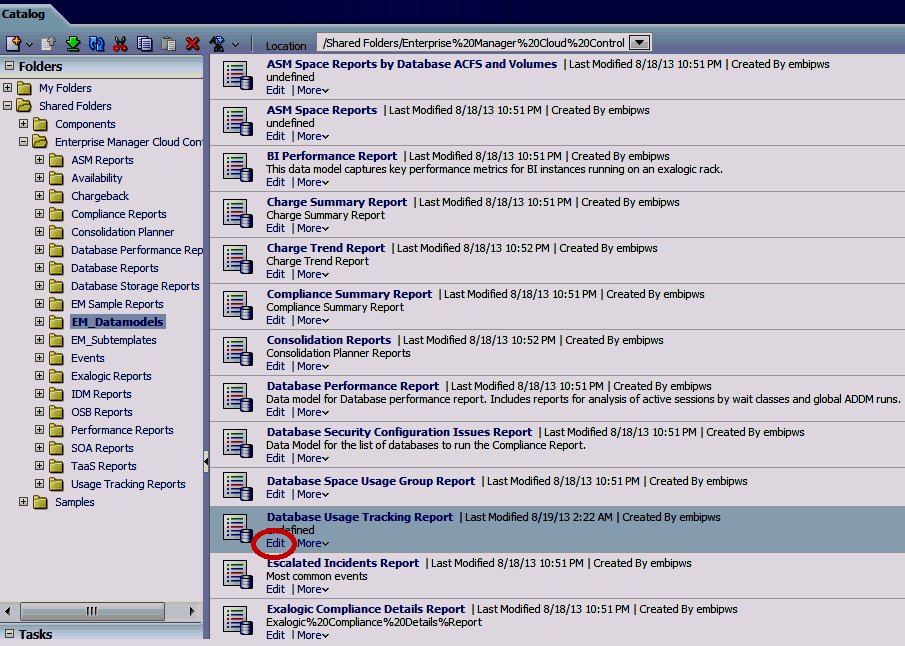
Select Shared Folders, then select Enterprise Manager Cloud Control and then EM_Datamodels
Scroll to Database Usage Tracking Report and click Edit.
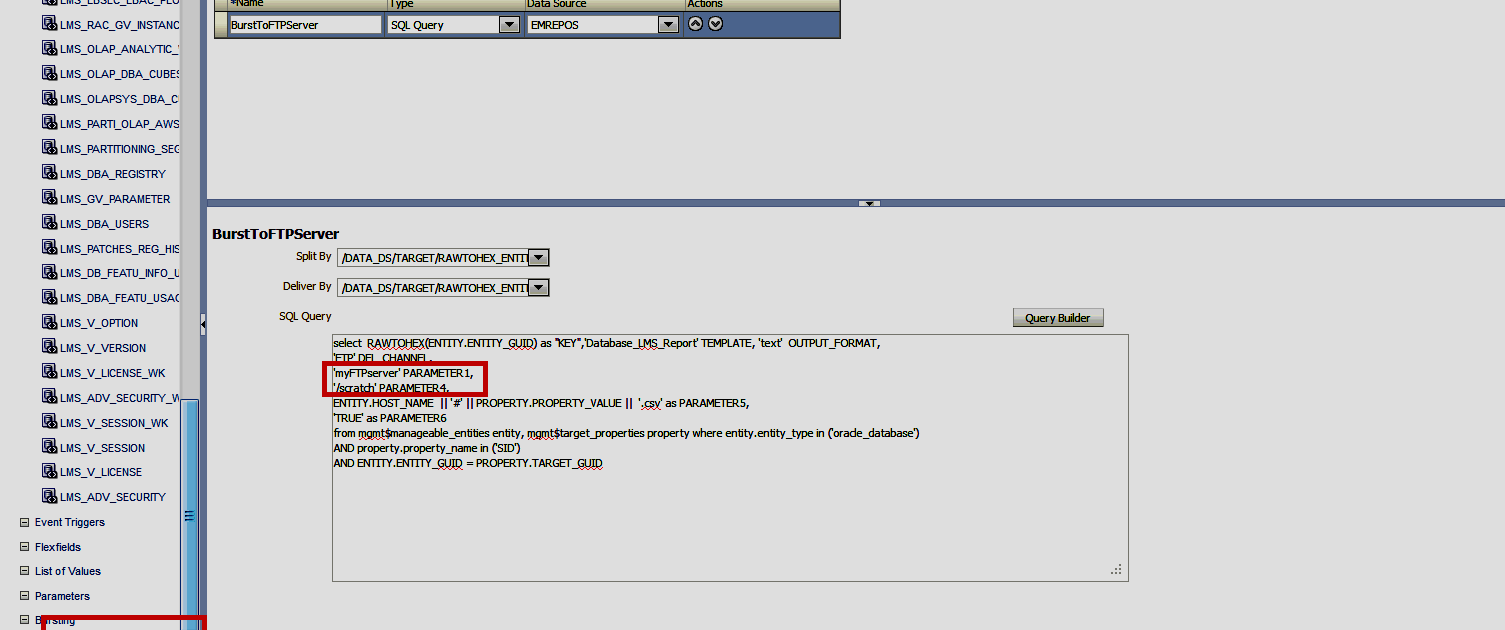
On the bottom of the left list, select Bursting, and then BurstToFTPserver.
In the SQL Query area, update the query as show below:
-
"myFTPserver" (configured in step 4) as the value for the PARAMETER1 column.
-
The output directory (absolute path of the directory on the disk) as the value for the PARAMETER4 column.
-
28.3.2 Running Usage Tracking Reports:
-
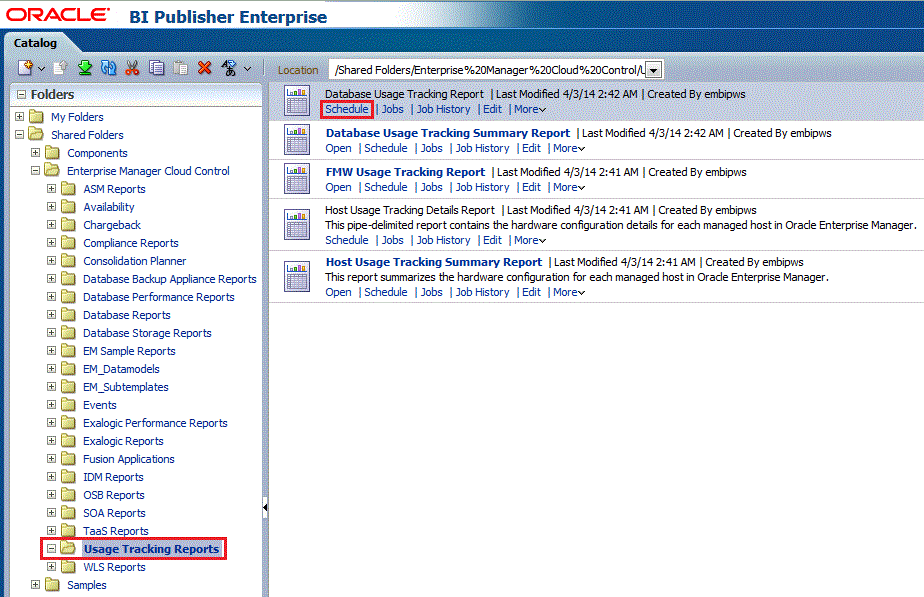
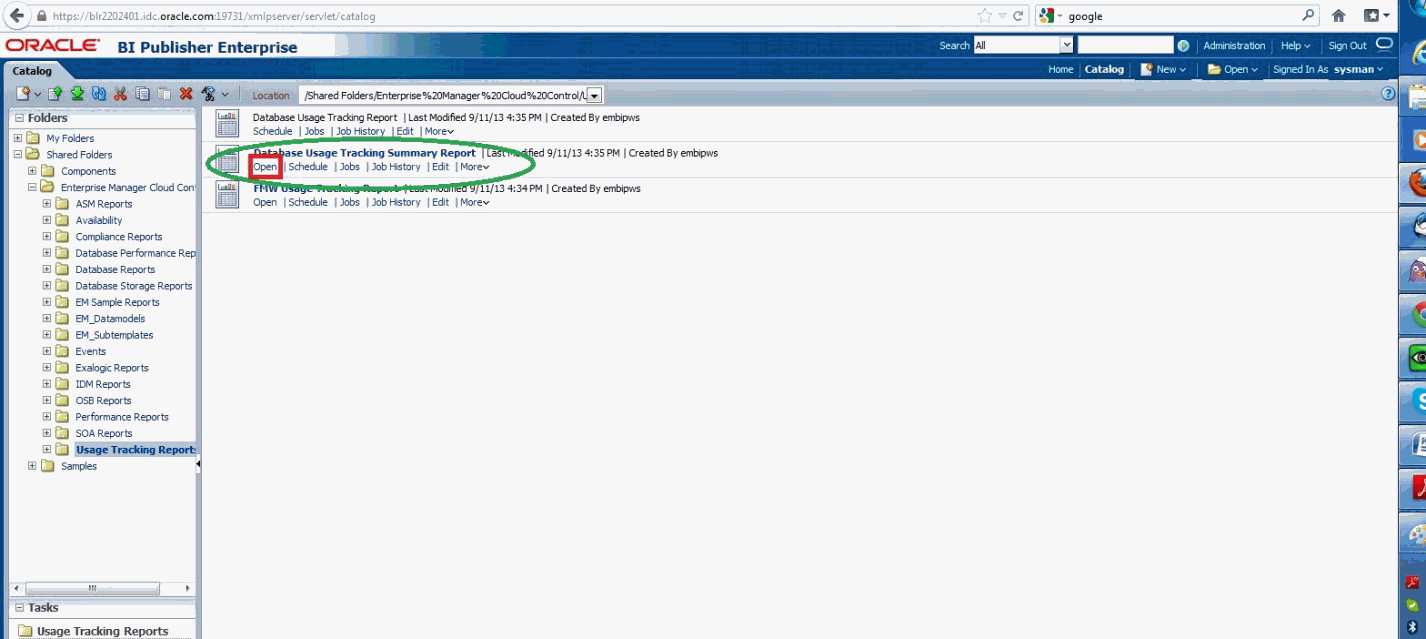
From the Catalog menu, select Shared Folders, then select Enterprise Manager Cloud Control, then Usage Tracking Reports, then Database Usage Tracking Report, and finally Schedule.
-
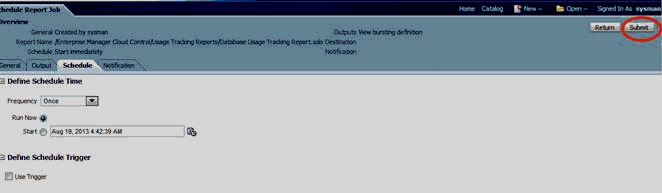
Make sure that, in the Schedule tab, the frequency is set to Once and Run Now is selected. Click Submit.
-
In the popup window, enter a job name to uniquely identify the job later.
The status of the submitted job can be monitored in "Report Job History" page as shown below.

Errors (if any) in the metric collection are displayed at the bottom of each report that gets generated for an instance.
Use the refresh button highlighted in the screen shot (job_running.png) to refresh the status of the job
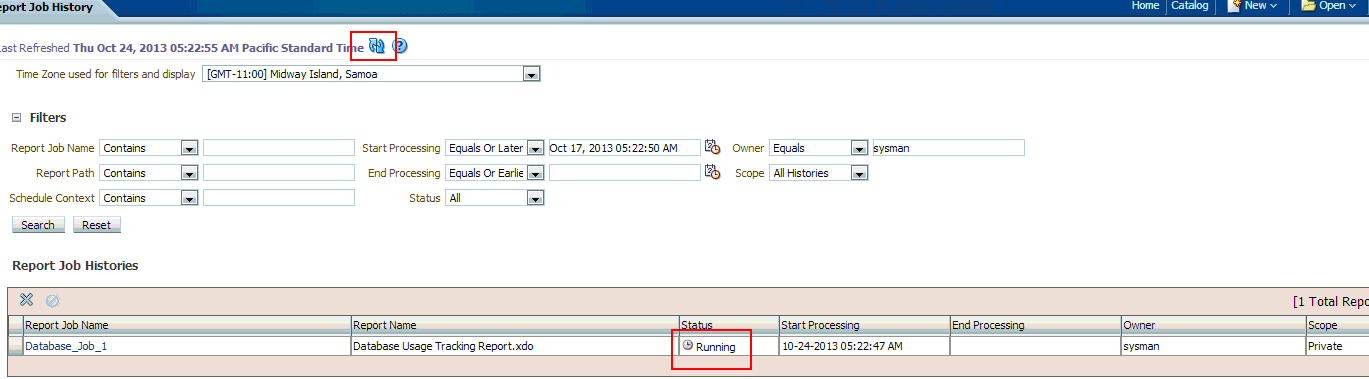
Wait until the status of the job changes from Running to Success.

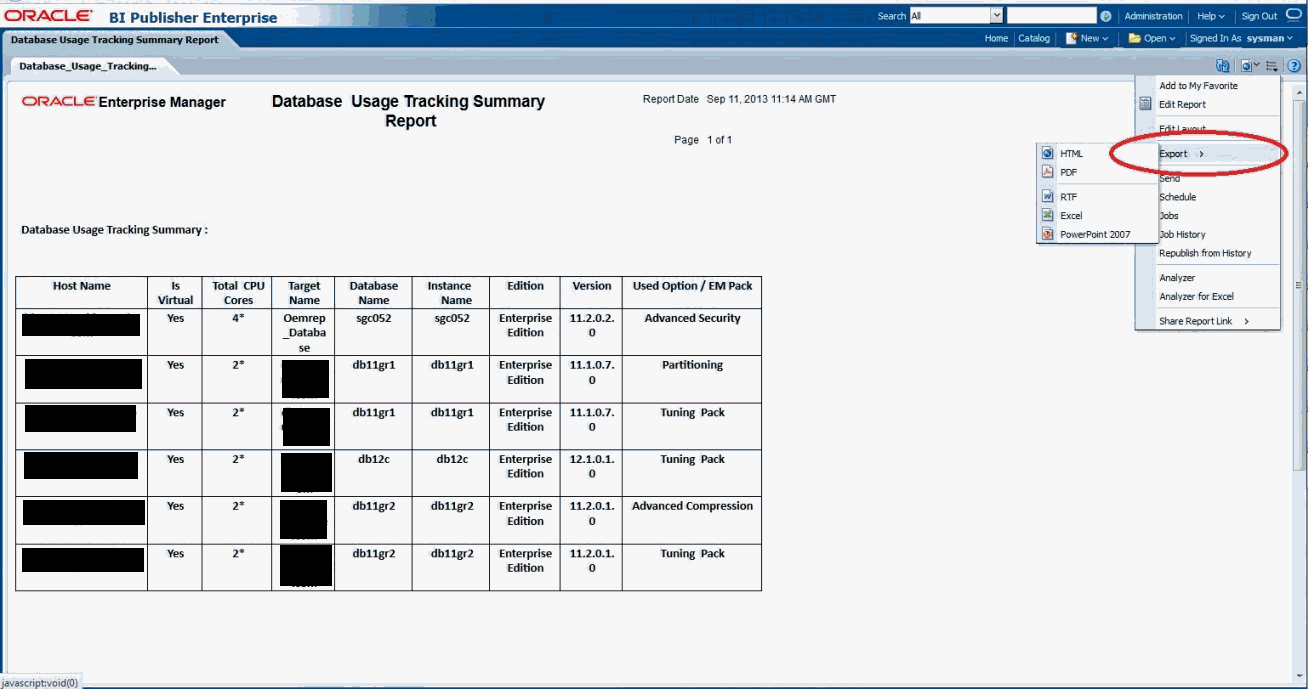
28.4 Database Usage Tracking Summary Report
Follow steps 1, 2 described in "Database Usage Tracking Report" if they have not already been done.
-
Set up Database Usage Tracking credentials.
-
Enable the metric collection.
-
Once logged into Enterprise Manager, from the Enterprise menu, select Reports and then BI Publisher Reports.
-
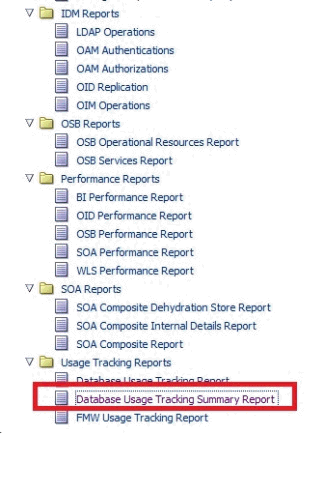
Click on Database Usage Tracking Summary Report in the tree. You will be prompted to log in to BI Publisher for the first time.
-
The report can also be viewed by logging in to BI Publisher.
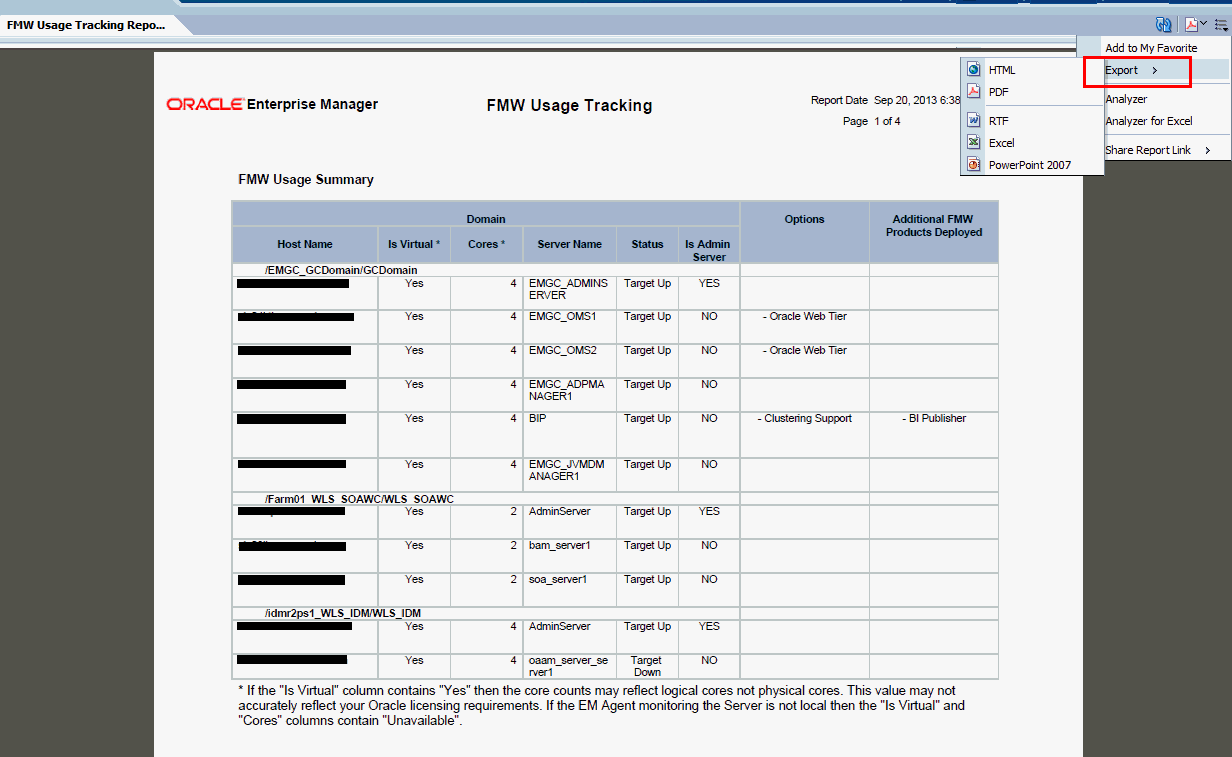
28.5 Fusion Middleware Usage Tracking Summary Report
Note:
The Fusion Middleware Usage Tracking Summary Report contains data that is collected when the Enterprise Manager Fusion Middleware Plug-in is installed. There are no steps required to enable the Fusion Middleware metric collection.-
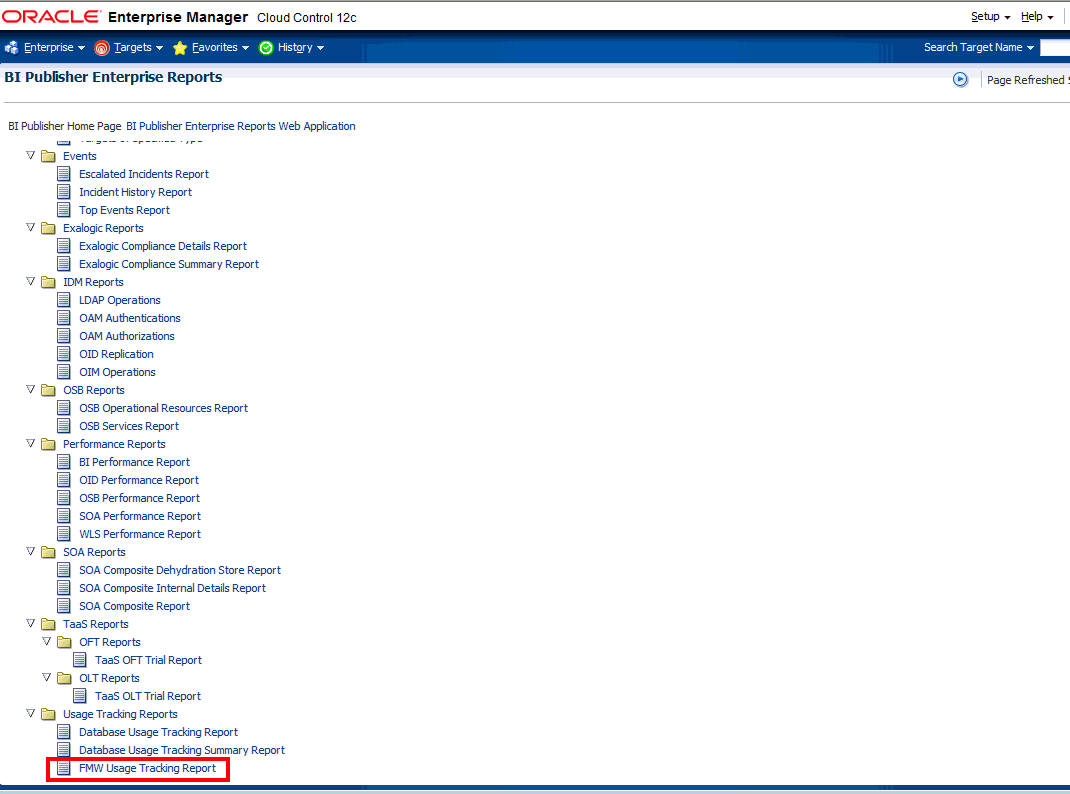
Once logged in to Enterprise Manager, from the Enterprise menu, select Reports, and then BI Publisher Reports.
-
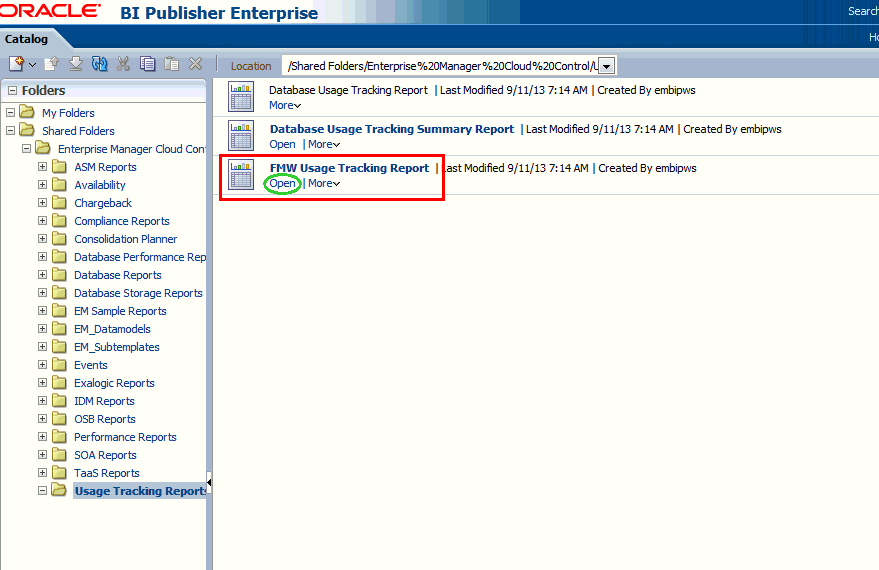
Click on FMW Usage Tracking Report in the tree. You will be prompted to login to BI Publisher for the first time.
-
The report can also be viewed by logging in to BI Publisher.
Click on Catalog Folders or the Catalog Menu as shown.
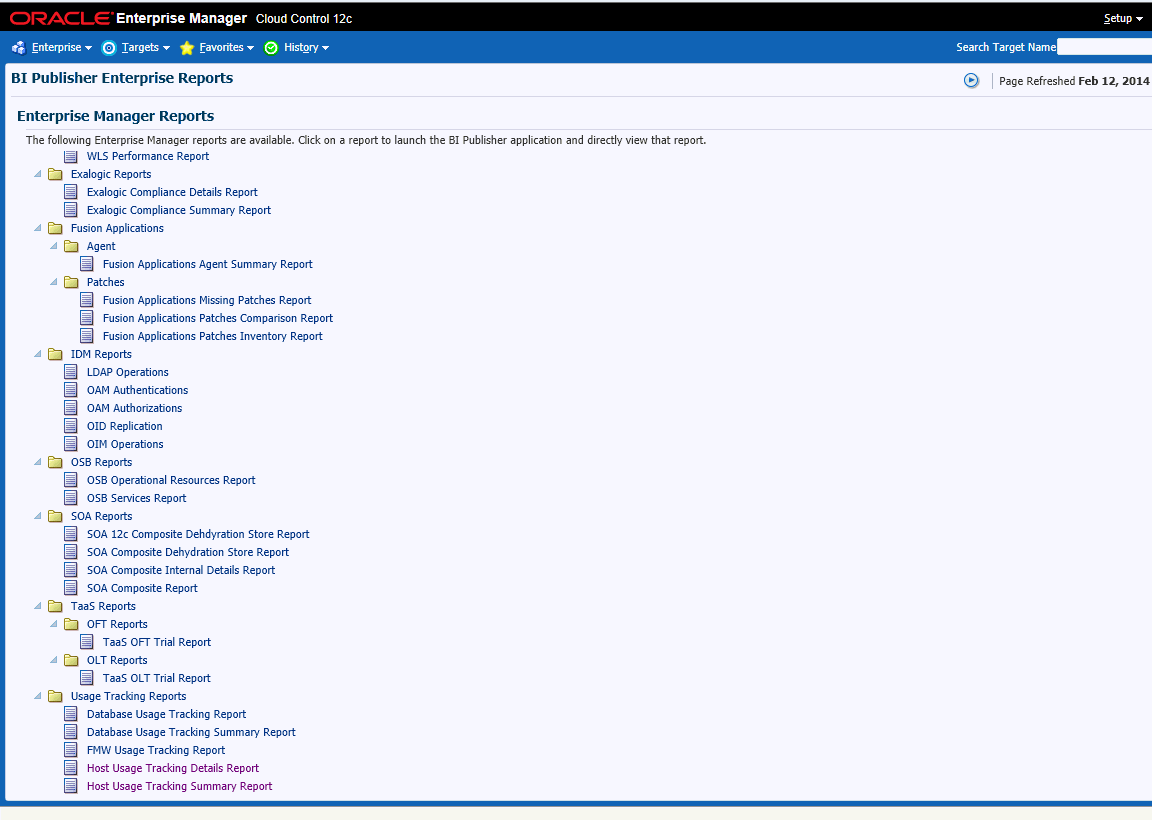
28.6 Host Usage Tracking Reports
The Host Usage Tracking Reports provides an overview of the Host processor information. This is to be used for informational purposes only and this does not represent your license entitlement or requirement. Please contact the License Management Services representative at
http://www.oracle.com/us/corporate/license-management-services/index.html to understand your license requirements.
Two reports namely "Host Usage Tracking Summary Report" and "Host Usage Tracking Details Report" have been added.
-
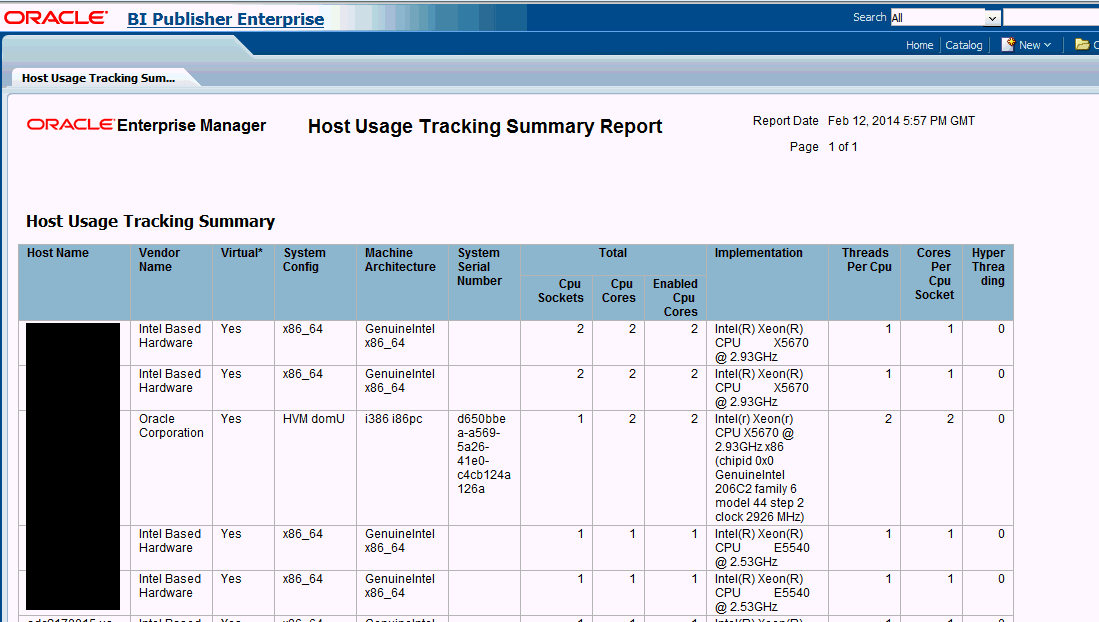
"Host Usage Tracking Summary Report" is a high level summary of the processor information on the Host system.
This report can be run and viewed online. The output report can be exported to PDF, RTF, Excel formats.
-
"Host Usage Tracking Details Report" provides the above usage data in an exportable format. The exported data can be sent to Oracle License Management Services for further analysis to determine licensing requirements. Please contact the License Management Services representative at http://www.oracle.com/us/corporate/license-management-services/index.html to initiate an engagement.
A single file with each managed host's processor information is created. The format of the output files is limited to a pipe delimited file.
28.6.1 Host Usage Tracking Summary Report
-
Once logged into Enterprise Manager, from the Enterprise menu, select Reports and then BI Publisher Reports.
-
In the tree list, click "Host Usage Tracking Summary Report" .You will be prompted to log into BI Publisher for the first time.
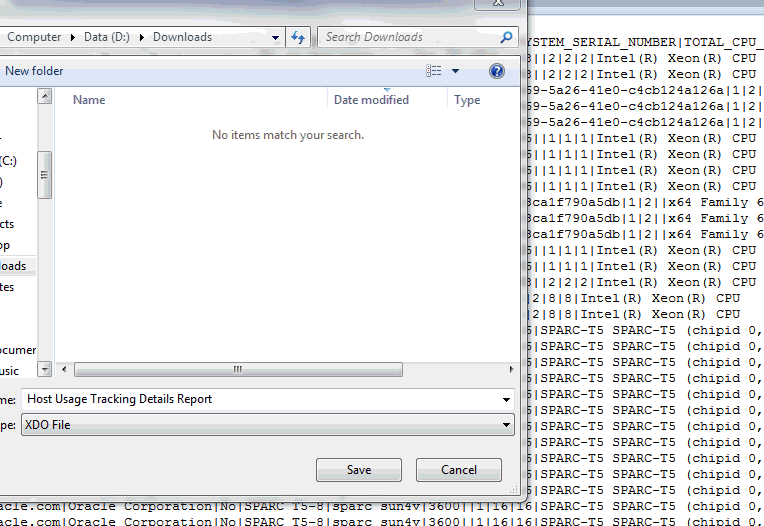
28.6.2 Host Usage Tracking Details Report
-
Once logged into Enterprise Manager, from the Enterprise menu, select Reports and then BI Publisher Reports.
-
In the tree list click "Host Usage Tracking Details Report". You will be prompted to login to BI Publisher for the first time.
-
Click the "View" icon in the upper-right corner and click "Text".

-
Click the "Actions" icon in the upper-right corner and select "Export" then "Text"

-
Select "Save"