9 Defining a Management User Interface
Enterprise Manager can be extended to support the management of new domains through the introduction of discovery, monitoring, and automation. While the Enterprise Manager framework provides a powerful set of features related to these management capabilities, most plug-in developers need to expose management capabilities in a way that is appropriate to their domain. The Metadata Plug-in Custom User Interface (MPCUI) features of Enterprise Manager provide you with this capability.
This chapter contains the following sections:
9.1 Introduction to Defining a Management User Interface
As a plug-in developer, you are responsible for the following steps for defining a custom user interface for managing your target types:
Note:
In addition to this document, the Extensibility Development Kit (EDK) includes a complete sample implementation that should be used as a guide during this process.-
Decide on the model for your target including:
-
Associations with other targets
-
Performance metrics and configuration data
-
Subcomponents of the target
-
Administrative tasks and operations
-
-
Familiarize yourself with the capabilities provided by the MPCUI library, such as:
-
UI components that are available (pages, charts, and so on)
-
Services that are available (metric data, SQL query, associations, task execution, and so on)
-
Difference in capabilities between a metadata-only implementation and a Flex implementation
-
Sample implementations and how they are constructed
-
-
Design the UI based on:
-
Data and tasks that are important
-
Capabilities provided by MPCUI
This can involve drawing the pages and describing their content, and reviewing the page with domain experts to ensure they expose the appropriate management capabilities.
-
-
Select the metadata-only or Flex implementation option.
For more information, see Section 9.3, "UI Options for a Plug-in".
Note:
It is easy to migrate the metadata-only approach to a Flex implementation later if required. For more information, see Section 9.8, "Converting a Metadata-based UI to a Flex-based UI". -
Create the target metadata for the items in your design (see step 1). This metadata is necessary to implement your UI later. For more information about target metadata, see the relevant chapters within this guide.
-
Develop the SQL queries required to retrieve configuration data that will be displayed in the UI. Typically, these queries reference the configuration
CM$views.For more information about configuration data, see Chapter 7.
-
Identify and define the activities that make up your UI, such as pages, wizards, and dialogs. The Integration metadata defines these activities.
For more information, see Section 9.5.2, "Defining Integration Metadata".
-
If you selected the Flex implementation option, then continue with the steps in Section 9.1.1, "Flex Implementation". Otherwise, continue with the steps in Section 9.1.2, "Metadata-only Implementation".
9.1.1 Flex Implementation
If you are using the Flex implementation option, then you are responsible for the following steps:
-
Obtain a copy of Adobe Flash Builder or download the Adobe Flex Software Development Kit (SDK).
For more information, see Section 9.30, "Development Environment Options".
Note:
The Adobe Flex SDK is free but it does not provide graphical editing or debugging capabilities. -
Create a project (if using Adobe Flash Builder) to hold the source code for your custom UI. You can use the sample project included in the EDK as a template. Ensure that the project settings are correct.
For more information, see Section 9.30.2, "Developing MPCUI in Adobe Flash or Flex Builder".
-
Implement an MXML class that extends the
MpApplicationclass. This is the Flex application class.For more information, see Section 9.6, "Defining the MPCUI Application".
-
Implement an MXML class that extends the
Integrationclass. This defines the set of activities included in the custom UI.For more information, see Section 9.6.1, "Defining the Application Activities (Integration Class)".
-
Develop each activity (such as page or dialog). Typically, each page includes a page class (written in MXML, extending the Page class) and a controller class (written in ActionScript extending the ActivityController class).
For more information, see Section 9.6.2, "Defining Pages", Section 9.6.3, "Defining Dialogs", and Section 9.6.4, "Defining Trains and Train Pages".
-
Build and test your custom UI from Adobe Flash Builder.
Note:
You must deploy at least one version of your plug-in before building and testing. The deployed plug-in must include the target metadata (such as metrics and configuration data). However, the plug-in does not have to include your MPCUI metadata for testing. -
Create the MPCUI metadata file.
This file includes:
-
SQL statements used by your custom UI
-
Menu items you want to include to support navigation to different pages defined in your UI
-
Reference to the Flex UI that you built
For more information, see Section 9.4, "Creating the MPCUI Metadata File".
-
-
Modify your plug-in to include the MPCUI metadata file and the SWF file built in Adobe Flash Builder.
Place these files in the oms/metadata/mpcui directory of the plug-in staging area.
For more information, see Section 9.7, "Packaging the MPCUI Implementation With the Plug-in".
-
Test your custom UI by accessing a target home page from the Enterprise Manager console.
This loads your custom UI in the context of the Enterprise Manager application and displays the Enterprise Manager application and target menus.
In addition to this document, additional resources for developing with Flex components are provided:
-
The API reference: This is located in your partner EDK directory under doc/sdk_api_ref.html
-
The HostSample example plug-in: The sample plug-in provided by Oracle provides examples of many MPCUI features. It is located in the EDK under samples/plugins/HostSample
You may also include any of the base Flex components (such as Button, Label, and so on). Oracle does not provide the documentation for Flex components as part of the EDK, but you can find the documentation online at the following link:
http://helpx.adobe.com/flex.html
9.1.2 Metadata-only Implementation
If you are using the metadata-only implementation option, then you are responsible for the following steps:
-
Create the MPCUI metadata file.
This file includes:
-
SQL statements used by your custom UI
-
Menu items you want to include to support navigation to different pages defined in your UI
-
All the metadata definitions discussed in the following steps
For more information, see Section 9.4, "Creating the MPCUI Metadata File".
-
-
Add the integration metadata to the MPCUI metadata file.
The integration metadata defines the set of activities included in the custom UI.
For more information, see Section 9.5.2, "Defining Integration Metadata".
-
Add the page definitions (ActivityDefinitions) to the MPCUI metadata file.
For more information, see Section 9.5.3, "Defining Navigation".
-
Modify your plug-in to include the MPCUI metadata file.
Place these files in the oms/metadata/mpcui directory of the plug-in staging area.
For more information, see Section 9.7, "Packaging the MPCUI Implementation With the Plug-in".
-
Test your custom UI by accessing a target home page from the Enterprise Manager console.
This loads your custom UI in the context of the Enterprise Manager application and displays the Enterprise Manager application and target menus.
9.2 MPCUI Concepts
There are several important concepts that should be understood when using the MPCUI framework. These concepts are defined briefly in this section and discussed in more detail in the subsequent sections.
9.2.1 Integration Class
The integration class is the bootstrap for your application, and is used to define the set of pages, dialogs, and trains that are included in the application. The MPCUI framework uses the information included in the integration class to drive the application including managing navigation between UI elements.
9.2.2 Activity
Top-level UI elements in the MPCUI are referred to generally as activities. Activities include pages, dialogs, trains and train pages, URLs, and jobs.
9.2.3 Page
Flex does not include the notion of a page, though this is a construct that is provided by the MPCUI framework to simplify the construction of the UI and make it fit more naturally into the larger Enterprise Manager console.
The MPCUI framework manages pages within the application, providing simple navigation between pages and integrating them into the browser history and the Enterprise Manager menu system.
9.2.4 Services
The MPCUI framework provides a series of services that can be used to retrieve data from the Management Server or to process actions (jobs or remote operations).
9.2.4.1 Data Services
The Data Services provided by MPCUI include data services to retrieve metric data, associations, target properties and so on. It includes a SQLDataService that can be used to run named SQL statements within the plug-in.
9.2.4.2 Operation Services
MPCUI includes a Job service and RemoteOp service that can be used to perform administrative actions against the targets managed by the plug-in code.
-
The Job service requires the inclusion of job type definitions in the plug-in
-
The RemoteOp service requires the registration of scripts with the plug-in framework
9.2.4.3 Asynchronous Service Request Handling
The Adobe Flex and Adobe Flash framework (and therefore the MPCUI framework) handles network requests asynchronously. This requires the use of a result handler pattern where a request is made to the server and as part of the request, a handler (or callback) is registered with the request. Upon completion of the request (or if a fault occurs), the handler is called and passed the result.
9.2.5 URL
MPCUI provides a number of different capabilities related to the generation of URLs and the ability to embed links to:
-
Other Enterprise Manager pages
-
Other pages within the MPCUI application
-
External pages
Because MPCUI is a Flex application, it is not quite as easy as embedding a link to a URL. For more information about URLs, see Section 9.10.2, "URL and Links".
9.3 UI Options for a Plug-in
The following UI options for a metadata plug-in are:
-
Use the default home page with limited information and no customization.
-
Convert a metadata plug-in (release 10.2 or 11.1) that includes home page customizations. Provides a home page with the same information as release 11.1 but no customization. For more information, see Section 9.31, "Migrating Home Page Customizations".
-
Metadata-only implementation using MPCUI. Provides a customized UI but with restrictions. For more information, see Section 9.3.1, "Metadata-only Implementation".
Note:
You can implement the UI using metadata only. Then, if you want to add features that are only available in the Flex implementation, evolve the metadata-only implementation to create a Flex implementation. For more information, see Section 9.8, "Converting a Metadata-based UI to a Flex-based UI". -
Flex implementation using MPCUI. A more complex implementation but provides most flexibility and features. For more information, see Section 9.3.2, "Flex Implementation".
9.3.1 Metadata-only Implementation
MPCUI metadata is XML that describes the layout of the UI and the binding to Enterprise Manager services. For more information about MPCUI metadata, see Section 9.4, "Creating the MPCUI Metadata File"
Use the Demo Host Sample (demo_hostsample) as a starting point or else you can develop a new UI. The UI must include at least one page (the home page), and can optionally include other pages. Each page definition is included in the MPCUI metadata file.
In addition to the metadata description of each page, the metadata must also include an integration definition. For more information about integration definitions, see Section 9.5.2, "Defining Integration Metadata".
9.3.2 Flex Implementation
The Flex implementation option provides additional capabilities for providing a customized UI on top of administrative capabilities included in the plug-in as jobs or as Agent scripts.
While one of the goals of the MPCUI framework is to provide a simplified layer of abstraction over the Flex framework with which it is implemented, you must become familiar with the Flex framework and how to develop using the Flex framework.
9.3.2.1 MXML
Flex includes a tag language (MXML) that can be used to lay out the user interface and bind the UI components to data elements. Much of what you do using MPCUI can be accomplished in MXML.
Note:
MXML is used for the metadata-only and Flex-based implementations.-
For the metadata-only implementation, use MXML to define all the pages within the MPCUI metadata file. For more information, see Section 9.5.2.1, "Defining Pages".
-
For the Flex-based implementation, save the metadata for each page in a separate MXML file to compile into a SWF file. For more information, see Section 9.6.2, "Defining Pages".
9.3.2.2 ActionScript
For cases that require more complex handling of data or events, you might have to develop part of the UI using ActionScript (the ECMA-script compliant programming language). Developers familiar with Java should become comfortable with ActionScript quickly.
9.3.2.3 SWF Binary File
When building a Flex application, the MXML and ActionScript are compiled to form a binary file. This binary format (*.swf) is included in the plug-in and interpreted by the Adobe Flash Player at run time. The Enterprise Manager extensibility framework and the MPCUI framework, in particular, handle the integration of the SWF with the necessary Enterprise Manager wrapper page and handle rendering of that page at run time. You do not have to construct additional Application Development Framework (ADF), HTML, or JavaScript to enable the display of your custom UI.
9.3.2.4 Defining the Home Page
Build the UI by defining pages and custom UI using the MPCUI components and services, and building an Adobe Flex application that is shipped as part of your plug-in. This option provides flexibility and control over the UI, but also requires additional effort to understand the components and services provided by the MPCUI framework.
If the modifications to the home page template are simple, take advantage of the MPCUI framework ability to ship metadata to describe the page, thus avoiding the requirement to build and package a Flex application (MPCUI SWF).
9.4 Creating the MPCUI Metadata File
Each plug-in that includes MPCUI must include an MPCUI metadata file.
The metadata file:
-
Defines SQL queries required by the MPCUI
-
Defines the menu items required by the MPCUI
-
Contains UI metadata (the layout of the custom UI) (Metadata-based option only)
-
Specifies the SWF (file name that includes the MPCUI) (Flex-based option only)
-
Specifies target icons, target navigator, and system home page options
-
Specifies the Discovery SWF (file name that includes the Guided Discovery UI) (Flex-based option only)
For more information about the syntax for this file, see the XSD file located in the Extensibility Development Kit (EDK) specifications.
Example 9-1 provides a summary of the metadata-based UI MPCUI metadata file and Example 9-2 provides a summary of the Flex UI metadata file
Example 9-1 MPCUI Metadata File for Metadata-based UI
  <CustomUI target_type="demo_hostsample"
                 xmlns="http://www.oracle.com/EnterpriseGridControl/MpCui/">

    <!-- SqlStatements defines the individual SQL statements that are used by
       the MPCUI code.  Each statement is identified by a unique name and
       can only be referenced by that name from the MPCUI code itself -->
    <SqlStatements>
      <Sql name="INSTANCE_INFO">
          select * from...
      </Sql>
    </SqlStatements>

  <UIMetadata>
    <Integration>
    .....
    </Integration>

    <ActivityDefinition
    .....
    </ActivityDefinition

  </UIMetadata>

    <!-- MenuMetadata defines the set of menu items that should appear in the
         target menu on the homepage and specifies which of the MPCUI pages
         should be accessed from that menu item -->
    <MenuMetadata>
      <menu label=”Host Sample”>
        <menuItem>
          <command .. />
        </menuItem>
      </menu>
    </MenuMetadata>

    <EmuiConfig>
      <context-pane-visible>true</context-pane-visible>
      <large-icon>dhs_large.png</large-icon>
      <small-icon>dhs_small.png</small-icon>
      <use-framework-homepage>true</use-framework-homepage>
    </EmuiConfig>

  </CustomUI>
Example 9-2 MPCUI Metadata File for Flex-based UI
  <CustomUI target_type="demo_hostsample"
                 xmlns="http://www.oracle.com/EnterpriseGridControl/MpCui/">

    <!--
    SQL Statements to be used by the custom UI code.  All bind variables should be
    identified using "?VAR?" type notation, and can then be referenced using
    either the SQLDataService MXML tag or using the SQL or BatchSQL services.
    -->
    <SqlStatements>
      <Sql name="INSTANCE_INFO">
          select * from...
      </Sql>
    </SqlStatements>

    <!--
      SwfFiles tag is used to register the Flex application (must extend
      MpApplication) that includes the custom UI for the plug-in.
      The SWF file registered must be included in the plug-in along with this
      meta-data in the oms/metadata/mpcui directory.
    -->
   <SwfFiles>
      <Swf is_homepage="true">HostSample.swf</Swf>
      <Swf discovery_module="DemoHostSample">HostSampleDiscovery.swf</Swf>
    </SwfFiles>

    <!-- MenuMetadata defines the set of menu items that should appear in the
         target menu on the homepage and specifies which of the MPCUI pages
         should be accessed from that menu item -->
    <MenuMetadata>
      <menu label=”Host Sample”>
        <menuItem>
          <command .. />
        </menuItem>
      </menu>
    </MenuMetadata>

    <EmuiConfig>
       <large-icon>dhs_large.png</large-icon>
       <small-icon>dhs_small.png</small-icon>
    </EmuiConfig>

  </CustomUI>
9.4.1 Overview of MPCUI Metadata Elements
Table 9-1 describes the key elements that define the discovery metadata.
Table 9-1 Key Elements Used to Define Discovery Metadata
| Element | Description |
|---|---|
|
The |
|
|
The
<UIMetadata>

  <!-- The meta-data only definition must include an Integration element
  which defines the set of activities (pages, dialogs, etc.) that make up
  the application -->
  <Integration>
    <intg:Integration targetType='demo_hostsample' xmlns:intg="oracle.sysman.emx.intg" >
    ..
    </intg:Integration>
  </Integration>

  <!-- The meta-data only definition must include 1 or more ActivityDefinition
  elements each of which defines an activity (e.g. page, dialog, etc.) -->
  <ActivityDefintion>
    <intg:Page id=”homePg” label=”Home Page” ...>
    </intg:Page>
  </ActivityDefintion>

</UIMetadata>
|
|
|
The |
|
|
The |
|
|
The |
|
|
The |
|
|
|
The
|
9.5 Defining Metadata
For a complete example of an MPCUI metadata implementation, see the Demo Sample implementation (demo_hostsample_uimd_fullmd.xml) provided with the Extensibility Development Kit (EDK).
9.5.1 Limitations of the Metadata Implementation
This implementation supports the definition of pages only, and does not support the definition of dialogs or trains. If the custom UI requires dialogs or trains, then you must use the Flex-based option for building your home page. For more information, see Section 9.3.2, "Flex Implementation".
The ability to perform manipulation of data for display or the ability to respond to some UI events and to invoke jobs or remote operations is not available in this implementation.
9.5.2 Defining Integration Metadata
Use the integration metadata to specify the set of pages and to define task flows between these pages (if required).
Example 9-3 Integration Metadata
    <Integration>
       <mp:Integration targetType="demo_hostsample" xmlns:mp="http://www.oracle.com/mpcui/">
         <mp:PageActivityDef id="homePg" label="Home" isDefaultPage="true" />
         <mp:PageActivityDef id="perfPg" label="Performance" />
         <mp:PageActivityDef id="processesPg" label="Processes" />
         <mp:PageActivityDef id="adminPg" label="Configuration" />
         <mp:DialogActivityDef id="detailsDialog" label="Metrics Detail" />
         <mp:DialogActivityDef id="metricHistory" label="Metric History">
           <mp:inputParams>
             <mp:InputParam name="targetName" />
             <mp:InputParam name="targetType" />
             <mp:InputParam name="metric" />
             <mp:InputParam name="columns" />
             <mp:InputParam name="period" />
             <mp:InputParam name="title" />
           </mp:inputParams>
         </mp:DialogActivityDef>
         <mp:DialogActivityDef id="metricDetails" label="Metric Details">
           <mp:inputParams>
             <mp:InputParam name="targetName" />
             <mp:InputParam name="targetType" />
             <mp:InputParam name="metric" />
             <mp:InputParam name="columns" />
             <mp:InputParam name="period" />
             <mp:InputParam name="title" />
           </mp:inputParams>
         </mp:DialogActivityDef>
       </mp:Integration>
    /<Integration>
9.5.2.1 Defining Pages
The page metadata defines the layout of a page including the components that make up the page and the data that is displayed on the page. Each page is contained within its own XML and must be registered with the home page Metadata Registration Services (MRS) using the same activity identifier specified for the page in the integration metadata. For more information about the integration metadata, see Section 9.5.2, "Defining Integration Metadata".
Note:
The tag language used to define pages is a subset of the tag language supported for the Flex-based implementation. You can take a page defined in a metadata file and turn it into a page that is part of an MPCUI application (SWF file) by:-
Changing the file extension from XML to MXML
-
Adding the appropriate MXML namespace at the top of the file
For more information, see Section 9.8, "Converting a Metadata-based UI to a Flex-based UI".
Example 9-4 is a partial sample of a metadata page definition:
Example 9-4 Metadata Page Definition
<ActivityDefinition>
<!--
Each page included in the plugin UI should extend the Page class and be
coded in MXML.
The page file specifies the layout of the page, declares some of the data
binding (see below) and specifies handlers for events that are initiated in
the page, when a user clicks a button or link for example. The page also
has a controller class (that extends PageController)that is associated with
the page. The controller loads data shown in the page and includes
functions that are called as event handlers.
-->
<mp:Page id="homePg" label="Home Page"
xmlns:mx="http://www.adobe.com/2006/mxml"
xmlns:mp="http://www.oracle.com/mpcui/" >
<!--
Data Services - these are sources of data that will be shown in the
page. Data can either be bound from a data service declared here, or it
may be loaded within the controller.
-->
<mp:services>
<!--
SQLDataService - this service allows you to execute a SQL query packaged
with your plugin and then refer to the result set from the query
execution. Properties passed to the query are declared as name-value
pairs. If the properties are runtime/dynamic properties then
you will have to use the SQL service within the controller, load the
data there and then map the result set to the page model.
-->
<mp:SQLDataService id="ids" queryID="INSTANCE_INFO" properties="{props('TARGET_GUID',appModel.target.guid)}" />
<mp:SQLDataService id="cht1" queryID="CHTSQL1" properties="{props('HC_TARGET_GUID',appModel.target.guid)}" />
<!--
MetricValuesDataService - this service allows you to obtain data for a
metric, for some period of time. This time period may be a historical
time period, or it may be REALTIME which creates a data service that
will poll for the current value of the metric through the Agent.
-->
<mp:MetricValuesDataService id="mv1"
flattenData="true"
targetName="{appModel.target.name}" targetType="{appModel.target.type}"
metricName="CPUProcessorPerf"
columns="{['CPUUser','CPUIdle']}"
timePeriod="LAST_DAY" />
<!--
AvailDataService - this service obtains target availability, that
includes current status, availability for the last 24 hours, and up
since time.
-->
<mp:AvailDataService id="ads" targetName="{appModel.target.name}" targetType="{appModel.target.type}" />
<!--
AssociationService - this service obtains associated targets
-->
<mp:AssociationDataService id="asc" targetName="{appModel.target.name}" targetType="{appModel.target.type}" assocTypes="{['hosted_by']}" />
</mp:services>
<!--
Page Content - the page should be laid out in a grid pattern using a
combination or columns (VBox)and rows (HBox). Also to ensure property
sizing/resizing behavior relative height/width should be used in
percentages.
-->
<mx:VBox width="100%" height="100%">
<!--
1st Row - will occupy 30% of the height of the page and includes a
Summary region, Availability region and Job Summary region. The
Availability and Job Summary region require no parameters. The
Summary region uses the InfoDisplay component to show a series of
name-value pairs. Each item may also specify an optional
destination and image.
The example below also demonstrates the ways data may be bound to a
UI component included in the page:
1. Data Service Reference
2. Global/Application Model Reference
3. Page Model Reference
4. Set Directly from Controller
-->
<mx:HBox width="100%" height="30%">
<mp:Region title="Summary" width="25%" height="100%" >
<mp:InfoDisplay id="summaryInfo">
<mp:InfoItem label="CPU Model" value="{ids.result.getString(0,'CPU Model')}" /> <!-- ref to SQLDataService -->
<mp:InfoItem label="Target Name" value="{appModel.target.name}" /> <!-- ref to global/application model -->
<mp:InfoItem label="Current Status" value="{ads.currentStatus}" image="{ads.currentStatusIcon}" /> <!-- ref to AvailDataService -->
<mp:InfoItem source="{ads.statusSinceItem}" /> <!-- ref to AvailDataService -->
<!-- <mp:InfoItem label="{model.osVersLabel}" value="{model.osVersion}" /> --> <!-- ref to page model; model set in controller in SQL svc handler -->
<!-- <mp:InfoItem id="infoItem" label="Controller Set" /> --> <!-- value property set directly in controller -->
<mp:InfoItem label="Hosted By" value="{asc.assocs.getAssoc('hosted_by').name}" /> <!-- ref to AssociationService -->
</mp:InfoDisplay>
</mp:Region>
<!--
<mp:AvailabilityRegion width="33%" height="100%" daySpan="1" />
-->
<mp:Region title="Memory Usage (Last 24 Hrs)" width="45%" height="100%">
<mp:AreaChart id="memHist" width="100%" height="100%"
metricName="MemoryPerf"
metricColumns="['Active','MemFree']"
timePeriod="LAST_DAY" />
<!-- <mp:Link label="Current" click="{controller.showCpuMetricDetails(event)}" /> -->
</mp:Region>
<mp:Region title="Memory Used (Current)" width="30%" height="100%">
<mp:LineChart id="memRt" width="100%" height="100%"
metricName="MemoryPerf"
metricColumns="['Active']"
timePeriod="REALTIME"
interval="15"/>
<!-- <mp:Link label="History" click="{invokeActivity('metricHistory',
bean('targetName', appModel.target.name, 'targetType', appModel.target.type,
'metric', 'Response', 'columns', ['Load'], 'period', 'LAST_DAY', 'title', 'Metric History'))}" /> -->
</mp:Region>
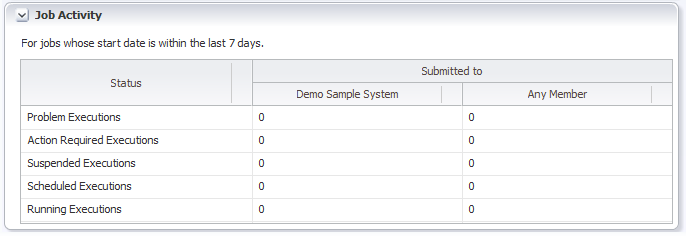
<!-- <mp:JobSummaryRegion width="25%" height="100%" /> -->
</mx:HBox>
<!--
2nd row - will occupy 35% of the overall page height and shows three
charts and shows the ability to access other activities (pages,
dialogs, etc.)
The 1st chart shows a line chart that displays a metric in
real-time.
It will automatically start polling the metric value in the
background and will continue to update the chart on the page until
the page is not shown. The 2nd chart shows a line chart that
displays a metric history. The 3rd chart shows a barch chart
showing metric data grouped by the key in the data, in this case the
CPU #.
Each region also includes a Link component and shows the ability to
navigate to other activites. This may be any activity (page,
dialog, train, URL, job). The 1st chart shows using the
invokeActivity method being called directly from the page and
passing context to the activity using the bean method to form the
input context for the metricDetails activity.
The 2nd link shows calling a function in the controller, and then
navigating to another activity from within the controller. The
final link shows the use of the invokeActivity method again, however
shows navigating to an activity that requires no additional context
(the Processes page).
-->
<mx:HBox width="100%" height="35%">
<mp:Region title="Per Processor Idle Time (%)" width="25%" height="100%">
<mp:BarChart id="bchart" timePeriod="LAST_DAY" width="100%" groupBy="byKey" metricName="CPUProcessorPerf" metricColumns="{['CPUIdle']}"/>
<mp:Link label="Show Processes" click="{invokeActivity('processesPg')}" />
</mp:Region>
<mp:Region title="CPU Utilization % (Last 24 Hrs)" width="45%" height="100%">
<mp:LineChart id="cpuutil" width="100%" height="100%"
metricName="CPUPerf"
metricColumns="['system','idle','io_wait']"
timePeriod="LAST_DAY" />
<mp:Link label="Current" click="{controller.showCpuMetricDetails(event)}" />
</mp:Region>
<mp:Region title="CPU Load (Current)" width="30%" height="100%">
<mp:LineChart id="cpuload" width="100%" height="100%"
metricName="Response"
metricColumns="['Load']"
timePeriod="REALTIME"
interval="15"/>
<mp:Link label="History" click="{invokeActivity('metricHistory',
bean('targetName', appModel.target.name, 'targetType', appModel.target.type,
'metric', 'Response', 'columns', ['Load'], 'period', 'LAST_DAY', 'title', 'Metric History'))}" />
</mp:Region>
<!--
<mp:Region title="Per Processor Idle Time (%)" width="34%" height="100%">
<mp:BarChart id="bchart" timePeriod="LAST_DAY" width="100%" groupBy="byKey" metricName="CPUProcessorPerf" metricColumns="{['CPUIdle']}"/>
<mp:Link label="Show Processes" click="{invokeActivity('processesPg')}" />
</mp:Region>
-->
</mx:HBox>
<!-- 3rd row - events region -->
<mx:HBox width="100%" height="35%">
<mp:IncidentRegion width="75%" height="100%" />
<!--
<mp:Region title="Memory Details" width="25%" height="100%" >
<mx:ComboBox id="selMemChart" dataProvider="{model.memChoices}" labelField="choiceLabel" change="{controller.changeMemChart(event)}" />
<mp:PieChart id="memChart" targetName="{appModel.target.name}" targetType="{appModel.target.type}"
metricName="MemoryPerf"
metricColumns="{model.memoryColumns}"
timePeriod="REALTIME" interval="15" />
</mp:Region>
-->
<mp:JobSummaryRegion width="25%" height="100%" />
</mx:HBox>
</mx:VBox>
</mp:Page>
</ActivityDefinition>
9.5.2.2 Mapping Data to UI Components
Use one of the following options to specify the data to be mapped to UI components in the metadata page definitions:
-
For components that support properties that specify the data to be included in the component. For example, the chart component supports properties to specify metric names and columns that are shown in the chart.
<c:LineChart id="memRt" width="100%" height="100%"
        metricName="MemoryPerf" metricColumns="['Active']"
        timePeriod="REALTIME" interval="15"/>
In the preceding example,
LineChartincludes properties that specify which metric should be displayed in the chart. The MPCUI framework retrieves the data from the Management Server to populate the chart. -
For data binding using the data service tag. The data service tag has several forms, including the following:
Note:
You must declare the data services that will be used within an activity (page) at the top of the page definition:<intg:Page id="homePg" label="Home Page" .... <intg:services> .... </intg:services>-
MetricValuesDataServiceThe
MetricValuesDataServicetag provides the ability to include metric data, either real-time or historical, from the Management Server. Then it binds that data to the UI components.<ds:MetricValuesDataService id="procData" flattenData="true" targetName="{appModel.target.name}" targetType="{appModel.target.type}" metricName="CPUProcessorPerf" columns="{['CPUIdle']}" timePeriod="REALTIME "interval="15" /> -
SQLDataServiceThe
SQLDataServicetag provides the ability to run a packaged SQL statement and bind the columns included in theresultSetto the UI component.<ds:SQLDataService id="ids" queryID="INSTANCE_INFO" properties="{props('TARGET_GUID',appModel.target.guid)}" />
After you declare a
DataServicefor the page, components within the page can reference the data provided by the service:<components:InfoItem label="CPU(0) Idle %" value="{procData.result.getString('CPU1','CPUIdle')}" /> <components:InfoItem label="CPU Model" value="{ids.result.getString(0,'CPU Model')}" />For more information about these tags, including the structure of the data returned by each, how parameters are set on the tags, and which UI components support easy integration of the data returned from these services, see Section 9.12, "Performing Task Automation".
Note:
There are a number of data services that are supported from the metadata-only or Flex-based implementations, includingMetricValuesDataService,SQLDataService,AssociationDataService, andAvailDataService. -
Finally, there are a number of common data items that are available to be mapped to the metadata components. These items contain properties that can be:
-
Displayed directly (for example,
appModel.target.name) -
Used as parameters to Data Services
-
Used as a bean input to an activity to which it is being navigated
Common data items include the appModel property. The appModel property includes static properties associated with the application runtime including target (and all it properties, see oracle.sysman.emx.model.Target) for the target the application is being rendered.
Reference the appModel.target properties from UI components in either the metadata-only or Flex implementation by using notation similar to:
<mp:InfoItem label="Target Name"
value="{appModel.target.name}" />
In this case, the following appears in the UI:
Target Name MyTargetName
9.5.3 Defining Navigation
The metadata UI definition support included in MPCUI is limited to the definition of pages, and does not support other activities such as dialogs, trains, jobs, and so on. Therefore, the only navigation possible between pages in the UI is by one of the following:
-
Defining a menu item in the metadata that can be used to access a page
The
MenuMetadataitem includes themenuItemelements that define navigation to activities defined in the MPCUI metadata. For example, if the metadata includes the following page definition:<ActivityDefinition> <intg:Page id="processesPg" label="Processes" ..> <!-- the body of the processes page would be declared here ? </intg:Page> </ActivityDefinition>Specify a
menuItemin theMenuMetadataelement to allow navigation to the previous page:<menuItem> <command id="processesPg" label="Processes" class="oracle.sysman.emSDK.pagemodel.menu.EMNavigationMenuCommand partialSubmit="true" > <property name="actionOutcome" value="goto_core-mpcustom-nav" /><property name="paramsMap"><mapEntry name="pageid" value="processesPg" /> </property> </command> </menuItem>The key properties in the
menuItemelement are:-
labelwithin the command element.labelspecifies the label that appears in the target menu on the home page. In the example given, a menu item ”Processes” would be included. -
the value specified for the
actionOutcomeproperty.actionOutcomespecifies the view ID for the page containing the SWF file.
-
-
Navigating from within a page using the
invokeActivitydirectiveUse the
invokeActivitydirective to navigate between activities defined in an MPCUI metadata implementation. Associate this directive with the click property of the Link or Button components. When the end user clicks one of these components, the click property specifies the action that should be taken.The
invokeActivitydirective takes the following:-
one required parameter (the activity id)
The activity id specifies the activity to which control should be passed
-
one optional parameter (a bean to provide input context to the activity)
The input context specifies information to be passed to the activity.
For example, if the implementation includes two activities, 'homePg' and 'processesPg' (two pages). Include a link in the home page that when clicked, it changes the display to the processes page.
<ActivityDefinition> <intg:Page id="homePg" label="Home Page" ... <mx:Link label=”Show Processes” click=”{invokeActivity('processesPg')}” />Use the activity content parameter to define an activity that is parameterized and therefore can be invoked from different contexts. The requirement for parameter input must be specified as part of the activity definition included in the metadata. For example, suppose you want a dialog activity that can show a historical line chart for any number of different metrics, and possibly event different targets. In the integration metadata the activity definition would appear similar to Example 9-5:
<intg:DialogActivityDef id='metricHistory' label='Metric History' > <intg:inputParams> <intg:InputParam name='targetName'/> <intg:InputParam name='targetType'/> <intg:InputParam name='metric'/> <intg:InputParam name='columns'/> <intg:InputParam name='period'/> <intg:InputParam name='title'/> </intg:inputParams> </intg:DialogActivityDef>The
inputParamselements specify the input parameters to the dialog (activity). Then from another page activity, two different links can direct to the same dialog, but with different parameters:<comp:Region title="Memory Used (Current)" width="30%" height="100%"> <c:LineChart id="memRt" width="100%" height="100%" metricName="MemoryPerf" metricColumns="['Active']" timePeriod="REALTIME" interval="15"/> <comp:Link label="History" click="{invokeActivity('metricHistory', bean('targetName', appModel.target.name, 'targetType', appModel.target.type, 'metric', 'Response', 'columns', ['Load'], 'period', 'LAST_DAY', 'title', 'Memory Used (History)'))}" /> </comp:Region> <comp:Region title="CPU Used (Current)" width="30%" height="100%"> <c:LineChart id="memRt" width="100%" height="100%" metricName="CPUProcessorPerf" metricColumns="['CPUUser,'CPUIdle']" timePeriod="REALTIME" interval="15"/> <comp:Link label="History" click="{invokeActivity('metricHistory', bean('targetName', appModel.target.name, 'targetType', appModel.target.type, 'metric', 'CPUProcessorPerf', 'columns', ['CPUUser','CPUIdle'], 'period', 'LAST_DAY', 'title', 'CPU Used (History)'))}" /> </comp:Region> -
9.6 Defining the MPCUI Application
The basis for the custom UI built using the MPCUI framework requires the construction of a Flex-based application. To simplify this process, the framework provides a series of base classes and structures. The starting point for this development is to extend the MpApplication class to define the application.
The application file is a simple MXML file that implements a single method, getIntegrationClass(), which returns an instance of the integration class associated with this application. The integration class (described in Section 9.6.1, "Defining the Application Activities (Integration Class)") defines the set of activities (such as pages, dialogs, and trains) that make up the application.
When compiled, the application binary (SWF file) is called by the same name as the application source file (by default). While you can call the application anything meaningful, Oracle recommends that the application class has the same name as the target type that it supports.
<?xml version="1.0" encoding="utf-8"?>
<intg:MpApplication xmlns:mx="http://www.adobe.com/2006/mxml"
xmlns:intg="oracle.sysman.emx.intg.*"
backgroundColor="#EFF3F7" preloader="oracle.sysman.emx.MpPreloader" >
<mx:Script>
<![CDATA[
/* Must override the getIntegrationClass method and
return the class that extends Integration */
override public function getIntegrationClass():Class
{ return HostSampleInteg; }
]]>
</mx:Script>
</intg:MpApplication>
9.6.1 Defining the Application Activities (Integration Class)
The integration class defines the set of UI elements that make up the application. The MPCUI framework interacts with the integration class to understand the structure of the application, allowing the framework to be the primary driver behind the display of and navigation between the UI elements that make up the application.
The application registers the integration class with the MPCUI framework in the application class through the getIntegrationClass method. Each application should have a single integration class only.
Example 9-7 Registering the Integration Class
<?xml version="1.0" encoding="utf-8"?>
<intg:Integration
xmlns:mx="http://www.adobe.com/2006/mxml"
xmlns:intg="oracle.sysman.emx.intg.*"
>
<!-- The integration class defines the pages, dialogs
and trains included in the application -->
<intg:activities>
<intg:PageActivityDef id='homePg' label='Home' pageClass='{HomePage}' pageControllerClass='{HomePageController}' isDefaultPage="true" />
<intg:PageActivityDef id='processesPg' label='Processes' pageClass='{ProcessesPage}' pageControllerClass='{ProcessesPageController}' />
<intg:PageActivityDef id='adminPg' label='Administration' pageClass='{CredentialsPage}' pageControllerClass='{CredentialsPageController}' />
-->
<intg:DialogActivityDef id='metricHistory' label='Metric History' dialogClass='{MetricHistoryDialog}' >
<intg:inputParams>
<intg:InputParam name='targetName'/>
<intg:InputParam name='targetType'/>
<intg:InputParam name='metric'/>
<intg:InputParam name='columns'/>
<intg:InputParam name='period'/>
<intg:InputParam name='title'/>
</intg:inputParams>
</intg:DialogActivityDef>
<intg:DialogActivityDef id='availDialog' label='Availability' dialogClass='{AvailabilityDialog}' />
</intg:activities>
</intg:Integration>
In Example 9-7, the availability activities include PageActivityDef, DialogActivity, and TrainActivityDef. Each activity typically specifies an ”id” property that will be used throughout the application to refer to this activity.
The pageClass and dialogClass properties specify the view class or the UI layout for each activity. For example, the homePg activity has a pageClass of HomePage. This means that included in the application should be a class called HomePage typically written in MXML.
Activities can specify a controller class (pageControllerClass). This property points to a class (often written in ActionScript) that will be associated with the activity and called by the MPCUI framework to initialize data in the page and respond to UI events from user interaction within the page.
9.6.2 Defining Pages
Each page must be registered with the MPCUI framework through the Integration class by adding a PageActivityDef. The PageActivityDef is defined by:
-
The page class is the concrete implementation of the page, that is its layout and contents and is a class that must extend the Page class.
-
Page controller
The page controller is a class that extends the ActivityController base class and encapsulates the set of handlers that support interacting with the Enterprise Manager services layer to obtain data and bind it to the UI components and respond to events issued by the UI on behalf of the end-user (e.g.button presses or link clicks)
Each application must include at least one page (one page activity) and you must identify one of the page activities as the default page.
Note:
The default page is displayed by the MPCUI framework as the home page for the selected target9.6.2.1 Page Class
The Page class is the base class for all pages defined by the end-user. page is the top-level UI element in the application. The framework provides integration of pages into the Enterprise Manager console by:
-
integrating pages with the Enterprise Manager menu system
-
performing updates of the browser history so that pages can be bookmarked
-
providing simple navigation between pages
Implement page classes in MXML and extend the Page base class to integrate with the MPCUI framework.
The tag language that is used to describe the page includes a mix of Flex components and MPCUI-provided components for layout and data display. The description of each component and example for its use are included in subsequent sections of this document.
For examples of the page class, see the HomePage.mxml and ProcessesPage.mxml files from the Demo HostSample in the EDK.
9.6.2.2 Page Model
Components within the page display information obtained through the Enterprise Manager services layer, and typically are bound to this data through the page model. The page model is the set of data associated with the page. The framework manages the lifecycle of this data so that as pages are displayed, data is loaded. When pages are removed, the data is cleaned up and can be garbage collected by the Adobe Flash Player plug-in.
Specify the data included in the page model by:
-
using data service tags
-
adding data directly to the page model in the result handlers for Enterprise Manager service requests
For additional information about describing the use of the service layer and how data is added to the model, see Section 9.12, "Performing Task Automation".
Although Adobe Flex and ActionScript support the ability to inline code in an MXML file using the Script tag, Oracle recommends that the Page code is limited to the layout of the UI elements that make up the page. Delegate data binding and event handling to the controller. This ensures that the MPCUI framework can manage the lifecycle of each page and the data bound to it correctly.
9.6.2.3 Page Controller
The page controller is a class that extends the PageController base class and includes the code that interacts with the Enterprise Manager services layer to obtain data and to process administrative actions. Furthermore, the controller contains the set of event handlers that are called in response to events issued from the Page components.
Note:
A page controller is not necessary if all of the data displayed in the page can be specified through thecomponent tags or the DataService tags and custom event handling is not necessary.
For example, if a page is a container for a number of Chart components, then each component supports the specification of the metric to be displayed in the chart. The component interacts with the MPCUI framework to manage the life cycle of that data correctly.
For cases where a controller is necessary, the init(page:Page) method is the location in the code where you can load data to be bound to the page UI elements. For examples for interacting with Enterprise Manager services and binding using the page model, see Section 9.12, "Performing Task Automation".
In addition to the init method, the controller includes methods that respond to events originating in the page. In cases where it is necessary to perform some processing in response to an event (for example, a button press), you can reference a method in the controller that will be called when that event occurs.
-
Within the Page:
<components:Link label="Show History" click="controller.showHistory(buffCacheChart);" /> -
Within the Controller:
public function showProcessorHistory(even:MouseEvent):void { // show an example of invoking an activity (a dialog in this case) and // getting information from the dialog when it returns (is closed) // create the context to be passed to the dialog var bean:Bean = new Bean('targetName', ApplicationContext.getTargetName(), 'targetType', ApplicationContext.getTargetType(), 'metric', 'CPUProcessorPerf', 'columns', ['CPUIdle'], 'period', 'LAST_DAY', 'title', 'Metric History'); page.invokeActivity('metricHistory', bean, processorHistoryDone); }
In the page code, a reference to controller is all that is necessary to interact with code included in the page controller. The framework manages creating the controller class when the page is loaded and provides the ability to call through into the controller to take some action.
The framework simplifies the process for taking some actions by providing convenience methods that can be called directly from the Page without requiring additional event handlers in the controller. For example, accessing another activity can be done in most cases without requiring additional controller code.
In the following example, clicking the link redirects the application to the processPg activity.
<components:Link label="Show Process" click="{invokeActivity('processPg')}" />
Note:
For more information, see the HomePageController.as and ProcessesPageController.as files from the Demo Sample.9.6.3 Defining Dialogs
The Dialog activity extends the MPCUI Dialog class. Dialogs are popup windows that display on top of the application without navigating away from the current Page displayed. Dialogs are typically defined in MXML files and do not have separate controller classes (although they can).
<?xml version="1.0" encoding="utf-8"?>
<intg:Dialog
xmlns:mx="http://www.adobe.com/2006/mxml"
xmlns:cht="oracle.sysman.emx.components.charts.*"
xmlns:intg="oracle.sysman.emx.intg.*"
xmlns:ds="oracle.sysman.emx.service.util.*"
xmlns:comp="oracle.sysman.emx.components.*"
xmlns:tbl="oracle.sysman.emx.components.table.*"
height="250" width="450"
title="{model.title}"
>
<cht:LineChart id="hchart" targetName="{model.targetName}" targetType="{model.targetType}" timePeriod="{model.period}" interval="15"
metricName="{model.metric}" metricColumns="{model.columns}" keys="{model.keys}" width="100%" height="100%" />
</intg:Dialog>
In the previous example, the dialog references model as the source of the properties it uses in the UI components.
Initialize the dialog model either:
-
In a controller associated with the dialog
-
By the MPCUI framework if the Dialog definition in the Integration class specifies input parameters
<intg:DialogActivityDef id='metricHistory' label='Metric History' dialogClass='{MetricHistoryDialog}' > <intg:inputParams> <intg:InputParam name='targetName'/> <intg:InputParam name='targetType'/> <intg:InputParam name='metric'/> <intg:InputParam name='columns'/> <intg:InputParam name='period'/> <intg:InputParam name='title'/> </intg:inputParams> </intg:DialogActivityDef>Note:
In this case, you must supply a bean as input that includes the input parameters required by the dialog.<components:Link label="Show History" click="{invokeActivity('metricHistory', bean('targetName', appModel.target.name, 'targetType', appModel.target.type, 'metric', 'Response', 'columns', ['Load'], 'period', '', 'title', 'Metric History'))}" />
Note:
For more examples, see the MetricDetailsDialog.mxml and the AvailabilityDialog.mxml files from the Demo Sample.9.6.4 Defining Trains and Train Pages
The train activity enables you to define a train (a guided workflow or wizard) by stringing together a series of pages.
To define a train, include a declaration of the train itself (TrainActivityDef) and each of the steps (TrainStepActivityDef) in the Integration class:
<intg:TrainActivityDef id='addNewUserEmbeddedTrain' label='Add New User'>
<intg:stepActivities>
<mx:Array>
<intg:TrainStepActivityDef id='anuStep1' label='User Info'pageClass='{trainSamp.S1_UserInfo}' pageControllerClass='{trainSamp.AddNewUserTrainStepController}'/>
<intg:TrainStepActivityDef id='anuStep2' label='Expiry' pageClass='{trainSamp.S2_Expiry}'pageControllerClass='{trainSamp.AddNewUserTrainStepController}'/>
<intg:TrainStepActivityDef id='anuStep3' label='Credentials' pageClass='{trainSamp.S3_Credentials}' pageControllerClass='{trainSamp.AddNewUserTrainStepController}'/>
<intg:TrainStepActivityDef id='anuStep4' label='Schedule' pageClass='{trainSamp.S4_Schedule}' pageControllerClass='{trainSamp.AddNewUserTrainStepController}'/>
<intg:TrainStepActivityDef id='anuStep5' label='Notifications' pageClass='{trainSamp.S5_Notifications}' pageControllerClass='{trainSamp.NotificationsTrainStepController}'/>
<intg:TrainStepActivityDef id='anuStep6' label='Confirmation' pageClass='{trainSamp.S6_Confirm}' pageControllerClass='{trainSamp.AddNewUserTrainStepController}'/>
</mx:Array>
</intg:stepActivities>
</intg:TrainActivityDef>
The TrainController includes the following methods:
-
init(Train): a method that is called when the train is loaded, and enables you to control the model associated with the train. -
trainDone: a method that is called when the user clicks the Finish or Cancel button within the train. At that point, you can inspect the train state (whatever is stored in the train model) to do one of the following-
Control if the train should complete and continue to the completion activity
-
Take some other action such as moving the train back to a previous step by using the
train.setStepmethod or end the train and invoke another activity.
-
Each train step within the train must extend the TrainStepPage (a special type of Page) and be associated with a controller (TrainStepController). In this case, the controller is a special type of PageController, and includes support for the init(Page) method that enables you to initialize the contents of the train page. Because the page is within a train, it might refer to either its own page model (such as model.property) or it might refer to data stored in the train model (such as train.model.property).
Finally, in either the train step controller or the train controller, the code can check for state and if the train can complete, that is, all the required information is entered, then the controller code can call train.setMayFinish().
Note:
For more information, see the trainSamp examples from the Demo Sample.9.6.5 Defining URLs
UrlActivityDef support the ability to define a URL that can be accessed using the invokeActivity directive from a UI component click handler (for example, InfoItem, ImageLink, and Button). The URL can be represented as an absolute URL including all request parameters, or parameters can be supplied at runtime. To define the URL that should have URL parameters substituted at runtime, define the UrlActivityDef to include inputParams as follows:
<mp:UrlActivityDef id='oracle' label='myExtApp' urlBase="http://www.extapp.com" >
<mp:inputParams>
<mp:InputParam name='pageId' />
</mp:inputParams>
</mp:UrlActivityDef>
To reference the URL the invokeActivity directive used specifying the id of the UrlActivityDef and passing a bean that includes the parameter and the appropriate value. The parameters provided will be added to the URL as request parameters.
<mp:InfoItem id="currentLoad" label="CPU Load"
value="{respData.result.getString('','Load')}"
click="{invokeActivity('extapp', bean('pageId','Load'))}"
/>
In this example, the URL that is accessed is http://www.extapp.com&pageId=Load.
9.7 Packaging the MPCUI Implementation With the Plug-in
Include the MPCUI implementation in a plug-in by placing a metadata definition of the MPCUI in the /mpcui subdirectory of the plug-in stage directory. For information about the structure and packaging of plug-ins, see Chapter 14.
Put the MPCUI metadata file in the following directory:
plugin_stage/oms/metadata/mpcui/my_mpcui_metatadata.xml
Include a single metadata file and the SWF file (the Flex application that is the custom UI) in the /mpcui subdirectory:
plugin_stage/oms/metadata/mpcui/my_mpcui_metadata.xml plugin_stage/oms/metadata/mpcui/MyMpcui.swf
Note:
In the previous examples, set the names of the XML (my_mpcui_metadata.xml) and SWF (MyMpcui.swf) files according to your requirements as a plug-in developer.9.8 Converting a Metadata-based UI to a Flex-based UI
The tag language used to define pages for the metadata-based UI is a subset of the tag language supported for the Flex-based implementation. Therefore, if you have a metadata-based UI and decide that you want additional features supported in the Flex implementation only, use your metadata-based UI to create the Flex-based UI. You do not have to start again because you can reuse the metadata.
Take a page defined in a metadata file for the metadata-based implementation and turn it into a page that is part of an MPCUI application (SWF file) by following these steps:
-
From the metadata file, identify the pages that you want to convert.
-
Copy the
ActivityDefinitionblock for a page and save the block as an MXML file. -
Repeat step 2 for each page that you want to convert. For example, if you have four page definitions, then you must create four MXML files.
-
Copy the Integration block from the metadata file and save the Integration block as an MXML file.
-
At the top of each MXML file, add the appropriate MXML namespace.
-
Create an application MXML file as described in Section 9.6, "Defining the MPCUI Application".
-
Create a Flex-based metadata file as described in Section 9.4, "Creating the MPCUI Metadata File"
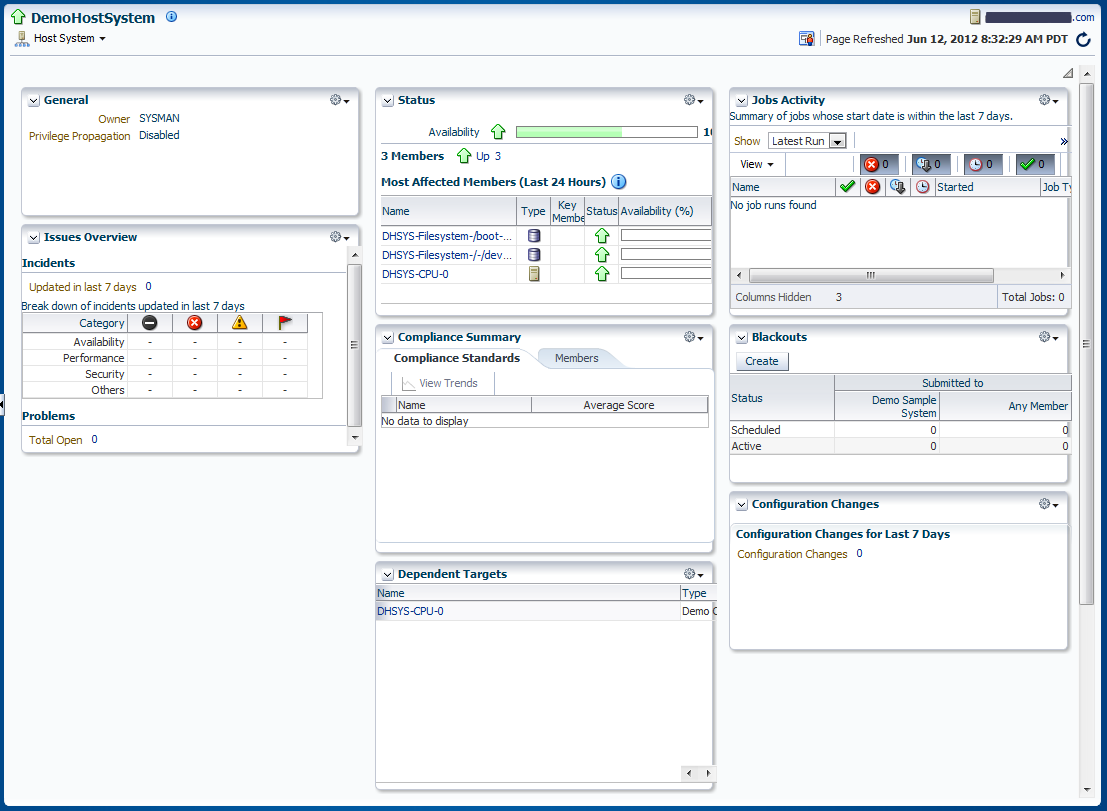
9.9 Defining System Home Pages
For target types identified as system targets, there are three options for which home page is rendered for the system target.
-
Display the Enterprise Manager default system home page.
This page shows a summary of the availability and incidents for the system members. This option is enabled by either of the following:
-
Omitting MPCUI metadata from your plug-in
-
Including MPCUI metadata in the plug-in and including the following
<EmuiConfig>element in the MPCUI metadata file:
-
-
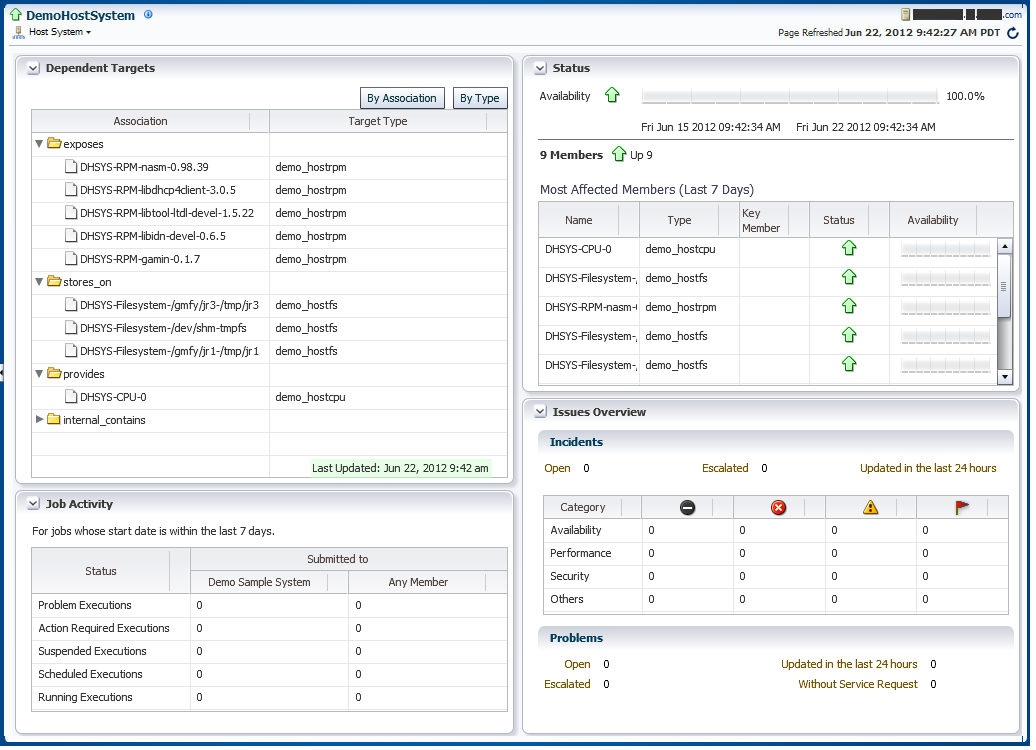
Display the Enterprise Manager default system home page, with some customized content.
The home page can show a number of prepackaged regions in a customized layout. The use of the default home page is controlled by metadata as illustrated in Example 9-8.
The selection of regions and their layout on the home page is specified by including systemUiIntegration metadata in the plug-in. For more information, see Section 9.9.1, "Defining systemUiIntegration Metadata"
Figure 9-2 System Home Page With Some Customization

Description of ''Figure 9-2 System Home Page With Some Customization''
-
Construct a custom home page using the MPCUI capabilities included with the EDK.
The home page is constructed using either MPCUI metadata or using the MPCUI Flex libraries. There are several data services and UI components that are provided by MPCUI specific to system or composite target types. For more information, see Section 9.9.2, "Defining System Regions"
9.9.1 Defining systemUiIntegration Metadata
To use the default system home page with some customized content:
-
Define a systemUiIntegration Metadata XML file for your target type including the following information:
-
Preferred layout
-
Add or remove regions (only required if you want to modify regions)
Example 9-9 provides an example of a systemUiIntegration Metadata XML file.
For information about the XML Schema Definition (XSD) that governs the systemUiIntegration Metadata XML file, see ORACLE_HOME/sysman/emSDK/core/system/xml/SystemUiIntegration.xsd.
Example 9-9 systemUiIntegration Metadata XML
<systemUiIntegration xmlns:xsi="http://www.w3.org/2001/XMLSchema-instance" xsi:schemaLocation="http://www.oracle.com/EnterpriseGridControl/SystemUiIntegration.xsd" xmlns="http://www.oracle.com/EnterpriseGridControl/SystemUiIntegration/"> <general targetType="demo_hostsystem" defaultLayout="twoColumnNarrowLeft" showOptionalRegions="false" topLevelTarget="true" allowCreateFromSystemsUi="true"/> <region taskFlowId="/WEB-INF/db/system/region/db-system-region-hihgavail-task-flow.xml#db-system-region-hihgavail-task-flow" titleResBundle="oracle.sysman.db.rsc.inst.DBMsg" titleNlsId="GENERAL" titleDefText="General" regionType="add" displayOrder="1" /> <region taskFlowId="/WEB-INF/sdk/core/regions/events/console/incident-overview-task-flow.xml#incident-overview-task-flow" titleResBundle="oracle.sysman.core.groups.ui.CoreGroupsUiMsg" titleNlsId="ISSUE_OVERVIEW" titleDefText="Issue Overview" regionType="add" displayOrder="4" /> <region taskFlowId="/WEB-INF/sdk/core/regions/jobs/jobs-activity-task-flow.xml#jobs-activity-task-flow" titleResBundle="oracle.sysman.db.rsc.inst.DBMsg" titleNlsId="JOB_ACTIVITY" titleDefText="Job Activity" regionType="add" displayOrder="7" /> <region taskFlowId="/WEB-INF/db/system/region/db-system-region-dep-members-task-flow.xml#db-system-region-dep-members-task-flow" titleResBundle="oracle.sysman.core.groups.ui.CoreGroupsUiMsg" titleNlsId="DEPENDENT_TARGETS" titleDefText="Dependent Targets" regionType="add" displayOrder="9" /> <region taskFlowId="/WEB-INF/sdk/core/regions/gccompliance/target/compliance-overview-task-flow-brief.xml#compliance-overview-task-flow-brief" titleResBundle="oracle.sysman.core.groups.ui.CoreGroupsUiMsg" titleNlsId="COMPLIANCE_SUMMARY" titleDefText="Compliance Standard Summary" regionType="add" displayOrder="6" /> <region taskFlowId="/WEB-INF/sdk/core/regions/mos/patch/target-patch-recommendation-task-flow.xml#target-patch-recommendation-task-flow" titleResBundle="oracle.sysman.db.rsc.inst.DBMsg" titleNlsId="PATCH_RECOMMEND" titleDefText="Patch Recommendations" regionType="add" displayOrder="12"/> <region taskFlowId="/WEB-INF/config/adfc/blackout/region/emcore-groups-blackout-task-flow.xml#blackout_group_taskflow" titleResBundle="oracle.sysman.core.groups.ui.CoreGroupsUiMsg" titleNlsId="BLACKOUTS" titleDefText="Blackouts" regionType="add" displayOrder="2" /> <region taskFlowId="/WEB-INF/sdk/core/regions/ecm/history/config-history-task-flow.xml#config-history-task-flow" titleResBundle="oracle.sysman.db.rsc.inst.DBMsg" titleNlsId="CONFIG_CHANGES" titleDefText="Configuration Changes (24 Hours)" regionType="add" displayOrder="5" /> </systemUiIntegration> -
-
Save the systemUiIntegration Metadata XML file to the following directory:
plugin_stage/stage/oms/metadata/systemUiIntegration -
If your plug-in is deployed already, then you can use the
emctl register oms metadatacommand to update the MPCUI part of your plug-in only. For more information about theemctl register oms metadatacommand, see Section 14.7.
9.9.2 Defining System Regions
The MPCUI framework supports a number of regions that can be used as part of a home page built to display information for a system target.
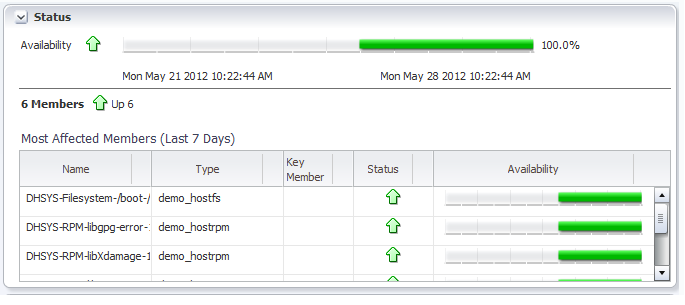
9.9.2.1 Defining System Status Region
The system status region shows the recent availability of the system target and all of its members. The region is included in the system home page by using the following tag:
<mp:StatusOverviewRegion id="statusOverview" height="50%"/>
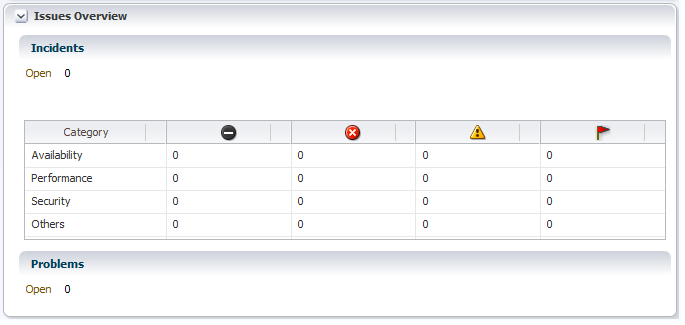
9.9.2.2 Defining System Issues Region
The system issues region shows the summary count of incidents for all of the targets in the system. The region is included in the system home page by using the following tag:
<mp:IssuesOverviewRegion id="issuesOverview" height="50%"/>
9.10 Defining Navigation
Navigation in the MPCUI application can be either of the following:
-
Between activities defined in the application. For more information, see Section 9.10.1, "Navigation to Activities".
-
To other URLs, where URL refers to other Enterprise Manager pages or to external URLs. For example:
http://www.example.com
For more information, see Section 9.10.2, "URL and Links".
9.10.1 Navigation to Activities
Section 9.5.3, "Defining Navigation" describes the approach to navigating between activities from a metadata implementation. These descriptions apply to navigating to activities from the menu or from another activity defined in MXML.
This section describes how to navigate to another activity from within the controller code, that is the ActionScript code associated with an activity.
public function showProcessorHistory(even:MouseEvent):void
{
// show an example of invoking an activity (a dialog in this case) and
// getting information from the dialog when it returns (is closed)
// create the context to be passed to the dialog
var bean:Bean = new Bean('targetName',
ApplicationContext.getTargetName(), 'targetType',
ApplicationContext.getTargetType(),
'metric', 'CPUProcessorPerf', 'columns', ['CPUIdle'],
'period', 'LAST_DAY', 'title', 'Metric History');
page.invokeActivity('metricHistory', bean, processorHistoryDone);
}
The preceding example shows a controller method that uses the page.invokeActivity method to redirect to another activity (in this case, a dialog).
The significant difference between this method and the method available from within the MXML page (described in Section 9.5.3, "Defining Navigation") is the ability to associate a callback (processorHistoryDone in this example) that will be called when the called activity completes. This callback is only useful for activities that do not cause the current activity to go out of scope.
9.10.2 URL and Links
There are a number of different methods for navigating from components in the MPCUI application to other locations through a URL. Use the Link component to render an HTML-style link including a tool tip and location.
-
Absolute URL (external to Enterprise Manager)
To provide a link to an absolute URL, use the ”UrlAbs” class and an instance of this class can then be associated with a Link destination or can be accessed through the
invokeActivitymethod.In the Page Class: <comp:Link id=”gotoOracle” label=”Oracle” destination=”{model.oracleUrl}” /> In the Controller Class: page.setModel(”oracleUrl”, new UrlAbs("http://www.oracle.com", "Oracle"));Alternative method using
invokeActivity:In the Page Class: <mx:Button label=”Go To Oracle” click=”{invokeActivity(model.oracleUrl)}” /> In the Controller Class: page.setModel(”oracleUrl”, new UrlAbs("http://www.oracle.com", "Oracle")); -
Link to Enterprise Manager Page Using Page Constants
In addition to absolute URLs, the MPCUI framework supports the ability to link to well known Enterprise Manager pages by constructing a ”UrlEm” object that can be referenced from the Link destination or passed to the
invokeActivitymethod as part of a click handler. The reference guide includes a complete list in the oracle.sysman.emx.Constants class of all page constants available and the corresponding parameters that must be specified to produce a URL.// setup link to availability page var availLink:UrlEm = new UrlEm(Constants.PAGE_AVAILABILITY, [new InputParam(Constants.P_TARGET_NAME, ApplicationContext.getTargetName()), new InputParam(Constants.P_TARGET_TYPE, ApplicationContext.getTargetType()), new InputParam(Constants.P_PAGE_TYPE, Constants.BY_DAY)]); page.setModel("availPageLink", availLink); -
Link to Enterprise Manager Pages That Do Not Have Constants Defined
Note that
UrlEmcan only be used to access pages that are supported via page constants in the oracle.sysman.emx.util.Constants class. For pages that do not currently have constants defined, you can access a page by creating aUrlRelobject containing the page's ADF view ID value.For example, to access the Bare Metal Provisioning dashboard, you would specify the page's view ID (/faces/core-bmp-dashboard) as follows:
var url:UrlRel = new UrlRel("/faces/core-bmp-dashboard", null);The easiest way to find the view ID for a given ADF page is in the page URL; it is the string following http://<server:host>/em/.
-
Link to Enterprise Manager Target Home page
A special case is to produce the URL to an Enterprise Manager target home page. For this situation, use the static
UrlEm.homepageUrlmethod:page.setModel("relatedHostLink", UrlEm.homepageUrl(host.name, host.type)); -
Dynamic URL Using ”DIRECT_URL”
For cases where a URL must be constructed dynamically at runtime from a data service, the following option may be used. The activity id "DIRECT_URL" is reserved for the special case and is provided by the framework. No UrlActivityDef is declared in this case, but instead the invokeActivity directive is passed a bean that specifies the "url" property. The value provided for that property will be used as the URL to direct to when the component is clicked.
In the following example, the data service "respData" is queried to obtain a URL. This would be replaced by whatever data service is used within the page to obtain the necessary URL. This may be a MetricValuesDataService or a SqlDataService.
<mp:InfoItem id="currentLoad" label="CPU Load" value="{respData.result.getString('','Load')}" click="{invokeActivity('DIRECT_URL', bean('url',respData.result.getString('','Load')))}" />
9.11 Accessing Enterprise Manager Data
The MPCUI framework provides access to Enterprise Manager services through ActionScript interfaces to the Enterprise Manager Web services layer. You can access these client services directly when necessary. Although in many cases, the services are further abstracted through UI components that utilize them to interact with the Enterprise Manager server to obtain the appropriate data to be displayed in the management UI.
The following sections describe the various services included in the MPCUI framework and provide brief examples of how these services can be used from your code.
Note:
The EDK does not support accessing arbitrary Web services from the Flex UI. The appropriate way to access Web services would through the Management Agent residing on the service host, as either metrics, jobs or remote commands invoked by a fetchlet.9.11.1 Metric Services
The MPCUI provides a simple service for retrieving metric data from the Management server in either real-time or historical form. For real-time data, the Oracle Management Service accesses the Management Agent to retrieve the data, so use this for cases where the metric can be collected efficiently in real time.
9.11.1.1 Using the Metric Values Service Transparently
Usually the metric values service is used transparently from a chart by specifying the metric to be displayed in the chart and in the case of a line chart, the periodicity of the data.
<mp:LineChart id="cacheChart"
width="100%" height="100%"
metricName="MSSQL_MemoryStatistics"
metricColumns="['cache_hit_ratio']"
timePeriod="REALTIME" interval="15" >
</mp:LineChart>
In this case, the caller never interacts directly with the service. The MPCUI framework uses the service to retrieve the data for the chart.
In the case of the table component, you can specify the metric directly also:
<c:Table id="processesTable" width="100%" height="100%"
metricName="CPUProcessesPerf"
metricColumns="['ProcUser', 'ProcCPU', 'ProcCmd']"
timePeriod="REALTIME"
interval="30"
>
<c:columns>
<mx:AdvancedDataGridColumn width="50" dataField="key" />
<mx:AdvancedDataGridColumn width="100" dataField="ProcUser" />
<mx:AdvancedDataGridColumn width="80" dataField="ProcCPU" />
<mx:AdvancedDataGridColumn width="400" dataField="ProcCmd" />
</c:columns>
</c:Table>
9.11.1.2 Using the MetricValuesDataService Tag
Use the MetricValuesDataService tag within a page (or dialog) to display metric data in a table component, where the dataProvider attribute of the table is set to the data service. Then the data from the metric service is displayed in the table or when data from the service will be shared between multiple components (for example, the table and a link or label).
Example 9-10 Using the MetricValueDataService Tag
<intg:services>
<dataserv:MetricValuesDataService id="mv1" flattenData="true"
targetName="{ApplicationContext.getTargetName()}"
targetType="{ApplicationContext.getTargetType()}"
metricName="Load" columns="{['cpuUtil', 'cpuUser', 'cpuKernel']}"
timePeriod="{MetricCollectionTimePeriod.LAST_DAY}"
/>
</intg:services>
<comp:Table id="mvTable" dataProvider="{mv1}" />
9.11.1.3 Calling the Metric Value Service From a Controller
The metric value service can be called from within a controller. This is the most flexible means of using the service and allows the caller to manipulate the data as necessary before adding the final results to the model so that it can be displayed in the UI.
Retrieving Individual Values from the Metric Service (MXML)
You can retrieve individual values from the metric service in order to display them in a Label, InfoItem, or other such component.
<ds:MetricValuesDataService id="procData"
flattenData="true"
targetName="{appModel.target.name}"
targetType="{appModel.target.type}"
metricName="CPUProcessorPerf"
columns="{['CPUIdle']}"
timePeriod="REALTIME"
interval="15" />
Then from the component that will display the value:
<components:InfoItem label="CPU(0) Idle %"
value="{procData.result.getString('0','CPUIdle')}" />
Example 9-11 The Metric Service from a Controller
var cpuPerf:Metric =
ApplicationContext.getTargetContext().getMetric("CPUPerf");
var cpuPerfSel:MetricSelector = procMetric.getSelector(
['system','idle', 'io_wait']);
cpuPerfSel.getData(cpuDataHandler, MetricCollectionTimePeriod.CURRENT,
page.getBatchRequest());
Use the metric service by creating a MetricSelector for a particular metric, and then calling the getData method on that selector. When calling the getData method, two parameters are passed:
-
the handler that will be called with the result of the request
-
the periodicity of the selection
When the service request has completed, either successfully or with an error, the handler is called and passed the results of the request and a fault. The caller must check for the presence of the fault before proceeding with any processing of the data result.
Example 9-12 Metric Service Result Handler
public function cpuDataHandler(cpuData:MetricResultSet,fault:ServiceFault):void
{
if(fault != null) return; // handle this better!
var dataPoint:TimestampMetricData = cpuData.results[0];
var collectionTime:Date = dataPoint.timestamp;
var idleTime:Number = dataPoint.data[0]['idle'];
var systemTime:Number = dataPoint.data[0]['system'];
var ioWaitTime:Number = dataPoint.data[0]['io_wait'];
}
To access the data, you must have the reference to dataService.result.getString(’key','column'). The key is required to identify the row in the sample to be returned in cases where the metric supports multiple keys. If the metric does not include a key column, then the key value should be passed as ’' or null. The column is the data column to be retrieved from the metric definitions.
Each data point (TimestampMetricData) has a time stamp member that tells you when that data point was collected, and includes a data array that is effectively a table for that metric.
If the metric has multiple keys (such as process, file systems, and so on), then the data array has multiple rows, one for each key, and each row has the requested data columns. In the previous examples, the data array contains one row for each process. If your metric does not include key columns, then the data array contains a single row only.
Each row in the data array is a KeyMetricData object. If your metric has keys, then the metricKey property tells you to which key the row applies. If you have no key for your metric, then ignore this property. The KeyMetricData is a dynamic object into which you can index, using the column name to get the value for that column.
In the previous examples, the code walks the rows in the data array, and for each row (KeyMetricData) it gets the ’ProcUser' column from the data. The original request also included the ’ProcCPU' and ’ProcCmd' columns, so those could be accessed in the same way, that is, data[’ProcCPU'] or data[’ProcCmd'].
9.11.1.4 Metric Data Source Filters
When using the metric data service through the MetricValuesDataService in MXML or the MetricSelector in ActionScript, it may be useful to request that the set of data returned by the service be filtered according to some additional selection criteria. This can be accomplished within the controller by implementing a custom data source and then filtering the results of the metric service in the controller and populating the custom data source with the results.
It is also possible to define a metric filter that can be applied to the request which will cause the service itself to filter the results and return only the filtered set to the client for display.
The metric filter, referred to as MetricPredicate, is made up of several elements, including individual column filters, the filter operator, and the optional order by criteria. Each column filter specifies a column to filter, the operator to filter by. and a value to filter against. The column filters support typical operators for numeric data, including GT, LT, GE, and LE.
For string data, the operators include EQ, NE, and REGEX. The REGEX operator will perform a regular expression string match using each value with the filter input value as the pattern. The regular expression pattern match is done using Java regex libraries, so the pattern should conform to the requirements of Java pattern matching.
The predicate operator combines the column filters into a single expression and supports either an AND (all column filters must be satisified) or an OR (any of the column filters being satisfied is sufficient). The order by criteria specifies a column to order the results by and a row count to limit to. This is useful in cases where a "top-N" result is desired.
When constructing a metric filter, the columns filters can be optional and an order by only specified. Alternately, the order by can be optional and the column filters only are specified. When constructing a metric filter, all columns included in column filters and in the order by must be part of the same metric, and it must be the metric that is being selected in the corresponding metric data service request. Combining columns from multiple metrics into the same filter is not supported.
The following example describes the process for defining a metric filter on a MetricValuesDataService tag. The data service tag includes the "predicate" property which is bound to the corresponding metric filter (MetricPredicate) as such:
<mp:MetricValuesDataService
id="fsMetDs"
metricName="FilesystemPerf"
columns="['MountPoint','Utilization','FreeKB','UsedKB','TotalKB','FSType',
'FSName']"
targetName="{appModel.targetName}"
targetType="{appModel.targetType}"
timePeriod="LAST_HOUR"
predicate="{model.fsFilter}"
/>
In the controller associated with the page, the filter is constructed by specifying the filter columns, operator, and order by criteria. In the following example, the file systems metric request from the service above is filtered to those filesystems with a TotalKB size of greater than 1000kb and a regular expression match on the filesystem name (FSName) of '.net'. Finally, the results are ordered by the FreeKB column descending limited to the first five filesystems.
private function createFsFilter():MetricPredicate
{
var filters:Array = new Array(
new MetricFilter('TotalKB', MetricOperator.GT, 1000),
new MetricFilter('FSName', MetricOperator.REGEX, '(.*)net(.*)') );
var orderBy:MetricOrderBy = new MetricOrderBy('FreeKB',
MetricOrderBy.DESC, 5);
var predicate:MetricPredicate = new MetricPredicate(filters,
MetricOperator.AND, orderBy);
return predicate;
}
9.11.2 Custom Data Source
In addition to the metric and SQL data sources (and service tags) that can be used to obtain data for charts, tables and other components, you can construct your own custom data source for these components. This is useful in situations where you want to obtain data from other MPCUI services and manipulate it before display. For example, to combine data from two metrics, filter the data in some way, or otherwise aggregate the data.Creating a custom data source requires the use of controller code to obtain the source data and then to manipulate it to create the data source. The custom data source provides the following important behavior:
-
Set column descriptors for the data included in the data source to provide help to the UI component when displaying the data. The descriptor contains properties such as data type, and display label (for legends or column headers).
-
Support multiple data points to enable the display of the data in a time-series chart.
-
Support caching and modification of the data source allowing components to show updated data as information underlying the data source changes.
9.11.2.1 Creating the Custom Data Source
Typically the custom data source (oracle.sysman.emx.model.CustomDataSource) is constructed and set in the page model using Page.setModel. When constructing the data source, you must specify the columns (or data items) that make up the data source along with a flag that can indicate the following:
-
If the data should be treated as if it includes a key
Specify the key only if the data source will be displayed in a chart that honors keys such as a bar or column chart. If the data will be shown in a tabular view or a non-chart component, then you do not have to identify one of the columns as a key.
-
If the data should be treated as if it includes multiple timestamp samples
Specify that the data includes timestamps only if the data will be displayed in a time-series chart (
LineChart) and might have data samples added to the data source over time by using the MPCUI polling mechanism.
public function CustomDataSource(columns:Array, hasKey:Boolean=false, isTimeSeries:Boolean=false)
The Array of columns specifies the data items included in the data source. This array can be either:
-
an array of strings, with each string specifying the label of the data item
-
an array of column descriptors (either
QueryColumDescorCustomColumnDescSpecifying a column descriptor enables you to specify a label for the column and a data type (for
QueryColumnDesc) or to specify additional properties to display the data in a tabular display such as the column width, that is, if the column is sortable, and so on (forCustomColumnDesc).
Example 9-13 shows a result handler in the controller that is set up to handle data returned from a request to the SqlQueryService.
Example 9-13 Handling Data Returned From a Request to the SQLQueryService
// execute a SQL query and then massage the data for display
var query:SqlQueryService = new SqlQueryService('CPU_USAGE',
[SqlQueryInput.createParam("TARGET_GUID",
ApplicationContext.getTargetContext().guid)]);
query.execute(cpuQueryHandler, page.getBatchRequest());
}
public function cpuQueryHandler(result:SqlQueryResultSet,
fault:ServiceFault):void
{
if(fault != null || result.getError() != null) return;
cpuSqlData = new CustomDataSource([
new QueryColumnDesc("Processor", QueryColumnType.STRING),
new QueryColumnDesc("Idle Percentage", QueryColumnType.DECIMAL),
new QueryColumnDesc("Used Percentage", QueryColumnType.DECIMAL)
], true);
page.setModel("cpuSqlData", cpuSqlData);
if(result.rows != null)
{
for(var r:int=0; r<result.rows.length; r++)
{
var id:String = result.getString(r, 'CPU Number');
var idle:Number = result.getNumber(r, 'Idle %');
var used:Number = result.getNumber(r, 'Used %');
cpuSqlData.setRow("Processor #"+id, idle, used);
}
}
}
In Example 9-13, the data source is constructed with three columns and the data types are specified. The second parameter to the constructor is passed as true, indicating that the data should be treated as if it has a key. In this case, the first column in the list is always treated as the key. You cannot specify a different position in the data.
Finally, for each row in the SqlQueryResultSet (result.rows), the code constructs a row in the custom data source.
See Also:
For a complete working example, see thedemo_hostsample,ProcessesPageController.as in the EDK.9.11.2.2 Binding the Data Source to a UI Component
In the page layout (for example, ProcessesPage.mxml), the data is bound to the UI component using the dataProvider property. In Example 9-14, note cpuSqlTable. This is a table that displays the data loaded into the cpuSqlData custom data source.
Example 9-14 Binding the Data Source to a UI Component
<mp:Region id="cpuUtilRegion" width="100%" height="100%" title="CPU Utilization" >
<mx:HBox width="100%" height="100%">
<mp:LineChart id="cpuUtilChart" width="60%" height="100%"
dataProvider="{model.cpuChartData}"
legendLocation="right" showLegend="true" />
<mp:Table id="cpuSqlTable" dataProvider="{model.cpuSqlData}"
width="40%" height="100%"/>
</mx:HBox>
</mp:Region>
Figure 9-7 shows what Example 9-14 displays.
Figure 9-7 Table Displaying Data Loaded into the cpuSqlData Custom Data Source
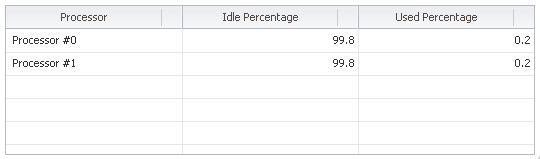
Description of ''Figure 9-7 Table Displaying Data Loaded into the cpuSqlData Custom Data Source''
9.11.2.3 Updating the Custom Data Source
Because the data source is bound to the UI component, when you update it, the UI displays the new data automatically. You have two options to update a custom data source:
-
Call either the
CustomDataSource.setRoworsetRowsmethods.These methods are used when you have a data source that does not include timestamped data. In this case, you are modifying the row or rows included in the data source.
-
If the data source includes timestamped data, then call the
CustomDataSource.setTimestampedRowsmethod.This method adds a new sample to the time series and typically is used in the case where the data source is displayed in a line chart. Adding a new sample by calling this method causes a new time slice to appear on the line chart.
For more information about these methods, see the API Reference and the demo_hostsample for examples using the Custom Data Source.
9.11.3 Computed Data Source
The Enterprise Manager metric collection framework supports the ability to compute values from counters. However, the values are only guaranteed to be correct when retrieved from the historical data collected by the agent and stored in the repository. Attempting to query these values from a real-time request (for example, MetricValuesDataService with timePeriod set to REALTIME) can lead to unexpected results as the value computed utilizes the last counter stored during historical collection and not a counter stored for the real-time collection. As such, if you require realtime display of computed metrics you may need to consider using the computed data source.
The computed data source provides the ability to combine data from two metrics into a single display. This is useful when the metric to be displayed is based on a compute expression using a stored counter a described previously.
To use this data source, you typically define two metrics. One metric computes the values to be collected and stored in the repository for historical purposes. This metric includes the compute expressions that consume the stored counters. The other metric would be a transient metric that only collects the counters themselves. This metric would not be collected for historical purposes as the raw counter values are typically not useful.
You need both sets of metrics when constructing the computed data source in the UI code. The first metric, which specifies the metrics in their computed form, is called the "source" metric. The data source uses these metrics to define the display attributes for the data, including the labels for the columns, and will also retrieve any required historical data.
/**
* Construct a data source that shows the CPU-System% and CPU-Idle% from historical
* data and then appends data to it from a real-time data source that acquires
* counter columns and derives the values from the counters. First declare the
* columns to be shown on the chart, the labels will be based on the metric-column * labels and will obtain the historical data that initially populates the chart.
*/
var srcCols:Array = [
new ComputeColumnDesc( ApplicationContext.getTargetContext(), "CPUPerf",
"system"),
new ComputeColumnDesc( ApplicationContext.getTargetContext(), "CPUPerf",
"idle"),
];
/**
* These are the counter columns; they do not need to be from the same metric as
* the source columns, however the counter columns must be from the same metric as
* all other counters.
*/
var ctrCols:Array = [
new ComputeColumnDesc( ApplicationContext.getTargetContext(), "CPUPerf",
"systemCounter"),
new ComputeColumnDesc( ApplicationContext.getTargetContext(), "CPUPerf",
"idleCounter"),
];
/**
* create the data source and pass the source columns, the counter columns and a
* pointer to the compute function. Finally pass the page the data source will be
* consumed on and the interval to be used to populate the data. The compute
* function will be called at each interval.
*/
var computedDataSource:ComputeDataSource = new ComputeDataSource(srcCols, ctrCols, computeFunction,
page, PollingInterval.EVERY_15_SECONDS);
page.setModel("compDataSource", computedDataSource);
The computed data source will then send a request for the historical data, and will then begin polling for the counters at the interval specified. Each time a sample is retrieved, the compute function will be called and passed a reference to the computed data source and a data point (TimestampMetricData) that contains the latest set of values for the counter metrics.
The compute function can then compute values using the counters and must return a data point that contains the metrics with the same name as those that were identified in the source columns. In the previous example, the counter columns are "systemCounter" and "idleCounter", but the data point that is returned from the compute function must include a value for the source columns, "system" and "idle".
public function computeFunction(ds:ComputeDataSource, dp:TimestampMetricData):TimestampMetricData
{
// retrieve the counter values from the data point passed; could also retreive
// any necessary context from the data source
var systemCounter:Number = dp.data[0]["systemCounter"];
var idleCounter:Number = dp.data[0]["idleCounter"];
// compute values; this is where you would replicate the logic in your
// computed metric
var systemValue:Number = systemCounter+Math.floor(Math.random()*(50 - 20 + 1)) + 20;
var idleValue:Number = idleCounter+Math.floor(Math.random()*(120 - 80 + 1)) + 80;
// you must now return a TimestampMetricData object. You can use the one passed and return
// it, but to do so you must add columns to the data point. The index reference [0] is
// a reference to the fact that the datapoint could have multiple rows, one for each key
// but the example does *NOT* support multiple keys. Also, if you created a new
// data point to return you would need to set the timestamp of the datapoint
// correctly, using the timestamp of the sourced datapoint
dp.data[0]["system"] = systemValue;
dp.data[0]["idle"] = idleValue;
return dp;
}
9.11.4 Packaged SQL and the Query Service
While the MPCUI framework provides access to the most useful data through either UI components or simplified services (such as the metric service), inevitably you must have access to other information stored in the Management Repository in a more unstructured form. The MPCUI framework provides a SQL query service for this access.
The SQL query service enables you to package SQL statements with your plug-in and then run the statements through a Web service and then bind that data to UI elements in your custom UI. The SQL query service does not provide an open-ended or scriptable API to the Management Repository as this would expose a potential security risk.
The SQL query service can only run SQL statements that have been deployed to the Management repository through the Enterprise Manager Extensibility Framework. This ensures that the statements can access EDK views only. This still provides you with a lot of flexibility and the ability to access data from your own views (for example, views generated from Enterprise Manager configuration data) along with Enterprise Manager partner EDK views.
You can encapsulate the query service entirely within the page code by using the SQLDataService tag. This tag allows the caller to specify the SQL to be processed and the parameters to be passed. This data service object can then be bound to a table or to other UI components that support it.
Example 9-15 Using the SQLDataService Tag
<intg:services>
<ds:SQLDataService id="dbSummaryDS" queryID="DATABASE_SUMMARY"
properties="{model.dbSummProp}" />
</intg:services>
<t:Table id="dbSummaryTable" dataProvider="{dbSummaryDS}">
<t:columns>
<mx:AdvancedDataGridColumn width="100" dataField="Name"/>
<mx:AdvancedDataGridColumn width="100" dataField="Status"/>
<mx:AdvancedDataGridColumn width="500" dataField="Database File Location"/>
</t:columns>
</t:Table>
Retrieving Individual Values From the SQL DataService
To reference a specific cell returned from SQLdataService for use within a component (such as Link or Label), the following type of reference is used:
<ds:SQLDataService id="ids" queryID="INSTANCE_INFO"
   properties="{props('TARGET_GUID',appModel.target.guid)}" />
<components:InfoItem label="CPU Model"
value="{ids.result.getString(0,'CPU Model')}" />
The reference to the data service is through dataService.result.getString(rowIndex,’column'), where rowIndex is the row returned from the query and column is the name of the column as specified in the original SQL query.
The query service can also be called from within a controller, providing much more flexibility in terms of how the data is manipulated before it is displayed. There are two APIs that provide access to the query service:
-
The SqlQuery interface allows for a single SQL query to be processed, passing the bind variable and receiving a result set in return. The result set provides an interface quite similar to that of the JDBC ResultSet.
Example 9-16 Using the SqlQuery API:
var getInfoSvc:SqlQuery = new SqlQuery("GET_TARGET_INFO", [["TARGET", name],["TYPE", type]]); // bind variables getInfoSvc.execute(getTargetInfoHandler); public function getTargetInfoHandler(resultSet:ResultSet, fault:ServiceFault):void { var target:Target; if(fault == null) { if(resultSet != null && resultSet.getError() == null) { target.setGuid(resultSet.getBase64Binary(0, "TARGET_GUID")); target.setTypeMetaVer(resultSet.getString(0, "TYPE_META_VER")); var props:Array = new Array(); for(var i:int=1; i<Target.NUM_PROPERTIES+1; i++) props.push(resultSet.getString(0, "CATEGORY_PROP_"+i)); target.setCatProperties(props); } } -
The bind variables are referenced by name and correspond to the variables as represented in the packaged SQL statement:
SELECT target_guid, type_meta_ver, category_prop_1, category_prop_2, category_prop_3, category_prop_4, category_prop_5 FROM mgmt_targets WHERE target_name = ?TARGET? AND target_type = ?TYPE?When a number of queries can be processed in a single request, you can use the
BulkSqlQueryinterface. Each query must be added to the bulk query and when all queries to be processed have been added, theBulkSqlQuery.executemethod is called and passed the result handler that will be called with the results.When a result handler for the
SqlQueryis passed a singleSqlQueryResultSetfor the processed query, the result handler for theBulkSqlQueryis passed aBulkResultSet. Then it must retrieve theSqlQueryResultSetfor each query using the request id specified when the query was added.A separate request id is required to support the case where the same query can be processed multiple times with different bind variables as part of the same bulk request.
Example 9-17 Using the BulkSqlQuery API
var guidParam:Array = [["TARGET_GUID", ApplicationContext.getTargetContext().guid]]; var bulkQuery:BulkSqlQuery = new BulkSqlQuery(); bulkQuery.addQuery("INSTANCE_INFO", "INSTANCE_INFO", guidParam); bulkQuery.addQuery("PROCESS_STATES", "PROCESS_STATES", guidParam); bulkQuery.addQuery("PROCESS_INFO", "PROCESS_INFO", guidParam); bulkQuery.execute(pageDataHandler, page.getBatchRequest()); public function pageDataHandler(bulkResult:BulkResultSet, fault:ServiceFault):void { var info:SqlQueryResultSet = bulkResult.getResultSet("INSTANCE_INFO");
9.11.4.1 Guidelines for Writing Packaged SQL
Adhere to the following guidelines when writing packaged SQL for the MPCUI:
-
Packaged SQL can only access views that are part of the partner EDK. This includes any views that are generated as a result of configuration metric definitions.
-
Any SQL that attempts to modify data (update or delete) will be filtered by the MRS during plug-in deployment.
-
SQL statements that attempt data definition language (DDL) will be filtered out by the MRS and are not allowed
-
Anonymous PL/SQL (for example, begin, end constructs) are not allowed as access to PL/SQL procedures is not allowed from packaged SQL
-
Bind variables must be identified by a text identifier and prefixed and suffixed by a
?. For example,?TARGET_TYPE? -
Bind variables are not case sensitive
-
The query service restricts the size of result sets to 1000 rows or 100,000 bytes, so care should be taken to limit the size of the possible result set returned by a query.
9.11.4.2 Packaging SQL in the Plug-In
SQL Statements used in the MPCUI code are packaged with the MPCUI metadata using the SqlStatements element
For information about the location of SQL statements in the MPCUI metadata, see Section 9.4.1, "Overview of MPCUI Metadata Elements". For information about the MPCUI metadata XSD, see the EDK Metadata API reference.
9.11.4.3 Getting Target Type Information
For cases where the plug-in UI requires information about a related target type, such as its display name, but does not require the details about a specific instance of that target type, the TargetFactory provides a function to retrieve this summary information.
The TargetFactory.getTargetTypeInfo function returns a TargetTypeInfo object that contains the display name of the target type. When calling this function, pass a TargetTypeInfo object with the internal targetType provided (for example, "oracle_database) and a handler function. The handler will be called with the TargetTypeInfo and any fault that occurred during the processing of the request:
var typeInfo:TargetTypeInfo = new TargetTypeInfo("oracle_database");
TargetFactory.getTargetTypeInfo(typeInfo, getTypeInfoHandler);
}
private function getTypeInfoHandler(typeInfo:TargetTypeInfo,
fault:ServiceFault):void
{
if(fault != null)
{
MpLog.logError(fault, "Getting Target Type Info");
return;
}
MpLog.info("Target Display Label for (oracle_database):
"+typeInfo.typeDisplayName);
}
9.11.5 Working With Target Services
In addition to the services described previously, the MPCUI framework provides a number of other services that are an integral part of the Target object (oracle.sysman.emx.model.Target). When the MPCUI application is running, the ApplicationContext.getTargetContext() call returns the Target instance for the primary target.
You can construct other target instances for associated targets. In either case, use the following methods to obtain additional information for these targets through the MPCUI service layer.
9.11.5.1 Target Properties Service
For any instance of the Target class, you can call the getTargetInfo() method to retrieve the target properties associated with that target instance. The returned target information populates the properties of the Target instance including: guid, catProperties, typeMetaVer, timezoneRegion, and so on.
For information about these properties, see the Target class documentation in the EDK (/doc/partnersdk/mpcui/emcore/doc/oracle/sysman/emx/model/Target.html).
When calling the getTargetInfo() method, you must provide a handler. This handler will be called when the targetInfo service returns. It is passed the fully populated Target instance and a fault object that is set to include any errors that occurred during the processing of the request to retrieve target properties:
var target:Target = ApplicationContext.getTargetContext();
target.getTargetInfo(targetInfoHandler);
public function targetInfoHandler(target:Target, fault:Fault):void
Note:
In the case ofApplicationContext.getTargetContext(), the current target information is loaded when the application starts and it is not necessary to call getTargetInfo() for that target instance unless you think that target properties have changed.9.11.5.2 Associated Targets Service
Use the target.getAssociatedTargets() method to retrieve the set of targets related to a target instance. This method is called and passed an array of association types and a handler that is called with the list of associated targets. Refer to the API documentation for a full description of the types of the objects returned by this method:
// get associated host
var target:Target = ApplicationContext.getTargetContext();
var assocTypes:Array = [ AssociationDataService.HOSTED_BY ];
target.getAssociatedTargets(assocTypes, assocHandler);
public function assocHandler(assocResult:GetAssociationsResult,
fault:ServiceFault):void
{
var host:ManageableEntityComponent =
assocResult.getAssoc(AssociationDataService.HOSTED_BY);
if(host != null)
page.setModel("relatedHost", host.name);
}
9.11.5.3 Metric Metadata Service
Use the target.getMetricMetadata () method to retrieve the metric definitions information for a target instance. The metric metadata information is retrieved by calling the Target.getMetric() method which returns a Metric object for a specified metric name. Refer to the API documentation for a full description of the types of the objects returned by this method:
var target:Target = ApplicationContext.getTargetContext();
target.getMetricMetadata(metadataHandler);
public function metadataHandler (target:Target,
fault:Fault):void
Note:
In the case ofApplicationContext.getTargetContext(), the current target metric metadata is loaded when the application starts and it is not necessary to call getMetricMetadata() for that target instance unless you think that target metadata has changed (which is unlikely).9.11.5.4 Availability Service
Use the target.getAvailability() method to retrieve current availability information for a target instance. The availability information (AvailOverviewData) includes the current status, the up time (%) for the last 24 hours and so on. Refer to the API documentation for a full description of the types of the objects returned by this method:
var target:Target = ApplicationContext.getTargetContext();
target.getAvailability(targetAvailHandler);
public function targetAvailHandler(availInfo:AvailOvervieData,
fault:Fault):void
9.11.6 Monitoring Service Request Performance
MPCUI includes a tracing service that enables you to monitor the performance of service requests made from the MPCUI code. This is useful when attempting to troubleshoot slow pages or to identify the amount of time spent processing the request in the Management server.
To enable service tracing:
-
Depending on your implementation, choose one of the following:
-
Flex-based UI
-
Locate the html-template/data/mpCuiProperties.xml file. It is included in the project directories (if you are using the Demo Sample as a template).
-
Add the following line to the mpCuiProperties.xml file:
<traceEnabled>true</traceEnabled>
-
Rebuild your application, and then launch it using the Flex Builder debugger or run option:
-
-
Metadata-only UI
-
When running the MPCUI page in the console, ensure that the plug-in is deployed.
-
Access the target home page associated with the plug-in.
-
In the address box of the browser window, add the following to the end of the URL:
&traceEnabled=true
-
Press Enter to reload the page.
-
The MPCUI application loads and the home page appears with the Activity Tracing dialog similar to Figure 9-8.
The Activity Tracing dialog displays the set of pages accessed in the current session, and below each page the set of requests made to the Management Server.
-
-
Expand or collapse the dialog using the controls in the upper right-hand corner. It continues to refresh while the MPCUI application is active.
Note:
When you select a service request in the top pane of the dialog, the Total Time (round trip) is shown as well as the time spent processing the request in the Management Server (Service Time). -
In the details pane, click Show Item Details to view the body of the request and response messages sent between your application and the Management server.
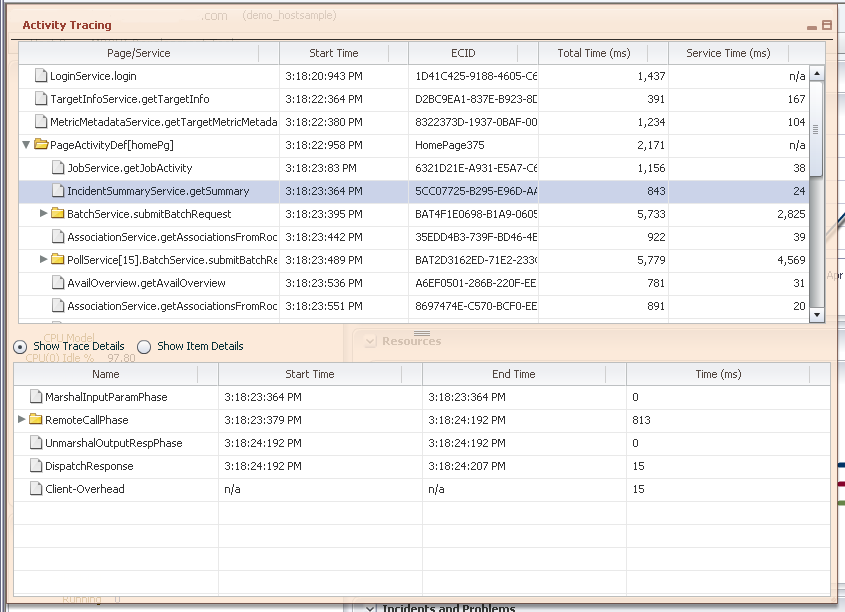
9.11.7 Automated Polling of Service Requests
Note:
An important use of the ”REALTIME” data selection for any chart, table, or data service is that it initiates automated polling of the data at the specified interval.The MPCUI framework supports a limited subset of intervals (15, 30, 60, 90 seconds) so that requests can be grouped together to avoid a large number of requests to the Management Server.
The MPCUI framework starts and stops the polling of these requests automatically as each page or dialog appears or is removed (goes out of scope).
You cannot initiate a polling request that is persistent beyond the scope of a page or dialog.
9.11.8 Batching of Service Requests
In addition to the batching of polling requests, the MPCUI framework provides the ability to explicitly batch requests made at runtime from activity (page or dialog) controllers. Batching of requests is a good practice as it avoids additional round trips to the Management Server which slows the performance of your UI pages and adds additional overhead to the Management Server.
The most common opportunity to batch requests is as part of the activity initialization.
-
For data services declared in the page layout (MXML file), the MPCUI framework will batch the requests for you.
-
For service requests you make from your
controller.init()method, you can pass the page's batch request to the service methods. The MPCUI framework calls theinit()method after your page is loaded.
Example 9-18 is extracted from the HomePageController.as file in the Demo Sample. Note the instances of page.getBatchRequest() in the method. All requests made in this way will be performed over a single pass to the Management Server.
Example 9-18 Batching Requests as Part of the Activity Initialization
override public function init(pg:IActivity):void
{
super.init(pg);
page = pg as HomePage;
var guidParam:Array = [["TARGET_GUID",
ApplicationContext.getTargetContext().guid]];
var bulkQuery:BulkSqlQuery = new BulkSqlQuery();
bulkQuery.addQuery("INSTANCE_INFO", "INSTANCE_INFO", guidParam);
bulkQuery.addQuery("CPU_USAGE", "CPU_USAGE", guidParam);
bulkQuery.execute(queryResultHandler, page.getBatchRequest());
// get processes metric to get process summary information
var procMetric:Metric = ApplicationContext.getTargetContext()
.getMetric("CPUProcessesPerf");
var procSelector:MetricSelector = procMetric
.getSelector(['ProcUser', 'ProcCPU', 'ProcCmd']);
procSelector.getData(processesHandler,
MetricCollectionTimePeriod.CURRENT, page.getBatchRequest());
var cpuPerf:Metric = ApplicationContext.getTargetContext()
.getMetric("CPUPerf");
var cpuPerfSel:MetricSelector = cpuPerf.
getSelector(['system', 'idle', 'io_wait']);
cpuPerfSel.getData(cpuDataHandler,
MetricCollectionTimePeriod.REALTIME, page.getBatchRequest());
// get associated host
var target:Target = ApplicationContext.getTargetContext();
var assocTypes:Array = [ AssociationDataService.HOSTED_BY ];
target.getAssociatedTargets(assocTypes, assocHandler,
page.getBatchRequest());
}
You can use batch requests elsewhere in controller code by creating a MultiServiceRequestor (batch request) and passing it to each request made. For example, suppose that in response to a button click in the page, two requests will be made to the Management Server to retrieve information. They could each be made separately (resulting in two trips to the server) as shown in Example 9-19:
Example 9-19 Creating Individual Batch Requests
var procMetric:Metric = ApplicationContext.getTargetContext()
.getMetric("CPUProcessesPerf");
var procSelector:MetricSelector = procMetric
.getSelector(['ProcUser', 'ProcCPU', 'ProcCmd']);
procSelector.getData(processesHandler,
MetricCollectionTimePeriod.CURRENT); // 1st round trip
var cpuPerf:Metric = ApplicationContext.getTargetContext()
.getMetric("CPUPerf");
var cpuPerfSel:MetricSelector = cpuPerf.
getSelector(['system', 'idle', 'io_wait']);
cpuPerfSel.getData(cpuDataHandler,
MetricCollectionTimePeriod.REALTIME); // 2nd round trip
Alternatively, you can combine the batch requests into a single batch request avoiding the additional round trip to the Management server as shown in Example 9-20:
Example 9-20 Combining Batch Requests
var batchRequest:MultiServiceRequestor = new MultiServiceRequestor();
var procMetric:Metric = ApplicationContext.getTargetContext()
.getMetric("CPUProcessesPerf");
var procSelector:MetricSelector = procMetric
.getSelector(['ProcUser', 'ProcCPU', 'ProcCmd']);
procSelector.getData(processesHandler,
MetricCollectionTimePeriod.CURRENT, batchRequest);
var cpuPerf:Metric = ApplicationContext.getTargetContext()
.getMetric("CPUPerf");
var cpuPerfSel:MetricSelector = cpuPerf.
getSelector(['system', 'idle', 'io_wait']);
cpuPerfSel.getData(cpuDataHandler,
MetricCollectionTimePeriod.REALTIME, batchRequest);
batchRequest.sendRequest(); // 1st and ONLY round trip!
Note:
You must call thesendRequest() method to commit the batch request. Otherwise, no requests will be sent. In the case of the PageController.init use of page.getBatchRequest(), this is not necessary because the MPCUI framework will do it for you.9.11.9 Software Library Search Service
When the plug-in UI requires information about Software Library entities, it can search using different criteria, including name, status, maturity level, or entity attributes. The desired entities can be filtered by specifying the query criteria using the SearchField enumeration. A list of EntityInfo objects that represent an entity revision that match the query criteria is returned. The URN in the EntityInfo object can be used as a unique identifier for the entity revision. If any error has occurred, it will be set in ListSwlibEntitiesResult.errorMessage.
// search the software library
var swSearch:ListSwlibEntities = new ListSwlibEntities();
swSearch.addSearchInput(new SearchInput(SearchField.NAME, "oracle"));
var swlib:Swlib = Swlib.getSwLib();
swlib.listEntities(swSearch, swSearchHandler);
}
private function swSearchHandler(result:ListSwlibEntitiesResult, fault:ServiceFault):void
{
var r:ListSwlibEntitiesResult; var e:EntityInfo;
if(fault != null)
{
MpLog.logError(fault, "Search Software Library");
return;
}
for(var i:int=0; i<result.swlibEntitiesList.length; i++)
{
var entity:EntityInfo = result.swlibEntitiesList[i];
MpLog.info("Swlib Entity: "+entity.toString());
}
page.setModel("swlibContents", result.swlibEntitiesList);
}
9.12 Performing Task Automation
The following sections describes how to perform task automation with examples.
It includes the following:
9.12.1 Automation Services
One of the more powerful aspects of the MPCUI framework is the ability to provide access to administrative features through a UI customized to that purpose. The framework supports the processing of administrative tasks through the Enterprise Manager job system and Web services that provide access to the job system.
The MPCUI provides the following job services:
-
Job.submit -
Job.runSynchronous -
JobExecution.getStatus -
JobExecution.getDetails -
JobExecution.stopJob -
JobExecution.deleteJob -
JobExecution.getJobDetailsURL -
RemoteOp.performOperation
9.12.1.1 Submitting or Running a Job
The job service allows any job that is registered with the plug-in target type to be submitted for processing. The service does not support the ability to submit system job types at this time.
Scheduling of jobs through the job service supports a limited set of the scheduling options supported by the job system. The job schedule supports the following options:
-
Immediate, once, hourly, daily, weekly, monthly, yearly
-
Start and end time for repeat submissions
-
Repeat count and frequency
-
Starting period grace time
-
Management Repository or target time zone
Supported job parameter types include Vector, Scalar, Large and ValueOf.
As with other services, the Adobe Flex framework issues requests asynchronously. This requires that a handler is provided that will be called when the request has completed (or failed). When submitting a job, the result handler is called and passed a JobExecution object. This object contains the processing context for the job that was submitted, and can be used to retrieve the status of the job and operate on the job (stop or delete it).
var job:Job = new Job("backup", "MyBackup", null,
ApplicationContext.getTargetContext(),
[Job.jobParam("dsn", "AdminDS"), Job.jobParam("sql_cmd",stmt)],
JobSchedule.IMMEDIATE);
job.submit(jobSubmitHandler);
}
private function jobSubmitHandler(exec:JobExecution, fault:Fault):void
{
// using exec (JobExecution) can now get current status of job,
// get step details, and start or stop the job
var execId:JobExecutionId = exec.getExecutionId();
}
When a job is run in this way (using the submit method), the job is submitted for processing and the service returns immediately. Therefore, the status of the job may change from submitted to running, and then to complete and the client must check the status periodically.
The job service also provides a way to submit a job for immediate processing and will wait (synchronously) until the job execution completes, fails or reaches a timeout. The client handler will not be called until this state is reached.
Example 9-22 Running a Synchronous Job
var job:Job = new Job("backup", "MyBackup", null,
ApplicationContext.getTargetContext(),
[Job.jobParam("dsn", "AdminDS"), Job.jobParam("sql_cmd",stmt)],
JobSchedule.IMMEDIATE);
job.runSynchronous((jobRunHandler, 30); // 2nd param is timeout
}
private function jobRunHandler(exec:SynchronousJobExecution, fault:Fault):void
{
// using exec (SynchronousJobExecution) can get details about job execution;
// this handler will not be called until the job completes, fails
// or the timeout is reached
var execId:JobExecutionId = exec.getExecutionId();
}
The Task interface is a simplified way of submitting a job for immediate processing, without requiring all of the additional settings associated with the Job.submitJob API.
Example 9-23 Using the Task API
var task:Task = new Task("TTisql", null, [Job.jobParam("dsn", "AdminDS"),
Job.jobParam("sql_cmd",stmt)]);
task.execute(createTableHandler, 10); // timeout is 10s
}
private function createTableHandler(result:SynchronousJobExecution, fault:Fault):void
{
var status:JobStatus = result.getRunStatus();
if(status == JobStatus.RUNNING)
{
// timed out while waiting for job... still running
In the case of a synchronous job, the status of the job is available immediately from the result passed to the handler; however, it should be checked to see if it equals JobStatus.RUNNING. If so, then the request reached the specified timeout and the caller must treat the job execution as if it were submitted asynchronously.
9.12.1.2 Getting Job Status and Step Details
After a job has been submitted, there are several APIs available to get the status of the job and the details of each step including job output. To use these APIs, the caller must have a valid JobExecution object, which is passed to the result handlers of submit and runSynchronous APIs. Currently, there is no service provided that allows a client to search for a job execution.
Example 9-24 Getting Job Status
private function submitHandler(exec:JobExecution, fault:Fault):void
{
exec.getStatus(statusHandler);
}
private function statusHandler(status:JobStatus, fault:Fault):void
{
if(status.getStatus() == JobStatus.FINISHED)
Getting the job status for a submitted job requires service request, and therefore requires a handler to be called with the result (and possibly a fault if the request processing fails). In addition to the status of the job, the job step details can be retrieved.
Getting Job Details:
Use the JobExecution object that is passed to the submit handler, to retrieve step output details as well as the job status. If the job has failed or if the step has not completed, then no data will be returned.
In the case of a synchronous job execution, the handler for the Job.runSynchronous or Task.execute call can check the job status and if complete, retrieve the job details from the result directly:
private function createTableHandler(result:SynchronousJobExecution, fault:Fault):void
{
var status:JobStatus = result.getRunStatus();
if(result != null && result.Status() == JobStatus.COMPLETED)
{
var steps:Array = result.getStepDetail();
for(var i:int=0; i<steps.length; i++)
{
var detail:JobStepDetail = steps[i];
proc.addDetailText(detail.output);
}
In the case of an asynchronous job execution, the handler for the Job.submit handler must call JobExecution.getStatus, and then JobExecution.getDetails. Each call requires a request to the server:
private function submitJob():void
{
var params:Array = new Array();
params.push(Job.jobParam("p0","p0value"));
var job:Job = new Job(type, name, desc, ApplicationContext.getTarget(), params,Job.immediateSchedule());
job.submit(submitHandler);
}
private function submitHandler(result:JobExecution, fault:Fault):void
{
if(fault == null && result != null)
{
// get the job status; calls the server
result.getStatus(statusHandler);
}
}
private function statusHandler(result:JobStatus, fault:Fault):void
{
if(fault == null && result != null)
{
if(result.getStatus() == JobStatus.COMPLETED)
{
// now can get job output details
result.getJobExecution().getDetails(detailsHandler);
}
}
}
private function detailsHandler(result:JobExecutionDetails, fault:Fault):void
{
if(fault == null && result != null)
{
var steps:Array = result.getStepDetail();
for(var i:int=0; i<steps.length; i++)
{
var detail:JobStepDetail = steps[i];
proc.addDetailText(detail.output);
}
}
}
9.12.1.3 Using a Timer to Periodically Check Job Status
If a job is submitted asynchronously (Job.submit) or runs synchronously but the request reaches a timeout and returns a job status of JobStatus.RUNNING. This indicates that the job is still running, and you might want to check the status of the job again at a later point.
The easiest thing from a code perspective is to expose a UI element that the user interacts with to cause the application to check the status of the job. For example, the UI might show a Running indicator with a button or link labeled Check Status Now. When the user clicks the button or link, it calls the JobExecution.getStatus method to retrieve the updated status.
If the required interaction pattern is that the UI remains active while the job is running in the background, and periodically updating the UI with information about the status of the job, then the MPCUI provides a job API to perform period checking of the job status. Each update calls a handler to provide the caller with the opportunity to process the current status and update the UI with that information.
9.12.1.4 Stopping and Deleting a Job
Jobs submitted through the MPCUI APIs can be stopped or deleted using the following APIs:
private function stopJob(exec:JobExecution):void
{
// NOTE: the JobExecution must be a valid job context obtained from submitted a job
exec.stopJob(stopJobHandler);
}
private function stopJobHandler(exec:JobExecution, fault:Fault):void
{
if(fault == null && exec != null)
{
// job was successfully stopped
}
}
private function deleteJob(exec:JobExecution):void
{
// NOTE: the JobExecution must be a valid job context obtained from submitted a job
exec.deleteJob(deleteJobHandler);
}
private function deleteJobHandler(exec:JobExecution, fault:Fault):void
{
if(fault == null && exec != null)
{
// job was successfully deleted
}
}
For jobs that are submitted using the Job.runSynchronous API, the job can be deleted when completed by passing the deleteWhenFinished parameter as true. It is the third parameter and it defaults to false:
var job:Job = new Job("backup", "MyBackup", null,
ApplicationContext.getTargetContext(),
[Job.jobParam("dsn", "AdminDS"), Job.jobParam("sql_cmd",stmt)],
JobSchedule.IMMEDIATE);
job.runSynchronous((jobRunHandler, 30, true);
9.12.1.5 Remote Operations
Using a job to perform administrative tasks is the most flexible approach in terms of scheduling and control (start, interrupt, or stop), but does come with the additional overhead of managing the task being processed. For simple tasks that do not require control over schedule and that are expected to be performed quickly, use the RemoteOp service.
This service allows the execution of a script packaged with the plug-in to be executed directly through the Management Agent.
Note:
The script must be packaged with the plug-in in the agent/ scripts directory (as described in the following section), and might require credentials or parameters to be processed.Packaging Scripts for Remote Operation
Scripts included in a plug-in for remote operations must be included in the staging area:
stage/agent/scripts
You can create additional subdirectories under /scripts if required. Scripts placed in this location can be referenced using the RemoteOp service by referencing the %scriptsDir% variable. For example:
./stage/agent/scripts/process/kill_process.pl
MPCUI Code (ActionScript)
var params:Array = [
RemoteOp.param("%scriptsDir%/process/kill_process.pl"),
RemoteOp.param(pid) ];
var remoteOp:RemoteOp = new RemoteOp("perl", params);
remoteOp.performOperation(killProcessHandler);
In this example, a RemoteOp object is constructed using the shell / command to run and the parameters to pass into that shell. The first parameter must always be the location of the script to be run, referencing its location relative to the %scriptsDir% variable. Subsequent parameters are included as required for the script being run.
To run the remote operation, the RemoteOp.performOperation method is called and passed a function that will be called when the remote operation completes processing. This handler has the following signature:
private function killProcessHandler(remoteOp:RemoteOp, fault:Fault):void
If the remote operation failed to be communicated to the Management Agent, then the fault parameter will include the details of that error. If the remote operation was processed, then the fault will be null and the remoteOp parameter supplied.
Check the remoteOp parameter status because it can indicate an error status returned during command execution on the Management Agent. Example 9-27 shows this check being performed.
Example 9-27 Checking the remoteOp Parameter Status
/**
* Check status; could be any number of problems some of which may result
* in step output, some of which (like missing creds) result in a non-successful
* run status but no step details.
*
* result.getRunStatus() - the status of the job, refer to Constants.JOB_*_STATUS
* result.getStepDetail().stepName/detail - name and output from each step in the job
* result.getJob() - the complete job Object, to reference parameters:
* result.getJob().parameter[0].paramName/paramValue[0]
*
*/
if(remoteOp.result.status != Constants.JOB_COMPLETED_STATUS)
{
// job did *NOT* complete successfully
var pid:String = remoteOp.getParameter(2).paramValue[0] as String;
var msg:String = "Unable to successfully kill process ["+pid+
"]. The status of the command was: "
+Util.getCatString(Util.JOB_STATUS, remoteOp.result.status)
+"\nReturn Code: "+remoteOp.result.returnCode
+"\nCommand Output: "+remoteOp.result.commandOutput;
MessageAlert.show(msg, "Failed to Kill Process", Alert.OK);
}
else
{
// successful job execution; process was killed; can look at the
// step details to get possible output from the job
MpLog.debug("Command was successful: "
+"\nReturn Code: "+remoteOp.result.returnCode
+"\nCommand Output: "+remoteOp.result.commandOutput);
page.processesTable.refreshImmediate();
}
9.12.2 Working With Credentials
The Enterprise Manager credentials model supports three different modes for performing operations that require credentials:
-
Preferred Credentials
Specific credentials are set for a target or all targets of a particular type. In this mode, the user does not select a set of credentials or provide credential values.
-
Named Credential Set
Sets of credentials are created for a target or all targets of a particular type, and each set is assigned a name. In this mode, the user is presented with a list of named sets and can select the set that they would use to perform the operation.
-
Override Credentials
In this mode, the user can supply credentials at runtime that are used to perform the operation.
9.12.2.1 Retrieving Credential Information
MPCUI provides the facilities for retrieving credential information about a particular target. The services can return information only that the current user is privileged to see. This ensures that there is no unauthorized access to secure information. It also requires that you must handle a situation where credential information might not be available to the user accessing the MPCUI code.
9.12.2.1.1 Check for Preferred Credentials
To check if a target has preferred credentials set for it, call the CheckPreferredCredsService.getPreferredCredsInfo method as follows:
var ccSvc:CheckPreferredCredsService = new CheckPreferredCredsService();
ccSvc.getPreferredCredsInfo(ApplicationContext.getTargetName(),
ApplicationContext.getTargetType(),
'HostCreds', checkPrefCredsHandler);
The service returns a CheckPreferredCredsResult object, which indicates whether global (applying to all target instances of the type) or instance (applying only to the single target instance) credentials are available:
public function checkPrefCredsHandler(result:CheckPreferredCredsResult,
fault:ServiceFault):void
{
if(fault != null)
MessageAlert.show(fault.faultDetail, "Error Checking Preferred Creds");
else
{
var msg:String = "Checked for Preferred Credentials for
target("+ApplicationContext.getTargetName()+","+
ApplicationContext.getTargetType()+" for set(HostCreds)
user("+ApplicationContext.getEmUser()+") \n"+
"Global Set = "+result.globalSet+" Instance Set = "
+result.instanceSet;
MessageAlert.show(msg, "Check Preferred Creds Result");
}
}
Note:
If preferred credentials are set, you can submit a job or perform a remote operation without passing any credentials information. In this case, the preferred set will be used.9.12.2.1.2 Retrieve Named Credentials Sets
You can retrieve the named credentials sets available for a particular target and:
-
display the named credentials set in a choice (list or combo box)
-
select from the named credentials set based on a convention required by your plug-in
The following code requests all named sets for two different credentials types for the current target, and calls the credSetResultHandler handler with the result:
var target:Target = ApplicationContext.getTargetContext();
target.getCredentialSets(["HostCreds", "HostSampleCreds"],
credSetResultHandler);
The results handler can then consume the named sets return as appropriate (in this example, constructing a data source for display in a table):
var credTableData:ArrayCollection;
if(creds.credSet != null)
{
credTableData = new ArrayCollection(creds.credSet);
// check to see if there are sets for both types
var hostFound:Boolean = false;
var sampFound:Boolean = false;
for(var c:int=0; c<creds.credSet.length; c++)
{
if(creds.credSet[c].credentialType == "HostCreds")
hostFound = true;
else if(creds.credSet[c].credentialType == "HostSampleCreds")
sampFound = true;
}
var missingType:String = ( !hostFound ? "HostCreds" :
"HostSampleCreds" );
var empty:CredentialSet = new CredentialSet();
empty.credentialType = missingType;
empty.name = "<No Sets Found>";
empty.guid = "";
credTableData.addItem(empty);
}
else
{
empty = new CredentialSet();
empty.credentialType = "<No Credential Sets Defined>";
empty.name = "";
empty.guid = "";
credTableData = new ArrayCollection([empty]);
}
9.12.2.2 Passing Credentials to Jobs and Remote Operations
This section discusses passing preferred credentials and named set credentials to jobs and remote operations.
If the task (job or operation) to be performed attempts to use preferred credentials, then the credentials parameter passed to the task is omitted. Both the job and remote operation services will attempt to perform the task using preferred credentials. If no preferred credentials are set, then an error will be returned
To specify that a named set be used to perform a task, the credentials are passed in a JobCredential (for jobs) and an OpCredential (for remote operations). In both cases, the credentials object includes the following four properties that must be set:
-
targetName: the target the credentials apply to, usuallyApplicationContext.getTargetName() -
targetType: the type of the target the credentials apply to, usuallyApplicationContext.getTargetType() -
usage: the credentials usage as defined for the operation (see the job type definition). This usage specifies which credentials types are required and where they are applied during job execution -
credGuid: the identifier of the named set to be used. This is one of the properties of theCredentialSetclass, which holds named credential sets. For more information, Section 9.12.2.1, "Retrieving Credential Information".
9.12.2.3 Reusable Credentials UI Components
MPCUI provides a credentials region that may be included in a page to allow the end user to interact with the Enterprise Manager credentials subsystem to view the set of credentials available and to select preferred, named, or override credentials when performing a task (job or remote operation).
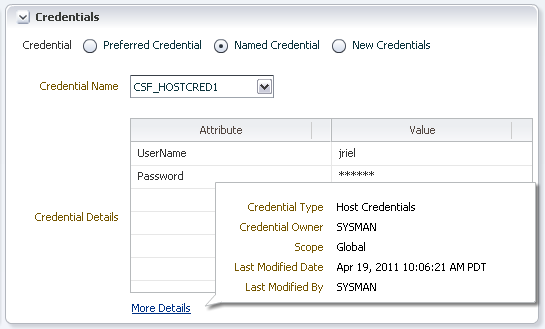
To include this region in a page, add the following MXML:
Example 9-28 Adding a Credentials Region
<credentials:CredentialsRegion id="credRegion" width="40%" height="100%"
title="Credentials" target="{ApplicationContext.getTargetContext()}"
credentialType="HostCreds" />
From the page controller associated with the page, retrieve the settings applied by the end user to this region:
Example 9-29 Retrieving Selected Credential Information
public function getCredsEntered(event:MouseEvent):void
{
var mode:String = page.credRegion.getMode();
var msg:String = "Credential Option Selected: "+mode+"\n";
var namedSet:String;
var creds:Array;
if(mode == CredentialsRegion.NAMED_MODE)
{
namedSet = page.credRegion.getNamedSet();
msg += "Named Set Selected: "+namedSet;
}
else if(mode == CredentialsRegion.OVERRIDE_MODE)
{
try
{
creds = page.credRegion.getOverrideCredentials();
for(var c:int=0; c<creds.length; c++)
msg += "Field:"+creds[c].label+", "+creds[c].value+"\n";
}
catch(e:Error)
{
msg += "Error Entering Credentials:\n";
msg += e.message;
}
}
else
{
// preferred selected...
}
MessageAlert.show(msg, "Credentials Entered");
}
In Example 9-29, note that the mode determines if the user selected preferred, named, or override credentials. Depending on the mode, the named set can be retrieved (CredentialsRegion.getNamedSet()) or the override credentials can be retrieved (CredentialsRegion.getOverrideCredentials()).
9.12.2.4 Managing Monitoring Credentials
The Target class provides the ability to retrieve and set the monitoring credentials for the current target. To retrieve the monitoring credentials, an instance of the Target class is required and the getMonitoringCredentials function is called, passing the results handler that will receive the credential meta data including the monitoring credentials set:
// get monitoring credentials target.getMonitoringCredentials(getMonCredResultHandler, page.getBatchRequest());
The handler would appear as follows:
private function getMonCredResultHandler(cred:CredentialTypeMetadata, fault:ServiceFault):void
{
if(fault != null)
{
if(cred != null && cred.isMissingCredentials())
{
// no monitoring credentials are set
MpLog.info("Monitoring Credentials have not been set: "+fault.faultDetail);
}
else
MpLog.logError(fault, "Get Monitoring Credentials");
return;
}
/**
* The CredentialTypeMetadata returned includes the meta-data for the
* credentials as well as the actual values. NOTE: credentials never
* return the actual values for any field identified as a password it only
* returns the masked "****" value. You should never have any need to
* access the actual values for a password field as any time credentials
* are passed you are passing a credential set and don't need the actual
* values of a pre-existing credentials set
*/
var credFieldValues:Array = (cred.credentialSets[0] as CredentialSet).columnValues;
for(var i:int=0; i<credFieldValues.length; i++)
{
var credField:CredentialColumnValue = credFieldValues[i];
MpLog.debug("Monitoring Credentials["+credField.label+"] = "+credField.value);
}
}
To set the monitoring credentials, the credentials fields according to the credential type specified for monitoring credentials. This is defined in your target metadata.
/**
* the CredentialSet passed contains the monitoring credentials to be set.
* Note that only the columnValues property of the credentials needs
* to be set when updating monitoring credentials as the framework
* derives the values for the credential set and type. It is CRITICAL
* that the label set for each columnValue is the column NAME and not
* the display label for that column. The name is the identifier assigned
* to the credential column in the target meta-data.
*
* In the demo_hostsample, for example, the credentials fields are:
* name: SampleCredUser label: User Id
* name: SampleCredPassword label: Password
* name: SampleCredRole label: Role
*/
var monitoringCreds:CredentialSet = new CredentialSet();
monitoringCreds.columnValues = [
new CredentialColumnValue("SampleCredUser", "myMonitoringUser"),
new CredentialColumnValue("SampleCredPassword", "myMonitoringPassword"),
new CredentialColumnValue("SampleCredRole", "myMonitoringRole")
];
var target:Target = ApplicationContext.getTargetContext();
target.setMonitoringCredentials(monitoringCreds, setMonCredResultHandler);
Then the handler would appear as:
private function setMonCredResultHandler(cred:CredentialSet, fault:ServiceFault):void
{
if(fault != null)
{
MpLog.logError(fault, "Set Monitoring Credentials");
return;
}
/**
* if the set monitoring credentials was successful then the handler is
* called with no fault and the set of credentials that were passed in
*/
}
9.13 Storing Session State
The session state service provides the ability to store global state associated with the Flex application. This is useful for cases where state should be maintained for the current user, even as they move between pages outside of the Flex application that defines the custom UI. For example, if the user modifies the state of the home page and then navigates to the "All Metrics" page, and then upon returning to the home page you wish to restore the state of the page as the user left it. Because the user has left the pages that make up the Flex application, it is necessary to store the state required on the server-side session established for this user session and not within the Flex application itself.
To set the session state, call the EmUser.setSessionData function, passing a SessionAttributes object. The session attributes contain an array of SessionAttribute objects, each of which has a corresponding name-value pair for the attributes stored.
public function setSessionAttributes():void
{
var sessionData:SessionAttributes = new SessionAttributes();
var item1Value:String = page.item1Input.text;
var item2Value:String = page.item2Input.text;
sessionData.attributes.push(new SessionAttribute("attr1",
item1Value));
sessionData.attributes.push(new SessionAttribute("attr2",
item2Value));
EmUser.setSessionData(sessionData, setSessAttrResultHandler);
}
public function setSessAttrResultHandler(attr:SessionAttributes,
fault:ServiceFault):void
{
if(fault != null)
{
MpLog.logError(fault, "Set Session Data");
return;
}
}
To retrieve the session state, use the corresponding EmUser.getSessionData service function. This function will retrieve the session state requested by passing a list of SessionAttributes and a handler that will be called with the result. This will be the same SessionAttributes, populated with the data retrieved from the session:
public function getSessionAttributes():void
{
var sessionData:SessionAttributes = new SessionAttributes();
sessionData.attributes.push(new SessionAttribute("attr1"));
sessionData.attributes.push(new SessionAttribute("attr2"));
EmUser.getSessionData(sessionData, getSessAttrResultHandler);
}
public function getSessAttrResultHandler(attr:SessionAttributes, fault:ServiceFault):void
{
if(fault != null)
{
MpLog.logError(fault, "Get Session Data");
return;
}
for(var i:int=0; i<attr.attributes.length; i++)
{
var item:SessionAttribute = attr.attributes[i];
if(item.name == "attr1")
page.setModel("lastItem1Value", item.value);
else if(item.name == "attr2")
page.setModel("lastItem2Value", item.value);
}
}
9.14 Defining Page Layout Components
To ensure that the MPCUI page resizes correctly when the browser window resizes, Oracle recommends the following guidelines for page layout of an MPCUI-based page:
-
Use the HBox (horizontal box) and VBox (vertical box) containers
-
Set the height and width of the containers using percentage sizes and not absolute pixel sizes
For example, to create a layout of three rows, each occupying one third of the height of the page, then enter the following in the MXML file:
Example 9-30 Defining a Page Layout of Three Rows
<mx:VBox height="100%" width="100%">
<!-- 1st row -->
<mx:HBox height="33%" width="100%">
</mx:HBox>
<!-- 2nd row -->
<mx:HBox height="33%" width="100%">
</mx:HBox>
<!-- 3rd row -->
<mx:HBox height="33%" width="100%">
</mx:HBox>
</mx:VBox>
Then enter the following to split each row horizontally into two separate or equal sections:
Example 9-31 Splitting Rows into Two Equal Sections
<mx:VBox height="100%" width="100%">
<!-- 1st row -->
<mx:HBox height="33%" width="100%">
<mx:VBox height="100%" width="50%" >
</mx:VBox>
<mx:VBox height="100%" width="50%" >
</mx:VBox>
</mx:HBox>
<!-- 2nd row -->
<mx:HBox height="33%" width="100%">
<mx:VBox height="100%" width="50%" >
</mx:VBox>
<mx:VBox height="100%" width="50%" >
</mx:VBox>
</mx:HBox>
<!-- 3rd row -->
<mx:HBox height="33%" width="100%">
<mx:VBox height="100%" width="50%" >
</mx:VBox>
<mx:VBox height="100%" width="50%" >
</mx:VBox>
</mx:HBox>
</mx:VBox>
Within each section, include individual components to fill out the layout of the page.
9.14.1 Defining Regions
The Enterprise Manager UI style guides recommends that you organize the information on the page into regions. A region is a visual box with a title that can be expanded and collapsed. For example, in Example 9-30, each of the rows could be split up into separate regions rather than more vertical containers:
<mx:VBox height="100%" width="100%">
<!-- 1st row -->
<mx:HBox height="33%" width="100%">
<components:Region height="100%" width="50%" title="Row 1 Region 1" >
</components:Region>
<components:Region height="100%" width="50%" title="Row 1 Region 2" >
</components:Region>
</mx:HBox>
<!-- 2nd row -->
<mx:HBox height="33%" width="100%">
<components:Region height="100%" width="50%" title="Row 2 Region 1" >
</components:Region>
<components:Region height="100%" width="50%" title="Row 2 Region 2" >
</components:Region>
</mx:HBox>
<!-- 3rd row -->
<mx:HBox height="33%" width="100%">
<components:Region height="100%" width="50%" title="Row 3 Region 1" >
</components:Region>
<components:Region height="100%" width="50%" title="Row 3 Region 2" >
</components:Region>
</mx:HBox>
</mx:VBox>
Example 9-32 results in a display similar to Figure 9-10. You can use each of the regions to contain other UI components (such as tables and charts) to display meaningful information. For more detailed examples, see the examples in the Demo Sample included in the Extensibility Development Kit.
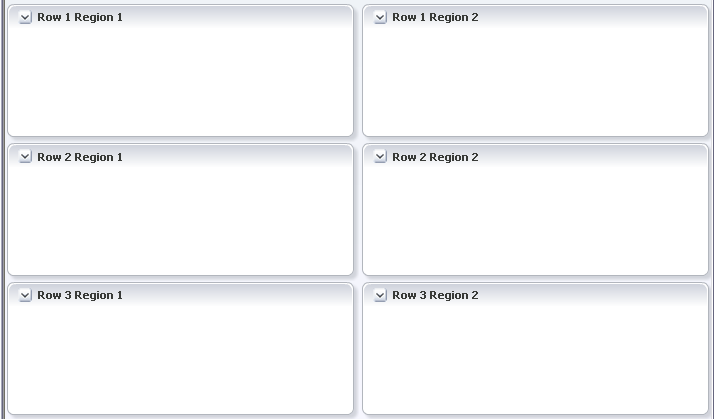
9.15 Including Packaged Regions
The Region component is an empty container within which you can display any number of components to construct your UI. MPCUI supplies several packaged regions that can be included in your page with a single simple tag
9.15.1 Availability Region
The availability region displays the availability of the target for the period specified in the AvailabiltyRegion tag daySpan property. It shows a segmented bar that shows details of the target availability (such as outages) over that same period:
<avail:AvailabilityRegion width="25%" height="100%" daySpan=”1”/>
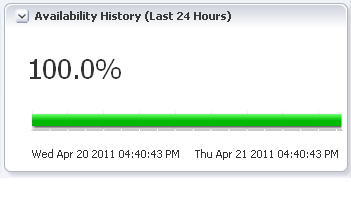
9.15.2 Incidents and Problems Region
The incidents region shows the set of open incidents for the current target and all related targets. It provides the option to filter the list of displayed incidents. The only necessary settings for the region are the size (width/height):
<events:IncidentRegion width="50%" height="100%"/>
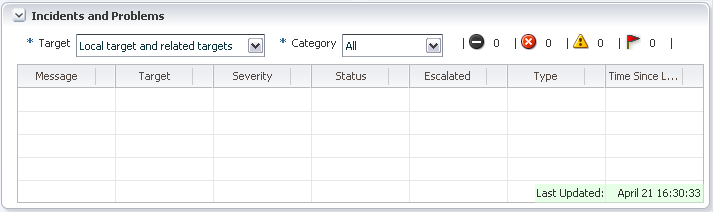
9.15.3 Job Summary Region
The jobs summary region displays the count of jobs by status.
<jobs:JobSummaryRegion width="20%" height="100%" />
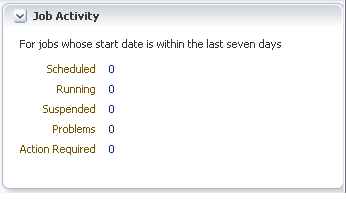
9.15.4 Credentials Region
For information about reusable credentials UI components, see Section 9.12.2.3, "Reusable Credentials UI Components".
9.16 Defining Charts
MPCUI supports three chart components. All chart components have integral support for displaying metric information by specifying the metric properties. Additionally, you can construct your own data for the chart using information obtained from other services including SQLDataService and map it to the charts using the dataProvider property.
The following examples and documentation for each chart type are a brief summary of the various options available for each chart. For a complete description of each chart's properties, refer to the API documentation. For examples of how these charts work at runtime, see the Demo Sample included in the Extensibility Development Kit.
9.16.1 Line Chart
Typically, the line chart displays information over time (often referred to as a time-series chart). Therefore, it lends itself to the display of metric information either historically or in real-time. The chart includes properties for specifying the metricName and metricColumns (an array) that should be shown in the chart and a timePeriod property that can be set to show historical data or real-time sampled data. When timePeriod is set to "REALTIME", the chart manages an automatic polling request for you and updates the chart data as new samples arrive.
<components:Region title="CPU Load" width="75%" height="100%" >
<charts:LineChart id="cpuload" width="100%" height="100%"
metricName="Response"
metricColumns="['Load']"
timePeriod=”REALTIME” interval=”15” />
<components:Link label="Show History"
click="{invokeActivity('metricHistory'))}" />
</components:Region>
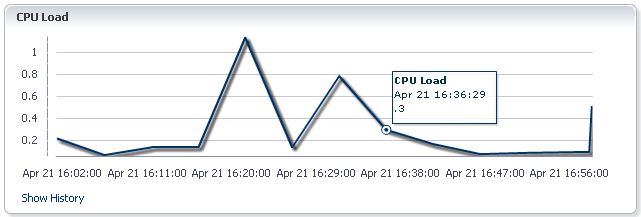
9.16.1.1 Providing Line Chart Data Source
In addition to specifying metrics to be plotted using the line chart, you can create your own data source that is used by the chart to display data. For example, data obtained through the SQL data service or some other means such as by using the polling service and then creating the data samples to be added to the chart.
In the following example, the page includes a chart with the chartDataSource mapped to an item in the page model that is constructed in the page controller.
-
ProcessesPage.mxml<ch:LineChart id="cpuUtilChart" width="100%" height="100%" chartDataSource="{model.cpuChartData}" /> -
ProcessesPageController.as(initmethod)// setup a data provider for the CPU line chart; it will be // updated each time a new data sample comes back for this metric // first get the polling context for a 15 second interval var pollingCtx:PollingContext = page.pollingContext.getContext(PollingInterval.EVERY_15_SECONDS); // now get the metric to be selected and initiate the request (won't start until // "startPolling" is called) var cpuPerf:Metric = ApplicationContext.getTargetContext().getMetric("CPUPerf"); var cpuPerfSel:MetricSelector = cpuPerf.getSelector(['system', 'idle', 'io_wait']); cpuPerfSel.getData(cpuDataHandler, MetricCollectionTimePeriod.REALTIME, pollingCtx); // start polling; this will automatically stop when the user moves to another page pollingCtx.startPolling(); -
ProcessesPageController.as(cpuDataHandlermethod)public function cpuDataHandler(cpuData:MetricResultSet, fault:ServiceFault):void { if(fault != null) return; // handle this better! // get the current data point and derive a new one to // add to the charts data source var dataPoint:TimestampMetricData = cpuData.results[0]; var systemTime:Number = dataPoint.data[0]['system']; var ioWaitTime:Number = dataPoint.data[0]['io_wait']; // create a new data point; this is added to the chart // data source (ChartData) below var dataSample:ChartDataSample = new ChartDataSample(); dataSample.timestamp = dataPoint.timestamp; dataSample["cpuTime"] = systemTime + ioWaitTime; // check if the chart data source is there yet and if // not create it and add it to the page model var cpuChartData:ChartData = page.model["cpuChartData"] as ChartData; if(cpuChartData == null) { cpuChartData = new ChartData(); page.setModel("cpuChartData", cpuChartData); // define the series "cpuTime" in the chart including a label page.cpuUtilChart.setLineSeries(["cpuTime"], ["CPU Time %"]); } cpuChartData.addDatapoint(dataSample); }
9.16.2 Area Chart
The area chart is similar to the line chart and has the same attributes. It displays data in the same way as LineChart. The showCumulativeLine property controls the display of an area chart. For most area charts, this property should be included in set to ”true” to show a stacked or cumulative area chart. Otherwise, the area chart overlays the fill areas for each series included in the chart.
<charts:AreaChart id="cpuutil" width="100%" height="100%"
metricName="CPUProcessorPerf"
metricColumns="{['CPUIdle']}"
timePeriod="LAST_DAY" />
9.16.3 Bar (Horizontal) Chart
The bar chart exposes the same properties as the column chart both for visible attributes and for specifying control over the data source:
<charts:BarChart id="spaceChart" timePeriod="CURRENT"
width="100%" height="100%"
groupBy="byKey"
metricName="MSSQL_Database"
metricColumns="{['spaceavailable']}" />
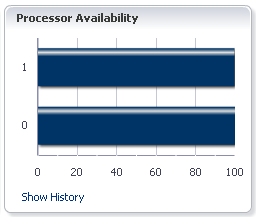
9.16.3.1 Grouping Bars
The groupBy property (available for bar and column charts) enables you to organize data by key or by column. The default (by column) applies when the data set does not include keys.
For example, assume you have the following data set where the User column is treated as the key to the data:
| User | Logins | Errors |
|---|---|---|
| Jones | 23 | 12 |
| Smith | 30 | 4 |
| Shah | 27 | 20 |
In Example 9-33, the groupBy property is set to byColumn. This creates two groups of columns, one for each data column, with all three keys appearing in each group as displayed in Figure 9-16.
<mp:BarChart id="userBarChart"
dataProvider="{model.userData}"
showLegend="true"
groupBy="byColumn"
/>
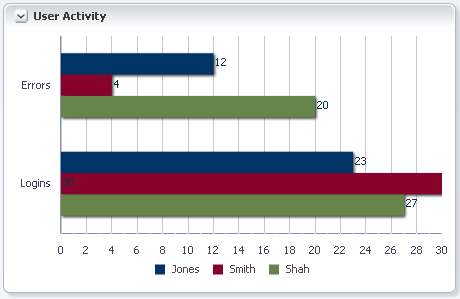
In Example 9-34, the groupBy property is set to byKey. This creates three groups, one for each key, with both columns (the data items) appearing in each group as displayed in Figure 9-17.
<mp:BarChart id="userBarChart"
dataProvider="{model.userData}"
showLegend="true"
groupBy="byKey"
/>

9.16.4 Column (Vertical Bar) Chart
The column chart is a vertical bar chart and exposes the same properties as the bar chart both for visible attributes and for specifying control over the data source:
<charts:ColumnChart id="bchart" timePeriod="LAST_DAY"
width="100%" groupBy="byKey"
metricName="CPUProcessorPerf" metricColumns="{['CPUIdle']}"/>
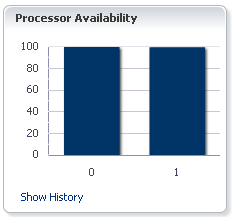
9.16.5 Pie Chart
In the following example, the code constructs a pie chart by specifying the metric name and metric columns. The MPCUI framework performs the necessary requests to obtain information from the Management Server and populates the values in the chart.
Note:
For themetricColumns attribute, the value is set in the controller (see the HomePageController.as example) in response to the user changing the value of the combo box above the chart.
<charts:PieChart id="memChart"
targetName="{appModel.target.name}"
targetType="{appModel.target.type}"
metricName="MemoryPerf"
metricColumns="{model.memoryColumns}"
timePeriod="LAST_DAY"
labelPosition="none" />
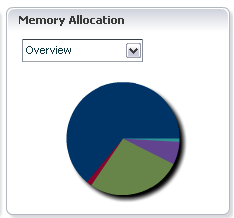
9.17 Defining Tables
The following sections describe the different methods of defining tables, providing examples of each method.
9.17.1 Data Service
Example 9-35 maps the table to the MetricDataService by specifying the metricName and metricColumns. You do not have to specify the headerText attributes for the columns because it will be filled with the metric column labels. You can override these labels if required.
Example 9-35 Mapping a Table to the MetricDataService
<c:Table id="processesTable" width="100%" height="100%"
metricName="CPUProcessesPerf"
metricColumns="['ProcUser', 'ProcCPU', 'ProcCmd']"
timePeriod="REALTIME"
interval="30"
>
<c:adminElements>
<mx:Button id="killProcessButton" label="Kill Process"
click="controller.killProcess(event)"/>
</c:adminElements>
<c:columns>
<mx:AdvancedDataGridColumn width="50" dataField="key" />
<mx:AdvancedDataGridColumn width="100" dataField="ProcUser" />
<mx:AdvancedDataGridColumn width="80" dataField="ProcCPU" />
<mx:AdvancedDataGridColumn width="400" dataField="ProcCmd" />
</c:columns>
</c:Table>

9.17.2 Custom Data Provider
In Example 9-36, the data for the table is loaded in the controller, and mapped to the page model processInfoData item. The processInfoData is an array of objects (of any type). The dataField property specified for each column identifies the public property that will be displayed in each column. In this case, the dataField name will also be used as the headerText. You can supply the headerText property to override this label.
<tbl:Table id="processInfoTable" dataProvider="{model.processInfoData}">
<tbl:columns>
<mx:AdvancedDataGridColumn width="100" dataField="Process ID"/>
<mx:AdvancedDataGridColumn width="250" dataField="User"/>
<mx:AdvancedDataGridColumn width="100" dataField="Database"/>
<mx:AdvancedDataGridColumn width="100" dataField="Status"/>
<mx:AdvancedDataGridColumn width="250" dataField="Command"/>
<mx:AdvancedDataGridColumn width="100" dataField="CPU Time"/>
<mx:AdvancedDataGridColumn width="100" dataField="Memory Usage"/>
</tbl:columns>
</tbl:Table>
9.17.3 Getting Selected Rows
The rows currently selected in the table can be obtained by looking at the selectedRows property of the table. This property is an array of selected rows, where each row is a Dictionary object that contains data in the row keyed by the column name. If the row is based on a custom data source, then the row will be whatever object was mapped into the table data source.
var process:Dictionary = page.processesTable.selectedRows[0];
If the table is set to allow single selection, then the selectedRows array includes a single entry only (or none if no row is selected).
9.18 Defining Dialogs
When you construct a dialog, typically you require an MXML class only, extending the oracle.sysman.emx.intg.Dialog class.
9.18.1 Dialog Registration
To make a dialog available to be displayed using the invokeActivity method, you must register it as an activity as part of the Integration class. In Example 9-37, note the following:
-
idattribute: The ID is used to reference this dialog from other activities within the application. It must be unique across all activities included in the application. -
dialogClassattribute: ThedialogClassattribute is a reference to the MXML class that extends Dialog and that is the implementation for this dialog.
inputParams are optional, but they enable the dialog to be reused in situations where input parameters are required and you want to pass an object as context directly from the MXML using the bean directive. The MPCUI framework maps the input object parameters to the dialog parameters.
If you do not define inputParams as part of the dialog definition, then any input data required by the dialog (such as any custom properties) would have to be set in ActionScript and the dialog shown using the Dialog.show method.
        <intg:DialogActivityDef id='metricHistory' label='Metric History' dialogClass='{MetricHistoryDialog}' >
            <intg:inputParams>
                <intg:InputParam name='targetName'/>
                <intg:InputParam name='targetType'/>
                <intg:InputParam name='metric'/>
                <intg:InputParam name='columns'/>
                <intg:InputParam name='period'/>
                <intg:InputParam name='title'/>
            </intg:inputParams>
        </intg:DialogActivityDef>
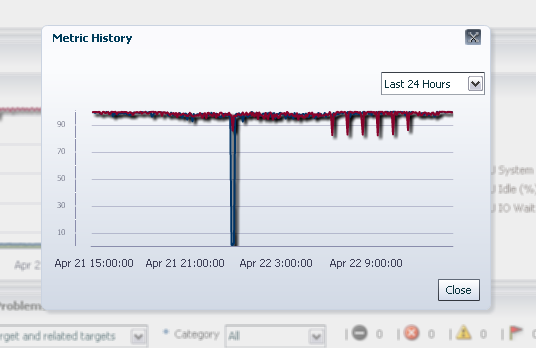
9.18.2 Displaying a Dialog and Waiting for Close Events
If the dialog includes some state that is required when the dialog closes, then a close handler can be passed to the invokeActivity method. This handler is called with the CloseEvent. This handler identifies which button was pressed to close the dialog and retrieves the dialog object itself to retrieve information from it.
Example 9-38 Waiting for a Close Event
public function showCpuMetricDetails(event:MouseEvent):void
{
var bean:Bean = new Bean("targetName", page.appModel.target.name,
"targetType", page.appModel.target.type,
"metric", page.cpuutil.metricName, "columns",page.cpuutil.metricColumns,
"period", "REALTIME", "title", "Metric Details (Current)");
page.invokeActivity("metricDetails", bean, metricDialogClosed);
}
public function metricDialogClosed(event:CloseEvent):void
{
MpLog.debug("Metric Details Dialog Closed");
var button:int = event.detail; // Alert.YES, Alert.NO, Alert.OK etc…
var metDetailsDialog:MetricDetailsDialog = event.currentTarget
as MetricDetailsDialog;
}
In Example 9-38, the metricDialogClosed function is passed to invokeActivity. When the dialog closes, the method is called and passed a CloseEvent. From this event, the currentTarget property contains the dialog itself, and the detail property indicates which button was pressed to close the dialog.
9.19 Defining Trains
The train allows the definition of a multi-step UI, with next and previous buttons to navigate between each step. The train is typically used in cases where the user is going to create or modify an entity that has a large number of attributes that can be organized into categories.
The train must be registered with the integration class, and includes a controller that extends TrainController and a page class for each step in the train and extends TrainStepPage. Each step (train step page) can have its own controller class. Because each step is a page with a controller, the layout, management of data and response to events within the step is exactly the same as any other page in the application. For more information about the Page class, see Section 9.6.2.1, "Page Class".
The train step controller can access the train itself by referencing the TrainStepPage.train property. Use this to access other information maintained within the train object or its model.
9.19.1 Train Definition Example
Example 9-39 provides a definition of train and Figure 9-22 shows the train.
<intg:TrainActivityDef id='addNewUserEmbeddedTrain' label='Add New User'>
<intg:stepActivities>
<mx:Array>
<intg:TrainStepActivityDef id='anuStep1' label='User Info' pageClass='{trainSamp.S1_UserInfo}' pageControllerClass='{trainSamp.AddNewUserTrainStepController}'/>
<intg:TrainStepActivityDef id='anuStep2' label='Expiry' pageClass='{trainSamp.S2_Expiry}' pageControllerClass='{trainSamp.AddNewUserTrainStepController}'/>
<intg:TrainStepActivityDef id='anuStep3' label='Credentials' pageClass='{trainSamp.S3_Credentials}' pageControllerClass='{trainSamp.AddNewUserTrainStepController}'/>
<intg:TrainStepActivityDef id='anuStep4' label='Schedule' pageClass='{trainSamp.S4_Schedule}' pageControllerClass='{trainSamp.AddNewUserTrainStepController}'/>
<intg:TrainStepActivityDef id='anuStep5' label='Notifications' pageClass='{trainSamp.S5_Notifications}' pageControllerClass='{trainSamp.NotificationsTrainStepController}'/>
<intg:TrainStepActivityDef id='anuStep6' label='Confirmation' pageClass='{trainSamp.S6_Confirm}' pageControllerClass='{trainSamp.AddNewUserTrainStepController}'/>
</mx:Array>
</intg:stepActivities>
</intg:TrainActivityDef>
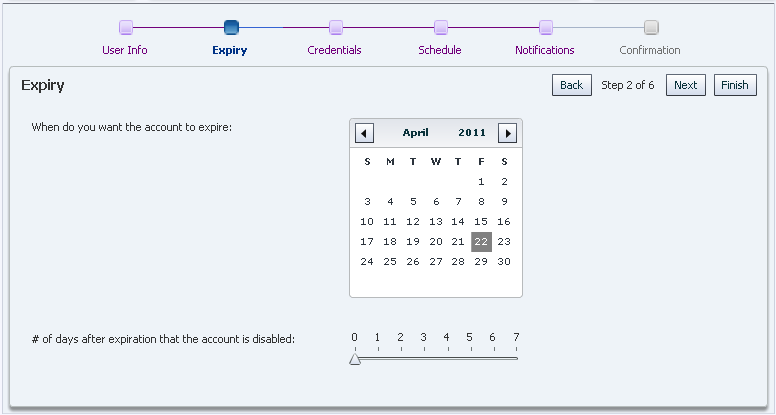
9.19.2 Train Controller
The train controller is used to managed state kept across all pages in the train and respond to changes in the train (movement between steps) and respond to the train completing when the user clicks either the Finish or Cancel button.
9.19.3 Train State
State may be maintained in the Train model using the Train.model property. This property is a dynamic property that can be used to hold any information appropriate to the train. Individual pages can store their own state in their own model properties and may also access information stored in the train model.
9.19.4 Train Events
Each train step controller can implement the init and destroy methods that are called when the step starts or stops. The step can do either of the following:
-
Perform a step-specific processing step
-
Access the train and allow it to process higher level logic
The train controller can also be called when the train ends (Finish or Cancel) by adding a listener function for the train done event:
Example 9-40 Adding a Listener Function
// register a listener for the train complete event, this may be a cancel or finish. train.addEventListener(TrainEvent.TRAIN_EVENT, trainDone);
The listener (trainDone in Example 9-40) can inspect the train state and determine if processing should continue or not. It can choose to direct control to some other activity (page) or can set the train back to another step:
Example 9-41 Defining Actions at the End of the Train
public function trainDone(event:TrainEvent):void
{
// train cancel/finish button was pressed, so caller can now validate
// the train (look at the model). The caller has the various options indicated below.
var train:Train = event.target as Train;
if(train.model["isComplete"])
{
// want to end the train, but go somewhere else (otherPage is a page id)
train.endTrain("otherPage");
else
{
// go back to train at a certain step
train.controller.setStepById("step2");
}
9.20 Defining Information Item and Information Displays (Label-Value Pairs)
The InfoDisplay and InfoItem classes allow you to display a set of label-value pairs in a group with the labels right-aligned and the values left-aligned. Each entry (InfoItem) in the display specifies a label, value, optional icon, destination, or click property.
The destination or click properties cause the value to appear as a link. You can set destination to either of the following:
-
String that is the identifier for some other activity (page or dialog)
-
URL object constructed in the controller (see
HomePage.mxmlandHomePageControllerfor examples)
You can specify the click handler instead of the destination and set it to a function within the controller that will be called when the item is clicked by the user.
Example 9-42 Defining Label Value Pairs
<components:InfoDisplay width="100%" height="100%" >
<!-- ref to SQLDataService -->
<components:InfoItem label="CPU Model"
value="{ids.result.getString(0,'CPU Model')}" />
<!-- ref to MetricDataService for metric with a key -->
<components:InfoItem label="CPU(0) Idle %"
value="{procData.result.getString('0','CPUIdle')}" />
<!-- ref to MetricDataService for metric with no key -->
<components:InfoItem label="Current Load"
value="{respData.result.getString('','Load')}" />
<!-- ref to page model; model set in controller in SQL svc handler -->
<components:InfoItem label="{model.osVersLabel}" value="{model.osVersion}" />
<components:InfoItem label="Hosted By" value="{model.relatedHost}"
destination="{model.relatedHostLink}" />
</components:InfoDisplay>
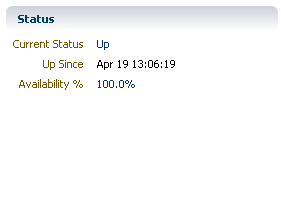
9.21 Using Built-in Renderers
In addition to the ability to define custom renderers for table columns, headers, and other UI elements using the capabilities provided by the Flex framework, the MPCUI framework also provides several built-in renderers that can be used to display custom icons in a table or for an InfoItem. These renderers are also useful for meta-data only implementations where it is not possible to create controller code to implement a renderer.
These built-in renderers show an icon in place of a text value, either in a Table or InfoItem component. The renderer is specified by using the "appModel.renderer" directive in the MXML and specifies a renderer id to select the renderer and then a set of input parameters for the renderer depending on the renderer type.
For example, the following code would result in an icon being displayed next to the value on the InfoItem and will show a check mark, warning, or error icon depending on the value displayed in the InfoItem:
<mp:InfoItem id="currentLoad" label="CPU Load"
  value="{respData.result.getString('','Load')}"
  imageRenderer="{appModel.renderer('CHECK_MARK',
  bean('type','number','warning','0.1','critical','0.4'))}" />
The first parameter, "CHECK_MARK" indicates which renderer to be used, see the complete list below. The second parameter, "bean" specifies the input parameter for the check mark renderer. This parameter will be different and in some cases optional depending on the renderer selected. Refer to the API documentation for details regarding what each renderer requires for input parameters.
The built-in renderers supported in 12.1.0.3.0 of the EDK include the following:
-
CHECK_MARK
Displays a check mark, warning icon or error icon depending on the value provided. The renderer can either be used to display a check mark or error icon in the case where a Boolean value is shown. The Boolean may be true/false, t/f or 0/1. If the 'type' parameter is specified as 'number', then the value will be compared to thresholds provided in the input parameters to also show a different icon if the following is beyond the specified threshold.
-
TARGET_TYPE
Displays the icon associated with a target type value. This is the internal target type id, e.g. 'oracle_database', not the actual displayed string representation of the target type.
-
TARGET_STATUS
Displays the icon associated with a status value. The status value will be up/down, true/false, or 0/1 and will display and up or down arrow according to that value.
When the renderer is associated with an InfoItem, by default the value shown in the InfoItem will be passed to the renderer to determine which icon should be displayed. In cases where an alternative value should be used to control the renderer, the InfoItem provides the "imageDataSource" property. This property can be bound to a data item that is different than the displayed value.
In the following example, the TARGET_TYPE renderer is used to show the target type icon next to the name of the target. In order to do this the imageDatasource property is set to an item that will contain the internal target type needed by the renderer.
<mp:InfoItem id="relatedHost" label="Hosted By" value="{model.relatedHost}"
  imageRenderer="{appModel.renderer('TARGET_TYPE')}"
  imageDataSource="{model.relatedHostType}"
  destination="{model.relatedHostLink}"  />
9.22 Defining Links
Use the link component to display what appears to the user to be a link to a URL. The link specifies a label property and also either a destination or click handler property. The destination can be an activity id or a URL object constructed in the controller. For information about the InfoItem class, see Section 9.20, "Defining Information Item and Information Displays (Label-Value Pairs)".
9.23 Including Enterprise Manager Images
To reference one of the images shipped with the Enterprise Manager product from the MXML in both Flex and metadata implementations, use the appModel.emImage function to refer to the desired image. Note that the list of images and their filenames is not currently part of the Enterprise Manager EDK and therefore is subject to change.
You should verify and test any use of`this information with each new release of Enterprise Manager. In a typical deployment, the images are located under the emcore_war/images directory. For example:
<mx:Image source="{appModel.emImage('yellowFlag.gif')}" />
9.24 Displaying a Processing Cursor
The UI displays the processing or busy cursor automatically when:
-
Any new activity is accessed (page, train or dialog)
-
Any request is made to the Management Server for data
Typically, you do not have to show the busy cursor. However, if you feel that you must show the busy cursor, take care that the cursor is ended cleanly. Ensure that if exceptions are thrown while the busy cursor is shown, that they are caught and the cursor is removed.
To show the cursor, call the MpCursor.setBusyCursor method.
To remove the cursor, call MpCursor.removeBusyCursor. Both methods accept an optional owner parameter. This parameter allows you to nest multiple cursors calls.
9.25 Defining a Processing Window
The processing window displays a dialog that is displayed during long running tasks. It can be updated periodically with status information as the task runs. You can show the dialog with:
-
an infinite completion, which shows a spinning status icon
-
a finite completion which shows a percentage bar that can be updated as the task executes (from 0-100% complete)
Example 9-43 Defining a Processing Window
  private var proc:ProcessingWindow;
  private var indeterminate:Boolean = false;

  public function showDialog():void
  {
    proc = new ProcessingWindow();
    proc.title="Processing";
    proc.operationText = "Get Metric Info Many Times...";
    proc.showDetailText = true;
    indeterminate = !indeterminate;
    proc.indeterminate = indeterminate;
    proc.show();

    taskCount = 0;
    longRunningTask();
  }

  private var taskCount:int = 0;
  private function longRunningTask():void
  {
    proc.addDetailText("Starting next item of work...");
    var querySvc:SqlQuery = new SqlQuery(allMetricsHandler);
    var queryRequest:RunQueryRequest = new RunQueryRequest();
    var tgt:Target = ApplicationContext.getTargetContext();
    queryRequest.addSqlQueryInput(new SqlQueryInput("GET_ALL_METRIC_INFO", "GET_METRIC_INFO", [
      ["TARGET_TYPE", tgt.type],
      ["TYPE_META_VER", tgt.typeMetaVer],
      ["CAT_PROP_1", tgt.catProperties[0]],
      ["CAT_PROP_2", tgt.catProperties[1]],
      ["CAT_PROP_3", tgt.catProperties[2]],
      ["CAT_PROP_4", tgt.catProperties[3]],
      ["CAT_PROP_5", tgt.catProperties[4]],
      ["TARGET_GUID", tgt.guid]
      ], SqlQueryInput.GENERIC_QUERY_TYPE));
    querySvc.runQuery(queryRequest);
  }

  public function allMetricsHandler(event:RunQueryResultEvent):void
  {
    proc.addDetailText("Got a response from query service at "+new Date().toLocaleString());
    taskCount++;
    proc.addDetailText("task update for the "+taskCount+"th time...");
    if(taskCount < 20)
    {
      if(!indeterminate) proc.setPercentComplete(taskCount*5);
      longRunningTask();
    }
    else
    {
      proc.addDetailText("All work complete.");
      proc.setComplete();
    }
  }
...
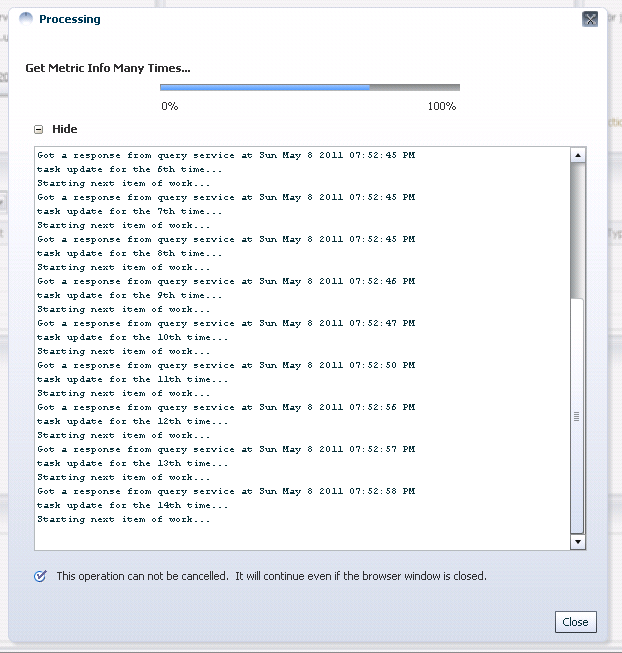
9.26 Defining Icons for Target Types
You can specify icons to associate with a target type to be displayed in the Cloud Control console wherever a target type icon is shown (such as next to the target menu).
MPCUI supports the following graphic formats for icons:
-
PNG
-
JPG
-
GIF
Oracle recommends the following sizing for icons:
-
Small icon: 16x16
-
Large icon: 24x24
Save the icon files in the plugin_stage/oms/metadata/mpcui directory. For more information about the plug-in staging directory, see Section 14.2, "Staging the Plug-in".
  <EmuiConfig>
     <large-icon>demo_hs_large_icon.png</large-icon>
     <small-icon>demo_hs_small_icon.png</small-icon>
  </EmuiConfig>
Figure 9-26 and Figure 9-27 provide examples of a small and a large icon.
9.27 Displaying the Target Navigator
The target navigator can be displayed on the left side of the home page of any composite target or any of its members. The target navigator displays the composite target at its root and then shows all members of the composite by searching for any contains associations below it. Targets that are associated with the composite target can have other non-contains associations with the composite target or with other targets. However, only those targets with contains associations with the composite target are shown in the target navigator. You can add these containment associations through any of the supported mechanisms for discovering or deriving associations. For more information, see Chapter 11.
To enable the target navigator, the MPCUI metadata must include the <EmuiConfig> element with the context-pane-visible property set to true. This must be set for the composite target type as well as any of its member targets. If it is not set for member targets, then the navigator will not appear showing the other members of the composite when the home page is displayed for those targets.
By default, the context-pane-visible property is set to false and the target navigator is not displayed.
Note:
If there are no contains associations, then the target navigator will not appear, even if thecontext-pane-visible property is set to true.9.28 Defining a UI for Guided Discovery
The MPCUI framework supports the ability to define a custom user interface that can be registered as part of a guided discovery flow. After registration, this discovery flow is available from the Add Targets Manually page. For more information about adding targets manually, see Section 12.6.
9.28.1 About Guided Discovery
The guided discovery flow provides you with the ability to add targets and associations to Enterprise Manager by running discovery scripts on selected Management Agents and calling service APIs to add the appropriate entities. This process is driven from a user interface wizard (train) and can use information supplied by the end user to guide the process. It is up to you to determine (based on your specific requirements) the information required from the end user during this process. For examples, see the plug-in samples in the EDK (demo_hostsample and demo_hostsystem). For more information about discovery scripts, see Chapter 12.
The services typically used during guided discovery include the following:
-
TargetInfo services to retrieve Management Agents and targets, for example, for target existence or target properties
-
AssociationInfo services to retrieve existing associations
-
Discovery service to run discovery scripts on selected Management Agents
-
TargetManagement services to create or delete targets
-
AssociationManagement services to create or delete associations
For more information about these services, see Section 9.28.5, "Using Discovery Service", Section 9.28.6, "Using Target Information Services", and Section 9.28.7, "Using Target Management Services".
9.28.2 Supporting Guided Discovery
To add guided discovery to a plug-in, ensure that the following directories contain the required files:
-
plugin_stage/discovery
-
Scripts that will be executed from the guided discovery flow. These scripts might include multiple targets and associations. For more information about discovery scripts, see Section 12.3.
-
customdiscover.lst file. This file must include one line for each discovery script to be provided with the plug-in. Each entry must reference a discovery category, which is a unique identifier that will be used to identify the script to be executed when calling the discovery service. The following entry shows a discovery category (DHS_DISC) that is used to refer to the demo_hostsample_discovery.pl script during the guided discovery flow.
DHS_DISC|demo_hostsample_discovery.pl
-
-
plugin_stage/oms/metadata/discovery
Discovery metadata file (plugin_discovery.xml). For more information about the discovery metadata file and an example of the discovery XML, see Section 12.2. For guided discovery, there are a number of attributes that must be specified correctly to allow your guided discovery to be registered correctly.
-
<DiscoveryModule name="DemoHostSample">This is the unique name for the discovery module and must match the module name used to register the discovery SWF in the MPCUI metadata file.
-
<NlsValue>Discover Demo Host Sample Targets</NlsValue>This is the label that appears in the Target Types list on the Add Targets Manually page of the Cloud Control console.
<CustomDiscoveryUI>
   <LaunchADF>
     <DestOutcome>goto_core-mpcustomdiscovery-page</DestOutcome>
   </LaunchADF>
</CustomDiscoveryUI>
This must be exactly the same in your discovery metadata file. It ensures that the guided discovery UI that you built and included in your plug-in will be launched.
-
-
plugin_stage/oms/metadata/mpcui
-
discovery.swf
Similar to the MPCUI application created for a target home page, the guided discovery UI is constructed as a Flex application.
-
MyMpcui.swf
In addition to the discovery SWF, the MPCUI metadata file must include an entry to register the discovery SWF with the appropriate discovery module.
Example 9-46 SwfFiles Tag From MPCUI Metadata File for Flex-based UI
<SwfFiles>
    <Swf is_homepage="true">HostSample.swf</Swf>
    <Swf discovery_module="DemoHostSample">HostSampleDiscovery.swf</Swf>
</SwfFiles>
The
<Swf discovery_module="DemoHostSample">HostSampleDiscovery.swf</Swf>entry shows a discovery SWF being registered with the discovery module that was registered in the discovery metadata. This UI is launched when this discovery module is selected by the user in the Add Targets Manually page in the Cloud Control console.
-
9.28.3 Constructing the Guided Discovery User Interface
The guided discovery UI is built using the MPCUI features for constructing a Flex UI. The UI components, such as regions, buttons, tables, dialogs, and so on are used to construct a user interface to guide the user through the process of adding new targets to Enterprise Manager. For information about adding these UI components, see the relevant sections of this chapter, such as Section 9.17, "Defining Tables" or Section 9.18, "Defining Dialogs".
9.28.3.1 Discovery Application and Integration Class
The discovery application must extend the MpDiscoveryApplication and not the MpApplication class. The discovery application is an MXML file that specifies the name of the application (taken from the name of the file) and the integration class that defines the activities included in the discovery application:
<?xml version="1.0" encoding="utf-8"?>
<mp:MpDiscoveryApplication xmlns:mx="http://www.adobe.com/2006/mxml"
                           xmlns:mp="http://www.oracle.com/mpcui/"
    backgroundColor="#EFF3F7" preloader="oracle.sysman.emx.MpPreloader" >
    <mx:Script>
        <![CDATA[
            import discovery.DiscoveryInteg;
            override public function getIntegrationClass():Class
                return discovery.DiscoveryInteg; }
        ]]>
    </mx:Script>
</mp:MpDiscoveryApplication>
The integration class for the discovery application defines the set of activities used by the discovery UI. The discovery application must include at least one PageActivity that is defined with the isDefaultPage=true property indicating that this is the page that will be loaded when the guided discovery starts. In Example 9-48 (extracted from the demo_hostsystem sample plug-in), take note of the discoHomePg activity.
Example 9-48 Integration Class
<mp:PageActivityDef id='discoHomePg' label='Discovery Console' pageClass='{discovery.DiscoveryTrainPage}' pageControllerClass='{discovery.DiscoveryTrainPageController}' isDefaultPage="true" />
<mp:TrainActivityDef id='discoTrain' label='Discover New Targets'>
    <mp:stepActivities>
        <mx:Array>
            <mp:TrainStepActivityDef id='selAgentsStep' shortLabel="Select Agents" label='Add Demo Host System Target: Select Agents' pageClass='{discovery.train.SelectAgentsStep}' pageControllerClass='{discovery.train.DiscoveryTrainStepController}'/>
            <mp:TrainStepActivityDef id='selHostSysStep' shortLabel="Select System" label='Add Demo Host System Target: Select Demo Host System' pageClass='{discovery.train.SelectHostSystemStep}' pageControllerClass='{discovery.train.DiscoveryTrainStepController}'/>
            <mp:TrainStepActivityDef id='selTargetsStep' shortLabel="Configure Targets" label='Add Demo Host System Target: Configure Targets' pageClass='{discovery.train.SelectTargetsStep}' pageControllerClass='{discovery.train.DiscoveryTrainStepController}'/>
            <mp:TrainStepActivityDef id='confTargetsStep' shortLabel="Confirm Changes" label='Add Demo Host System Target: Confirm Changes' pageClass='{discovery.train.ConfirmChangesStep}' pageControllerClass='{discovery.train.DiscoveryTrainStepController}'/>
            <mp:TrainStepActivityDef id='finTopo' shortLabel="Summary" label='Add Demo Host System Targets: Apply Changes' pageClass='{discovery.train.FinalizeTopoStep}' pageControllerClass='{discovery.train.DiscoveryTrainStepController}'/>
        </mx:Array>
    </mp:stepActivities>
</mp:TrainActivityDef>
9.28.4 Structure of the Discovery Application
The discovery application is often a single page that either has a train embedded in it, or that displays dialogs to obtain information from the end user to guide the discovery process. The steps of the guided discovery flow depends on the requirements, but often involve the following:
-
Determine on which Management Agents to run a discovery script
-
Run the discovery script
-
Process the results of the discovery script, adding additional information provided by the end user
-
Call APIs to add or delete targets
One important consideration about guided discovery is that it can be used to update the topology of existing composite targets as well as discover new targets. In the case of the sample plug-in (demo_hostsystem), the guided discovery UI allows the user to add new system targets, but also allows the user to add or remove members from an existing system.
This use case also illustrates the requirement to use Enterprise Manager APIs to query for the set of existing targets known to Enterprise Manager to compare the set with information returned from the discovery script to identify which targets are already managed by Enterprise Manager and which are not. For example, the result might be a list of new targets that should be added and a list of other targets that no longer exist in the managed configuration and must be removed from Enterprise Manager.
This scenario also illustrates that the discovery application might also be integrated with the custom UI built for the target home page. This provides the user with the ability to update the configuration of an existing composite target directly from the composite target home page.
See the HostSystemConfiguration page in the demo_hostsystem sample plug-in for an example of using discovery UI from within a target home page.
9.28.5 Using Discovery Service
The Discovery service is used to run a discovery script included with your plug-in. For a description of your plug-in requirements to support discovery, see Section 9.28.2, "Supporting Guided Discovery".
Example 9-49 (included in the demo_hostsystem sample plug-in in the DiscoveryTrainStepController) shows calling the discovery service (TargetFactory.discoverTargets). This service includes an addRequest method that can be called multiple times to process discovery on multiple Management Agents if required.
Each call to the addRequest method is passed the following along with the handler that will be called with the results of the discovery script:
-
Request ID
A unique identifier (assigned by you) associated with that particular request which will enable you to retrieve the specific results associated with that request.
-
Agent
the Management Agent Target that the discovery should be run against
-
Plug-in ID
The plug-in ID associated with the discovery to be run. A plug-in can include multiple discovery modules and categories.
-
Discovery category
The discovery category. This must map to a discovery script through an entry in the discover.lst file included in the agent part of the plug-in.
Example 9-49 Discovery Service
/**
 * when doing discovery, the service will accept multiple requests to be
 * processed at the same time.  this would typically be the case if multiple
 * agents were involved in the process, but could also be if different discovery
 * categories (scripts) were to be processed.
 *
 * the discovery request includes the following elements:
 *     requestId   a unique identifier associated with that particular request
 *                 that will allow you to retrieve the specific results associated
 *                 with that request.
 *     agent       the agent Target that the discovery should be run against
 *     pluginId    the pluginId associated with the discovery to be run; a plug-in
 *                 can include multiple discovery modules and categories
 *     discCat     the discovery category; this must map to a discovery script via
 *                 an entry in the discover.lst file included in the agent part of
 *                 the plugin
 *     params      parameters that are to be passed to the discovery script
 *
 * Note on discoveryModule - in addition to the pluginId, the discovery UI is
 * passed the discovery module associated with this discovery pass.  If you've
 * chosen to implement multiple types of discovery operations from a single
 * discovery UI you may retrieve thediscoveryModule to determine in what context
 * the UI was launched.
 */

var requestId:String = "DiscReq1";
var pluginId:String = ApplicationContext.getPluginId();
var discoveryCategory:String = "DHSYSTEM_DISC";
discSvc.addRequest(requestId, agent, pluginId, discoveryCategory, params);

TargetFactory.discoverTargets(discSvc, discoverResultsHandler);
The discovery results handler, declared as follows, is passed a fault object and the discovery results.
public function discoverResultsHandler(disc:Discovery, fault:ServiceFault):void
If a fault did not occur during processing of the discovery script, then the fault object will be null. The discovery object passed to the handler includes an Array of the DiscoveryRequest objects constructed by calling the addRequest method. Each request includes the properties specified (such as agent, category, and so on) and also includes a DiscoveredTargets object. The DiscoveredTargets object includes the list of targets returned from the discovery script that was run on the target Management Agent for the specified request. For more information about discovery scripts, see Section 12.3 and for information about the discovery objects returned by the DiscoveryService, see the API documentation in the EDK.
9.28.6 Using Target Information Services
During the discovery process it is often necessary to obtain target information such as a list of agents or the set of targets of a particular type. The target information service provides a number of APIs that can be used for such purposes. This section provides an overview of these services. For additional information, see the API documentation in the EDK and for examples of their use, see the demo_hostsystem sample plug-in.
-
TargetFactory.getAgents
The getAgents API enables you to retrieve a set of Management Agents that can be used to perform discovery. You can filter the list by specifying selection properties (Array of TargetProperty) such as selecting all the Management Agents running on a Windows host.
-
TargetFactory.getTargets
Use the getTargets API to retrieve a list of targets specifying any number of selection criteria including hosts, target types, managed status, or metadata version. Each item is specified as a list of possible values and the request can include one or more selection criteria.
-
Target.getSystemMembers
Use the getSystemMembers API to retrieve the list of system member targets. These are targets that are included in the system through the systemStencil. For information about the system targets, see the Oracle Enterprise Manager Cloud Control Extensibility Programmer's Guide.
-
Target.getCompositeMembers
Use the getCompositeMembers API to retrieve the list of composite member targets. Composite members are those included in a composite (or system target) through containment associations. For information about composite targets, see the Oracle Enterprise Manager Cloud Control Extensibility Programmer's Guide.
9.28.7 Using Target Management Services
The target management services provide you with the ability to create or delete targets or associations. In the case of target management, associations can also be passed as part of the target definition and the associations are added as part of the process of adding the target itself. This section provides an overview of these services. For additional information, see the API documentation in the EDK and for examples of their use, see the demo_hostsystem sample plug-in.
-
TargetFactory.createTargets
Use the createTargets API add targets to Enterprise Manager. The process of adding targets to Enterprise Manager forces the deployment of the necessary plug-in to the Management Agents associated with each target. The request to this API is a list of Target objects, each of which must, at a minimum, specify a name, type, and agent. Typically, target instance properties (if used for this target type) can also be specified.
-
TargetFactory.deleteTargets
Use the deleteTargets API to remove targets from Enterprise Manager. The request to this API is a list of Target objects. Removing a target from Enterprise Manager should be done with care as deleting the target is not reversible and it removes all target, metric, and configuration history.
-
Target.createAssociations
Use the createAssociations API to add associations between the specified target and another target. Associations can be created in this way when creating them by using derived associations or by using the system stencil. In all cases, the association must be associated with a corresponding allowed pairs definition. For more information, see Chapter 11.
-
Target.deleteAssociations
Use the deleteAssociations API to delete associations between the specified target and other targets.
9.29 About Logging
The following sections discuss the logging options for MPCUI.
9.29.1 Add Logging to your Code
Use the logging facility (MpLog) to log messages from your code.
Note:
Do not use the Flash trace global method as this only provides output to the Flash log where the browser is running a debug version of the Adobe Flash Player.While logging can be useful in situations where diagnostics are necessary, it has a cost in terms of code size and overhead. Therefore, use logging with care.
Perform logging by calling one of several MpLog methods (such as debug, info, error, or fatal). The methods accept a message string and an optional list of parameters that must be substituted.
To substitute parameters, indicate the parameter location using {#} format:
MpLog.debug("The metric {1} was not found for the target {2}.", metricName, targetName);
The message generated for this log statement appears in the following log output:
2011-04-22 11:10:17 [MpCui] DEBUG The metric CPU was not found for the target MYHOST
The level (info, debug, error, fatal) allows the user to enable log output for different classes of messages.
-
By default, all error and fatal messages are sent to the log output location.
-
The info and debug level messages are only sent if these levels are explicitly enabled.
Furthermore, you can direct the messages for each level to different output locations. There are three possible log locations:
-
FLASHLOG: messages are sent to the Flash log (requires a debug Adobe Flash Player)
-
EMLOG: messages are sent to the Enterprise Manager application logs
-
CONSOLE: messages are sent to a small window displayed at the bottom of the MPCUI display
9.29.2 Options for Capturing Log Output
The options for capturing log output depend on your implementation:
9.29.2.1 Running MPCUI From Adobe Flash Builder
When you are developing MPCUI using Adobe Flash or Flex Builder, the log messages sent to FLASHLOG appear in the console window at the bottom of the Adobe Flash Builder integrated development environment (IDE) by default.
To change these logging settings:
-
Open the html-template/data/mpCuiProperties.xml file.
-
Locate the
loglevelelement:<!-- Logging level: DEBUG, INFO, ERROR, FATAL, WARN (or ALL) output location: FLASHLOG, CONSOLE, EMLOG format: level,output;level,output (e.g. DEBUG,FLASHLOG;ERROR,EMLOG) --> <loglevel>ALL,FLASHLOG</loglevel> -
Modify the
loglevelelement as required. -
Rebuild your Adobe Flex application before running the application.
9.29.2.2 Running MPCUI from Enterprise Manager Console
After the plug-in is deployed, the settings for logging are detected from the HTTP request. The default setting is FATAL,FLASHLOG;ERROR,FLASHLOG.
The end user can modify the settings as follows:
-
Append the following to the URL in the address bar of the browser:
&loglevel=ALL,FLASHLOG
-
You can substitute ALL,FLASHLOG with any valid logging settings, such as ERROR,CONSOLE and so on.
-
For diagnostic situations, add the following to the end of the URL:
&loglevel=ALL,CONSOLE
-
Refresh the page to see the page and all log messages in the console window similar to Figure 9-28
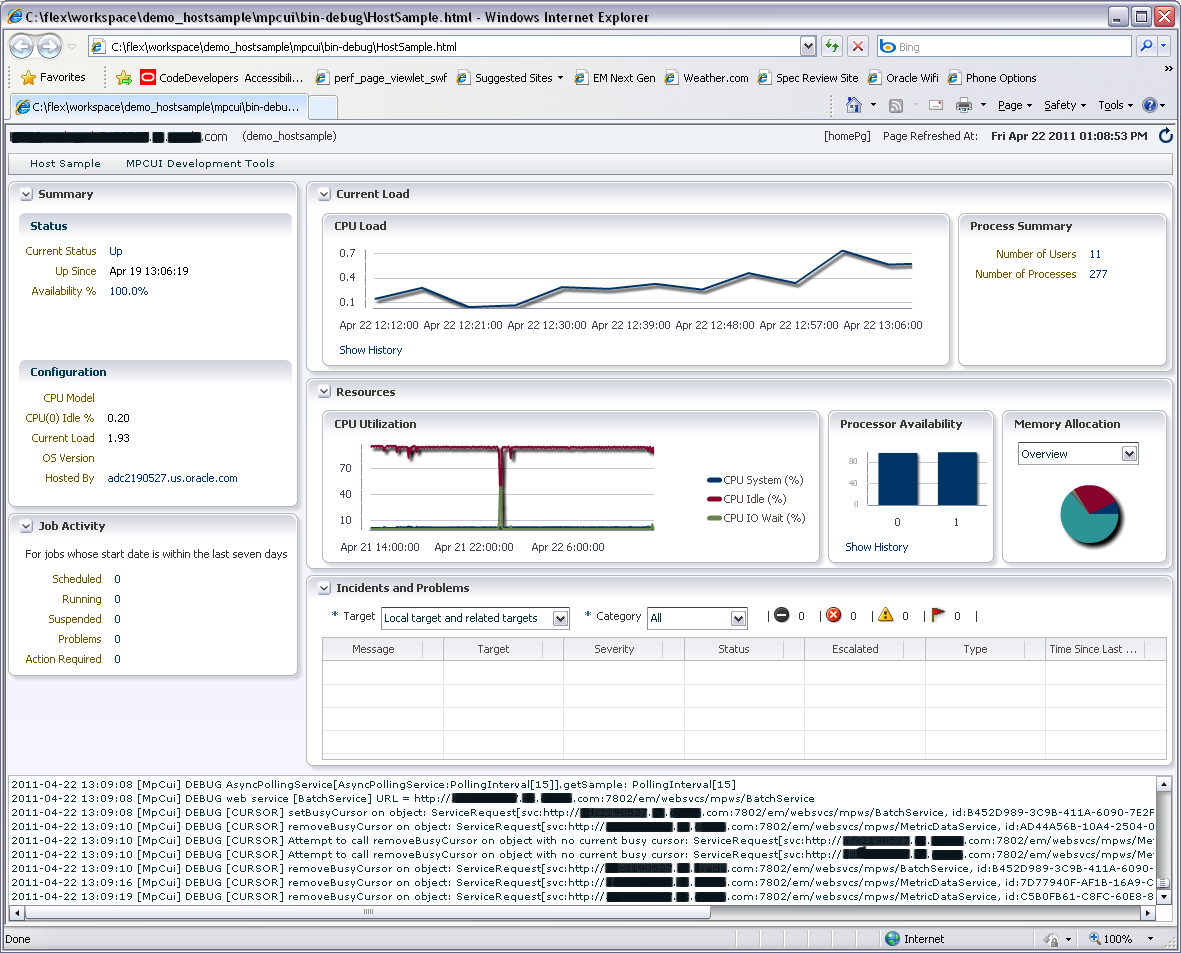
9.30 Development Environment Options
When building a custom UI for your plug-in, you have the following development environment options:
-
Metadata Only
Use your preferred text editor to edit your MPCUI metadata file. For more information about the MPCUI metadata file, see Section 9.4.1, "Overview of MPCUI Metadata Elements".
-
Flex SDK and Apache Ant
Download the Flex SDK and utilize the Apache Ant build files supplied with the EDK to build your SWF code. This option does not require a license for Flex Builder but it requires the use of the command line debugger (fdb) as opposed to the graphical debugger that is part of Flex Builder. For more information about using Flex SDK and Apache Ant, see Section 9.30.1, "Developing MPCUI with Flex SDK and Apache Ant".
-
Flex Builder
You must acquire a license for Flex Builder to build and debug your Flex code included with your plug-in. For more information about using Flex Builder, see Section 9.30.2, "Developing MPCUI in Adobe Flash or Flex Builder".
Note:
The project settings used in Adobe Flash Builder for your MPCUI project are critical to ensure that your application is built correctly and operates correctly when deployed as part of your plug-in. Oracle recommends that you use the settings of the demo_hostsample sample project as a guide and match these settings exactly.In Adobe Flash Builder, select the project properties (from the File menu, select Properties), and ensure that the settings match those of the sample project. Ensure that the settings on the Flex Build Path properties on the Library path tab are the same as those on the Flex Compiler properties.
9.30.1 Developing MPCUI with Flex SDK and Apache Ant
If Flex Builder is not available, then install Adobe Flex SDK and use Ant to build the SWF file for your plug-in as follows:
Note:
These steps build HostSample.swf using Ant on Windows.Two Apache Ant build files are included for reference in case you want to build the Demo Sample from the command line or without using the Flex Builder IDE:
-
demo_hostsample\mpcui\build.xml
-
demo_hostsample\mpcui\plugin-build-config.xml
-
Download and install Apache Ant from the following website:
http://ant.apache.org
-
Download and install Flex SDK version 3.5:
-
Download the Flex SDK 3.5 ZIP file from the following website:
http://download.macromedia.com/pub/flex/sdk/flex_sdk_3.5.zip
-
Download the Flex 3.5 Data Virtualization Components for Flex Builder ZIP file from the following website:
http://download.macromedia.com/pub/flex/sdk/datavisualization_sdk3.5.zip
-
Download the Flex 3.5 Automation Libraries for Flex Builder ZIP file from the following website:
http://download.macromedia.com/pub/flex/sdk/automation_sdk3.5.zip
Note:
When you are adding the automation libraries to the SDK directory, they must be expanded into the FLEX_HOME/frameworks directory, and not in the FLEX_HOME directory.
-
-
Edit the demo_hostsample\mpcui\build.xml file.
Update the FLEX_HOME property so
locationpoints to the location of the Flex SDK installation. -
Build the HostSample.swf file:
-
cd demo_hostsample\mpcui
-
antEntering this command builds the demo_hostsample\mpcui\bin-debug\HostSample.swf file.
-
9.30.2 Developing MPCUI in Adobe Flash or Flex Builder
Note:
This section assumes the use of Adobe Flash Builder 4. However, these steps should be the same if you are using Adobe Flex Builder 3.This section describes the process to follow when building a Flex application using the MPCUI libraries and Adobe Flash Builder. These steps assume the use of the sample application provided with the EDK referred to as the Demo Host Sample (or demo_hostsample). As with many development activities it is often easiest to start with a working example to understand how the provided APIs work and how to use them to accomplish higher-level use cases.
To simplify the process for developing your custom UI, build and run the Flex application from Adobe Flash Builder without having to redeploy the plug-in to Enterprise Manager after each change. When running from Adobe Flash Builder, your UI will not have access to the other Enterprise Manager features and pages available to the console, but you will be able to exercise your UI to ensure that it is functioning correctly before deploying it as part of your plug-in.
9.30.2.1 Configuring Adobe Flash Builder
The MPCUI libraries provided with the EDK are built with and require the use of the Flex SDK 3.5. Therefore when building your MPCUI project in Adobe Flash Builder you must use the 3.5 SDK.
To check the version:
-
From within Adobe Flash Builder, from the Window menu, select Preferences.
-
In the Preferences dialog, expand Flash Builder, then select Installed Flex SDKs.
Note:
In Adobe Flex Builder 3, from the Preferences dialog, expand Flex.
If you do not have Flex SDK 3.5, then you must install Flex SDK 3.5:
-
Download the following Flex SDK 3.5 ZIP files:
-
Download the Flex SDK 3.5 ZIP file from the following website:
http://download.macromedia.com/pub/flex/sdk/flex_sdk_3.5.zip
-
Download the Flex 3.5 Data Virtualization Components for Flex Builder ZIP file from the following website:
http://download.macromedia.com/pub/flex/sdk/datavisualization_sdk3.5.zip
-
Download the Flex 3.5 Automation Libraries for Flex Builder ZIP file from the following website:
http://download.macromedia.com/pub/flex/sdk/automation_sdk3.5.zip
-
-
Expand these ZIP files into a new directory on your system (for example, c:\flex3.5\sdks\).
Note:
When you are adding the automation libraries to the SDK directory, they must be expanded into the FLEX_HOME/frameworks directory, and not in the FLEX_HOME directory.For additional information about adding SDK versions to Adobe Flash Builder (or Flex Builder), visit the Adobe website:
http://www.adobe.com/support/flashbuilder/
-
From within Adobe Flash Builder, from the Window menu, select Preferences.
-
In the Preferences dialog, expand Flash Builder , then select Installed Flex SDKs.
Note:
In Adobe Flex Builder 3, from the Preferences dialog, expand Flex. -
Click Add and browse to the location where you unpackaged the ZIP files in step 2.
9.30.2.2 Setting up the Demo Sample Project
To set up the demo sample project:
-
Locate the demo_hostsample.zip file in the EDK distribution.
-
Copy this file to a location on your Windows system where you installed and configured Adobe Flash Builder.
-
From Adobe Flash Builder, from the File menu, select Import Flex Project.
-
Browse to the location where the demo_hostsample.zip file is located, select the file, then click Finish.
A warning dialog (Project Will Be Upgraded) appears, which indicates that "Project 'demo_hostsample' was created with a previous version of Flash Builder."
A second dialog (Choose Flex SDK Version) appears with the same warning
-
In the second dialog, select Use a specific SDK and from the list, select Flex 3.5, then click OK.
-
In the first dialog, click OK to upgrade the project.
The demo_hostsample project appears in the Adobe Flash Builder navigator.
-
Navigate to the mpcui/src directory to view the source files that comprise the plug-in UI.
When these files are compiled, the mpcui/bin-debug/HostSample.swf file is created. This is the Flex application that is the custom UI for this target and it is included in the plug-in.
For information about the SWF file, see Section 9.7, "Packaging the MPCUI Implementation With the Plug-in" and Section 9.6, "Defining the MPCUI Application".
9.30.2.3 Running Demo Sample MPCUI from Adobe Flash Builder
Note:
One of the advantages of MPCUI is that it allows you to test your Flex UI as part of the deployed plug-in or by running it from within Adobe Flash Builder directly. This latter option makes iterative development much simpler, however it requires that at least one version of the plug-in is deployed to Enterprise Manager and that a target instance has already been discovered before attempting to run the UI (Flex application) from Adobe Flash Builder.After the Demo Sample plug-in has been deployed and the demo_hostsample.zip project has been imported into Adobe Flash Builder and builds successfully, then you can run the Flex application from Adobe Flash Builder.
-
From the Navigator, select demo_hostsample.
-
From the Run menu, select Run HostSample or Debug HostSample.
A browser window appears with a Management Server Connection login dialog.
Note:
If the Management Server Connection dialog does not appear or if any other error appears, then verify that the project was imported correctly and verify that no errors appear in the Problems or Console tabs that appear in the bottom of the Flash Builder window.During normal operation, when the user accesses your UI through the Enterprise Manager console by going to a target home page, this dialog does not appear because the UI is running as an integral part of the Enterprise Manager console and is embedded in a console session.
However, when running from Adobe Flash Builder, your UI requires information to connect to the Enterprise Manager site where your plug-in has been deployed and where the target instance that you will manage is located. Enter the same information for host, port and credentials that you would use to connect to your running Enterprise Manager console. Use either http or https depending on your configuration; however you must ensure that the ports you supply are correct for the protocol supplied.
-
Below Target to Monitor, enter the target name and type (the internal type and not the displayed label) of a target instance associated with this plug-in. It must be a target that exists in Enterprise Manager already. If you are using the Demo Sample, then the target type is demo_hostsample, and the name is the target name you provided when creating the target instance.
-
Click OK.
The Demo Sample home page appears and is populated with data.
Note:
In this mode, the Enterprise Manager page decorations and the target context area do not appear at the top of the page but they will appear when you access the target home page from the Enterprise Manager console. A menu appears that allows you to exercise the multiple pages included in your custom UI.9.30.2.4 Elements of the Demo Sample Flex UI
The following is a brief list of the components that make up the Demo Sample Flex UI. For more comments that describe the purpose of each file and the items demonstrated in each file, see the source code.
demo_hostsample
    html-template/data/demo_hostsample_menu.xml
    mpcui/src
          HostSample.mxml            The application definition, must extend
                                     MpApplication and implement the single
                                     method "getIntegrationClass"
          HostSampleInteg.mxml       The integration class, defines the set of
                                     pages, dialogs, trains, etc. that make up
                                     the application
          HomePage.mxml              The target homepage, contains the layout of
                                     the UI for the homepage
          HomePageController.as      The controller for the HomePage, includes
                                     the methods that load data for the page
                                     and respond to events from the page
          ProcessesPage.mxml
          ProcessesPageController.as
          CredentialsPage.mxml
          CredentialsPageController.as
          AvailabilityDialog.mxml
          MetricHistoryDialog.mxml
9.30.2.5 Updating the Demo Sample
As you modify and rebuild your UI in Adobe Flash Builder, you can run or debug the Flex application directly from Adobe Flash Builder as you make changes.
Ensure that there are no compiler errors shown in the Problems tab before attempting to proceed. Adobe Flash Builder displays a warning if you try to run the application with unresolved errors.
Note:
Although you can see your updated UI in Adobe Flash Builder, you have not updated the version that is deployed to Enterprise Manager. The updated version will not appear in the Enterprise Manager console until you update the plug-in.9.30.2.6 Modifying the Deployed Plug-in
After you make changes to your UI in Adobe Flash Builder, you can apply the changes to your plug-in so that you can also view the updates from a target home page within the Enterprise Manager console.
To do this, you must either create and deploy a new version of your plug-in or use the metadata registration service (MRS).
MRS allows you to apply incremental updates to your plug-in without creating and deploying a entirely new version. For more information about MRS, see Section 14.7.
After you have modified your custom UI by modifying your Flex code in Adobe Flash Builder:
-
Rebuild the SWF file (/bin-debug)
-
FTP or copy the SWF file to the server where your Enterprise Manager site is installed and where you deployed the Demo Sample plug-in (HostSample.swf) originally.
-
Copy this file to the location where you created the plug-in staging directory:
stage/oms/metadata/mpcui
Note:
There is an existing version of this file (HostSample.swf) in the directory along with an MPCUI metadata XML file. -
Update the plug-in using the following command:
emctl register oms metadata -sysman_pwd sysman -pluginId oracle.sysman.xohs
-service mpcui -file demo_hostsample_uimd_swf.xml
For information about the
emctlcommand, see Section 14.7.
9.30.3 Setting Up an Adobe Flash Builder Project for MPCUI
This section assumes you are using Adobe Flash Builder 4.5 but includes notes for Adobe Flash Builder 3 users.
To set up an Adobe Flash Builder project, you can create an empty project or import the demo_hostsample project in to Adobe Flash Builder to use as a template. If you are importing the demo_hostsample project, then compete the steps in Section 9.30.3.1, "Before You Begin". Otherwise, proceed to Section 9.30.3.2, "Creating an Adobe Flash Builder Project".
Note:
You must have configured Adobe Flash Builder to include the Flex 3.5 SDK files. For more information about including the Flex 3.5 SDK files, see Section 9.30.2.1, "Configuring Adobe Flash Builder".9.30.3.1 Before You Begin
If you are using the demo_hostsample project as a template, you must complete the following steps before you set up the Adobe Flash Builder project for MPCUI.
-
Delete the contents of the following directories:
-
/stage
-
/scripts
-
/rsc
These directories provide support for deploying the sample plug-in, but are not appropriate to your new project.
-
-
From the mpcui/metadata directory, rename the demo_hostsample_uimd_swf.xml file to targettype_mpcui.xml, where targettype is the name of your target type.
Delete all the other contents of the mpcui/metadata directory except targettype_mpcui.xml.
-
From the mpcui/data directory, edit the mpCuiProperties.xml file as follows:
-
Replace the OMS connection with the information for connecting to your Enterprise Manager server.
<!-- Default OMS Connection --> <hostname>myhost.us.example.com</hostname> <port>7777</port> <emUser>sysman</emUser> <password>sysman_pasword</password> -
Replace the
<metadata>tag with the file name as created in step 2 (/metadata/targettype_mpcui.xml)<!-- the filename that includes the mpcui meta-data that will be included in the plug-in. This is used to populate the menus for testing of the UI in standalone (FlashBuilder) mode If not specified then a default filename of <targetType>_menu.xml will be used. --> <metadata>../metadata/targettype_mpcui.xml</metadata>
-
-
From the /src directory, rename the HostSample.mxml (application definition) and HostSampleInteg.mxml (integration class) files to file names relating to your target, such as MyTargetUi.mxml and MyTargetUiInteg.mxml. For more information about these files, see Section 9.6, "Defining the MPCUI Application".
Delete all the other contents of the /src directory except for these two files, MyTargetUi.mxml and MyTargetUiInteg.mxml files.
-
Ensure that the following two files are located in the /mpcui/libs directory:
-
mpcui_12.1.0.2.0.swc
-
mprslldr_12.1.0.2.0.swc
Note:
These files are version specific. If you are moving from an earlier version of the EDK to a later version, then you must replace these files with the latest version and ensure the project properties are updated to reflect this change. -
-
Ensure that the stylesFusionFX.swf file is located in the /html-template directory. If this file is missing, then locate the file in the demo_hostsample.zip file and add it to the /html-template directory.
-
From Adobe Flash Builder, select the project properties (from the File menu, select Properties), and select Flex Compiler.
Ensure that the Flex SDK version is set to Flex 3.5. If there is an error, then the location of your Flex 3.5 SDK files is not the same as the location used for the sample.
Click Configure Flex SDKs... and then edit the settings for Flex 3.5 to point to the location where you installed the Flex 3.5 SDK files.
9.30.3.2 Creating an Adobe Flash Builder Project
From Adobe Flash Builder, create a new project and complete the following steps to set up the project:
-
Name the project a meaningful name related to your target (such as MyTargetUI). This name will be assigned to the default application file after the project is created. For example, /src/MyTargetUi.mxml.
-
Ensure that the Flex SDK version is set to Flex 3.5. For more information, see Section 9.30.2.1, "Configuring Adobe Flash Builder". Click Finish to create the application.
-
In the demo_hostsample.zip file, locate the mpcui/html-template/stylesFusionFX.swf file. Make a copy of this file into your project under the /html-template directory.
-
In the demo_hostsample.zip file, locate the mpcui/libs directory, and copy the following files into your project under the /libs directory:
-
mpcui_12.1.0.2.0.swc
-
mprslldr_12.1.0.2.0.swc
-
-
Create a directory called metadata and create a file called targettype_mpcui.xml. This file contains the MPCUI metadata for your plug-in. For more information about this file, see the demo_hostsample and Section 9.4, "Creating the MPCUI Metadata File".
-
In the demo_hostsample.zip file, locate the mpcui/data/mpCuiProperties.xml file and copy it into your project in a new directory called data.
Edit this file as follows:
-
Replace the OMS connection with the information for connecting to your Enterprise Manager server.
<!-- Default OMS Connection --> <hostname>myhost.us.example.com</hostname> <port>7777</port> <emUser>sysman</emUser> <password>sysman_pasword</password> -
Replace the
<metadata>tag with the file name as created in step 5 (/metadata/targettype_mpcui.xml)<!-- the filename that includes the mpcui meta-data that will be included in the plug-in. This is used to populate the menus for testing of the UI in standalone (FlashBuilder) mode If not specified then a default filename of <targetType>_menu.xml will be used. --> <metadata>../metadata/targettype_mpcui.xml</metadata>
-
-
In the /src directory, you should have a projectname.mxml file. You must modify this file to correspond to the required settings of an MPCUI application and add an integration class. For more information, see Section 9.6, "Defining the MPCUI Application".
-
Ensure that the Project properties are set correctly as described in Section 9.30.3.3, "Setting MPCUI Project Properties".
9.30.3.3 Setting MPCUI Project Properties
It is critical to ensure that the project properties for an MPCUI application are set correctly to ensure that the project operates successfully.
-
From Adobe Flash Builder, select the project properties (from the File menu, select Properties), and select Flex Compiler.
-
Check that Flex SDK version is set to Flex 3.5
-
Ensure that Enable strict type checking is not selected
-
-
From Adobe Flash Builder, select Project, then select Properties, then select Flex Build Path and click the Library Path tab.
-
If you are starting from a new project, then you must edit the library path by accessing the project's build path properties page:
-
Remove the libs entry in the Build Path libraries.
-
Click Add SWC and select the mprslldr.swc file.
-
Repeat the previous step to select the mpcui.swc file.
These steps are necessary so that each file can have different linkage settings.
-
-
Ensure that Verify RSL Digests is not checked.
-
Expand the mprslldr.swc entry and ensure that Link Type is set to Merged into code. If not, then select Link Type and change the setting to Merged into Code.
-
If you are using Flex Builder 3, check the following:
-
Expand the MPCUI swc entry, select Link Type and then click Edit.
-
Change Link Type to Runtime shared library (RSL).
-
Set Verification to None (trusted environments only)
-
Set Deployment Path/URL: to mpcui.swf and select Automatically extract swf to deployment path.
-
-
If you are using Adobe Flash Builder 4.5:
-
Expand the MPCUI swc entry, select Link Type and then click Edit.
-
Change Link Type to Runtime shared library (RSL).
-
Click Add next to RSL deployment paths: and enter mpcui.swf for Deployment Path/URL and ensure that Automatically extract SWF to deployment path is selected.
-
If an entry already exists under RSL Deployment paths and it is not mpcui.swf, then edit it to ensure the correct path as noted in the previous step.
-
-
9.30.3.4 Verifying Correct MPCUI Library Linkage
When you have set up your project and are building a SWF, you must verify that it operates correctly when deployed to any of the various Enterprise Manager platform versions that support the version of the EDK you are using.
Initially, verify the size of your SWF file. If it is larger than 1 MB, then you might have linked your SWF incorrectly. A typical MPCUI SWF file is 300-600 KB. This is not a definitive test, but is a good indication whether your SWF is linked correctly.
To verify that your SWF is linked correctly:
Note:
These steps are specific to deploying and running the plug-in in a 12.1.0.2.0 environment.-
Update the SWF file in your plug-in and deploy the new version of your plug-in to the Enterprise Manager server.
Note:
If your plug-in is deployed already, then you can use theemctl register oms metadatacommand to update the MPCUI part of your plug-in only. For more information, see Section 14.7. -
Access the home page for a target that is associated with this plug-in and the SWF file included in your plug-in.
-
If the home page load fails with an error in the
TargetInfoService, you might have linked with an older swc file (pre-12.1.0.2.0) but not linked it as an RSL. If this happens, then do the following:-
Modify the URL in the browser address by appending the following text and then reload the page:
&traceEnabled=true
-
When the page loads and the error appears, dismiss the error dialogs and in the request trace window, locate and select the
TargetInfoService.getTargetInfoentry, then select theShot Item Details. -
Search the response message that appears in the right-hand side of the window at the bottom for "rslVersionError". If you find this text, it indicates that the server rejected the request coming from a client that is incorrectly linked. Review the project properties to ensure that you have correctly linked the SWF as described in Section 9.30.3.3, "Setting MPCUI Project Properties".
If the error is included in the response message, typically it appears as follows:
<rslVersionError SOAP-ENV:actor="http://schemas.xmlsoap.org/soap/actor/next" xmlns="http://em.oracle.com/">12.1.0.2.0
                                                 </rslVersionError>
-
-
If the home page loads correctly, then modify the URL in the browser address bar by appending the following text and then reload the page
&loglevel=ALL,CONSOLE
-
When the page has loaded, check the log output displayed in the logging window at the bottom of the page and search for the following text:
[MpCui] INFO Application Linked with Version
If the application is correctly linked, then the version of the linked swc files should appear on this line.
The next line should include the following text and indicate the version of the Enterprise Manager server to which you are connected. If not, then your SWF is linked incorrectly:
[MpCui] INFO RSL Library Loaded Version
2012-05-04 13:37:44.269 [MpCui] INFO Application Linked with Version: 12.1.0.1.1
2012-05-04 13:37:44.270 [MpCui] INFO RSL Library Loaded Version     : 12.1.0.2.0
2012-05-04 13:37:44.271 [MpCui] INFO RSL Library Min Supported Vers : 12.1.0.1.0
2012-05-04 13:37:44.273 [MpCui] INFO RSL Build Date                 : 2012.04.02
2012-05-04 13:37:44.274 [MpCui] INFO Application & RSL Versions are COMPATIBLE
9.30.3.5 Using Earlier SWC Files With a Later Enterprise Manager OMS
If you are building your MPCUI SWF against an earlier version of the EDK (such as version 12.1.0.1.0) but then want to run it against an existing OMS that is part of a later version (such as 12.1.0.2.0), you must deploy the updated SWF to Enterprise Manager as part of your plug-in.
To do this, you can use Adobe Flash Builder, however your Adobe Flash Builder project will contain and use the older version of the mpcui.swf file and will use the local copy within Adobe Flash Builder and not the later version from the OMS. This results in unpredictable results, therefore follow the steps below:
To run in this mode:
-
Copy the mpcui.swf file from the Enterprise Manager server (such as 12.1.0.2.0) add the file to the bin-debug directory under your project.
Note:
Ensure that Build automatically is disabled so that your project does not rebuild and replace this file with an updated copy based on the earlier MPCUI swc file. -
Replace the mpcui.swf file in Adobe Flash Builder each time you update and rebuild the project as this build step replaces the mpcui.swf file with the file associated with the MPCUI swc file that you are compiling against.
9.30.3.6 Understanding MPCUI RSL Caching
An advantage of using the MPCUI RSL is that it allows the code included in this library to be cached in the browser of Adobe Flash Player. Therefore, the code must not be reloaded each time an Enterprise Manager page that includes an MPCUI SWF file is accessed.
However, when you upgrade your Enterprise Manager site, any users that accessed pages from the previous version, will still have the older version of the MPCUI RSL cached in their browser. This release includes additional checks to the server to validate this, and the user might see an error indicating that the page could not be loaded due to a version mismatch in the MPCUI RSL. If this error appears, you must clear the Adobe Flash Player cache before continuing. For more information, see Section 9.30.3.7, "Clearing Adobe Flash Player Cache".
9.30.3.7 Clearing Adobe Flash Player Cache
To clear the Adobe Flash Player cache without clearing the browser cache:
-
To access the Adobe Flash Player Settings Manager: Global Storage Settings page, open the following URL:
http://www.macromedia.com/support/documentation/en/flashplayer/help/settings_manager03.html
The following window appears.
Figure 9-29 Adobe Flash Player Settings Manager: Global Storage Settings
Description of ''Figure 9-29 Adobe Flash Player Settings Manager: Global Storage Settings''
-
Deselect Store common Flash components to reduce download times.
-
Click Confirm on the confirmation window to clear any cached RSLs.
-
Select Store common Flash components to reduce download times.
This enables caching again and any previously cached RSLs will be downloaded.
9.31 Migrating Home Page Customizations
Earlier versions of the Enterprise Manager extensibility framework supported the ability to customize the default Enterprise Manager home page by:
-
setting a set of charts to display on the home page
-
defining a series of related links to display on the home page
For Enterprise Manager release 11.2, you could choose to continue to use these customizations as a basis for the UI for your target. This avoids implementing a custom UI for your target but maintains limited control over the home page.
Use the empdk utility to read the home page customizations from Enterprise Manager and generate the required 11.2 files to define this metadata. For information about the empdk utility, see Chapter 18.
Note:
The ability to read home page customizations from an Enterprise Manager release earlier than 11.2 and then generate 11.2 metadata is not supported for this release.9.32 Accessibility Guidelines
The MPCUI framework is designed to support a user interface that complies with the Oracle Global HTML Accessibility Guidelines (OGHAG). This section provides information about accessibility standards for your UI implementation.
Also, Adobe provides guidelines and information to help with the implementation of Flex applications (on which MPCUI is based) to meet accessibility standards. For more information, see the following websites:
-
Adobe Flex Accessibility Page
http://www.adobe.com/accessibility/products/flex/
-
Adobe Flex Accessibility Best Practices
http://blogs.adobe.com/accessibility/files/2011/03/Flex-4-Accessibility-Best-Practices.pdf
-
Adobe Flex Accessibility Blog
http://blogs.adobe.com/accessibility/category/flex
9.32.1 Accessibility Options in Enterprise Manager
Enterprise Manager provides the end user with the ability to set options for accessibility including a screenreader option. The MPCUI framework is aware of these settings and makes them available to you in your Flex code (see the oracle.sysman.emx.util.AdaSettings in the API reference).
Typically you do not have to check for these settings because MPCUI automatically renders accessible components when the end user sets their account to require an accessible user interface. Among other things, this replaces charts with an accessible view of the same data.
9.32.2 Summary of Critical Issues
When constructing an accessible MPCUI Flex application, consider the following items:
-
Enable accessibility
Add the accessible flag to the compiler settings.
For more information, see the Adobe Best Practices and the settings in the demo_hostsample example plug-in
-
Use MPCUI Pages, dialog and components
These components include accessibility support.
For more information, see Section 9.32.3, "Using MPCUI Components".
-
Set Tab Order of Components
Sets the reading and tab order for all components.
For more information, see Section 9.32.4, "Controlling Reading and Tabbing Order".
-
Set Name and Description
For components that require additional text description (such as images).
For more information, see Adobe Best Practices.
-
Avoid the use of or provide accessible equivalents for drag-and-drop, audio, and decorative content.
For more information, see Adobe Best Practices.
-
Avoid conveying information using color
For more information, see Adobe Best Practices.
-
Do not add menus to the Flex Application.
Use the Enterprise Manager Target menu.
For more information see this guide.
-
Avoid using non-accessible Flex components
For a list of accessible components, see Adobe Best Practices.
9.32.3 Using MPCUI Components
Because the MPCUI framework provides components that include accessibility support beyond the base Flex components, use the MPCUI version of those components. In addition to the specific components listed in Table 9-2, the application should include only MPCUI top-level activities such as Page, Dialog, or Train. Implement your application based on the MpApplication base class. Table 9-2 provides a list of important components included in the MPCUI framework:
Table 9-2 Important MPCUI Components
| Flex Component | MPCUI Alternative |
|---|---|
|
|
|
|
|
|
|
|
|
|
|
|
|
|
|
|
|
|
|
|
|
|
|
|
9.32.4 Controlling Reading and Tabbing Order
While Flex provides support for determining the reading and tabbing order of components included in the application, it does not work well for complex layouts that include multiple regions and pages. To ensure that the application provides a tab order that make sense, set the order within each page or dialog.
The MPCUI framework provides a means of setting the tab order. Use this method instead of setting the tabIndex of each property. Do not set the tabIndex of the components included in your pages, but use the tabOrder property of the page or dialog.
To use the tabOrder property, you must assign a unique ID to every component included in the Page. All Flex and MPCUI components support the id property. Example 9-51 shows a Page declaration that includes the tabOrder property.
Example 9-51 Page Declaration That Includes the tabOrder Property
<mp:Page label="Home Page"
    xmlns:mx="http://www.adobe.com/2006/mxml"
    xmlns:mp="http://www.oracle.com/mpcui/"
    tabOrder="{[ summaryRegion, statusRegion, currentStatus, statusSince, availability,
            configurationRegion, cpuModel, cpuPer, currentLoad, osVersion, relatedHost,
            installedSoftware, jobSummary,
            reportsRegion, allReports, hostPerfReport,
            currentLoadRegion, cpuLoadRegion, cpuload, showCpuHistory,
            processSummaryRegion, numUsers, numProcesses,
            resourcesRegion, cpuUtilRegion, cpuutil,
            processorRegion, processorChart, showProcessorHistory,
            memoryRegion, selMemChart, memChart,
            eventsRegion
            ]}"
    defaultComponent="{currentStatus}"
    >

    <!-- First Column, 25% width of page, two regions stacked vertically -->
    <mx:HBox width="100%" height="100%">
        <mx:VBox width="25%" height="100%" >
            <mp:Region id="summaryRegion" title="Summary" height="50%" width="100%" >
                <mp:InnerRegion id="statusRegion" title="Status" height="40%" width="100%" >
                    <mp:InfoDisplay width="100%" height="100%">
                        <!-- reference to the AvailDataService -->
                        <mp:InfoItem id="currentStatus" label="Current Status" value="{ads.currentStatus}" image="{ads.currentStatusIcon}"
                            click="invokeActivity(Constants.PAGE_AVAILABILITY, bean(Constants.P_TARGET_NAME, appModel.target.name,
                            Constants.P_TARGET_TYPE, appModel.target.type));" />
                        <mp:InfoItem id="statusSince" source="{ads.statusSinceItem}"  />
                        <mp:InfoItem id="availability" label="Availability %" value="{NumberFormat.formatNumber(ads.availPercent,1)}%" destination="availDialog" />
                    </mp:InfoDisplay>
                </mp:InnerRegion>
The tabOrder property is an array of the component ids included in the page that must be included in the tabbing or reading order.
For more information, see the demo_hostsample sample application and the API reference document.
Note:
In addition to setting thetabOrder property for components appearing to the screen reader, set the defaultComponent property also. This instructs the screen reader to set focus to a particular component when the page is rendered initially.9.33 Localization Support
To provide support for localized text resources, you must use strings in the custom UI. To do this, you must:
9.33.1 Register Bundles
To use resource properties files in MPCUI (Flex code), you must register resource bundles in the integration class. Using the demo_hostsample plug-in, the integration class is HostSampleInteg.mxml; this is the class that extends Integration. Within that class, prior to the activities list, include a block such as the following:
<mp:resourceBundles>
<mp:MpBundle name="demoUiMsg" path="oracle.samples.xohs.rsc" isDefault="true" />
<mp:MpBundle name="demoJobMsg" path="oracle.samples.xohs.rsc" />
</mp:resourceBundles>
As this shows, you can break up your resources into more than one bundle, and mark one bundle as the default bundle. This simplifies access to strings in this bundle throughout the rest of the UI code. The path attribute must be consistent with the path where the properties files were added to the Properties JAR file. For information about the Properties JAR file, see Section 3.7.4, "Package Resource Bundles".
9.33.2 Reference Strings from MXML (Page, Dialog Definitions)
To reference a string in a page or dialog class in MXML, the getString and getBundleString methods are provided. The getString method retrieves strings from the default resource bundle, and the getBundleString method retrieves strings from any bundle registered in the Integration class.
The getString method is used as follows:
<mp:InnerRegion id="configurationRegion" title="{getString('CONFIGURATION')}" height="60%" width="100%" >
This method locates a string with the key ”CONFIGURATION” in the default resource bundle (demoUiMsg) and uses it as the title of this inner region. If the string cannot be found, then the key (CONFIGURATION) is shown.
The getBundleString method is used as follows:
<mp:InfoItem id="currentLoad" label="{getBundleString('demoJobMsg', 'JOBLOAD')}" value="{respData.result.getString('','Load')}" />
The first parameter to getBundleString specifies the bundle from which to retrieve the string.
9.33.3 Access Strings from ActionScript (Controller Code)
To access strings from the ActionScript code, use either the Util.getString method or the Util.getBundleString method:
var str:String = Util.getString("CONFIGURATION"); // retrieves string from default bundle
var str2:String = Util.getBundleString("demoJobMsg", "JOBLOAD"); // retrieves string from named bundle
9.34 Providing Online Help
If you want to include online help for your customized UI pages, package the help JAR files in the following directory:
plugin_stage/oms/online_help
For an example of a help JAR file, see the plugin_sample_help.jar in the /oms/online help directory of the demo_hostsample example in the EDK.