2 Bundle Patch 1 for Linux x86 and Linux x86-64
The following sequence must be followed when applying BP1:
-
Apply Bundle Patch 1 on Oracle Management Service
-
Upgrade all deployed Plug-ins to the 12.1.0.2 releases on the OMS
-
Apply Bundle Patch 1 on all Management Agents
-
Upgrade all deployed Plug-ins to the 12.1.0.2 releases on the Agents
Read the following important notes before proceeding with the installation process:
-
Verify that you have first applied the OMS Patch 13242773 on all OMS instances before applying this Bundle Patch on Management Agents. If the OMS patch is not applied before applying the Bundle Patch, then the metadata version will not be registered with the OMS and the OMS will block the patched Management Agents from uploading data.
-
If you have configured Enterprise Manager for high availability by deploying one or more additional OMS and using a local Real Application Cluster or Data Guard database for the repository database, use the following patching sequence:
-
Stop each OMS.
-
Apply the patch to each OMS Oracle Home.
-
Run the post deploy steps.
There is no special consideration when using Data Guard because any changes to the repository that occur as part of the patching exercise are forwarded to the standby database repository as part of normal Data Guard operations.
-
-
If you have configured Enterprise Manager for Disaster Recovery by deploying one or more standby OMS and a standby database (Oracle RAC or single instance) at another site, patching of the standby site should be performed after all patches and plug-in updates have been deployed on the primary site.
Once the primary site patches and updated plug-ins have been deployed, any changes to the repository made due to these updates will be forwarded to the standby database repository as part of normal Data Guard operations. Therefore, to patch the standby site use the following patching sequence:
-
Apply the patches to the standby OMS Homes without performing the post deploy operations that update the repository.
-
Deploying the updated plug-ins without updating the repository.
-
2.1 Applying Bundle Patch 1 on Oracle Management Service
In a multi-OMS environment, ensure that the following prerequisites are met on each OMS host:
-
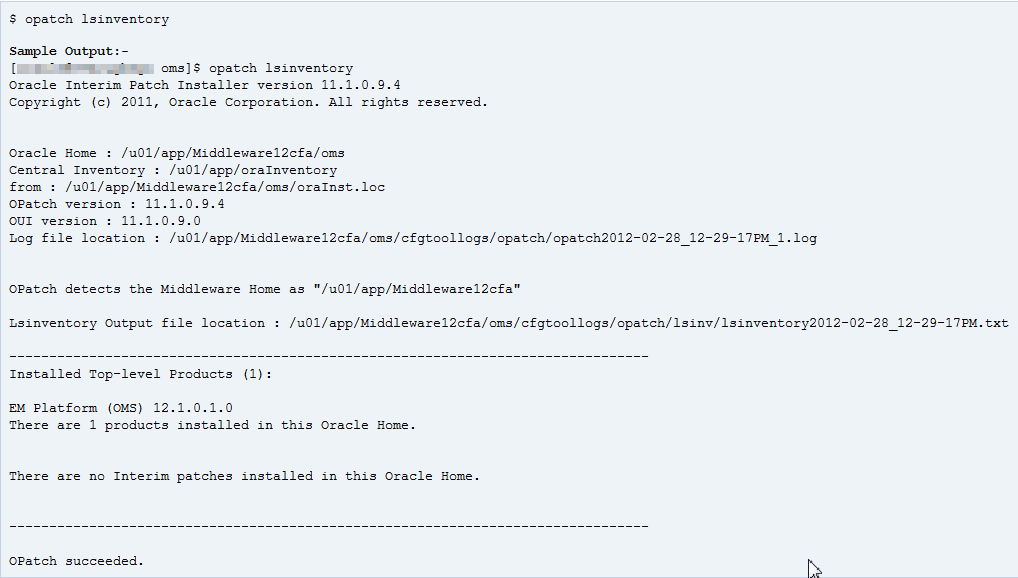
Verify that you have the latest version of OPatch 11.1.
The minimum OPatch version required to install BP1 is 11.1.0.9.4. You must also check that the OPatch version is 11.1.0.9.4 or higher. Do not use OPatch 11.2.x.
You can determine the current version of OPatch by running the command opatch version from the OMS Home/OPatch. For more information. see Section 1.4.3, "Using the Correct OPatch Version".
To determine the latest version of OPatch, complete the following:
-
Log in to My Oracle Support (
https://support.oracle.com). -
Select Patches & Updates.
-
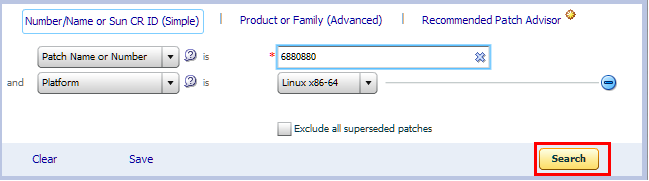
Enter 6880880 in the search field and click Search.
-
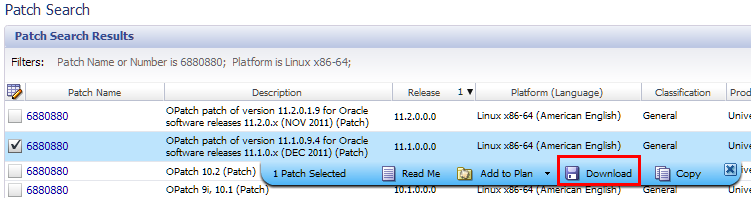
Select the latest OPatch version (11.1.0.9.4 or higher)
The selected OPatch has a README with instructions to upgrade the OPATCH and also a download button to download the zip.
-
-
Set the ORACLE_HOME environment variable to the OMS Home, which is MIDDLEWARE_HOME/oms.
-
Verify that ORACLE_HOME/bin and ORACLE_HOME/OPatch are included in the path.
Set the environment variable using the following command:
setenv PATH $ORACLE_HOME/bin:$ORACLE_HOME/OPatch:$PATH
Check if the PATH variable is set by running the following command:
echo $PATH
-
Verify the state of Oracle Inventory used by OPatch to install the patches by running the following command:
<MIDDLEWARE_HOME>/oms/opatch lsinventory
-
Check that the Oracle Database, which contains the Management Repository, and its listener are up and running.
-
Download OMS BP1 13242773 from My Oracle Support, as described earlier in step 1.
The zip files are stored under a location that will be referred to as
PATCH_TOP_DIRin this document. -
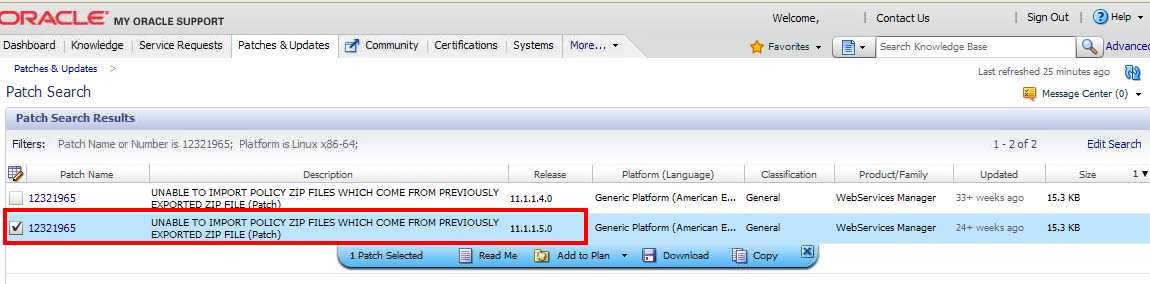
Download the JDeveloper (13470978) and Web Services Manager (12321965) patches from My Oracle Support.
You will be required to apply these patches after applying the 13242773 BP1 on the OMS.
Download the patch 12321965 for Release 11.1.1.5.0 version.
-
Select a location for storing the contents of the BP1 ZIP file.
-
Extract the contents of the BP1 ZIP file to the location you created in steps 6 and 7 by running the following command:
$ unzip -d PATCH_TOP_DIR p13242773_121010_<platform>.zipNavigate to the PATCH_TOP_DIR/13242773 directory by running the command:
$ cd PATCH_TOP_DIR/13242773 -
Shut down the OMS by running the following command:
ORACLE_HOME/bin/emctl stop oms -all
To verify that the OMS has completely stopped, run the following command:
emctl status oms
Note:
In a multi-OMS environment, shut down all OMS instances. -
Stop the following components if running within your Cloud Control domain before applying BP1 or updating any plug-in to the latest release:
-
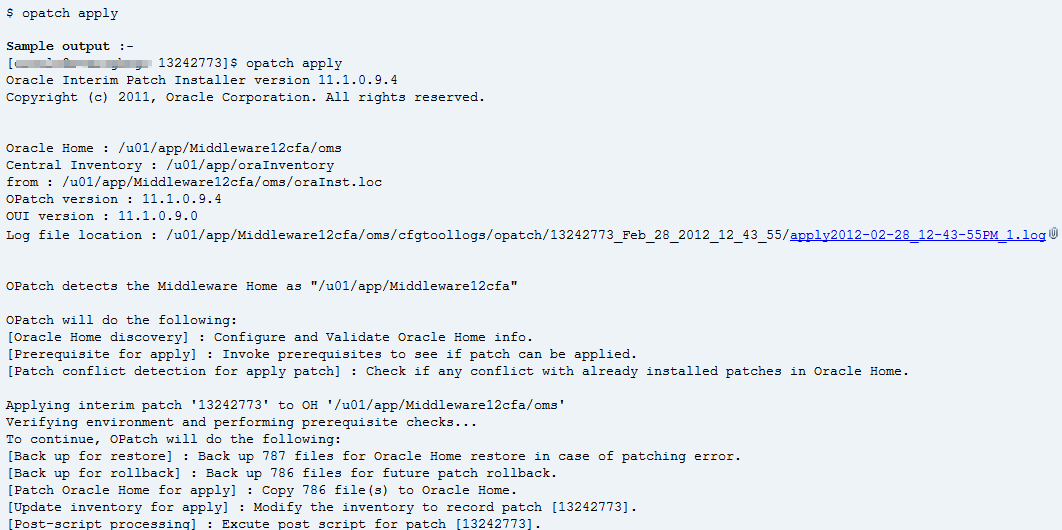
Install BP1 by running the following command:
<MIDDLEWARE_HOME>/oms/opatch apply
Make sure to run this command on all OMS instances in a multi-OMS environment. Run
opatch applyin parallel for all OMS instances in this step OR complete the BP1 application process on the first OMS, then do the same for the other OMS instances. -
Select the appropriate script to automate the BP1 post installation process, depending on whether you have a Single OMS Environment or a Multi-OMS Environment.
Note:
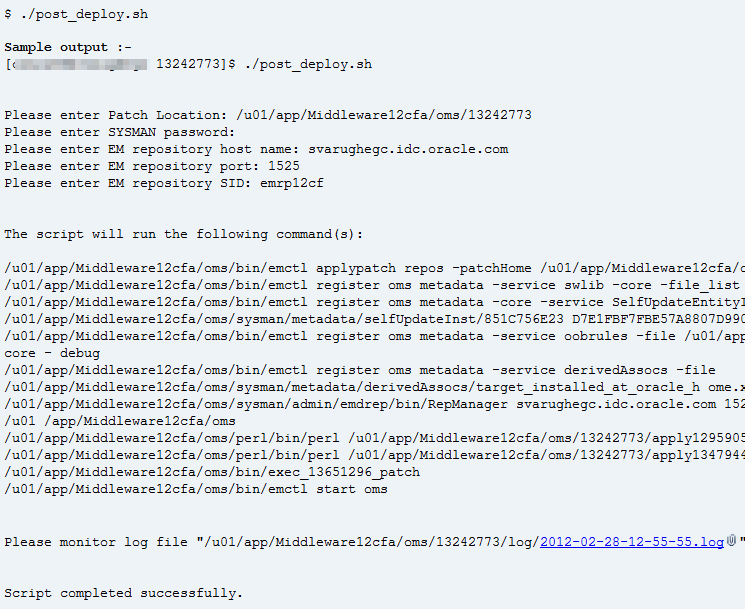
Ensure that you are in the BP1 location PATCH_TOP_DIR. Also, keep the Repository host name, SID, Listener port, and SYSMAN password ready before running thepost_deploy.shscript.-
In a single OMS environment, run the following command from the BP1 directory:
$ PATCH_TOP_DIR/13242773/post_deploy.shThe OMS will be started automatically after running the
post_deploy.shscript. -
Complete the following:
-
Find the Administration Server by running the following command from $ORACLE_HOME/bin:
./emctl status oms
Output similar to the following is displayed:
./emctl status oms

Oracle Enterprise Manager Cloud Control 12c Release 12.1.0.1.0
Copyright (c) 1996, 2012 Oracle Corporation. All rights reserved.
WebTier is Up
Oracle Management Server is Up

./emctl status oms -details

Oracle Enterprise Manager Cloud Control 12c Release 12.1.0.1.0
Copyright (c) 1996, 2012 Oracle Corporation. All rights reserved.
Enter Enterprise Manager Root (SYSMAN) Password :
Console Server Host : slc00tae.us.oracle.com
HTTP Console Port : 7789
HTTPS Console Port : 7801
HTTP Upload Port : 4890
HTTPS Upload Port : 4901
OMS is not configured with SLB or virtual hostname
Agent Upload is locked.
OMS Console is locked.
Active CA ID: 1
Console URL: https://xxx.us.oracle.com:7801/em
Upload URL: https://xxx.us.oracle.com:4901/empbs/upload

WLS Domain Information
Domain Name : GCDomain
Admin Server Host: xxx.us.oracle.com

Managed Server Information
Managed Server Instance Name: EMGC_OMS1
Managed Server Instance Host: xxx.us.oracle.com
-
Run the following command on the Primary OMS of a multi-OMS setup:
The Primary OMS is the one co-located with the Admin server.
$ ./PATCH_TOP_DIR/13242773/post_deploy.sh -
Run the following command on the other OMS environments (non-Primary):
$ ./ PATCH_TOP_DIR/13242773/MultiOms_post_deploy.shYou will be asked to enter the patch location. For example:
/scratch/xxx/PATCH_TOP_DIR/13242773
-
-
-
Apply the JDeveloper and Web Services Manager patches 13470978 and 12321965 to OMS.
Note:
This must be applied to all of the OMS instances in a multi-OMS environment. Also, there is no specific sequence to apply these two patches.If you have Enterprise Manager installed using the Enterprise Manager binaries with BP1, then this JDeveloper patch is automatically installed with no further work required.
If you are applying the BP1 on your existing Enterprise Manager installation, then you must apply the JDeveloper patch as an extra step. There are a variety of fixes in the patch, including functional issues and Google Chrome and Microsoft Internet Explorer 9 browser support. The JDeveloper patch should be applied after BP1. For instructions, refer to the README of the respective patch.
Apply the patches following the instructions in the README of the corresponding patch. When you search for patch 12321965, you will find two releases of the patch, namely, 11.1.1.5.0 and 11.1.1.4.0. Make sure that you select and apply the 11.1.1.5.0 release of the patch. Verify that you apply both the patches in the oracle_common directory that resides in the Middleware Home (MW_HOME/oracle_common/). Set environment variable ORACLE_HOME to your [MW_HOME]/oracle_common directory before applying patches 13470978 and 12321965 to the OMS.
-
Verify that BP1 was properly installed by running the following command to check that the patch is registered in the inventory:
<MIDDLEWARE_HOME>/oms/opatch lsinventory
To verify that all the patches are installed on the OMS, run the following commands:
-
Set the following environment variable on the OMS host:
setenv ORACLE_HOME <MIDDLEWARE_HOME>/oms
-
Run the following verification commands to ensure the patch has been applied to the OMS:
<MIDDLEWARE_HOME>/oms/opatch lspatches -id 13242773 -verify
<MIDDLEWARE_HOME>/oms/opatch lspatches -oh <MIDDLEWARE_HOME>/oracle_common -id 12321965 -verify
<MIDDLEWARE_HOME>/oms/opatch lspatches -oh /<MIDDLEWARE_HOME>/oracle_common -id 13470978 –verify
The results of the commands will show the patch number and its details if present in the OMS.
-
-
Apply BP1 patches and JDeveloper and Web Services Manager patches (13470978 and 12321965) to each standby OMS (if standby OMS instances have been deployed) by completing the following:
-
Shut down all standby OMS servers.
-
Using Opatch, apply the patches using the instructions provided here, but do not run the
post_deploy.shcommand (described in step 14). -
Run the following for each standby OMS instance, where ORACLE_HOME is the Oracle Home of the OMS :
$ ORACLE_HOME/perl/bin/perl 13242773_PATCH_TOP_DIR/apply12959056.pl
$ ORACLE_HOME/perl/bin/perl 13242773_PATCH_TOP_DIR/apply13479448.pl
$ sh $ORACLE_HOME/bin/exec_13651296_patch
These scripts can be found under:
13242773_PATCH_TOP_DIR/custom/scripts/
-

2.2 Setting up the Infrastructure for Agent Patching before doing Plug-in Upgrade
For patching Management Agents, the patches can be automatically downloaded during the patching flow if Enterprise Manager is configured to connect to My Oracle Support. If a connection to My Oracle Support is not possible, you can upload the patches manually to Enterprise Manager.
Based on your connectivity policy, complete the following to set up the necessary infrastructure in either online or offline mode.
2.2.1 Setting Up My Oracle Support Credentials
Complete the follow steps to set up the My Oracle Support credentials. If you have already set up your MOS credentials, then you can skip this section.
-
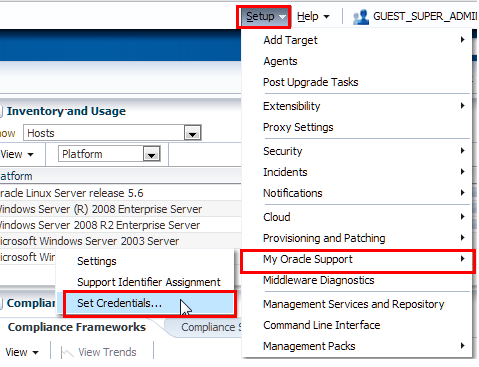
From the Setup menu, select My Oracle Support, then select Set Credentials.
-
Supply your My Oracle Support credentials, click Apply to save this information, then click the Refresh From My Oracle Support link to see the job.
This also triggers jobs to update Opatch and refresh MOS. You should check that these jobs complete successfully before proceeding. However, if these jobs have run successfully during the last 24 hours, they will not be triggered and you can just proceed.
2.2.2 About Infrastructure Set Up in Online Mode
This section describes the steps involved in setting up the infrastructure when using Management Agent patching in online mode.
Complete the following to setup the infrastructure if you are using Management Agent patching in online mode:
-
Check that the connection to My Oracle Support is set to Online.
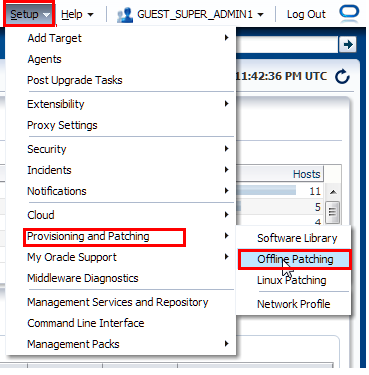
From the Setup menu, select Provisioning and Patching, then select Offline Patching.
-
Set the connection setting to Online and click Apply.
-
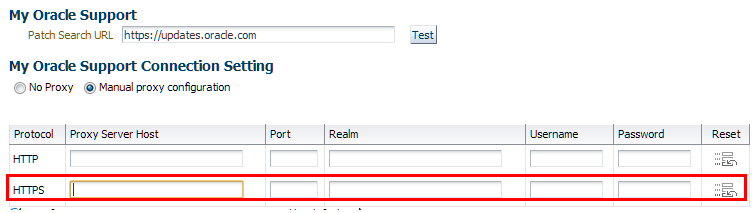
Select the My Oracle Support and Proxy Connection tab.
-
If needed, configure your Proxy Connection to connect to My Oracle Support (MOS). If you choose Manual Proxy Configuration, provide the required Proxy Server and Port and Realm details, then click Apply.
-
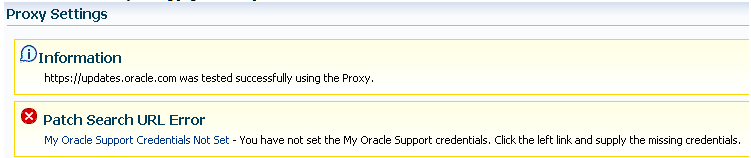
Click Test to check that the connectivity works correctly when the configuration is complete.
If connectivity is not working, you can switch to offline mode. For more information, see Section 2.2.3, "Setting up the Infrastructure if you are using Agent Patching in Offline Mode".
-
Click Apply to save the configuration following a successful test.
The error message shown is for information proposes only. You can use the included link to set up MOS credentials. For more information, see Section 2.2.1, "Setting Up My Oracle Support Credentials".


2.2.3 Setting up the Infrastructure if you are using Agent Patching in Offline Mode
If you cannot use the online mode and configure connectivity to MOS, then you must use the offline patching method. Follow the steps below to set up the infrastructure to patch your Management Agents with the Bundle Patch.
-
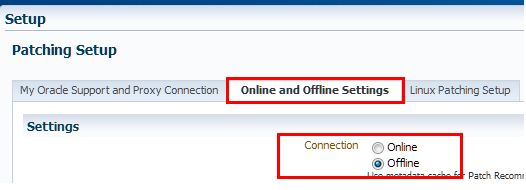
Verify that the connection to My Oracle Support is set to "Offline".
From the Setup menu, select Provisioning and Patching, then select Offline Patching.
-
From the Patching Setup page, select Online and Offline Settings, then select Offline and click Apply.
-
Update the Enterprise Manager metadata files by completing the following:
-
Download metadata files from My Oracle Support from the following location:
https://support.oracle.com
You can download all of the required XMLs using a
wgetscript. Execute the script as instructed in the My Oracle Support note 1436338.1 at the following location:https://support.oracle.com/CSP/main/article?cmd=show&type=NOT&doctype=HOWTO&id=1436338.1
You can also select and download the files manually. Table 2-1, "Metadata Files" provides a list of the files to be downloaded and their locations.
Metadata XML File Download Location aru_products.xml
https://updates.oracle.com/Orion/Services/metadata?table=aru_productsaru_releases.xml
https://updates.oracle.com/Orion/Services/metadata?table=aru_releasesaru_platforms.xml
https://updates.oracle.com/Orion/Services/metadata?table=aru_platformsaru_languages.xml
https://updates.oracle.com/Orion/Services/metadata?table=aru_languagesaru_product_groups.xml
https://updates.oracle.com/Orion/Services/metadata?table=aru_product_groupsaru_product_releases.xml
https://updates.oracle.com/Orion/Services/metadata?table=aru_product_releasesaru_component_releases.xml
https://updates.oracle.com/Orion/Services/metadata?table=aru_component_releasesaru_targets.xml
https://updates.oracle.com/Orion/Services/metadata?table=aru_targetscertifications.xml
patch_recommendations.xml
-
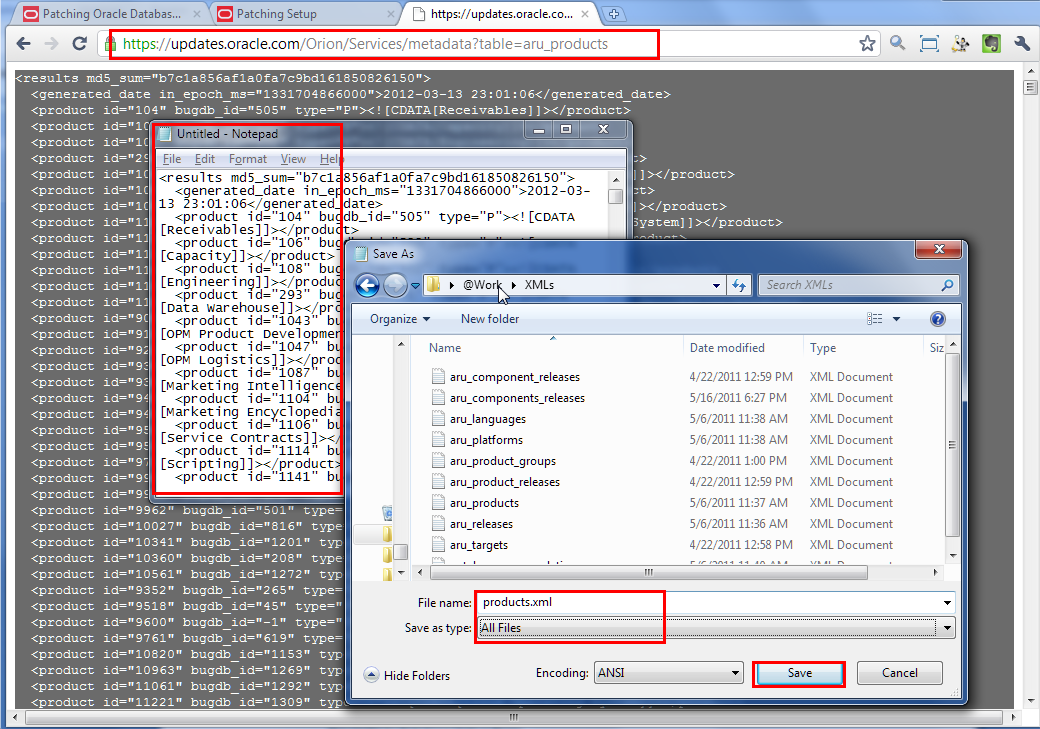
Download the URLs and store them in the local system.
Copy and paste the contents of every URL into a separate text file and save it with the proper name and the .xml extension (for example, save the file as aru_products.xml).
The URL opens in the browser and the contents are copied into Notepad and the file is then saved as an XML.
-
Upload the metadata files to Enterprise Manager.
From the Setup menu, select Provisioning and Patching, then select Offline Patching.
-
Click Browse in the Metadata Cache section to select the xml metadata files.
-
Click Upload to upload the metadata files
Following a successful upload, the Status column for the XML files will be Green. Other column information will also be updated.
-
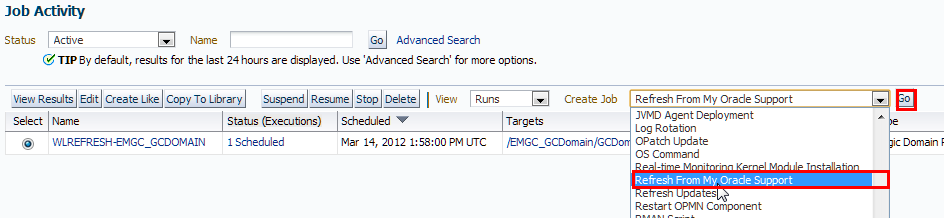
From the Enterprise menu, select Job, then select Activity.
-
Select Refresh From My Oracle Support from the Create Job list and click Go.
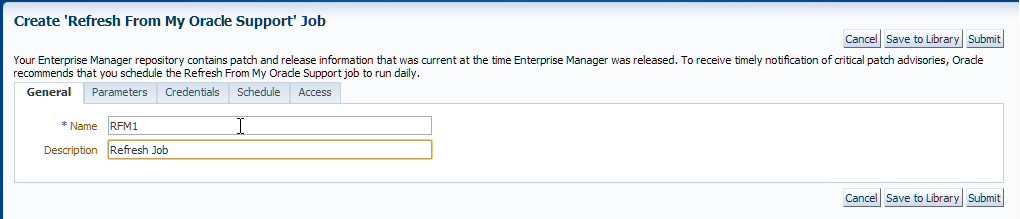
-
Specify a name for the job and click Submit.
When the job is created and submitted, a confirmation screen is presented.
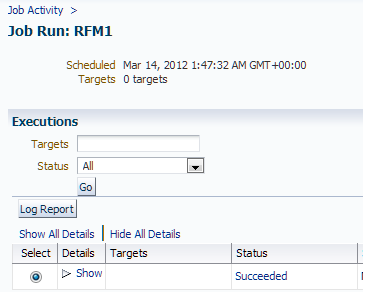
-
Click the link to track the status of the job.
Ensure that the job succeeds. You might have to refresh the page or set up the refresh to be every 30 seconds.
Note: If the job fails, refer to the trouble shooting section at the end of the document or call Oracle Support.
-
-
Download the required Management Agent patches and OPatch patches from My Oracle Support (
https://support.oracle.com) by completing the following:-
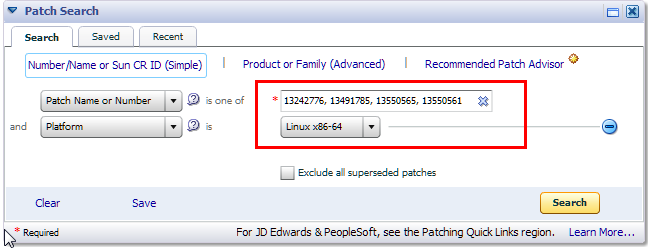
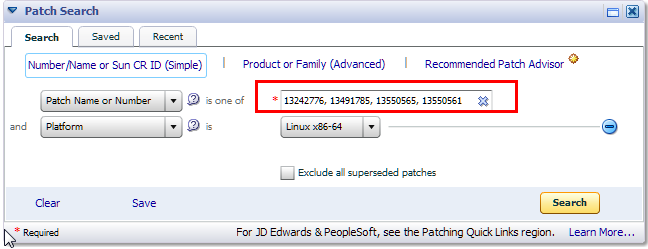
Download the Management Agent patches by specifying the four patch numbers 13242776, 13491785, 13550565, and 13550561 as comma-separated entries In the Patch Search region of the Patches & Updates page, then click Search.
Make sure you select the right platform, for example, Linux x86-64.
-
Click Search.
-
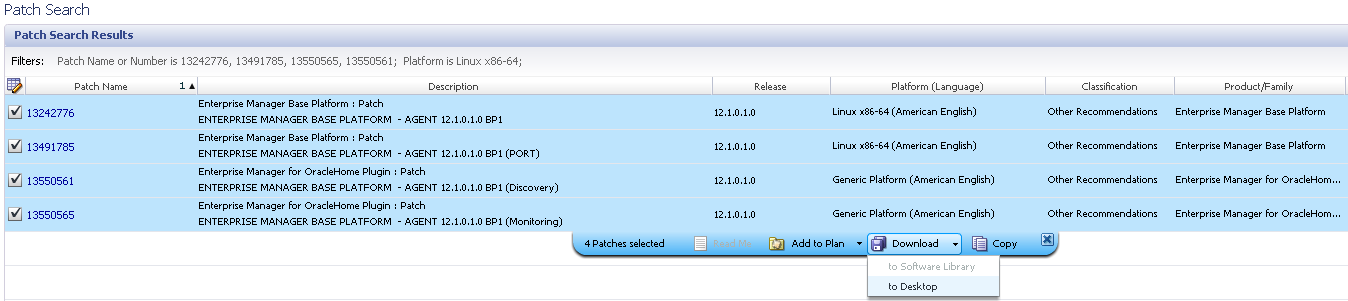
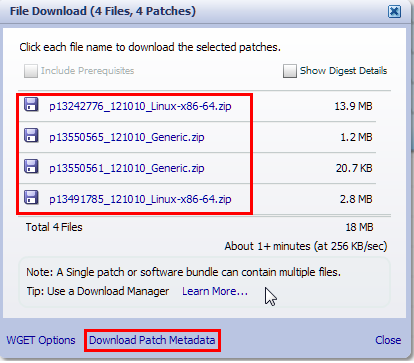
Download the patch zip files and the patch metadata files for the patches.
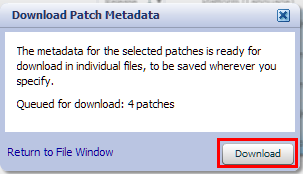
To download the patch metadata, click Download Patch Metadata, then click Download.
Click the patch zip file to download the zip file.
Note:
Make sure you download both. -
Download the required OPatch patches from My Oracle Support (
https://support.oracle.com).Search for patch "6880880" for the appropriate platform for the Management Agent target. For example, if your target is Linux x86-64, pick platform Linux x86-64.
-
Click Search.
Download the patch for the version 11.1.0.0.0 series only.
-
Download both the patch zip file and the patch metadata.
To download the patch metadata file, click Download Patch Metadata, then click Download.
-
-
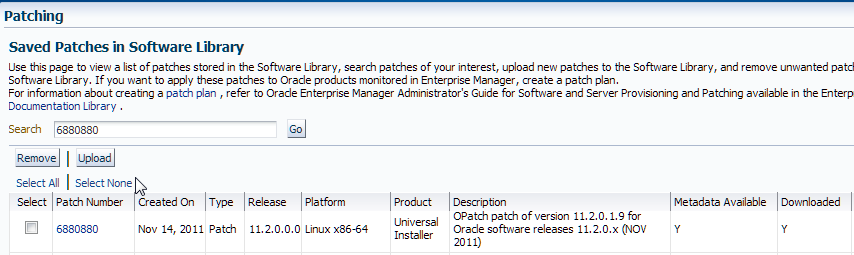
Upload the Management Agent patches to the Software Library.
-
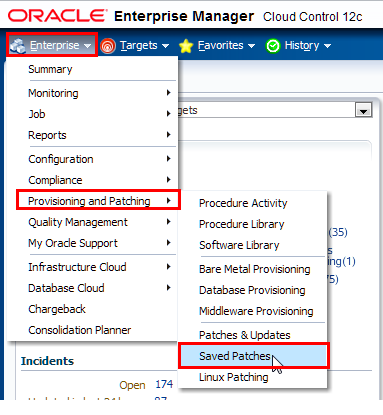
From the Enterprise menu, select Provisioning and Patching, then select Saved Patches.
-
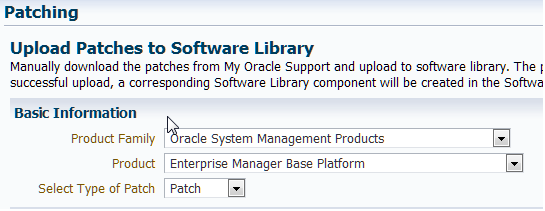
Click Upload to open the Upload Patches to Software Library page.
Of the four patches for Management Agents, two are for "Base platform" (13242776 and 13491785) and the other two are for "Oracle Home plug-in" (13550561 and 13550565).
-
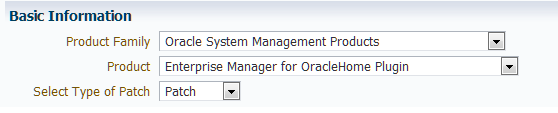
Set the Basic Information as shown.
-
For patches 13242776 and 13491785, select the patch metadata file and patch zip file from the local directory on the system and click Upload.
-
Upload patches 13550561 and 13550565 by selecting their patch metadata and the patch zip file.
-
Reset the Basic Information attributes as shown.
-
Select the patch metadata and the patch zip file and click Upload.
-
-
To upload OPatch 6880880 to the Software Library, specify the Basic Information attributes.
Select the patch metadata and patch zip file for the Opatch patch 6880880 and upload it. Ensure that you fill in all attributes required in the page:
-
Release: Choose version as "11.1.0.0.0".
-
Created On: Use today's date
-
Description: Opatch for version 11.1.0.x
-
Platform: Select the platform for which you downloaded the patch (for example, Linux x86-64)
-
Language: Select 'American English'
-
-
Click Upload.
Upon successful upload, all the patches will be visible in the Saved Patches page.
At the end of this process, all of the Agent patches and the Opatch patch should be listed in the Saved Patches in Software Library page.


2.3 Upgrading All Deployed Plug-ins to the 12.1.0.2 Releases on OMS
The following sections describe in detail the steps required to upgrade deployed plug-ins to their Enterprise Manager 12.1.0.2 releases. The following topics are addressed:
2.3.1 Prerequisites for Deploying Plug-ins
Make sure that you upgrade all of your version 12.1.0.1 plug-ins to the 12.1.0.2 releases (with out revision) where available. Update all plug-ins on an OMS instance one after the other until all have been upgraded (plug-ins can only be updated one at a time).
To verify that your plug-ins are upgraded to the latest 12.1.0.2 release, complete the following:
-
Back up your Oracle Inventory, Repository Database, Middleware Home, Instance Home, Software Library, Management Agent. You can refer to the back up instruction from Enterprise Manager Cloud Control Administrator's Guide available here:
http://docs.oracle.com/cd/E24628_01/index.htm
-
Log in to your repository database as SYSMAN and recompile invalid objects using the following command:
EXEC EMD_MAINT_UTIL.recompile_invalid_objects
SQL> EXEC
EMD_MAINT_UTIL.recompile_invalid_objects

PL/SQL procedure successfully completed.
Make sure that you do not have any invalid objects in your repository. To check any invalid object, log in to the repository as a system user and run the following command:
SELECT object_name, object_type FROM ALL_OBJECTS WHERE owner='SYSMAN' and status <> 'VALID' ;

SQL> SELECT object_name, object_type
FROM ALL_OBJECTS
WHERE owner='SYSMAN' and status <> 'VALID' ;

no rows selected
If you find any invalid objects, run the first SQL again:
EXEC EMD_MAINT_UTIL.recompile_invalid_objects
-
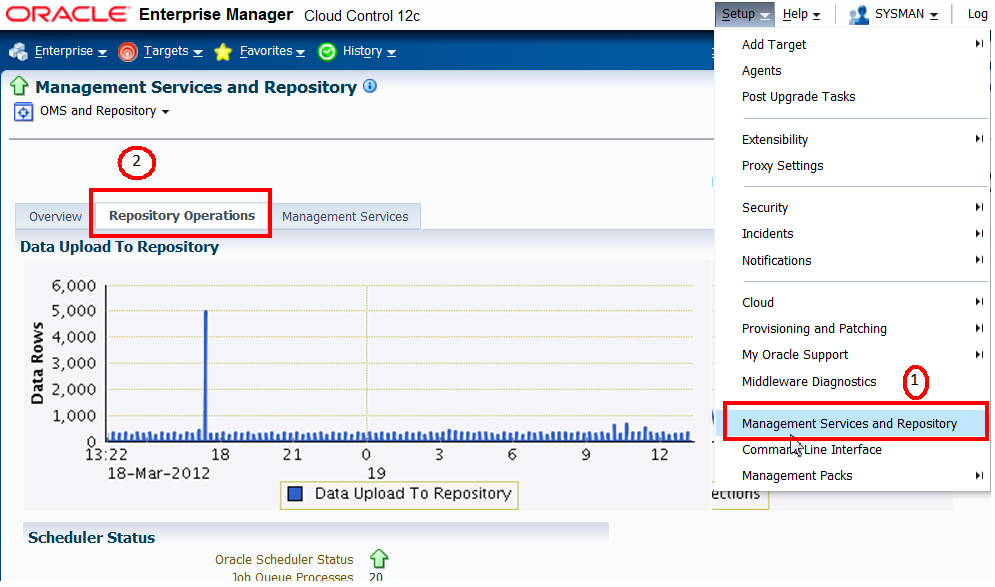
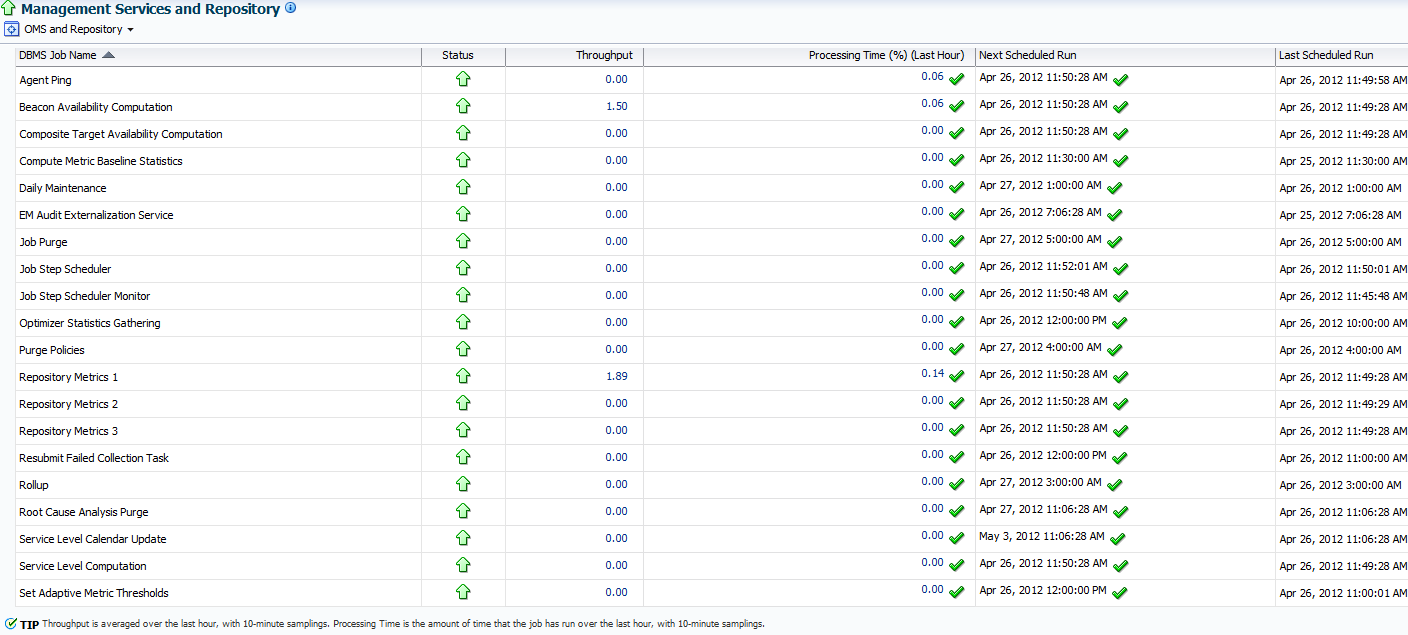
Verify that DBMS jobs are running.
If they are not running, run the following package as sysman user:
EXEC EMD_MAINTENANCE.submit_em_dbms_jobs
To check if jobs are running, open the Enterprise Manager console and from the Setup menu, select Management Services and Repository, then select Repository Operations.
-
Stop and start your Database and OMS before your start the plug-in upgrade.
Do this on all the OMS instances of an multi-OMS environment.
-
Verify that the Target Management Agent (where you will be upgrading your plug-in) is up and running.
-
Follow the instructions in Section 2.7, "Upgrading ADP and JVMD (Optional)" if you are updating to the 12.1.0.2 release of the Oracle Fusion Middleware Plug-in and you already have Application Dependency and Performance (ADP) or JVM Diagnostics (JVMD) installed.
-
Stop the following components if they are running within your Cloud Control domain before updating any plug-in to the latest release:
-
Application Dependency and Performance (ADP) Manager
-
JVM Diagnostics (JVMD) Manager
-
Note:
Upgrade all your 12.1.0.1 version plug-ins to 12.1.0.2 releases one after the other until all have been upgraded. This means downloading one 12.1.0.2.0 plug-in, deploying that plug-in, then downloading another 12.1.0.2.0 plug-in and deploying that one, and so on.2.3.2 Deploying Plug-ins in Online Mode on OMS
To deploy plug-ins in an online mode, complete the following:
-
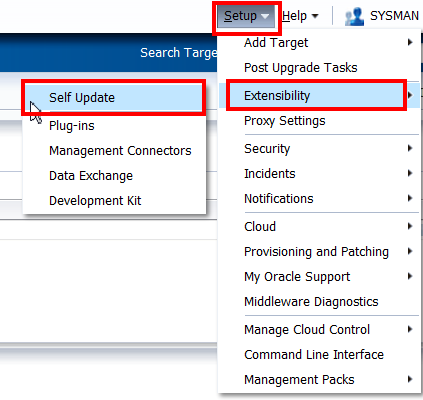
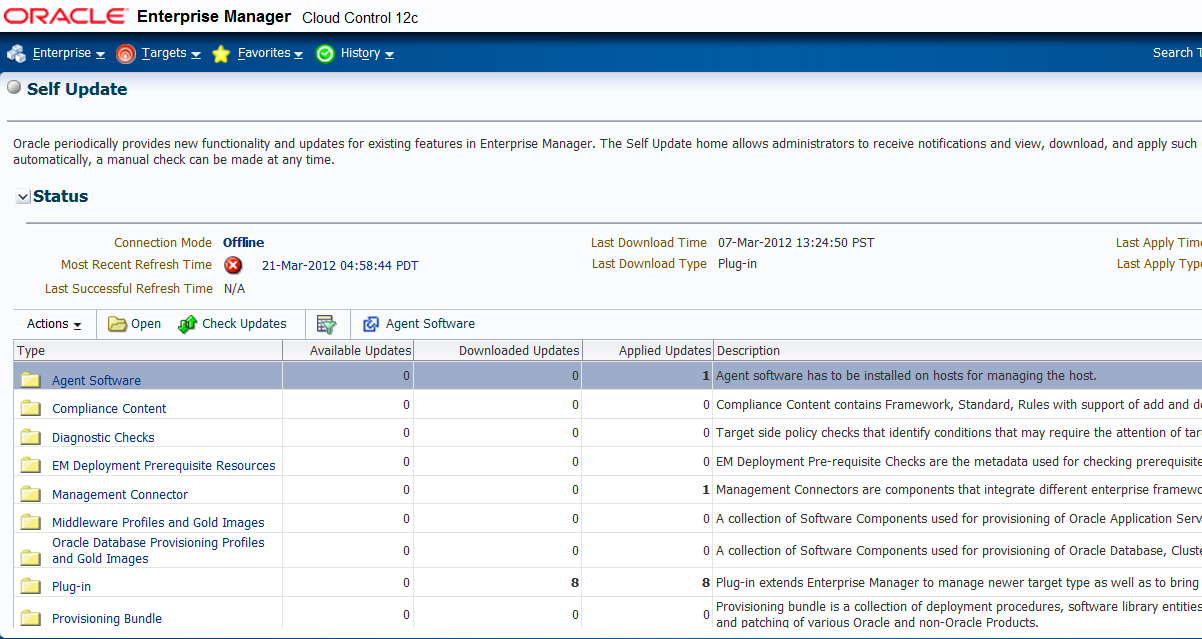
From the Setup menu, select Extensibility, then select Self Update to get the complete list of available updates.
-
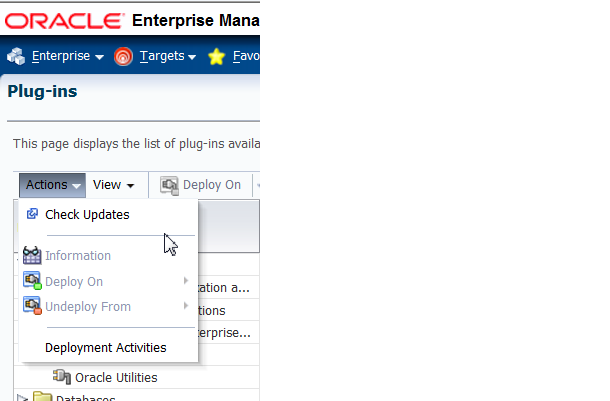
From the Plug-ins home page, select Actions, then select Check Updates.
A job gets triggered and updates the Available Update column. A confirmation screen is displayed when a job is successfully submitted.
-
Select Open from the Actions menu.
-
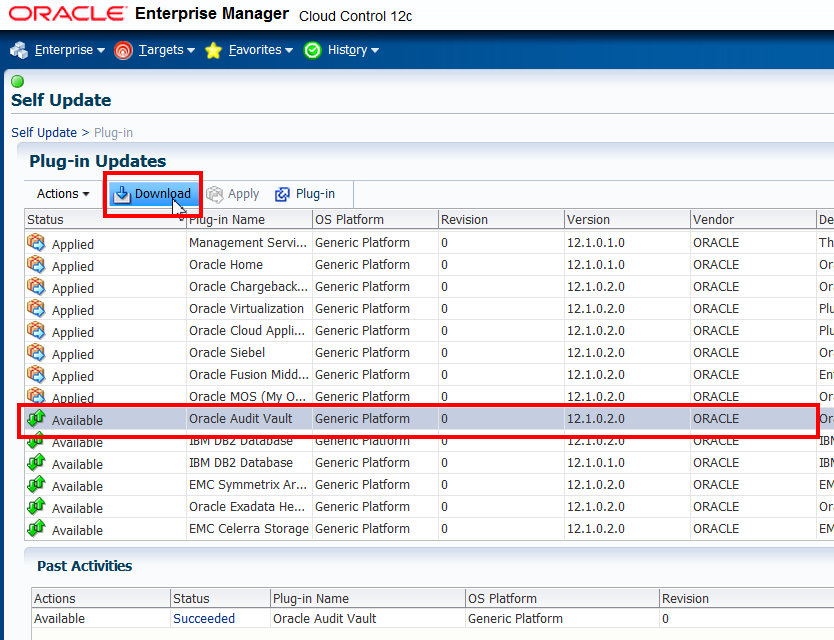
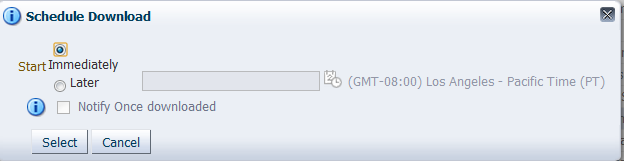
Select an update from the list of available updates and click Download.
The Schedule Download dialog appears. In the example shown below, the Oracle Audit Vault plug-in is selected.
-
Select when you want to download the update (immediately or at some later specified time).
Note that multiple downloads can be scheduled simultaneously.
-
Click Select.
An Enterprise Manager job is created to download the update to the Software Library. Enterprise Manager starts downloading the archive from the Oracle Enterprise Manager store.
Note:
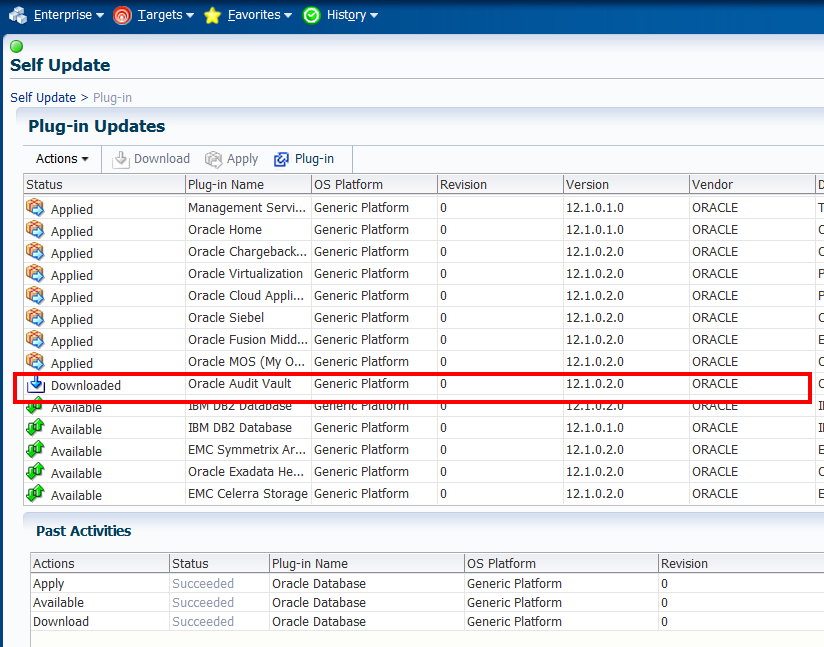
The page is not refreshed automatically. Click Refresh to view the updated download status.Once an entity has been downloaded to the Software Library, it is ready to be applied to your installation.
-
Select an update from the list with a status of Downloaded, then click Apply.
You are then redirected to the plug-in deployment page.
-
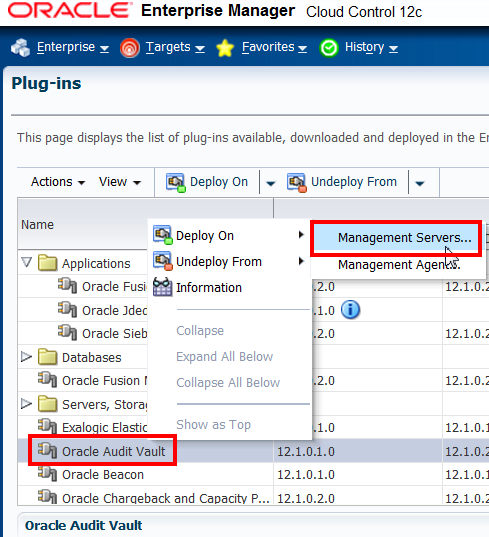
Select the plug-in and deploy it on OMS.
Right click the plug-in name, select Deploy On, then select Management Servers.
-
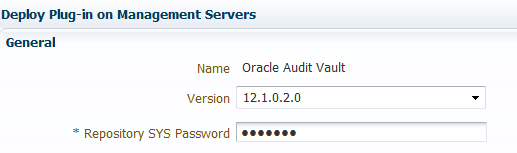
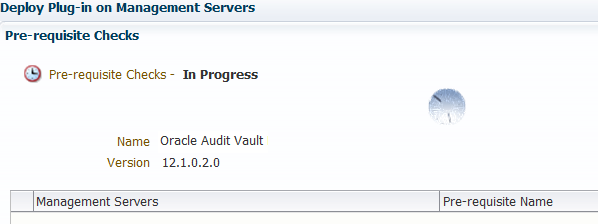
Provide the Repository SYS Password and click Continue.
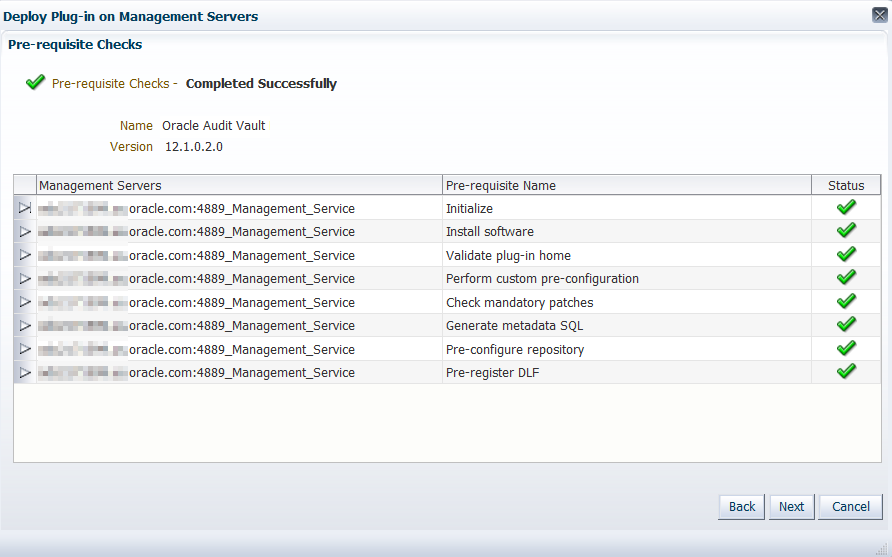
Plug-in upgrade prerequisites checks are executed.
-
Click Next.
-
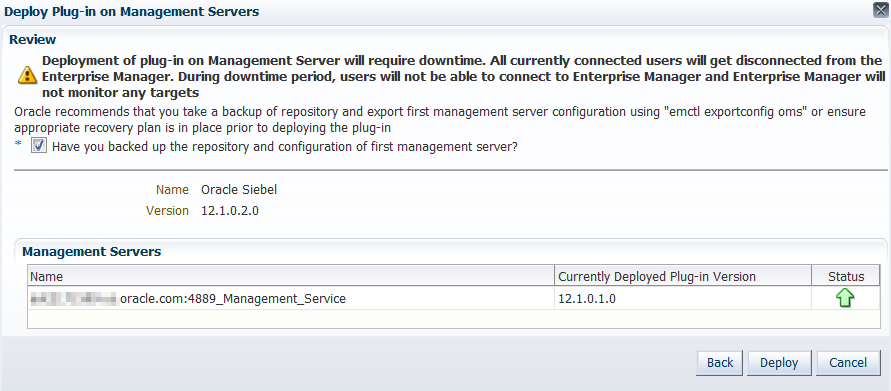
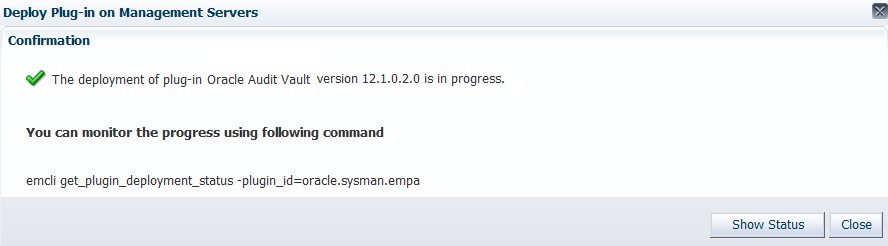
Click Deploy when the prerequisite checks have completed successfully.
The OMS will be bounced automatically, So it is better to use
$ emctl status oms -detailsto check for the plug-in deployment status. -
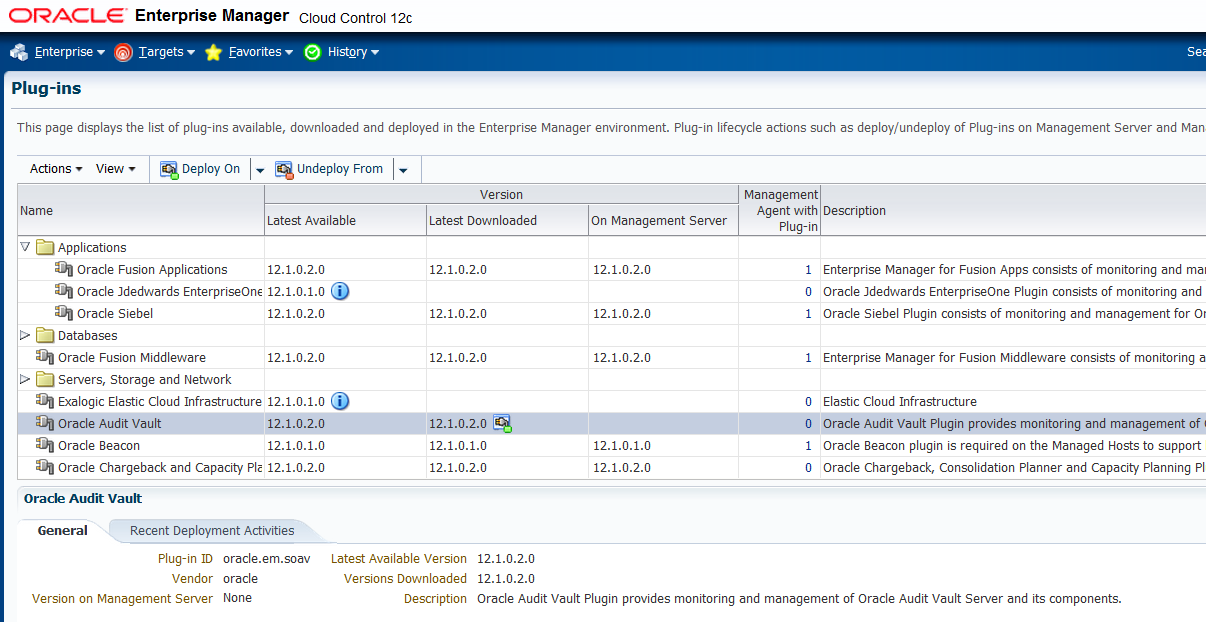
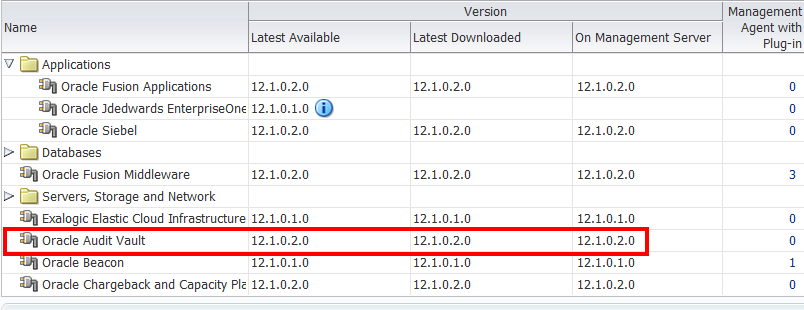
From the Setup menu, select Extensibility, then select Plug-ins.
The plug-in version on OMS is now 12.1.0.2.0, as shown in the On Management Server column.
-
To deploy each updated plug-in on each Standby OMS, complete the following:
-
Go to the Self Update page, click Plug-in, then select the required plug-in.
-
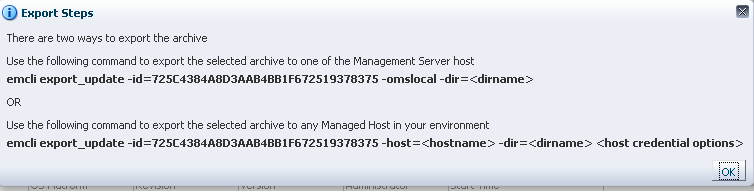
From the Actions menu, select Export.
A pop-up window showing two possible export steps opens. Note the value of the
-idparameter displayed in the pop-up window. You will need this value for the next step. -
Before proceeding with the export steps, log in to OMS Home (OMSHOME/bin) and run the sync command, as shown below:
./emcli sync
The "Synchronized successfully" message should be displayed.
Run the following EM CLI command on one of the primary site OMS servers:
emcli export_update -id=<update id> -deep -host=<standby OMS host> -dir=<directory to export archives> <host credential options>
For example:
$ emcli export_update -id=725C4384A8D3AAB4BB1F672519378375 -deep -host=adc1140458.us.oracle.com -dir=/scratch/aime/plugins -credential_name=BDC -credential_owner=sysman
The command syntax contains the following options:
The
-idoption is taken from the pop up window.The
-deepoption is required. In a multiple OMS setup, the request can be processed by any OMS. Therefore, the directory should be a valid path (ideally shared) for each OMS that can process the request.The
-hostoption identifies the target host to export the plug-in to.The
-diroption identifies the directory on the target host to export the plug-in to.<host credential options>specifies the host credentials and can be one of the following:credential_set_name: The set name of the preferred credential stored in the repository for the host target. For example, HostCredsNormal (the default unprivileged credential set) or HostCredsPriv (the privileged credential set).credential_name:The name of a named credential stored in the repository. You must specify this option along with the credential_owner option.credential_owner: The owner of a named credential stored in the repository. You must specify this option along with the credential_name option.The command generates multiple zip files in the specified directory on the standby OMS host. The zip file with the name of the form version_OMS_platform_revision.zip, is the one to be used in the following steps. If you have multiple standby OMS hosts, copy this file to each host.
-
Start the Standby Administration Server, if it is down, using the following command:
$ emctl start oms -admin_only
-
Install the OMS archive on the First Standby OMS Oracle Home using the following command:
$ pluginia -archives path to plugin archive -
Configure the plug-in on the First Standby OMS Oracle Home using the following command:
pluginca -action deploy -isFirstOMS true -plugins plugin-list -oracleHome oms oracle home -middlewareHome wls middleware home
where
plugin-listis the plug-in name in the formatplugin-id=plugin-version. -
Copy the plug-in archive file to each Standby additional OMS.
-
Run the following commands from each Standby additional OMS Oracle Home:
$ pluginia -archives path to plugin archive

$ pluginca -action deploy -isFirstOMS false -plugins plugin-list -oracleHome oms oracle home -middlewareHome wls middleware home
-
This completes the plug-in deployment on Standby site. Validate the plug-ins by going to the Self Update page.
Select a plug-in and view its information. All OMS servers should be listed.
-

2.3.3 Deploying Plug-ins in Offline Mode on OMS
To deploy plug-ins in an offline mode, complete the following:
-
From the Setup menu, select Extensibility, then select Self Update.
-
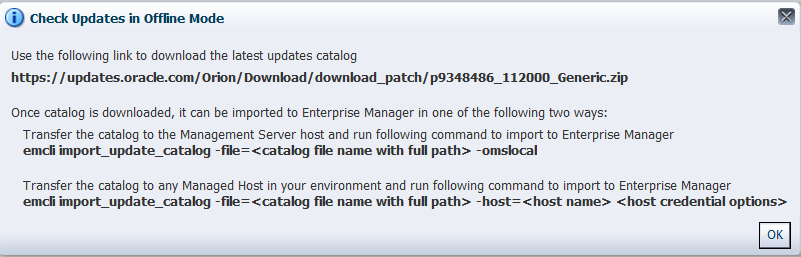
Click Check Updates.
The following message appears
You must download the latest updates catalog using the link provided in the message.
https://updates.oracle.com/Orion/Download/download_patch/p9348486_112000_Generic.zip
Note:
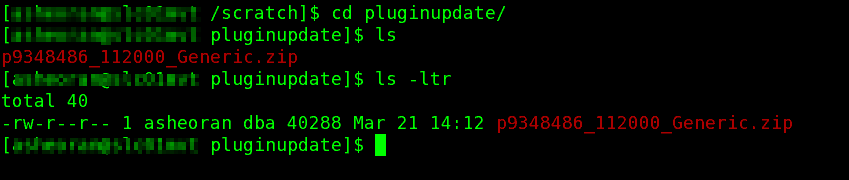
Do not unzip the file.Make sure that you have this ZIP file on the OMS host. The following examples use a directory called "plugupdate " on the OMS host to store this catalog ZIP file.
-
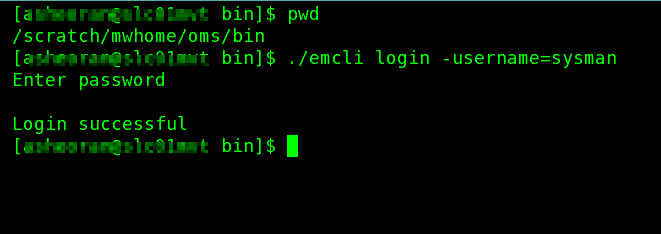
Go to the <OMS home>/bin directory and log in into the EM CLI by running the following command as the install user:
./emcli login -username=sysman
-
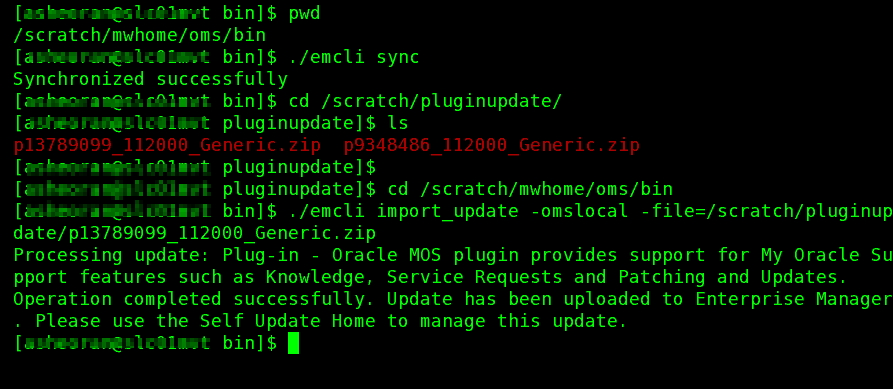
Execute
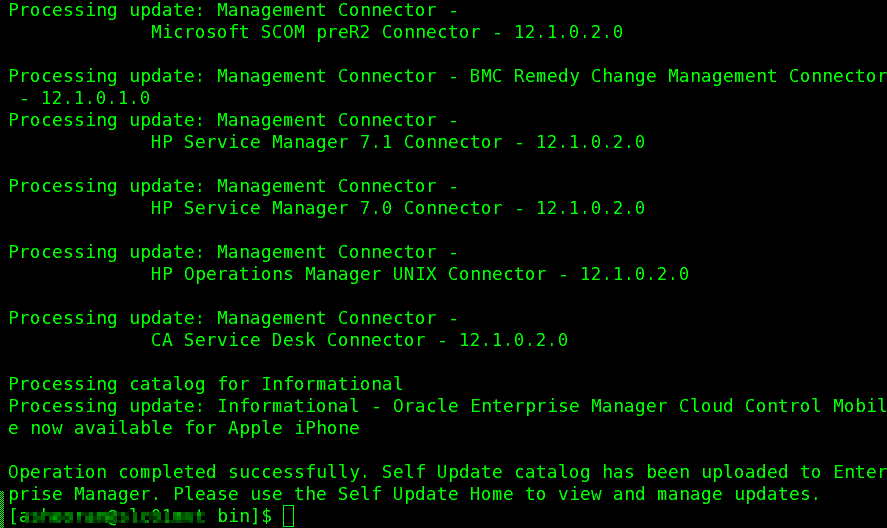
emcli synchronize(mandatory) using the following command, as shown in the figure below:$OMS_OracleHome/emcli sync
-
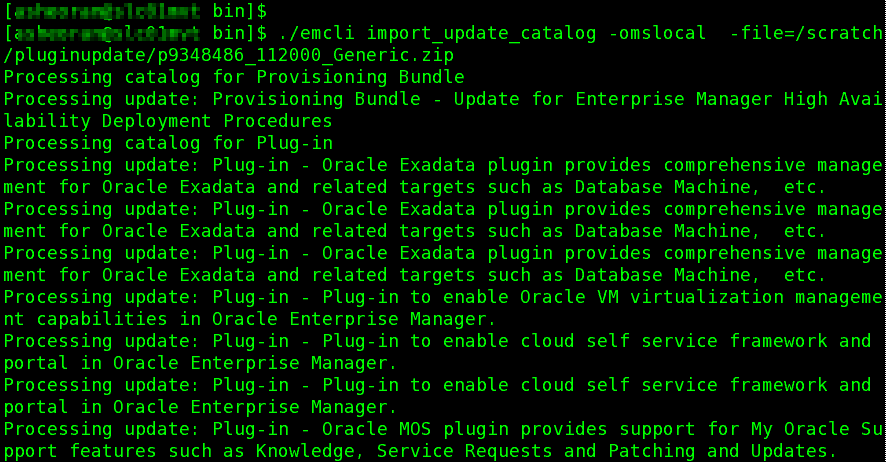
Import the catalog file by executing the following command:
$OMS_OracleHome/emcli import_update_catalog -omslocal -file=<absolute location of the zip file>
For example:
$OMS_OracleHome/emcli import_update_catalog -omslocal -file=/scratch/pluginupdate/p9348486_112000_Generic.zip
Note: Run the above command on all of the other additional OMS servers incase of an multi-OMS environment.
-
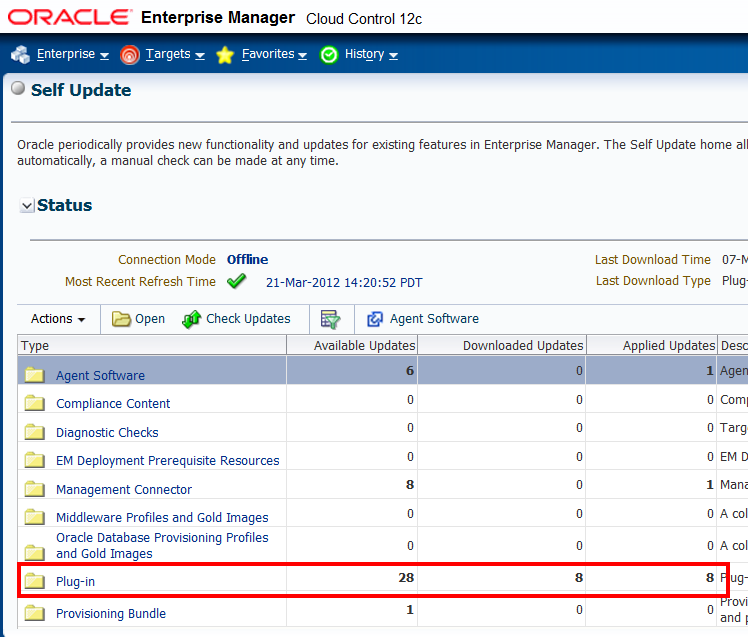
Return to the Self Update page and refresh the page.
You will see the Available Updates count updated.
-
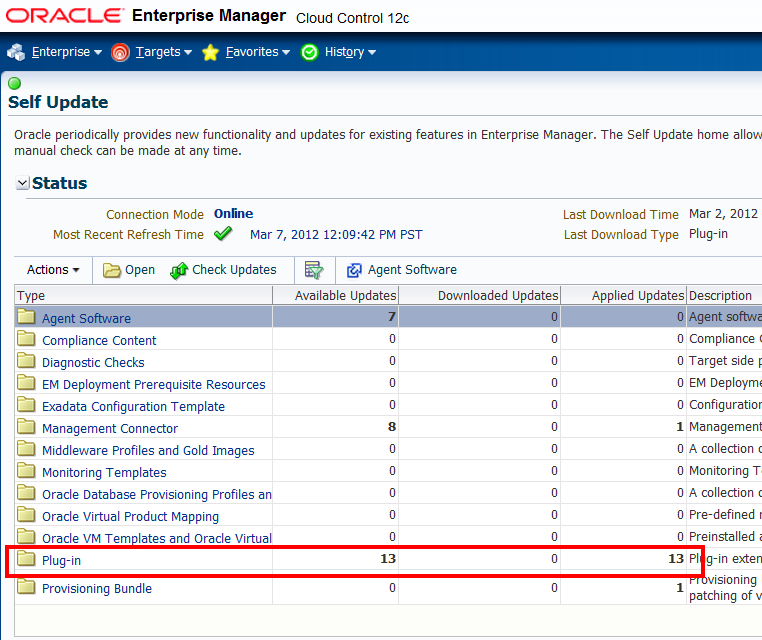
Select the Plug-in folder to see a list of the available new plug-ins.
-
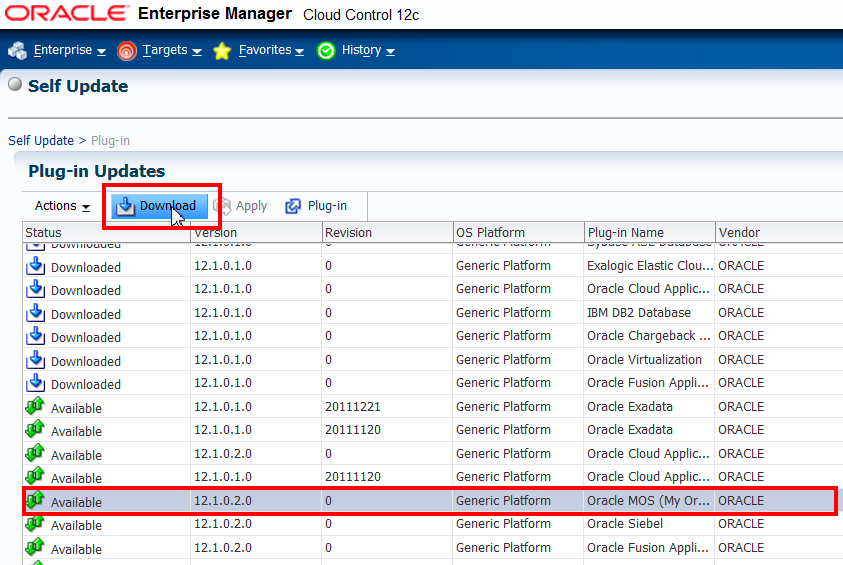
Select the plug-in and click Download.
-
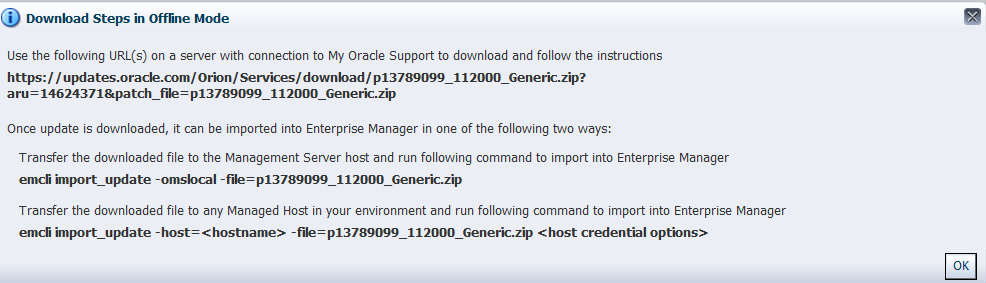
Follow the instructions provided in the message.
Download the update file for the selected plug-in and make sure that it is on the OMS host.
Note:
Do not unzip the file. You must download the update file for all the plug-ins separately, one after the other. -
Go to the <OMS home>/bin directory and import the update file you downloaded in the previous step by executing the following command:
./emcli import_update -omslocal -file=<absolute location of the zip file>
For example:
./emcli import_update -omslocal -file=/scratch/pluginupdate/p13789099_112000_Generic.zip
Note:
If your session has expired, you might be prompted to log in again. You can do this using the following command:$ORACLE_HOME/bin/emcli login -username=sysman
This command will make the update show up in "Downloaded" state in the Self Update Home page and can be "Applied" from the user interface.
-
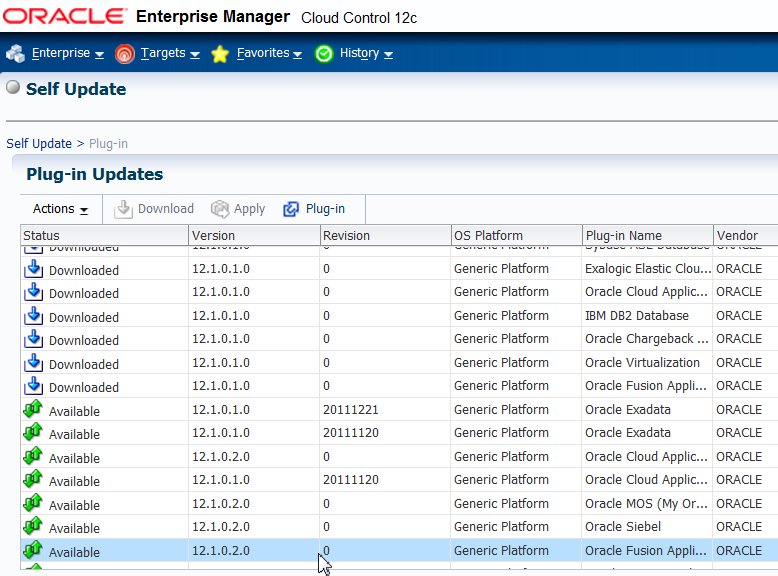
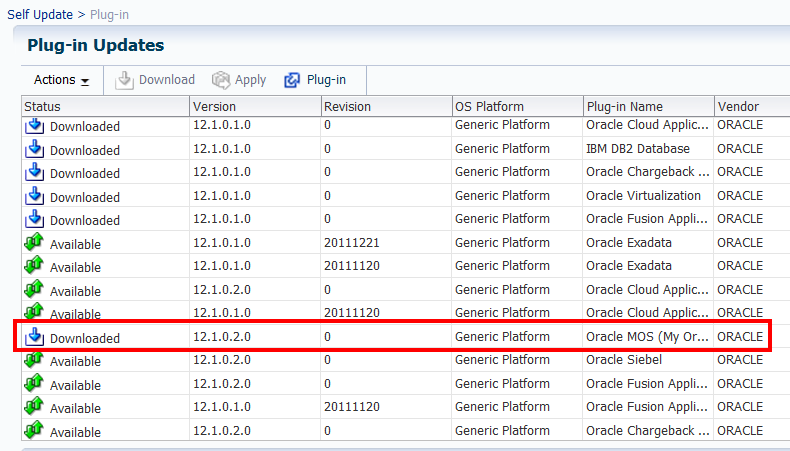
Select Plug-in on the Self Update page.
You will see the status has changed for the MOS plug-in from Available to Downloaded.
Note:
You must download the update files for the remaining plug-ins one after the other (repeat steps 9 to 12 for each plug-in update) and then run the command to change the status from Available to Downloaded. -
Select the plug-in and click Apply.
-
Repeat steps 4 to 8 in Section 2.3.2, "Deploying Plug-ins in Online Mode on OMS" to deploy the plug-in on OMS

2.4 Applying Bundle Patch 1 on Management Agents
This following section describes in detail the steps required to apply BP1 on Management Agents.
-
Ensure that the OMS patches are applied before starting to patch the Management Agents.
-
Ensure that all plug-ins have been upgraded to the 12.1.0.2 releases.
Note:
You can also refer to My Oracle Support note 1359221.1 for details on how to apply patches on 12c Management Agents using the Cloud Control console. -
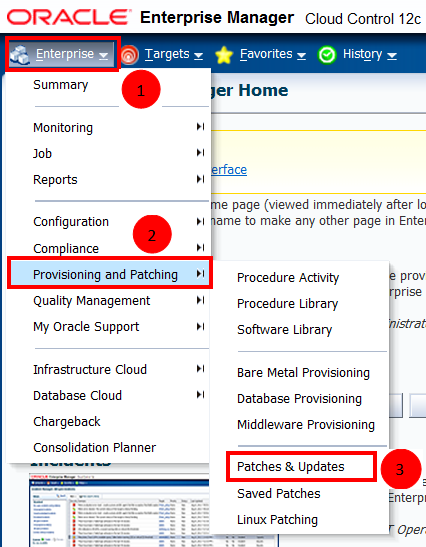
From the Enterprise Menu, select Provisioning and Patching, then select Patches & Updates as shown in the following image.
-
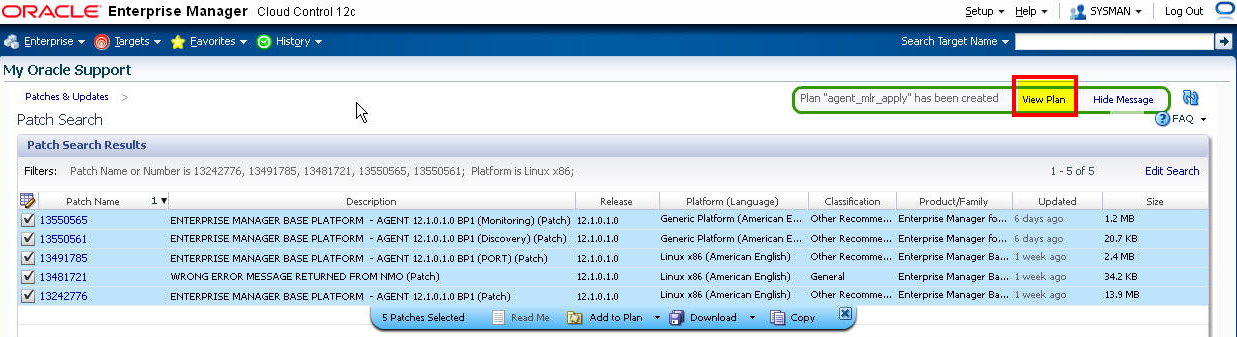
In the Patch Search Region of the Patches & Updates page, enter the Patch numbers 13242776, 13491785, 13550565, and 13550561, choose the platform, then click Search.
If Enterprise Manager is in offline patching mode, you will need to specify one patch at a time in the search field rather than a comma separated list (for example, 13242776 individually rather than all in a list 13242776, 13491785, 13550565, 13550561).
-
Select all the patches, click Add to Plan, then select Add to New, as shown below.
Based on the connectivity setting to My Oracle Support, the patch will be either searched directly from My Oracle Support or from the pre-staged Software Library list.
-
Specify a name for the plan in the Plan Name field.
-
Set the target type to "Agent".
-
Click Search and select the agents you want to patch.
You can also search for agents by specifying the Group name, if you have any created.
-
Click Create Plan.
-
Click View Plan at the top of the page to view the newly created patch plan.
-
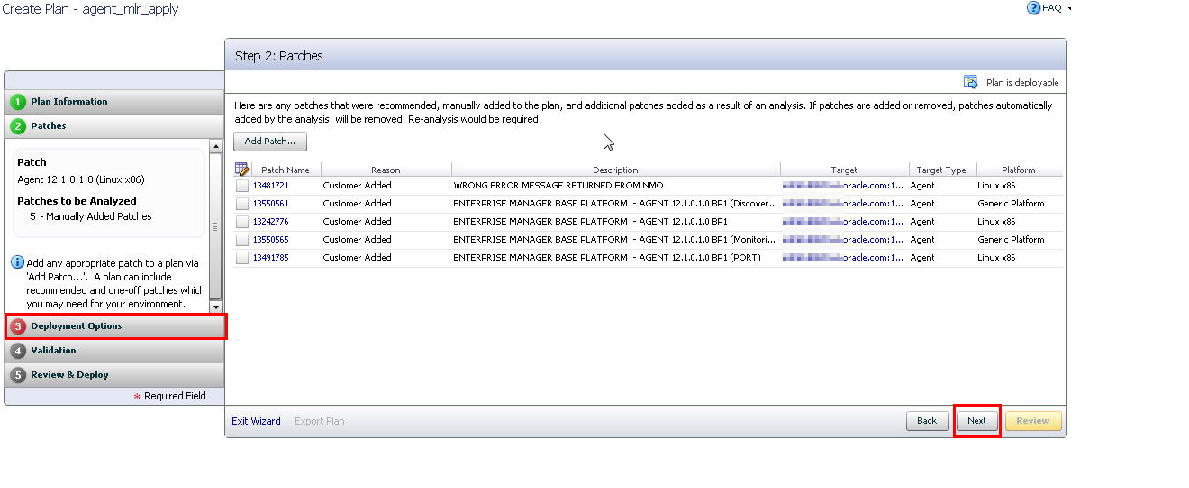
Click Next or click Deployment Options, as shown below.
-
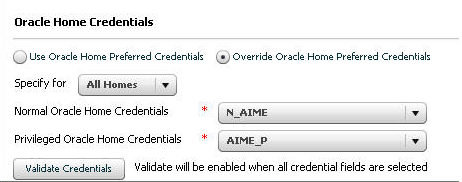
From the Deployment Options, specify the credentials of the target Management Agents, as shown below.
If Oracle Home Preferred Credentials are not set, select Overwrite Oracle Home Preferred Credentials for the Agent Oracle Home and use Normal Oracle Home Credentials/Privilege Oracle Home Credentials.
Note:
If you do not have direct access to 'ORACLE' credentials and have to setup Privilege credentials as 'root', configure Enterprise Manager to use SUDO or PBRUN.Follow the instructions provided in the chapter "Setting up Credentials in the Lifecycle Management Guide", which can be found at the following location:
http://docs.oracle.com/cd/E24628_01/em.121/e27046/infrastructure_setup.htm#BABGGJB
-
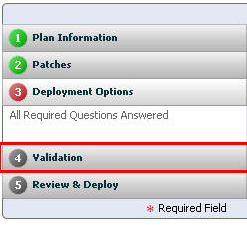
Click Next or Validation on the left-hand panel, as shown below.
-
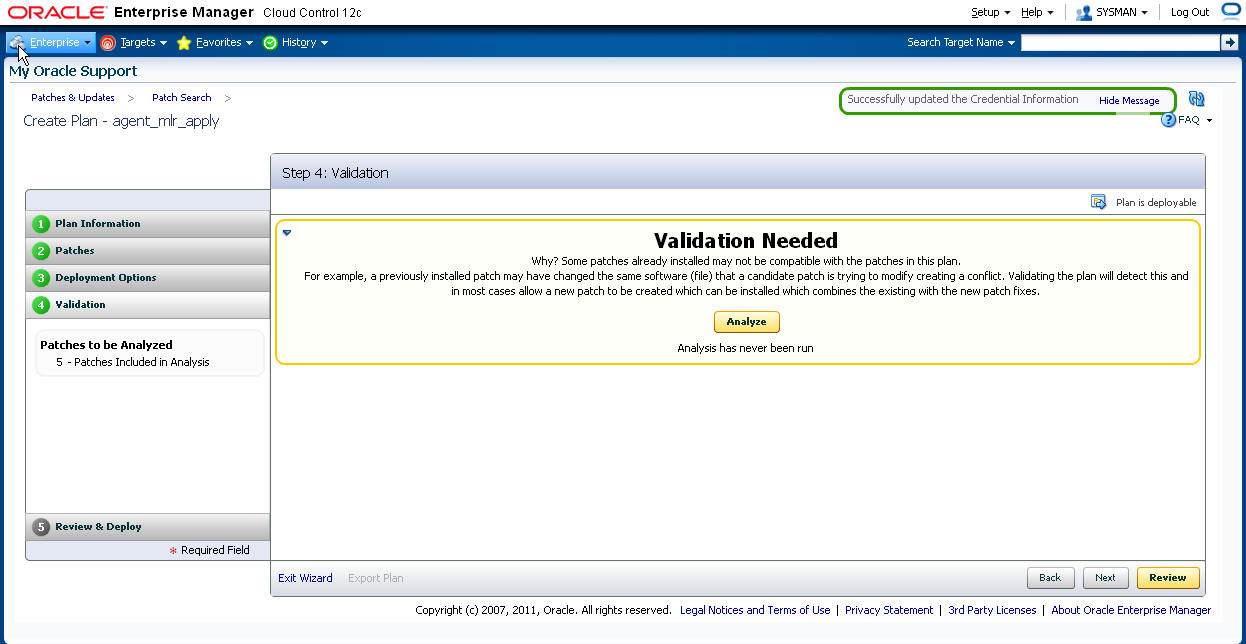
Click Analyze on the Validation page as shown below.
The analysis process runs prerequisite checks and also checks for patch conflicts. The analysis process takes close to 10 minutes to complete.
-
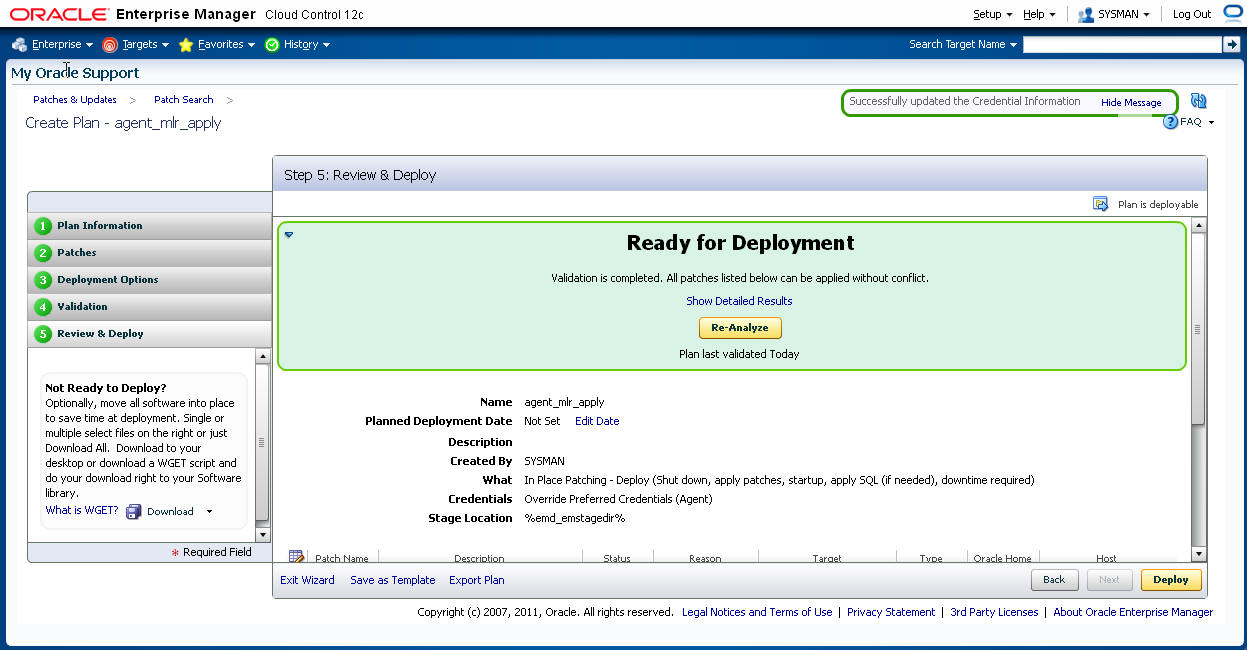
Click Next on successful completion of the analysis.
-
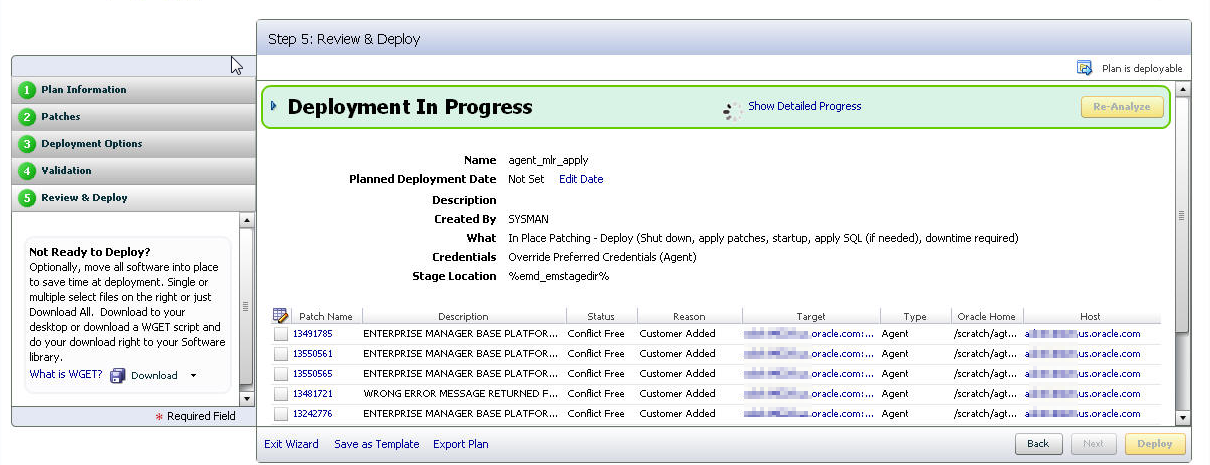
Click Deploy on the Review page.
This process takes time to complete (based on the number of agents being patched), but it can be tracked using the Show Detailed Progress link, as shown below.


2.5 Upgrading All Downloaded Plug-ins to the 12.1.0.2 Releases on Management Agent
This section explains the steps involved in upgrading all the downloaded plug-ins to the 12.1.0.2 releases on a Management Agent. The following topics are covered:
2.5.1 Deploying a Plug-in in Online Mode on a Management Agent
Next you will select plug-ins that were already upgraded on Oracle Management Service and upgrade the plug-ins on existing Management Agents. To deploy a plug-in in online mode on a Management Agent, complete the following:
-
From the Setup menu, select Extensibility, then select Self Update.
-
Select Plug-in and from the Actions menu, select Open.
-
Click the Plug-in link.
-
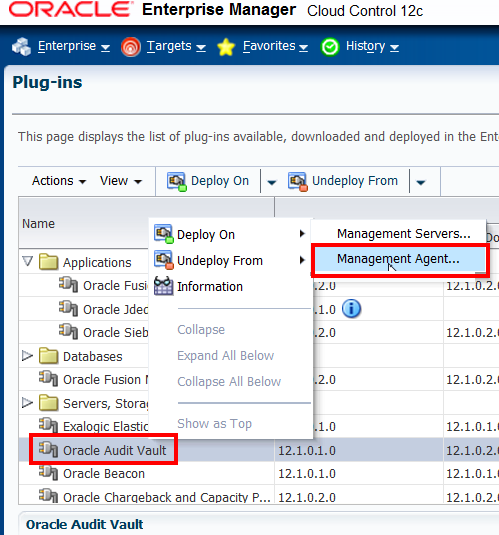
R ight-click the plug-in, select Deploy On, then select Management Agent, as shown below.
-
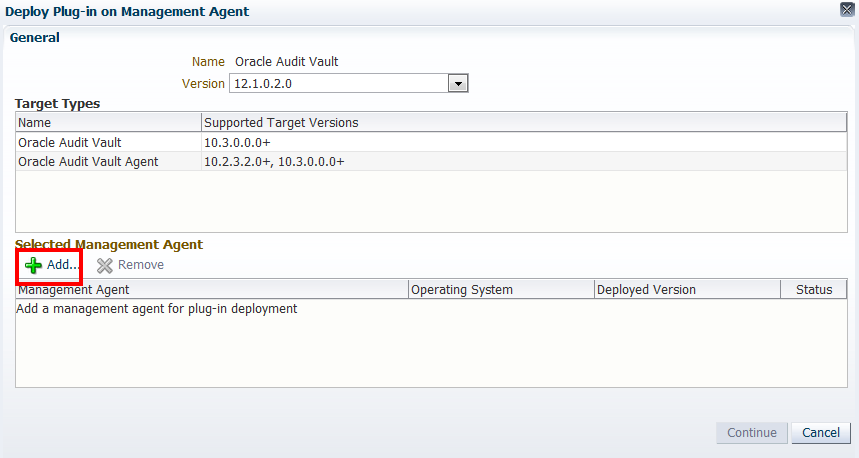
Click Add to add the Management Agent where the plug-in will be deployed, as shown below.
-
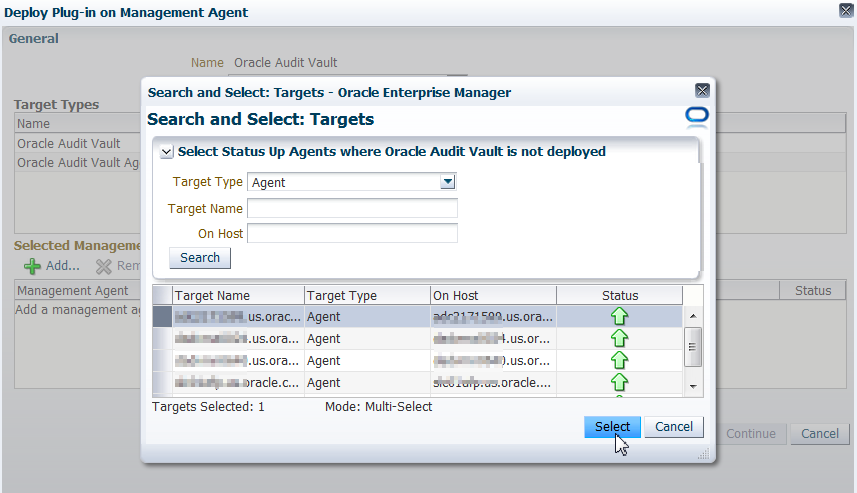
Choose the required agent and click Select.
You can select multiple agents in a single window.
-
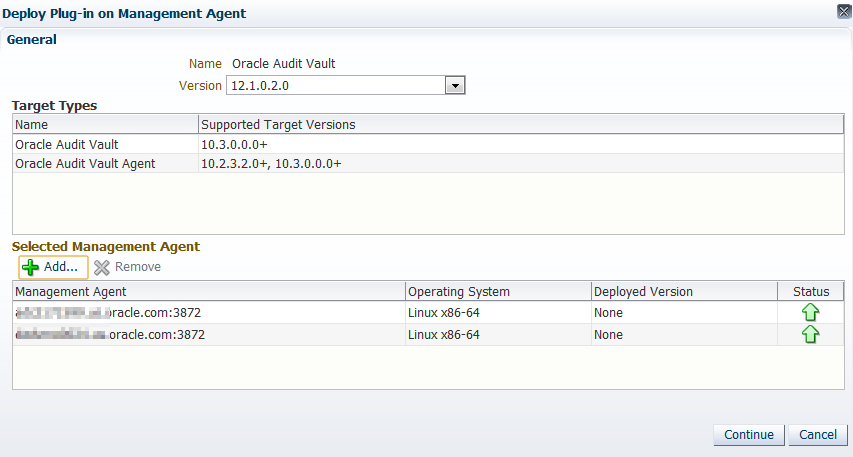
Click Continue, as shown below.
-
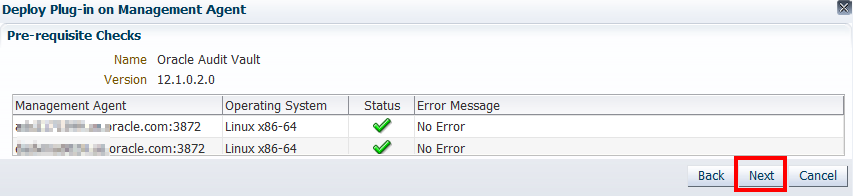
Run the plug-in upgrade prerequisites checks and click Next, as shown below.
-
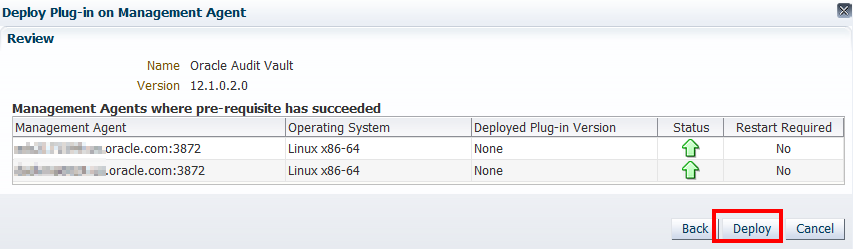
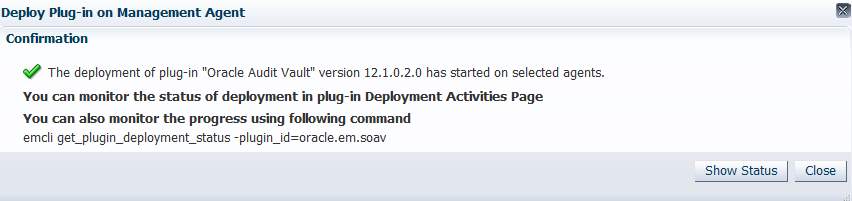
Click Deploy on the Review page to deploy the plug-in on the Agents.
You can monitor the plug-in deployment by clicking Show Status.
Make sure that the plug-ins are deployed successfully before moving forward.

2.5.2 Deploying a Plug-in in Offline Mode on a Management Agent
As plug-ins are readily available from the plug-in deployment to OMS, you can directly deploy the plug-ins to the agents. To deploy a plug-in in offline mode on a management agent, complete the following:
-
From the Setup menu, select Extensibility, then select Plug-ins
-
R ight-click the plug-in, select Deploy On, then select Management Agent to deploy the plug-in on the Management Agent.
-
Complete the remaining steps as described in Section 2.5.1, "Deploying a Plug-in in Online Mode on a Management Agent".
2.6 Upgrading BI Publisher Reports Shipped with the Plug-ins
This section provides detailed information on the steps needed to upgrade the Oracle Business Intelligence Publisher (BI Publisher) reports that shipped with the plug-ins. However, you should only run these steps if BI Publisher was previously installed and configured to work with Oracle Enterprise Manager Cloud Control 12c.
If BI Publisher is not installed and configured, this step will occur automatically when BI Publisher is configured at a later time.
To upgrade the BI Publisher reports, complete the following:
-
Start the BI Publisher Managed Server named "BIP".
-
Navigate to <MIDDLEWARE_HOME>/oms/bin
-
Run the following commands at the command line of the account that owns the Middleware Home:
emcli login -username=sysman
Enter the SYSMAN password at the prompt (the prompt will not echo).
emcli sync
emcli deploy_bipublisher_reports -force
It is very important that you use the "
-force" option, otherwise the reports will not be updated.You should receive confirmation of success. The message, which will be in your native language, will translate to the following in English:
The Enterprise Manager Oracle-provided Reports have been deployed to the Enterprise Manager Shared folder "Enterprise Manager Cloud Control" on the previously registered BI Publisher "http[s]://{biphost}:{bipport}/xmlpserver".
2.7 Upgrading ADP and JVMD (Optional)
This section provide detailed instructions on upgrading Application Dependency and Performance (ADP) and JVM Diagnostics (JVMD). The instructions provided are valid for the following conditions only:
-
You already have ADP or JVMD installed.
-
You have updated both Oracle Management Service and Management Agent on the target servers to the 12.1.0.2 release of the Oracle Fusion Middleware Plug-in.
Note:
The following instructions supersede any other instructions on ADP or JVMD patching contained in the OMS Patch (13242773) README document.2.7.1 Upgrading Application Dependency and Performance
To upgrade ADP, complete the following:
-
Unzip the
ADPManager.ziparchive, which is in the following location:$MIDDLEWARE_HOME/plugins/oracle.sysman.emas.oms.plugin_12.1.0.2.0/archives/ocamm/
This will create a folder called
ADPManager.earwithin the same directory. -
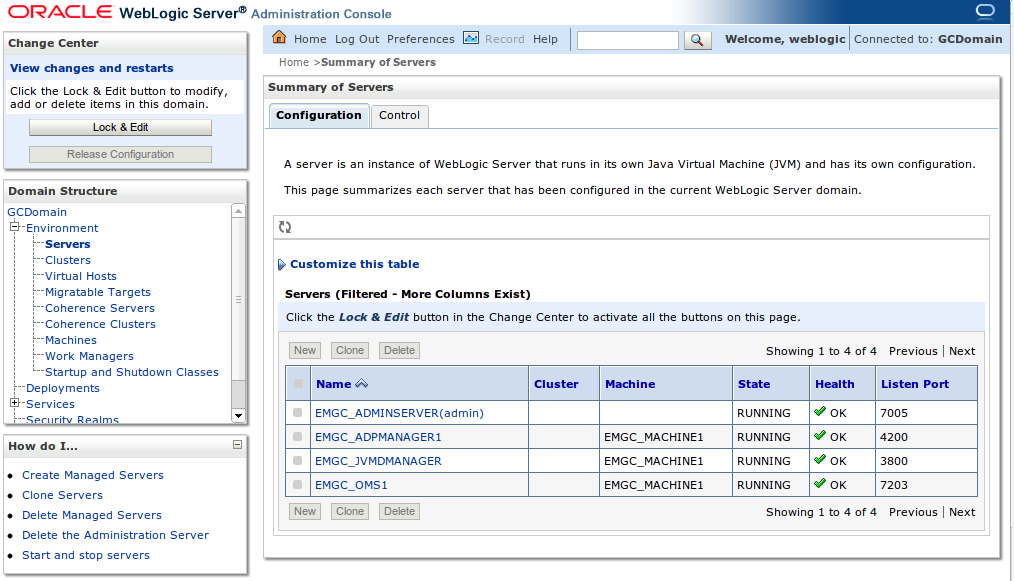
Log in to the Oracle WebLogic Server Administration Console of the EMGC Domain and click Servers.
-
Locate all deployed ADP Managers.
These will be managed servers that contain "EMGC_ADPMANAGER" in the server name. For example, "EMGC_ADPMANAGER1". Perform the steps below for each ADP Manager. For illustration purposes, the server name "EMGC_ADPMANAGER1" is used.
-
Shut down EMGC_ADPMANAGER1 using the Oracle WebLogic Server Administration Console.
-
Use the
mvcommand to rename the existingADPManager.earfolder in the EMGC_ADPMANAGER1directory toADPManager.ear_12cc01978:mv $MIDDLEWARE_HOME/gc_inst/user_projects/domains/GCDomain/EMGC_ADPMANAGER1/ADPManager.ear $MIDDLEWARE_HOME/gc_inst/user_projects/domains/GCDomain/EMGC_ADPMANAGER1/ADPManager.ear_12cc01978
-
Use the
mvcommand to move theADPManager.earfolder you created to EMGC_ADPMANAGER1:mv $MIDDLEWARE_HOME/plugins/oracle.sysman.emas.oms.plugin_12.1.0.2.0/archives/ocamm/ADPManager.ear $MIDDLEWARE_HOME/gc_inst/user_projects/domains/GCDomain/EMGC_ADPMANAGER1/
-
Change directory to the config directory under the
ADPManager.ear_12cc01978folder using the following command:cd $MIDDLEWARE_HOME/gc_inst/user_projects/domains/GCDomain/EMGC_ADPMANAGER1/ADPManager.ear_12cc01978/ADPManager.war/config/
-
Copy the
Acsera.propertiesfile as shown in the following command:Note:
If you have previously installed but never started the ADP manager, then the listed configuration files will not exist. In this case, you can safely skip steps 8 and 9.cp -f configuration.xml Acsera.properties key $MIDDLEWARE_HOME/gc_inst/user_projects/domains/GCDomain/EMGC_ADPMANAGER1/ADPManager.ear/ADPManager.war/config/
-
Add the following properties at the end of the
Acsera.propertiesfiles you just copied:JMXContainer.DisableComputeClassPaths = true DeployerClient.CoreJAgentJars=lib/bcel.jar; lib/com.oracle.diagnostics.instrumentor_1.8.0.0-try-03.jar; lib/jManagement Agent1.5.jar DeployerClient.WLDFJar=com.oracle.diagnostics.instrumentor_1.8.0.0-try-03.jar
-
Start ADP Manager using the Oracle WebLogic Server Administration Console.
-
Redeploy all ADP Agents on the previously configured target servers.
Note that you will essentially redeploy the Management Agents on top of the original Management Agents. For instructions, see the following:
http://docs.oracle.com/cd/E24628_01/install.121/e22624/adp_installation.htm#CJHFFADD
-
Restart the target servers.

2.7.2 Upgrading JVM Diagnostics
Note:
Before you begin upgrading JVM Diagnostics, ensure that you delete the existing JVM pool targets. To do so, log in to Enterprise Manager Cloud Console, and from Targets menu, select Middleware. On the Middleware page, select all the targets of type Java Virtual Machine Pool one by and one, and click Remove.To upgrade JVMD, complete the following:
-
Unzip the
jvmd.ziparchive, which is in the following location:$MIDDLEWARE_HOME/plugins/oracle.sysman.emas.oms.plugin_12.1.0.2.0/archives/jvmd/
This will create a set of files in the same directory, including
jammanager.ear. -
Log in to the Oracle WebLogic Server Administration Console of the EMGC Domain and click Servers.
-
Locate all deployed JVMD Managers.
These will be managed servers that contain "EMGC_JVMDMANAGER" in the server name, such as "EMGC_JVMDMANAGER1". For each JVMD Manager, perform the steps below. For illustration purposes, the server name "EMGC_JVMDMANAGER1" will be used.
-
Start EMGC_JVMDMANAGER1, if it is not already running.
-
Click Lock & Edit in the Change Center on the Oracle WebLogic Server Administration Console.
-
Select Deployments, then click the checkbox for Enterprise Application for a JVMD Manager.
For example: jammanagerEMGC_JVMDMANAGER1
-
Click Update.
-
Note the source path to the existing
jammanager.ear.For example:
$MIDDLEWARE_HOME/gc_inst/user_projects/domains/GCDomain/servers/EMGC_ADMINSERVER/upload/jammanagerEMGC_JVMDMANAGER1/app/jammanager.ear
-
At the source path you noted in the previous step replace the existing jammanager.ear with the jammanager.ear from the following location:
$MIDDLEWARE_HOME/plugins/oracle.sysman.emas.oms.plugin_12.1.0.2.0/archives/jvmd/
-
Click Next to complete the update.
-
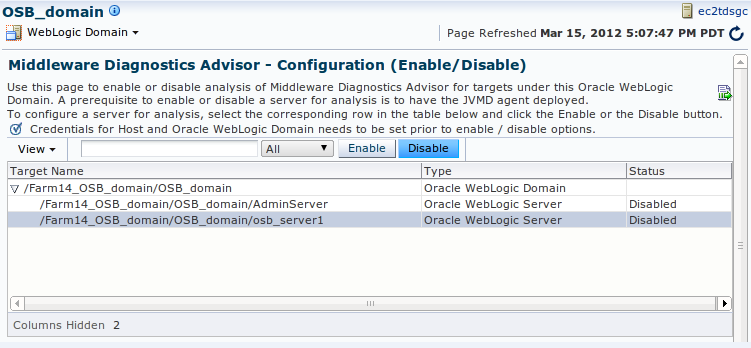
If you have Middleware Diagnostics Advisor (MDA) enabled, complete the following to disable it for every Oracle WebLogic Domain and Oracle WebLogic Server target it has been enabled for:
-
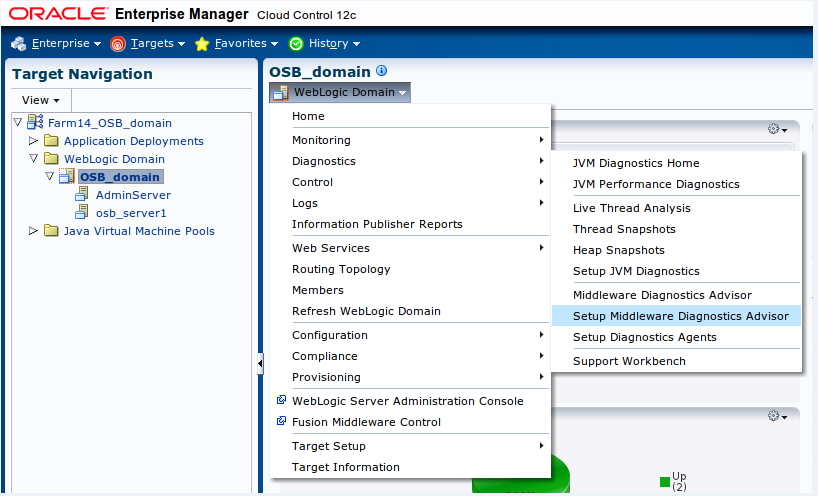
In Cloud Control, navigate to the target home page for a WebLogic Server domain.
-
From the WebLogic Domain menu, select Diagnostics, then select Setup Middleware Diagnostics Advisor.
-
Select each target that MDA has been enabled for, then click Disable, as shown below.
-
-
Undeploy existing JVMD Management Agents from the target server.
Management Agents will usually have names such as javadiagnosticManagement Agent_ServerName.
-
Remove the corresponding Java Virtual Machine targets using Enterprise Manager Cloud Control:
-
From the Targets menu, select Middleware.
-
Locate the Java Virtual Machine targets that correspond to the JVMD Management Agents you undeployed.
-
Select each Java Virtual Machine target in the table, then click Remove.
-
-
Redeploy all JVMD Management Agents.
For more information, see the following:
http://docs.oracle.com/cd/E24628_01/install.121/e22624/jvmd_installation.htm#CHDCFFGC
-
After all JVMD Management Agents have been redeployed, return to the Middleware Diagnostics Advisor Configuration page and re-enable MDA for each target it was previously enabled for.