1 Overview of Bundle Patch 1
This chapter provides an introduction to Bundle Patch 1 (BP1) and the prerequisites for installation. It contains the following sections:
1.1 Overview
This document provides step by step instructions for applying Bundle Patch 1 (BP1) in to your existing Enterprise Manager Cloud Control 12.1.0.1 installation. Note BP1 is not an Enterprise Manager patch set release, and therefore does not change the Enterprise Manager version to 12.1.0.2.
1.2 Use Cases and Recommendations
The following sections provide recommendations on how to use BP1 under different use case scenarios. The scenarios are detailed under the following headings:
1.2.1 General Use Case Recommendations
General use cases and recommendations on the installation of BP1 are outlined in Table 1-1.
Table 1-1 General Use Case Recommendations
| Use Case | Recommendation |
|---|---|
|
If you are new to Enterprise Manager |
You will need to retrieve the new Enterprise Manager 12c binaries from the Oracle Technology Network (OTN) and carry out a fresh install. The installation should include BP1 and the latest plug-in releases. |
|
Using Enterprise Manager Cloud Control 12.1.0.1 release in a non-production test or sandbox environment |
You should analyze how much configuration setup you have done in Enterprise Manager and the number of Management Agents you have deployed. Based on this analysis, you should uninstall the existing Cloud Control and do a fresh installation if this is feasible This also means that you have to reinstall all your existing Management Agents. This is the simplest way to get to the benefits and features of the latest patched Cloud Control release, which includes BP1 and the latest plug-in releases. The Enterprise Manager uninstall instructions are available at the following location: http://docs.oracle.com/cd/E24628_01/install.121/e24089/part_deinstall_em.htm#sthref642 You can get the updated Enterprise Manager binaries with BP1 from the following location: http://www.oracle.com/technetwork/oem/enterprise-manager/downloads/index.html?origref=http://www.oracle.com/technetwork/index.html |
|
If you have already downloaded and installed 12.1.0.1 release in a Production environment |
If you have already downloaded and installed Enterprise Manager 12c Release 12.1.0.1 in a production environment, complete the following steps Skipping steps could result in potential issues. Oracle recommends that you open a proactive service request.
If you have additional OMS instances or a disaster recovery configuration, then follow the BP1 application instructions detailed in Section 2.1, "Applying Bundle Patch 1 on Oracle Management Service". |
1.2.2 Upgrading to the Current Release
Use cases and recommendations related to upgrading from an Enterprise Manager Grid Control Release 10.2.0.5 or 11.1.0.1 are discussed in Table 1-2.
Table 1-2 Upgrading to the Current Release
| Use Case | Recommendation |
|---|---|
|
Upgrading to the current release |
You can upgrade directly from Enterprise Manager Grid Control 10.2.0.5 or 11.1.0.1 releases to the current release with BP1 included by completing the following:
|
|
If you have applied the pre-upgrade console patch, but have not upgraded Management Agent or OMS |
If you have just applied the pre-upgrade console patch, but have not yet gone ahead with Management Agent or OMS upgrade, complete the following steps:
The new version of the pre-upgrade console patch will only work with EM12c binaries (with BP1 included) and Management Agent 12.1.0.1 binaries. To ensure that you get the latest patch from OTN, refer to the last updated date on the OTN download page. Follow the Instructions provided in the Upgrade Guide from here: |
|
If you have applied the pre-upgrade console patch and upgraded the Management Agent or OMS |
In this case you should finish your upgrade to Enterprise Manager 12c and complete the following instructions in the specified order :
Oracle recommends that you open a proactive Service Request (SR) with Oracle Support. |
1.2.3 Performing an Additional OMS Installation
Use cases and recommendations related to performing an additional OMS installation are discussed in Table 1-3.
Table 1-3 Performing an Additional OMS Installation
| Use Case | Recommendation |
|---|---|
|
If your first OMS is deployed with new Enterprise Manager binaries with BP1 included or if you have applied the BP1 manually |
You can proceed with the additional OMS installations. The deployment procedure will clone the first OMS, so there will be no need to apply BP1 on the second OMS once the install is done. As a part of the additional OMS installation, you will be required to deploy the Management Agent on the host where you plan to have the additional OMS. Get the latest Management Agent binaries from the Self Update feature, which have BP1 included for Management Agent deployment. |
|
If your first OMS has not been updated with the new Enterprise Manager binaries, or if you have not applied the BP1 manually to the OMS |
Select one of the following two options: Option 1:
Option 2:
|
1.3 Bundle Patch 1 Compatibility Matrix
Refer to Table 1-4, "Bundle Patch 1 Compatibility Matrix" to understand the valid patches and version combinations of OMS, plug-ins, and Management Agents.
Table 1-4 Bundle Patch 1 Compatibility Matrix
|
Target Agent without Bundle Patch 1 applied and 12.1.0.1 plug-in on target Management Agent |
Target Agent with BP1 and 12.1.0.1 plug-in on target Management Agent |
Target Agent without BP1 and 12.1.0.2 plug-in on target Management Agent |
Target Agent with BP1 applied and 12.1.0.2 plug-in on target Management Agent |
|
|
12.1.0.1 OMS without BP1 applied |
Yes |
No |
No |
No |
|
12.1.0.1 OMS with BP1 Applied and 12.1.0.1 plug-in on OMS (no plug-in upgrade) |
Yes |
Yes |
No |
No |
|
12.1.0.1 OMS with BP1 applied and 12.1.0.2 plug-in on OMS (plug-in upgrade done) |
YesFoot 1 |
Yes |
No |
YesFoot 2 |
Footnote 1 An example for this use case is that you have Solaris Management Agents without BP1 applied, 12.1.0.1 plug-ins on agents pointing to Linux 32-bit OMS with BP1 applied, and 12.1.0.2 plug-ins on the OMS.
Footnote 2 This is a fresh install of Enterprise Manager 12c binaries with BP1 included.
1.4 Mandatory Pre-Requisites for installing Bundle Patch 1
The following are the mandatory prerequisites for installing BP1:
-
Software Library Configured.
-
All Enterprise Manager components backed up.
-
The Agent Patching Infrastructure set up correctly (differs for offline versus online modes).
-
The My Oracle Support (MOS) connection configured for Management Agent patching or the download of patches from MOS and upload to Enterprise Manager.
Make sure that you go through all of the prerequisites described in the following sections before applying Bundle Patch 1.
1.4.1 Oracle Software Library Configured
You need to verify whether you already have the Software Library configured. If not, complete the following:
-
From the Enterprise menu, select Provisioning and Patching, then click Software Library.
-
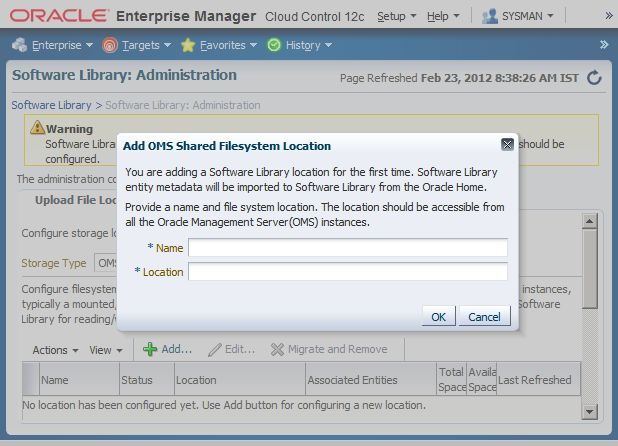
From the Actions list, select Administration, then select Add if nothing has yet been configured.
-
Select the OMS Shared Filesystem location.
Note:
This is a location on a shared filesystem that is visible to all OMS instances. For example, this could be an NFS mounted location and should have read/write access from all of the OMS instances.Upon addition of the location, a job executes to configure the Software Library. Under this location, all required entities for Enterprise Manager, such as Provisioning, Patching, and Cloud Management, are populated.
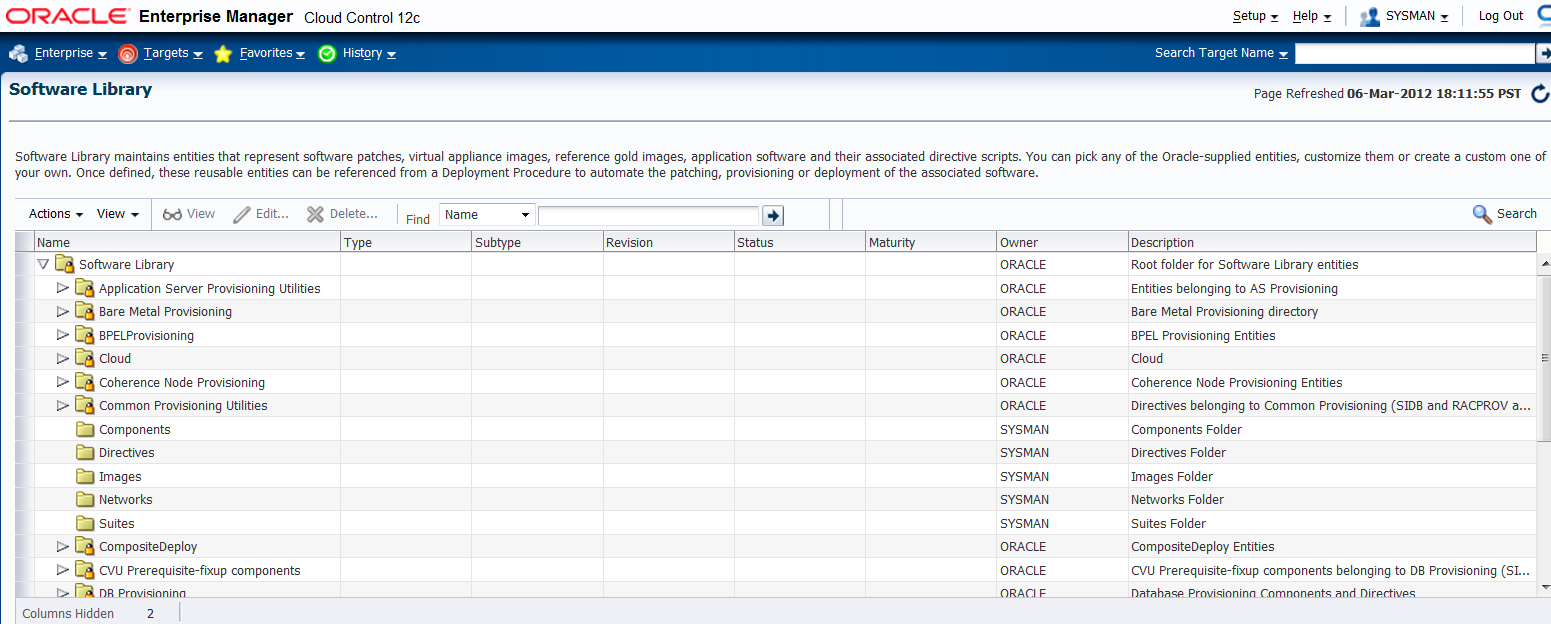
Once the job is successful, you will see the components configured in the Software Library.
-
From the Enterprise Manager menu, select Patching and Provisioning, then click Software Library to view the Software Library.
1.4.2 Backing Up Enterprise Manager Components
Before you apply BP1, be sure that you back up the following components:
-
Oracle Inventory
-
Management Repository Database
-
Middleware Home and Enterprise Manager domains
-
Instance Home where OMS is installed
-
Default Management Agent with OMS
-
Software Library
You must back up all components listed above. A failure during any stage of the BP1 process may make it necessary to restore one or more of these components.
For more information, see the Backing Up Enterprise Manager chapter in the Oracle Enterprise Manager Cloud Control Administrator's Guide. This can be found at the following location:
http://docs.oracle.com/cd/E24628_01/doc.121/e24473/ha_backup_recover.htm#BGBCCIJC
1.4.3 Using the Correct OPatch Version
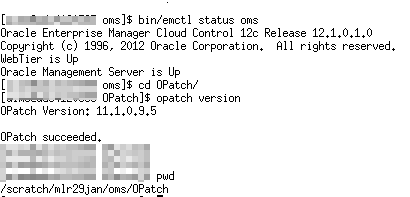
Verify you have the right OPatch version under the OMS Oracle Home. The OPatch version required to install BP1 is 11.1.0.9.4 or higher.
Set ORACLE_HOME to OMS HOME and run the following command to verify the OPatch version:
$ opatch version
If the OPatch version is less than 11.1.0.9.4, complete the following:
-
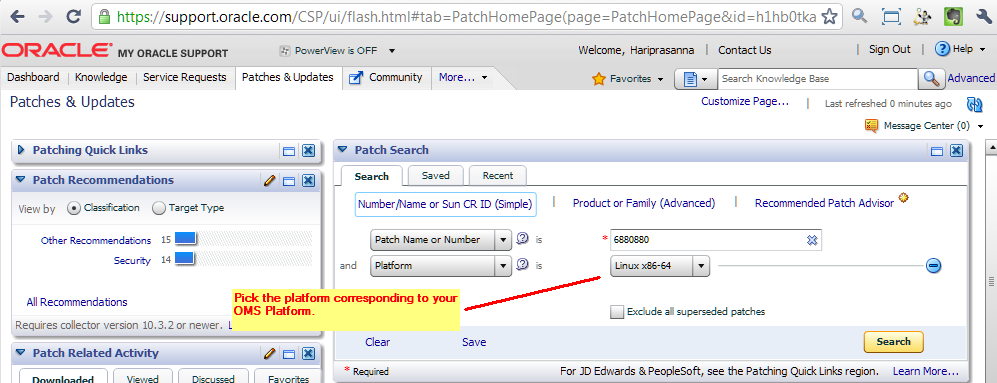
Download the latest OPatch patch (6880880) under release 11.1.0.x series from My Oracle Support (
https://support.oracle.com).The Patch Number is 6880880. Select the platform that corresponds to your OMS platform.
-
Click Search.
-
Select the Opatch 11.1.0.0.0 version and click Download.
Note:
Do not select OPatch 11.2.0.x as this will result in failures during patch application. -
Transfer the zip to the OMS Server.
-
Rename the existing OPatch folder under the OMS ORACLE HOME to OPatch_old_MMYY
-
Unzip the new Opatch patch zip under the OMS ORACLE HOME.
This creates an Opatch directory with the latest Opatch.

1.5 Troubleshooting
To learn more about troubleshooting tips and a list of known issues while applying Bundle Patch 1, refer to My Oracle Support note 1395640.1 at the following location:
https://support.oracle.com/CSP/main/article?cmd=show&type=NOT&doctype=REFERENCE&id=1395640.1