Oracle® Enterprise Manager
System Monitoring Plug-in for Oracle Enterprise Manager Ops Center Guide
12c Release 5 (12.1.0.5.0)
E38529-08
April 2016
This document describes how to use the Infrastructure Stack plug-in to connect the monitoring capabilities of Oracle Enterprise Manager Cloud Control and Oracle Enterprise Manager Ops Center.
The following topics are discussed in this document:
Introduction
Oracle Enterprise Manager Cloud Control and Oracle Enterprise Manager Ops Center are complementary technologies that are designed to provide an enterprise-level data center management solution for all levels, from applications to storage disks.
As shown in Figure 1-1, Oracle Enterprise Manager Cloud Control software enables businesses to improve application, middleware, database, and operating system performance. Oracle Enterprise Manager Ops Center software enables businesses to manage the operating systems, virtual machines, servers, and storage devices.
The plug-in module extends the Oracle Enterprise Manager Cloud Control monitoring features to include hardware-based events from Oracle Enterprise Manager Ops Center, including:
-
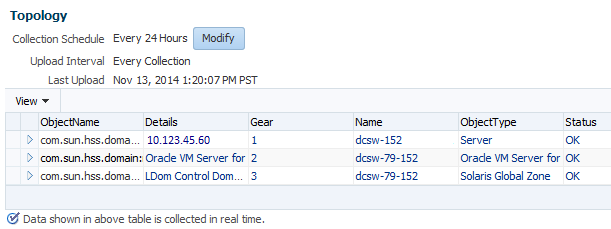
Topology view of assets. All Metrics shows the various layers of the topology, including zones and logical domains, as shown in Figure 1-2. For example, if you have an agent on a zone within a logical domain, the topology details all of the components.
-
Service processors.
-
Server containers (chassis).
-
Oracle SPARC Enterprise M-series server domains.
Note:
This plug-in only passes hardware-based events from Enterprise Manager Ops Center to Enterprise Manager Cloud Control. The EM host agent is responsible for gathering OS level data.
The plug-in module extends the Oracle Enterprise Manager Cloud Control monitoring features to include the additional infrastructure layers below the operating system that are provided by Oracle Enterprise Manager Ops Center, including:
-
Virtual assets, including Oracle Solaris Zones and Oracle Solaris VM Server for SPARC domains and guests
-
Service processors
-
Server containers (chassis)
-
Oracle SPARC Enterprise M3000/M4000/M5000/M8000/M9000 Server domains
To enable data to flow between the two applications, you must configure each application separately, then complete the connection.
Figure 1-3 Overview of Tasks to Deploy and Configure the Plug-in

Description of "Figure 1-3 Overview of Tasks to Deploy and Configure the Plug-in"
When you configure Oracle Enterprise Manager Ops Center and Oracle Enterprise Manager Cloud Control applications to work together, the monitoring information is shared between both applications. Each user interface includes information about resources that the other application manages. Because each application provides operating system monitoring, operating system information is not shared between the applications.
Note:
To collect metric information, you must discover and manage the hardware and operating system in Enterprise Manager Ops Center. You can manage the operating system with or without an Ops Center agent.
When you do not manage the operating system, the infrastructure stack is not fully defined. The infrastructure stack is created, but the software does not collect metrics.
Requirements
This section describes what is needed to enable monitoring of the infrastructure stack:
Supported Versions
The supported version of the plug-in is determined by the Oracle Enterprise Manager Cloud Control version. Beginning with Cloud Control 12c Release 1 (12.1.0.1.0), the Ops Center Infrastructure Stack 12c plug-in is available in the Oracle Enterprise Manager Store.
Each row in Table 1-1 is a supported combination of Oracle Enterprise Manager Cloud Control and Ops Center software and the required infrastructure plug-in.
Table 1-1 Supported Infrastructure Plug-in
| Oracle Enterprise Manager Cloud Control | Oracle Enterprise Manager Ops Center | Infrastructure Plug-in |
|---|---|---|
|
Cloud Control 12c (12.1.0.4 and 12.1.0.5) |
Ops Center 12c Release 2 and Release 3 |
The latest Ops Center infrastructure stack 12c plug-in from the Oracle Enterprise Manager Store. |
|
Cloud Control 12c (12.1.0.3) |
Ops Center 12c Release 1 (12.1.0.0.0 - 12.1.4.0.0) |
The latest Ops Center infrastructure stack 12c plug-in from the Oracle Enterprise Manager Store. |
|
Cloud Control 12c (12.1.0.2) |
Ops Center 12c Release 1 (12.1.0.0.0 - 12.1.3.0.0) |
The latest Ops Center infrastructure stack 12c plug-in from the Oracle Enterprise Manager Store. |
|
Cloud Control 12c (12.1.0.1) |
Ops Center 11g Release 1 (all update releases) |
The latest Ops Center infrastructure stack 12c plug-in from the Oracle Enterprise Manager Store. |
|
Grid Control 11g Release 1 (11.1.0.1.0) |
Ops Center 12c Release 1 |
ocas_plugin-2.x.jar |
|
Grid Control 11g Release 1 (11.1.0.1.0) |
Ops Center 11g Release 1 |
ocas_plugin-2.x.jar |
|
Grid Control 10g Release 2 (10.2.0.5.0) |
Ops Center 11g Release 1 |
ocas_plugin-2.x.jar |
Note:
Releases earlier than Oracle Enterprise Manager Ops Center 11g Release 1, Update 3 (11.1.3.0.0) cannot display repository data from the Oracle Enterprise Manager 12c database.
To connect Oracle Enterprise Manager Grid Control 10g Release 2 (10.2.0.5.0) with Ops Center 2.5, you must use the connector instead of the plug-in.
Prerequisites
Perform the following tasks before deploying the plug-in:
-
Install and configure Oracle Enterprise Manager Cloud Control Server.
Deploy Oracle Enterprise Manager Cloud Control Agents on the systems to be monitored. The plug-in uses the Java version that is bundled with the Oracle Management Agent.
-
Install and configure Oracle Enterprise Manager Ops Center Enterprise Controller and Proxy Controller.
Note:
Do not install Oracle Enterprise Manager Cloud Control and Oracle Enterprise Manager Ops Center on the same system due to resource constraints.
-
Discover and manage the hardware and operating systems in Oracle Enterprise Manager Ops Center to deploy the Oracle Enterprise Manager Ops Center agents on the systems to be monitored.
If you a use a WS-MAN/JMX HTTP proxy, you can use an existing HTTP proxy that the Oracle Management Agent uses, or you can configure a new proxy to access the Oracle Enterprise Manager Ops Center Enterprise Controller.
Additional sub-requirements for proper operation of the plug-in are met if the Enterprise Manager Cloud Control and Ops Center software are installed as documented.
User Requirements
The SYSMAN user is required to deploy the plug-in and view the asset information collected by the Oracle Enterprise Manager Ops Center software in the Oracle Enterprise Manager Cloud Control console.
A new user in Oracle Enterprise Manager Ops Center is required for Oracle Enterprise Manager Cloud Control integration. This user does not require any roles or permissions.
Get and Deploy the Plug-in
Complete the following tasks to obtain and deploy the plug-in:
The Oracle Enterprise Manager Store is an external site that contains functional updates, including the latest version of the management plug-in files. Enterprise Manager Cloud Control checks the site periodically to provide you with the latest version. You can download the plug-in from the Oracle Enterprise Manager Store to the Software Library (the local store).
Note:
Enterprise Manager must have Internet access to download the plug-in from the Oracle Enterprise Manager Store.
Things to Know
The following are things you should know before you deploy the plug-in:
-
You can import multiple versions of the same plug-in. However, you can only deploy one version on the Oracle Management Service (OMS) at any given time.
-
The Management Agent can have the same or earlier version of the plug-in that is deployed on the OMS host.
-
The Management Agent cannot have a later version than the version that is on the OMS host.
-
The Management Repository SYSMAN user password is required to complete the deployment process.
Download the Plug-in From the Enterprise Manager Store
This procedure assumes that you are connected to the Internet and describes how to download the plug-in immediately. Alternatively, you can choose to schedule the download to occur at a specified time.
Deploy the Plug-in to the Management Server
The Management Repository SYSMAN user password is required to complete the deployment process.
Add Targets for Monitoring
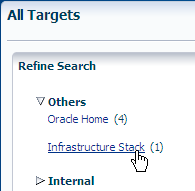
You must associate the Infrastructure Stack plug-in to existing Oracle Enterprise Manager Cloud Control Agents to enable cross-software monitoring.
-
Log in to Oracle Enterprise Manager Cloud Control as SYSMAN.
-
From the Setup menu, click Add Target, then click Add Targets Manually.
-
Select Add Targets Declaratively by Specifying Target Monitoring Properties, then select the Infrastructure Stack target type, browse and select a Monitoring Agent, then click Add Manually.
-
Complete the following information:
-
Target Name: The unique target name that appears in the Oracle Enterprise Manager Cloud Control UI.
-
Ops Center Enterprise Controller Host Name: The host name for the Oracle Enterprise Manager Ops Center Enterprise Controller. The host name must be resolvable by, and reachable from, the host where the Enterprise Manager Cloud Control Agent is running.
-
Ops Center Enterprise Controller User Name: The user log in name for the Oracle Enterprise Manager Ops Center Enterprise Controller.
-
Ops Center Enterprise Controller Password: The corresponding password for the Oracle Enterprise Manager Ops Center user.
-
Optionally, add the WS-MAN/JMX proxy host name and port.
Figure 1-4 Add Infrastructure Stack to New Targets

Description of "Figure 1-4 Add Infrastructure Stack to New Targets" -
-
Click OK to add the new target.
Configure the Connection
After the plug-in is deployed and configured in Enterprise Manager Cloud Control, you must configure the Enterprise Controller to communicate with the Enterprise Manager Cloud Control repository. The connection enables target information from Enterprise Manager Cloud Control to appear in the Enterprise Manager Ops Center user interface.
Note:
Ensure that you enter the correct Enterprise Manager Cloud Control server name, port, and database details. The database must be the database that is connected to the specified Enterprise Manager Cloud Control console.
- Launch the Oracle Enterprise Manager Ops Center software and log in as an Administrative user.
- Expand the Administration section in the Navigation pane, then click Cloud Control.
- Click Configure/Connect in the Actions pane.
- Enter the server name and port number for the Oracle Enterprise Manager Cloud Control console. The default port is 7799.
- Enter the Oracle Enterprise Manager Cloud Control database host name, port number, SID (Oracle System ID), SYSMAN user name and password for the Enterprise Manager Cloud Control instance. The default port is 1521.
- Click Finish.
Enable Monitoring
In Enterprise Manager Cloud Control, monitoring is disabled by default. You must enable monitoring for each target.
Verify and Validate the Plug-in
In Oracle Enterprise Manager Cloud Control, you can launch the Oracle Enterprise Manager Ops Center home page from the Infrastructure Stack target home page. If correctly configured, the page appears for the operating system that is associated with the target.
After waiting a few minutes for the plug-in to start collecting data, use the following steps to verify and validate that Enterprise Manager is properly monitoring the plug-in target:
About Events, Alerts, Problems, and Incidents
Basic information gathered by both applications is accessible from both user consoles. For more detailed information, go to the software console that gathered the information.
What is an Event or Alert?
An event, or alert, is a discrete occurrence detected by Enterprise Manager related to one or more managed entities at a particular point in time which may indicate normal or problematic behavior. Examples of events include: database target going down, performance threshold violation, change in application configuration files, successful completion of job execution, or job failure. An alarm can have one or more alerts. The alert determines the alarm severity.
Enterprise Manager 11g generated alerts for exception conditions (metric alerts). Beginning with Enterprise Manager 12c Release 1, metric alerts are a type of event, one of many different event types. The revised event model significantly raises the number of conditions in an IT infrastructure for which Enterprise Manager can detect and raise events.
Where to View Alarms?
An alarm can have one or more alerts. Only the latest open Enterprise Manager Ops Center alert appears in Enterprise Manager Cloud Control. The Ops Center Root Cause ID is the identifier for the latest alert. If another alert appears, the previous alert and associated ID are no longer visible in the UI.
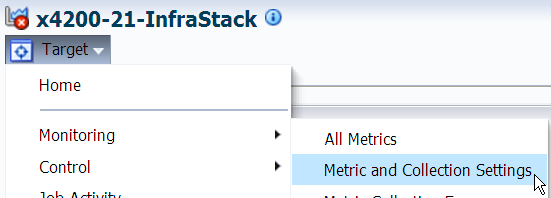
To view the alarm metrics from Enterprise Manager Ops Center for a system, select the system, then go to the All Metrics page. The alarm metrics appear in the Infrastructure Stack Alarms page, as shown in Figure 1-11.
Alarm metrics from Enterprise Manager Ops Center 12c Release 1 Update 3 and earlier appear in the Deprecated page under All Metrics, as shown in Figure 1-12.
Figure 1-12 Alarms in Deprecated Section of All Metrics

Description of "Figure 1-12 Alarms in Deprecated Section of All Metrics"
See Related Resources for links to the Oracle Enterprise Manager Ops Center documentation to learn more about Enterprise Manager Ops Center alarms, states, and severity levels.
What is an Incident or Problem?
An incident is an event or a set of closely correlated events that requires immediate action to resolve. A problem is defined as a less critical set of events. When an alarm reaches a Critical or Warning severity, the software generates an incident. The incident is based on the current severity level, not the highest severity level.
In Oracle Enterprise Manager Ops Center 12c, events are associated with Informational, Warning, or Critical incidents. A critical incident in Oracle Enterprise Manager Ops Center equals an incident in Oracle Enterprise Manager Cloud Control. Earlier versions of Oracle Enterprise Manager Ops Center use the term problem instead of incident.
Table 1-2 shows the relationship of the terms between the applications and releases.
Table 1-2 Incident Terminology
| Oracle Enterprise Manager Cloud Control 12c | Oracle Enterprise Manager Ops Center 12c | Oracle Enterprise Manager Ops Control 11g Update 3 |
|---|---|---|
|
Incident |
Critical Incident |
Critical Problem |
|
Problem |
Warning Incident |
Warning Problem |
|
Problem |
Informational Incident |
Informational Problem |
From the Oracle Enterprise Manager Ops Center user interface, you can launch the Oracle Enterprise Manager Cloud Control console while viewing a specific asset that is being monitored by both applications. You can also launch the console from the Administration section in the Oracle Enterprise Manager Ops Center user interface.
What are Annotations?
Annotations are comments, suggestions, or automated operations with associated scripts that you can use to document an incident in Ops Center. Annotations might include the Oracle Auto Service Request (ASR) number.
Instead of manually filing a service request, you can configure Enterprise Manager Ops Center to automatically create service requests for known issues. When ASR is enabled in Enterprise Manager Ops Center, the software automatically generates service requests based on critical incidents. Contact information for the ASR is taken either from Enterprise Manager Ops Center or from the Customer Service Identifier (CSI) associated with the asset. Annotations are added to the incident to indicate the status of the ASR creation. Once created, ASRs are identical to other service requests.
View Incidents, Problems and Annotations
In Oracle Enterprise Manager Cloud Control, use the Incident Manager Console to view, manage, diagnose and resolve incidents.
In Oracle Enterprise Manager Ops Center, use the Message Center to view and add annotations and to view, manage, diagnose and resolve incidents.
Only Critical incidents or problems from Oracle Enterprise Manager Ops Center appear in the Oracle Enterprise Manager Cloud Control console. Warning incidents from Oracle Enterprise Manager Ops Center do not appear as an incident.
In Oracle Enterprise Manager Cloud Control, you can create a custom set of Incident Rules that defines which Incident Rule levels display in the metric alerts.
View Annotations in Oracle Enterprise Manager Cloud Control
When you add an annotation to an Incident in Ops Center, the software automatically updates the annotation details in the Cloud Control user interface. For a given system, go to All Metrics, then select Infrastructure Stack Annotations, as shown in Figure 1-14.
The following Infrastructure Stack annotation details are available: Ops Center Annotation identifier (ID), timestamp for the Annotation Last Update Time, Annotation Synopsis with the Automated Service Request (ASR) number, when available, the Ops Center Alarm identifier (ID), and the Ops Center Root Cause Alarm ID. Figure 1-15 is an example of how the Ops Center Annotation ID, Annotation timestamp, and Annotation Synopsis appear on the page. The Annotation ID is a unique key for the metric. When a service request is generated, the details appear in the Annotation Synopsis, as seen in the last line in Figure 1-15.
Figure 1-15 Infrastructure Stack Annotations

Description of "Figure 1-15 Infrastructure Stack Annotations"
See the Oracle Enterprise Manager Ops Center documentation for more information about annotations.
Launch a Console Window
An asset, or target, that is being monitored by both applications has information from both software applications.You can launch the console for one software application from the other software console.
Launch the Enterprise Manager Ops Center Console From Enterprise Manager Cloud Control
While in Oracle Enterprise Manager Ops Center, you can view more details about the information gathered with Oracle Enterprise Manager Cloud Control by clicking the asset to launch the monitored target page in Oracle Enterprise Manager Cloud Control.
Perform the following steps to launch the Oracle Enterprise Manager Ops Center console from Oracle Enterprise Manager Cloud Control:
- Log in to Oracle Enterprise Manager Cloud Control as SYSMAN, then navigate to the target's home page.
- Click Launch Ops Center console in the Related Links section at the bottom of the page.
Launch the Enterprise Manager Cloud Control Console From an Asset in Enterprise Manager Ops Center
Perform the following steps to launch the Oracle Enterprise Manager Cloud Control console from Oracle Enterprise Manager Ops Center:
Launch the Oracle Enterprise Manager Cloud Control Console From Oracle Enterprise Manager Ops Center
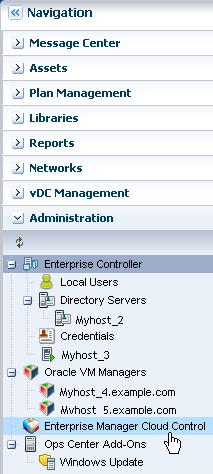
To launch the Oracle Enterprise Manager Cloud Control console outside the context of a specific monitored asset, use the link in the Administration section of Oracle Enterprise Manager Ops Center. This method is useful to confirm configuration and connectivity.
Perform the following steps to launch the console from Oracle Enterprise Manager Ops Center Administration:
- Log into Oracle Enterprise Manager Ops Center.
- Click Administration in the Navigation pane.
- Click Cloud Control Console in the Action pane.
Create and View Enterprise Manager Ops Center Reports
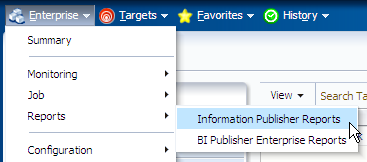
With the Infrastructure Stack plug-in, the following Oracle Enterprise Manager Ops Center reports are available in the Oracle Enterprise Manager Cloud Control Information Publisher reports:
-
Topology report: Provides stack layers report
-
Configuration report: Provides basic configuration of each layer within the stack
-
Hardware sensors report: Provides hardware sensors details based on the service processor, including current value and status, and thresholds
Create Reports
To save the data in a comma separated value (CSV) format, click the icon next to the table. To print the report, click Printable Page and use your browser print function.
Create a Customized Report
-
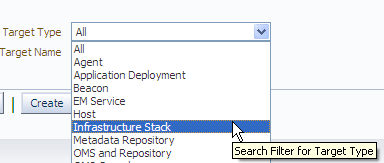
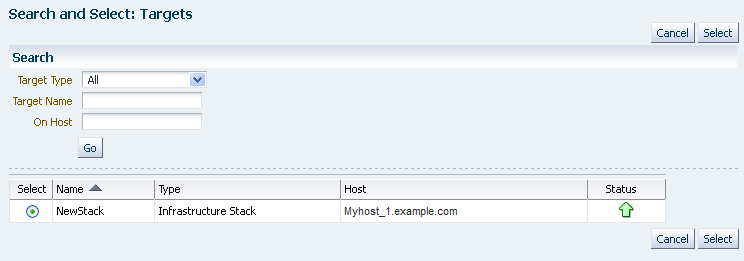
To define report parameters to create a customized report, scroll down to Ops Center reports. Select a report, such as Infrastructure Stack Topology, then click Create.
-
Define the report parameters in the Create Report Definition page, then click OK.
Figure 1-22 Create Report Definition Page
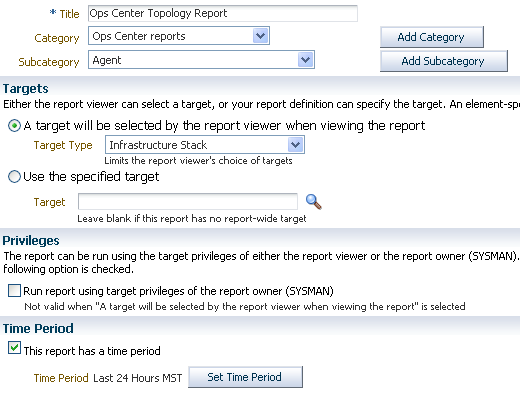
Description of "Figure 1-22 Create Report Definition Page" -
The report appears in the Reports table.
Figure 1-23 Ops Center Reports Table With the New Report

Description of "Figure 1-23 Ops Center Reports Table With the New Report"
Upgrade the Plug-in
New versions of the Infrastructure Stack plug-in might be released independent of the Oracle Enterprise Manager releases. You can go to the Oracle Enterprise Manager Store to download the latest version of the Infrastructure Stack plug-in. .
Available updates are visible on the Plug-ins page. You can download them from the Enterprise Manager Store or import them using the emcli command.
Things to Know About Upgrading
The following are some things to know about upgrading a plug-in:
-
You do not need to remove the existing version of a plug-in from the Oracle Management Service (OMS) or Management Agents before upgrading to the latest version.
-
Upgrading a plug-in to a new version does not remove the content of the older plug-in.
-
You can import multiple versions of the same plug-in. However, you can only deploy one version on the OMS at any given time.
-
A Management Agent cannot have a later version of the plug-in than the OMS.
-
You cannot downgrade to an earlier version.
Undeploy the Plug-in
Follow instructions provided within the Oracle Enterprise Manager Cloud Control Administrator's Guide to remove, or un-deploy, a plug-in. At a high level, the Oracle Enterprise Manager Cloud Control administrator must do the following:
-
Ensure that all Infrastructure Stack instances being monitored are removed from the agent monitoring configuration
-
Un-deploy the Plug-in from all agents
-
Remove the Plug-in
Removing a plug-in removes all of its metadata from the Management Repository.
- From the Setup menu, click Extensibility, then click Plug-ins.
- Select the row for the plug-in you want to remove to in the table.
- Click Undeploy From, then click either Management Servers or Management Agent. You can then select the OMS or Management Agent you want to remove the plug-in from.
- Confirm the plug-in removal. Enterprise Manager notifies the connected and relevant Enterprise Manager users and begins the de-configuration process.
Disconnect Enterprise Manager Cloud Control Access
You can disconnect and unconfigure the link between the Oracle Enterprise Manager Ops Center and Cloud Control applications.
Related Resources
For Oracle Enterprise Manager Cloud Control, see the documentation library at http://docs.oracle.com/cd/E24628_01/index.htm.
-
For information about installing the Enterprise Manager Cloud Control software and agents, see the Oracle Enterprise Manager Cloud Control Basic Installation Guide or the Oracle Enterprise Manager Cloud Control Advanced Installation and Configuration Guide.
-
For more information about plug-ins, including how to undeploy a plug-in, see the Oracle Enterprise Manager Cloud Control Administrator's Guide.
For Oracle Enterprise Manager Ops Center 12c Release 3, see the documentation library at http://docs.oracle.com/cd/E59957_01/index.htm.
See the following for more information:
-
Installing and configuring the Enterprise Controller and Proxy Controller: Oracle Enterprise Manager Ops Center Installation Guide for Oracle Solaris Operating System or the Oracle Enterprise Manager Ops Center Installation Guide for Linux Operating Systems
-
Monitoring: Oracle Enterprise Manager Ops Center Configure Reference
-
Annotations: Oracle Enterprise Manager Ops Center Operations Reference
For Oracle Enterprise Manager Ops Center 12c Release 2, see the Oracle Enterprise Manager Ops Center Feature Reference Guide and other documentation in the library at http://docs.oracle.com/cd/E40871_01/index.htm.
Oracle® Enterprise Manager System Monitoring Plug-in for Oracle Enterprise Manager Ops Center Guide, 12c Release 5 (12.1.0.5.0)
E38529-08
Copyright © 2007, 2016, Oracle and/or its affiliates. All rights reserved.
This software and related documentation are provided under a license agreement containing restrictions on use and disclosure and are protected by intellectual property laws. Except as expressly permitted in your license agreement or allowed by law, you may not use, copy, reproduce, translate, broadcast, modify, license, transmit, distribute, exhibit, perform, publish, or display any part, in any form, or by any means. Reverse engineering, disassembly, or decompilation of this software, unless required by law for interoperability, is prohibited.
The information contained herein is subject to change without notice and is not warranted to be error-free. If you find any errors, please report them to us in writing.
If this is software or related documentation that is delivered to the U.S. Government or anyone licensing it on behalf of the U.S. Government, then the following notice is applicable:
U.S. GOVERNMENT END USERS: Oracle programs, including any operating system, integrated software, any programs installed on the hardware, and/or documentation, delivered to U.S. Government end users are "commercial computer software" pursuant to the applicable Federal Acquisition Regulation and agency-specific supplemental regulations. As such, use, duplication, disclosure, modification, and adaptation of the programs, including any operating system, integrated software, any programs installed on the hardware, and/or documentation, shall be subject to license terms and license restrictions applicable to the programs. No other rights are granted to the U.S. Government.
This software or hardware is developed for general use in a variety of information management applications. It is not developed or intended for use in any inherently dangerous applications, including applications that may create a risk of personal injury. If you use this software or hardware in dangerous applications, then you shall be responsible to take all appropriate fail-safe, backup, redundancy, and other measures to ensure its safe use. Oracle Corporation and its affiliates disclaim any liability for any damages caused by use of this software or hardware in dangerous applications.
Oracle and Java are registered trademarks of Oracle and/or its affiliates. Other names may be trademarks of their respective owners.
Intel and Intel Xeon are trademarks or registered trademarks of Intel Corporation. All SPARC trademarks are used under license and are trademarks or registered trademarks of SPARC International, Inc. AMD, Opteron, the AMD logo, and the AMD Opteron logo are trademarks or registered trademarks of Advanced Micro Devices. UNIX is a registered trademark of The Open Group.
This software or hardware and documentation may provide access to or information about content, products, and services from third parties. Oracle Corporation and its affiliates are not responsible for and expressly disclaim all warranties of any kind with respect to third-party content, products, and services unless otherwise set forth in an applicable agreement between you and Oracle. Oracle Corporation and its affiliates will not be responsible for any loss, costs, or damages incurred due to your access to or use of third-party content, products, or services, except as set forth in an applicable agreement between you and Oracle.

