Cloning an Oracle E-Business Suite System
Cloning an Oracle E-Business Suite System
One of the key features of the Oracle Application Management Pack for Oracle E-Business Suite is the ability to clone an Oracle E-Business Suite system automatically using the Smart Clone procedure.
The key highlights of the cloning process include:
-
The Oracle Application Management Pack for Oracle E-Business Suite allows Oracle E-Business Suite systems to be cloned using the Cloud Control provisioning framework.
-
Cloud Control automates the creation of clone systems and executes any required application-specific actions.
-
Cloning of systems deployed on Oracle Real Application Clusters (RAC) is possible. For more information, see the My Oracle Support Knowledge Documents listed later in this section.
Smart Clone
Smart Clone expects, as a prerequisite, the target Oracle E-Business Suite database to be cloned and discovered in the Enterprise Manager. In doing so, customers can choose their own options in creating the target Oracle E-Business Suite database by cloning from the source Oracle E-Business Suite database using the Database Plug-in Provisioning Pack, RMAN, a storage system solution, or so on; whichever suits their needs the best. Smart Clone starts with taking the discovered target database as a input to configure a database target and then clones the applications tier of the source instance. It then applies that to the target Oracle E-Business Suite system.
Smart Clone supports the following scenarios for Release 11i and Release 12.x:
-
Configuring single instance databases
-
Configuring RAC databases
-
Customizing the listener names is supported if you have the required Oracle E-Business Suite patches applied.
-
Configuring listeners with SCAN IPs is supported if both the database version and the cluster version are greater than 11.2.0.2
-
The following table lists the details of use cases and their supported releases:
| Use Case | Source Oracle E-Business Suite Instance | Target Oracle E-Business Suite Instance | Releases Supported |
|---|---|---|---|
| 1A | Single Apps Node configured with Single Instance DB or RAC DB | Single Apps Node configured with Single Instance DB or RAC DB | 11i, 12.0, 12.1, 12.2 |
| 1B | Single Apps Node configured with Single Instance DB or RAC DB | Multi Apps Node (with or without Shared File System) configured with Single Instance DB or RAC DB | 12.0, 12.1 |
| 2A | Multi Apps Node (with or without Shared File System) configured with Single Instance DB or RAC DB | Single Apps Node configured with Single instance DB or RAC DB | 11i, 12.0, 12.1, 12.2 |
| 2B | Multi Apps Node (with or without Shared File System) configured with Single Instance DB or RAC DB | Multi Apps Node (with or without Shared File System) configured with Single Instance DB or RAC DB | 12.0, 12.1 |
In addition to the above features, the following scenarios are supported:
-
As soon as Oracle E-Business Suite announces the certification on any database version with Oracle E-Business Suite, then the Oracle Application Management Pack for Oracle E-Business Suite (Release 12.1.0.2.0) customers should be able to use the Smart Clone deployment procedure immediately for Oracle E-Business Suite cloning.
-
Any specific needs like data masking, data compression, and so on can be performed before running Smart Clone.
-
Smart Clone supports cloning of systems with different OS users for the database tier and the applications tier.
Terms
The following table lists some cloning terms used in this document.
| Term | Meaning |
|---|---|
| Source | Oracle E-Business Suite system being cloned. |
| Target | Oracle E-Business Suite system being created as a copy of the source system. |
| Smart Clone | The cloning utility in Oracle Application Management Pack for Oracle E-Business Suite. Smart Clone allows you to use a database target cloned using an external solution as an input to its cloning procedures. |
Requirements and Setup Steps
-
Cloning using Oracle Application Management Pack for Oracle E-Business suite requires Perl 5.005 or higher on the Oracle Enterprise Manager agent. The user who starts the agent processes must set the PERL5LIB environment variable pointing to Perl 5.005 (or higher) libraries. Also, the Perl executable 5.005 must be used.
-
While upgrading the database from 9i to 10g (or 11g) with and Oracle E-Business Suite Release 11i instance, you need to ensure that the source instance perl.exe is pointed to the database 10g (11g) ORACLE_HOME of the Oracle E-Business Suite.
-
All the virtual internet protocol (VIP) addresses configured in the Oracle Cluster Ready Services (CRS) of the targets nodes identified for the created RAC instance must be up and running.
-
With Release 11i, for a clone job from Single Node - Single User to Single Node - Multiple User, ensure that you have write permissions for user IDs to the target base directory. Give 770 permissions to the directories from/to the target base directory with the following command:
$ chmod -R 770 <target base directory>
-
If for a cloning process the target is multi-node and the database node domain and the applications node domain are different, perform the following step:
-
Include the target database node server name in the /etc/hosts file of the target applications node so that the applications node will be able to resolve the database node without the domain name. The modification should be like the following (this entry is for Linux x86; change as appropriate for your platform):
<ip-address> <Machine name with domain name> <Machine Name>
For example:
140.87.205.217 adc60002demo.us.oracle.com adc60002demo
-
For Release 12 only: In addition to the above entry in the /etc/hosts file, the applications node context file needs to be changed.
Change the s_dbdomain entry in the <STAGE_LOC>/appsTier/context/apps/<SID>_<SERVER_NAME>.xml file to the correct domain name of the database tier.
For example, if the database node domain name is idc.oracle.com, and the applications node domain name is us.oracle.com, then the context file
/d1/QA/stage/PMS29/080522035852/PMS29_adc60010demo.xml
should be changed to
<domain oa_var="s_dbdomain">idc.oracle.com</domain>
-
-
The OS utilities make, ld, cc, and ar must be in the environment PATH variable in all the host targets. If not, please update the PATH variable accordingly and restart the agent in the same terminal.
Prerequisites
The following are prerequisites to running an individual Smart Clone procedure:
-
The target database must have already been cloned from the source Oracle E-Business Suite database.
To do this, you can:
-
Use the Enterprise Manager 12c Database Plug-in to perform the required database cloning procedures OR
-
Use any other technology which suits your database cloning needs.
Once the Target Database is cloned, discover it in Enterprise Manager 12c.
-
-
The Oracle E-Business Suite Agent Plug-in must be deployed on all the target database hosts and applications hosts.
-
The Enterprise Manager user running the Smart Clone procedure must have the appropriate privileges.
The following privilege setup instructions can be ignored if the user is a "Super Administrator".
In order to execute the Smart Clone deployment procedure, a non-Super Administrator user must have certain target-level privileges and the resource privileges.
The privileges listed below could be granted in many ways depending on the desired level of granularity of privileges to be granted to the user. For more details on granting privileges, please refer to the section "Configuring Security" in the manual Oracle Enterprise Manager Cloud Control Administrator's Guide 12c Release 1.
The following outlines one of the ways of granting the required privileges for executing the Smart clone procedure.
Target Privileges
-
Add any Target
-
Privileges applicable to all targets
-
Name: Add any Target (Description: Add any target in Enterprise Manager)
-
-
-
Operator any Target
-
Privileges applicable to all targets
-
Name: Operator any Target (Description - Ability to perform administrative operations on all managed targets)
-
Included Privileges - View any Target
-
Applicable Target Types - All Target Types
-
-
Resource Privileges
-
Job System resource:
-
Name - Job System
-
Description - Job is a schedulable unit of work that administrator defines to automate the commonly run tasks
-
Resource Type Privilege - Create
-
-
Deployment Procedure:
-
Name - Deployment Procedure
-
Description - Deployment procedures are customizable orchestration routines for various Provisioning and Patching tasks
-
Resource Type Privilege - Create
-
-
-
The following Named Credentials must be defined:
-
Host target type
-
Authentication Target Type: "Host"
-
Credential Type: "Host Credentials"
-
-
Oracle E-Business Suite target type
Please refer to the section Creating Named Credentials for Oracle E-Business Suite for instructions on creating the Oracle E-Business Suite Database Credentials.
-
Cloning with RAC Instances
With Smart Clone, if the target Oracle E-Business Suite instance database is of type "RAC" and if you want to configure Parallel Concurrent Processing after the clone is completed, then it is recommended that you follow instructions described in the following My Oracle Support Knowledge Documents, depending on your RDBMS version:
-
Document 312731.1, "Configuring Oracle Applications Release 11i with 10g RAC and 10g ASM"
-
Document 757980.1, "Using Oracle 11g Release 1 Real Application Clusters and Automatic Storage Management with Oracle E-Business Suite Release 11i (11.1.0.6)"
-
Document 455398.1, "Using Oracle Real Application Clusters and Automatic Storage Management with Oracle E-Business Suite Release 11i and Oracle Database 11g"
-
Document 783188.1, "Certified RAC Scenarios for E-Business Suite Cloning" for more information on cloning of systems deployed on Oracle Real Application Clusters (RAC) is possible.
-
Document 559518.1, "Cloning Oracle E-Business Suite Release 12 RAC-Enabled Systems with Rapid Clone" for information on cloning a Release 12 system on a RAC database
Preferences
For Oracle E-Business Release 12.1 and earlier, the following properties are set in the Preferences page. Navigate to the Preferences page by navigating to Targets > Oracle E-Business Suite > Administer > Preferences. These preferences are not applicable to cloning with Oracle E-Business Suite Release 12.2. For Release 12.2, default values are used.
-
Number of parallel threads/processes that will be used while zipping, transferring and unzipping the files under APPL_TOP directory of the applications tier.
-
Minimum value: 1
-
Maximum value: 16
-
If the value is empty OR less than 1 OR greater than 16, then the default value of 8 is used.
-
-
Number of parallel threads/processes that will be used while zipping, transferring and unzipping the files under Tools Oracle Home directory of the applications tier.
-
Minimum value: 1
-
Maximum value: 8
-
If the value is empty OR less than 1 OR greater than 8, then the default value of 4 is used.
-
-
Number of parallel threads/processes that will be used while zipping, transferring and unzipping the files under Tools Oracle Home directory of the applications tier.
-
Minimum value: 1
-
Maximum value: 4
-
If the value is empty OR less than 1 OR greater than 4, then the default value of 2 is used.
-
-
Number of parallel threads/processes that will be used while zipping, transferring and unzipping the files under COMMON_TOP directory of the applications tier.
-
Minimum value: 1
-
Maximum value: 4
-
If the value is empty OR less than 1 OR greater than 16, then the default value of 2 is used.
-
Considerations for Cloning with Oracle E-Business Suite Release 12.2
Oracle E-Business Suite Release 12.2 is deployed on Oracle WebLogic Server. As a result, most of the technology stack scripts used in cloning (such as adpreclone, adclone, adstrtall, adstpall, and so on) require the WebLogic Admin password. Therefore, the WebLogic Admin password is required in the cloning procedure interview for Release 12.2 systems.
Also, note the following regarding zipping of files during the cloning process:
-
<COMMON_TOP>/clone/FMW/FMW_Home.jar will be very large (2.7 GB).
-
The WebLogic Server home directory (FMW_Home) will NOT be zipped or transferred.
Diagnostic Tests
For information on diagnostic tests for this feature, see: Diagnostic Tests for Cloning.
Running a Single Node to Single Node or Multi Node to Single Node Cloning Procedure for Release 11i and 12.1.x
This section describes running the Single Node to Single Node and Multi Node to Single Node Smart Clone procedure. These procedure can be used for Release 11i and Release 12.1.x.
At a high level, a Smart Clone procedure performs the following
-
Configures the target database.
-
Clones and configures the applications tier from the source Oracle E-Business Suite system.
These two steps result in creating a target Oracle E-Business Suite system which is ready to use.
To run a single-node cloning procedure
-
Navigate to the Cloning home page by selecting Targets > Oracle E-Business Suite > Administer > Cloning.
-
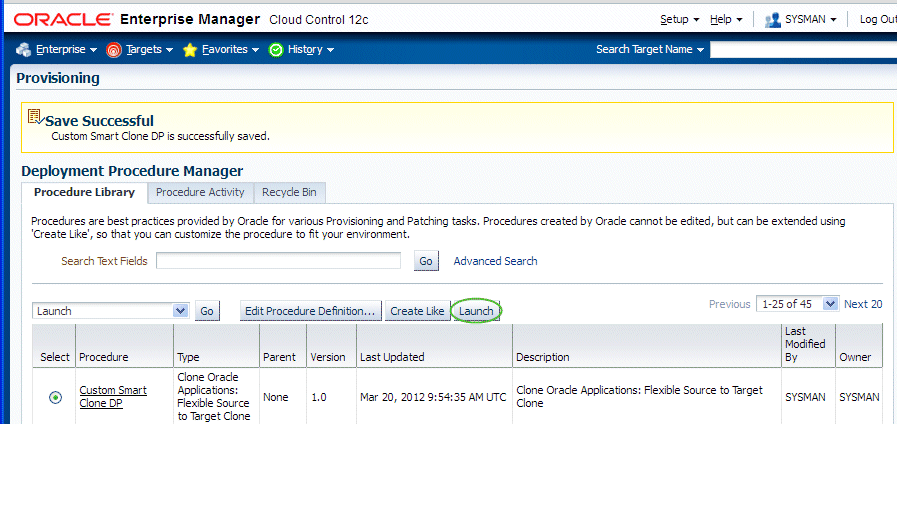
Select "Smart Clone" from the dropdown list and click Go.

-
Enter general information for the cloning process. This step captures information related to the target database already cloned and discovered in Enterprise Manager.
Provide a transaction name for the Clone Name.
Choose the source Oracle E-Business Suite you would like to clone from the LOV.
Specify the target database which is to be cloned from the source Oracle E-Business Suite's database.
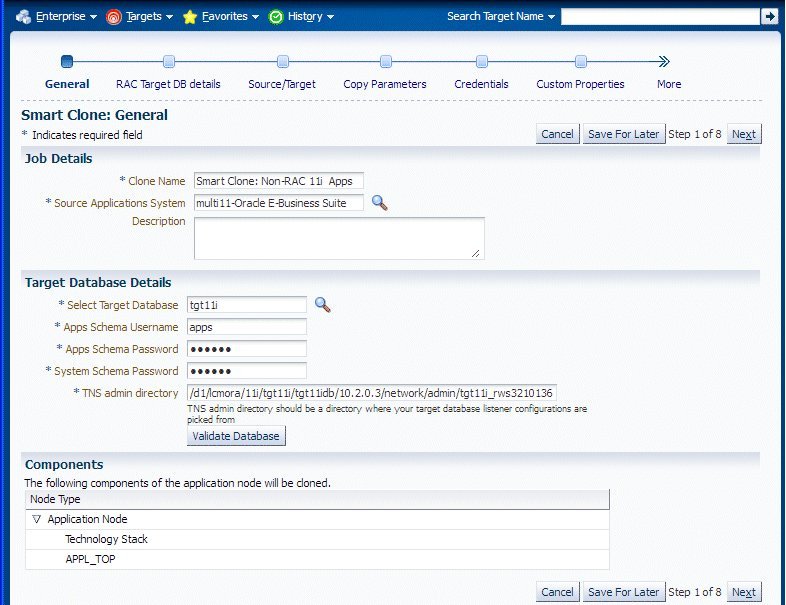
Based on the type of database chosen (that is, a single instance database or a RAC database), the Target Database Details region is dynamically rendered.
For a single instance database, provide the following:
-
Target Database
-
Apps Schema Username
-
Apps Schema Password
-
System Schema Password
-
TNS admin directory
You can click on Validate Database button or you can leave it to the Next button to perform the same action.
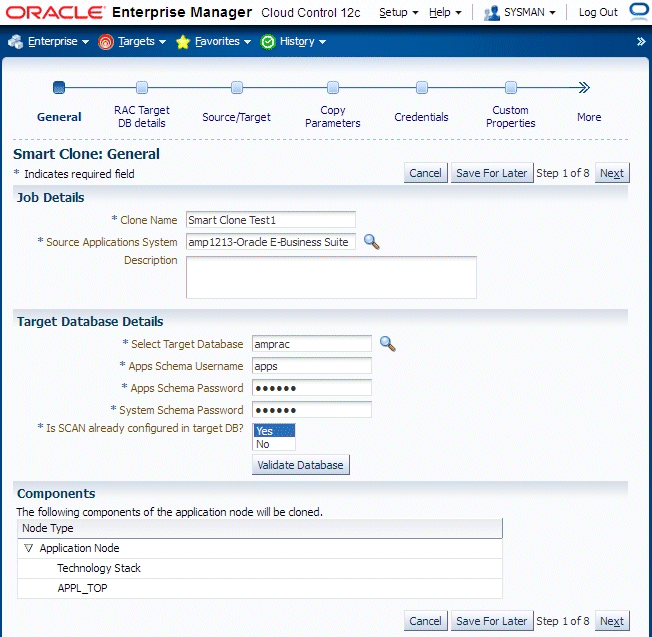
If the target database is a RAC database, the Target Database Details region is rendered differently, as shown in the following figure. Specify whether SCAN is configured in the target database.
-
-
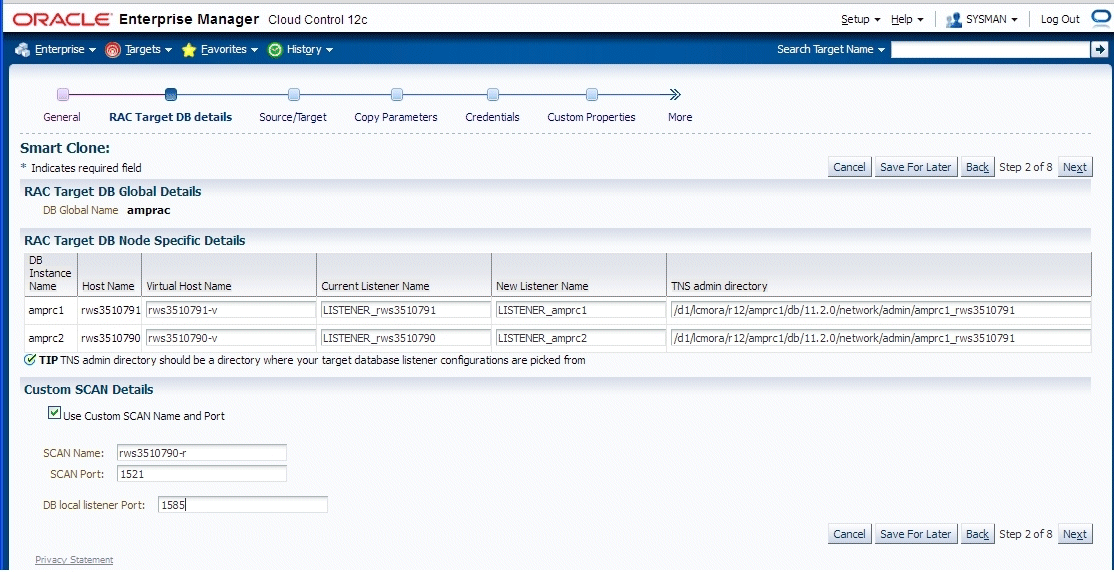
Enter RAC Target database details, if applicable.
This step only applies if the target database is a RAC database. This step is skipped if the target database has the type Single Instance.
If the source Oracle E-Business Suite technology stack has the required patches applied for configuring customized names for listeners, then this page will automatically render in such a way that you provide names for the target database listeners by providing the required names in the column "New Listener Name".
If the source Oracle E-Business Suite technology stack does not have the required patches, then Smart Clone will provide default names for the listeners using the naming convention "LISTENER_<hostname>".
If the source Oracle E-Business Suite technology stack has the required patches applied for configuring the target database with "SCAN Listeners", then the "Custom SCAN Details" section is rendered with the "SCAN Name" and "SCAN Port" fields populated automatically. It is highly recommended not to change these values if it automatically populated. If for some reason the SCAN Name and SCAN Port fields are not populated (for example, if the cluster target instance discovered in Enterprise Manager has not populated these values yet as properties), then you must enter the correct values for these fields.
Optionally, check the box "Use Custom SCAN Name and Port" if you want to get the target database configured with the SCAN listener. If you do not check the box "Use Custom SCAN Name and Port" box, then Smart Clone will clone the target database with virtual host names.
If the source Oracle E-Business Suite technology stack does not have the required patches, then the "Custom SCAN Details" section will not be rendered, and the target database will be configured with virtual host names.
If the target instance is already configured with scan listeners, then by default the "Use Custom SCAN Name and Port" box will be checked.
-
Enter source and target information.
In this step, Smart Clone captures information related to the source and target.
-
All application tier information of the source Oracle E-Business Suite system is displayed.
-
You enter details for the target Oracle E-Business Suite system.
If the source Oracle E-Business Suite system is deployed on a single applications tier, the Source regions appear as shown in the following figure. Information is shown for the following services: Admin, CP (Concurrent Processing), Forms, and Web.

In the Available Target System Nodes region, choose the source host that can be used as a reference while cloning the target applications tier. Specify the target host from the LOV where Smart Clone should create the target applications tier.
If the source Oracle E-Business Suite system is deployed on a multi-node applications tier, then the Source regions appear as shown below.
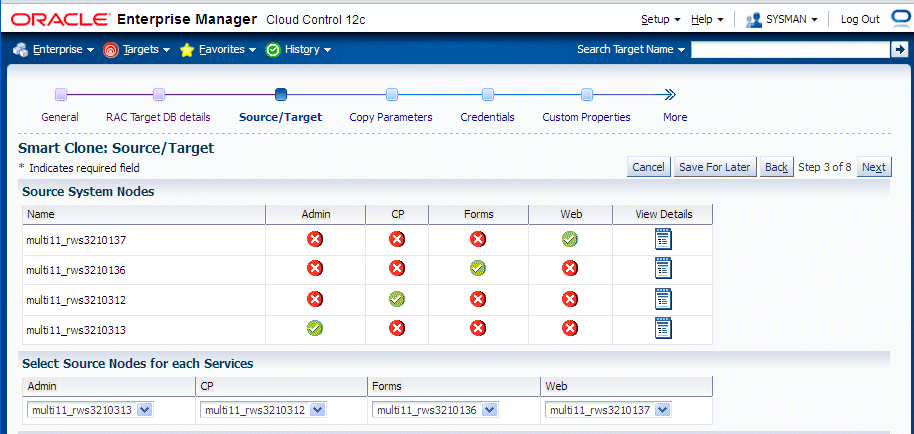
The Source System Nodes region shows the details of the source Oracle E-Business Suite applications tier in terms of
-
Number of nodes the applications tier is deployed on.
-
Details of the services on the nodes.
For a Release 11i multi-node applications tier system, you will need to choose the nodes for the services which are to be used as references for creating the Release 11i single node applications tiers. Do this in the "Select Source Nodes for Each Service" region.
For Release 12, selecting the service in this section is unnecessary because the reference source host will be selected only from the "Available Target System Nodes" region.
-
-
In the Available Target System Nodes region, choose "Single-Node Target". This is the default option.
Then choose the source host that can be used as a reference while cloning the target applications tier. Specify the target host from the LOV where Smart Clone should create the target applications tier.

For the target system node, click the Specify Details icon to update its properties in the Target Node Summary page.
-
The Target Node Summary page is shown below.
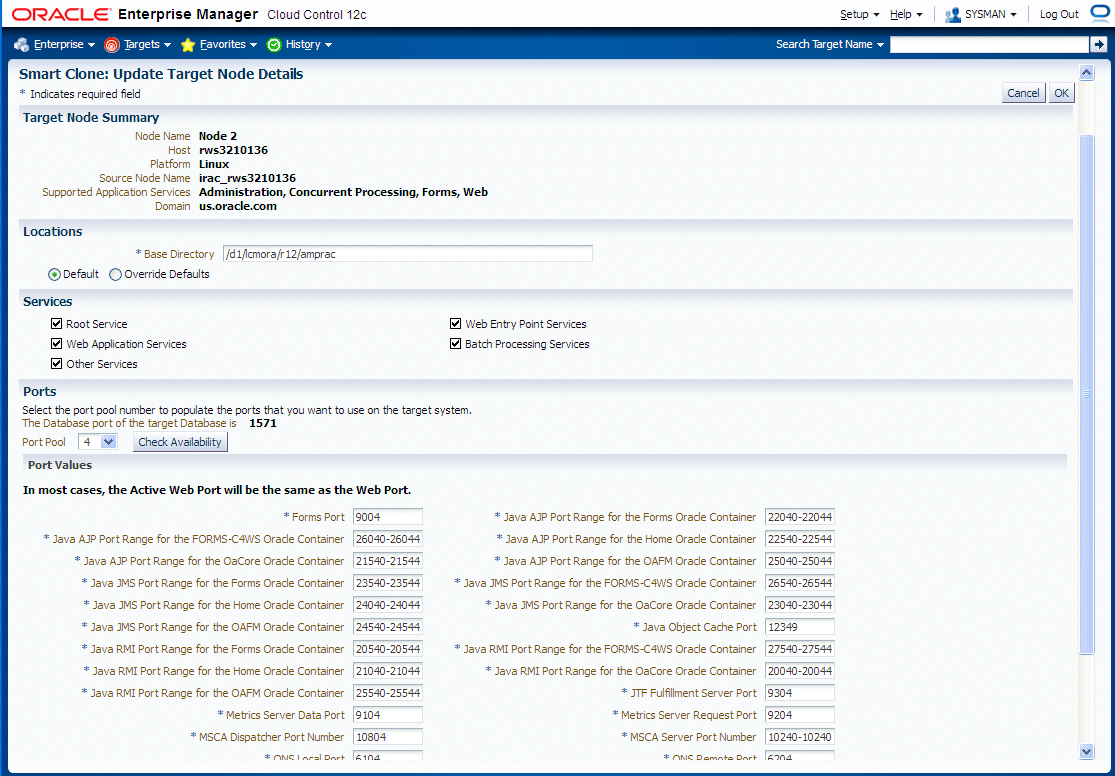
The port pool and individual port values are updated from the source instance.
If there is an invalid value in the port pool from the source instance, the following error is shown: "NOTE: Source Apps portpool context variable (s_port_pool) is invalid: <value>. Setting to default value '0'. Please update as needed!"
-
In the Copy Parameters step, enter information on how the copying process should be done.
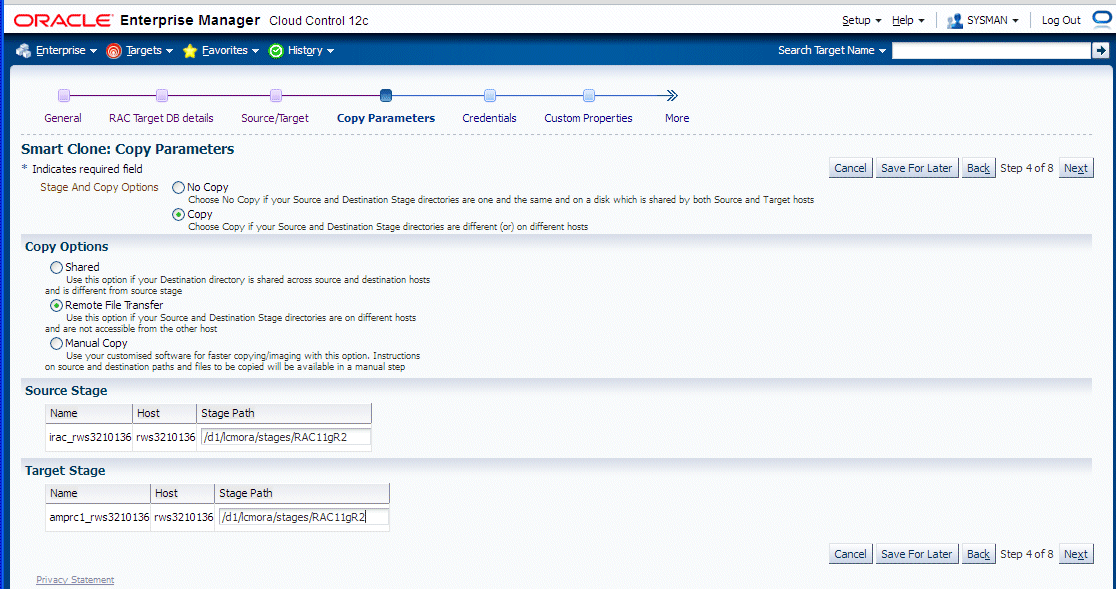
-
Enter Credentials.
Smart Clone uses named credentials. You can select and test the named credentials on this page.
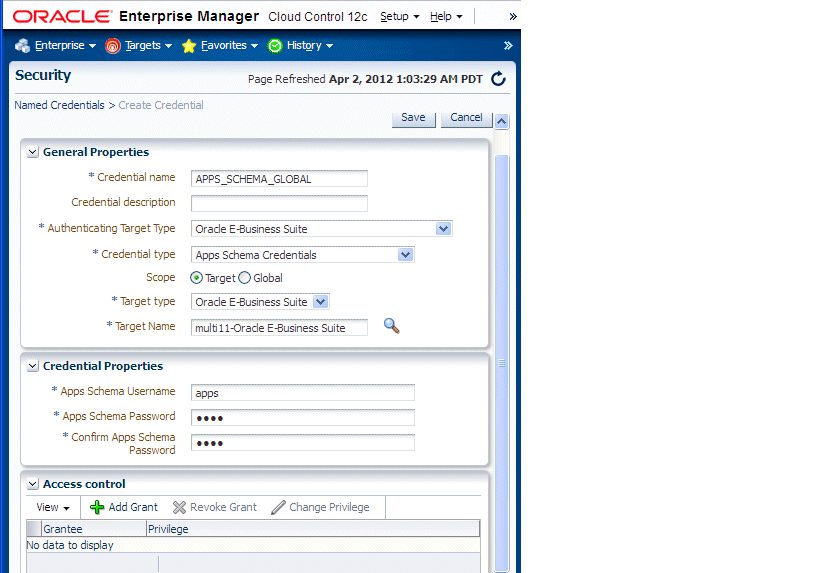
Named credentials can be created by navigating to the Setup menu, then Security > Named Credentials, and clicking Create.
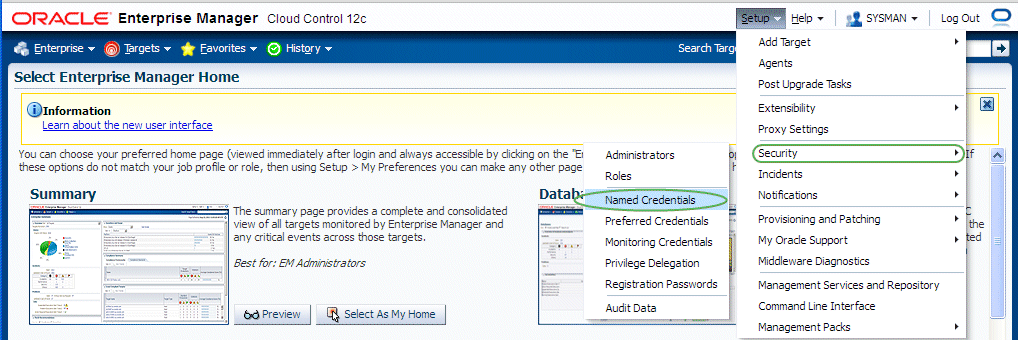
Smart Clone requires the following credentials to be created:
-
Application Node OS Credentials and Database Node OS Credentials.
-
Authentication Target Type - Host
-
Credential Type - Host Credentials
-
-
Database Schema Credentials
Please refer to the section Creating Named Credentials for Oracle E-Business Suite for information on creating the Oracle E-Business Suite Database Credentials.
Note: Database schema credentials appear only when the source applications system is on Release 11i and using a non-shared file system.
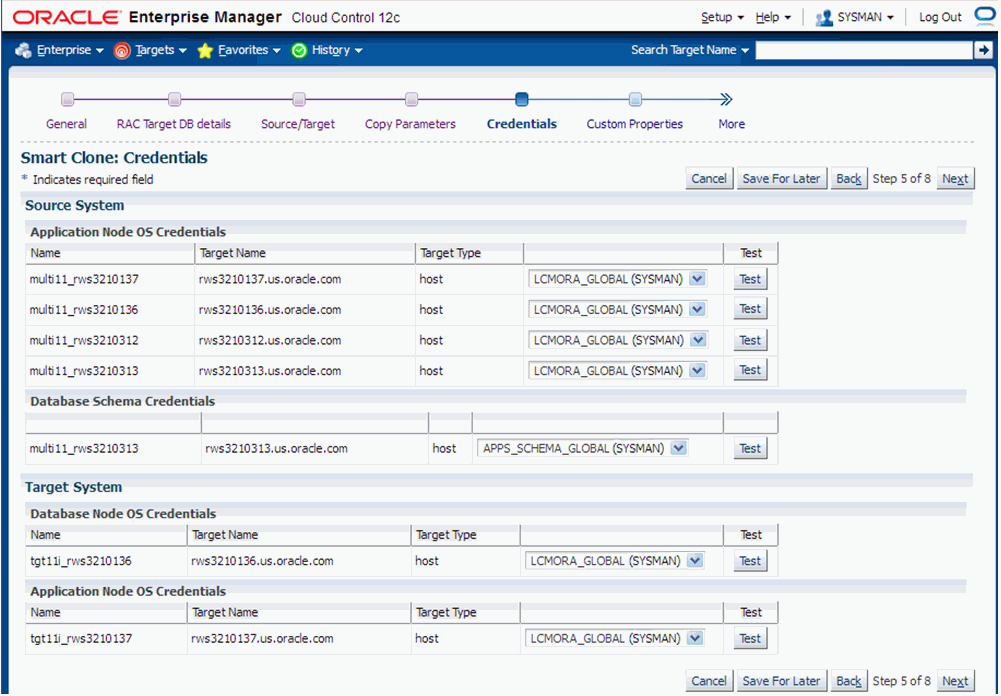
The Credentials page for a Smart Clone procedure where the source applications system is multi-node and the target database is non-RAC is shown in the figure below. This page allows you to enter in and test all required credentials for the nodes.
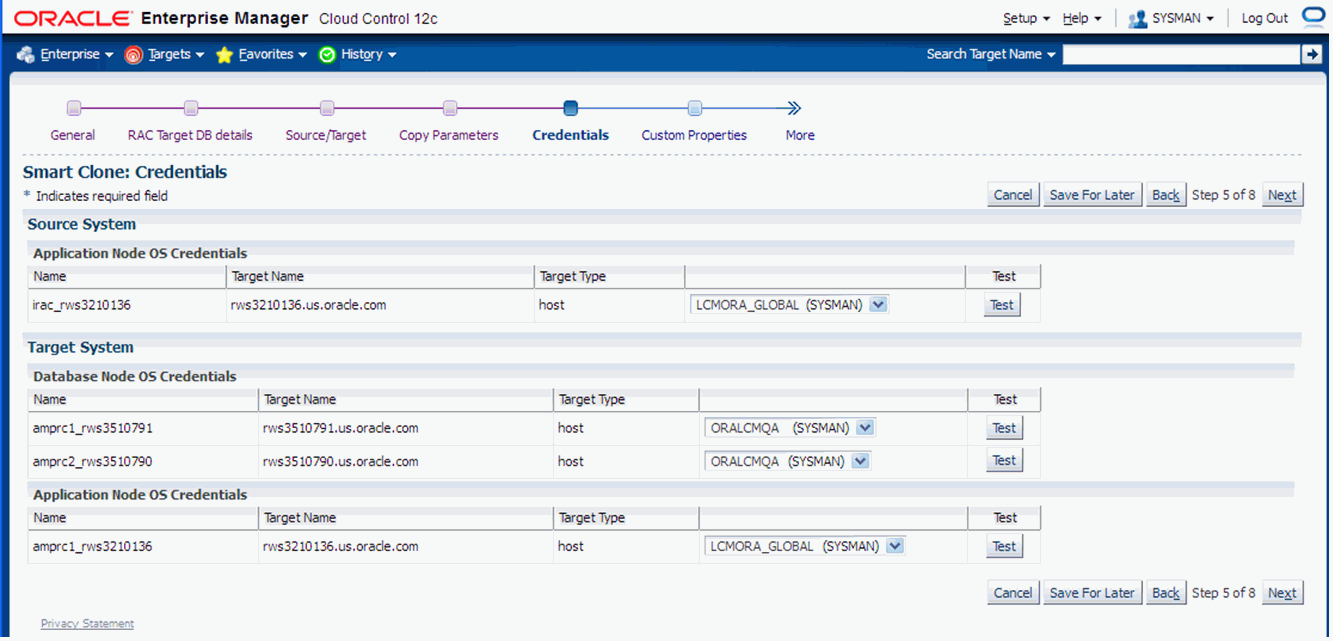
The Credentials page for a Smart Clone procedure where the source applications system is single node and the target database is RAC is shown in the figure below. On this page you can enter and test the required credentials for all the nodes.
-
-
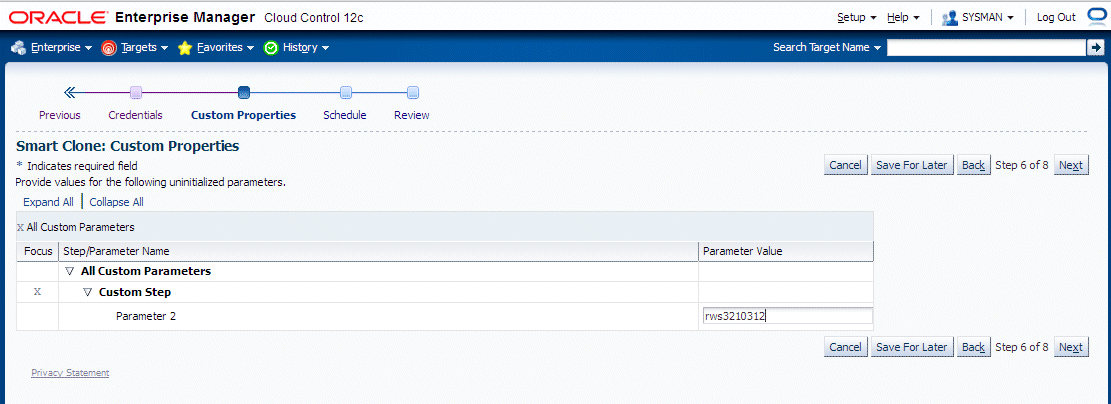
Enter values for custom parameters. These would be used in any directive steps you have created.
You can create directive steps to be integrated into a deployment procedure. For more information on deployment procedures, see the Oracle Enterprise Manager Cloud Control Administrator's Guide. For a description on how to create a directive step and insert it into a procedure created using the "Create Like" feature and a shipped Smart Clone procedure, see: Adding Custom Steps to a Smart Clone Deployment Procedure.
-
Schedule the deployment.

-
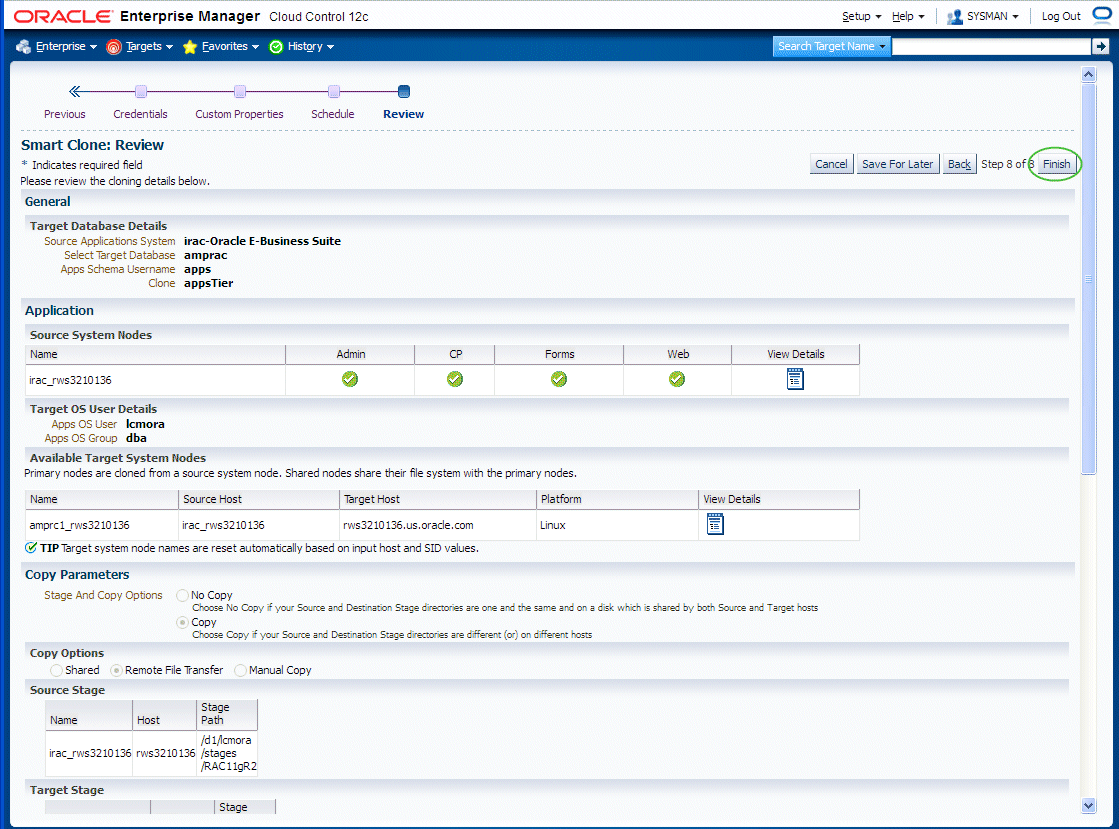
Review your Smart Clone deployment procedure and click Finish.
Running Scale-Up and Scale-Down Multi-Node Cloning Procedures
This section describes using Smart Clone for scale-down and scale-up cloning of Oracle E-Business Suite application nodes.
This type of procedure is supported for Oracle E-Business Suite Releases 12.0 and 12.1.
This procedure is similar to the single-node Smart Clone procedure; the main difference is in specifying the source and target in the "Source/Target" step in the interview process.
The following steps provide a high-level description of a Smart Clone procedure:
-
Smart Clone configures the target database.
-
Smart Clone clones and configures the applications tier from the source Oracle E-Business Suite system.
These steps result in creating a target Oracle E-Business Suite system which is ready to use.
To run a multi-node cloning procedure
-
Navigate to the Cloning home page by using the following path: Targets menu > Oracle E-Business Suite > Administer > Cloning. Choose "Smart Clone" from the "Start a Clone" list.
-
Enter general information for the cloning process. This step captures information related to the target database already cloned and discovered in Enterprise Manager.
Provide a transaction name for the Clone Name.
Choose the source Oracle E-Business Suite you would like to clone from the LOV.
Select the target database which is cloned from the source Oracle E-Business Suite's database.
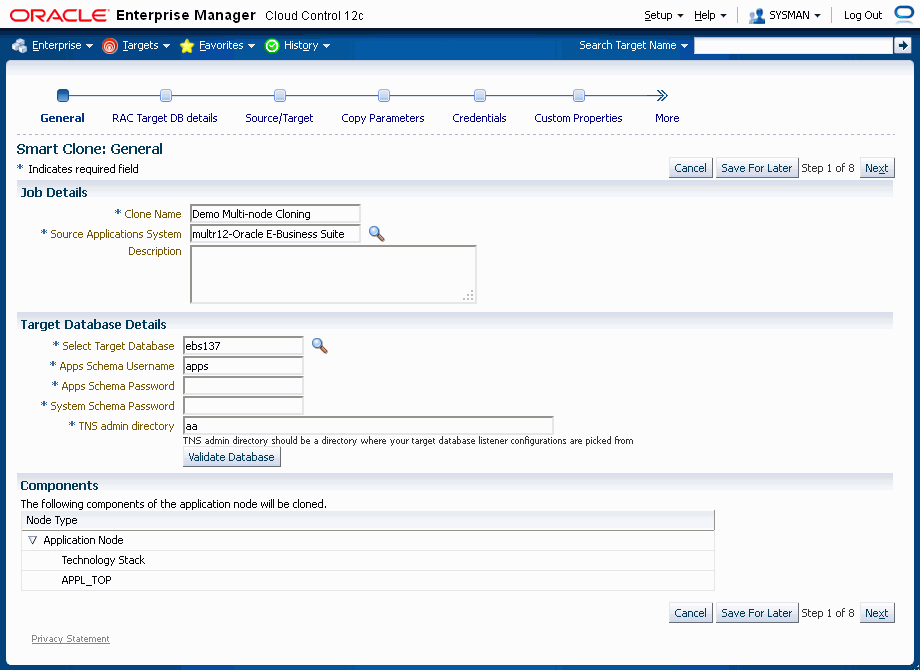
Based on the type of database (that is, a single instance database versus a RAC database), the rendering of the Target Database Details region will dynamically change. The figure below shows the rendering of the region for a single instance database.
Provide the following for the target database:
-
Apps Schema Username
-
Apps Schema Password
-
System Schema Password
-
TNS admin directory
You can click on Validate Database button or you can leave it to the Next button to perform the same action.
If the target database is a RAC database, the Target Database Details is rendered differently, as shown in the following figure.

Provide the following for the target database:
-
Apps Schema Username
-
Apps Schema Password
-
System Schema Password
Specify whether SCAN is configured in the target database.
You can click on Validate Database button or you can leave it to the Next button to perform the same action.
-
-
Enter RAC Target database details, if applicable.
This step only applies if the target database is a RAC database. This step is skipped if the target database is a single instance database.
If the source Oracle E-Business Suite technology stack has the required patches applied for configuring customized names for listeners, then this page would automatically render so that you provide names for the target database listeners in the required field "New Listener Name".
If the source Oracle E-Business Suite technology stack does not have the required patches, then Smart Clone will give default names to the listeners using the naming convention "LISTENER_<hostname>".
If the source Oracle E-Business Suite technology stack has the required patches applied for configuring the target database with "SCAN Listeners", then the "Custom SCAN Details" region is rendered with the "SCAN Name" and "SCAN Port" fields populated automatically. It is highly recommended not to change these values if it automatically populated. If for some reason the SCAN Name and SCAN Port fields are not populated (for example, if the cluster target instance discovered in Enterprise Manager has not populated these values yet as properties), then you must enter correct values into these fields.
Optionally, check the box "Use Custom SCAN Name and Port" if you want to get the target database configured with the SCAN listener. If you do not check the box "Use Custom SCAN Name and Port", then Smart Clone will clone the target database with virtual host names.
If the source Oracle E-Business Suite technology stack does not have the required patches, then the "Custom SCAN Details" region will not be rendered and the target database will be configured with virtual host names.
If the target instance is already configured with SCAN listeners, then by default the "Use Custom SCAN Name and Port" box will be checked.

-
Enter source information in the Source/Target step.
The "Source System Nodes" region shows the details of the source Oracle E-Business Suite applications tier including:
-
Number of nodes on which the applications tier is deployed
-
Details of the services on the nodes

-
-
Enter target information on the Source/Target step.
Choose the type of target. For multi-node cloning, the options are:
-
Multi-node target with a non-shared file system
-
Multi-node target with a shared file system
Note that when the target has a shared file system that:
-
The first node in the admin service list is considered the primary service.
-
The Target location has "Override Defaults" selected as a provision to update the shared directory location for APPL_TOP, COMN_TOP, and so on.
If you choose either of the multi-node choices, a new set of options is shown:

-
-
Add a node to each service by clicking on the Add button for the service and choosing the node from the LOV.
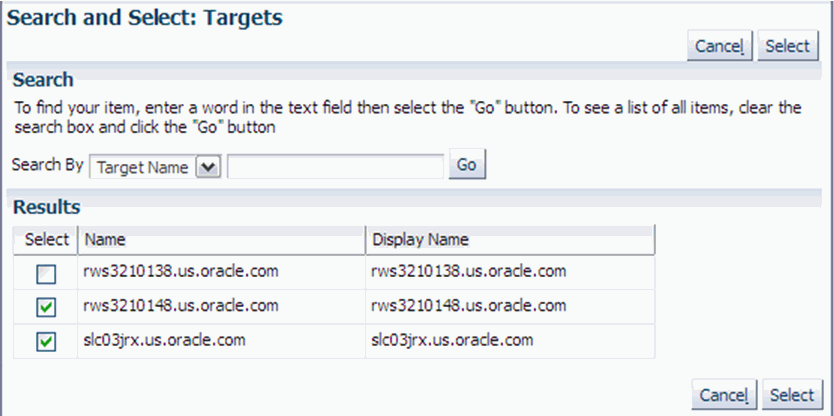
If you want to delete a node from a service, select the node to be deleted and click the Delete button.
-
After you add the lists of nodes, you can navigate to the "Common Properties" page.
In this page you specify properties such as port data and the applications base directory location.
Common Properties for Non-Shared APPL_TOP
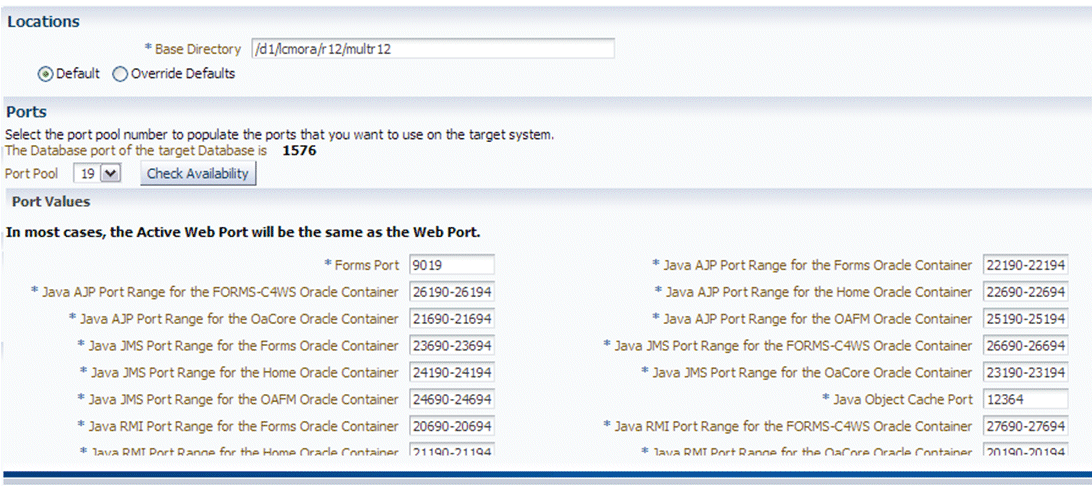
Common Properties for Shared APPL_TOP
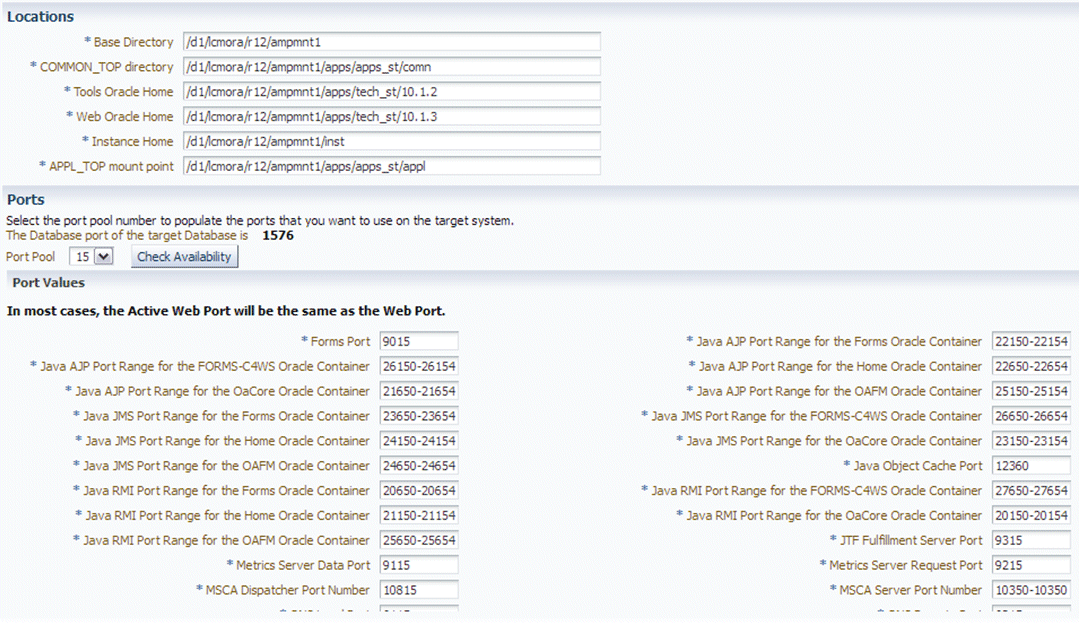
When you click the Check Availability button, the port availability on all selected nodes will be checked. This verification is also done when you click OK for the page itself.
The port pool and individual port values are updated from the source instance.
If there is an invalid value in the port pool from the source instance: following error will be shown: "NOTE: Source Apps portpool context variable (s_port_pool) is invalid: <value>. Setting to default value '0'. Please update as needed!"
Click Next to proceed to the next step. After you click Next, the system checks to confirm all the services are enabled on the target node.
Note: Dependent services are automatically added to the nodes.
-
In the Copy Parameters step, choose options for how your copying will be done.

-
Enter Credentials.
Smart Clone uses Named Credentials. You can select and test the named credentials on this page.
Named credentials can be created by navigating to the Setup menu, then Security > Named Credentials, and clicking Create.

Smart Clone requires the following credentials to be created:
-
Application Node OS Credentials and Database Node OS Credentials.
-
Authentication Target Type - Host
-
Credential Type - Host Credentials
-
-
Database Schema Credentials
Please refer to the section Creating Named Credentials for Oracle E-Business Suite for information on creating the Oracle E-Business Suite Database Credentials.
Note: Database schema credentials appear only when the source applications system is on Release 11i and using a non-shared file system.

The Credentials page for a Smart Clone procedure where the source applications system is multi-node and the target database is non-RAC is shown below. This page allows you to enter and test all required credentials.

The Credentials page for a Smart Clone procedure where the source applications system is single node and the target database is RAC is shown below. This page allows you to enter and test the required credentials.

-
-
Enter values for custom parameters.
You can create directive steps to be integrated into a deployment procedure. For more information on deployment procedures, see the Oracle Enterprise Manager Cloud Control Administrator's Guide. For a description on how to create a directive step and insert it into a procedure created using the "Create Like" feature and a shipped Smart Clone procedure, see: Adding Custom Steps to a Smart Clone Deployment Procedure.

-
Schedule the deployment.

-
Review your Smart Clone deployment procedure and click Finish.

When a multi-node to multi-node applications tier cloning procedure is submitted, then, irrespective of whether it is a "scale-up" or "scale-down" procedure, the admin node is configured first with the given services enabled. Then each node will be configured one after the other, depending on the node details specified in the cloning interview.
After all the nodes are configured, the URLs used in accessing Oracle E-Business Suite are redirected to the node on which AutoConfig was last run. Therefore, after all nodes are configured, you should run AutoConfig again on the node in which the web service is enabled.
Note: For more information, see My Oracle Support Knowledge Document 1349509.1, "All the URLs Accessing Oracle E-Business Suite Are Getting Redirected to the Web Node Where AutoConfig Last Ran."
Running Smart Clone for Oracle E-Business Suite Release 12.2
-
Navigate to the Cloning home page by selecting Targets > Oracle E-Business Suite > Administer > Cloning. Select "Smart Clone for Oracle E-Business Suite 12.2.x" and click Go.

-
Enter basic information for your cloning procedure, including Clone Name, Description, and target and source information.
Also enter the source WebLogic Admin Password and the target database APPS credentials.
In the case of single-node target database cloning, you will be prompted the TNS_ADMIN of target database.
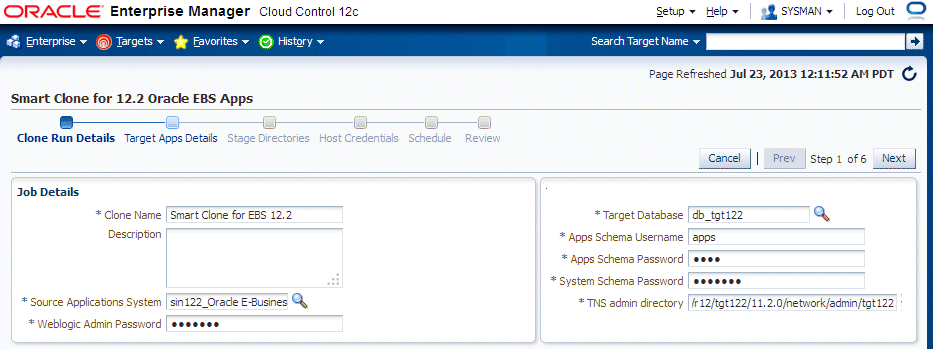
If the target database is a RAC database, a new region of prompts appears to capture RAC-specific information, as shown below.
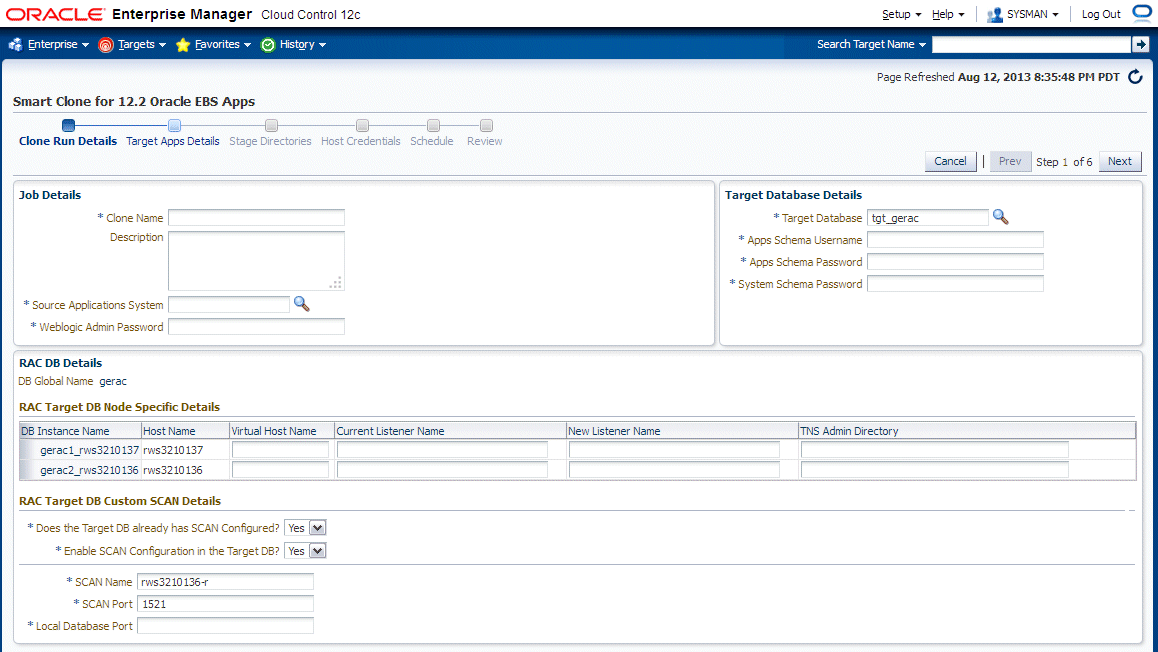
For the RAC Target DB Node Specific Details:
-
Virtual Host Name - The virtual host name. Note that the domain name must NOT be appended.
-
Current Listener Name- The value with which the database instance can be connected.
-
New Listener Name - If you want to change the existing listener name, enter the new name here. If you want to retain the existing listener name, then enter the current listener name in this field.
-
TNS Admin Directory - The TNS_ADMIN value with which the database instance can be connected.
For the RAC Target DB Custom SCAN Details section: If the target database is already SCAN-configured, then select "Yes" for "Does the Target DB already has SCAN Configured" In this case, enter the Local Database port. Also in this case, "Enable SCAN Configuration in the Target DB" will automatically become "Yes".
If you wish to configure SCAN on the target database, then select "Yes" for "Enable SCAN Configuration in the Target DB". You will then be prompted for the SCAN name and port.
The SCAN name and SCAN port will be populated from the cluster target.
-
-
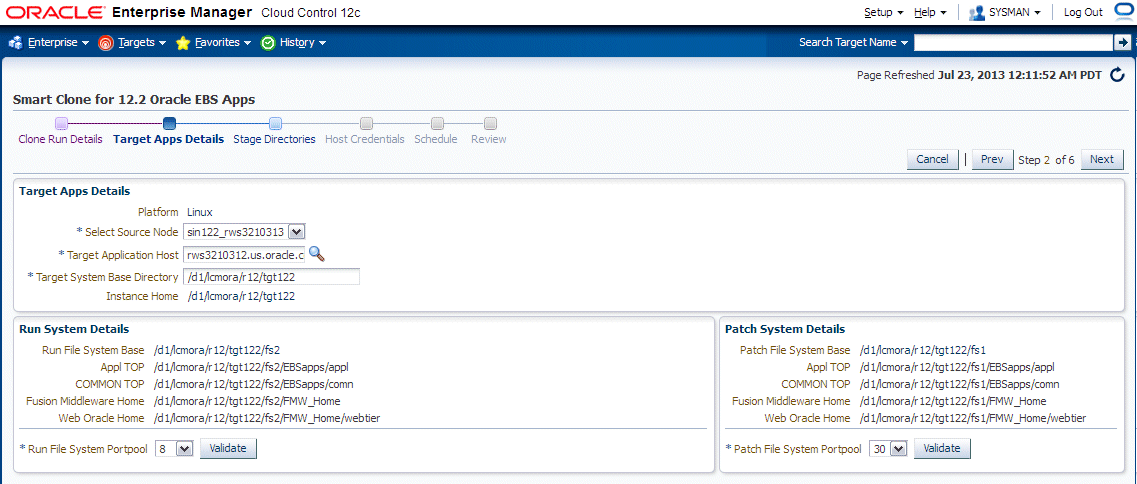
Enter target application details.
Select the host on which the target applications system is intended to be cloned and the base directory. Once the base directory is provided, other directories details are automatically populated. Please note that these auto-populated values are read-only.
You can choose the port pool for run file system and patch file system. You can validate the ports individually for the run file system and the patch file system. In case of port unavailability, an error will list the invalid port information.
-
In the Stage Directories step, enter stage location information.
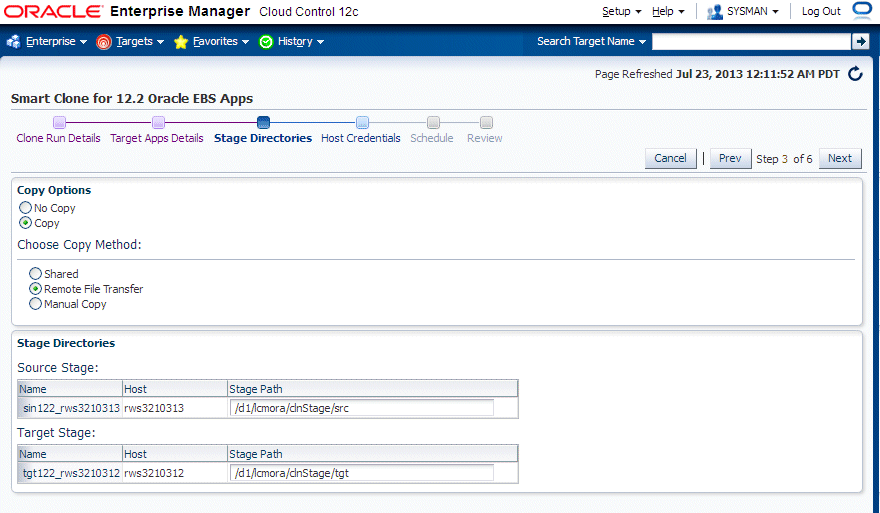
The source stage location is where the source application file system is staged. The target stage is the location where the staged application files are copied.
Note: Ensure that these directories have write permissions.
Specify your copy options:
No Copy - Select this if the source and target applications file systems are in the same host. This is applicable to Single-Node to Single-Node applications cloning. Make sure both source and target stage locations are same.
If you choose Copy, select the Copy Method:
-
Shared File Copy Option - Choose this option if the stage location is shared across the source and target.
Note: Because of a known limitation in Smart Clone for Release 12.2.x, please do not use the 'Shared File Copy' option currently. Instead use 'No Copy' method as they are functionally same.
-
Remote File Transfer Option - Choose this if the source and target applications file systems are in different hosts.
-
Manual Copy Option - If this option is chosen, you will have to manually copy the source file system to target file system. The clone procedure will be halted and will wait for user confirmation.
-
-
Provide Host Credential Details in the next page.
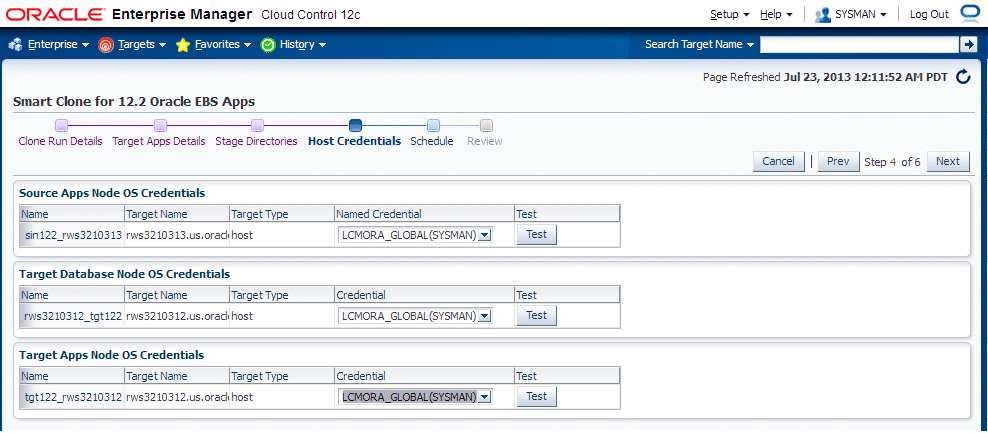
You can validate a credential using the Test button.
In the case of a RAC database, all the target database node information must be entered.
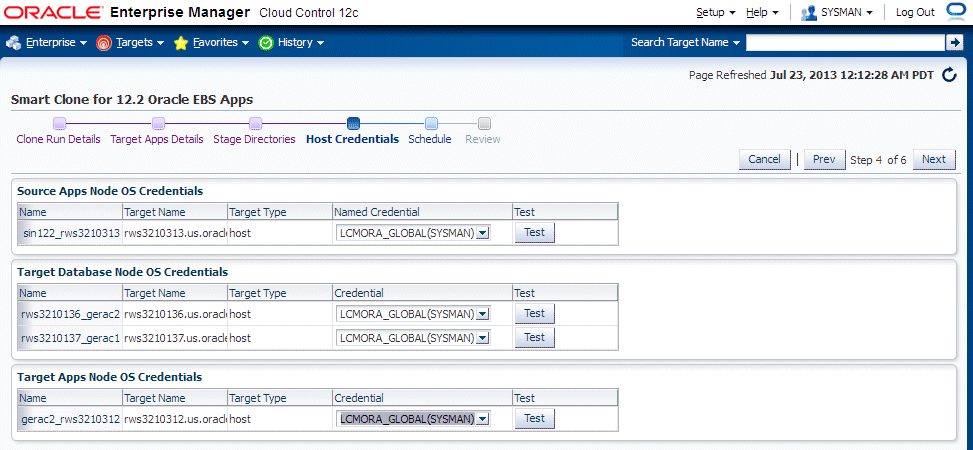
-
Enter the Schedule information.
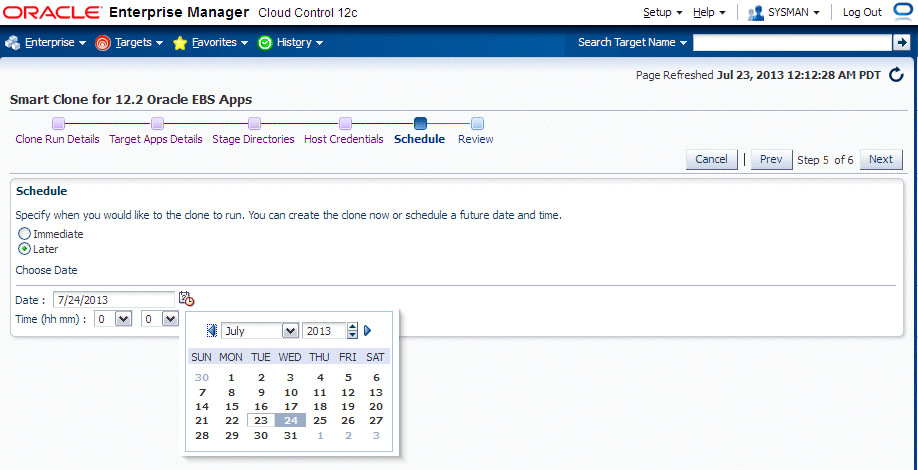
You can select "Immediate" to submit the Smart Clone run immediately, or you can schedule the Smart Clone run for a future date.
-
Review the information you have entered.
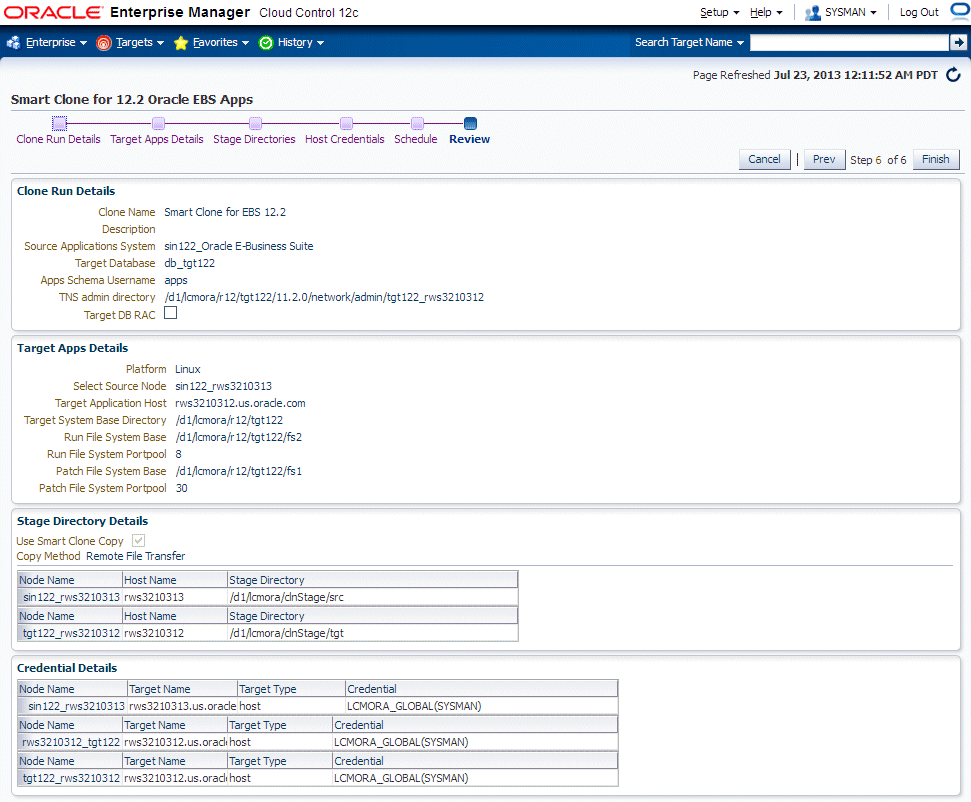
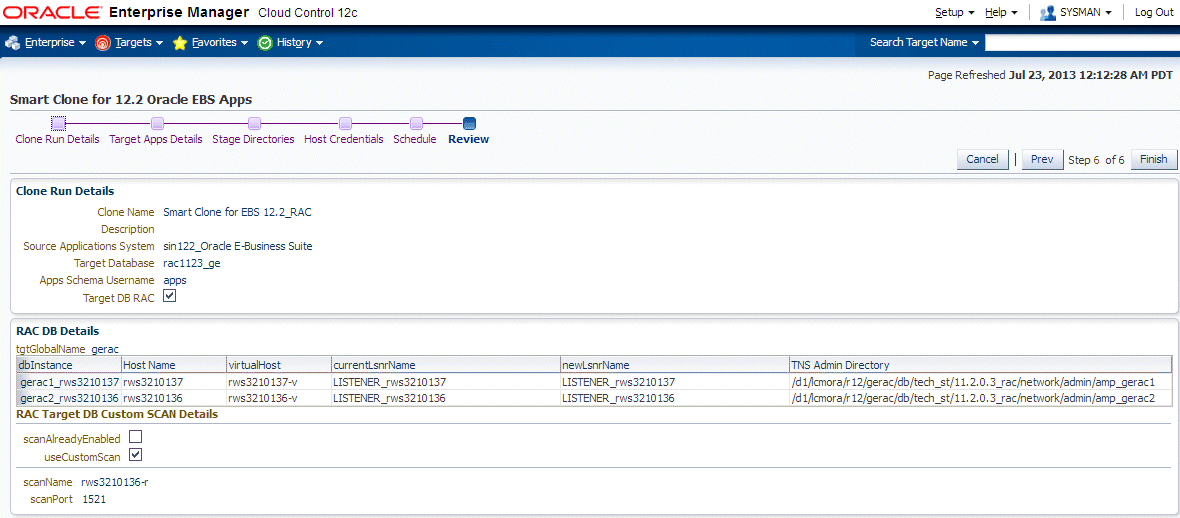
In the case of a RAC target database, specific information pertaining to RAC is also displayed.
Note on manual steps if the source is a multi-node application tier instance
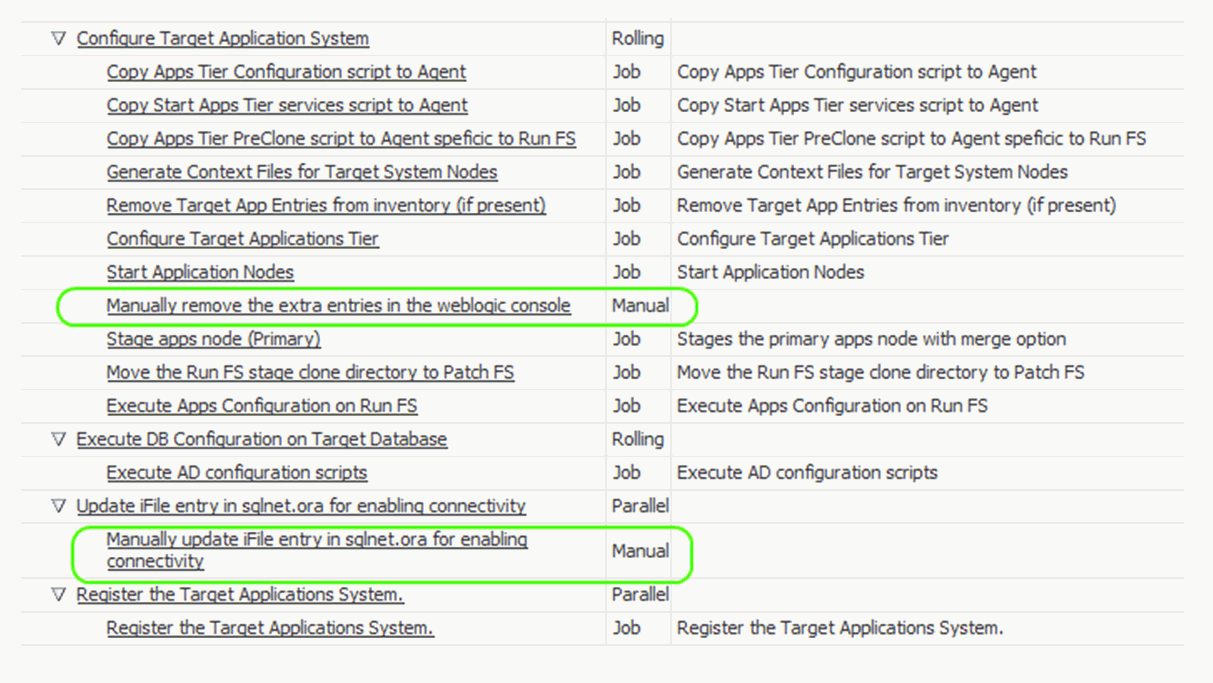
In the Smart Clone Deployment Procedure for Release 12.2.x , if the source is multi-node application tier instance, then there will be manual steps involved. The figure below illustrates these steps.
-
In the first manual step, a manual step is needed after the RUN File system is configured and started. You must manually login to WebLogic console of the RUN file system and remove the redundant source node entries as described in the manual step information.

Then you must confirm your changes in the EM Console.
-
As AutoConfig on the database tier will update the sqlnet.ora file; there will be a manual step just before the target Oracle E-Business Suite discovery step for updating iFile to enable the OMS host(s) to connect to the target Oracle E-Business Suite database.
Adding Custom Steps to a Smart Clone Deployment Procedure
This section describes creating custom steps and adding them to a Smart Clone deployment procedure. For more information generic information on how to create a directive step and add it to a copy of an out-of-the-box deployment procedure, refer to the Oracle Enterprise Manager Cloud Control Administrator's Guide.
Create a directive step
-
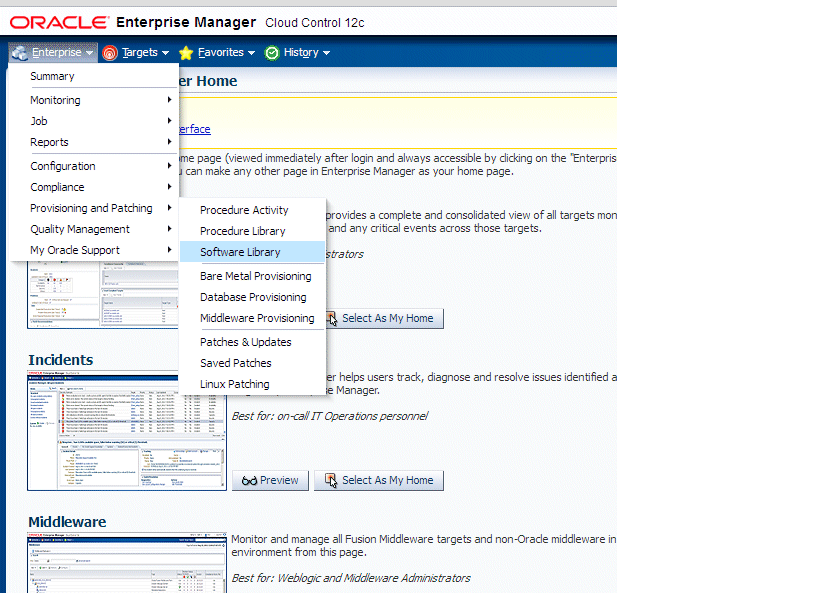
From the Enterprise menu, select Provisioning and Patching, then select Software Library.
-
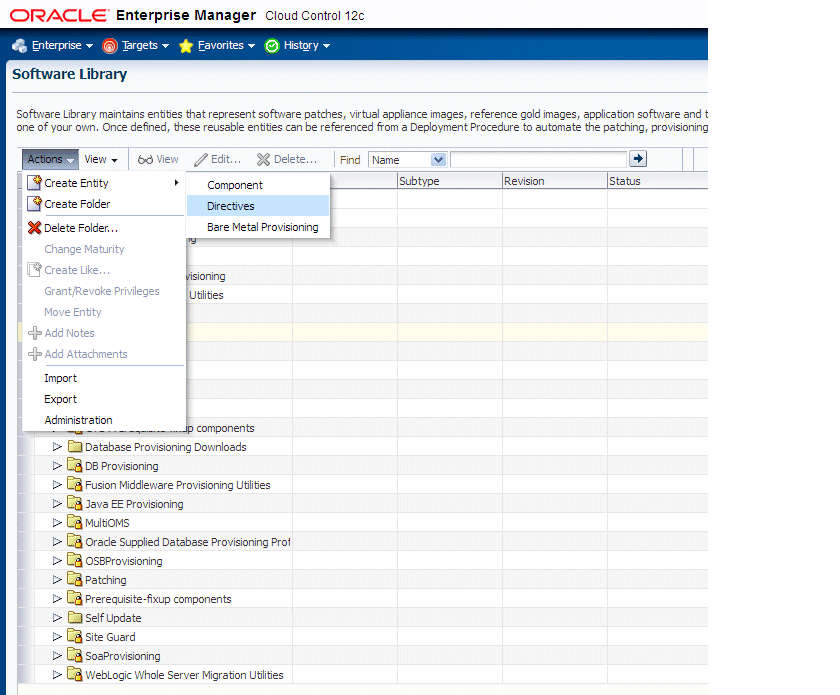
Create a new directive. From the Actions menu, select Create Entity, then select Directives.
-
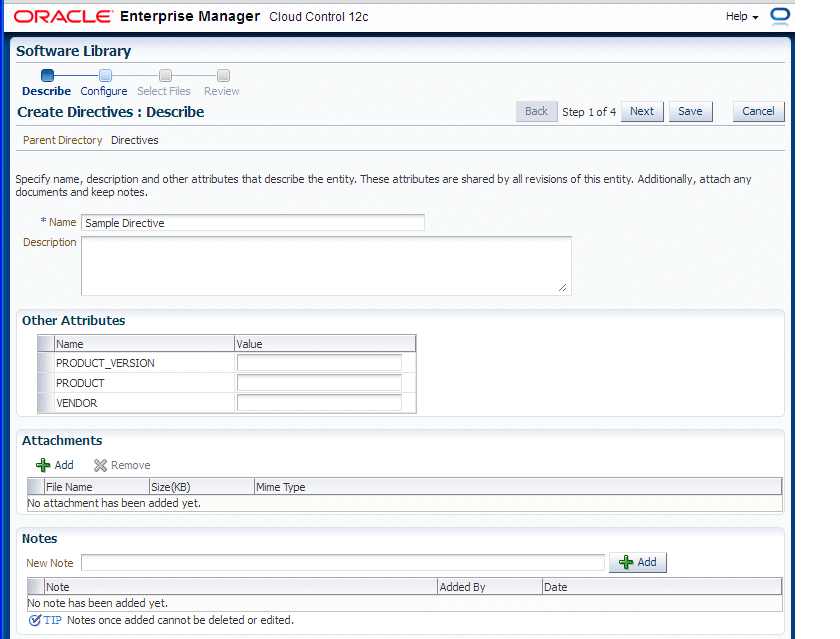
Specify a name and other attributes for the directive.
-
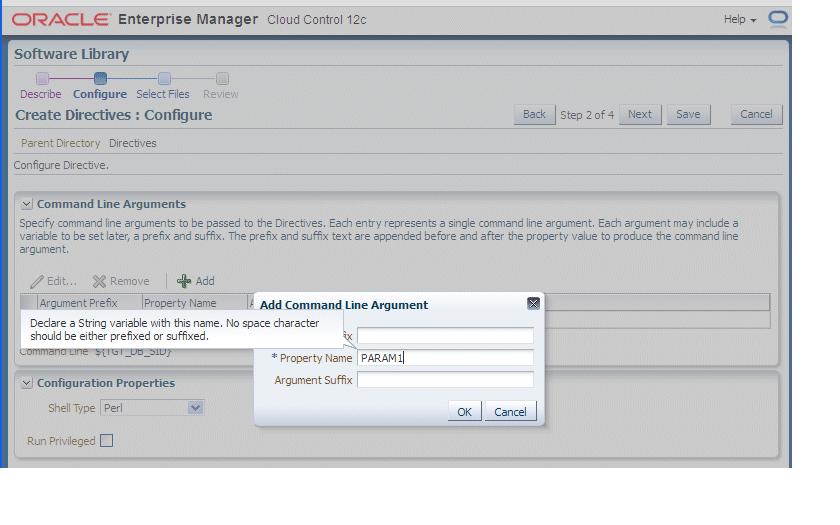
Add parameters for the directive.
-
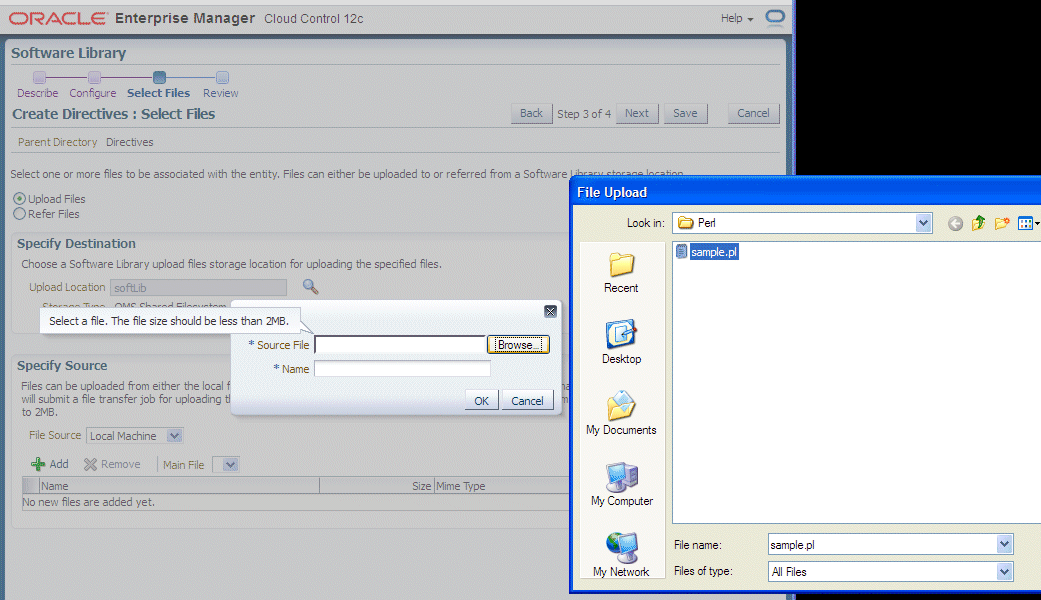
Select the "Software Library" location and the script to be executed. In the example below, a Perl script is used.
-
Click Next and Save and Upload.
Create a copy of the out-of-box Smart Clone deployment procedure
-
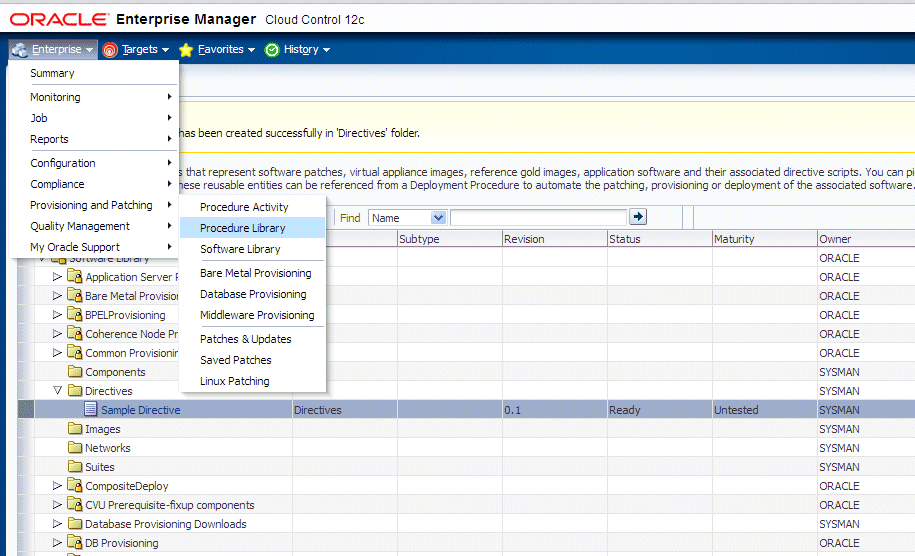
From the Enterprise menu, select Provisioning and Patching, then select Procedure Library.
-
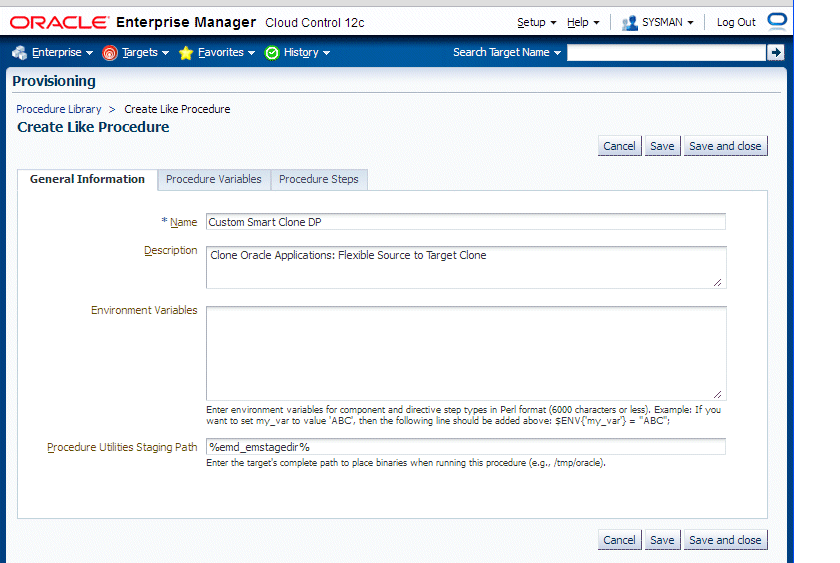
Select "Smart Clone" and click "Create Like".
-
Enter a name and other general information.
-
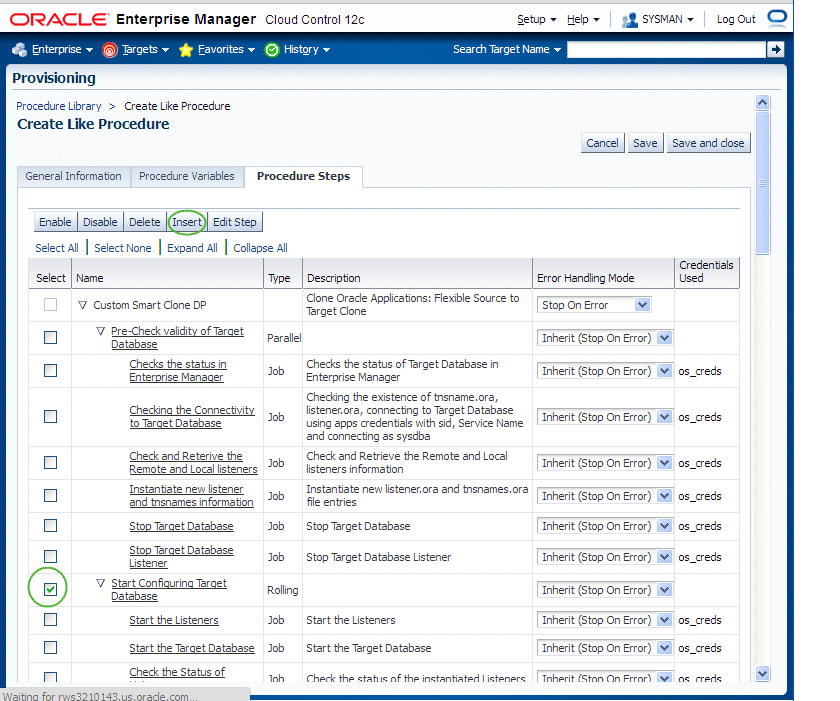
On the Procedure Steps tab, select the step before, inside, or after which you want to add the custom step, and click Insert.
-
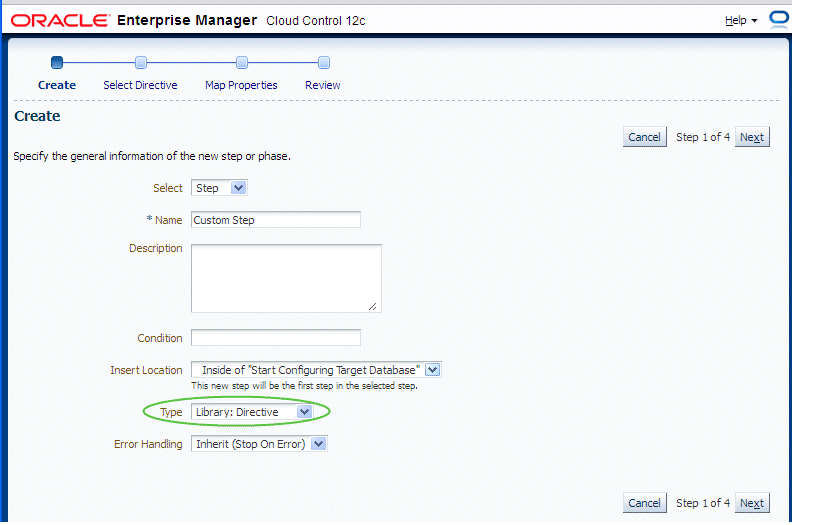
Give the new step a name and enter additional information for the step.
-
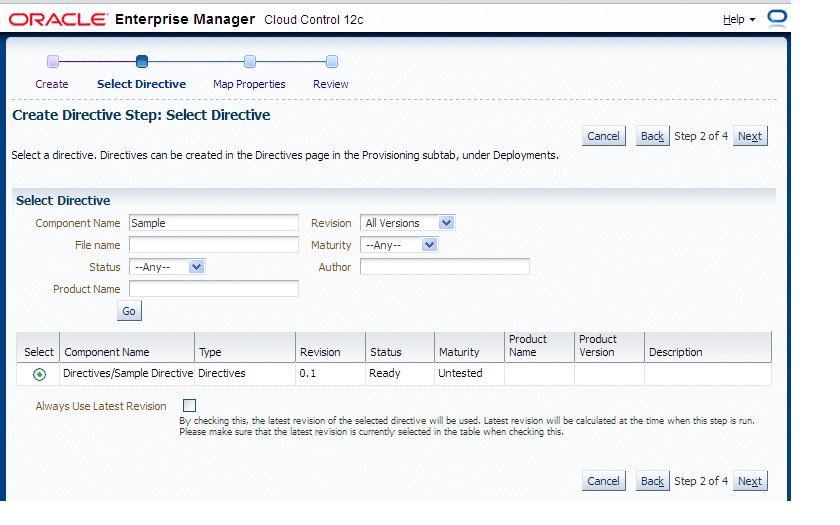
Search for the directive and click Next.
-
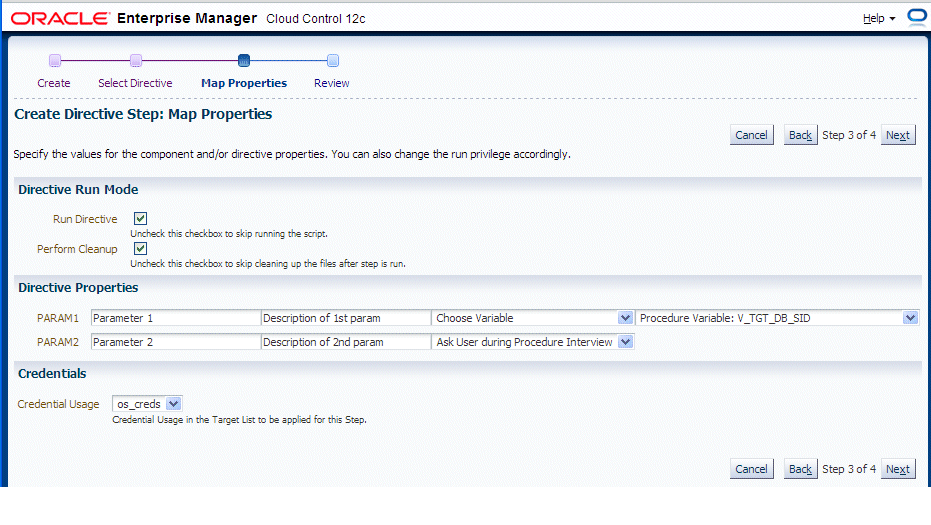
Map the parameters as required in the Map Properties step.
In our example, a text box will be provisioned in the Smart Clone procedure interview to provide the value for "Parameter 2".
Note: The option 'Ask User during Procedure Interview' is NOT supported in Smart Clone for Release 12.2.x.
-
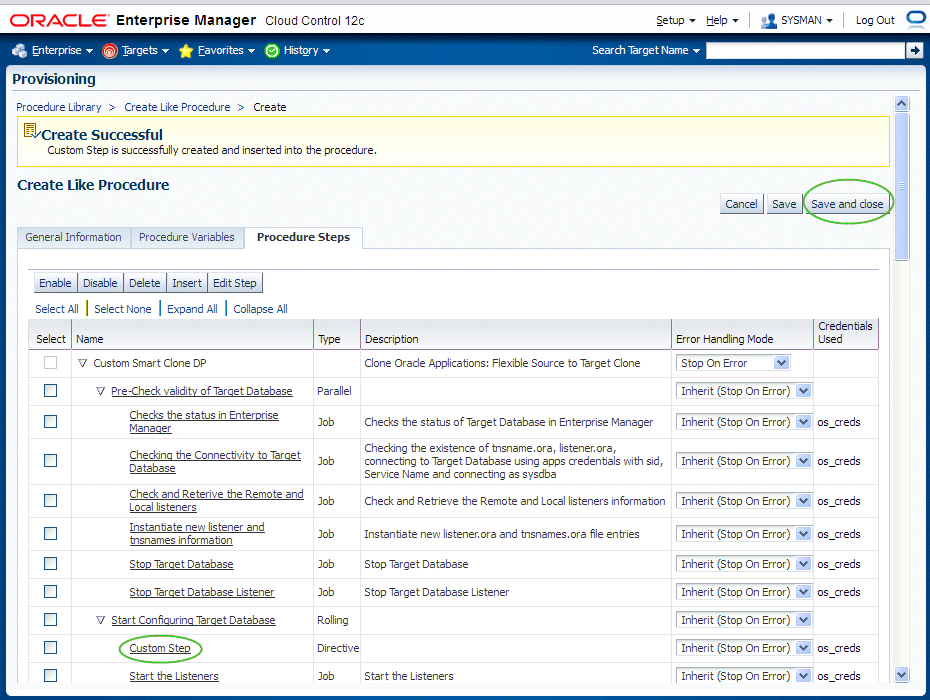
Save the custom step and then save the procedure.
-
You can now submit the newly-created deployment procedure.
