Discovering Oracle E-Business Suite with Cloud Control
Preparatory Steps for Discovery
Privileges needed to do discovery
To discover an Oracle E-Business Suite, users must have the Add any Target target type privilege.
Prerequisites to do discovery
-
The Oracle E-Business Suite database must be discovered in Enterprise Manager Cloud Control.
-
The hosts on which the Oracle E-Business Suite is deployed must be discovered in Enterprise Manager Cloud Control.
-
AutoConfig must be enabled and updated on all nodes in order for Oracle E-Business Suite systems to be properly recognized by Oracle Application Management Pack for Oracle E-Business Suite. Refer to the applicable documentation:
-
My Oracle Support Knowledge Document 165195.1, "Using AutoConfig to Manage System Configurations with Oracle Applications 11i"
-
My Oracle Support Knowledge Document 387859.1, "Using AutoConfig to Manage System Configurations in Oracle E-Business Suite Release 12"
-
Oracle E-Business Suite Setup Guide for Release 12.2, Technical Configuration chapter
-
Note: For an AutoConfig-enabled Release 11i instance, running AutoConfig on the database tier adds the following lines to sqlnet.ora automatically:
tcp.validnode_checking = yes
tcp.invited_nodes=(11i_HOST)
In this case, database discovery or application discovery through Oracle Enterprise Manager will fail because the Oracle E-Business Suite instance database tier listener will reject any connection requests other than from itself. To prevent this failure, add the Oracle Enterprise Manager Cloud Control server to sqlnet_ifile.ora as listed below and bounce the database listener before discovery via Oracle Enterprise Manager.
tcp.invited_nodes=(11i_HOST, EMGC_HOST)
Discovery Wizard
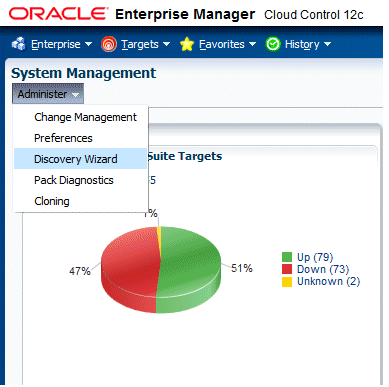
An Oracle E-Business Suite instance is discovered using Discovery Wizard. It allows you to validate, track, plan, log, and customize Oracle E-Business Suite discovery processes. To access Discovery Wizard, select Discovery Wizard from the Administer menu in the System Management page.

Adding an Oracle E-Business Suite database
-
Navigate to Discovery Wizard.
-
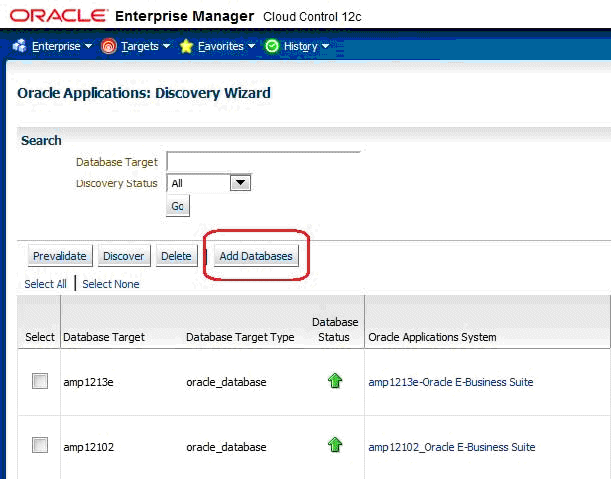
Click on the Add Databases button.

-
Select the Oracle E-Business Suite database target.
-
Once added, the database target shows up in the Discovery Wizard. You can now proceed to discover the Oracle E-Business Suite instance.
Prevalidating Discovery
Prevalidation allows you to analyze the Oracle E-Business Suite instance and Enterprise Manager Cloud Control to ensure successful discovery. Validation checks include verifying the following:
-
Context files
-
Context variables
-
Agent installation
-
OS user privileges
-
Versions of target metadata
For more information on these checks, see: Prevalidation Checks for Discovery.
-
To prevalidate discovery, go to Discovery Wizard.
-
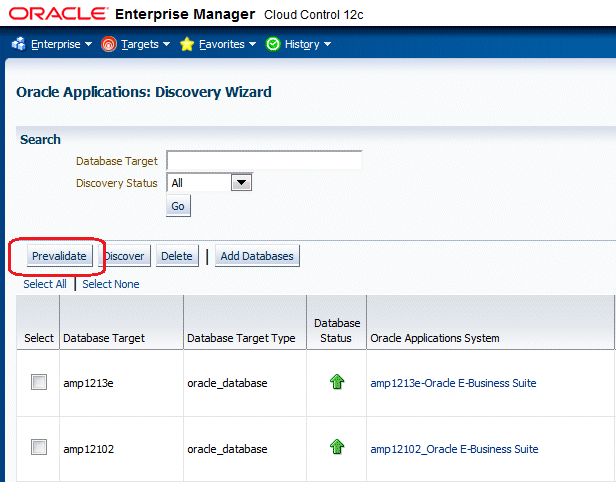
Select the Oracle E-Business Suite database target and click on Prevalidate.

-
Enter the monitoring schema credentials for the database.
-
Click Prevalidate Discovery.
-
A job will be submitted to prevalidate the discovery.
The Diagnostics Status column in the Discovery Wizard shows the status of prevalidation as a link. You can drill down to get the details. A detailed report will be generated that can be used to resolve any issues. Only one Oracle E-Business Suite instance can be prevalidated at a time.
Discovering Oracle E-Business Suite Release 11i, 12.0, or 12.1
-
Navigate to Discovery Wizard.
-
Select the Oracle E-Business Suite database target and click on Discover.
-
Enter the monitoring schema credentials for the database.
-
Click Start Discovery.
-
A job will be submitted to do the discovery. The Diagnostics Status column in the Discovery Wizard will show the status of discovery as a link. You can drill down to get the details.
Discovering Oracle E-Business Suite Release 12.2
-
Set the Normal Host preferred credential where the WebLogic Administration Server is running. See: Setting Oracle E-Business Suite Preferred Credentials.
-
Navigate to Discovery Wizard.
-
Select the Oracle E-Business Suite database target and click on Discover.

-
Enter the monitoring schema credentials for the database.
-
Enter the username and password for the WebLogic Administration Server.
-
Click Start Discovery.
-
A job will be submitted to do the discovery. The Diagnostics Status column in the Discovery Wizard will show the status of discovery as a link. You can drill down to get the details.
Additional Features of Discovery
Discovering multiple Oracle E-Business Suite targets
Discovery Wizard allows you to discovery multiple Oracle E-Business Suite targets. Select all the needed Oracle E-Business Suite database instances and click on Discover. You must enter the Monitoring Schema username and password for all of them in the next page. For Release 12.2 targets, you must also enter the WebLogic Admin username and password.
Discovering Oracle E-Business Suite as EM_MONITOR user (Recommended)
Oracle E-Business Suite can be discovered and monitored using an EM_MONITOR user which has read-only access to Oracle E-Business Suite tables required for monitoring. By default the EM_MONITOR user is locked so a user would have to unlock it explicitly to use it.
Discovering Oracle E-Business Suite by assigning EM_OAM_MONITOR_ROLE to database user (such as DBSNMP)
Oracle E-Business Suite can be discovered and monitored using any database user; for example, the provided DBSNMP user has been granted EM_OAM_MONITOR_ROLE. This role is been provided with read-only access to Oracle E-Business Suite tables required for monitoring.
Troubleshooting discovery
In case if anything goes wrong with the discovery, you must check the discovery log to troubleshoot. It is available at:
$<MIDDLEWARE_HOME>/oms/sysman/log/ebsDiscovery_<DBSID>_oracle_database.log
Restrictions for discovery
-
If you are using Oracle's E-Business Suite Online Patching feature and you have an active patching cycle in progress, you must wait until it completes before attempting to discover an Oracle E-Business Suite instance.
-
You cannot discover two Oracle E-Business Suite instances with the same name.
Customizing discovery
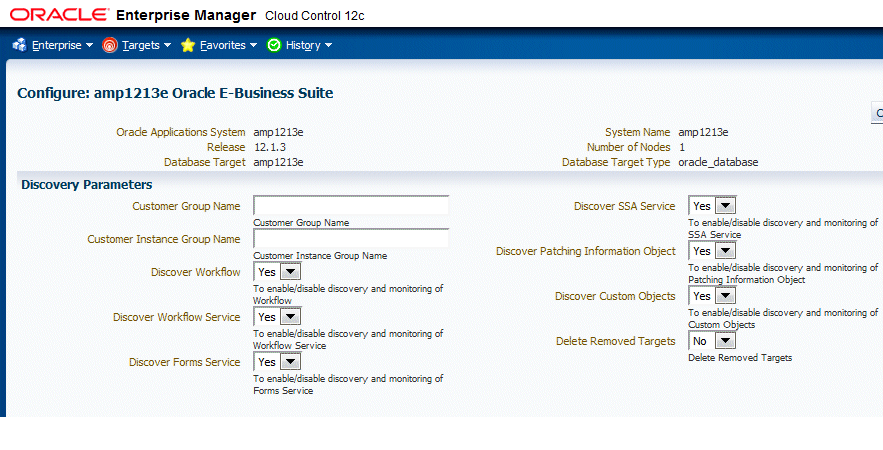
It is possible to customize the discovery. You can exclude the discovery of certain targets and services. To customize the discovery of an Oracle E-Business Suite instance, click on the link available in the Configure column in Discovery Wizard. You will be prompted to enter the monitoring schema credentials for the database.
Customization at instance level
The following table explains the different options available for you.
| Parameter | Description | Applicable Oracle E-Business Suite Releases |
|---|---|---|
| Customer Group Name | All targets discovered for this instance will be grouped under this group. This group will be added to Group: Customer Group Name. | All Releases |
| Customer Instance Group Name | If the Customer Instance Group Name is provided, then all the targets discovered for this instance and the Customer Instance Group Name will be added to this group. | All Releases |
| Discover Discoverer | Disable/Enable discovery of the Discoverer component. | Release 11i only |
| Discover Workflow | Disable/Enable discovery of the Oracle Workflow components. | All Releases |
| Discover Workflow Service | Disable/Enable creation of the Oracle Workflow service. If you do not discover workflow targets, then the workflow service will not be discovered. | Release 12 and Above |
| Discover Forms Service | Disable/Enable creation of the Oracle Forms service. | Release 12 and above |
| Discover SSA Service | Disable/Enable creation of the Self-Service Applications (SSA) Service. | Release 12 and above |
| Discover Patching Information | Disable/Enable discovery of the Patching Information Object. This target is essential for any Oracle E-Business Suite patching application and should be enabled if any patching applications are used with this instance. | Release 12 and above |
| Discover Custom Objects | Disable/Enable discovery of custom objects configuration. | Release 12 and above |
| Delete Removed Targets | Whether to delete an Oracle E-Business Suite member target from OMS which was originally discovered and later detached from the Oracle E-Business Suite target hierarchy with a rediscovery. For example, say you have discovered an Oracle E-Business Suite instance with five nodes. Later you customize the discovery and exclude two nodes. When you perform rediscovery, the two excluded nodes become orphan nodes. If this option is set to Yes, then the orphan targets will be deleted during rediscovery. | All Releases |

Excluding nodes from getting discovered
The Configure Discovery page lists all the nodes. You can exclude a node from being discovered. Uncheck the check box corresponding to the node in the Enable column. At least one applications node must be selected for successful discovery. Discovery can happen even if you do not select any database node.
For Oracle E-Business Suite Release 12.2, you cannot exclude a node if the WebLogic Administration Server is running on that node.
Customization at the node level
You can also configure the targets that get discovered in each node. Click on the Configure column corresponding to each node.
Customization at apps node level
You can exclude Forms and the Apps JVM from being discovered in Release 12.
Mapping Aliased Host
A host which is uniquely identified by an IP Address can have different alias names in the network. It is possible that the Oracle E-Business Suite context file has one host name while it has been discovered in Cloud Control with a different alias name. In such case you must map the host name available in the context file to the corresponding host name with which it has been discovered. This can be done by configuring the discovery for each node. The section Map Aliased Host serves this purpose. Select the radio button Select overriding hostname. A list of values is shown from which you can select the appropriate host which can be mapped to the host in which this node is running.

Resetting the customization
From the Configure Discovery page you can reset your customization to default or you can reset it to the last configuration with which discovery was done successfully.
Command-Line Discovery for Oracle E-Business Suite Systems
The Oracle Application Management Pack for Oracle E-Business Suite provides a command-line interface for the batch discovery of multiple Oracle E-Business Suite systems. Command-line discovery is executed using the script ebsdiscovery.sh which is located under $PLUGIN_HOME/scripts/cli.
Prerequisites
The operating system user who runs command-line discovery must have the full permissions on the OMS ORACLE_HOME. Before running command-line discovery, set the following environment variables:
-
ORACLE_HOME: This environment variable must be set to OMS Home.
-
JAVA_HOME: This environment variable must be set to a valid JDK directory. The OMS ORACLE_HOME ships with one under $ORACLE_HOME/jdk. Once the OMS ORACLE_HOME is set, JAVA_HOME may be set simply by reference to the ORACLE_HOME variable:
export JAVA_HOME=$ORACLE_HOME/jdk
-
PLUGIN_HOME: This environment variable must point to the folder returned by the query "select plugin_home from GC$CURRENT_DEPLOYED_PLUGIN where plugin_id='oracle.apps.ebs' and destination_type='OMS'".
Before running discovery for multiple instances, it is highly recommended that you first try discovering a single Oracle E-Business Suite system.
Discovery
The ebsdiscovery.sh script can be run with the following parameters:
-
inputfile=<ebslist>
This option, when passed to the ebsdiscovery.sh script, will allow for the use of an input file which may contain details for the discovery of several Release 11i or Release 12 Oracle E-Business Suite systems (Oracle Applications environments). See: The ebsList.txt file for more information.
How this option works: Information will be taken from the file specified as <ebslist> and submitted as separate Enterprise Manager jobs for discovering each Oracle E-Business Suite system described in the file. If this “inputfile” option is not provided, then the default value is ebsList.txt. Please see ebsList.txt under $OMS_HOME/sysman/admin/scripts/ebs/cli/amp/disc/ for a sample input file.
-
omscred=<oms credentials file>
OMS Credentials will be taken from this file. This file is machine-generated and should not be edited. If this file does not exist, the ebsdiscovery.sh script will create it after prompting for the necessary input values. If this “omscred” option is not provided, then the default value is omscred.conf.
-
logdir=<log directory>
This option determines the location where the log files will be written.
An example of running the command is:
./ebsdiscovery.sh inputfile=ebsList.txt omscred=omscred.conf logdir=/tmp
After the discovery job is started, you can view its status on the Oracle Management Server. From the Oracle Enterprise Manager console, navigate to Enterprise (menu) > Job > Activity. The status of the job is shown in the Status field. Click on the job name link to drill down to details on the discovered Oracle E-Business Suite instance.
The ebsList.txt file
The ebsList.txt file contains parameters and values for the discovery process.
The ebsList.txt file

The format for the ebsList.txt file is:
DBTARGET=>[[
           DBTARGET=><DBTARGET>;
           DBTYPE=><oracle_database | rac_database>;
           APPS_USER=><apps db user>;
           APPS_PASSWORD=><apps password>;
           ]]
Extra parameters can be provided as <key>=><value> pairs delimited by a semi-colon (;).
For ENCRYPTED_PASSWORD=><encrypted apps password>, the encrypted password will be used to decrypt the password on successive usage of the ebsList.txt file. To override the old password, change the input and add APPS_PASSWORD key value pair again with the new, changed password.
ebsList.txt Parameters
The following table describes the ebsList.txt parameters and their valid values.
| Key | Supported Release | Valid Values | Description | Default |
|---|---|---|---|---|
| DB_TARGET | All | DB Target Name | Database Target name of the Apps you want to discover | N/A |
| DB_TYPE | All | oracle_database or rac_database | Database type | oracle_database |
| APPS_USER | All | Apps username | apps | |
| APPS_PASSWD | All | Apps password | This will be replaced by ENCRYPTED_APPS_PASSWD | apps |
| APPS_MONITORING_USER | 12.0 or higher | Apps Monitoring username | This is used for out-of-box service monitoring | |
| APPS_MONITORING_PASSWORD | 12.0 or higher | Apps Monitoring password | This will be replaced by ENCRYPTED_APPS_MONITORING_PASSWORD | |
| DISCOVER_WORKFLOW | All | Y or N | Whether to Discover Workflow targets | Y |
| DISCOVER_WORKFLOW_SERVICE | 12.0 or higher | Y or N | Whether to Discover Workflow Service if DISCOVER_WORKFLOW is Y | Y |
| DISCOVER_FORMS | 12.0 or higher | Y or N | Whether to Discover Forms or not | Y |
| DISCOVER_FORMS_SERVICE | 12.0 or higher | Y or N | Whether to Discover Forms Service if DISCOVER_FORM is Y | Y |
| DISCOVER_SSA | 12.0 or higher | Y or N | Whether to discover SSA Service or not | Y |
| DISCOVER_CUSTOM_OBJECTS | 12.0 or higher | Y or N | Whether to Discover Custom Objects or not | Y |
| DISCOVER_PATCHING | 12.0 or higher | Y or N | Whether to discover Patching Configuration target | Y |
| PROTOCOL | 11i | http or https | Whether to have http or https | http |
| SRVLT_URL_FROM_CTXFILE | 11i | Y or N | Whether to take Servlet URL from Context file or Not. If this value is N, Value for Servlet url will be "/servlet/oracle.forms.servlet.ListenerServlet" | Y |
| ADD_CUSTOMER_GROUP | 12.0 or higher | Y or N | Shall Add Customer Group | N |
| CUSTOMER_INST_GRP_NAME | 12.0 or higher | Text | Customer Instance Group Name | N/A |
| CUSTOMER_GRP_NAME | 12.0 or higher | Text | Customer Group Name | N/A |
| DELETE_REMOVED_TARGETS | All | Y or N | Whether or not to delete removed targets. Default is N | N |
| DISCOVER_DISCOVERER | 11i | Y or N | Whether or not discover discoverer | Y |
| FORMS_SRVLT_PROTOCOL | 11i | http or https | Whether to have http or https for forms servlet mode | http |
| DISCOVER_JVM_USAGE | 12.0 or higher | Y or N | Whether or not to discover JVM usage target | A |
| WLS_ADMIN_USER | 12.2 or higher | Username of the WLS admin | N/A | |
| WLS_ADMIN_PWD | 12.2 or higher | Password for the WLS admin user | N/A |
Customer Groups Created by Discovery
Groups are an optional feature in Enterprise Manager that allows the logical organization of targets in accordance to user preference. Command line discovery allows the definition of target groups and placement of Oracle E-Business Suite systems in these groups at time of discovery. Groups can also be created using the normal discovery process available in the management console, as well as after discovery.
To view these groups, navigate within the Enterprise Manager console to Targets (menu) > Groups.
Rediscovering an Oracle E-Business Suite instance
If the Oracle E-Business Suite configuration has changed after discovery, then you must rediscover the Oracle E-Business Suite instance so that such changes are reflected in Enterprise Manager. Examples of changes to the configuration are:
-
A new node has been added
-
A service, such as a concurrent processing service, has been enabled in a node
The steps for rediscovery are the same:
-
Navigate to Discovery Wizard.
-
Select the Oracle E-Business Suite database.
-
Click Discover.
Deleting an Oracle E-Business Suite Instance
If you no longer want to monitor and manage a Oracle E-Business Suite instance, you can delete it. The steps are:
-
Go to the System Management page.
-
Select the Oracle E-Business Suite instance from the section Oracle E-Business Suite instances.
-
Click Delete.
By default, the system deletes application server targets (like the HTTP server, OC4J, and so on) when deleting the parent Oracle E-Business Suite target. If you do not want all the application server targets deleted, change the preference. For information on updating preferences, see: Setting Preferences.