3 Using EM CLI
This chapter discusses the following Enterprise Manager Command Line Interface (EM CLI) topics:
3.1 Using Command-line EM CLI
Command-line EM CLI is the traditional and most direct way of invoking an EM CLI verb. The basic syntax from the system prompt is:
emcli verb_name -required_parameter1 -required_parameter2 ... -optional_parameter1 -optional_parameter2 ...
The syntax for a particular verb applies to its usage whether it is invoked through the command line or programatically. For example, the syntax for the create_group verb is:
emcli create_group
      -name="name"
      [-type=<group>]
      [-add_targets="name1:type1;name2:type2;..."]...
      [-is_propagating="true/false"]
This indicates that the -name parameter is required, whereas the -type parameter, enclosed within brackets, is optional, as well as the -add_targets and -is_propagating parameters. This example shows how the verb might be used at the command-line prompt:
emcli create_group -name=db_group
      -add_targets="emp_rec:oracle_database"
      -add_targets="payroll:oracle_database"
Chapter 5, "Verb Reference" provides the format, descriptions of required and optional parameters, and examples for most EM CLI verbs. Those that are not documented can be found in the online help by entering the following command:
emcli help verb_name
3.2 Using EM CLI in Interactive or Script Mode
As introduced in Chapter 1, EM CLI provides Interactive and Script modes to enhance and extend the basic functionality offered through the standard command-line invocation. Both Interactive and Script mode provide the same functionality. Unless otherwise stated explicitly, all of the information presented in this chapter pertains to both Interactive and Script modes.
The following sections discuss the fundamental principles associated with the EM CLI interactive or scripting modes:
-
Interactive Mode — Connecting to an Oracle Management Server (OMS)
-
Examples of Standard, Interactive, and Script Verb Invocations
Tip:
For a demonstration of using EM CLI in script and interactive mode, click on the links below to view the following Enterprise Manager Screenwatches:3.2.1 Jython Interpreter
Beginning with Enterprise Manager Cloud Control version 12cR3, EM CLI includes an embedded Jython interpreter (Jython 2.5.3), where all of the verbs are registered as functions, known as EM CLI verb functions or simply functions. Usage of these functions is similar to the corresponding verb. In these functions, the parameters (supplied as key-value pairs) are those present in the verb arguments.
In Interactive mode, the interpreter opens a shell where you can type your commands. Using Script mode, you can run your Jython program by passing it to the interpreter in a non-interactive fashion. For both modes, apart from using the EM CLI verb functions, you can also program in Jython conventionally.
3.2.2 Script and Interactive Mode Syntax
The syntax for these two modes varies slightly.
Enter emcli and provide the script location as shown in the following example, where my_script.py is the full path of a valid Python script:
%emcli @my_script.py
To start EM CLI in Interactive mode:
Enter emcli at the command prompt to start an interactive shell, as follows:
Linux platform:
     % emcli
     emcli>
Windows platform:
     C:\Directory> emcli
     emcli>
Comparing Script and Interactive Modes
To illustrate using the interpreter in both Script and Interactive mode to achieve the same objective, This examples print the current version of the installed EM CLI client. Example 3-1 shows a Python script that uses the version() verb of EM CLI to print the current version. Example 3-2 achieves the same result using the interactive shell. Note that the version verb used in both of these examples has the same signature and functionality.
3.2.3 Interactive Mode — Connecting to an Oracle Management Server (OMS)
Because most of the verbs require a connection to an OMS, you need to set up an OMS connection in an Interactive shell before you can invoke any verb by minimally setting the following required client properties and optionally setting others:
-
EMCLI_OMS_URL
-
EMCLI_TRUSTALL or EMCLI_CERT_LOC
The following procedure provides a recommended method of setting up these properties and subsequently logging in.
-
Type help('client_properties') in the Interactive shell for more information about the available client properties, as shown in the following output example:
emcli>help('client_properties') EMCLI_OMS_URL : OMS URL To connect to. EMCLI_USERNAME : OMS Username. EMCLI_AUTOLOGIN : Possible values are true,false. Default is false. EMCLI_TRUSTALL : Possible values are true,false. Default is false. EMCLI_VERBJAR_DIR : Location of bindings directory. EMCLI_CERT_LOC : Location of a valid certificate file. EMCLI_LOG_LOC : Directory where log files will be stored. EMCLI_LOG_LEVEL : Possible values are ALL,INFO,FINE,FINER,WARN,SEVERE Default is SEVERE. EMCLI_OUTPUT_TYPE : Possible values are json, JSON, text, TEXT. Default is json in script mode and text in interactive mode. status() will list values of all the client properties. set_client_property(propertyname,value), get_client_property(propertyname), and clear_client_property(name)can be used to set, get, and clear a client property -
Set the required client properties from either the Interactive shell directly using the set_client_property() function, or as environment variables before a shell is launched.
-
For example, to connect to an OMS at https://host1.example.com:1234/em in which you want to trust all certificates:
emcli>set_client_property('EMCLI_OMS_URL', 'https://host1.example.com:1234/em') emcli>set_client_property('EMCLI_TRUSTALL','true') -
For example, to set the same client properties as environment variables on a Linux platform:
% setenv EMCLI_TRUSTALL true
% setenv EMCLI_OMS_URL https://host1.example.com:1234/em
Windows platform:
C:\Directory> set EMCLI_TRUSTALL=true
C:\Directory> set EMCLI_OMS_URL=https://host1.example.com:1234/em
-
-
Log into the OMS:
emcli>login(username='<user>')
-
Provide a password at the prompt. You can also alternatively provide a password as shown:
emcli>login(username='foo', password='bar')
Alternatively Logging in with EMCLI_USERNAME
You can use the EMCLI_USERNAME client property to log in as shown in This example for the Linux platform:
% setenv EMCLI_USERNAME sysman
        emcli>login()
        Enter password :  ******

        Login successful
Windows platform:
C:\Directory> set EMCLI_USERNAME sysman
        emcli>login()
        Enter password :  ******

        Login successful
Displaying the Status of a Session
You can use the status() command to display the status of an EM CLI session, as shown in This example:
emcli>status()
        <banner>

        Verb Jars Home (EMCLI_VERBJAR_DIR)  :
                                      /<Location>/int/./bindings/12.1.0.x.0/.emcli
        EM CLI Home (EMCLI_INSTALL_HOME)        : /<Location>/int/.
        EM CLI Version                          : 12.1.0.x.0
        Java Home                               : /jdk6/jre
        Java Version                            : 1.x.0_x
        Log file (EMCLI_LOG_LOC)                : CONSOLE
        Log level (EMCLI_LOG_LEVEL)             : SEVERE
        EM URL (EMCLI_OMS_URL)                  : https://host1.example.com:1234/em
        EM user (EMCLI_USERNAME)                : <user>
        Auto login (EMCLI_AUTOLOGIN)            : false
        Trust all certificates (EMCLI_TRUSTALL) : true
To exit the EM CLI interactive shell, use the exit verb as shown:
emcli>exit()
3.2.4 Examples of Standard, Interactive, and Script Verb Invocations
This examples contrast these three methods of verb invocations.
Example 1 — String-based Arguments
Standard invocation:
% emcli create_user -name='jan.doe' -type='EXTERNAL_USER'
Interactive mode invocation:
emcli>create_user(name='jan.doe',type='EXTERNAL_USER')
Script mode invocation:
create_user(name='jan.doe',type='EXTERNAL_USER')
Example 2 — List-based Arguments
Standard invocation:
   % emcli grant_privs -name='jan.doe' \
           -privilege="USE_ANY_BEACON" \
           -privilege="FULL_TARGET;TARGET_NAME=host1.example.com:TARGET_TYPE=host"
Interactive mode invocation:
   emcli>priv_list = ['USE_ANY_BEACON',
   'FULL_TARGET;TARGET_NAME=myhost.us.example.com:TARGET_TYPE=host']
Script invocation:
   priv_list=['USE_ANY_BEACON',
   'FULL_TARGET;TARGET_NAME=myhost.us.example.com:TARGET_TYPE=host']
Example 3 — Flag-based Boolean Arguments
Standard invocation:
% emcli get_targets -noheader
Interactive mode invocation:
emcli>get_targets(noheader=True)
Script invocation:
get_targets(noheader=True)
Advisory Information About Incomplete Commands in Interactive Mode
If you do not complete a command in interactive mode, the Jython interpreter prompts with three dots on the next line. Until the line is complete, Jython continues to generate this prompt. For example:
emcli > status(
...
...
...
...)
Providing the closing parenthesis executes the status command.
In This example, "\n" completes the line, and reports a syntax error.
emcli> get_targets -targets="oracle_database"
...
...
...\n
3.2.5 Writing and Running the First Script
To assist you in writing your first script, this section analyzes a sample script that retrieves all targets and prints their names. Example 3-3 shows the entire script.
Note:
Line numbers are provided only for explanatory purposes for Table 3-1. For a copy-ready script, see Example A-1 in Appendix A, "Sample Scripts".Example 3-3 Script That Retrieves All Targets and Prints Their Names
 1 #emcli_get_targets.py
 2
 3 #Import all emcli verbs to current program
 4 from emcli import *
 5
 6 def print_target_details(target):
 7    '''
         8    print the target name and target type given a target tuple.
         9    '''
        10    print target['Target Name'] + ' ' + target['Target Type']
11
12 #Set the OMS URL to connect to
13 set_client_property('EMCLI_OMS_URL','https://host1.example.com:1234/em')
14 #Accept all the certificates
15 set_client_property('EMCLI_TRUSTALL','true')
16
17 #Login to the OMS
18 login(username='adminuser')
19
20 #Invoke get_targets and loop over the targets array
21 targets_array = get_targets().out()['data']
22 for target in targets_array:
23       #Call print_target_details function to print the target details
24     print_target_details(target)
Note:
Observe the method of accessing the JSON response from the verb response get_targets().out()[’data']. The get_targets() response provides a handle to the response object, and out()[’data'] provides a handle over the underlying JSON data. This methodology is consistent for most verbs.Table 3-1 provides an analysis of each line of code.
Table 3-1 Line-by-Line Script Analysis
| Lines | Description |
|---|---|
|
4 |
Jython import construct to import all EM CLI verb functions in the current program. You can also selectively import the verb functions. You can use the Jython import function to import all of the functions as wildcards or on an as needed basis explicitly. For example:
from emcli import *
... imports all of the functions, whereas ...
from emcli import get_targets
... imports only the get_targets function. |
|
6 - 10 |
Custom Jython function to print the name and type of a target. It accepts a key value tuple of the form. It accepts a key value tuple of the form |
|
13, 15 |
Necessary connection to OMS in order to retrieve all targets. Before connecting to the OMS, you must first set the OMS connection details using the Note that none of these details are stored in disk. These details are stored in memory and only last for a single script execution. For more information on client properties, enter help('client_properties') from the interactive shell. You can define EMCLI_OMS_URL and EMCLI_TRUSTALL variables as environment variables if you do not want to set these in your script. If you have downloaded certificates somewhere, you can also use the environment variable EMCLI_CERT_LOC to point to the certificate directory. In this case, you do not need EMCLI_TRUSTALL. |
|
18 |
Login function to connect to the OMS. The example uses the Sysman user to log in. This prompts for a password during execution. |
|
21 - 24 |
Invokes the get_targets() function and captures its response in an array called targets_array. This is in JSON format. This example iterates through this array and uses the custom function print_target_details to print its name and type. |
Example 3-4 shows that executing this script retrieves the list of all targets and their types.
Example 3-4 Output of Script that Retrieves All Targets
$emcli @emcli_get_targets.py
Enter password :  ******
test.example.com host
EM Management Beacon oracle_beacon
CSAcollector oracle_csa_collector
Oemrep_Database oracle_database
EM Jobs Service oracle_em_service
test.example.com:1838 oracle_emd
Management Services and Repository oracle_emrep
Management_Servers oracle_emsvrs_sys
test.example.com:7654_Management_Service oracle_oms
test.example.com:7654_Management_Service_CONSOLE oracle_oms_console
test.example.com:7654_Management_Service_PBS oracle_oms_pbs
/EMGC_EMGC_DOMAIN/EMGC_DOMAIN weblogic_domain
Logout successful
The Logout Successful message indicates that the login session to the OMS is closed at the end of the execution.
3.2.6 Invoking an EM CLI Verb Programatically
As mentioned earlier, all of the verbs are available as global Jython functions with verb options as function parameters. Flag-based options are provided by specifying True as the value. List-based options are provided by constructing a Python list and using it as an argument. Table 3-7 provides more details on this.
3.2.6.1 Accessing Verb Invocation Responses
Every EM CLI verb invocation returns a Response object. The Response object is part of EM CLI, and has the functions listed in Table 3-2.
Table 3-2 Response Object Functions
| Function | Description |
|---|---|
|
out() |
Provides the verb execution output. The output can be text, or the JSON.isJson() method on the Response object can be used to determine whether the output is JSON. Refer to the section "JSON Processing" for more details. |
|
error() |
Provides the error text (if any) of the verb execution if there are any errors or exceptions during verb execution. Refer to the section "Error and Exception Handling" for more details. |
|
exit_code() |
Provides the exit code of the verb execution. The exit code is zero for a successful execution and non-zero otherwise. Refer to the section "Error and Exception Handling" for more details. |
|
isJson() |
Provides details about the type of output. It returns True if response.out() can be parsed into a JSON object. |
Example 3-5 invokes the get_targets verb and prints the output, error, and exit code of the execution.
Note:
Line numbers are provided only for illustrative purposes. For a copy-ready script, see Example A-2 in Appendix A, "Sample Scripts".Example 3-5 Script that Incorporates Functions in the get_targets Verb
1  #emcli_introspect_response.py
2
3  #Import all emcli verbs to current program
4  from emcli import *
5
6  #Set the OMS URL to connect to
7  set_client_property('EMCLI_OMS_URL','https://host1.example.com:1234/em')
8  #Accept all the certificates
9  set_client_property('EMCLI_TRUSTALL','true')
10
11 #Login to the OMS
12 login(username='sysman')
13
14 res = get_targets()
15
16 print 'Number of targets:'+str(len(res.out()['data']))
17 print 'Errors           :'+res.error()
18 print 'Exit code        :'+str(res.exit_code())
19 print 'IsJson           :'+str(res.isJson())
Line 16 shows that instead of printing the raw response (which will be JSON), the example uses the Jython len() function to print the length of the response array, which is basically the count of all of the targets. Note that the example uses the Jython str() function to convert an integer type to a string.
Example 3-6 shows the execution of the script in Example 3-5.
3.2.6.2 JSON Processing
If a verb response is JSON, it can be interactively iterated and accessed. You can use response.isJson() to check whether the verb output is JSON. If the verb output is JSON, response.out()['data'] provides the object in the Jython object model.
JSON processing has been shown in previous examples. Example 3-7 shows another example of this processing. The example uses custom SQL with the list() function, which provides a generic method to retrieve data about managed objects in Enterprise Manager. Custom SQL only works if the OMS user has super user privileges.
Note:
Line numbers are provided only for explanatory purposes for Table 3-3. For a copy-ready script, see Example A-3 in Appendix A, "Sample Scripts".Example 3-7 Script that Incorporates Custom SQL with the list() Function
1  #emcli_json_processing.py
2  #Import all EM CLI verbs to current program
3  from emcli import *
4  def format(str):
5     '''
6     Given a string argument returns it back or returns
7     a blank string if it is of None type
8     '''
9     if str is None:
10      return ""
11    return str
12
13 def get_targets_with_props(p_prop_name, p_prop_val):
14 '''
15 Returns targets with given property name and its value. Uses list verb.
16 '''
17 l_sql = "select target_name, target_type, property_value " \
18         "from mgmt$target_properties " \
19         "where property_name = '" + p_prop_name + "' " + "   " \
20         "and property_value like '" + p_prop_val + "'"
21    obj = list(sql=l_sql)
22    return obj
23 #Set the OMS URL to connect to
24 set_client_property('EMCLI_OMS_URL','https://host1.example.com:1234/em')
25 #Accept all the certificates
26 set_client_property('EMCLI_TRUSTALL','true')
27 #Log in to the OMS
28 login(username='sysman')
29 #Find all the targets that have Version property set to release 12
30 l_targets = get_targets_with_props('Version', '12%')
31 for target in l_targets.out()['data']:
32       tn =  target['TARGET_NAME']
33       tt =  target['TARGET_TYPE']
34       pv =  target['PROPERTY_VALUE']
35       print "Name "+tn + " Type =" + tt + " value=" + pv
Table 3-3 provides an analysis of relevant lines of code. The remainder of the program is similar to Example 3-3, which was analyzed in Table 3-1.
Table 3-3 Line-by-Line Script Analysis
| Lines | Description |
|---|---|
|
13 - 22 |
A custom Jython function get_targets_with_props() returns all of the targets with a given property name and value. It uses the list() function or verb to query the targets. This verb, introduced in 12cR3, provides a convenient way to search the Enterprise Manager repository for resources. One of its features is to list the resources matching a given SQL query, which is used in the example. The output of this verb is JSON, which can be accessed using out()[’data']. |
|
31 - 35 |
Iterates over the JSON response and prints the target name and target type. |
Example 3-8 shows that executing this script retrieves the list of all targets and their types.
3.2.7 Error Exception Handling
If an exception or error occurs during verb execution, an exception of type emcli.exception.VerbExecutionError is raised. emcli.exception.VerbExecutionError extends from RuntimeError and hence stops the execution. You can use standard Jython exception handling to catch this exception.
emcli.exception.VerbExecutionError has the functions listed in Table 3-4.
Table 3-4 Functions for emcli.exception.VerbExecutionError
| Function | Description |
|---|---|
|
error() |
Provides the error text of the verb execution. |
|
exit_code() |
Provides the exit code of the verb execution. |
Example 3-9 shows the usage of VerbExecutionError.
Note:
Line numbers are provided only for explanatory purposes for Table 3-5. For a copy-ready script, see Example A-4 in Appendix A, "Sample Scripts".Example 3-9 Script that Incorporates Exception Handling
1  #emcli_error_exception_handling.py
2
3  #import all emcli verbs to current program
4  from emcli import *
5  #import the verbexecutionerror
6  from emcli.exception import VerbExecutionError
7
8  #Set the OMS URL to connect to
9  set_client_property('EMCLI_OMS_URL','https://host1.example.com:1234/em')
10 #Accept all the certificates
11 set_client_property('EMCLI_TRUSTALL','true')
12
13 #Login to the OMS
14 login(username='sysman')
15
16 #Create a group
17 res = create_group(name='Jan_Doe_Group')
18
19 print res.out()
20
21 #Try to create the same group again
22 try:
23   #This will trigger an exception as the group exist already
24   create_group(name='Jan_Doe_Group')
25 except VerbExecutionError , e:
26    print e.error()
27    print 'Exit code:'+str(e.exit_code())
Table 3-5 provides an analysis of relevant lines of code.
Table 3-5 Line-by_Line Script Analysis
Example 3-10 shows the output of the script shown in Example 3-9.
3.2.8 Utility Functions
The functions shown in Table 3-6 are also available in the EM CLI package.
Table 3-6 Additional Functions
| Function | Description |
|---|---|
|
last_out() |
Returns the output for the last executed EM CLI command. It returns None if an EM CLI command has not been executed in the current session. |
|
last_error() |
Returns the error text (if any) for the last executed EM CLI command. It returns None if an EM CLI command has not been executed in the existing session, or all of the previous executions were successful. |
|
clear() |
Clears the current shell in Interactive mode. |
|
exit(ret_val) |
Exits from the EM CLI Interactive shell with ret_val. |
3.2.9 Extending EM CLI with Python Libraries
You can extend EM CLI with end-user Python libraries by doing one of the following:
-
Copy modules to the extension directory, as shown in This example:
$EMCLI_INSTALL_HOME/extdir
-
Specify the EMCLI_PYTHONPATH environment variable where the Python modules are loaded from.
3.2.10 Selected Use Cases
Table 3-7 shows various use cases and corresponding solution examples for standard EM CLI versus interactive invocations or scripts.
| Task/Action | Usage for Standard EM CLI | Usage for EM CLI Interpreter (interactive shell or script) |
|---|---|---|
|
Invoke a verb with string-based arguments |
% emcli create_user -name='jane.doe' -type='EXTERNAL_USER' |
create_user(name='jane.doe', type='EXTERNAL_USER') |
|
Invoke a verb with list-based arguments |
% emcli grant_privs -name='jan.doe' -privilege="USE_ANY_BEACON" \ privilege="FULL_TARGET;TARGET_NAME=host1.example.com:TARGET_TYPE=host" |
#First construct a list priv_list = ['USE_ANY_BEACON','FULL_TARGET;TARGET_NAME=host1.example.com: TARGET_TYPE=host'] #Now use the list grant_privs(name='jan.doe', privilege=priv_list) |
|
Invoke a verb with flag-based Boolean arguments |
% emcli get_targets -noheader |
get_targets(noheader=True) |
|
Using help |
help $verb_name For example, help get_targets prints the help for the get_targets verb. |
help(’$verb_name') For example, help(’get_targets') prints the help for the get_targets verb. |
3.3 Advanced Script Examples
This chapter provides examples of using EM CLI to write scripts and automate routine tasks. To use these scripts, Oracle recommends that you are experienced with scripting languages and familiar with Jython (Python for the Java platform).
3.3.1 Changing Lifecycle Status Properties
To assist you in writing scripts, this section analyzes a sample script that changes the lifecycle status properties.
Example 3-11, "LifeCyclePropertyChange.py" enables an Enterprise Manager administrator to change the lifecycle status of all the Oracle databases (release 11.2) in their test environment from Test to Production. Without this script, you would have to log in to the Enterprise Manager Cloud Control console, and identify all the release 11.2 databases, then manually change the property to Production for each database target from the target's home page.
You can reuse this script whenever there is a request to change a set of targets to a different Lifecycle status.
Note:
Line numbers are provided only for explanatory purposes for Table 3-3. For a copy-ready script, see Example A-5 in Appendix A, "Sample Scripts".Example 3-11 LifeCyclePropertyChange.py
#Disclaimer
#EXCEPT WHERE EXPRESSLY PROVIDED OTHERWISE, THE SITE, AND ALL CONTENT PROVIDED ON
#OR THROUGH THE SITE, ARE PROVIDED ON AN "AS IS" AND "AS AVAILABLE" BASIS. ORACLE
#EXPRESSLY DISCLAIMS ALL WARRANTIES OF ANY KIND, WHETHER EXPRESS OR IMPLIED,
#INCLUDING, BUT NOT LIMITED TO, THE IMPLIED WARRANTIES OF MERCHANTABILITY, FITNESS
#FOR A PARTICULAR PURPOSE AND NON-INFRINGEMENT WITH RESPECT TO THE SITE AND ALL
#CONTENT PROVIDED ON OR THROUGH THE SITE. ORACLE MAKES NO WARRANTY THAT: (A) THE
#SITE OR CONTENT WILL MEET YOUR REQUIREMENTS; (B) THE SITE WILL BE AVAILABLE ON AN
#UNINTERRUPTED, TIMELY, SECURE,OR ERROR-FREE BASIS; (C) THE RESULTS THAT MAY BE
#OBTAINED FROM THE USE OF THE SITE OR ANY CONTENT PROVIDED ON OR THROUGH THE SITE
#WILL BE ACCURATE OR RELIABLE; OR (D) THE QUALITY OF ANY CONTENT PURCHASED OR
#OBTAINED BY YOU ON OR THROUGH THE SITE WILL MEET YOUR EXPECTATIONS.
#ANY CONTENT ACCESSED, DOWNLOADED OR OTHERWISE OBTAINED ON OR THROUGH THE USE OF
#THE SITE IS USED AT YOUR OWN DISCRETION AND RISK. ORACLE SHALL HAVE NO
#RESPONSIBILITY FOR ANY DAMAGE TO YOUR COMPUTER SYSTEM OR LOSS OF DATA THAT
#RESULTS FROM THE DOWNLOAD OR USE OF CONTENT.
#ORACLE RESERVES THE RIGHT TO MAKE CHANGES OR UPDATES TO, AND MONITOR THE USE OF,
#THE SITE AND CONTENT PROVIDED ON OR THROUGH THE SITE AT ANY TIME WITHOUT NOTICE.
 1 from emcli import *
 2
 3 search_list = ['PROPERTY_NAME=\'DBVersion\'','TARGET_TYPE= \'oracle_database\'','PROPERTY_VALUE LIKE \'11.2%\'']
 4
 5 if len(sys.argv) == 2:

 6        print login(username=sys.argv[0])
 7        l_prop_val_to_set = sys.argv[1]
 8        l_targets = list(resource="TargetProperties", search=search_list, columns="TARGET_NAME,TARGET_TYPE,PROPERTY_NAME")
 9        for target in l_targets.out()['data']:
10             t_pn =  'LifeCycle Status'
11             print "INFO: Setting Property name " + t_pn + " to value " + l_prop_val_to_set
12             print set_target_property_value(property_records=target['TARGET_NAME']+":"+target['TARGET_TYPE']+":"+t_pn+":"+l_prop_val_to_set)
13  else: ]
14        print "\n ERROR: Property value argument is missing"
15        print "\n INFO: Format to run this file is filename.py <username> <Database Target LifeCycle Status Property Value>"
3.3.1.1 Script Analysis
Table 3-1 provides an analysis of each line of the code.
Table 3-8 Line-by_Line Script Analysis
| Lines | Description |
|---|---|
|
1 |
Jython import construct to import all EM CLI verb functions in the current program. |
|
3 |
search_list is a variable to pass to the search option in the list verb. This example uses escape characters to represent single quotes. To pass more than one value for the same option in the list verb, define as comma separated values, surrounded by square brackets. |
|
5 |
Defines an if condition to ensure the user provides two arguments with the script, otherwise the script prints an error message (defined in lines #15, 16) |
|
6 |
Provides a login to Enterprise Manager. You can remove this if you have set up EM CLI with autologin. For more information about setup and autologin, see Section 2.2.3, "Downloading and Deploying the EM CLI Client with the Script Option" and the setup and the login verbs. |
|
7 |
l_prop_val_to_set is a variable. This is the property value to be set. Remember that this script is changing this value from Test to Production. You can change this value to any acceptable Lifecycle property value. For a list of valid values, see the modify_lifecycle_stage_name verb or the Oracle Enterprise Manager Cloud Control Administrator's Guide. |
|
8 |
Stores the output of the list verb in l_targets. In the list verb, this script passes the resource as TargetProperties, and search as the search_list variable. This script specifies three columns:
|
|
9 |
Defines a for loop. The data in l_targets is available in JSON format. This loop iterates through the information target property information returned from the list verb. For information about JSON processing, see Section 3.2.6.2, "JSON Processing" |
|
10 |
Sets t_pn to the LifeCycle Status value. |
|
11 |
Provides a progress message to the user stating that the script is setting the LifeCycle Status to the value passed to the script from the command line. |
|
12 |
Defines the set_target_property_value verb, which sets the value using the property_records option. When this verb is set for a target pair, it moves to the next one. This example shows three databases, but in reality, use this script for a larger number of databases. |
|
13 -15 |
Else statement combined with the if condition in line #5. If the arguments specified in line #5 are not provided correctly, then the script displays one of the following error messages:
|
3.3.1.2 Script Output
Running Example 3-11, "LifeCyclePropertyChange.py" provides the following output:
Example 3-12 Output from LifeCyclePropertyChange.py
$ emcli @myScript.py user Production

Login successful

INFO: Setting Property name LifeCycle Status to value Production for db1
Properties updated successfully
INFO: Setting Property name LifeCycle Status to value Production for db2
Properties updated successfully
INFO: Setting Property name LifeCycle Status to value Production for db3
Properties updated successfully

Logout successful
3.3.2 Changing Your Database Password
To assist you in writing scripts, this section analyzes a sample script that changes the password of your database.
Example 3-13, "dbPasswordChange.py" is useful if you want to reset the database password on a regular basis for security compliance. If you change the database password in a target database, then Enterprise Manager monitoring for that target database is unavailable. To ensure consistent monitoring, you would have to log in to the Enterprise Manager Cloud Control UI, select the required database target and change the password for each and every database, which is very time-consuming.
By using Example 3-13, "dbPasswordChange.py", you can add a number of databases to a group and then change the password for all these databases within the group.
Note:
Line numbers are provided only for explanatory purposes for Table 3-9. For a copy-ready script, see Example A-6 in Appendix A, "Sample Scripts".Example 3-13 dbPasswordChange.py
#Disclaimer
#EXCEPT WHERE EXPRESSLY PROVIDED OTHERWISE, THE SITE, AND ALL CONTENT PROVIDED ON
#OR THROUGH THE SITE, ARE PROVIDED ON AN "AS IS" AND "AS AVAILABLE" BASIS. ORACLE
#EXPRESSLY DISCLAIMS ALL WARRANTIES OF ANY KIND, WHETHER EXPRESS OR IMPLIED,
#INCLUDING, BUT NOT LIMITED TO, THE IMPLIED WARRANTIES OF MERCHANTABILITY, FITNESS
#FOR A PARTICULAR PURPOSE AND NON-INFRINGEMENT WITH RESPECT TO THE SITE AND ALL
#CONTENT PROVIDED ON OR THROUGH THE SITE. ORACLE MAKES NO WARRANTY THAT: (A) THE
#SITE OR CONTENT WILL MEET YOUR REQUIREMENTS; (B) THE SITE WILL BE AVAILABLE ON AN
#UNINTERRUPTED, TIMELY, SECURE,OR ERROR-FREE BASIS; (C) THE RESULTS THAT MAY BE
#OBTAINED FROM THE USE OF THE SITE OR ANY CONTENT PROVIDED ON OR THROUGH THE SITE
#WILL BE ACCURATE OR RELIABLE; OR (D) THE QUALITY OF ANY CONTENT PURCHASED OR
#OBTAINED BY YOU ON OR THROUGH THE SITE WILL MEET YOUR EXPECTATIONS.
#ANY CONTENT ACCESSED, DOWNLOADED OR OTHERWISE OBTAINED ON OR THROUGH THE USE OF
#THE SITE IS USED AT YOUR OWN DISCRETION AND RISK. ORACLE SHALL HAVE NO
#RESPONSIBILITY FOR ANY DAMAGE TO YOUR COMPUTER SYSTEM OR LOSS OF DATA THAT
#RESULTS FROM THE DOWNLOAD OR USE OF CONTENT.
#ORACLE RESERVES THE RIGHT TO MAKE CHANGES OR UPDATES TO, AND MONITOR THE USE OF,
#THE SITE AND CONTENT PROVIDED ON OR THROUGH THE SITE AT ANY TIME WITHOUT NOTICE.

 1 from emcli  import *
 2 from emcli.exception import VerbExecutionError
 3 import sys
 4 import time
 5
 6 def check_job_status(job):
 7   count=0
 8   while (count < 10):
 9    count = count + 1
10    obj = emcli.get_jobs(job_id=job)
11    #print obj.out()
12    for entry in obj.out()['data']:
13        l_status = entry['Status ID']
14        l_exec_id = entry['Execution ID']
15        #print entry['Status ID']
16        if (l_status == '5'):
17            print "Job completed successfully"
18            count=100
19        elif (l_status == '4'):
20            l_resp = get_job_execution_detail(execution=l_exec_id, showOutput=True, xml=True)
21            print "Job failed, error details "
22            print "Output " + str(l_resp.out())
23            count=100
24        else:
25            time.sleep(2)
26
27 def update_db_pwd_for_target(p_target_name, p_target_type, p_old_password, p_new_password):
28    l_target_name = p_target_name
29    l_target_type = p_target_type
30    print "Changing the password for member : name = " + l_target_name + " type = " + l_target_type
31    try :
32        l_resp = update_db_password (target_name=l_target_name,
33                                  target_type = l_target_type,
34                                  change_at_target="yes",
35                                  user_name="dbsnmp",
36                                  old_password=p_old_password,
37                                  new_password=p_new_password,
38                                  retype_new_password=p_new_password)
39        l_job_submitted = l_resp.out()['JobId']
40        check_job_status(l_job_submitted)
41    except emcli.exception.VerbExecutionError, e:
42        print "ERROR : Change Password failed for name = " + l_target_name + " type = " + l_target_type
43        print "ERROR : " + e.error()
44
45 def update_db_pwd_for_group(p_group, p_old_password, p_new_password):
46    print "Changing the password for group - " + p_group + " from " + p_old_password + " to " + p_new_password
47    members = get_group_members(name=p_group).out()['data']
48    for member in members:
49        l_target_name = member['Target Name']
50        l_target_type = member['Target Type']
51        update_db_pwd_for_target(l_target_name, l_target_type, p_old_password, p_new_password)
52
53
54 #Set the OMS URL to connect to
56 set_client_property('EMCLI_OMS_URL','https://myoms.com/em')
57 #Accept all the certificates
58 set_client_property('EMCLI_TRUSTALL','true')
59
60 login(username=sys.argv[0])
61
62
63 l_grp_name = 'maurGroup'
64
65 l_group_members = ['db1:oracle_database','db2:oracle_database','db3:rac_database']
66
67
68
69 res = create_group(name = l_grp_name, add_targets = l_group_members)
70
71 print "Listing members for group " + l_grp_name
72
73 for member in get_group_members(name=l_grp_name).out()['data']:
74    print member
75
76
77 y_n_input = raw_input('Now lets change the password for all the members in this group(y/n)')
78 if y_n_input != 'y':
79  exit(0)
80
81 l_tgt_username = "dbsnmp"
82 l_old_password = "secret1"
83 l_new_password = "secret2"
84
85 update_db_pwd_for_group(l_grp_name, l_old_password, l_new_password)
3.3.2.1 Script Analysis
Table 3-9 provides an analysis of each line of the code.
Table 3-9 Line-by_Line Script Analysis
| Lines | Description |
|---|---|
|
1-2 |
Imports all EM CLI verbs, and imports VerbExecutionError. |
|
3-4 |
Imports Jython libraries. |
|
6-25 |
Defines the job where the script updates the database password for each member of the l_grp_name group. After each successful job completion, the script displays a message to the user, and waits 2 seconds before processing the next job, unless there are any errors or all database passwords are updated. |
|
27-43 |
Defines variables for updating the database password on each target member of the l_grp_name group. While the script successfully updates the database password, it provides the following message to the user before proceeding to update the password of the next database target: Changing the password for member : name = database_name type = database_type |
|
45-51 |
Defines a loop to get all members from the l_grp_name group and update the password for each member as defined in line #85. When the script starts processing this loop, it provides this message to the user: Changing the password for group - l_grp_name from l_old_password to l_new_password |
|
54-58 |
Necessary connection to OMS to retrieve all targets. Before connecting to the OMS, you must set the OMS connection details using the set_client_property() function. This sets the OMS URL to https://myoms.com/em and enables the client to trust all certificates. Note that none of these details are stored in disk. These details are stored in memory and only last for a single script execution. For more information on client properties, enter help('client_properties') from the interactive shell. You can define EMCLI_OMS_URL and EMCLI_TRUSTALL variables as environment variables if you do not want to set these in your script. If you have downloaded certificates somewhere, you can also use the environment variable EMCLI_CERT_LOC to point to the certificate directory. In this case, you do not need EMCLI_TRUSTALL. For more information, see Section 3.2.3, "Interactive Mode — Connecting to an Oracle Management Server (OMS)". |
|
60 |
Provides a login to the OMS. You can remove this if you have set up EM CLI with autologin. For more information about setup and autologin, see Section 2.2.3, "Downloading and Deploying the EM CLI Client with the Script Option" and the setup and the login verbs. |
|
63 |
l_grp_name is a variable for the group name |
|
65 |
l_group_members is a variable for the array of the database name and type. |
|
69 |
Adds members from l_group_members to the l_grp_name group |
|
71-74 |
Provides a message to users while the script is adding members to the l_grp_name group |
|
77-79 |
Provides a prompt to users to decide if they want to continue with the script. If the user enters n, then the script exits. If the user enters y, then the script proceeds. |
|
81 |
l_tgt_username is a variable for the user name of the database owner. |
|
82 |
l_old_password is a variable for the existing password associated with the database owner. |
|
83 |
l_new_password is a variable for the new password associated with the database owner. |
|
85 |
Replaces the existing password with the new password for all members of the l_grp_name group. |
3.3.2.2 Script Output
Running Example 3-13, "dbPasswordChange.py" provides the following output:
Example 3-14 Output From dbPasswordChange.py
$ emcli @myScript.py user
Enter password : **********

Listing members for group maurGroup
('Target Name': 'aixsdbsi', 'Target Type': 'oracle_database')
('Target Name': 'winsidb1', 'Target Type': 'oracle_database')
('Target Name': 'db10g', 'Target Type': 'rac_database')
('Target Name': 'solcdbone', 'Target Type': 'rac_database')
Now let's change the password for all the members in this group (y/n)y
Changing the password for group - maurGroup from secret1 to secret2
Changing the password for member : name = aixsdbsi type = oracle_database
Job completed successfully
Changing the password for member : name = winsidb1 type = oracle_database
Job completed successfully
Changing the password for member : name = db10g type = rac_database
Job completed successfully
Changing the password for member : name = solcdbone type = rac_database
Job completed successfully

Logout successful
3.3.3 Promoting Discovered Targets
To assist you in writing scripts, this section analyzes a sample script that promotes discovered Oracle Database targets.
Consider a corporate environment where databases are added for each user requesting an instance using their UI. Most companies automate the entire process from database creation, adding data files, and so on. As part of your automation process, at the end, you can add this script.
Example 3-15, "promote_discovered_dbs.py" promotes the databases automatically, which are then ready to be monitored by Enterprise Manager. This removes the necessity for you to have to log in to the Enterprise Manager Cloud Control UI and promote the databases manually.
Note:
Line numbers are provided only for explanatory purposes for Table 3-10. For a copy-ready script, see Example A-7 in Appendix A, "Sample Scripts".Example 3-15 promote_discovered_dbs.py
#Disclaimer
#EXCEPT WHERE EXPRESSLY PROVIDED OTHERWISE, THE SITE, AND ALL CONTENT PROVIDED ON
#OR THROUGH THE SITE, ARE PROVIDED ON AN "AS IS" AND "AS AVAILABLE" BASIS. ORACLE
#EXPRESSLY DISCLAIMS ALL WARRANTIES OF ANY KIND, WHETHER EXPRESS OR IMPLIED,
#INCLUDING, BUT NOT LIMITED TO, THE IMPLIED WARRANTIES OF MERCHANTABILITY, FITNESS
#FOR A PARTICULAR PURPOSE AND NON-INFRINGEMENT WITH RESPECT TO THE SITE AND ALL
#CONTENT PROVIDED ON OR THROUGH THE SITE. ORACLE MAKES NO WARRANTY THAT: (A) THE
#SITE OR CONTENT WILL MEET YOUR REQUIREMENTS; (B) THE SITE WILL BE AVAILABLE ON AN
#UNINTERRUPTED, TIMELY, SECURE,OR ERROR-FREE BASIS; (C) THE RESULTS THAT MAY BE
#OBTAINED FROM THE USE OF THE SITE OR ANY CONTENT PROVIDED ON OR THROUGH THE SITE
#WILL BE ACCURATE OR RELIABLE; OR (D) THE QUALITY OF ANY CONTENT PURCHASED OR
#OBTAINED BY YOU ON OR THROUGH THE SITE WILL MEET YOUR EXPECTATIONS.
#ANY CONTENT ACCESSED, DOWNLOADED OR OTHERWISE OBTAINED ON OR THROUGH THE USE OF
#THE SITE IS USED AT YOUR OWN DISCRETION AND RISK. ORACLE SHALL HAVE NO
#RESPONSIBILITY FOR ANY DAMAGE TO YOUR COMPUTER SYSTEM OR LOSS OF DATA THAT
#RESULTS FROM THE DOWNLOAD OR USE OF CONTENT.
#ORACLE RESERVES THE RIGHT TO MAKE CHANGES OR UPDATES TO, AND MONITOR THE USE OF,
#THE SITE AND CONTENT PROVIDED ON OR THROUGH THE SITE AT ANY TIME WITHOUT NOTICE.

  1 from emcli.exception import VerbExecutionError
  2 import sys
  3
  4 alltargets=False
  5 targetparms=0
  6 uname=''
  7 pword=''
  8 url=''
  9 monitor_pw=''
 10
 11 def helpUsage():
 12    print 'Usage: promote_discovered_dbs.py [-help]'
 13    print '[-all] Add all discovered Single Instance DBs'
 14    print '[-targets <target1:target2:...] Add only targets listed'
 15    sys.exit()
 16
 17 for i in range(len(sys.argv)):
 18    if sys.argv[i] in ("-help"):
 19            helpUsage()
 20    elif sys.argv[i] in ("-targets"):
 21            if i+1 < len(sys.argv):
 22                    targetparms = sys.argv[i+1]
 23    else:
 24                    print 'Usage: promote_discovered_dbs.py [-help]'
 25                    print '[-all] Add all discovered Single Instance DBs'
 26                    print '[-targets <target1:target2:...] Add only targets listed'
 27                    sys.exit()
 28     elif sys.argv[i] in ("-url"):
 29            if i+1 < len(sys.argv):
 30                    url = sys.argv[i+1]
 31     elif sys.argv[i] in ("-username"):
 32            if i+1 < len(sys.argv):
 33                    uname = sys.argv[i+1]
 34    elif sys.argv[i] in ("-password"):
 35            if i+1 < len(sys.argv):
 36                    pword = sys.argv[i+1]
 37    elif sys.argv[i] in ("-monitor_pw"):
 38            if i+1 < len(sys.argv):
 39                    monitor_pw = sys.argv[i+1]
 40    elif sys.argv[i] in ("-all"):
 41                    alltargets = True
 42
 43 # Make sure user did not specify target list and all targets.
 44 if alltargets<>0 and targetparms <>0:
 45             print 'Cannot specify target list and all switch'
 46    print 'Usage: promote_discovered_dbs.py -url <EM URL> -username <username> -password <password> -monitor_pw <password>'
 47    print '[-all] Add all discovered SI Databses'
 48    print '[-targets <target1:target2:...] Add only list targets'
 49    print '[-help]'
 50    sys.exit()
 51
 52 if len(uname)==0 or len(pword)==0 or len(url)==0:
 53         print 'Missing required arguments (-url, -username, -password)'
 54         print 'Usage: promote_discovered_dbs.py -url <EM URL> -username <username> -password <password> -monitor_pw <password>'
 55         print '[-all] Add all discovered SI Databses'
 56         print '[-targets <target1:target2:...] Add only list targets'
 57             print '[-help]'
 58         sys.exit()
 59
 60 # Set Connection properties and logon
 61 set_client_property('EMCLI_OMS_URL',url)
 62 set_client_property('EMCLI_TRUSTALL','true')
 63 login(username=uname,password=pword)
 64
 65 cred_str = "UserName:dbsnmp;password:" + monitor_pw + ";Role:Normal"
 66
 67 if targetparms <> 0:
 68    targetparms = targetparms.replace(":",":oracle_database;")+":oracle_database"
 69    target_array = get_targets(unmanaged=True,properties=True,targets=targetparms).out()['data']
 70 elif alltargets:
 71    target_array = get_targets(targets="oracle_database",unmanaged=True,properties=True ).out()['data']
 72 else:
 73     print 'Missing required arguments (-targets or -all)'
 74    helpUsage()
 75
 76 if len(target_array) > 0:
 77    for target in target_array:
 78                     print 'Adding target ' + target['Target Name'] + '...',
 79
 80            for host in str.split(target['Host Info'],";"):
 81                if host.split(":")[0] == "host":]
 82                    print host.split(":")[1]
 83            try:
 84                res1 = add_target(type='oracle_database',name=target['Target Name'],host=host.split(":")[1], credentials=cred_str,properties=target['Properties'])
 85                print 'Succeeded'
 86                     except VerbExecutionError, e:
 87                print 'Failed'
 88                print e.error()
 89                print 'Exit code:'+str(e.exit_code())
 90 else:
 91    print 'INFO: There are no targets to be promoted. Please verify the targets in Enterprise Manager webpages.'
 92
3.3.3.1 Script Analysis
Table 3-10 provides an analysis of each line of the code.
Table 3-10 Line-by_Line Script Analysis
| Lines | Description |
|---|---|
|
1 |
Imports all EM CLI verbs, and imports VerbExecutionError. |
|
2 |
Imports Jython libraries. |
|
4-9 |
Sets variables:
|
|
10 |
Defines input arguments. |
|
11-15 |
Defines the message displayed to the user if they run the script with invalid or missing arguments: Usage: promote_discovered_dbs.py [-help][-all] Add all discovered Single Instance DBs[-targets <target1:target2:...] Add only targets listed |
|
17-41 |
Defines a For loop that checks that the input variables (defined in lines 4 to 9) are valid and present, otherwise the script terminates and displays the message defined in lines 11-15. |
|
43-50 |
Defines an If statement to check that the user doesn't provide the |
|
52-58 |
Defines an If statement to check that user provides the user name, password, and URL of Enterprise Manager when running the script. If any of these arguments are missing, then the scripts terminates and displays the message defined in lines 11-15. |
|
60-62 |
Necessary connection to OMS to retrieve all targets. Before connecting to the OMS, you must set the OMS connection details using the set_client_property() function. This sets the OMS URL to https://myoms.com/em and enables the client to trust all certificates. Note that none of these details are stored in disk. These details are stored in memory and only last for a single script execution. For more information on client properties, enter help('client_properties') from the interactive shell. You can define EMCLI_OMS_URL and EMCLI_TRUSTALL variables as environment variables if you do not want to set these in your script. If you have downloaded certificates somewhere, you can also use the environment variable EMCLI_CERT_LOC to point to the certificate directory. In this case, you do not need EMCLI_TRUSTALL. For more information, see Section 3.2.3, "Interactive Mode — Connecting to an Oracle Management Server (OMS)". |
|
63 |
Provides a login to the OMS. You can remove this if you have set up EM CLI with autologin. For more information about setup and autologin, see Section 2.2.3, "Downloading and Deploying the EM CLI Client with the Script Option" and the setup and the login verbs. |
|
65 |
Defines a variable for the credential string required for monitoring targets. |
|
67 |
Defines an if statement to determine if the |
|
68 |
Sets the value for target_params |
|
69 |
Sets the values for target_array, using the targets (where the list of targets is defined by targetparams), unmanaged, and properties parameters of the get_targets verb. When it is set for the first target, the script then moves on to the next target. |
|
70-71 |
Defines an else if statement to set the values for target_array if the -all option is provided when running the script, using the targets, unmanaged, and properties parameters of the get_targets verb. When it is set for the first target, the script then moves on to the next target. |
|
72-74 |
Defines an else statement in case the -targets or -all options are not provided when running the script. If this happens, the script terminates and displays the message defined in lines 11-15. |
|
76-78 |
Determines if there is data in the array, and if there is data, the script displays a message similar to the following:
|
|
80-82 |
Extracts the host name from the host information |
|
83-88 |
Adds the targets to the Management Repository using the add_target verb and displays the following message: Succeeded If the script fails to add targets to the Management Repository, then it displays the following message: Failed |
|
90 |
From line 76, if there are no targets in the array, the script terminates, and displays the following message to the user: INFO: There are no targets to be promoted. Please verify the targets in Enterprise Manager webpages.Logout successful |
3.3.3.2 Script Output
Running Example 3-15, "promote_discovered_dbs.py" with various options provides the following outputs:
Example 3-16 Output from promote_discovered_dbs.py with -all option
$ emcli @promote_discovered_dbs.py -url https://host.us.example.com:7799/em -username sysman -password welcome1 -monitor_pw welcome1 -all
Adding target sid7458.us.example.com... host.us.example.com
Succeeded
Logout successful
Example 3-17 Output from promote_discovered_dbs.py with -targets option
$ emcli @promote_discovered_dbs.py -url https://host.us.example.com:7799/em -username sysman -password welcome1 -monitor_pw welcome1 -targets sid7458.us.example.com
Adding target sid7458.us.example.com... host.us.example.com
Succeeded
Adding target db1... host.us.example.com
Succeeded
Adding target db2... host.us.example.com
Succeeded
Adding target db3... host.us.example.com
Succeeded
Logout successful
Example 3-18 Output from promote_discovered_dbs.py with -targets option
$ emcli @promote_discovered_dbs.py -url https://host.us.example.com:7799/em -username sysman -password welcome1 -monitor_pw welcome1 -targets db1:db2:db3
Adding target db1... host.us.example.com
Succeeded
Adding target db2... host.us.example.com
Succeeded
Adding target db3... host.us.example.com
Succeeded
Logout successful
Example 3-19 Output from promote_discovered_dbs.py where the specified targets do not exist
$ emcli @promote_discovered_dbs.py -url https://host.us.example.com:7799/em -username sysman -password welcome1 -monitor_pw welcome1 -targets abc
INFO: There are no targets to be promoted. Please verify the targets in Enterprise Manager webpages.
Logout successful
Example 3-20 Output from promote_discovered_dbs.py where no targets are available for promotion
$ emcli @promote_discovered_dbs.py -url https://host.us.example.com:7799/em -username sysman -password welcome1 -monitor_pw welcome1 -all
INFO: There are no targets to be promoted. Please verify the targets in Enterprise Manager webpages.
Logout successful
Example 3-21 Output from promote_discovered_dbs.py where the -all or -targets option is missing
$ emcli @promote_discovered_dbs.py -url https://host.us.example.com:7799/em -username sysman -password welcome1 -monitor_pw welcome1
Missing required arguments (-targets or -all)
Usage: promote_discovered_dbs.py [-help]
[-all] Add all discovered Single Instance DBs
[-targets <target1:target2:...] Add only targets listed
Logout successful
3.4 Using the Generic 'List' Verb
EM CLI provides dozens of listing verbs, such as list, get, show, and describe. Rather than selecting from all of these choices, EM CLI provides a generic list verb that you can execute with various types of queries.
The generic list verb provides the following benefits:
-
Generates JavaScript Object Notation (JSON) for script use and standard output for command-line use
-
Can specify your own custom SQL to retrieve data from the repository using repository views
3.4.1 Selected list Verb Use Cases
The following sections provide examples of using the list verb for various purposes.
3.4.1.1 Listing Registered Resources
The list verb supports describing the registered listable resources.
To list all registered resource groups and resources:
emcli list -help
To describe a specific resource:
emcli list -resource="<resource_name>" -help
This provides a list of all of the columns along with descriptions.
emcli list -resource="<resource_name>"
To list a specific number of columns:
emcli list -resource="<resource_name>" -columns="col1,col2"
This command lists only col1 and col2 columns from the specified resource.
3.4.1.2 Searching for Data
The list verb supports search capabilities.
To search using the list verb:
emcli list -resource="<resource_name>" -search="<column>='<value>'"
To specify multiple search conditions:
emcli list -resource="<resource_name>" -search="<column1> = '<value1>'" -search="<colum2> = '<value2>'"
3.4.1.3 Registering Resources with the Bind Parameter
To list resources with the bind option:
emcli list -resource="<resource_name>" -bind="col1 = "'val1'"
This is required for a few resources that require bind parameters as specific input.
3.4.1.4 Listing with End-user Defined SQL
To execute user-defined SQL using the -sql option:
emcli list -sql='select * from mgmt$target'
The SQL provided in the -sql option is executed as the Enterprise Manager user MGMT_VIEW, which has read-only access to the Enterprise Manager published MGMT$ database views in the SYSMAN schema. The -sql option requires Super Administrator privileges.
3.5 Using the Registered Clients Page
The registered clients page shows all of the EM CLI client installations, and enables you to clean up or delete unused installations.
Note the following characteristics of this page:
-
Registered clients are only visible to super users.
-
You can search for existing registered clients by host name and version.
3.5.1 Accessing the Page
To access the Registered Clients page and display its contents:
-
From the Enterprise Manager Cloud Control console Setup menu, select Command Line Interface.
The Command Line Interface tab appears. The figure below shows the page with a couple of registered clients.
-
To select the columns to be displayed, select Columns from the View drop-down, then select Manage Columns. Choose any columns to be hidden from the pop-up, then click OK.
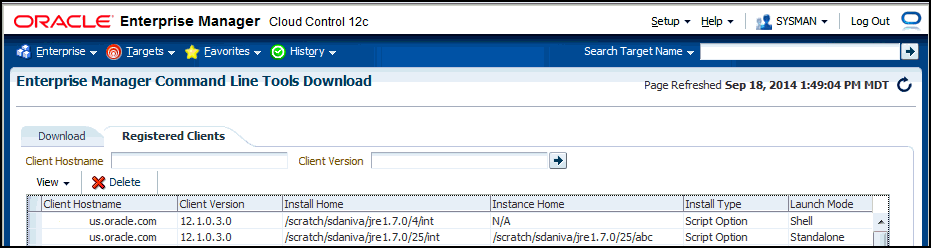
Column definitions are as follows:
-
Client Hostname — Host name of the client where EM CLI is installed.
-
Client Version — Version of the EM CLI client.
-
Install Home — Complete path of the directory where the EM CLI client is installed.
-
Instance Home — Complete path of the directory of the EM CLI instance home.
-
Install Type — Can be Standalone, Shell, or Script.
-
Setup By — EM CLI was set up by this OS user.
-
Auto Login — Enabled or disabled.
-
Trust All Certificates — Enabled or disabled.
-
Setup at Time — Time at which EM CLI was set up.
-
Last Synced At — Time when the sync verb was last executed.
-
Last Login At — Time when the last login occurred.
-
Last Logged In User — Enterprise Manger user last logged in.
-
EM URL — URL of Enterprise Manager.
3.5.2 Deleting an Entry from the Table
Deleting an entry from the table in this page only deletes it from the repository, but does not delete the files from the client host where EM CLI is installed. After deletion, when EM CLI is launched from the same deleted entries directory, it re-adds the entry into the table.
For example, suppose a row in the table indicates that EM CLI is installed in host.example.com at /u01/dir. If you delete this row from the table, this action does not delete the files in /u01/dir at host.example.com. Now if you log in to host.example.com and execute emcli setup, Enterprise Manger adds the same row into the table which was deleted earlier.