5 Working with Ticketing Templates
This chapter provides details on the default ticketing templates shipped along with the ServiceNow connector. The ticketing templates specify the mappings between Enterprise Manager ticket attributes and ServiceNow incident attributes.
This chapter covers the following topics:
Default Ticketing Templates
When a connector instance is created in Enterprise Manager, all associated templates are available for ticket create/update operations. This section describes the default mappings between the Enterprise Manager ticket data fields and the ServiceNow incident data fields.
The ticketing templates XML Style Sheet (XSL) files contains mappings between the two systems. These files are located in the Self Update archive. To extract the installation file, perform the steps described in the Exporting a Template File section.
There are three default ServiceNow templates, as described in Table 5-1:
Table 5-1 Default ServiceNow Templates
| XSL File Name | Enterprise Manager User Interface | Description | Required ServiceNow User Permissions (Roles) |
|---|---|---|---|
ServiceNow_CreateAndUpdate_Default.xsl |
ServiceNow Create and Update |
|
|
ServiceNow_CreateAndUpdate_AutoClose.xsl |
ServiceNow Create, Update, and Close |
|
|
ServiceNow_CreateAndUpdate_AutoResolve.xsl |
ServiceNow Create, Update, and Resolve |
|
|
Note:
For more information on ServiceNow system roles, see the Base System Roles section of the ServiceNow Product Documentation Wiki:http://wiki.servicenow.com/index.php?title=Base_System_Roles#gsc.tab=0
Standard Fields Mapping
Table 5-2 shows the standard fields provided by Enterprise Manager and how they are mapped to equivalent fields within ServiceNow:
Table 5-2 Enterprise Manager-to-ServiceNow Standard Fields Mapping
| Enterprise Manager UI Field | Enterprise Manager Backend Field | ServiceNow Field | Notes |
|---|---|---|---|
|
Priority |
SystemAttributes/Priority |
Priority |
See Table 5-3 |
|
Severity |
SystemAttributes/SeverityCode |
Priority |
See Table 5-3 |
|
Resolution State |
SystemAttributes/ResolutionState |
State |
See Table 5-5 |
|
Summary |
SystemAttributes/Summary |
Short description |
|
|
Description |
SystemAttributes/Description |
Description at the top of comments |
Links directly to Enterprise Manager ticket |
|
Event Class |
EMEvent/SystemAttributes/EventClass |
Incident Details > Event Type |
Displayed if defined for Enterprise Manager ticket |
|
Category |
SystemAttributes/Category |
Incident Details > Category |
Category of the Enterprise Manager Event |
|
Escalation |
SystemAttributes/EscalationLevel |
Incident Details > Escalation Level |
|
|
Owner |
SystemAttributes/Owner |
Incident Details > Owner |
|
|
Acknowledge |
SystemAttributes/Acknowledge |
Incident Details > Acknowledged |
|
|
Target Name |
SystemAttributes/SourceInfo/TargetInfo/TargetName |
Source Details > Target |
|
|
Target Type |
SystemAttributes/SourceInfo/TargetInfo/TargetTypeLabel |
Source Details > Type |
Links directly to the Enterprise Manager target |
|
Owner |
SystemAttributes/SourceInfo/SourceObjInfo/ObjOwner |
Source Details > Owner |
|
|
Target Host |
.../TargetProperty/Name=Target_Host -> Value |
Source Details > Target_Host |
Displayed if defined for Enterprise Manager target |
|
Comment |
.../TargetProperty/Name=Comment -> Value |
Source Details > Comment |
Displayed if defined for Enterprise Manager target |
|
Contact |
.../TargetProperty/Name=Contact -> Value |
Source Details > Contact |
Displayed if defined for Enterprise Manager target |
|
Cost Center |
.../TargetProperty/Name=Cost Center -> Value |
Source Details > Cost Center |
Displayed if defined for Enterprise Manager target |
|
Department |
.../TargetProperty/Name=Department -> Value |
Source Details > Department |
Displayed if defined for Enterprise Manager target |
|
Lifecycle Status |
.../TargetProperty/Name=Lifecycle Status -> Value |
Source Details > Lifecycle Status |
Displayed if defined for Enterprise Manager target |
|
Line of Business |
.../TargetProperty/Name=Line of Business -> Value |
Source Details > Line of Business |
Displayed if defined for Enterprise Manager target |
|
Location |
.../TargetProperty/Name=Location -> Value |
Source Details > Target Location |
Displayed if defined for Enterprise Manager target |
|
Operating System |
.../TargetProperty/Name=Operating System -> Value |
Source Details > Operating System |
Displayed if defined for Enterprise Manager target |
|
Platform |
.../TargetProperty/Name=Platform -> Value |
Source Details > Platform |
Displayed if defined for Enterprise Manager target |
|
Target Version |
.../TargetProperty/Name=Target Version -> Value |
Source Details > Target Version |
Displayed if defined for Enterprise Manager target |
|
Rule Name |
NotificationRuleName |
Source Details > Rule Name |
Displayed if Incident was created by a Rule |
|
Rule Owner |
NotificationRuleOwner |
Source Details > Rule Owner |
Displayed if Incident was created by a Rule |
Priority and Severity Mapping
Table 5-3 and Table 5-4 show the mapping between the Enterprise Manager ticket priority/severity values and how the corresponding values are set in ServiceNow based on those incidents.
Note:
Now Incident Priority is calculated from Impact and Priority as described in the Incident Management section of the ServiceNow Product Documentation Wiki:http://wiki.servicenow.com/index.php?title=Incident_Management#gsc.tab=0
Table 5-3 Enterprise Manager-to-ServiceNow Priority Mapping
| Enterprise Manager Priority | ServiceNow Impact | ServiceNow Urgency | ServiceNow Priority |
|---|---|---|---|
|
Urgent |
1 |
1 |
1 |
|
Very High |
1 |
2 |
2 |
|
High |
2 |
2 |
3 |
|
Medium |
2 |
3 |
4 |
|
Low |
3 |
3 |
5 |
Note:
The Enterprise Manager priority is used whenever it is set (that is, overrides severity code setting). Otherwise, the Enterprise Manager severity code is used.Table 5-4 Enterprise Manager-to-ServiceNow Severity Mapping
| Enterprise Manager Severity Code | ServiceNow Impact | ServiceNow Urgency | ServiceNow Priority |
|---|---|---|---|
|
FATAL |
1 |
1 |
1 |
|
CRITICAL |
1 |
2 |
2 |
|
WARNING |
2 |
2 |
3 |
|
ADVISORY |
2 |
3 |
4 |
|
Anything else but CLEAR |
3 |
3 |
5 |
Note:
ServiceNow Incident is Closed/Resolved when the Enterprise Manager severity code becomes CLEAR.State Mapping
As shown in Table 5-5, the mapping between states within Oracle Enterprise Manager and ServiceNow are quite similar:
Customizable Fields
Table 5-6 shows fields that exist in ServiceNow that are not provided by Enterprise Manager, but can be customized as needed:
Table 5-6 Customizable ServiceNow Fields
| ServiceNow Field | Default Value | Notes |
|---|---|---|
|
Caller |
sample.user |
Requires ServiceNow configuration |
|
Location |
Sample Location |
Requires ServiceNow configuration |
|
Category |
EM Incident |
Requires ServiceNow configuration |
|
Assignment group |
EMSampleGroup |
Requires ServiceNow configuration |
|
Assigned to |
sample.user |
Requires ServiceNow configuration |
|
Close code |
Solved (Work Around) |
|
|
Closed by |
sample.user |
Requires ServiceNow configuration |
|
Close notes |
Enterprise Manager Resolution |
Editing Templates
Although default mappings are sufficient for most implementations, if the out-of-box ticketing templates do not satisfy your requirements, you can modify them. To modify a template, Oracle recommends that you use one of the existing templates as the base template. Copy this ticket template to a new file, modify, and register the new ticketing template.
Oracle recommends that only users with advanced knowledge of XSLT make complex changes. If necessary, you can revert the templates to the original.
To edit an existing ticketing template:
-
Select the connector instance and go to the Configure Management Connector page.
-
Select the Template tab.
-
Select the desired template and click Edit.
-
Edit the Description and Template Contents fields as needed, then click Save.
The ticket template is automatically registered. Saving the registered template updates it in the repository.
Installing a New or Modified Template File
These customization files assume a fresh installation of ServiceNow.
Note:
In order to import the template files for use with the connector, it is required to overwrite existing templates. Oracle recommends that you back up these templates before you start the uninstall process.The modified versions of the templates will be reinstalled when the connector is reinstalled, as will any newly added templates and remaining original templates.
If you want to create a custom template, you need to install a new or modified template before it is recognized in Enterprise Manager.
For each new custom template, run the following emctl register_template connector command as a user with execute privilege on emctl and the ability to read the template:
$ORACLE_HOME/bin/emctl register_template connector -t <template.xsl> -repos_pwd <reposPassword> -cname <connectorName> -iname <internalName> -tname <templateName> -ttype 2 [-d <description>]
Where:
-
<template.xsl>is the full path name of the template file. -
<reposPassword>is the Enterprise Manager root (SYSMAN) password. -
<connectorName>is the name of the connector instance installed in the Configuring a Connector Instance section -
<internalName>is the internal name to use for the template. -
<templateName>is the name to display for the template. -
<description>is the description of the template.
For example, the following command adds a new outbound template (newTemplate.xsl) for the connector instance:
emctl register_template connector -t /home/oracle/custom_templates/template.xml -repos_pwd sysmanpass -cname "ServiceNow Connector Instance" -iname "newTemplate" -tname "New Template" -ttype 2 -d "Demo template"
Exporting a Template File
Out-of-the-box ServiceNow customized template files are included in the Self Update archive that was installed in Installing the Connector.
To extract a template file to install on an offline system or to customize it and re-install it:
-
Determine the command required to export the ServiceNow template file:
-
From the Setup menu, select Extensibility, then select Self Update.
-
Click the Management Connector link in the Type column.
-
Click the ServiceNow connector to select it, then select Export from the Actions list.
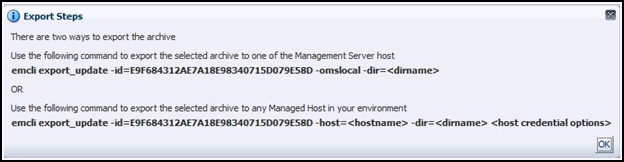
A pop-up window, similar to the example shown below (Figure 5-1), appears with the command required to export the file.
-
-
Open a command window on the Management Server host system and navigate to a temporary directory where you can copy and unzip the file.
-
Log in to EM CLI using the following command. You will be asked to provide the password information for the
sysmanuser account.emcli login -username=sysman
EM CLI must be executed from the OMS host. See the Oracle Enterprise Manager Command Line Interface for information about setting up EM CLI.
-
Run the EM CLI
export_updatecommand from your system, changing<dirname>to the full path of the temporary directory.This action creates a zip file. The file name is composed of the ID value you specify in the
export_updatecommand with a.zipextension. In the example command in Figure 2-1 above, the zip file name would be:E9F684312AE7A18E98340715D079E58D.zip
-
Extract the ServiceNow template file from the
.zipfile using the following command:unzip *.zip archives/<filename>
Restoring Templates
After you edit or customize a template, you can restore it to its previous default contents if needed by performing the following steps.
Note:
You can restore out-of-box templates that you have may edited or customized to their default values. You cannot restore new templates that you have created (using theemctl register_template command).-
From the Setup menu, select Extensibility, and then select Management Connectors.
-
On the Management Connectors page, select the connector instance and go to the Configure Management Connector page.
-
Select the Template tab.
-
Select the template and click Restore.
-
Click Yes in the confirmation page that appears to restore.