2 Installing the Connector
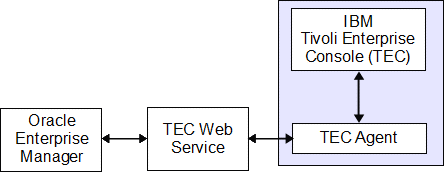
The Oracle Enterprise Manager Connector Framework requires a web service interface for forwarding event information to IBM TEC. Since TEC does not provide a web services interface, you must install a third-party TEC web service front-end, which is included in the Oracle Enterprise Manager TEC installation package.
You can install the web service on any Unix or Windows system that supports Oracle Java Development Kit (JDK) 1.6 and has connectivity with the TEC server. In addition to the TEC web service front-end, you must also install a back-end Oracle TEC Agent on the same physical system as the TEC server. The Oracle TEC Agent is preconfigured and is also included in the Oracle Enterprise Manager TEC installation package.
Figure 2-1 shows the communication between the various components of the TEC Connector.
The following sections in this chapter discuss these topics:
2.1 Installation Platforms
You can install the TEC web service on the following platforms that support Oracle Java Development Kit (JDK) 1.6:
-
Microsoft Windows
-
Oracle Solaris
-
HP-UX
-
Linux
You can install the TEC Agent on the following platforms:
-
Microsoft Windows (2000, 2003, 2008, XP)
-
Oracle Solaris (SPARC OS version 5-10)
-
IBM AIX (RS/6000 OS version 5.2+)
2.2 Prerequisites
In order to install the connector, the My Oracle Support Preferred Credentials must be set to enable the download of the connector through self-update. To set the credentials, perform the following steps:
-
From Enterprise Manager Cloud Control, click Setup.
-
Select My Oracle Support in the pane.
-
Select Set Credentials... then enter the username and password information and click Apply.
-
From Enterprise Manager Cloud Control, click Setup.
-
Select Extensibility in the pane.
-
Select Self Update and click Check Updates to schedule a job to collect the metadata for the connectors.
Refer to the "Setting up Self Update" chapter in the Oracle Enterprise Manager Cloud Control Administrator's Guide for more details.
The following list provides prerequisites to installing the connector:
-
A utility for unzipping .zip files is available on the system hosting IBM TEC (Windows only).
-
Oracle JDK 6.0 Update 11 or higher is installed on the system where the TEC Web Service will be installed.
-
Use of this connector requires the creation of an event class named OracleEnterpriseManager at the IBM TEC server. Sample BAROC and rules files are provided with the installation that you can install manually or with the included installation script.
2.3 Installing the Connector in Enterprise Manager
The TEC connector is not included out-of-box so it must be downloaded from the Oracle Enterprise Manager store. All connectors in the Enterprise Manager store will be available on the Self Update page for downloading. To install (apply) the connector, you must have super administrator privileges. However, there is no user restriction for downloading the conenctor.
This section identifies the steps required to download and install (apply) the connector.
-
From the Enterprise Manager console, click Setup.
-
Select Extensibility in the pane.
-
Get a list of available connectors by selecting Self Update, then click Management Connector.
The TEC connector should be listed with a status of Available.
-
Click the TEC connector to select it, then click Download.
The Schedule Download window is displayed to determine when the download should be performed.
-
Click Select to download immediately.
Note:
If you want to schedule the download for a later time, specify the date/time when the download should take place, then click Select. You must return to finish the remainder of this procedure after the scheduled download date/time. -
If necessary, refresh the screen until the status of the connector changes to Downloaded.
-
Click the TEC connector to select it, then click Apply.
You will be prompted to confirm the operation and then a window displays indicating the request has been submitted.
-
Refresh the screen until the status of the connector changes from Apply Scheduled to Applied.
2.3.1 Installing the Connector if Enterprise Manager is in "Offline" Mode
Under certain circumstances, such as in high security environments, an active Internet connection between Enterprise Manager and the Enterprise Manager Update Store may not be available. In such situations, Enterprise Manager can be set to install the connector in an "offline" mode.
The installation process still requires that a computer exist at your site that has Internet access, as a connection to the Enterprise Manager Update Store is still required to obtain the necessary files. The files that you download to this computer can then be transferred to a computer behind your firewall.
To install the connector if Enterprise Manager is in "offline" mode:
-
From the system that you will ultimately deploy the connector, set Enterprise Manager Cloud Control to Offline Mode:
-
From the Setup menu, select Provisioning and Patching, then select Offline Patching.
-
In the Online and Offline Settings page, select Offline.
-
-
From the Setup menu, select Extensibility, then select Self Update.
-
On the Self Update page, click Check Updates. A message appears with the following URL to an Oracle site from where the updates catalog file can be downloaded:
https://updates.oracle.com/Orion/Download/download_patch/p9348486_112000_Generic.zip
-
From an Internet-enabled computer, download the catalog file using the aforementioned URL.
-
Copy the downloaded catalog file to the OMS host or the Management Agent host where you plan to import the connector.
-
Import the catalog file to Enterprise Manager:
-
If the catalog file is on the OMS host:
emcli import_update_catalog -file="file" -omslocal
Where:
-
-file: is the direct path to the connector archive (*.zip). -
-omslocal: indicates that the path mentioned in the-fileoption is directly accessible to the Enterprise Manager server
-
-
If the catalog file is on a different host:
emcli import_update_catalog -file="file" -host="hostname" [-credential_set_name="setname"] | -credential_name="name" -credential_owner="owner"
Example 2-1 shows a sample for importing the catalog archive.
-
-
On the Self Update page, in the table, click Management Connectors.
-
On the Connector Updates page, select the imported update that is available for download. Click Download.
A message appears with a URL to an Oracle site from where the update can be downloaded.
-
From a computer that is connected to the internet, download the update using the aforementioned URL.
-
Copy the downloaded file to the OMS host or the Management Agent host where you plan to deploy the connector.
-
To import the downloaded connector archive into Enterprise Manager, run the following command:
emcli import_update -file=”<path to *.zip file>” -omslocal
Where:
-
-file: is the direct path to the connector archive (*.zip). -
-omslocal: indicates that the path mentioned in the-fileoption is directly accessible to the Enterprise Manager server
-
Example 2-1 Sample for Importing Catalog Archive
emcli import_update_catalog -file="/u01/common/p9348486_112000_Generic.zip"  -omslocal

Imports the master catalog file p9348486_112000_Generic.zip. The file must exist
on the OMS host. In a multiple OMS setup, the request can be processed by any
OMS, so the file should be accessible from the OMS processing the request. This
means that the file must be kept on a shared location that is accessible from all
the OMS instances.

emcli import_update_catalog -file="/u01/common/p9348486_112000_Generic.zip" -host="host1.example.com" -credential_set_name="HostCredsNormal"

Imports the master catalog file p9348486_112000_Generic.zip that is present on
the host host1.example.com. The host must be a managed host target in Enterprise
Manager, and the Management Agent on this host must be up and running. The
preferred unprivileged credentials for host host1.example.com are used to retrieve
the remote file.
2.4 Installing the IBM TEC Web Service
The TEC web service acts as a front-end for all data flowing into and out of TEC. Oracle Enterprise Manager posts calls to the web service whenever it needs to create or update an event.
You can install the TEC web service on any Unix or Windows system that runs Oracle JDK 1.6 and has connectivity to the TEC server and the Oracle Enterprise Manager server.
2.4.1 Installing and Running the IBM TEC Web Service on Unix
The following sections explain how to install and then subsequently run the Web Service.
2.4.1.1 Prerequisites
The following prerequisites must be met before proceeding to the next section:
-
Oracle Java Development Kit (JDK) version 6 Update 11 or higher is installed.
-
The
JAVA_HOMEenvironment variable is set to the JDK installation directory.
2.4.1.2 Installing the Web Service on Unix
To install the web service on a Unix platform, perform the following steps:
-
Create a directory where you want to install the web service.
-
Obtain a copy of the
TEC_webservices_adapter.jarfile from the Management Server host machine as specified in Section 2.4.3, "Exporting the Web Service Installation File". -
Copy the
TEC_webservices_adapter.jarfile to the web service installation directory. -
Open a terminal and change the working directory to the webservice installation directory.
-
Enter the following command to unzip and extract the .tar file:
$JAVA_HOME/bin/jar xvf TEC_webservices_adapter.jarThis creates the adapters directory that contains the installation files.
Note:
If the system where the TEC web service is being installed does not have the JDK installed, you cannot extract the jar file contents. You need to copy the jar file to a system that has the JDK installed and transfer the files after they have been extracted. -
Enter the following command to change the working directory:
cd adapters/endpoints/tec -
Enter the following command to run the installation script:
sh ./install.sh -
When the script prompts whether you want to use HTTPS:
-
If you specify Y, the web service is set up to use HTTPS port number 8443.
-
If you specify N, the web service is set up to use HTTP port number 8080.
-
-
When the script prompts for the user name of the web service, enter the user name that must be provided to access the TEC web service.
The user name (and the password in the next step) can be any value and is not associated with any specific OS or TEC account. Note this value and supply it when configuring the TEC connector in Enterprise Manager.
-
When the script prompts for the password of the web service, enter the password that must be provided to access the TEC web service.
-
When the script prompts for the host name of the IBM TEC server, enter the host name or IP address where the server is installed.
-
When the script prompts for the port number of the IBM TEC server, enter the port number of the TEC reception port if a port mapper is not defined for the server. If a port mapper is defined for the server, specify a port number of 0.
Note:
The TEC reception port is defined by thetec_recv_agent_portparameter in the.tec_configfile in the$BINDIR/TME/TECdirectory. -
Copy the API jar files from the TEC installation disk to the
adapters/lib/adaptersdirectory. The files you need to copy arelog.jarandevd.jar, which are located in theEIFSDK/jarsdirectory of the TEC installation disk. -
After the script displays the message "TEC Web Service Complete," press Enter to complete the installation.
-
If the web service was configured to run using the HTTPS protocol, you must set up SSL as specified in Section 6.1, "Configuring Enterprise Manager to use SSL".
-
Delete the
TEC_webservices_adapter.jarfile from the installation directory.
The web service framework is now installed and ready to start.
2.4.1.3 Running the Web Service on Unix
To run the IBM TEC Web Service framework commands listed with the following tasks, first change the working directory to the following location in the installation directory:
adapters/bin
-
Start — ./service.sh start
-
Shut Down — ./service.sh stop
-
Restart — ./service.sh restart
-
Check Status — ./service.sh status
2.4.1.4 Testing the Web Service on Unix
Perform the following steps to verify that the IBM TEC Web Service is functional.
-
Open a terminal and change the working directory to the adapters/bin directory in the installation directory.
-
Enter the following command to run the test script:
./testAdapter.sh -
When the utility prompts for the web service password, enter the password you specified for the TEC web service in step 10 of Section 2.4.1.2, "Installing the Web Service on Unix".
If the test completes successfully, the last line the utility displays is "Test completed successfully."
2.4.1.5 Uninstalling the Web Service on Unix
To uninstall the web service on Unix:
-
Run the
service.sh statuscommand to determine whether the web service is running. -
If the web service is running, run the
service.sh stopcommand to stop the web service and verify it completes successfully. -
Delete all files in the installation directory.
2.4.2 Installing and Running the IBM TEC Web Service on Windows
The following sections explain how to install and then subsequently run the Web Service.
2.4.2.1 Prerequisites
The following prerequisites must be met before proceeding to the next section:
-
Oracle Java Developmet Kit (JDK) Version 6 Update 11 or higher is installed.
-
The
JAVA_HOMEenvironment variable is set to the JDK installation directory. -
Zip utility, such as WinZip, is installed for unzipping a zip file.
2.4.2.2 Installing the Web Service on Windows
To install the web service on a Windows platform, perform the following steps:
-
Create a directory where you want to install the web service.
-
Obtain a copy of the web service installation file from the Management Server host machine as specified in Section 2.4.3, "Exporting the Web Service Installation File".
-
Copy the
TEC_webservices_adapter.jarfile to the web service installation directory. -
Open a terminal and change the working directory to the webservice installation directory.
-
Enter the following command to unzip and extract the .jar file:
%JAVA_HOME%\bin\jar xvf TEC_webservices_adapter.jarThis creates the adapters directory that contains the installation files.
Note:
If the system where the TEC web service is being installed does not have the JDK installed, you cannot extract the jar file contents. You need to copy the jar file to a system that has the JDK installed and transfer the files after they have been extracted. -
Enter the following command to change the working directory:
cd adapters\endpoints\tec -
Enter the following command to run the installation script:
.\install.bat -
When the script prompts whether you want to use HTTPS:
-
If you specify Y, the web service is set up to use HTTPS port number 8443.
-
If you specify N, the web service is set up to use HTTP port number 8080.
-
-
When the script prompts for the user name of the web service, enter the user name that must be provided to access the TEC web service.
Note:
The user name (and the password in the next step) can be any value and is not associated with any specific OS or TEC account. Note this value and supply it when configuring the TEC connector in Enterprise Manager. -
When the script prompts for the password of the web service, enter the password that must be provided to access the web service.
-
When the script prompts for the host name of the IBM TEC server, enter the host name or IP address where the server is installed.
-
When the script prompts for the port number of the IBM TEC server, enter the port number of the TEC reception port. The default value for this port is 5529.
Note:
The TEC reception port is defined by thetec_recv_agent_portparameter in the.tec_configfile in the$BINDIR/TME/TECdirectory. -
Copy the API jar files from the TEC installation disk to the
adapters\lib\adaptersdirectory. The files you need to copy arelog.jarandevd.jar, which are located in theEIFSDK\jarsdirectory of the TEC installation disk. -
After the script displays the message "TEC Web Service Complete," press Enter to complete the installation.
-
If the web service was configured to run using the HTTPS protocol, you must set up SSL as specified in Section 6.1, "Configuring Enterprise Manager to use SSL".
-
Delete the
TEC_webservices_adapter.jarfile from the installation directory.
The web service framework is now installed and ready to start.
2.4.2.3 Running the Web Service as a Windows Service (Optional)
Optionally, if you want the web service to run as a Windows service, perform the following steps:
-
Change the working directory to the
adapters\bindirectory in the installation directory. -
If the web service will be run using a 64-bit JDK, copy the
iWaveAdapters.exeandiWaveAdaptersw.exefiles from the x64 directory to the current directory (.) overwriting the existing files. -
Enter the following command to install the web service as a Windows service:
service.bat install
-
If the web service will be run using a 64-bit JDK, perform the following substeps to configure the service to use the 64-bit JDK:
-
In the
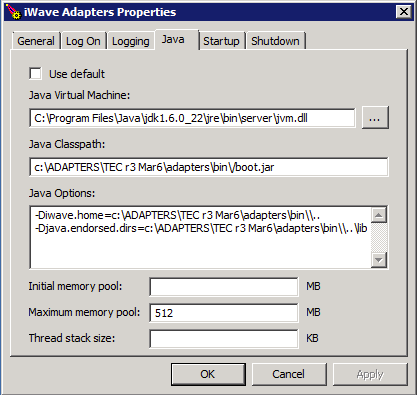
adapters\bindirectory, double click theiWaveAdaptersw.exefile. This will cause the iWave Adapters Properties window to be displayed. -
Click the Java tab. The Java tab will be displayed that shows the JVM settings as shown in Figure 2-2.
-
Uncheck the Use default check box if it is checked.
-
Click
 to open the Select Java Virtual Machine DLL window.
 -
Navigate to the
jvm.dllfile in the 64-bit JDK installation directory and click Open. -
Click OK.
-
2.4.2.4 Running the Web Service on Windows
To start the TEC web service framework when set up as a standalone application (not set up to run as a Windows service):
-
Change the working directory to the adapters\bin directory in the installation directory.
-
Run the following command:
startAdapters.bat
To shut down the TEC web service framework, close the window where you started the adapter.
To start the TEC web service framework when set up to run as a Windows service:
net start iWaveAdapters
To shut down the TEC web service framework:
net stop iWaveAdapters
2.4.2.5 Testing the Web Service on Windows
Perform the following steps to verify that the IBM TEC Web Service is functional.
-
Open a terminal and change the working directory to the
adapters/bindirectory in the installation directory. -
Enter the following command to run the test script:
./testAdapter.bat -
When the utility prompts for the web service password, enter the password you specified for the TEC web service in Step 10 of Section 2.4.2.2, "Installing the Web Service on Windows".
If the test completes successfully, the last line the utility displays is "Test completed successfully."
2.4.2.6 Uninstalling the Web Service on Windows
To uninstall the web service on Windows, determine if the web service is installed as a Windows service:
-
If the web service is installed as a Windows service, perform the following steps:
-
Determine if the web service is running.
-
If the web service is running, run the
service.batstop command to stop the web service and verify it completes successfully. -
Run the
service.batuninstall command to remove it as a Windows service and verify it completes successfully.
-
-
If the web service is not installed as a Windows service, perform the following steps:
-
Determine if the web service is running.
-
If the web service is running, stop the web service by closing the Java window.
-
-
Delete all files in the installation directory.
2.4.3 Exporting the Web Service Installation File
The TEC Web Service installation file is included in the Self Update archive that was installed in Section 2.3, "Installing the Connector in Enterprise Manager". To extract the installation file, perform the following steps.
-
Determine the command required to export the web service installation file. To do this, perform the following steps:
-
From the Enterprise Manager console, click Setup.
-
Select Extensibility in the pane.
-
Select Self Update, then click Management Connector.
-
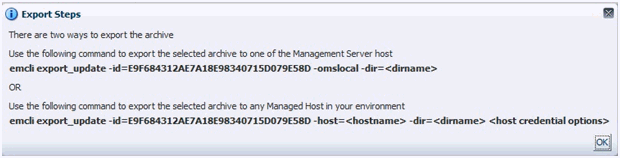
Click the TEC connector, then select Export from the Actions list.
A popup window appears with the command required to export the file. See Figure 2-3 below for an example of the popup window.
-
-
Open a command window on the TEC server machine and navigate to a temporary directory where the file can be copied.
-
Log into emcli using the following command. You will be asked to provide the password information for the sysman account.
emcli login -username=sysman -
Run the emcli export_update command from your system, changing <dirname> to the full path of the temporary directory.
A zip file will be created. The file name is comprised of the id value specified in the export_update command with a
.zipextension. In the example command in Figure 2-3, the zip file name would beE9F684312AE7A18E98340715D079E58D.zip -
Extract the web service installation file from the zip file using the following command:
unzip *.zip archives/TEC_webservices_adapter.jar
2.4.3.1 Setting Up EM CLI On Your System
Install the Enterprise Manager EMCLI_Client on the same host on which the connector is installed. This will need to be able to communicate to your OMS. Follow these steps to set up EM CLI on your system:
-
Log in to the Enterprise Manager console.
-
From the Setup menu, select Command Line Interface.
-
Click the Download the EM CLI kit to your workstation link and download the .jar file in the server.
-
Follow the steps given in the page to install the EM CLI client on the server.
Note:
Refer to EM CLI Guide for more detailed information.2.5 Installing and Running the IBM TEC Agent
The following sections provide procedures for installing and running the TEC Agent.
2.5.1 Installing the Agent
The back-end TEC Agent pushes data from TEC into the TEC Web Service. The Agent is comprised of a script (invoked by TEC rules and a command line utility invoked by the script) to send a transaction to the TEC Web Service. The TEC Agent must be installed on the same physical system as the TEC server. The TEC Agent is preconfigured to interface with the TEC Web Service and requires minimal configuration.
To install the TEC Agent, perform the following steps:
-
Obtain a copy of the agent installation file from the Management Server host machine as specified in Exporting the Agent Installation File.
-
Copy the installation file into the directory where you intend to install the TEC Agent.
Note:
You need to do this on the IBM TEC system host.Table 2-1 identifies the installation file name for each supported platform.
-
Open a terminal and change the working directory to the installation directory.
-
Unzip the installation file. This creates the TEC-agent directory that contains the installation files.
-
For Windows platforms, use a zip utility to unzip the
TECAgentWindows.zipfile. -
For AIX platforms, issue the following command to unzip and untar the files:
gunzip -c TECAgentAIX.tar.gz | tar xvf - -
For Solaris platforms, issue the following commands to unzip and untar the files:
gunzip -c TECAgentSolaris.tar.gz | tar xvf -
-
-
Set up the TEC environment:
-
For Windows systems, enter the following commands to start the bash shell:
%SystemRoot%\system32\drivers\etc\Tivoli\setup_env.cmdbash -
For Unix systems, enter the following command to start the bash shell:
/etc/Tivoli/setup_env.sh
-
-
Change the working directory to the TEC-agent directory.
-
Enter the following command to run the setup script to configure the TEC Agent:
./install.shThe following prompts appear in this sequence:
-
Enter the hostname or IP address where the TEC Webservice Adapter is installed. If the agent is being installed on the same machine as the TEC Web Service, accept the default of localhost.
-
Do you want to install the default Oracle Enterprise Manager classes and rules [Y]?
Enter Y to install and activate the class definitions and rules for the OracleEnterpriseManager class. This class must be installed before events from Enterprise Manager can be inserted into TEC. Enter N to skip the installation of the OracleEnterpriseManager class. The classes must be manually installed if you choose not to install the class definitions. See Handling Data Flowing from Enterprise Manager to TEC for instructions about how to manually install the class definitions.
WARNING:
If you elect to have the script install the classes and rules, it will restart the TEC server without prompting. If this is unacceptable, you will need install the files and restart the TEC server manually.
The following prompts appear in this sequence if you choose to install the OracleEnterpriseManager class.
-
Enter the name of the rule base to use:
Enter the name of the rule base where the class should be installed. This can be an existing rule base or one that does not exist.
-
Rule base could not be found. Do you want to create it [N]?
This prompt only appears if the rule base specified in the previous response did not already exist. Specify Y to create a new rule base, or specify N to exit the script without installing the OracleEnterpriseManager class.
-
Enter the rule base directory:
This prompt only appears if the script cannot determine the directory where the rule base files are located. Enter the directory where the rule base files are located. The script terminates if the directory does not exist.
-
-
Delete the installation file from the installation directory.
2.5.2 Running and Stopping the Agent
You do not need to start or stop the Agent. A TEC rule invokes it whenever a transaction needs to be sent to the TEC Web Service adapter. The Agent terminates after the transaction has been successfully delivered to the TEC Web Service adapter.
2.5.3 Exporting the Agent Installation File
The agent installation file is included in the zip file that was extracted in Section 2.4.3, "Exporting the Web Service Installation File". To extract the installation file, perform the following steps.
-
Open a command window on the TEC server machine and navigate to the temporary directory where the zip file was created.
-
Extract the agent installation file from the zip file using one of the following commands depending on the platform where the agent will be deployed:
-
For AIX:
unzip *.zip archives/TECAgentAIX.tar.gz -
For Solaris:
unzip *.zip archives/TECAgentSolaris.tar.gz -
For Windows:
unzip *.zip archives/TECAgentWindows.tar.gz
-
2.5.4 Uninstalling the TEC Agent
To uninstall the IBM TEC Agent:
-
If the TEC agent is being permanently deleted, the custom Oracle rules and BAROC files must be uninstalled as specified in Removing TEC Rules/BAROC Files.
-
Delete all files in the installation directory.
Note:
If the TEC agent is being replaced, the custom rules that call the TEC agent will fail until the replacement agent has been installed in the same location.2.6 Updates to TEC Rules
TEC rules must initiate event information sent from TEC to the TEC Web Service. This requires changes to the TEC rule sets to invoke the tec2uniagt script, which sends event information to the TEC Web Service. The following sections describe the required changes to the TEC rule sets for data flowing in both directions.
2.6.1 Handling Data Flowing from Enterprise Manager to TEC
For the TEC connector to work out of the box, the Oracle Enterprise Manager default classes must be installed and loaded into the TEC Server. When installing the TEC Agent, you have the option to install the classes and rules.
If you choose to install the default classes, the install script compiles the classes and rules, and loads them into the TEC Server. It also shuts down and restarts the server to pick up the new classes.
If you choose not to install the classes, you must manually install the classes and rules. The default class files are located in the TEC-agent/Samples directory. The OracleEnterpriseManager.baroc file defines the five classes that are required to insert events into TEC. The OracleEnterpriseManager.rls file contains the rules required to send the event data back to the TEC Web Service after an event has been created, updated, or closed. To manually install the classes with the install script, perform the following steps.
-
Open a command terminal at the system where the TEC server is installed.
-
Change the working directory to the TEC-agent/Samples directory in the TEC Agent install directory.
-
Set up the TEC environment:
-
For Windows systems, enter the following commands to start the bash shell:
%SystemRoot%\system32\drivers\etc\Tivoli\setup_env.cmdbash -
For Unix systems, enter the following command to start the bash shell:
/etc/Tivoli/setup_env.sh
-
-
Enter the following command to install the default classes:
./rule_load.sh
2.6.2 Removing TEC Rules/BAROC Files
-
Open a command terminal at the system where the TEC server is installed.
-
Change the working directory to the
TEC-agent/Samplesdirectory in the TEC Agent install directory. -
Set up the TEC environment based on the platform:
-
For Windows systems, enter the following commands to start the bash shell:
%SystemRoot%\system32\drivers\etc\Tivoli\setup_env.cmdbash -
For Unix systems, enter the following command to start the bash shell:
/etc/Tivoli/setup_env.sh
-
-
Enter the following command to uninstall the default classes:
./rule_unload.sh
2.7 Uninstalling the Connector
To uninstall the connector, you must first delete all defined instances of the connector, then you must delete the connector from the Self Update page.
-
From the Setup menu, select Extensibility, then Management Connectors.
-
Select an instance of the connector you want to delete, then click Delete.
-
On the Confirmation page, click Yes.
-
Repeat steps 2 and 3 until all instances of the connector have been deleted.
-
From the Setup menu, select Extensibility, then Self Update.
-
Click on the Management Connector link in the Type column. A list of updates appears for Management Connectors.
-
Click on the connector you want to delete, select Actions, then select Delete. The Delete Update window appears.
-
Click Delete to delete the connector. A pop-up confirmation window appears.
-
Click OK to confirm and delete the connector.