2 Installing and Uninstalling the Connector
The CA Service Desk (CASD) ticketing connector is comprised of the CASD adapter and CASD connector components. The CASD adapter provides a web service interface for manipulating tickets in CA Service Desk.
This chapter provides the following information for installing or uninstalling the CASD Connector, as well as switching from one console to the other:
2.1 Prerequisites
Ensure that the following prerequisites have been met before continuing:
-
Before using CA Service Desk Connector, ensure that CA Service Desk 11 or 12 is installed and configured.
-
As a prerequisite to installing the CASD Adapter, Java JRE 6.0 update 15 or higher must be installed on the system where the CASD Adapter is being installed, and the system must be one of the following platforms:
-
Microsoft Windows
-
Oracle Solaris
-
HP-UX
-
Linux
-
-
You must set up an account in the CASD system to access the CASD API. The CASD adapter must use the account exclusively, and the account must have permission to create, update, and retrieve ticket (incident) information.
-
The connectivity between the adapter and CASD is HTTP. The connectivity between the Enterprise Manager and the adapter can be HTTP or HTTPS.
-
My Oracle Support Preferred Credentials must be set. To set the credentials, perform the following steps:
Note:
These My Oracle Support credentials are required when there is an internet connection between your Enterprise Manager installation and the Oracle Management Service (OMS). If there is no connection, see Installing the Connector if Enterprise Manager is in "Offline" Mode for details.-
From the Enterprise Manager console Setup menu, select My Oracle Support, then Set Credentials.
-
Enter the user name and password information, then click Apply.
-
2.2 Installing the Connector
This section provides the procedure required to download and install (apply) the connector. The CASD connector is not included out-of-the-box, so you need to download it from the Oracle Enterprise Manager store. All connectors in the Enterprise Manager store are available on the Self Update page for downloading.
-
Install the Connector When Enterprise Manager is in "Online" Mode
-
Installing the Connector if Enterprise Manager is in "Offline" Mode
2.2.1 Install the Connector When Enterprise Manager is in "Online" Mode
In most cases, there is an internet connection between your Enterprise Manager installation and the Oracle Management Service (OMS). There are two main steps for installing the connector when Enterprise Manager is in "online" mode:
2.2.1.1 Download the CA Service Desk Connector
To download the connector:
-
From the Enterprise Manager console Setup menu, select Extensibility, then Self Update.
-
From the Self Update page, look for the CASD connector in the table list. If it does not appear, go to the next step.
-
Click Check Updates to schedule a job to collect the metadata for the connector.
See Also:
Refer to the "Setting up Self Update" section of the "Updating Cloud Control" chapter in the Oracle Enterprise Manager Cloud Control Administrator's Guide for more details:http://docs.oracle.com/cd/E24628_01/doc.121/e24473/self_update.htm#BEJJEHDJ
Note:
You can also set up Self Update in offline mode. See the "Applying an Update in Offline Mode" section from the Oracle Enterprise Manager Cloud Control Administrator's Guide for details:http://docs.oracle.com/cd/E24628_01/doc.121/e24473/self_update.htm#BEJICEBD
2.2.1.2 Install the CS Service Desk Connector
To install the connector:
-
From the Enterprise Manager console Setup menu, select Setup, then select Extensibility.
-
Click on the Management Connector link in the Type column.
The CASD connectors appear in the list with a status of Available.
-
Click on the appropriate CASD connector to select it, and then click Download.
The Schedule Download window appears, where you can determine when the download should be performed.
-
Click Select to download immediately.
If you want to schedule the download for a later time, specify the date and time when the download should occur, and click Select. You will need to return and finish the remainder of this procedure after the scheduled download date and time.
-
If necessary, refresh the screen until the status of the connector changes to Downloaded.
-
Click on the CASD connector to select it, and then click Apply.
After you respond to the prompt to confirm the operation, a page appears that indicates the request has been submitted.
-
Refresh the screen until the status of the connector changes from Apply Scheduled to Applied.
2.2.2 Installing the Connector if Enterprise Manager is in "Offline" Mode
Under certain circumstances, such as in high security environments, an active Internet connection between Enterprise Manager and the Enterprise Manager Update Store may not be available. In such situations, Enterprise Manager can be set to install the connector in an "offline" mode.
The installation process still requires that a computer exist at your site that has Internet access, as a connection to the Enterprise Manager Update Store is still required to obtain the necessary files. The files that you download to this computer can then be transferred to a computer behind your firewall.
To install the connector if Enterprise Manager is in "offline" mode:
-
From the system that you will ultimately deploy the connector, set Enterprise Manager Cloud Control to Offline Mode:
-
From the Setup menu, select Provisioning and Patching, then select Offline Patching.
-
In the Online and Offline Settings page, select Offline.
-
-
From the Setup menu, select Extensibility, then select Self Update.
-
On the Self Update page, click Check Updates. A message appears with the following URL to an Oracle site from where the updates catalog file can be downloaded:
https://updates.oracle.com/Orion/Download/download_patch/p9348486_112000_Generic.zip
-
From an Internet-enabled computer, download the catalog file using the aforementioned URL.
-
Copy the downloaded catalog file to the OMS host or the Management Agent host where you plan to import the connector.
-
Import the catalog file to Enterprise Manager:
-
If the catalog file is on the OMS host:
emcli import_update_catalog -file="file" -omslocal
Where:
-
-file: is the direct path to the connector archive (*.zip). -
-omslocal: indicates that the path mentioned in the-fileoption is directly accessible to the Enterprise Manager server
-
-
If the catalog file is on a different host:
emcli import_update_catalog -file="file" -host="hostname" [-credential_set_name="setname"] | -credential_name="name" -credential_owner="owner"
Example 2-1 shows a sample for importing the catalog archive.
-
-
On the Self Update page, in the table, click Management Connectors.
-
On the Connector Updates page, select the imported update that is available for download. Click Download.
A message appears with a URL to an Oracle site from where the update can be downloaded.
-
From a computer that is connected to the internet, download the update using the aforementioned URL.
-
Copy the downloaded file to the OMS host or the Management Agent host where you plan to deploy the connector.
-
To import the downloaded connector archive into Enterprise Manager, run the following command:
emcli import_update -file=”<path to *.zip file>” -omslocal
Where:
-
-file: is the direct path to the connector archive (*.zip). -
-omslocal: indicates that the path mentioned in the-fileoption is directly accessible to the Enterprise Manager server
-
Example 2-1 Sample for Importing Catalog Archive
emcli import_update_catalog -file="/u01/common/p9348486_112000_Generic.zip"  -omslocal

Imports the master catalog file p9348486_112000_Generic.zip. The file must exist
on the OMS host. In a multiple OMS setup, the request can be processed by any
OMS, so the file should be accessible from the OMS processing the request. This
means that the file must be kept on a shared location that is accessible from all
the OMS instances.

emcli import_update_catalog -file="/u01/common/p9348486_112000_Generic.zip" -host="host1.example.com" -credential_set_name="HostCredsNormal"

Imports the master catalog file p9348486_112000_Generic.zip that is present on
the host host1.example.com. The host must be a managed host target in Enterprise
Manager, and the Management Agent on this host must be up and running. The
preferred unprivileged credentials for host host1.example.com are used to retrieve
the remote file.
2.3 Exporting the Adapter Installation File
The adapter installation file is included in the connector that was installed in the previous section.
To extract the installation file:
-
Determine the command required to export the adapter installation file. To do this, perform the following steps:
-
From the Setup menu, select Extensibility, then Self Update.
-
Click on the Management Connector link in the Type column.
-
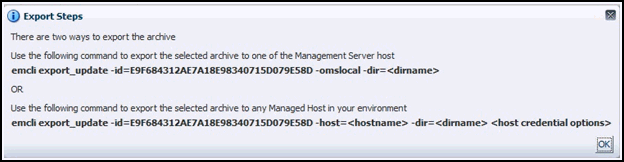
Click on the CASD connector to select it, then select Export from the Actions list.
A pop-up window, like the example shown in Figure 2-1, appears with the command required to export the file.
-
-
Open a command window on the Management Server host system and navigate to a temporary directory where you can copy and unzip the file.
-
Log into EM CLI using the following command. You will be asked to provide the password information for the sysman account.
emcli login -username=sysman
EM CLI must be executed from the OMS host. See the Oracle Enterprise Manager Command Line Interface for information about setting up EM CLI.
-
Run the EM CLI export_update command from your system, changing <dirname> to the full path of the temporary directory.
This action creates a zip file. The file name is comprised of the id value you specify in the export_update command with a .zip extension. In the example command in Figure 2-1, the zip file name would be E9F684312AE7A18E98340715D079E58D.zip .
-
Extract the adapter installation .jar file from the .zip file using the following command:
unzip *.zip archives/casd_adapter.jar
2.4 Installing the Adapter
The CASD Adapter acts as a front end for all tickets flowing into and out of CASD. Oracle Enterprise Manager posts calls to the web service whenever it needs to create or update a ticket, or get a ticket ID from CASD.
You can install the CASD Adapter on a supported Unix or Windows system that has connectivity to the CASD server and the Oracle Enterprise Manager server.
2.4.1 Security Recommendations
Because the CASD Adapter stores sensitive information for accessing CA Service Desk, access to the adapter files should be limited. Oracle recommends setting up a separate group (hereafter referred to as "the adapter group") that has permission to configure and run the CASD Adapter. Access to the adapter should not be allowed for anyone that is not a member of the adapter group.
2.4.2 Installing and Running the CASD Adapter on Unix
The following sections explain how to install and then subsequently run the Adapter.
2.4.2.1 Installing the Adapter on Unix
To install the adapter on a Unix platform:
-
Log in as a user that is a member of the adapter group. See Section 2.4.1, "Security Recommendations" for more information regarding the adapter group.
-
Create a directory where you want to install the adapter.
-
Open a terminal and change the working directory to the installation directory.
-
Obtain a copy of the casd_adapter.jar file from the Management Server host system as specified in Section 2.3, "Exporting the Adapter Installation File", and copy it to the installation directory.
-
Make sure the JAVA_HOME environment variable is set to the directory where Java 1.6 is installed.
-
Enter the following command to unzip and extract the jar file:
$JAVA_HOME/bin/jar xvf casd_adapter.jarThis creates the adapters directory that contains the installation files.
Note:
If the system where the CASD adapter is being installed does not have the JDK installed, you cannot extract the jar file contents. You must copy the jar file to a system that has the JDK installed and transfer the files after they have been extracted. -
Enter the following command to change the working directory:
cd adapters/endpoints/ca-usd -
Enter the following command to run the installation script:
sh ./install.sh -
When the script prompts whether you want to use HTTPS, answer Y (yes) or N (no):
-
If you specify Y, the adapter is set up to use HTTPS port number 8443.
-
If you specify N, the adapter is set up to use HTTP port number 8082.
-
-
When the script prompts for the user name of the web service, enter the user name that must be provided to access the CASD adapter web service.
Note:
This user name is not associated with any CASD or system account. It can be any value that you choose. This user name will be used to restrict access to the adapter web service interface. -
When the script prompts for the password of the web service, enter the password that must be provided to access the CASD adapter web service.
Note:
This password is not associated with any CASD or system account. It can be any value that you choose. This password will be used to restrict access to the adapter web service interface. -
When the script prompts for the hostname/IP address of the CASD server, enter the host name or IP address of the system where the CASD server is deployed. The host name defaults to localhost if no value is provided.
-
When the script prompts for the port number of the CASD server, enter the port number the CASD web server uses (Tomcat or IIS). The port number defaults to 8080 if no value is provided.
-
When the script prompts for the user name to use when accessing CASD, enter the user name of the CASD account referenced in Section 2.1, "Prerequisites".
-
When the script prompts for the password to use when accessing CASD, enter the password of the CASD account referenced in Section 2.1, "Prerequisites".
-
After the script displays the message CASD Adapter Install Complete, press Enter to complete the installation.
-
Enter the following command to change the working directory to the conf directory.
cd adapters/conf -
Change the permissions on the framework.properties file to allow read, write, and execute permissions for the owner and the adapter group and no access for any other users.
-
If the adapter was configured to run using the HTTPS protocol, you must perform the following steps:
-
Install an SSL certificate in the adapter keystore. You must either install a self-signed certificate, or install a certificate obtained from a Certificate Authority (CA).
-
To install a self-signed certificate, perform the steps specified in Section 7.1, "Installing a Self-Signed Certificate".
-
To install a certificate from a CA, perform the steps specified in Section 7.2, "Installing a Certificate from a Certificate Authority".
-
-
Import the SSL certificate from the adapter keystore into the Enterprise Manager keystore. Perform the steps specified in Section 7.3, "Importing the Adapter Certificate into Enterprise Manager".
-
The adapter framework is now installed and ready to start.
2.4.2.2 Running the Adapter on Unix
To run the CASD Adapter framework commands listed with the following tasks, first change the working directory in the installation directory to:
adapters/bin
The following commands are available for running the adapter:
-
Start -
./service.sh start -
Shut Down -
./service.sh stop -
Restart -
./service.sh restart -
Check Status -
./service.sh status
2.4.2.3 Testing the Adapter on Unix
To verify that the CASD Adapter is functional:
-
Open a terminal and change the working directory to the adapters/bin directory in the installation directory.
-
Enter the following command to run the test script:
./testAdapter.sh -
The test script prompts for the password information. At the prompt, enter the password that was configured for accessing the Adapter web service in step 11 of Installing the Adapter on Unix.
For information on setting the user name and password, see Changing Web Service Credentials.
-
If the test completes successfully, the last line the utility displays is Test completed successfully.
2.4.3 Installing and Running the CASD Adapter on Windows
The following sections explain how to install and then subsequently run the Adapter.
2.4.3.1 Installing the Adapter on Windows
To install the adapter on a Windows platform:
-
Log in as a user that is a member of the adapter group. See Security Recommendations for more information regarding the adapter group.
-
Create a directory where you want to install the adapter.
-
Open a terminal and change the working directory to the installation directory.
-
Obtain a copy of the casd_adapter.jar file from the Management Server host system as specified in Exporting the Adapter Installation File, and copy it to the installation directory.
-
Make sure the JAVA_HOME environment variable is set to the directory where Java 1.6 is installed.
-
Enter the following command to unzip and extract the jar file:
"%JAVA_HOME%\bin\jar" xvf casd_adapter.jarThis creates the adapters directory that contains the installation files.
Note:
If the system where the CASD adapter is being installed does not have the JDK installed, you cannot extract the jar file contents. You must copy the jar file to a system that has the JDK installed and transfer the files after they have been extracted. -
Enter the following command to change the working directory:
cd adapters\endpoints\ca-usd -
Enter the following command to run the installation script:
.\install.bat -
When the script prompts whether you want to use HTTPS, choose Y (yes) or N (no):
-
If you specify Y, the adapter is set up to use HTTPS port number 8443.
-
If you specify N, the adapter is set up to use HTTP port number 8082.
-
-
When the script prompts for the user name of the web service, enter the user name that must be provided to access the CASD adapter web service.
Note:
This user name is not associated with any CASD or system account. It can be any value that you choose. This user name is used to restrict access to the adapter web service interface. -
When the script prompts for the password of the web service, enter the password that must be provided to access the CASD adapter web service.
Note:
This password is not associated with any CASD or system account. It can be any value that you choose. This password is used to restrict access to the adapter web service interface. -
When the script prompts for the hostname/IP address of the CASD server, enter the host name or IP address of the system where the CASD server is deployed. The host name defaults to localhost if no value is provided.
-
When the script prompts for the port number of the CASD server, enter the port number the CASD web server uses (Tomcat or IIS). The port number defaults to 8080 if no value is provided.
-
When the script prompts for the user name to use when accessing CASD, enter the user name of the CASD account referenced in Section 2.1, "Prerequisites".
-
When the script prompts for the password to use when accessing CASD, enter the password of the CASD account referenced in Section 2.1, "Prerequisites".
-
Enter the following command to change the working directory to the conf directory.
cd adapters\conf -
Change the permissions on the framework.properties file to allow read, write, and execute permissions for the adapter group and no access for any other users.
-
After the script displays the message CASD Adapter Install Complete, press Enter to complete the installation.
-
If the adapter was configured to run using the HTTPS protocol, you must perform the following steps:
-
Install an SSL certificate in the adapter keystore. You must either install a self-signed certificate, or install a certificate obtained from a Certificate Authority (CA).
-
To install a self-signed certificate, perform the steps specified in Installing a Self-Signed Certificate.
-
To install a certificate from a CA, perform the steps specified in Installing a Certificate from a Certificate Authority.
-
-
Import the SSL certificate from the adapter keystore into the Enterprise Manager keystore. Perform the steps specified in Importing the Adapter Certificate into Enterprise Manager.
-
The adapter framework is now installed and ready to start.
2.4.3.2 Running the Adapter as a Windows Service (Optional)
Optionally, if you want the adapter to run as a Windows service, perform the following steps:
-
Log into an account that has permission to add a Windows service.
Note:
On most systems, the account must be a member of the Administrators group to add a Windows service. -
Make sure the account has read and execute permissions for the
adapters\bindirectory. -
Change the working directory to the
adapters\bindirectory in the installation directory. -
If the adapter will be run using a 64-bit JRE, copy the
iWaveAdapters.exeandiWaveAdaptersw.exefiles from the x64 directory to the current directory (.) overwriting the existing files. -
Enter the following command to install the adapter as a Windows service:
service.bat install
-
If the adapter will be run using a 64-bit JRE, perform the following substeps to configure the service to use the 64-bit JRE:
-
In the
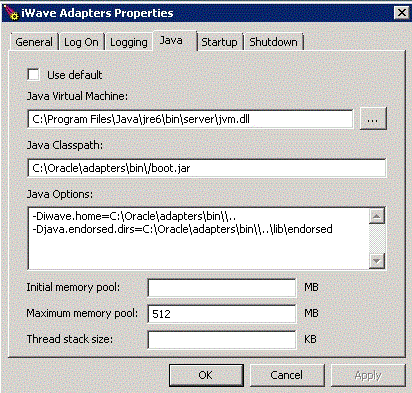
adapters\bindirectory, double click theiWaveAdaptersw.exefile. This will cause the iWave Adapters Properties window to be displayed. -
Click the Java tab. The Java tab will be displayed that shows the JVM settings as shown in Figure 2-2.
-
Uncheck the Use default check box if it is checked.
-
Click
 to open the Select Java Virtual Machine DLL window.
 -
Navigate to the
jvm.dllfile in the 64-bit JRE installation directory and click Open. -
Click OK.
-
2.4.3.3 Running the Adapter on Windows
There are two ways you can run the adapter on Windows: Standalone Service and Windows Service.
2.4.3.3.1 Standalone Service
To start the CASD adapter framework when set up as a standalone application (not set up to run as a Windows service):
-
Change the working directory to the adapters\bin directory in the installation directory.
-
Run the following command:
startAdapters.bat
To shut down the CASD adapter framework, close the window where you started the adapter.
2.4.3.4 Testing the Adapter on Windows
To verify that the CASD Adapter is functional.
-
Open a terminal and change the working directory to the adapters\bin directory in the installation directory.
-
Enter the following command to run the test script:
.\testAdapter.bat -
The test script prompts for the password information. At the prompt, enter the password that was configured for accessing the Adapter web service in step 11 of Installing the Adapter on Windows.
-
If the test completes successfully, the last line the utility displays is Test completed successfully.
2.5 Uninstalling the Connector
To uninstall the connector, you must first delete all defined instances of the connector, and then you must delete the connector from the Self Update page.
To uninstall the connector:
-
From the Setup menu, select Extensibility, then Management Connectors.
-
Select an instance of the connector you want to delete, then click Delete.
-
On the Confirmation page, click Yes.
-
Repeat steps 2 and 3 until all instances of the connector have been deleted.
-
From the Setup menu, select Extensibility, then Self Update.
-
Click on the Management Connector link in the Type column.
A list of updates appears for Management Connectors.
-
Click on the connector you want to delete, select Actions, then select Delete.
The Delete Update window appears.
-
Click Delete to delete the connector.
The confirmation window appears.
-
Click OK.
2.6 Uninstalling the Adapter
This section describes the procedures for uninstalling the adapter on Unix and on Windows.
2.6.1 Uninstalling the Adapter on Unix
To uninstall the adapter on a Unix platform:
-
Stop the adapter as specified in Section 2.4.2.2, "Running the Adapter on Unix".
-
Delete the adapters folder from the adapter installation directory.
2.6.2 Uninstalling the Adapter on Windows
To uninstall the adapter on a Windows platform:
-
Stop the adapter as specified in Section 2.4.3.3, "Running the Adapter on Windows".
-
If the adapter is installed as a Window service, perform the following steps to uninstall the adapter as a service:
-
Open a command window and change the working directory to the adapters\bin directory in the adapter install directory.
-
Issue the command
.\service uninstall
-
-
Delete the adapters folder from the adapter installation directory.