6 Performing Oracle Site Guard Operations
This chapter contains information about creating, executing and monitoring Oracle Site Guard operation plans.
It contains the following topics:
6.1 Overview
Oracle Site Guard operation plans contain steps that must be executed during a disaster-recovery activity. In addition to the steps defined in an operation plan, the operation plan allows for such concepts as serial and parallel execution of steps, ignoring or retrying steps upon error, and so on.
Figure 6-1 shows the roadmap for managing Oracle Site Guard operations. Steps marked optional are required if the site topology and operation plans require the configuration. However, since most enterprise deployments are large, they typically require all the configuration steps listed in the figure below.

Note:
-
Before you create operation plans, ensure that you complete the tasks listed in Chapter 4, "Configuring Oracle Site Guard".
-
You must log in using the
EM_SG_ADMINISTRATORrole privilege for performing the configuration tasks. Ensure that you have created the required user credentials as described in Section 3.2.2, "Creating Oracle Site Guard Administrator Users".
6.2 Managing Operation Plans
An operation plan contains the execution flow for the Oracle Site Guard operation. It is a pre-configured workflow consisting of a set of ordered actions (steps).
Before you execute any Oracle Site Guard disaster-recovery operation, you must create a plan for that operation.
Steps such as the following, can be included in an operation plan:
-
Stopping Oracle HTTP Servers.
-
Stopping the node managers, managed servers, and administration server in an Oracle WebLogic domain.
-
Performing a database role reversal using Oracle Data Guard.
-
Executing custom user scripts at certain points in the operation plan sequence.
Oracle Site Guard creates a default version of the operation plan based on the site topology and the Oracle Site Guard configuration. You can use this default operation plan or customize it depending on your configuration.
This section contains the following topics:
6.2.1 Creating Operation Plans
You can create an operation plan using one of the following methods:
6.2.1.1 Creating an Operation Plan Using Enterprise Manager Cloud Control Console
To create an operation plan using the Enterprise Manager Cloud Control Console, follow these tasks:
-
Log in to Enterprise Manager as a user with
EM_SG_ADMINISTRATORrole privileges. -
From the Targets menu, click Systems.
The Systems page is displayed.
-
On the Systems page, click the name of the system (Generic System) for which the plan is being created.
The Generic System page for this site is displayed.
-
Click Generic System > Site Guard > Operations.
The Site Guard Operations page is displayed.
-
Click Create.
The Create New Operation Plan dialog is displayed.
-
Enter the following details:
Plan Name: Enter a name for the plan.
Operation Type: Select an operation type from the following options:
-
Switchover
-
Failover
-
Start
-
Stop
Note:
-
For information about Oracle Site Guard operation types, see Section 2.4, "Oracle Site Guard Workflows".
-
The options displayed in the dialog change depending on the operation type you select. For switchover and failover operation types, you must select the standby system for the plan. For start and stop operations, select the current role for the system.
Primary System: This field displays the name of the system for which this plan is being created. You cannot change the values in this field.
Standby System: Select a standby system from the list. Note that this option is enabled only when you select Switchover or Failover in the Operation Types field.
Current Role: Select either Primary or Standby. This is the role of the system that this plan applies to. The plan can only run when the system is assigned a role. Note that this option is enabled only when you select Start or Stop in the Operation Type field.
-
-
Click Save.
6.2.1.2 Creating an Operation Plan Using EMCLI Commands
Run the following emcli commands in the command-line interface to create a new operation plan:
emcli create_operation_plan
         [-primary_system_name="name_of_primary_system"]
         [-standby_system_name="name_of_standby_system"]
         [-system_name="name_of_the_system"]
         [-operation="name_of_the_operation"]
         [-name="name_of_the_operation_plan"]
         [-role="role_associated_with_the_system"]
         [-like="name_of_the_operation_plan_from_which_the_steps_are_to_be_copied"
| Parameter | Description |
|---|---|
-primary_system_name |
Specify the name of your system associated with the primary site. This option is used for switchover or failover operations. |
-standby_system_name |
Specify the name of your system associated with the standby site. This option is used for switchover or failover operations. |
-system_name |
Specify the name of the system. This option is used for start or stop operations. |
-operation |
Specify the function of the operation. Example: switchover, failover, start or stop. |
-name |
Specify the name of the operation plan. |
-role |
Specify the role associated with a system, when you run an operation (start or stop). |
| -like | Name of the operation plan from which the steps are to be copied. If this option is specified, system name, operation, and role are ignored. |
6.2.2 Creating New Operation Plans Using Existing Plans
You can create and configure new operation plans by cloning (copying) an existing plan. This applies to all types of plans.
To clone a plan using the Enterprise Manager Cloud Control Console, follow these steps:
-
Log in to Enterprise Manager as an
EM_SG_ADMINISTRATORuser. -
From the Targets menu, click Systems.
The Systems page is displayed.
-
Select the system name (Generic System) for which the operation plan is created. The Generic System page for that site is displayed.
-
Click Generic System > Site Guard > Operations.
The Site Guard Operations page is displayed.
-
Select an existing operation plan from the table and click Create Like.
-
Enter a name for the new plan.
-
Click Save.
6.2.3 Editing and Updating Operation Plans
You can perform the following tasks to update or edit an operation plan:
-
Change the order of the steps in an operation plan.
-
Enable or disable individual steps in the operation plan.
-
Choose to stop or continue a step in an operation plan if Oracle Site Guard encounters an error while running the operation plan.
-
Customize each step to execute steps in a serial order or parallel on different hosts.
You can modify the steps in an operation plan, and save the updated operation plan at any point in time.
To edit and update operation plans use one of the following methods:
6.2.3.1 Editing and Updating Operation Plans Using Enterprise Manager Cloud Control Console
To edit and update an operation plan using the Enterprise Manager Cloud Control Console, follow these steps:
-
Log in to Enterprise Manager with
EM_SG_ADMINISTRATORrole privileges. -
From the Targets menu, click Systems.
The Systems page is displayed.
-
On the Systems page, click the name of the system (Generic System) for which this plan is being created.
The Generic System page for that site is displayed.
-
On the system's home page, from the Generic System > Site Guard > Operations.
The Site Guard Operations page is displayed.
A list of configured operation plans is displayed in the Operation Plans tab.
-
Select an existing operation plan by clicking on the plan listed in the Plan Name column.
The steps associated with the selected operation plan are listed in the Operation Details table located below the Operation Plan table. Each row in the table represents a step that is executed as part of the operation plan.
-
Click Edit to enable the options for updating and customizing the steps in the operation plan.
-
Select Move Up (green arrow), Move Down (red arrow), or Delete Step to sequence the steps in the operation plan.
In addition, select the attribute from the Error Mode, Execution Mode, or Run Mode columns.
An operation plan step cannot be moved out of the group it belongs to.
-
Click Save to update the plan.
6.2.3.2 Editing and Updating Operation Plans Using EMCLI Command
To edit or update the operation plan, run the following emcli commands in the command-line interface:
-
Get the list of configured operation plans by running the following command:
emcli get_operation_plans        [-name="name_of_the_operation_plan"]
        [-operation="type_of_operation"]
        [-system_name="name_of_the_system"]
        [-primary_system_name="name_of_the_primary_system"]
        [-standby_system_name="name_of_the_standby_system"]
Parameter Description -nameSpecify the name of the operation plan. -operationSpecify the name of the operation. For example, switchover,failover,start, orstop.This is an optional parameter. If you do not specify this parameter, then all the operation plans will be listed.
-system_nameSpecify the name of system used in the operation plan. If you specify these values, then the values for -primary_system_nameand-standby_system_nameneed not be specified.-primary_system_nameSpecify the name of primary system used in the operation plan. You can specify the values of this parameter instead of the values of -system_name. The-standby_system_nameparameter can also be additionally used for better filtering.-standby_system_nameSpecify the name of the standby system used in the operation plan. You can specify the values of this parameter instead of the values of -system_name. The-primary_system_nameparameter can also be additionally used for better filtering. -
Get the details of an operation plan that you want to update by running the following command:
emcli get_operation_plan_details
      -name="name_of_the_operation_plan"
Parameter Description -nameSpecify the name of the operation plan. -
Update the plan by running the following command:
emcli update_operation_plan
         -name="operation_plan_name"
         -step_number="step_number"
         -target_host="host_name"
         -target_name="target_name"
         [error_mode="error_mode"]
         [enabled="true" or "false"]
         [-execution_mode="Serial" or "Parallel"]
         [-move="up"or"down"]
         [-delete="true" or "false"]
Parameter Description -nameSpecify the name of the operation plan. -step_numberSpecify the number of the step that should be updated. -target_hostSpecify the name of the system. Specifying this will update all the steps related to this target host. -target_nameSpecify the database target name. -error_modeThe function of the operation. For example: stoporcontinue.-enabledEnter trueorfalse.-execution_modeSpecify the execution mode. For example: SerialorParallel-moveChange the order by specifying UporDown.-delete Specify whether you want to delete steps. Specify trueorfalse.
6.2.4 Deleting an Operation Plan
You can delete an operation plan using one of the following methods:
6.2.4.1 Deleting an Operation Plan Using Enterprise Manager Cloud Control Console
To delete an operation plan using the Enterprise Manager Cloud Control Console, follow these steps:
-
Log in to Enterprise Manager with
EM_SG_ADMINISTRATORrole privileges. -
From the Targets menu, click Systems.
The Systems page is displayed.
-
On the Systems page, click the name of the system (Generic System) for which this plan is being created.
The Generic System page for that site is displayed.
-
On the system's home page, from the Generic System > Site Guard > Operations.
The Site Guard Operations page is displayed.
A list of configured operation plans is displayed in the Operation Plans tab.
-
Select an existing operation plan by clicking on the plan listed in the Plan Name column.
-
Click Delete to delete the selected operation plan.
A confirmation pop-up window appears.
-
Click Yes to confirm the action.
6.2.4.2 Deleting an Operation Plan Using Command-Line Interface
To delete an operation plan, run the following emcli command in the command-line interface:
emcli delete_operation_plan
         –name="name_of_the_operation_plan"
| Parameter | Description |
|---|---|
-name |
Specify the name of the operation plan. |
6.3 Running Prechecks
Oracle Site Guard runs the Precheck utility before performing any operation, by default. You can also run the Precheck utility separately, before executing any Oracle Site Guard operations. The Precheck utility in Oracle Site Guard for Fusion Middleware plug-in release (12.1.0.7) is enhanced to include Prechecks for database lags and the replication health of the ZFS appliance.
Oracle Site Guard performs the following Prechecks:
-
Checks the agent status on all hosts involved in the operation.
-
Checks if any new targets are added to the generic system after the operation plan is created.
-
Checks if all targets involved in the operation plan exist in the Enterprise Manager repository.
-
Detects if any targets are moved out or deleted from the generic system after the operation plan is created.
-
Asserts the existence of non-runtime, configured scripts (Pre Scripts/Post Scripts/Mount Scripts/Unmount Scripts/storage role reversal) on their respective target hosts.
-
Runs Oracle Data Guard Broker Prechecks to ascertain whether the Database is ready for role reversal (for switchover/failover operation).
-
Performs Database Role Checks.
-
Performs Database Lag (Apply and Transport) Checks.
-
Runs checks on ZFS storage appliances to assert the role-change readiness.
You can run the Precheck utility using one of the following methods:
6.3.1 Running Precheck Utility Using Enterprise Manager Cloud Control Console
To run a Precheck utility using the Enterprise Manager Cloud Control follow these steps:
-
Log in to Enterprise Manager Cloud Console as a user with
EM_SG_ADMINISTRATORrole privileges. -
From the Targets menu, click Systems.
The Systems page is displayed.
-
On the Systems page, click the name of the system (Generic System) for which the Prechecks are to be run.
-
Click Generic System > Site Guard > Operations. The Site Guard Operations page is displayed.
-
Select an operation plan from the list by clicking on the plan name from the list.
-
Click Run Prechecks.
A dialog box is displayed.
-
Click Yes to confirm the action.
To track the progress and results of the Precheck, click the click here link in the Confirmation pane at the top of the page, or navigate to Enterprise > Provisioning and Patching > Procedure Activity.
For more details about monitoring a procedure activity see Section 6.6, "Monitoring Oracle Site Guard Operations".
6.3.2 Running Precheck Utility Using Command-Line Interface
To run the Oracle Site Guard Precheck utility using EMCLI, run the following command:
emcli run_prechecks
       -operation_plan="operation_plan_name"
       [-database_lag_checks="true"|"false"]
| Parameter | Description |
|---|---|
-operation_plan |
Enter the name of your operation plan. |
-database_lag_checks |
Run database lag checks as part of Prechecks for all data guard configured databases. This parameter is optional.
The default value is |
Note:
[ ] indicates that the parameter is optional.6.4 Scheduling Health Checks
To schedule a health check for an operation plan, use one of the following methods:
6.4.1 Scheduling a Health Check Using Enterprise Manager Cloud Control Console
To schedule Health Checks using the Enterprise Manager Cloud Control follow these steps:
-
Log in to Enterprise Manager Cloud Console as a user with
EM_SG_ADMINISTRATORrole privileges. -
From the Targets menu, click Systems.
The Systems page is displayed.
-
On the Systems page, click the name of the system (Generic System) for which the Prechecks are run.
-
Click Generic System > Site Guard > Operations.The Site Guard Operations page is displayed.
-
Select an operation plan from the list by clicking on the plan name from the list.
-
Click Schedule Health Checks.
The Schedule Health Checks for operation plan dialog box is displayed.
-
Configure the schedule for the health check.
-
Click Save.
To inspect the results for each Health Check, navigate to Enterprise > Provisioning and Patching > Procedure Activity.
For more information about monitoring procedure activity see Section 6.6, "Monitoring Oracle Site Guard Operations".
6.4.2 Scheduling a Health Check Using EMCLI
To schedule a Health Check using EMCLI, run the following command in the command-line interface.
emcli schedule_siteguard_health_checks
        -operation_plan={name of the operation plan}
        -schedule=
           {
             start_time:yyyy/MM/dd HH:mm;
             [tz:{java timezone ID};]
             [frequency:interval/weekly/monthly/yearly;]
             [repeat:tx;]
             [end_time:yyyy/MM/dd HH:mm;]
             [grace_period:xxx;]
           }
| Parameter | Description |
|---|---|
-operation_plan |
Enter the name of your operation plan. |
-schedule |
Specify the schedule for the health check. Enter the values for the following parameters:
- - - If the frequency is set to If the frequency is set to If the frequency is set to - - If frequency is set to If the frequency is set to - - - For example: Examples: start_time:2014/06/10 15:45 start_time:2014/10/29 2:00;frequency:interval;repeat:1d start_time:2014/08/10 01:00;frequency:interval;repeat:1w start_time:2014/08/10 01:00;frequency:weekly;days:6,7;grace_period:60;tz:America/New_York |
6.5 Executing Oracle Site Guard Operation Plans
Use one of the following methods to start a site:
-
Executing Oracle Site Guard Operation Plan Using Enterprise Manager Cloud Control Console
-
Executing Oracle Site Guard Operation Plan Using EMCLI Command
6.5.1 Executing Oracle Site Guard Operation Plan Using Enterprise Manager Cloud Control Console
To execute an operation plan using Enterprise Manager Cloud Control console, complete the following tasks:
-
Log in to Enterprise Manager using the
EM_SG_ADMINISTRATORrole privileges. -
From the Targets menu, click Systems.
The Systems page is displayed.
-
On the Systems page, click the name of the system (Generic System) for which the operation plan is being executed.
-
On the Generic System page, click Generic System > Site Guard > Operations.
The Site Guard Operations page is displayed.
-
Select an operation plan from the list.
-
Click Execute Operation.
A dialog box is displayed.
-
Select Run Prechecks check box to run Prechecks before executing the operation plan.
-
Click Yes to confirm the action.
To track the progress and results of the operation, click the click here link in the Confirmation pane at the top of the page, or navigate to Enterprise > Provisioning and Patching > Procedure Activity.
For more details about monitoring a procedure activity see Section 6.6, "Monitoring Oracle Site Guard Operations".
6.5.2 Executing Oracle Site Guard Operation Plan Using EMCLI Command
To execute an operation plan, run the following EMCLI command in the command-line interface:
emcli submit_operation_plan
         -name="name_of_operation_plan"
         [-run_prechecks="true | false"]
         [-stop_primary="flag_specifying_whether_primary_site_to_be_stopped_during_failover"]
         [-database_lag_checks="true"|"false"]
| Parameter | Description |
|---|---|
-name |
Specify the name of the operation plan. |
-run_prechecks |
Specify the run_prechecks value (true or false).
By default, the value of this parameter is If you set the value to |
-stop_primary |
Specify whether to stop targets on primary site during a Failover operation. Set value true or false. |
-database_lag_checks |
Run database lag checks as part of Prechecks for all Data Guard configured databases. This parameter is optional.
The default value is |
6.6 Monitoring Oracle Site Guard Operations
You can monitor an operation activity using one of the following methods:
6.6.1 Monitoring an Operation Plan Using Enterprise Manager Cloud Control Console
This section contains the following topics:
6.6.1.1 Viewing an Operation Activity
To monitor an operation activity submitted for execution, complete the following steps:
-
Log in to Enterprise Manager using the
EM_SG_ADMINISTRATORrole privileges. -
In the Enterprise menu, click Provisioning and Patching and then click Procedure Activity. The Provisioning page is displayed.
-
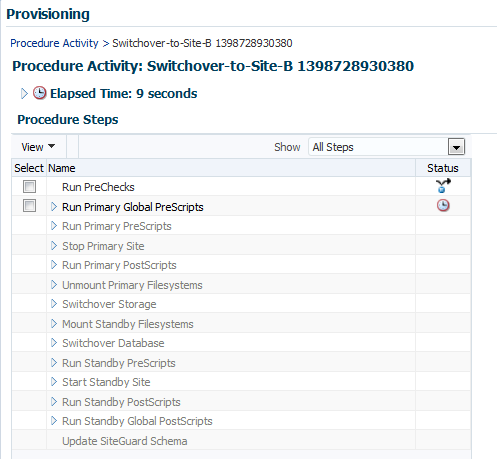
In the Procedure Activity table, click the name of the activity of operation you want to monitor.
The Procedure Activity page for that operation is displayed. See Figure 6-2.
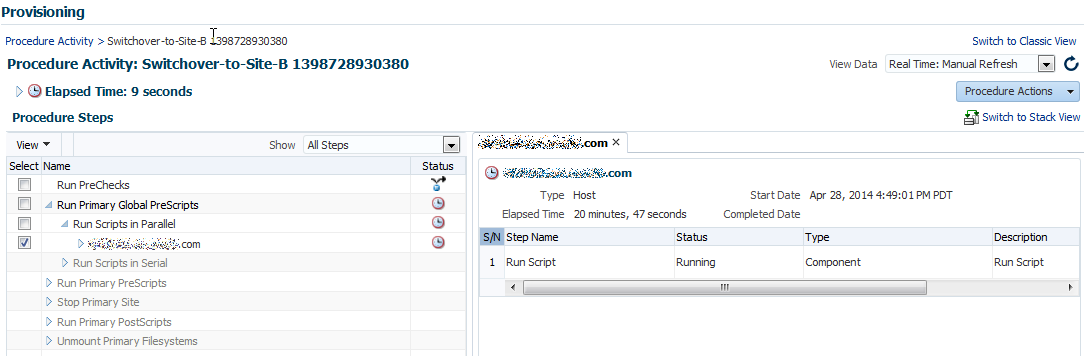
-
Click the drop-down symbol next to the top-level step to view the sub-steps. The hierarchical steps of the activity are displayed. See Figure 6-3.
6.6.1.2 Suspending, Resuming, or Stopping an Operation
Operations in progress can be suspended and resumed later. You can also stop the operations that you do not want to resume. Follow these steps:
-
Log in to Enterprise Manager using the
EM_SG_ADMINISTRATORrole privileges. -
In the Enterprise menu, click Provisioning and Patching and then click Procedure Activity. The Provisioning page is displayed.
-
In the Procedure Activity table, click the name of the operation you want to monitor.
The Procedure Activity page for that operation is displayed.
-
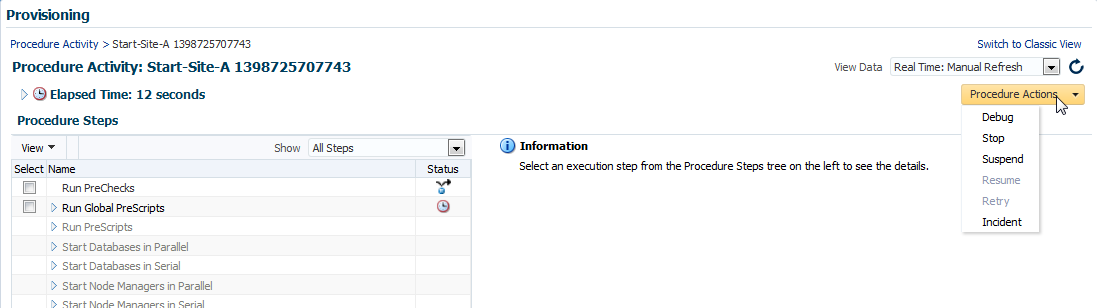
Click Procedure Actions located on the right-hand side of the page.
-
Click an action from the drop-down menu. See Figure 6-4.
6.6.2 Monitoring an Operation Plan Using EMCLI
To monitor the status of an operation plan using EMCLI, complete the following steps in the command-line interface:
-
Get a list of procedures by running the following command:
emcli get_instances
       [-type={procedure type}]
       [-format=name:]
       [-script]
       [-noheader]
Parameter Description -typeSpecify the procedure type. This parameter is optional. -formatSpecify the output format of the list of instances. Enter pretty,script,orcsv. This parameter is optional and the default value ispretty.-scriptSpecify whether the output format is script or not. This parameter is optional. -noheaderDo not display column headers. This parameter is optional. -
Note down the GUID for the operation in the list of operations displayed by the emcli
get_instancescommand. -
Get the status of the operation using the following command:
emcli get_instance_status -instance="GUID"
6.7 Managing Execution Errors
Oracle Site Guard uses the Enterprise Manager Cloud Control deployment procedures framework to orchestrate disaster-recovery operations on remote hosts. The framework provides error management support through error modes.
Errors encountered during operation plan execution can be managed in multiple ways. Oracle Site Guard provides an option to define the error mode for individual steps, and also lets you enable or disable steps. For example, if an operation step has an associated error mode of 'Stop on Error', Oracle Site Guard stops the operation while executing that step.
To retry that step and continue the operation, complete the following steps:
-
Log in to Enterprise Manager using the
EM_SG_ADMINISTRATORrole privileges. -
In the Enterprise menu, click Provisioning and Patching and then click Procedure Activity. The Provisioning page is displayed.
-
In the Procedure Activity table, click the name of the operation you want to change.
The Procedure Activity page for that operation is displayed.
-
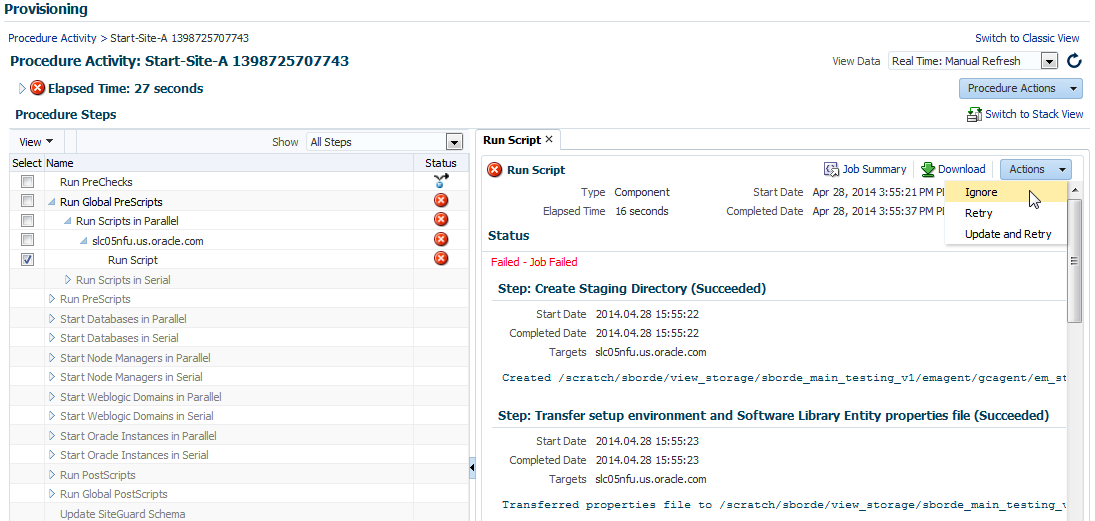
Click the drop-down symbol next to the top-level steps to view the sub-step. The hierarchical steps of the activity are displayed. Click the drop-down symbols at the hierarchical step until you reach the step that encountered the error.
See Figure 6-5.
-
Select the step, and click Actions. A drop-down menu is displayed.
-
From the drop-down menu, click the action that you want Oracle Site Guard to perform to manage this error.
-
Click Ignore to ignore the error, and continue with the other steps in the plan.
-
Click Retry to re-run the step.
-
Click Update and Retry to update the parameters for this step, and re-run the step.
Note:
-
You cannot change the error mode of a step using the steps provided in this section. To change an error mode of a step, edit the operation as instructed in Section 6.2.3, "Editing and Updating Operation Plans".
-
For more information about how to diagnose execution errors, see Chapter 5, "Troubleshooting Oracle Site Guard."
-
6.8 Manually Reversing Site Roles
While using Oracle Site Guard to test disaster recovery work flows or isolated parts of work flows, you might encounter a situation where you need to manually reconfigure site roles, and explicitly designate a site as the primary site. When you designate a site as a primary site, or manually reconfigure site roles, the other site is automatically designated as the Standby site.
To manually reconfigure site roles, use one of the following methods:
6.8.1 Manually Reversing Site Roles Using Enterprise Manager Cloud Control Console
To manually reconfigure site roles using Enterprise Manager Cloud Control Console, complete the following steps:
-
Log in to Enterprise Manager Cloud Console as a user with
EM_SG_ADMINISTRATORrole privileges. -
From the Targets menu, click Systems.
The Systems page is displayed.
-
Click the name of the system (Generic System) that you want to designate as the primary site.
The Generic System page for the site is displayed.
-
On the home page of the system, from the Generic System menu, click Site Guard, and then click Configure.
The Site Guard Configuration page is displayed.
-
Click Set as Primary.
6.8.2 Manually Reversing Site Roles Using EMCLI
To manually reverse the roles of the primary and standby sites, run the following EMCLI commands in the command-line interface:
Note:
For information about logging in to the Enterprise Manager Command-Line Interface, see Oracle Enterprise Manager Command Line Interface Guide.
emcli update_siteguard_configuration
         -primary_system_name="primary_system_name"]
         -standby_system_name="standby_system_name"]
         [-reverse_role="flag_specifying_whether_system_roles_to_be_reversed"]
| Parameter | Description |
|---|---|
-primary_system_name |
Enter the name of the system that is the current primary site and needs to be designated as the new standby site. |
-standby_system_name |
Enter the name of the system that is the current standby site and needs to be designated as the new primary site. |
-reverse_role |
Specify this option to reverse site roles. |