13 Setting Up JD Edwards EnterpriseOne Single Sign-On Through Oracle Access Management 11g Release 2
This chapter contains the following topics:
-
Section 13.3, "Installing Oracle Identity and Access Management"
-
Section 13.4, "Setting Up OAM to Support an EnterpriseOne Single Sign-on Configuration"
-
Section 13.5, "Setting Up EnterpriseOne for Single Sign-On Integration with OAM"
13.1 Understanding JD Edwards EnterpriseOne Single Sign-On Through Oracle Access Management
Oracle Access Management (OAM) provides single sign-on functionality for Oracle applications, including JD Edwards EnterpriseOne. It provides a secure internet infrastructure for identity management for EnterpriseOne applications and processes. This infrastructure provides:
-
Identity and access management across EnterpriseOne applications, enterprise resources, and other domains.
-
Foundation for managing the identities of customers, partners, and employees across internet applications. These user identities are protected by security policies for web interaction.
Integration with OAM provides EnterpriseOne implementations with these features:
-
OAM authentication, authorization, and auditing services for EnterpriseOne applications.
-
OAM single sign-on for EnterpriseOne applications and other OAM-protected resources in a single domain or across domains.
Note:
EnterpriseOne single sign-on through OAM is supported only by the EnterpriseOne Web client, not Collaborative Portal. -
OAM authentication schemes that provide single sign-on for EnterpriseOne applications:
-
Basic Over LDAP (Lightweight Directory Access Protocol): Users enter a user name and password in a window supplied by the Web server.
This method can be redirected to Secure Socket Layer (SSL).
-
Form: Similar to the basic challenge method, users enter information in a custom HTML form.
You choose the information that users must provide in the form.
-
X509 Certificates: X.509 digital certificates over SSL.
A user's browser must supply a certificate.
-
Integrated Windows Authentication (IWA): Users will not notice a difference between an OAM authentication and IWA when they log on to the desktop, open an Internet Explorer (IE) browser, request an OAM-protected web resource, and complete single sign-on.
-
Microsoft .NET Passport: NET Passport is a component of the Microsoft .NET framework. The .NET plug-in is a Web-based authentication service that provides single sign-on for Microsoft-protected web resources.
-
Custom: You can use other forms of authentication through the OAM Authentication Plug-in API.
-
-
Session timeout: OAM enables you to set the length of time that a user session is valid.
-
Ability to use Oracle Identity Manager for identity management. Oracle Identity Manager provides identity management features such as portal inserts, delegated administration, workflows, and self-registration EnterpriseOne applications.
You can determine how much access to provide to users upon self-registration. Oracle Identity Manager workflows enable a self-registration request to be routed to appropriate personnel before access is granted. OAM also provides self-service, enabling users to update their own identity profiles.
See Also:
-
Oracle Fusion Middleware Integration Guide for Oracle Identity Management Suite and the Oracle Identity Manager documentation.
13.1.1 JD Edwards EnterpriseOne Integration Architecture
EnterpriseOne has a configurable authentication mechanism that allows it to authenticate a user against:
-
Native tables (through a security kernel).
-
Lightweight Data Access Protocol (LDAP).
-
Custom plug-ins, including the ability to read HTTP Headers.
EnterpriseOne single sign-on through OAM involves:
-
Protection through a WebGate, which is a plug-in that intercepts Web resource (HTTP) requests and forwards them to the Access Server for authentication and authorization.
-
Populating a header variable with an attribute value that is stored in the LDAP directory used by OAM.
-
Configuring EnterpriseOne to invoke the OAM authentication process, overriding the default authentication mechanism.
13.1.2 Single Sign-On Architecture
Single sign-on with OAM requires an EnterpriseOne HTML Server configuration with an application server, such as Oracle WebLogic Server 10g, that contains a J2EE container, which is required for the Java servlets and Java code to run. In addition, WebGate must be installed on an Oracle HTTP Server, and it must be configured to protect the EnterpriseOne URLs that are used to access the HTML Server.
The following illustration shows the integration environment and process flow:
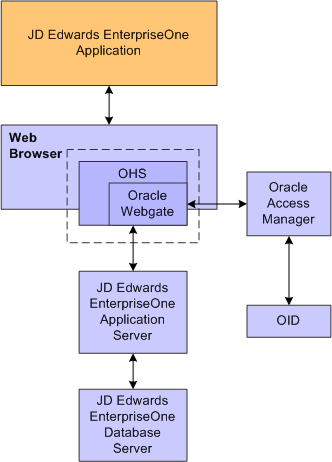
The following steps describe the single sign-on process:
-
A user attempts to access an EnterpriseOne program by entering a URL to the EnterpriseOne Web client in a Web browser.
-
A WebGate deployed on the EnterpriseOne HTTP Server intercepts the request.
-
The WebGate checks OAM to determine whether the resource (EnterpriseOne URL) is protected.
-
If a valid session does not exist and the resource is protected, WebGate prompts the user for credentials through the OAM login page.
-
After the user enters their single sign-on user ID and password on the OAM login page, the WebGate captures the user credentials and sends them to OAM for authentication.
-
OAM compares the user credentials against the Oracle Internet Directory (OID).
-
If the user's single sign-on credentials are not in OID, OAM notifies WebGate and the user is denied access to EnterpriseOne.
-
If OAM finds the user's single sign-on credentials in OID, OAM authenticates the credentials.
-
-
If the credentials are validated, the user gains access to the EnterpriseOne Web client.
-
If a valid session already exists and the user is authorized to access the resource, WebGate redirects the user to the requested EnterpriseOne resource.
13.1.3 Supported Versions and Platforms
For supported versions and platforms for the integration of OAM with JD Edwards EnterpriseOne Tools and JD Edwards EnterpriseOne Applications, see the Certifications tab on My Oracle Support:
Also, see document 745831.1 (JD Edwards EnterpriseOne Minimum Technical Requirements Reference) on My Oracle Support:
https://support.oracle.com/epmos/faces/DocumentDisplay?id=745831.1
13.2 Prerequisites
In addition to single sign-on configuration instructions, this chapter contains instructions on how to install Oracle Identity and Access Management 11gR2, which requires the following prerequisites:
-
Create the OAM schemas through Oracle Repository Utility (RCU).
Note:
The Oracle Repository Utility version must match the product that you are installing. -
Install Oracle WebLogic Server.
-
Obtain the Oracle Identity and Access Management install images from Oracle Software Delivery Cloud.
13.3 Installing Oracle Identity and Access Management
This section provides basic installation instructions to support a single sign-on configuration for EnterpriseOne. If your configuration requires supporting additional applications, see the Oracle Fusion Middleware Installation Guide for Oracle Identity and Access Management.
To install Oracle Identity and Access Management:
-
Launch the Oracle Identity and Access Management runInstaller (or setup.exe).
-
On the Welcome screen, click Next.
-
Select the Install Software Updates option.
The installer performs a prerequisites check.
-
Specify the Oracle Middleware Home and accept the default Oracle Home Directory name.
-
Review the Installation Summary and click Install.
-
Click Finish when the installation is complete.
13.4 Setting Up OAM to Support an EnterpriseOne Single Sign-on Configuration
After installing Oracle Identity and Access Management, perform the following tasks:
-
Configuring the Database Security Store for an Oracle Identity and Access Management Domain
-
Registering the WebGate Agent for JD Edwards EnterpriseOne HTML Server
-
Configuring Oracle HTTP Server for the EnterpriseOne HTML Server
13.4.1 Creating a New OAM Domain
To create a new OAM domain:
-
Launch the config.sh (.cmd) from MW_Home/Oracle_IDM1/common/bin directory.
-
Select Oracle Access Management - 11.1.2.0.0. Other required products will be selected automatically.
-
Enter a domain name, for example: IDM_domain.
-
Enter the Administrator user name and password.
-
Select Production Mode and verify the JDK location.
-
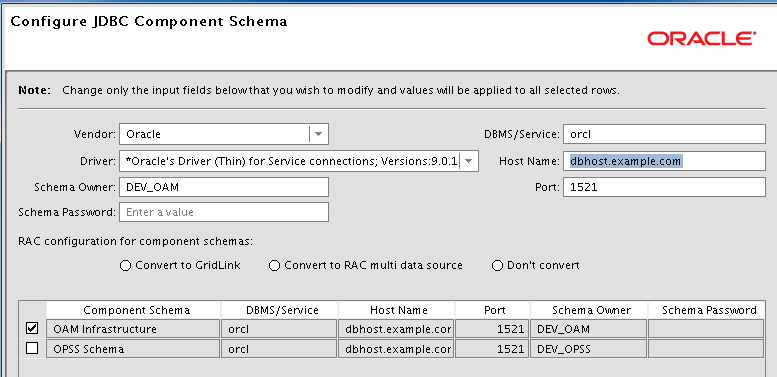
On Configure JDBC Component Schema, enter the JDBC component schema information. You can set values for Schema Owner, Schema Password, Database and Service, Host Name, and Port.
Select each component schema one at a time because the schema owners are different.
The schemas should have already been created using the Oracle Repository Utility (RCU) as described in the Prerequisites section in this chapter.
-
Click Next to verify the connections.
-
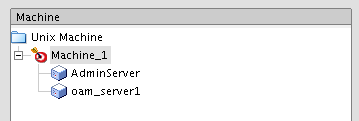
Select the Administration Server and then select the Managed Servers, Clusters, and Machines options.
You can accept the default values for the Administration Server and Port.
-
Enter or accept the default Managed Server name, oam_server1.
-
Click Next to skip the Cluster configuration.
-
Click Add to configure the Machine information.
-
Assign the servers from the left pane after the machine is created.
-
Review the Configuration Summary and click Create.
-
Click Finish when complete.
Before you start the WebLogic Administration Console, complete the steps in the remaining tasks in this section.
13.4.2 Upgrading OPSS Schema Using Patch Set Assistant (PSA)
After a domain is created, you must upgrade the Oracle Platform Security Services (OPSS) schema that you created using RCU.
-
Launch "psa" from the following directory:
MW_Home/oracle_common/bin
-
Click Next on the Welcome screen.
-
Select only the Oracle Platform Security Services option.
-
Check the boxes if all prerequisites are met.
-
Enter the OPSS schema database connection information.
The installer will verify the connection.
-
Review the information on the Upgrade Summary screen and then click Upgrade.
-
Click Close when the upgrade completes.

13.4.3 Configuring the Database Security Store for an Oracle Identity and Access Management Domain
You must run the configureSecurityStore.py script to configure the Database Security Store. This is the only security store type supported by Oracle Identity and Access Management 11g Release 2.
There are two options to configure the Database Security Store:
-
-m create -
-m join
The instructions in this chapter use the Create option because the join option is for additional domains to use the same Database Security Store already created.
To configure a domain to use a database security store using the -m create option, you must run the configureSecuirytStore.py scripts as follows depending on your particular platform:
-
On Windows:
MW_home\oracle_common\common\bin\wlst.cmd <IAM_Home>\common\tools\configureSecurityStore.py -d <domaindir> -c IAM -p <opss_schema_pwd> -m create -
On UNIX:
MW_home/oracle_common/common/bin/wlst.sh <IAM_Home>/common/tools/configureSecurityStore.py -d <domaindir> -c IAM -p <opss_schema_pwd> -m create
Note:
For both platforms, the -c option must be specified as IAM.The following is sample output from the script:
Using default context in /u01/Oracle/Middleware/user_projects/domains/IDM_domain/config/fmwconfig/jps-config-migration.xml file for credential store.
Credential store location : jdbc:oracle:thin:@myserver.com:1521/orcl
Credential with map Oracle-IAM-Security-Store-Diagnostics key Test-Cred stored successfully!
 Credential for map Oracle-IAM-Security-Store-Diagnostics and key Test-Cred is:
                GenericCredential
Info: diagnostic credential created in the credential store.
Info:  Create operation has completed successfully.
At this point, you can start the Domain Administration Server and the Managed Server.
13.4.4 Registering the WebGate Agent for JD Edwards EnterpriseOne HTML Server
Sign in to Oracle Access Management Console.
-
Open the Oracle Access Management Console, for example
http://oamserver:oamport/oamconsole -
Enter the Admin user and password.
-
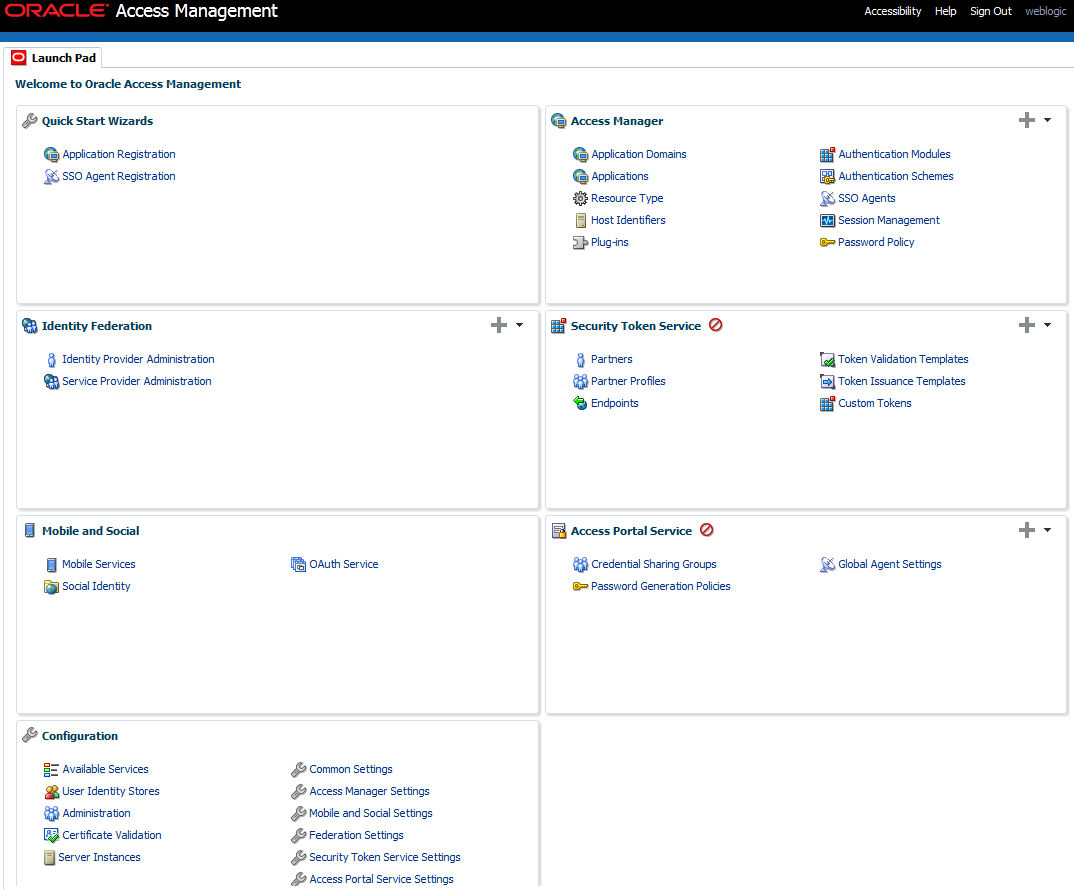
On the Launch Pad, select the SSO Agent Registration from the Quick Start Wizards section.
-
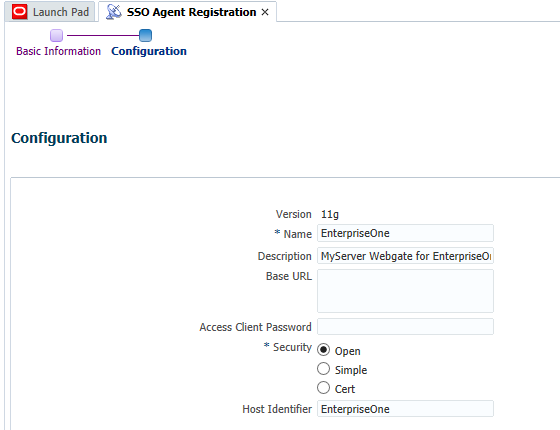
Select your Webgate, for example 11g Webgate, and click Next.
-
In the Configuration section, enter a name and description for the Webgate.
-
In the Security Option area, select the Open option, and then click the Finish button.
If successful, the system displays a confirmation message and shows the location in which the artifacts are stored. This also creates entries for the new Webgate under the Host Identifiers and Application Domains nodes.
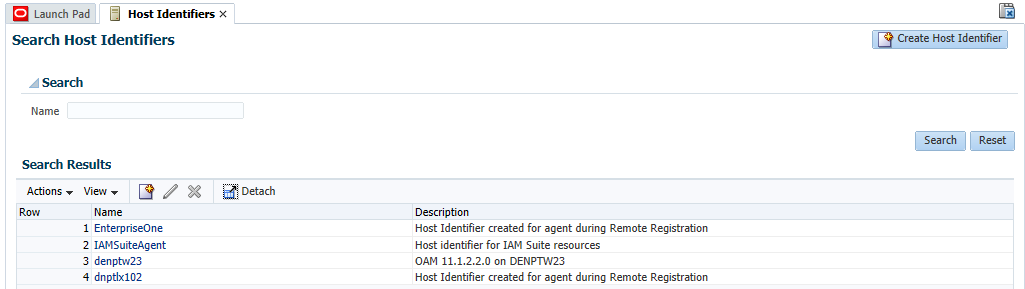
-
To see the entry under Host Identifiers, on the Launch Pad, open the Host Identifiers from Access Manager section, and then click Search.
OAM displays a list of host identifiers as shown in the following screenshot:
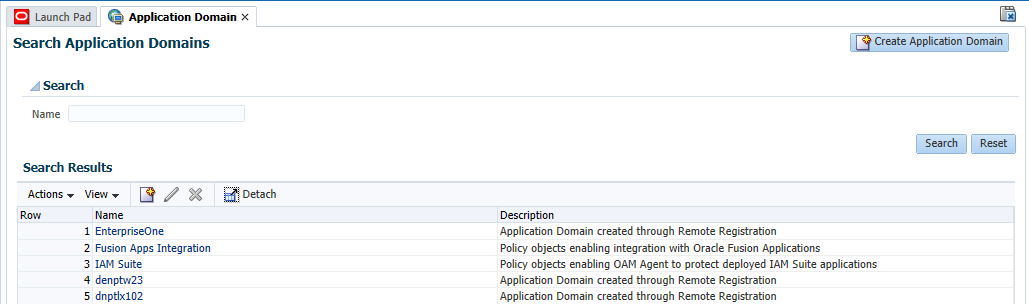
-
To see the entry under Application Domains, on the Launch Pad, open the Application Domains from the Access Manager section, and then click Search.
OAM displays a list of application domains as shown in the following screenshot:
13.4.5 Creating Additional Authentication Policies and Resource
Open the Oracle Access Management Console.
-
Select Application Domains from the Access Manager section.
-
Click Search and select your domain name, and then click Edit.
-
Select the Authentication Policies tab.
-
Click Create Authentication Policy button.
-
Create the following policies with your Authentication Scheme.
-
E1Menu Policy
-
ParameterizedURL Policy
-
ShortcutLauncher Policy
-
-
Click the Resources tab to create HTTP Type Resources for these policies.
-
Create the following policies for the Protected Resource Policy:
-
/ -
/.../* -
/jde
-
-
Create the following resource for the E1Menu Policy:
/jde/E1Menu.maf -
Create the following resource for the ParameterizedURL Policy:
/jde/HostedE1Servlet -
Create the following resources for the ShortcutLauncherPolicy:
-
/jde/ShortcutLauncher -
/jde/servlet/com.jdedwards.runtime.shortcut.ShortcutLauncherThe output should be similar to the following example:
-
-
Enter the EnterpriseOne URL to the Success URL field in the Protected Resource Policy.


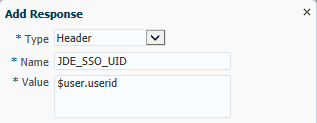
13.4.6 Configuring the EnterpriseOne SSO Parameter
Open the Oracle Access Management Console.
-
Select Application Domains from the Access Manager section.
-
Click Search and select your domain name, and then click Edit.
-
Select the Authorization Policies tab.
-
Select the Protected Resource Policy.
-
Click the Responses tab and click the plus (+) sign.
-
In the Add Response area, complete the following fields:
-
Type. From the drop-down menu, select Header.
-
Name. Enter JDE_SSO_UID in this field.
-
Value. Enter $user.userid in this field.
-
-
Click the Add button.
13.4.7 Copying the Webgate Artifact to the Oracle HTTP Server
After registering the SSO agent, verify the cwallet.sso and OBAccessClient.xml files have been created in the following directory:
<MW_Home>/user_projects/domain/IDMDomain/output/<SSO_Agent_Name>
Copy the cwallet.sso and OBAccessClient.xml files to the following location on the Oracle WebTier (OHS) Server:
<MW_Home>/Oracle_WT1/instances/instance1/OHS/oh1/webgate/config
13.4.8 Configuring Oracle HTTP Server for the EnterpriseOne HTML Server
After you install and configure the Oracle HTTP Server and Oracle HTTP WebGate, you will need to configure the mod_wl_ohs.conf file.
To configure the mod_wl_ohs.conf file:
-
Navigate to the mod_wl_ohs.conf file located at:
MW_Home>/Oracle_WT1/instances/instance1/config/OHS/ohs1
-
Edit the mod_wl_ohs.conf file.
-
Add a Virtual Host section.
NameVirtualHost *:7777 <VirtualHost *:7777> <Location /jde> <--EnterpriseOne Context SetHandler weblogic-handler WebLogicHost myserver.com WebLogicPort 9003 <-- EnterpriseOne Port </Location> -
If you would prefer to use the single signon for the Weblogic console, then include a <Location /console> section.
<Location /console>  <--WebLogic Console Configuration (optional)
    SetHandler weblogic-handler
    WebLogicHost myserver.com
    WebLogicPort 9001
</Location>
Note:
The HTTP port number (for example: 7777) will be the SSO port. -
-
Restart the HTTP server.
-
Change the directory to
MW_Home>/Oracle_WT1/instances/instance1/bin. -
Run
./opmnctl stopall -
Run
./opmnctl startall
-
13.5 Setting Up EnterpriseOne for Single Sign-On Integration with OAM
This section discusses how to set up the EnterpriseOne HTML Server for single sign-off integration with OAM through EnterpriseOne Server Manager.
-
Open Server Manager from a Web browser.
-
Select your EnterpriseOne HTML Server instance.
-
In the Configuration section, select Security Settings.
-
In the Security Server Configuration section, select the Enable Oracle Access Manager option.
-
Enter the Oracle Access Manager (OAM) sign-off URL. This sign-off URL should include the OAM server URL, for example:
http://OAMServer:OAMPort/oam/server/logout.html?end_url=http://e1server:e1ssoport/jde/index.jsp
Also, you can find the sign-off URL in the SSO agent that you set up in the OAM Console, as described in Registering the WebGate Agent for JD Edwards EnterpriseOne HTML Server. In the OAM Console, select SSO Agents and then search for and open the SSO agent. The sign-off URL is in the Logout Redirect URL field.
-
Click Apply.
-
At the prompt, click the Synchronize button to synchronize the changes in all .ini files.
-
Stop and restart the EnterpriseOne HTML Server.

13.6 Testing the Single Sign-On Configuration
Perform the steps in this section to test the single sign-on configuration.
-
In a Web browser, enter the following URL to the EnterpriseOne Web client:
http://yourhost:yourssoport/jde/E1Menu.maf
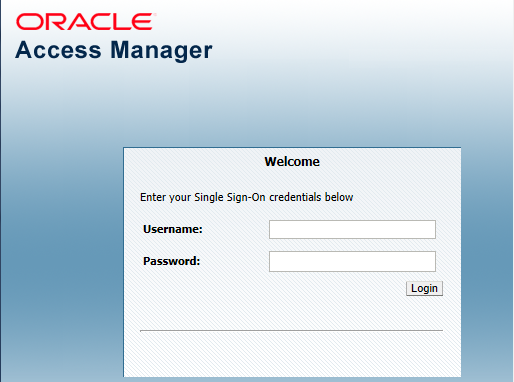
The OAM 11g login page appears.
-
On the login page, enter the LDAP username and password. The LDAP user should also be a valid EnterpriseOne user.
If the credentials are validated, the system grants access to the EnterpriseOne Web client. You have successfully configured single sign-on!