14 Using Oracle Access Manager to Enable Support for Windows Native Authentication with EnterpriseOne
This chapter contains the following topics:
-
Section 14.1, "Understanding Windows Native Authentication Support in OAM"
-
Section 14.4, "Configuring OAM to Use Windows Native Authentication"
This chapter includes instructions in support of Oracle Access Manager 11g Release 1 (OAM 11gR1) and 11g Release 2 (OAM 11gR2). For OAM 11gR2, Oracle Access Manager has been renamed to Oracle Access Management. When necessary, this chapter contains explicit instructions for each version of OAM.
14.1 Understanding Windows Native Authentication Support in OAM
OAM enables users to automatically authenticate to their web applications, including EnterpriseOne web client applications, using their desktop credentials. This is known as Windows Native Authentication (WNA). This configuration requires storing user credentials in a Windows Active Directory instance that is registered as a user-identity store in OAM.
Note:
You can enable support of long user IDs and passwords in a JD Edwards EnterpriseOne single sign-on configuration with OAM. See Chapter 15, "Configuring Long User ID and Password Support for EnterpriseOne" in this guide for more information.14.2 Before You Begin
Before following the instructions in this chapter, make sure that you have:
-
A fully-configured Active Directory authentication service.
-
An EnterpriseOne HTML Server.
-
A SSO/OAM (including Oracle HTTP Server and WebGate) configuration with your EnterpriseOne web client applications.
-
A record of the domain names and the server's fully qualified domain names.
-
Synchronized clocks between Active Directory and OAM servers.
14.3 Performing Prerequisite Integration Tasks
This section describes the integration tasks that you must complete before configuring OAM to use Windows Native Authentication. The integration tasks include:
-
For Oracle Identity and Access Management 11gR1 only: Installing the Java Cryptography Extension (JCE) Unlimited Strength Jurisdiction Policy File version of the JDK that is configured in the OAM WebLogic Server domain.
For JDK 6:
http://www.oracle.com/technetwork/java/javase/downloads/jce-6-download-429243.htmlFor JDK 7:
http://www.oracle.com/technetwork/java/javase/downloads/jce-7-download-432124.html -
Creating a Service Principal Name (SPN) from the Active Directory Machine
14.3.1 Creating an Active Directory User
To create an active directory user:
-
Log on to the Active Directory server.
-
Use the "Active Directory Users and Computers" application to create an Active Directory user ID.
-
Record the user name—both the sAMAccountName and userPrincipalName—and password.
14.3.2 Editing the krb5.conf (ini) File on the OAM Server
-
Open the krb5.conf (ini) file, which is normally located in
/etc/krb5.conforC:\Windows\krb5.ini. -
Update the file with your Active Directory domain information. If the file does not exist, use the following entries to create it:
[libdefaults]
default_realm=JDELDAP.COM
default_tkt_enctypes=RC4-HMAC
default_tgs_enctypes=RC4-HMAC
ticket_lifetime=600
clock_skew = 600

[realms]
JDELDAP.COM = {
 kdc = denjdeldap1.jdeldap.com
 admin_server = denjdeldap1.jdeldap.com
 default_domain = JDELDAP.COM
 }

[domain_realm]
 .jdeldap.com = JDELDAP.COM
 jdeldap.com = JDELDAP.COM
14.3.3 Creating a Service Principal Name (SPN) from the Active Directory Machine
-
Run the following command to create a service principal name (SPN):
>setspn -S HTTP/OAM_Server ActiveDirectoryUserID
Note:
You can use the "-A" option, but "-S" checks for a duplicate SPN as shown in the following example. In the examples, JDE is the Active Directory user ID.
Description of the illustration ''image002.png''
-
Run the "ktpass" command to create the SPN and associate it with the Active Directory user ID that you created.
ktpass -princ HTTP/yourdomain.com@JDELDAP.COM -mapuser ActiveDirectoryUserID -pass ###### -out C:\jde105.keytab -ptype KRB5_NT_PRINCIPAL -crypto ALL

Description of the illustration ''image004.png''
-
To verify that the SPN and the Key Tab file are set up correctly, view the user information from Active Directory, as shown in the following example:
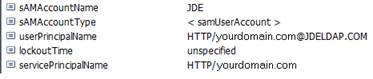
Description of the illustration ''image006.png''
You can also use the "setspn" command to view the user information:
>setspn -L ActiveDirectoryUserID

Description of the illustration ''image007.png''
-
Use the following command to remove the SPN:
>setspn -D "SPN" ActiveDirectoryUserID

Description of the illustration ''image009.png''
-
After verifying the setup of the SPN and the Key Tab, copy the Key Tab file to the OAM server.
14.3.4 Obtaining the Kerberos Ticket
-
On the OAM host machine, run this command from
JDK_HOME/bin:>kinit -V HTTP/yourdomain.com@JDELDAP.COM -k -t /u01/OracleOAM/Middleware/jde_wna/jde105.keytabAfter running the command, the system should display "
Authenticated to Kerberos v5". -
Run the "
klist -e" command to check the ticket:Ticket cache: FILE:/tmp/krb5cc_501 Default principal: HTTP/yourdomain.com@JDELDAP.COM Valid starting Expires Service principal 07/10/13 14:30:22 07/10/13 14:40:22 krbtgt/JDELDAP.COM@JDELDAP.COM Etype (skey, tkt): ArcFour with HMAC/md5, AES-256 CTS mode with 96-bit SHA-1 HMAC Kerberos 4 ticket cache: /tmp/tkt501 klist: You have no tickets cached
This concludes the initial integration steps for Active Directory and Kerberos. If "klist" and "kinit" commands are not successful, resolve the issue before continuing.
14.4 Configuring OAM to Use Windows Native Authentication
-
Log in to OAM Admin Console: http://host:port/oamconsole.
For OAM 11gR2, the Admin Console is called the Oracle Access Management console.
-
Create an Active Directory data source and set it as the Default Store:
For OAM 11gR1: On the System Configuration tab, expand the Data Sources folder, select user identity Stores, and then click the Create button.
For OAM 11gR2: Select the User Identity Store from the configuration area, and the click the Create button.
-
When you create the data source, select the Default Store option to make it the default identity store.
-
Click the Apply button.
-
Click the Test Connection button to test the configuration.
-
-
Update the Kerberos Authentication Module:
For OAM 11gR1: on the System Configuration tab, select the Access Manager Settings pane. Expand the Authentication Modules node, Kerberos Authentication module, and then double-click Kerberos.
For OAM 11gR2: Select the Authentication Modules from the Access Manager area, click Search, and select Kerberos Module.
-
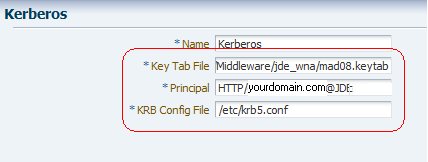
Complete the following fields to enter the location of your Key Tab and krb5.conf (ini) files:
Key Tab File: Enter /u01/OracleOAM/Middleware/jde_wna\mad08.keytab
Principal: Enter HTTP/yourdomain.com@JDELDAP.COM
KRB Config File: Enter /etc/krb5.conf (C:\Windows\krb5.ini)
-
Click the Apply button.
-
-
Verify that the authentication scheme is using the correct Kerberos authentication module you modified in the previous step:
For OAM 11gR1: Select the Policy Configuration tab. Under the Authentication Schemes node, double-click KerberosScheme.
For OAM 11gR2: Select Authentication Schemes from the Access Manager area. Click Search and then double-click KerberosScheme.
-
Edit the Protected Resource Policy:
For OAM 11gR1: Expand the Application Domains node, the domain node, Authentication Policies, and then double-click Protected Resource Policy.
For OAM 11gR2: Select the Application Domain from the Access Manager area and then click Search. Select your domain node from the Authentication Policies, and then double-click Protected Resource Policy.
-
In the Authentication Policy area, edit the Protected Resource Policy by selecting KerberosScheme for the Authentication Scheme.
-
Click the Apply button.
-
14.4.1 Enabling the Browser to Return Kerberos Tokens
You can use the following procedures to configure Internet Explorer or Mozilla Firefox browsers to return Kerberos tokens.
Note:
For Google Chrome, no special configuration is required.To enable Kerberos tokens in Internet Explorer:
-
On a Windows host in the Active Directory domain, sign in as a domain user.
-
Open the Internet Explorer browser.
-
Select Tools, Internet options, and then select the Advanced tab.
-
In the Security section, make sure that the "Enable Integrated Windows Authentication" option is selected.
-
Select the Security tab, Local Intranet, Sites.
-
Click the Advanced button and add the OAM host or domain name.
-
Restart the Internet Explorer browser for the changes to take affect.
To enable Kerberos tokens in Mozilla Firefox:
-
Open the Firefox browser.
-
In the address bar, point the browser to about:config.
-
Scroll down and double-click "network.negotiate-auth.trusted-uris".

-
For the string value, enter the OAM host or domain name and click OK.
14.4.2 Modify the EnterpriseOne ini Setting
After completing the configuration, modify the EnterpriseOne ini setting so that users are not returned to the sign-in screen after signing out of EnterpriseOne.
-
Sign in to EnterpriseOne Server Manager.
-
Select your EnterpriseOne HTML server.
-
In the Configuration area, select Network Settings.

-
Under the Security Server Configuration section, in the Oracle Access Manager Sign-Off URL field, remove the rest of the information starting with "
?end_url=". Only the OAM server URL should remain, as shown in the following examples:Example of a sign-off URL in OAM 11gR1:
http://server:port/oamsso/logout.htmlExample of sign-off URL in OAM 11gR2:
http://server:port/oam/server/logout.htmlAlso, you can find the sign-off URL in the SSO agent that you set up in the OAM Console, as described in Registering the WebGate Agent for JD Edwards EnterpriseOne HTML Server. In the OAM Console, select SSO Agents and then search for and open the SSO agent. The sign-off URL is in the Logout Redirect URL field.
When logging out, a message stating "User logged out successfully" appears.

-
Restart the server.
14.4.3 Validating the Windows Native Authentication Configuration
To validate the Windows Native Authentication configuration:
-
Log on to a Windows system as an Active Directory domain user.
-
Open a browser and launch the EnterpriseOne web client.
If the configuration was successful, you should be able to access the EnterpriseOne web client without being prompted for credentials.