15 Configuring Long User ID and Password Support for EnterpriseOne
This chapter describes how to use Oracle Access Manager to configure support of long user IDs and passwords in a JD Edwards EnterpriseOne single sign-on configuration. It contains the following topics:
This chapter includes instructions in support of Oracle Access Manager 11g Release 1 (OAM 11gR1) and 11g Release 2 (OAM 11gR2). For OAM 11gR2, Oracle Access Manager has been renamed to Oracle Access Management. When necessary, this chapter contains explicit instructions for each version of OAM.
15.1 Understanding Long User ID and Password Support for EnterpriseOne
In EnterpriseOne, a user ID is limited to 10 characters. Using OAM, you can manage long user IDs and passwords in a single sign-on configuration with EnterpriseOne. This configuration does not change the behavior of existing EnterpriseOne user IDs, but it requires mapping EnterpriseOne users to the long IDs.
15.2 Prerequisites
Make sure the following software is properly configured:
-
Oracle Internet Directory (OID)
-
Oracle Identity and Access Management
-
Oracle HTTP Server (WebTier) and WebGate
-
OAM agent and single sign-on between OAM and EnterpriseOne
15.3 Configuring LDAP for Longer User IDs
-
Log in to Oracle Internet Directory, for example: http://host:port/odsm
-
Create a user account:
-
In the tree in the left pane, expand the Root node, dc=com, dc=mycompany.
-
Click the Create icon.
-
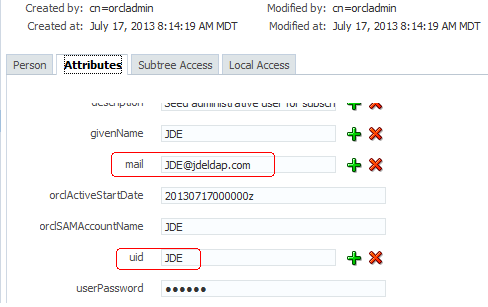
If you are planning to use an email address for your user ID, record the information in the "mail" attribute.
-
-
Log out and close Oracle Directory Manager.
Note:
If you are using Active Directory, use "userPrincipalName" as the "mail' attribute and "sAMAccountName" as the "uid" attribute.
15.4 Creating a User Mapping in EnterpriseOne
Note:
The application for mapping EnterpriseOne user IDs is available only on the EnterpriseOne Windows client.-
Sign in to the EnterpriseOne Windows client.
-
Select the System Administration Tools menu (GH9011), Security Maintenance, Security Maintenance Advanced and Technical Operations, and then double-click SSO Environment Configuration Tools.

-
On SSO Environment Configuration Tools, select the "Configure the UserID Mapping" link.
-
On Work With SSO E/E1 UserID Mapping, click the Add button.
-
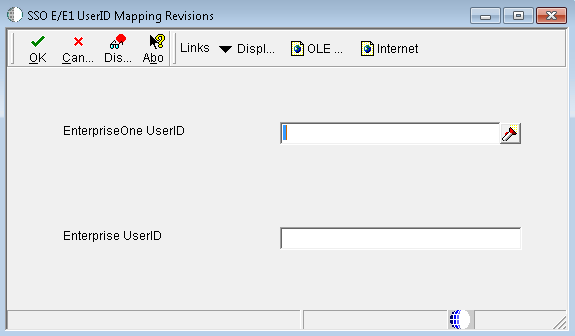
On SSO E/E1 UserID Mapping Revisions, complete these fields:
-
EnterpriseOne UserID: Enter the existing EnterpriseOne user ID.
-
Enterprise UserID: Enter the new longer user ID created in LDAP.
This is the same as the user ID entered in the "mail" field in OID or "userPrincipalName" in Active Directory.
Important:
All entries MUST be entered in upper case.EnterpriseOne saves the information in the F00927 table as shown in the following screenshot:

Description of the illustration ''image029.png''
-
15.5 Configuring OAM for Long User IDs
Set up and configure OAM single sign-on to use a different attribute for EnterpriseOne. To do so, perform the following tasks:
15.5.1 Creating an Identity Store
-
In the OAM Console, access the User Identity Stores:
For OAM 11gR1, on the System Administration tab, expand the Data Sources folder, and then select User Identity Stores.
For OAM 11gR2, click the User Identity Stores from the Configuration area.
-
Click the Create button.
-
Enter a store name and store type in the applicable fields.
-
In the *Location field, enter your LDAP Server and port.
-
In the Bind DN and Password fields, enter the credentials to the LDAP Server.
-
Click the Test Connection.
-
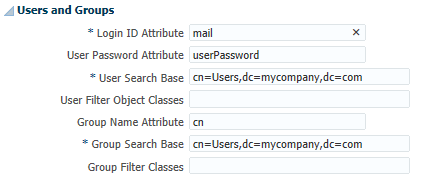
In the Users and Groups area, change the User Name Attribute to use the long ID attribute, such as "mail" for OID.
Note:
Use "userPrincipalName" for Active Directory. -
Click the Apply button to add the identity store.
-
In the Users and Groups area, change the User Name Attribute to use the long ID attribute, such as "mail" for OID:
Note:
Use "userPrincipalName" for Active Directory.For OAM 11gR1:
-
Select the Default Store option to make it the default identity store.
-
Click the Apply button to add the identity store.
For OAM 11gR2:
-
Click the Apply button to add the identity store.
-
Return to the User Identity Store main page and select your identity store as the Default Store.Select the Default Store option to make it the default identity store.
-
15.5.2 Creating an Authentication Module
-
Add a new authentication module:
For OAM 11gR1:
-
On the System Configuration tab, select the Access Manager Settings pane.
-
Expand Authentication Modules, select LDAP Authentication module, and then click the New button.
For OAM 11gR2:
-
Select the Authentication Modules from the Access Manager Area.
-
Select Create LDAP Authentication Module from the Create Authentication Module drop-down menu.
-
-
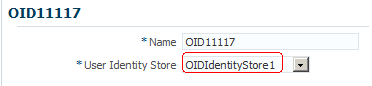
In the Name field, enter a name for the authentication module. For example: OID11117
-
In the User Identity Store field, select the identity store that you created in the previous step.
-
Click the Apply button to add the authentication module.
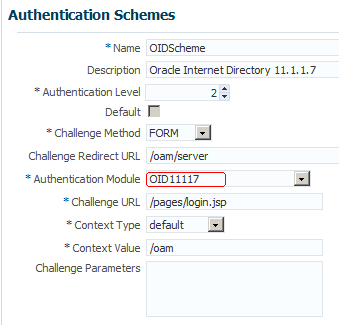
15.5.3 Creating an Authentication Scheme
-
Create a new authentication scheme:
For OAM 11gR1:
-
On the Policy Configuration tab, select Authentication Schemes.
-
Click the New button.
For OAM 11gR2:
-
Select the Authentication Schemes from the Access Manager Area.
-
Select the Create Authentication Scheme button.
-
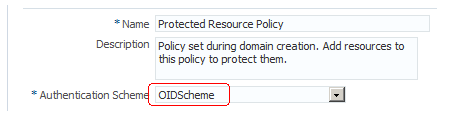
15.5.4 Applying the Authentication Scheme to the Application Domain
For OAM 11gR1:
On the Policy Configuration tab, expand the Application Domains node, the domain node, Authentication Policies, and then double-click Protected Resource Policy.
For OAM 11gR2:
-
Select the Application Domains from the Access Manager area, click Search, and select your domain node.
-
Click the Authentication Policies tab, and then double-click Protected Resource Policy.
-
Enter the new authentication scheme.
-
Click the Apply button to add the authentication scheme.
-
Repeat these steps if you have more EnterpriseOne policies.
15.6 Validating the Long ID Configuration
To validate the long ID configuration, use the single sign-on URL to access EnterpriseOne and then enter the long ID, such as an email address, to sign in. If the configuration was successful, you should be able to access the EnterpriseOne web client.