A Creating a Sample Mobile Application
This appendix guides you through the steps to create a sample EnterpriseOne mobile enterprise application using Oracle Mobile Application Framework (MAF).
This appendix contains the following topics:
-
Section A.2, "Creating the Sample Address Book Mobile Application"
-
Section A.4, "Connecting to the EnterpriseOne Application Interface Services (AIS) Server"
A.1 Before You Begin
Before following the instructions in this section, see Section 3.2, "Prerequisites" in this guide to ensure you have completed the required prerequisites.
The prerequisites include the JDEMobileSampleApplication.zip. This zip file contains the components for running the same sample mobile application that this appendix describes how to create. You can use this sample for comparison purposes. To run this sample application, you must configure it with the JDEMobileFramework.jar and Login.jar as described in Section A.3.1 and Section A.3.2.
Remember, the files in the JDEMobileSampleApplication.zip are intended for reference purposes only.
Important:
To run the sample mobile application, you must make sure that the JDEMobileSampleApplication and the Oracle MAF extension are from the same JDE_Mobile_Framework package. In other words, if you installed the 2.0.1 MAF extension from the JDE_Mobile_Framework_2.0.1 package, then you will need to run the JDEMobileSampleApplication that is included in that package.To verify the version of the Oracle MAF extension:
-
In JDeveloper click the Help menu, About, and then click the Extensions tab.
-
In the "find" field, type
mafand then press Enter. Scroll to the right to check the version.
A.2 Creating the Sample Address Book Mobile Application
This section contains the following topics:
A.2.1 Creating a New Mobile MAF Application
This section describes how to create a new sample mobile application entitled Address Book.
-
Launch JDeveloper.
-
Select the File menu > New > Application.
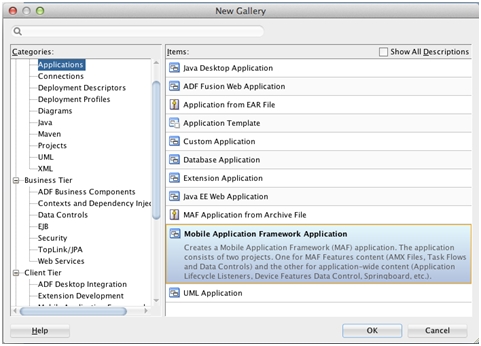
-
In the New Gallery, select Mobile Application Framework Application and click OK.
-
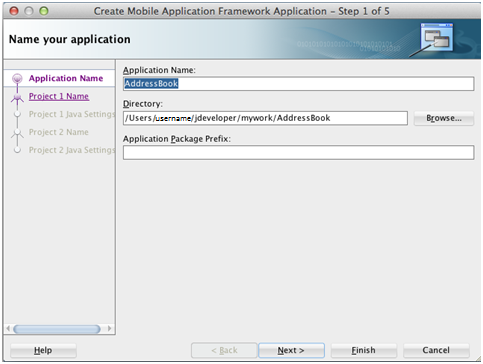
On "Name your application," enter AddressBook in the Application Name field, and then click Finish to skip the rest of the steps.
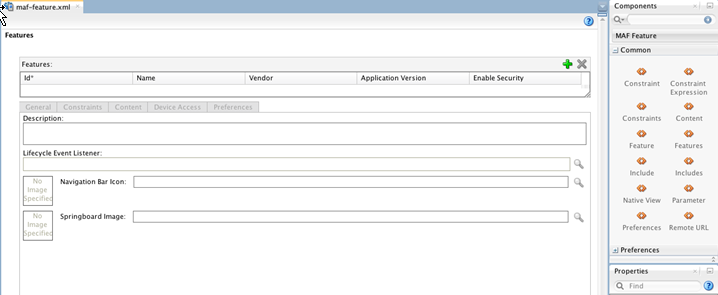
The application displays the Features list.
-
In the Features section, click the green plus sign to add a new feature to the list.
-
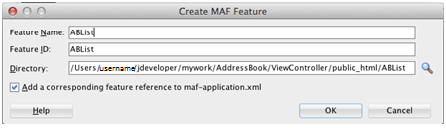
On Create MAF Feature, enter ABList in the Feature Name and Feature ID fields.
-
Click OK.
-
Select the Content tab.
-
Change the Content Type to MAF Task Flow.
-
Click the add button next to the File field.
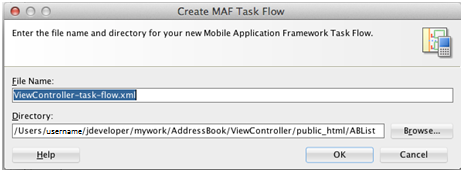
-
On Create MAF Task Flow, use the default name in the File Name field for the task flow and click OK.
JDeveloper displays the new task flow.
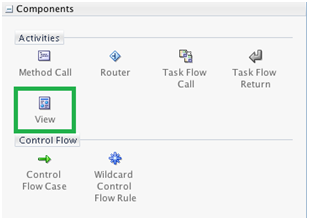
-
In the Components window on the right, click the View button to add a new view to the task flow.
-
Name the new view ablist.
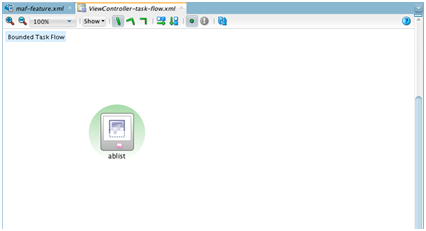
-
On the ViewController-task-flow.xml tab, double-click the new ablist view element to create the view page.
The new page opens automatically.
-
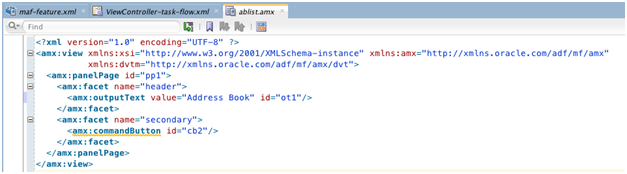
On the ablist.amx tab, change the
outputText valueto "Address Book" as shown in the preceding example. This is the title for the first page of the sample mobile application. -
Save your application.
A.2.2 Running the Mobile Application in the Simulator
To run the mobile application in the simulator:
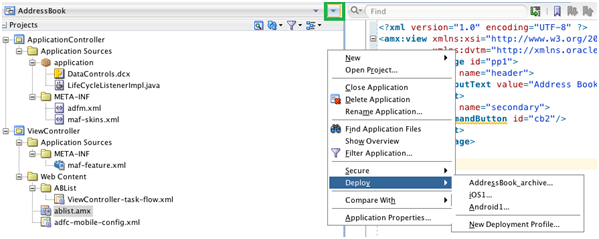
-
From the application drop-down, select Deploy > iOS1.
-
On Deployment Action, select Deploy application to simulator and click Finish.
Deployment details can be viewed in the deployment log. Wait for it to finish.
The simulator displays the application on the second page of the home screen.
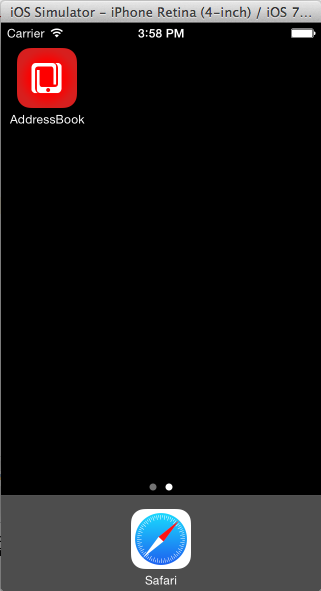
-
Click the application icon to launch it.
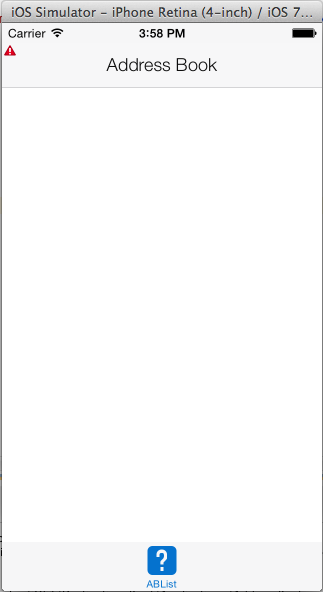
The page that you created appears with the header text "Address Book," as shown in the following example:
If your mobile application failed to build or deploy at this point, please refer to the Oracle Fusion Middleware Developing Mobile Applications with Oracle Mobile Application Framework documentation for more information:
http://docs.oracle.com/middleware/mobile200/mobile/develop/index.html
A.3 Using the JDE Mobile Helpers
This section describes how to incorporate the JDE Mobile Helpers into the sample mobile application.
See Section 2.3.1, "JDE Mobile Helpers" for more information about the JDE Mobile Helpers.
A.3.1 Including the JDEMobileFramework.jar
The JDEMobileFramework.jar provides a set of classes and API methods that enable the mobile application to manage (create, read, update, delete) data in EnterpriseOne through REST services.
To include the JDEMobileFramework.jar:
-
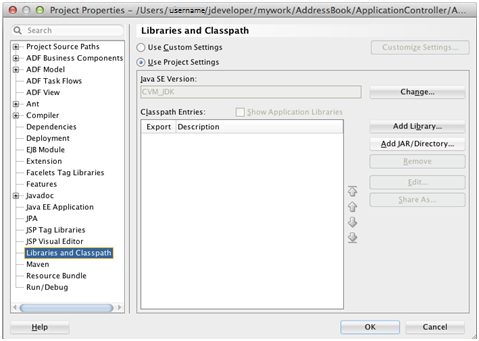
In JDeveloper, in the Projects panel, right-click the ApplicationController project and select Project Properties.
-
On Project Properties, select Libraries and Classpath.
-
Click the Add JAR/Directory button and select the JDEMobileFramework.jar that you downloaded to your local file system, and click Open.
If you do not have JDEMobileFramework.jar, see Prerequisites in this guide.
-
Click OK to save the properties. If you receive an error message, ignore it and click Cancel.
A.3.2 Including the Login.jar
The Login.jar provides a configuration page, login page, and a springboard. The springboard contains links to Legal Terms or the End User License Agreement (EULA), About, and Logout.
To include the Login.jar:
-
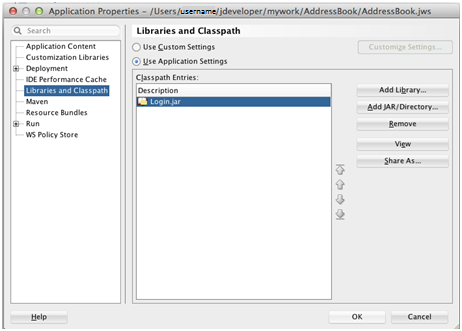
In JDeveloper, click the Applications drop-down menu and select Application Properties.
-
On Application Properties, select Libraries and Classpath, and then click the Add JAR/Directory button to add the Login.jar.
-
Click OK to save the properties.
-
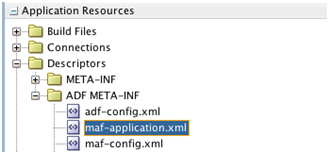
In the Application Resources section, expand Descriptors > ADF META-INF, and double-click maf-application.xml to open it.
-
Click the Feature References tab, and then click the green plus sign to add a feature reference.
-
Click the Id drop-down menu and select com.oracle.e1.jdemf.login. If you receive an error message, ignore it and click Cancel.

-
Use the blue arrow on the right to move the login feature to the top of the list.
-
On the Application tab, clear the Show Navigation Bar on Application Launch check box.
-
In the Projects panel, expand ApplicationController > Application Sources > application and double-click LifeCycleListener.java to open it.

-
On the LifeCycleListener.java tab, place the following line of code in the existing start() method, as shown in the preceding example:
LoginConfiguration.setDefaultFeature("ABList");This code directs the Login feature to navigate to the appropriate page after a successful login.
-
Save the LifeCycleListener.java.
A.3.3 Including the Javascript and CSS
The Javascript and CSS files are dependencies of the JDEMobileFramwork.jar and the Login.jar. The Javascript provides an animated icon to show that the mobile application is processing while making service calls. The CSS provides an extension to the styling skin provided by Oracle MAF. It enables you to make adjustments to the style of the configuration, login, and springboard pages of your mobile application.
To include the Javascript and CSS:
-
In the file system, copy the js folder provided in the JDEMobileFramework zip file, and save it to the
ViewController/public_htmldirectory. -
In the file system, copy the css folder provided in the JDEMobileFramework zip file, and save it to the
ApplicationController/public_htmldirectory. -
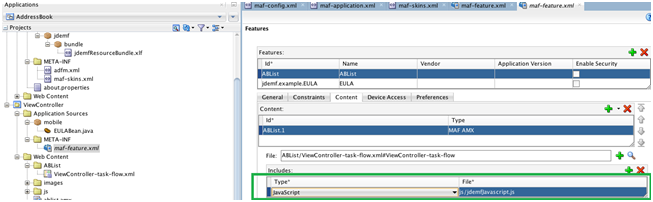
In the Projects panel in JDeveloper, expand ViewController > Application Sources >META_INF, and double-click the maf-feature.xml to open it.
-
Select the ABList feature, click the Content tab, and click the plus sign in the Includes section to add the jdemafJavascript.js file. This file is located in js folder.
-
Under ApplicationController > Application Sources > META-INF, open the maf-skins.xml and copy the following code into the file:
Note:
Remove any code lines that might exist before you copy the following code into the file.<?xml version="1.0" encoding="UTF-8" ?> <adfmf-skins xmlns="http://xmlns.oracle.com/adf/mf/skin"> <skin id="s1"> <family>jdeCustomSkinFamily</family> <id>jdeCustomSkinFamily-v1.Android</id> <extends>jdeCustomSkinFamily</extends> <style-sheet-name>css/jdemfCustomStyles-Android.css</style-sheet-name> <version> <name>v1</name> <default>true</default> </version> </skin> <skin id="s2"> <family>jdeCustomSkinFamily</family> <id>jdeCustomSkinFamily-v1.iOS</id> <extends>jdeCustomSkinFamily</extends> <style-sheet-name>css/jdemfCustomStyles-iOS.css</style-sheet-name> <version> <name>v1</name> <default>true</default> </version> </skin> <skin id="s3"> <family>jdeCustomSkinFamily</family> <id>jdeCustomSkinFamily</id> <extends>mobileAlta-v1.1</extends> <style-sheet-name>css/jdemfCustomStyles-Base.css</style-sheet-name> <version> <name>v1</name> <default>true</default> </version> </skin> </adfmf-skins> -
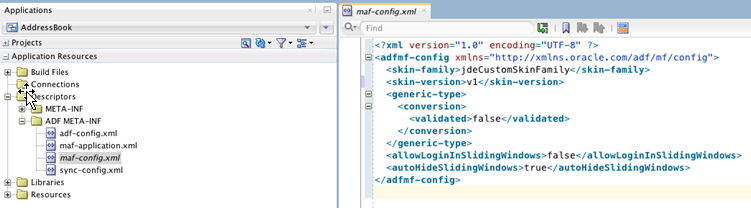
In the Application Resources panel, expand Descriptors > ADF META-INF, and open the maf-config.xml.
-
Enter jdeCustomSkinFamily for the <skin-family> and enter v1 for the <skin-version>, as show in the following example:
A.3.4 Including the Resource Bundle
The Resource Bundle contains text resources for the pages provided in the Login.jar.
To include the Resource Bundle:
-
Copy the jdemfResourceBundle.xlf file provided in the JDEMobileFramework zip file and save it to the following directory:
ApplicationController/src/com/oracle/e1/jdemf/bundleYou must add each directory in the path if it does not exist.
Note:
The ViewController project is dependent on the ApplicationController project. Adding the bundle to the ApplicationController project will also make it available to the ViewController project. -
In JDeveloper, click the "refresh" button for the bundle to appear under com.oracle.e 1.
-
Right-click ViewController and select Project Properties.
-
On Project Properties, select Resource Bundle.
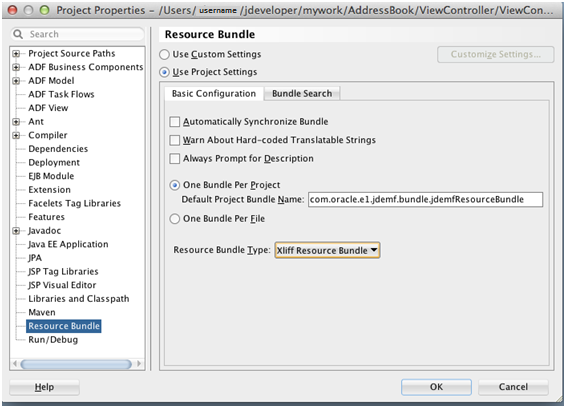
-
Set the Default Project Bundle Name to:
com.oracle.e1.jdemf.bundle.jdemfResourceBundle -
Click OK to save the properties. If a warning message appears, ignore it and click Ok or Cancel to proceed.
A.3.5 Including Logo Images
You should include a logo image for the pages in the Login.jar. If you do not insert one, a question mark (?) appears in place of the image. Oracle provides the following image files as examples of the recommended size, quality, and color of images that you should use in your mobile application:
-
jde_transparent_no_jde_small.png
This is a 242 x 87 transparent image for the login page, intended for a white background.
-
jde_transparent_springboard.png
This is a 242 x 87 transparent image for the springboard, intended for a dark background.
You can use any image as long as it has the same dimensions as the example images. You can use the same name for the images and place them in the same location as instructed in the following steps.
Important:
Do not use the logo image examples provided by Oracle; they are provided for example purposes only.To include logo images:
-
In the file system, copy the jde_transparent_no_jde_small.png file to the
ViewController/public_html/imagesdirectory. -
Copy the jde_transparent_springboard.png to the
ViewController/public_html/imagesdirectory. -
In JDeveloper, deploy the application.
You should see the configuration screen and login screen. After logging in, it should take you to your ABList feature with the page with the "Address Book" title.
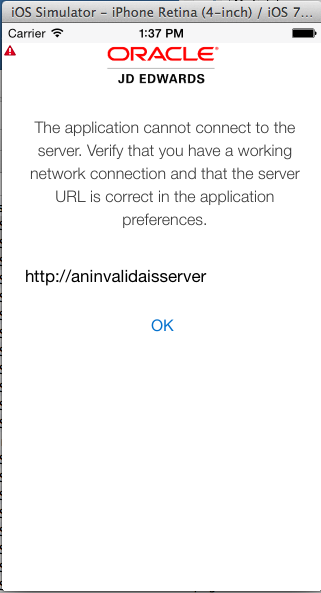
The Login.jar also provides information screens if configuration or connection issues arise during login, for example:
Note:
If you receive an error, under the Application Resources panel in JDeveloper, double-click maf-application.xml. In the maf.application.xml tab, make sure the Files and Network options are selected.
A.3.6 Enabling the Custom Springboard
The springboard provided in the Login.jar shows links to the About page, the EULA, and the Logout.
To enable the springboard:
-
Open the maf-application.xml.
-
In the Navigation section on the Application tab, clear the Show Navigation Bar on Application Launch check box.
-
For Springboard, select the Custom option
-
In the Feature drop-down menu, select com.oracle.e1.jdemf.springboard.
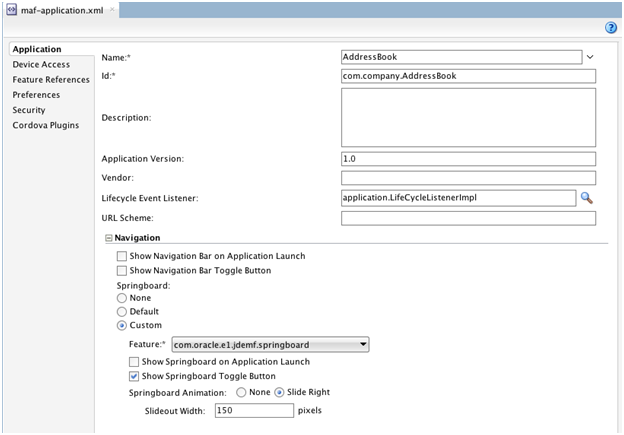
-
Select the Show Springboard Toggle Button check box.
-
For Springboard Animation, select the Slide option.
-
In the Slideout Width field, enter 150.
-
Clear any other check boxes and then click the Feature References tab.

-
In the Feature References section, click the green plus sign to add the springboard feature, and then select false for both the "Show on Navigation Bar" and "Show on Springboard" options.
A.3.7 Including the about.properties
The about.properties enables you to configure information displayed on the About page, including the application name, application version, and the application ID (which is used by EnterpriseOne application security for authorizing user access to the mobile application). If you enable the springboard, you should provide these values so that they appear on the About page.
To include the about.properties:
-
Copy the about.properties file provided in the JDEMobileFramework zip file and save it in the
ApplicationController/srcdirectory. -
In the Projects panel, expand Application Controller > Application Sources, and double-click about.properties to open it.
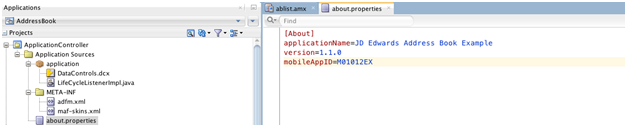
-
Modify the about.properties file with information for your application, as shown in the preceding example.
-
Click the Feature References tab.
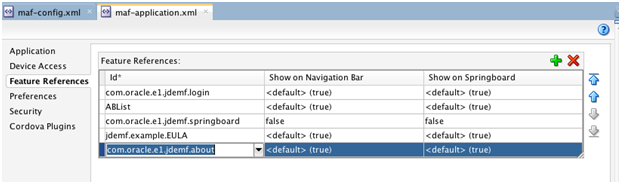
-
In the Feature References section, click the green plus sign to add the com.oracle.e1.jdemf.about feature.
A.3.8 Including an End User License Agreement (EULA)
If you enable the springboard, you should include a EULA feature and EULA page so the Legal Terms link has a page to access. You can provide a license agreement for your application here.
To include a EULA:
-
Double-click the maf-feature.xml.
-
In the Features section, double-click the green plus sign to add a feature for the EULA.
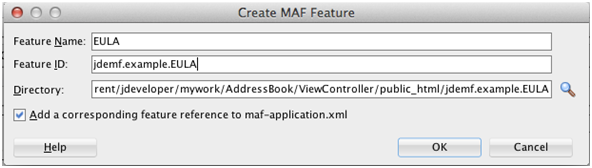
-
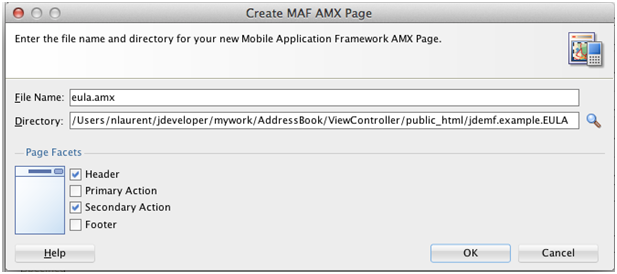
On Create MAF Feature, enter EULA in the Feature Name field, give it a unique id, and then click OK.
-
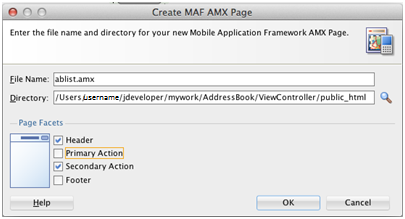
After you create the EULA feature, select the Content tab.
-
Click the green plus sign next to the File field.
-
On Create MAF AMX Page, enter a name for the page in the File Name field.
-
Clear the Primary Action check box, and then click OK.
-
In the new eula.amx page, you can design your EULA page as needed, as shown in Example A-1.
Example A-1 Using the Verbatim Tag to Include HTML
The following sample code is an example of a page that uses the verbatim tag to include HTML. It also uses the configured resource bundle (loadBundle tag).
<?xml version="1.0" encoding="UTF-8" ?> <amx:view xmlns:xsi="http://www.w3.org/2001/XMLSchema-instance" xmlns:amx="http://xmlns.oracle.com/adf/mf/amx" xmlns:dvtm="http://xmlns.oracle.com/adf/mf/amx/dvt"> <amx:loadBundle basename="com.oracle.e1.jdemf.bundle.jdemfResourceBundle" var="jdeBundle" id="lb1"/> <amx:panelPage id="pp1"> <amx:facet name="header"> <amx:outputText value="#{jdeBundle.LEGAL_TERMS}" id="ot1"/> </amx:facet> <amx:facet name="secondary"> <amx:commandButton text="#{jdeBundle.DONE}" id="cb1" actionListener="#{eulaBean.doneEULA}"/> </amx:facet> <amx:verbatim id="v1"> <![CDATA[ <p class="MsoNormal" style="margin-bottom: 0.0001pt; text-align: center; line-height: normal;"><b><span style="font-size: 12pt; font-family: "Arial","sans-serif"; color: black;">MY END USER LICENSE AGREEMENT</span></b> </p> Legal.... ]]> </amx:verbatim> </amx:panelPage> </amx:view> -
Save the EULA page.
-
In the Projects panel, right-click ViewController and select Project Properties.
-
On Project Properties, select Dependencies, select the ApplicationController.jpr, and click the green plus sign button.
-
On Edit Dependencies, click the Build Output check box, click OK, and then click OK again to close the Project Properties.
-
Add code for the Done button, which returns the user to the application after viewing the EULA. To do so:
-
In the Projects panel, expand ViewController > Web Content, and double-click the eula.amx.
-
In the eula.amx code, highlight the commandButton element.
-
In the Button - Done - Properties window on the right, hover over the Action Listener field and click the "gear" button, and select Edit.
-
On "Edit Property: Action Listener," click the New button to create a new managed bean.
-
On Create Managed Bean, complete the following fields and then click OK:
-Bean Name: eulaBean
-Class Name: EulaBean
-Scope: pageFlow
-
Click the New button next to the Method field to create a new method for the bean.
-
On Create Method, enter doneEULA in the Method Name field and click OK.
-
On "Edit Property: Action Listener," click OK to accept the new bean and method.
This adds the new bean method to the action listener.
-
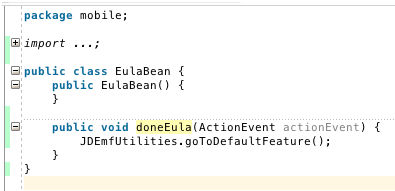
In the code, right-click the
doneEulamethod name and select Go to Declaration. -
In the new method, replace the
//add event code here...comment with this line of code:JDEmfUtilities.goToDefaultFeature();Your new method should look like this:
-
-
In the Projects panel, expand Application Controller > Application Sources > application, and double-click the LifeCycleListenerImple.java.
-
Add the following line of code to the start() method to set the EULA Feature, and make sure to use the feature ID that you used to create the feature. If you do not remember it, you can find the ID in the maf-feature.xml.
LoginConfiguration.setEULAFeature("jdemf.example.EULA");The following example shows the line in the LifeCycleListenerImple.java:

-
Deploy the application again. You should see a springboard launch icon.
The page displays the About, Legal Terms, and Logout links. The About page shows the information in about.properties; the Legal Terms page shows the eula.amx page:

A.4 Connecting to the EnterpriseOne Application Interface Services (AIS) Server
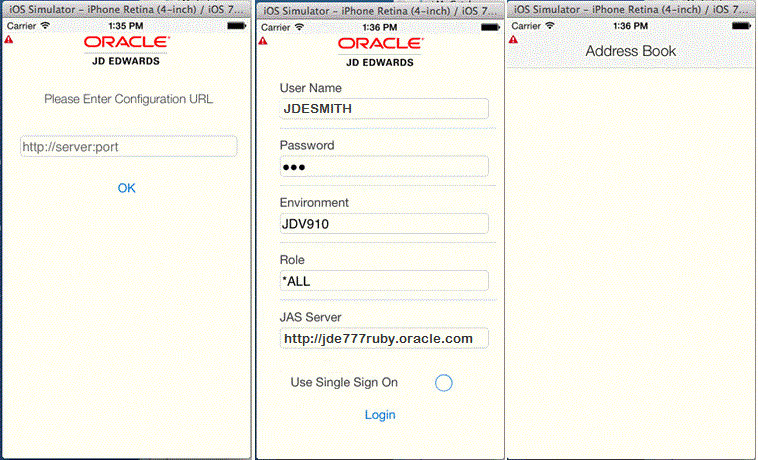
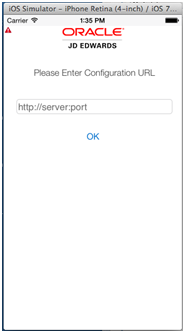
After you configure the Login.jar, the application displays a configuration screen for connecting to the AIS Server.
To connect to the AIS Server:
-
On the first page in the mobile application, enter the URL to the AIS Server and click OK:
-
If the connection is successful, enter your EnterpriseOne user name and password in the following login page:
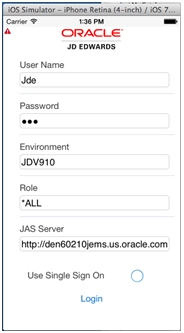
Based on the AIS Server configuration, the Environment, Role, and JAS Server fields, as well as the "Use Single Sign On" check box, may or may not be displayed here.
-
Click Login.
If the application takes you to the ABList feature, you have successfully established a session with the AIS Server. Your mobile application can make service calls.
A.5 AIS Client Class Generator
The AIS Client Class Generator is a JDeveloper extension that generates Java classes to store data returned from the REST service calls.
You must configure the AIS Client Class Generator before you can use it to generate classes. See Section 5.2, "Configuring the AIS Client Class Generator" in this guide.
A.6 Reading EnterpriseOne Data
The JDEMobileFramework.jar includes APIs that enable the mobile application to make service calls to EnterpriseOne and read data from EnterpriseOne.
You use the AIS Client Class Generator to generate classes to hold the data returned from those calls. To do so, perform the following tasks:
-
Configure the AIS Client Class Generator to generate classes in a custom package.
-
Create a new Java class in the application package.
-
Call the AIS service for populating the data in the Data Control.
-
Create a UI for displaying the data.
To use the AIS Client Class Generator to generate classes in a custom package:
-
In JDeveloper, select the Tools menu > Preferences.
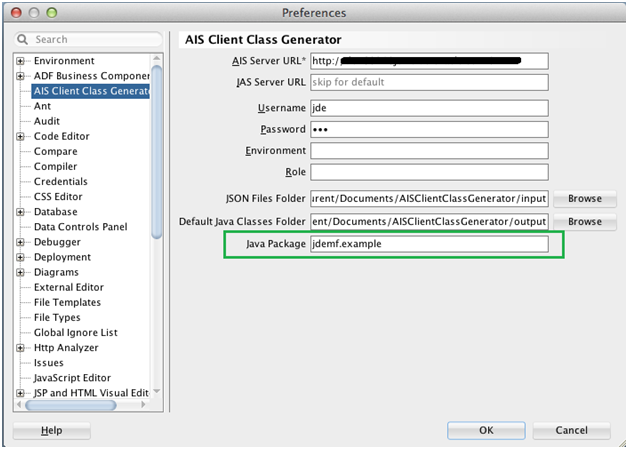
-
Select AIS Client Class Generator from the list on the left.
-
In the Java Package field, enter a valid package name, and then click OK.
-
In the Projects panel, click ApplicationController to highlight it. You must make sure that this is highlighted before generating classes.
-
Select the Tools menu > AIS Client Class Generator to launch it.
-
In the AIS Client Class Generator, complete these fields to generate classes for the W01012B form in the P01012 application:
-
Username. Enter an EnterpriseOne username.
-
Password. Enter the EnterpriseOne password.
-
Application Name. Enter P01012.
-
Form Name. Enter W01012B.
-
-
Make sure the following check boxes are selected, and then click the Generate button.
-
DemoMode
-
Generate for Mobile Application
The Preview JSON Data and Keep JSON Files check boxes are optional. If you select the Preview JSON Data check box, the JSON displays a preview of the JSON, as shown in the following example:

-
-
On JSON Data Preview, make sure the preview shows at least one grid record, and then click Continue.
-
After receiving confirmation that the generation was a success, click OK.
-
In the Projects panel, click the "refresh" button so that the new classes appear in the ApplicationController tree.
To create a new Java class in the application package:
-
In the Projects panel, expand ApplicationController > Application Sources, right-click application, and then select New > Java Class.
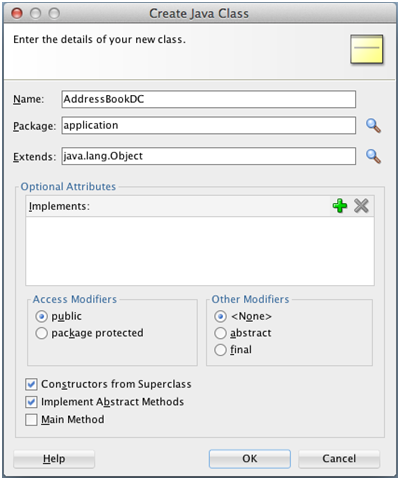
-
On Create Java Class, enter AddressBookDC in the Name field and then click OK.
This will be the main data control for the application.
-
Add a member to the AddressBookDC class of the P01012_W01012B_FormParent type. This will hold the data returned from the service call.
The placement of the following code for the member is shown in the image that follows:
P01012_W01012B_FormParent p01012_W01012B_FormParent = new P01012_W01012B_FormParent();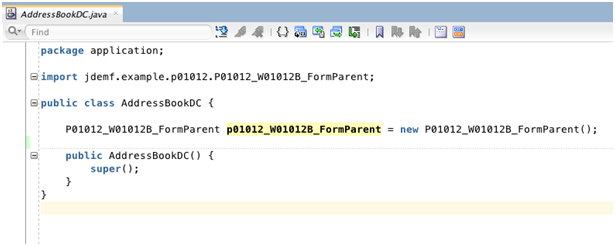
-
Right-click on the page and select Generate Accessors to generate accessors for the new member variable.
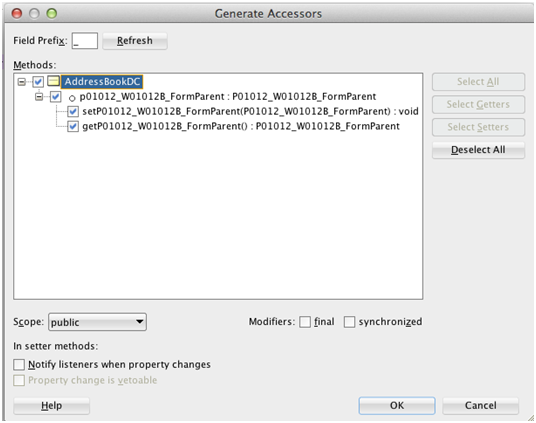
-
On Generate Accessors, select the check box next to the AddressBookDC method and click OK.
-
Under Application Controller > Application Sources > application, right-click AddressBookDC.java and select Create Data Control.
-
On Choose Bean Class, accept the defaults and click Next.
-
On Bean Data Control Options, accept the defaults and click Finish.
JDeveloper displays the new Data Control in the panel on the left.
To populate the data in the Data Control by calling the AIS service:
-
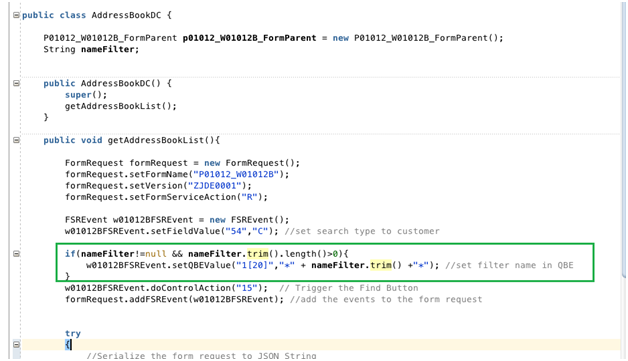
In the Projects panel, open the AddressBookDC.java class, and add the following code, which adds a new method to call the service and put the data in the member variable form parent:
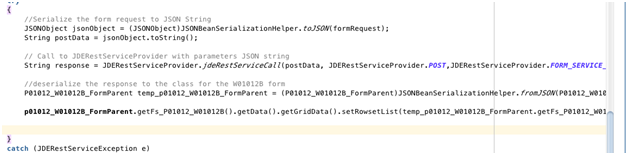
public void getAddressBookList(){ FormRequest formRequest = new FormRequest(); formRequest.setFormName("P01012_W01012B"); formRequest.setVersion("ZJDE0001"); formRequest.setFormServiceAction("R"); FSREvent w01012BFSREvent = new FSREvent(); w01012BFSREvent.setFieldValue("54","C"); //set search type to customer w01012BFSREvent.doControlAction("15"); // Trigger the Find Button formRequest.addFSREvent(w01012BFSREvent); //add the events to the form request try { //Serialize the form request to JSON String JSONObject jsonObject = (JSONObject)JSONBeanSerializationHelper.toJSON(formRequest); String postData = jsonObject.toString(); // Call to JDERestServiceProvider with parameters JSON string String response = JDERestServiceProvider.jdeRestServiceCall(postData, JDERestServiceProvider.POST,JDERestServiceProvider.FORM_SERVICE_URI); //deserialize the response to the class for the W01012B form p01012_W01012B_FormParent = (P01012_W01012B_FormParent)JSONBeanSerializationHelper.fromJSON(P01012_W01012B_FormParent.class, response); } catch (JDERestServiceException e) { JDERestServiceProvider.handleServiceException(e); } catch(Exception e) { throw new AdfException(e.getMessage(), AdfException.ERROR); } } -
Call this new method from the constructor (for now).
public AddressBookDC() {
        super();
        getAddressBookList();
}
To create a UI to display the data:
-
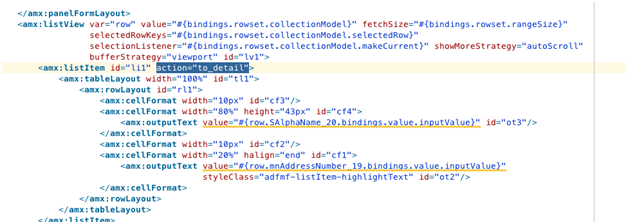
Under ViewController > Web Content, open the ablist.amx page.
-
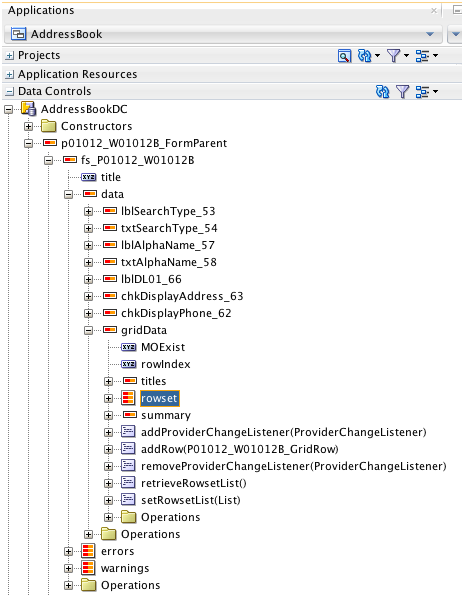
In the Data Controls panel, locate the rowset in the data control, which is located under p01012_W01012B_FormParent > fs_P01012_W01012B > data > gridData.
-
Drag the rowset to the ablist.amx page after the
</amx:facet>end tag. -
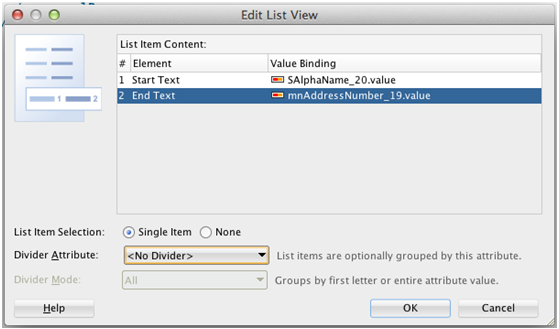
Select MAF List View, and in the ListView Gallery, select the Start-End type of the list view.
-
For the Start Text, select SAlphaName_20.value, and for the End Text, select mnAddressNumber_19.value.
-
Click OK.
-
Locate the amx:cellFormat element and change the cell format that contains the alpha name to 80%. Change the cell format that contains the address number to 20%. See Figure A-1 for an example.
-
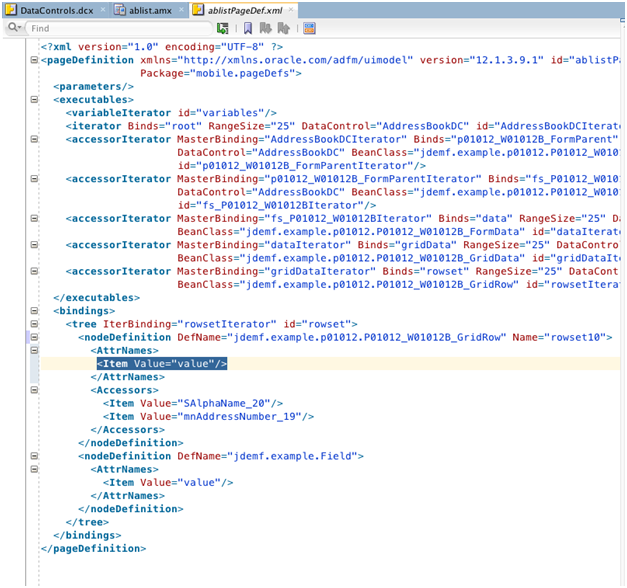
In the Projects panel, expand ViewController > Application Sources > mobile.pageDefs, open the ablistPageDef.xml, and select the Source tab.
-
In the <AttrName> element, add the following line of code:
<Item Value="value"/> -
Deploy and run the application.
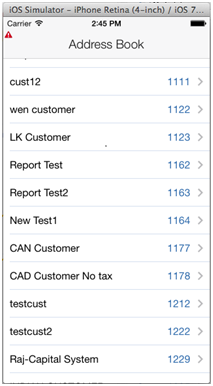
After logging in, it should automatically populate the list with customer names as shown in the following example:
A.7 Implementing Filter Fields
Implement a Name (string) filter. To do so:
-
Select the AddressBookDC.java tab, and add the following code to add a member variable:
String nameFilter; -
Right-click on the page and select Generate Accessors.
-
Add the following code to the getAddressBookList() method to use the new filter value:
if(nameFilter!=null && nameFilter.trim().length()>0){
//set filter name in QBE
       w01012BFSREvent.setQBEValue("1[20]","*" + nameFilter.trim() +"*");
}
The following example shows the code in the method:
-
Remove the call to getAddressBookList() in the constructor. Later in these steps, you will call this method from the search button instead.
-
Change the code after the response is retrieved. This will enable the data to refresh after a new search is performed.
//deserialize the response to the class for the W01012B form
            P01012_W01012B_FormParent temp_p01012_W01012B_FormParent = (P01012_W01012B_FormParent)JSONBeanSerializationHelper.fromJSON(P01012_W01012B_FormParent.class, response);

            p01012_W01012B_FormParent.getFs_P01012_W01012B().getData().getGridData().setRowsetWithList(temp_p01012_W01012B_FormParent.getFs_P01012_W01012B().getData().getGridData().retrieveRowsetList());
The following example shows the code:
Description of the illustration ''response_code.png''
-
Under ViewController > Web Content, open ablist.amx.
-
In the Data Controls panel, expand AddressBookDC and locate the new nameFilter field.
-
Drag the nameFilter to the amx page before the start of the list view and after the end of the secondary facet.
-
On the context menu, select Text > MAF Input Text w/Label.
-
Change the label to:
label= "Name" -
Remove the existing button in the secondary facet.
-
In the Data Controls panel, locate the getAddressBookList() method in the AddressBookDC data control.
-
Drag the method inside the secondary facet in the amx page, and click MAF Button in the context menu to create a button.
-
To name the new button, change the text attribute to:
text="Search" -
Add a panelFormLayout around the name input field, which will delineate it from the list with a box, as shown in the following example:
<amx:panelFormLayout labelPosition="start" fieldHalign="start"> <amx:inputText value="#{bindings.nameFilter.inputValue}" label="Name" id="it1"/> </amx:panelFormLayout> -
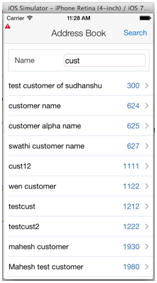
Deploy the application and perform a search by entering a value in the Name field, which should return matching results, as shown here:
A.8 Page Navigation and Getting More Details
This section describes how to generate classes that enable the mobile application to retrieve additional details from the Address Book application.
To generate the classes that will hold the additional details:
-
Select the Tools menu > AIS Client Class Generator to launch the AIS Client Class Generator.
By default, the AIS Client Class Generator should display the values and options that you entered previously.
This time, you need to request the following five fields from the W01012A form in EnterpriseOne, which you specify in the ReturnControlIDs field in the generator:
AlphaName(28), AddressLine1(40), City(52), State(54), PostalCode(50)
-
To generate classes, complete these fields and click the Generate button:
-
Application Name: P01012
-
Form Name: W01012A
-
ReturnControlIDs: 28|40|52|54|50
-
Demo Mode: Checked
JDeveloper displays the generated classes in the Projects panel, under ApplicationController > Application Sources > application node.
-
-
Create a member variable in the AddressBookDC class, as shown in the following example:

Description of the illustration ''ab_class_memb_var.png''
-
Right-click and select Generate Accessors.
-
On Generate Accessors, select the check box next to AddressBookDC and click OK.
-
Under the ViewController > Web Content > ABList, open the ViewController-task-flow.xml.
-
To add another view to the task flow, in the Components window, drag View onto the page.
-
Enter abdetail for the view name.
-
Add a control flow by dragging it from the Components and extending it from ablist icon to the abdetail icon.
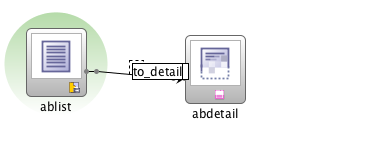
-
Enter to_detail for the name.
-
Double-click the abdetail view to generate the amx. You can use the default values on the Create MAF AMX Page dialog box.
-
In the abdetail.amx page, enter the following code to configure a back button:
<amx:facet name="primary">
  <amx:commandButton id="cb1" action="__back" text="Back"/>
</amx:facet>
-
Open the ablist.amx page and set the action for a list item to use the "to_detail" navigation, as shown in the following example:
Figure A-1 Example of setting page navigation action
Description of ''Figure A-1 Example of setting page navigation action''
-
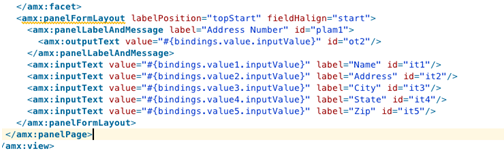
Return to the abdetil.amx file and create a panelFormLayout after the last facet, as shown in the following example:

Description of the illustration ''panel_form_layout.png''
-
In the Data Controls panel, locate the address number value within the W0102B form, which is located under AddressBookDC > p01012_W01012B_FormParent > fs_P01012_W01012B > data > gridData > rowset > mnAddressNumber_19.
-
Drag the value field under mnAddressNumber_19 to the page inside the panelFormLayout, and in the context menu, select Text > MAF Output Text w/Label.
-
Change the label to "Address Number" as shown in the following example:

Description of the illustration ''labelname_addressnumber.png''
-
Locate the data area of the W01012A form, which is under AddressBookDC > p01012_W01012A_FormParent > fs_P01012_W01012A > data.
-
Drag the value that is within the txtAlphaName_28 data element of the AlphaName to the page after the panelLabelAndMessage for AddressNumber.
-
In the context menu, select Text > MAF Input Text w/Label.
-
Repeat for the other detail fields, and set the labels with their names, as shown in the following example:
Description of the illustration ''set_detail_labels.png''
-
Open the AddressBookDC.java and create this new method:
public void getAddressBookDetail(String addressNumber) { FormRequest formRequest = new FormRequest(); formRequest.setFormName("P01012_W01012A"); formRequest.setVersion("ZJDE0001"); formRequest.setFormServiceAction("R"); formRequest.addToFISet("12", addressNumber); try { //Serialize the form request to JSON String JSONObject jsonObject = (JSONObject) JSONBeanSerializationHelper.toJSON(formRequest); String postData = jsonObject.toString(); // Call to JDERestServiceProvider with parameters JSON string String response = JDERestServiceProvider.jdeRestServiceCall(postData, JDERestServiceProvider.POST, JDERestServiceProvider.FORM_SERVICE_URI); //deserialize the response to the class for the W01012A form p01012_W01012A_FormParent = (P01012_W01012A_FormParent) JSONBeanSerializationHelper.fromJSON(P01012_W01012A_FormParent.class, response); } catch (JDERestServiceException e) { JDERestServiceProvider.handleServiceException(e); } catch (Exception e) { throw new AdfException(e.getMessage(), AdfException.ERROR); } } -
Configure the application so that the method is called when the user loads the detail page.
-
Open the abdetail.amx and use the tabs at the bottom to open the Bindings.
-
Click the green plus sign to add a binding to the Bindings column.
-
On Insert Item, add a methodAction.
-
Select the getAddressBookDetails(String) method, and enter the following value for the input. This is the value of the mnAddressNumber_19 field.
#{bindings.value.inputValue} -
In the Executables column, click the Add icon.
-
On Insert Item, select invokeAction and click OK.
-
On Insert invokeAction, enter getDetails for the id.
-
Select the getAddressBookDetail method and then click OK.
-
In the Executables page, select the getDetails action and drag it up in the list, directly after mnAddressNumber_19Iterator.
-
Highlight getDetails, click the Pencil icon, and set Refresh to "always."
-
Click OK and then test the application in the simulator.
If successful, the simulator displays the Address Book details when you select a record, as shown in the following illustration:
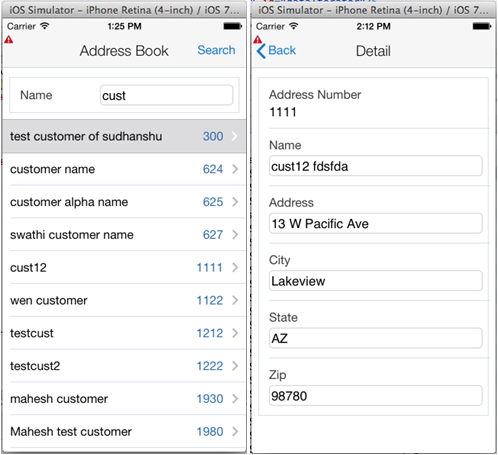
Description of the illustration ''mbl_abdetails.png''
-
A.9 Updating Data in EnterpriseOne
Next, use the details form to update the values in the database.
To update the values:
-
In the AddressBookDC class, add the following new method to update the values:
public void updateAddressBookDetail(String addressNumber) { FormRequest formRequest = new FormRequest(); formRequest.setFormName("P01012_W01012A"); formRequest.setVersion("ZJDE0001"); formRequest.setFormServiceAction("U"); formRequest.addToFISet("12", addressNumber); FSREvent w01012AUpdateFSREvent = new FSREvent();//set all the field values w01012AUpdateFSREvent.setFieldValue("28", p01012_W01012A_FormParent.getFs_P01012_W01012A().getData().getTxtAlphaName_28().getValue()); w01012AUpdateFSREvent.setFieldValue("40",p01012_W01012A_FormParent.getFs_P01012_W01012A().getData().getTxtAddressLine1_40().getValue() ); w01012AUpdateFSREvent.setFieldValue("52",p01012_W01012A_FormParent.getFs_P01012_W01012A().getData().getTxtCity_52().getValue() ); w01012AUpdateFSREvent.setFieldValue("54", p01012_W01012A_FormParent.getFs_P01012_W01012A().getData().getTxtState_54().getValue()); w01012AUpdateFSREvent.setFieldValue("50", p01012_W01012A_FormParent.getFs_P01012_W01012A().getData().getTxtPostalCode_50().getValue()); w01012AUpdateFSREvent.doControlAction("11"); // Trigger the OK Button formRequest.addFSREvent(w01012AUpdateFSREvent); //add the events to the form request try { //Serialize the form request to JSON String JSONObject jsonObject = (JSONObject) JSONBeanSerializationHelper.toJSON(formRequest); String postData = jsonObject.toString(); // Call to JDERestServiceProvider with parameters JSON string String response = JDERestServiceProvider.jdeRestServiceCall(postData, JDERestServiceProvider.POST, JDERestServiceProvider.FORM_SERVICE_URI); //after the call navigate back to the list page AdfmfContainerUtilities.invokeContainerJavaScriptFunction("ABList", "adf.mf.api.amx.doNavigation", new Object[]{"__back"}); } catch (JDERestServiceException e) { JDERestServiceProvider.handleServiceException(e); } catch (Exception e) { throw new AdfException(e.getMessage(), AdfException.ERROR); } } -
Open the abdetail.amx page.
-
Select the updateAddressbookDetail(String) method from the data control.
-
Drag it between the secondary facet (remove the existing button first).
-
On Edit Action Binding, set the parameter value to: #{bindings.value.inputValue}
This is the binding value that corresponds to the address number.
-
Run the application in the simulator to test the following actions:
-
Change the values.
-
Click Save.
-
Search on a new name.
-
A.9.1 Handling Errors
Some of the fields may potentially have errors such as an invalid state code. This section describes how to handle those errors.
-
Add the following items to the AddressBookDC class:
-
An error array member variable.
-
A property change support member variable.
-
A provider change member variable.
-
Setters and getters.
-
Provider change support methods.
This code also provides a getter for an errorCount, which is set when the array is set using the property change listener, as shown in the following code sample:
FormErrorWarningMobile[] errors; private PropertyChangeSupport propertyChangeSupport = new PropertyChangeSupport(this); protected transient ProviderChangeSupport errorChangeSupport = new ProviderChangeSupport(this); public void addProviderChangeListener(ProviderChangeListener l) { errorChangeSupport.addProviderChangeListener(l); } public void removeProviderChangeListener(ProviderChangeListener l) { errorChangeSupport.removeProviderChangeListener(l); } public void setErrors(FormErrorWarningMobile[] errors) { int oldCount = 0; if(this.errors!=null){ oldCount = this.errors.length; } int newCount = 0; if(errors != null){ newCount = errors.length; } this.errors = errors; errorChangeSupport.fireProviderRefresh("errors"); propertyChangeSupport.firePropertyChange("errorCount", oldCount,newCount); } public FormErrorWarningMobile[] getErrors() { return errors; } public int getErrorCount() { if(errors != null){ return errors.length; }else{ return 0; } } public void addPropertyChangeListener(PropertyChangeListener l) { propertyChangeSupport.addPropertyChangeListener(l); } public void removePropertyChangeListener(PropertyChangeListener l) { propertyChangeSupport.removePropertyChangeListener(l); } -
-
Modify the code in the updateAddressBookDetail method of the AddressBookDC class. Instead of always navigating back to the list first, check the errors and then return to the list.
Replace this line:
//after the call navigate back to the list page AdfmfContainerUtilities.invokeContainerJavaScriptFunction("ABList", "adf.mf.api.amx.doNavigation", new Object[]{"__back"});With this code:
//deserialize the response to the class for the W01012A form P01012_W01012A_FormParent temp_p01012_W01012A_FormParent = (P01012_W01012A_FormParent) JSONBeanSerializationHelper.fromJSON(P01012_W01012A_FormParent.class, response); clearErrors(); if(temp_p01012_W01012A_FormParent.getFs_P01012_W01012A().getErrors() != null && temp_p01012_W01012A_FormParent.getFs_P01012_W01012A().getErrors().length > 0 ){ //set error list setErrors(temp_p01012_W01012A_FormParent.getFs_P01012_W01012A().getErrors()); }else{ //no errors navigate back AdfmfContainerUtilities.invokeContainerJavaScriptFunction("ABList", "adf.mf.api.amx.doNavigation", new Object[]{"__back"}); } public void clearErrors(){ setErrors(null); } -
Open abdetail.amx.
-
In the Data Controls panel, select errors under AddressBookDC and drag it to the page, placing it after the last facet to create a list view.
-
On the context menu, select MAF List View.
-
On ListView Gallery, select the default view.
-
On Edit List View, select MOBILE from the Text drop-down menu and click OK.
-
In the Data Control panel, locate the errorCount under AddressBookDC.
-
Drag errorCount onto the page and in the context menu, select Text > MAF Output Text.
-
Remove the list view and output text that you previously added; they were just added to create bindings.
-
After the last facet, insert the following list view code:
<amx:listView var="row" value="#{bindings.errors.collectionModel}" fetchSize="#{bindings.errors.rangeSize}" styleClass="adfmf-listView-insetList" id="lv1" rendered="#{bindings.errorCount.inputValue gt 0}"> <amx:listItem showLinkIcon="false" id="li1"> <amx:panelGroupLayout> <amx:inputText rows="3" value="#{row.MOBILE}" id="ot3" inlineStyle="color:Red;word-wrap:break-word;" readOnly="true"/> </amx:panelGroupLayout> </amx:listItem> </amx:listView> -
Run the application in the simulator and test the following tasks in the application:
-
Enter an invalid state code.
-
Click Save.
The simulator should display the "not found" error as shown in the following example:
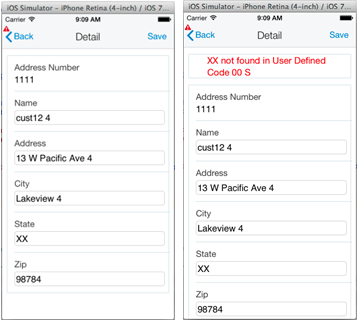
Description of the illustration ''invalid_code.png''
If you correct it with a valid value and click Save, the application will successfully save the record.
-
A.10 Device Integration
This example shows how to enable the mobile application user to add a record they are viewing to the contacts list on the device. To do so:
-
Open the maf-application.xml and select the Plugins tab.
-
Select the check box next to Contacts to enable access to the Contacts on the device.
-
Add a member variable to the AddressBookDC.java class to hold the confirmation message.
-
Generate accessors with property change support.
After defining the member variable and generating accessors, the resulting code should look like this:
private String addContactResultMsg = null; public String getAddContactResultMsg() { return addContactResultMsg; } public void setAddContactResultMsg(String addContactResultMsg) { String oldAddContactResultMsg = this.addContactResultMsg; this.addContactResultMsg = addContactResultMsg; propertyChangeSupport.firePropertyChange("addContactResultMsg", oldAddContactResultMsg, addContactResultMsg); } -
Add the following new method, which enables the record to be added to the device's contacts list:
public void createDeviceContact() { String resultMessage = "Contact Exists"; // Call FindContacts to determine if the contact already exists on device. String contactSearchName = p01012_W01012A_FormParent.getFs_P01012_W01012A().getData().getTxtAlphaName_28().getValue(); try { Contact[] foundContacts = DeviceManagerFactory.getDeviceManager().findContacts("name", contactSearchName, true); if (foundContacts != null && foundContacts.length == 0) { Contact newContact = new Contact(); // Assign contact name. ContactName name = new ContactName(); name.setFormatted(contactSearchName); name.setGivenName(contactSearchName); newContact.setName(name); // Assign address to contact. ContactAddresses[] addresses = new ContactAddresses[1]; ContactAddresses address = new ContactAddresses(); address.setStreetAddress(p01012_W01012A_FormParent.getFs_P01012_W01012A().getData().getTxtAddressLine1_40().getValue()); address.setLocality(p01012_W01012A_FormParent.getFs_P01012_W01012A().getData().getTxtCity_52().getValue()); address.setPostalCode(p01012_W01012A_FormParent.getFs_P01012_W01012A().getData().getTxtPostalCode_50().getValue()); address.setRegion(p01012_W01012A_FormParent.getFs_P01012_W01012A().getData().getTxtState_54().getValue()); addresses[0] = address; newContact.setAddresses(addresses); try { // Add contact to device. DeviceManagerFactory.getDeviceManager().createContact(newContact); // Device contact now exists. resultMessage = "Contact Added"; } catch (Exception e) { throw new AdfException(e.getMessage(), AdfException.ERROR); } } } catch (Exception e) { // Unable to interact with device's contact list - display error. resultMessage = "Unable to Add Contact"; } setAddContactResultMsg(resultMessage); } -
Open the abdetail.amx page and locate the new method called createDeviceContact under the AddressBookDC data control.
-
Drag the method to the page as a button, and then delete the button.
This creates the bindings.
-
Locate the addContactResultMsg under the AddressBookDC data control.
-
Drag it to the page as an output text, and then delete the output text.
This creates the bindings.
-
Enter the following code for the footer after the end of the panel form layout (
</amx:panelFormLayout>):<amx:facet name="footer"> <amx:panelGroupLayout id="pgl6" layout="horizontal" halign="end"> <!-- Add Contact To Device--> <amx:commandButton actionListener="#{bindings.createDeviceContact.execute}" text="Create Device Contact" disabled="#{!bindings.createDeviceContact.enabled}" id="cb4"> <amx:showPopupBehavior id="spb1" popupId="p1" align="overlapTopCenter" alignId="it2"/> </amx:commandButton> </amx:panelGroupLayout> </amx:facet> -
Enter the following code for the popup message after the end panel page tag (
</amx:panelPage>):<!-- display add contact result message. --> <amx:popup id="p1" autoDismiss="true"> <amx:panelGroupLayout id="pgl3" halign="center" valign="middle"> <amx:commandLink text="#{bindings.addContactResultMsg.inputValue}" id="cl3" inlineStyle="white-space:pre;font-size:larger;color:black;text-decoration:none;"> <amx:closePopupBehavior id="cpb1" popupId="p1"/> </amx:commandLink> </amx:panelGroupLayout> </amx:popup> -
Run the application in the simulator to test performing the following tasks in the application:
-
Open a record and click the Create Device Contact button in the footer, which displays the "Contact Added" message.
-
Go to the device's contacts and you can see the contact listed with the address, as shown in the following example:
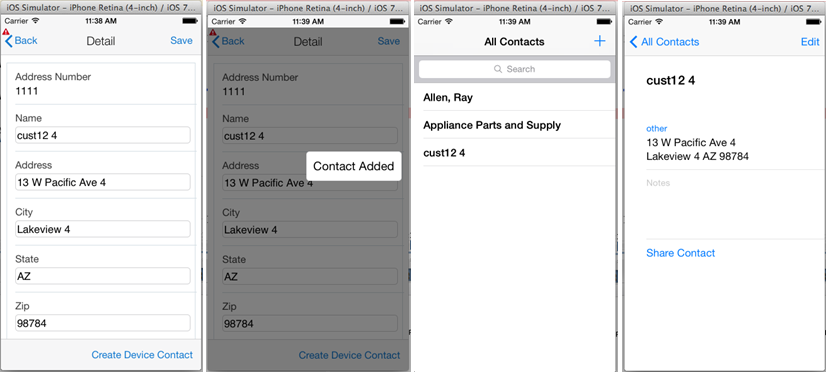
Description of the illustration ''contact_added.png''
If you attempt to add it again, you get the contact exists message, as shown in the following example:
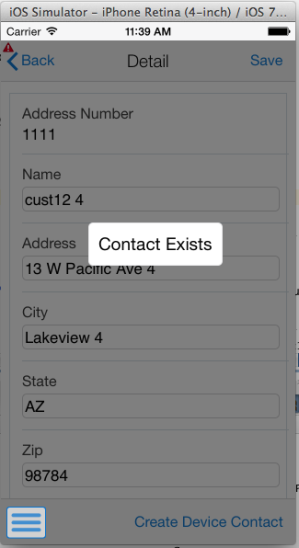
Description of the illustration ''contact_exists.png''
-