A Creating a Sample ADF Application
This appendix guides you through the steps to create a sample EnterpriseOne ADF enterprise application using Oracle ADF Application Framework (ADF).
This appendix contains the following topics:
A.1 Before You Begin
To create the sample application discussed in this chapter, you must download the EnterpriseOne ADF Foundation and AIS Client Java API from the JD Edwards Update Center. These downloads contain five jar files required for creating EnterpriseOne ADF applications.
The AIS Client Class Generator extension for JDeveloper should already be installed. See Chapter 3, "Getting Started".
You must also have a basic understanding of how to use JDeveloper.
A.1.1 AIS Class Generator
The EnterpriseOne AIS Client Class Generator is a tool you use to create Model foundational classes. These classes are specific to the EnterpriseOne application which will be accessed by the ADF application. This tool will be referred to in sections to follow which run you through the steps of creating an EnterpriseOne ADF application, so ensure that you understand the Generator and how to create the JSON file with REST testing tool. The AISCGE 12c install is included with the Application Interface Services Client Java API 1.2.1 download from Update Center.
A.2 Creating the Sample Address Book ADF Application
This section explains how to build the ADFAddressBook application. You will add the functionality to search the EnterpriseOne Address Book and display the results in a list. The purpose of this section is to demonstrate how to make use of the form service request, and how to leverage current EnterpriseOne functionality. This section does not explain how to develop a fully functional user interface Address Book application.
A.2.1 Getting Started
The steps performed for this section are required for all EnterpriseOne ADF applications. In the following sections, you will continue to build out the ADF application started here and add functionality to search and review address book data from the EnterpriseOne Address Book (P01012) application.
-
To begin, save the following jar files to the C:\JDeveloper\mywork directory:
-
AIS_Client.jar
-
jackson-annotations-2.2.4.jar
-
jackson-core-2.2.4.jar
-
jackson-databind-2.2.4.jar
-
E1UserSession.jar
-
A.2.2 Creating a New ADF Application
This section describes how to create a new ADF application.
-
In JDeveloper, create a new ADF Application.
-
On the New Gallery form, select Applications from the Categories section, and then click ADF Fusion Web Application from the Items: list.
-
Click OK.
-
On the Name Application form, enter the following information:
-
Application Name: E01012
-
Directory: C:\jdeveloper\mywork\E01012
-
Application Package Prefix: com.oracle.e1.E01012
Ensure that the Application Package Prefix is populated correctly with the following sample name: com.oracle.e1.E01012
Note:
Oracle's standards are to name ADF applications beginning with the letter E, for example, E01012.
-
-
Accept the default settings and click Finish.
-
Add the jar files to your Model project by completing the following steps:
-
Right-click Model project
-
Select Project Properties
-
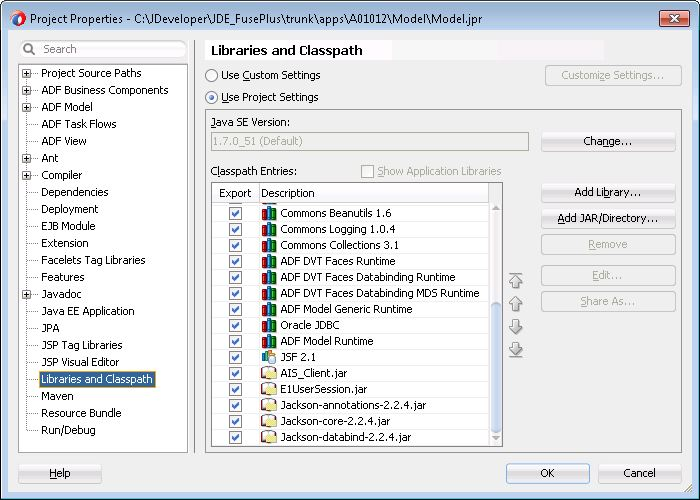
Select Libraries and Classpath (towards the bottom of the left pane)
-
Click the Add Jar/Directory… button located on the right side of the screen and add the following jars:
-
AIS_Client.jar
-
jackson-annotations-2.2.4.jar
-
jackson-core-2.2.4.jar
-
jackson-databind-2.2.4.jar
-
E1UserSession.jar
-
-
The following graphic displays the results you should now see:
-
-
Click the Add Library button located on the right side of the screen.
-
Click the ADF Model Generic Runtime Classpath entry, and then click OK.
-
Click the Add Library button again.
-
Select ADF Faces Runtime 11 Classpath entry and then Click OK.
-
Click OK to save the changes.
-
In the Projects panel on the left, delete the WEB-INF folder that has been added to the Model project.
-
Save changes made to the Model project.
A.3 Building an EnterpriseOne ADF Application in JDeveloper
This section describes how to use the form service request and leverage existing EnterpriseOne functionality. It describes how to build the E01012 - AddressBook application and describes how to create the functionality used to search for EnterpriseOne Address Book data and display the results in a list. It does not describe how to develop a fully functional Address Book application.
Before continuing through this section, you should have completed the steps in the previous sections. You should also be able to use the AIS Client Class Generator.
A.3.1 Generating Form Service Foundation Classes for the Data Model
You use the AIS Client Class Generator in JDeveloper to generate the form service foundation classes that are needed to process responses to AIS form service requests.
To set preferences in your JDeveloper for AIS class generator:
-
From the Tools menu, select Preferences.
-
From the Preferences panel click AIS Class Generator.
If you do not see the AIS Class Generator form, click the Load Extension button to refresh the form.
-
See Section 5.2, "Configuring the AIS Client Class Generator" for information on what to enter in the fields that display.
To run the AIS Client Class Generator
-
Highlight the Model project.
-
Run the AIS Client Class Generator by clicking the Tools menu, and then clicking AIS Class Generator.
-
Enter the following inputs:
Generate W01012B Class
-
-
Application Name: P01012
-
Form Name: W01012B
-
Version: ZJDE0001
-
ReturnControlIDs: 1[19,20,48,49,50,51],54,58,63,62
-
FormInputs: (C, 54)
-
FormServiceAction: R
-
FindOnEntry: <checked>
-
DemoMode: <checked>
-
Generate for Mobile: <unchecked>
-
Preview JSON: <checked>
-
Keep JSON: <checked>
-
Click Generate.
Generate the W01012A Class
-
-
-
Application Name: P01012
-
Form Name: W01012A
-
Version: ZJDE0001
-
FormServiceAction: R
-
FindOnEntry: <checked>
-
DemoMode: <checked>
-
Preview JSON: <checked>
-
Keep JSON: <checked>
-
Return Control IDs: [blank]
Refresh the Model project to see the newly generated classes available for consumption.
-
A.3.2 Creating the Data Control Class
This section describes how to create the AddressBookDC.java class.
-
In the Projects panel located on the left of the screen, right-click the Model project, select New, and then select From Gallery.
-
On the New Gallery form, select Java from the Categories panel, and then select Class in the Items panel.
-
On the Create Java Class form, enter the following information:
Name: AddressBookRecord
Package: com.oracle.e1.E01012.formservicetypes
-
Click the OK button to create the Java class.
-
Add the following fields to AddressBookRecord.java:
-
Add the following method to AddressBookRecord.java:
-
Right-click within the cass and select Generate Accessors... from context menu.
-
Select all methods and click OK button.
-
Save changes to AddressBookRecord.java.
-
In the Projects panel located on the left of the screen, right-click the Model project, select New, and then select Java Class.
-
On the Create Java Class form, enter the following information:
Name: AddressBookDC
Package: com.oracle.e1.E01012.model
-
Click the OK button to create the Java class.
-
Add the following fields to AddressBookDC.java:
private P01012_W01012B_FormParent addressBook = new P01012_W01012B_FormParent(); private P01012_W01012B_GridRow selectedAddressBook = new P01012_W01012B_GridRow(); private AddressBookRecord addressBookDetail = new AddressBookRecord(); private String selectedAddressNumber = ""; // Processing Options private String p01012Version = ""; private String hideTax = ""; private String displaySupplierMaster = ""; private String displayCustomerMaster = ""; private String searchTypeDefault = ""; private String displayCSMS = ""; private String p0100041Version = ""; private String selfServiceMode = ""; private String typeCode = ""; private String postalCodeValidate = ""; private String postalAddressRetrieval = ""; private String p03013Version = ""; private String p04012Version = ""; -
Right-click within the class and select Generate Accessors... from context menu.
-
Select all methods and click OK button
-
Save changes to AddressBookDC.java.
A.3.3 Populating Address Book List and Creating the Data Control
In this section you will populate the address book list and create the data control.
-
Add the following connection fields and constants to AddressBookDC.java
// Session private E1UserSessionBean userBean; private LoginEnvironment loginEnv; private boolean runningInJDEADFContainer = true; // Hard coded connection values. private static final String AIS_SERVER = "http://host:port"; private static final String USER_NAME = "username"; private static final String PASSWORD = "password"; private static final String DEVICE = "E1ADFApps"; private static final String ROLE = "role"; private static final String ENVIRONMENT = "environment"; -
Add the code shown below to AddressBookDC.java:
public AddressBookDC() { ADFContext.getCurrent().getPageFlowScope().put("showDetail", "false"); String handshakeId = (String) ADFContext.getCurrent().getPageFlowScope().get("handshakeId"); if (handshakeId == null || (handshakeId != null && handshakeId.length() == 0)) { runningInJDEADFContainer = false; userBean = new E1UserSessionBean(AIS_SERVER, USER_NAME, PASSWORD, ENVIRONMENT, ROLE, DEVICE); } else { // Initialize application for about properties, only do this when running in the container E1AdfUtils.intializeAppInstance("/com/oracle/e1/E01012/"); } loginEnv = E1AdfUtils.getLoginEnvironment(userBean); if (loginEnv != null) { List<String> reqCapabilities = loginEnv .getRequiredCapabilities(); reqCapabilities.add("processingOption"); retrievePOValues(); } else { processConnectionException(); } } private void retrievePOValues() { try { String appName = (String) ADFContext.getCurrent().getPageFlowScope().get("appName"); String appVersion = (String) ADFContext.getCurrent().getPageFlowScope().get("appVersion"); ProcessingOptionRequest e01012PORequest = new ProcessingOptionRequest(loginEnv); if ((appName == null) || (appName.length() == 0)) { appName = "E01012"; } e01012PORequest.setApplicationName(appName); if ((appVersion == null) || (appVersion.length() == 0)) { appVersion = "ZJDE0001"; } e01012PORequest.setVersion(appVersion); String response = JDERestServiceProvider.jdeRestServiceCall(le, e01012PORequest, JDERestServiceProvider.POST_METHOD, JDERestServiceProvider.PO_SERVICE); ProcessingOptionsSet e01012POSet = loginEnv .getObjectMapper().readValue(response, ProcessingOptionsSet.class); if (e01012POSet != null) { p01012Version = (String) e01012POSet.getOptionValue("szP01012Version_2"); if (p01012Version == null) { p01012Version = "ZJDE0001"; } ProcessingOptionRequest p01012PORequest = new ProcessingOptionRequest(loginEnv); p01012PORequest.setApplicationName("P01012"); p01012PORequest.setVersion(p01012Version); String response1 = JDERestServiceProvider.jdeRestServiceCall(loginEnv, p01012PORequest, JDERestServiceProvider.POST_METHOD, JDERestServiceProvider.PO_SERVICE); ProcessingOptionsSet p01012POSet = loginEnv.getObjectMapper().readValue(response1, ProcessingOptionsSet.class); if (p01012POSet != null) { hideTax = (String) p01012POSet.getOptionValue("HideTax_4"); displaySupplierMaster = (String) p01012POSet.getOptionValue("GoToSupplierMaster_5"); displayCustomerMaster = (String) p01012POSet.getOptionValue("GoToCustomerMaster_6"); searchTypeDefault = (String) p01012POSet.getOptionValue("SearchTypeDefault_7"); displayCSMS = (String) p01012POSet.getOptionValue("GoToCSMS_8"); p0100041Version = (String) p01012POSet.getOptionValue("Version_9"); selfServiceMode = (String) p01012POSet.getOptionValue("cSelfServiceMode_10"); typeCode = (String) p01012POSet.getOptionValue("cTypeCode_11"); postalCodeValidate = (String) p01012POSet.getOptionValue("cPostalCodeValidate_12"); postalAddressRetrieval = (String) p01012POSet.getOptionValue("cPostalAddressRetrieval_13"); p03013Version = (String) p01012POSet.getOptionValue("szCustMasterVersion_VER_14"); p04012Version = (String) p01012POSet.getOptionValue("szSuppMasterVersion_VER_15"); } } } catch (CapabilityException e) { // Processing Option cability is not supported on AIS. Use default search type. searchTypeDefault = "E"; } catch (JDERestServiceException e) { processErrorException(JDERestServiceProvider.handleServiceException(e)); } catch (Exception e) { processErrorException(e); } } public void launchE1App() { E1FormInterconnect form = new E1FormInterconnect(); form.setApplication("P01012"); form.setForm("W01012B"); form.setVersion("ZJDE0001"); form.addFormInterconnectValue("2", "C"); E1AdfUtils.launchE1Application(form); } public void getAddressBookList() { if (loginEnv != null) { FormRequest formRequest = new FormRequest(loginEnv); formRequest.setFormName("P01012_W01012B"); formRequest.setVersion(p01012Version); formRequest.setMaxPageSize("600"); formRequest.setFormServiceAction("R"); FSREvent w01012BFSREvent = new FSREvent(); // Set search type based on the processing option of P01012. w01012BFSREvent.setFieldValue("54", searchTypeDefault); String alphaNameFilter = (String) ADFContext.getCurrent().getPageFlowScope().get("alphaNameFilter"); if (alphaNameFilter != null && alphaNameFilter.trim().length() > 0) { w01012BFSREvent.setFieldValue("58", "*" + alphaNameFilter + "*"); } else { w01012BFSREvent.setFieldValue("58", "**"); } w01012BFSREvent.doControlAction("15"); // Trigger the Find Button formRequest.addFSREvent(w01012BFSREvent); // Add the events to the form request try { String response = JDERestServiceProvider.jdeRestServiceCall(loginEnv, formRequest, JDERestServiceProvider.POST_METHOD, JDERestServiceProvider.FORM_SERVICE_URI); P01012_W01012B_FormParent temp_p01012_W01012B_FormParent = loginEnv.getObjectMapper().readValue(response, P01012_W01012B_FormParent.class); addressBook.getFs_P01012_W01012B().getData().getGridData().setRowset(temp_p01012_W01012B_FormParent.getFs_P01012_W01012B().getData().getGridData().getRowset()); // Reset index of list view iterator. BindingContainer bc = BindingContext.getCurrent().getCurrentBindingsEntry(); DCIteratorBinding rowsetItr = ((DCBindingContainer) bc).findIteratorBinding("rowsetIterator"); if (rowsetItr != null) { rowsetItr.clearForRecreate(); rowsetItr.setCurrentRowIndexInRange(0); } // Reset list view's selected row keys so no list item is initially highlighted. ADFContext adfContext = ADFContext.getCurrent(); ELContext elContext = adfContext.getELContext(); ExpressionFactory expFactory = adfContext.getExpressionFactory(); MethodExpression method = expFactory.createMethodExpression(elContext, "#{addressBookListenerBean.resetListViewSelectedItem}", Object.class, new Class[] {}); method.invoke(elContext, null); if (addressBook.getFs_P01012_W01012B().getData().getGridData().getRowset().size() > 0) { ADFContext.getCurrent().getPageFlowScope().put("selectedRowKey", "0"); processSelectedAddress(0); } else { ADFContext.getCurrent().getPageFlowScope().put("showDetail", "false"); } } catch (JDERestServiceException e) { processErrorException(JDERestServiceProvider.handleServiceException(e)); } catch (IOException e) { processErrorException(e); } } else { processConnectionException(); } } public void addressSelected(SelectionEvent selectionEvent) { System.out.println("addressSelected called by bean " + this.hashCode()); RichListView listView = (RichListView) selectionEvent.getSource(); // Access the rowset used by the list view. CollectionModel model = (CollectionModel) listView.getValue(); JUCtrlHierBinding binding = (JUCtrlHierBinding) model.getWrappedData(); // Retrieve index of selected list item row. RowKeySetTreeImpl selectedRow = (RowKeySetTreeImpl) listView.getSelectedRowKeys(); List nextObj = (List) selectedRow.iterator().next(); JUCtrlHierNodeBinding node = binding.findNodeByKeyPath(nextObj); int rowIndex = (Integer) node.getRowKey().getKeyValues()[0]; AdfFacesContext.getCurrentInstance().addPartialTarget(listView); processSelectedAddress(rowIndex); } private void processSelectedAddress(int rowIndex) { System.out.println("processSelected called by bean " + this.hashCode()); if (rowIndex >= 0) { selectedAddressBook = addressBook.getFs_P01012_W01012B().getData().getGridData().getRowset().get(rowIndex); setSelectedAddressNumber(selectedAddressBook.getMnAddressNumber_19().getValue()); ADFContext.getCurrent().getPageFlowScope().put("showDetail", "true"); } else { ADFContext.getCurrent().getPageFlowScope().put("showDetail", "false"); } getAddressBookDetail(selectedAddressNumber); } public void getAddressBookDetail(String addressNumber) { if (loginEnv != null) { FormRequest formRequest = new FormRequest(loginEnv); formRequest.setFormName("P01012_W01012A"); formRequest.setVersion("ZJDE0001"); formRequest.setFormServiceAction("R"); formRequest.addToFISet("12", addressNumber); try { String response = JDERestServiceProvider.jdeRestServiceCall(loginEnv, formRequest, JDERestServiceProvider.POST_METHOD, JDERestServiceProvider.FORM_SERVICE_URI); P01012_W01012A_FormParent tempDetail = loginEnv.getObjectMapper().readValue(response, P01012_W01012A_FormParent.class); if (tempDetail != null) { P01012_W01012A_FormData form = tempDetail.getFs_P01012_W01012A().getData(); setSelectedAddressNumber(form.getTxtAddressNumber_21().getValue()); addressBookDetail.setAddressNumber(form.getTxtAddressNumber_21().getValue()); addressBookDetail.setAlphaName(form.getTxtAlphaName_28().getValue()); addressBookDetail.setMailingName(form.getTxtMailingName_38().getValue()); addressBookDetail.setAddress(form.getTxtAddressLine1_40().getValue()); addressBookDetail.setCity(form.getTxtCity_52().getValue()); addressBookDetail.setState(form.getTxtState_54().getValue()); addressBookDetail.setZipCode(form.getTxtPostalCode_50().getValue()); addressBookDetail.setTaxId(form.getTxtTaxID_34().getValue()); addressBookDetail.setBusinessUnit(form.getTxtBusinessUnit_62().getValue()); addressBookDetail.setSearchType(form.getTxtSearchType_36().getValue()); } else { addressBookDetail.clear(); } BindingContainer bindings = BindingContext.getCurrent().getCurrentBindingsEntry(); OperationBinding abDetailIterator = bindings.getOperationBinding("Execute"); if (abDetailIterator != null) { abDetailIterator.execute(); } } catch (JDERestServiceException e) { processErrorException(JDERestServiceProvider.handleServiceException(e)); } catch (IOException e) { processErrorException(e); } } else { processConnectionException(); } } public void clearFields() { addressBookDetail.clear(); } private void processErrorException(String msg) { displayMessage("Error", msg); } private void processErrorException(Exception e) { displayMessage("Error", e.getMessage()); } private void processConnectionException() { displayMessage("Connection Error", "Connection failed. Please contact your system administrator"); } private void displayMessage(String title, String msg) { if (runningInJDEADFContainer) { E1AdfUtils.addErrorMessage(msg); E1AdfUtils.launchMessagePopup(); } else { FacesContext.getCurrentInstance().addMessage("E1ADFApp", new FacesMessage(FacesMessage.SEVERITY_ERROR, title, msg)); } -
Right-click the AddressBookDC in the Projects Panel and select Create Data Control.
-
Accept the defaults and click Next, Next, and Finish.
A.3.4 Creating a Task Flow
This section describes how to create a task flow.
-
In the Projects panel on the left, expand both the ViewController project and Web Content folder, and right-click the Page Flows folder.
-
Select New and then choose ADF Task Flow.
-
On the Create Task Flow form, complete the following fields:
- Name: E01012_AddressBook_BTF
Verify that Create as Bounded Task Flow and Create with Page Fragments options are both selected.
-
From the Components palette, drag a View component onto the E01012_AddressBook_BTF.xml diagram.
-
Name the view AddressBookList.
-
Drag a Task Flow Return component onto the E01012_AddressBook_BTF.xml diagram.
-
From the Components palette, select the Control Flow Case component, click on the AddressBookList view, and then click on the return activity. This creates a flow arrow from the view to the activity.
-
Set the action string for the flow arrow to exit.
-
Use the following graphic as a guide for setting up the bounded task flow diagram:
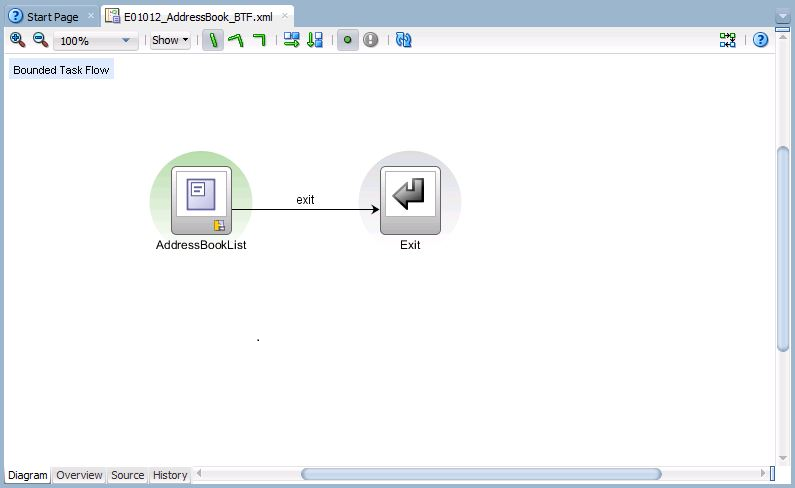
Description of the illustration e01012_btf.png
-
Double-click the AddressBookList view to create a facelet page fragment called AddressBookList.jsff.
Note:
Make sure you save the jsff file to the following location:C:\jdeveloper\mywork\E01012\ViewController\public_html\fragments
-
Select the Overview tab at the bottom of the E01012_AddressBook_BTF.xml diagram, select Behavior tab from the available list on the left, and change the Share data controls with calling task flow option to Isolated.
-
Select the Parameters tab and add the following Input Parameter Definitions:
| Name | Class | Required |
|---|---|---|
|
appName |
java.lang.String |
false |
|
appVersion |
java.lang.String |
false |
|
handshakeId |
java.lang.String |
false |
|
jargonCode |
java.lang.String |
false |
Note:
In addition to the above list of input parameters, bounded tasks flows for EnterpriseOne ADF applications must satisfy the following requirements:- The bounded task flow must contain a Task Flow Return activity with an "exit" action string for the navigation rule.
- The bounded task flow must have a wild card navigation rule to transition to the exit activity using the "exit" action string if you are using multiple views in your bounded task flow.
A.3.5 Creating Address Book Search Panel
-
In the Projects panel located on the left, expand the ViewController, Web Content, and fragments nodes and double-click the AddressBookList.jsff page fragment.
This will display the page fragment in the design panel in the middle.
-
Select the source tab at the bottom of the panel. Insert a Panel Stretch Layout between the ui:composition tags from the Components palette and set the following attributes:
- startWidth: 350px
- inlineStyle: margin:10px;
- dimensionsFrom: parent
-
Insert a second Panel Stretch Layout component in the start facet of the first Panel Stretch layout and set the following attribute:
- topHeight: 40px
-
Insert a Panel Group Layout component inside the top facet of the inner Panel Stretch Layout. Set the layout attribute to horizontal.
-
Insert an Input Text Component inside the Panel Group Layout and set the following attributes:
- label: Name
- value: #{pageFlowScope.alphaNameFilter}
-
Insert a Spacer component after the Input Text component and set its width attribute to 12px.
-
From the Data Controls panel on the left, expand the AddressBookDC node and drag the getAddressBookList() method onto the page fragment after the Spacer component.
You will be prompted to specify the type of component to add.
-
Select ADF Button and change the text attribute to Search.
-
Insert a Spacer component after the ADF Button and set its width attribute to 8px.
-
Insert a Button component after the Spacer, set its action attribute to exit, and then set its text attribute to Close.
-
From the Data Controls panel, drag the rowset member in addressBook > fs_P01012_W01012B > data > gridData into the center facet of the inner Panel Stretch Layout.
You will be prompted to specify the type of component to add.
-
Select Table/List View > ADF List View and then click Next and Finish to add the component.
-
Delete the separator facet inside of the Panel Group Layout.
-
Select the Bindings tab at the bottom of the panel.
-
In the Bindings list on the left, highlight the rowset binding and click the pencil icon to edit the binding.
-
On the Edit Tree Binding form, click the green '+' icon and select mnAddressNumber_19.
-
Select the parent folder, click the green icon again, and then select SAlphaName_20. You can ignore the "Rule Already Exists for the selected Accessor" error.
-
Click the OK button to save the binding changes.
-
In the Bindings list, click the green '+' icon to add a new binding.
-
On the Insert Item form, select action from the list and click the OK button.
-
On the Create Action Binding form, expand the AddressBookDC node and select the Execute operation under addressBookDetail.
-
Click the OK button to add the binding.
-
Click the green '+' icon again to add a second binding.
-
On the Insert Item form, select methodAction from the list and click the OK button.
-
On the Create Action Binding form, expand the AddressBookDC node and select the addressSelected(SelectionEvent) method. Click the OK button to add the binding.
-
Click Save All from the toolbar.
-
Select the Source tab at the bottom of the panel.
-
Insert an Output Text Component inside the Panel Group Layout of the List View and set the value attribute to #{item.mnAddressNumber_19.bindings.value.inputValue} - #{item.SAlphaName_20.bindings.value.inputValue}.
-
Set focus on the List View component and then select the Edit option next to the SelectionListener property in the Properties panel.
-
On the Edit Property form, click the New button next to the Managed Bean drop-down list, and set the following fields:
- Bean Name: addressBookListenerBean
- Class Name: AddressBookListenerBean
- Scope: request (Use default)
-
Click the OK button to create the class and the managed bean declaration in the E01012_AddressBook_BTF.xml.
-
Select the New button next to the Method drop-down list and set the following field:
- Method Name: addressRecordSelected
-
Click the OK button to create the method and click OK again to close the Edit Property form.
-
Set the List View binding attribute to #{addressBookListenerBean.listView} and the selection attribute to single.
-
Set focus on the List View component and then select the Edit option next to the PartialTriggers property in the Properties panel.
-
On the Edit Property: PartialTriggers form, expand the top facet and panel group layout components and double-click button-b1 from the Available panel to move it to the Selected panel.
-
Click the OK button to set the attribute value.
-
In the Projects panel, expand the ViewController and Application Sources nodes and open the com.oracle.e1.E01012.view.AddressBookListenerBean.java class.
-
Add the code shown below to AddressBookListenerBean.java.
private RichPanelFormLayout form; private RichListView listView; public AddressBookListenerBean() { } public void addressRecordSelected(SelectionEvent event) { BindingContainer bc = BindingContext.getCurrent().getCurrentBindingsEntry(); OperationBinding addressSelected = bc.getOperationBinding("addressSelected"); if (addressSelected != null) { Map args = addressSelected.getParamsMap(); args.put("selectionEvent", event); addressSelected.execute(); // Refresh detail panel. AdfFacesContext.getCurrentInstance().addPartialTarget(form); } } public void resetListViewSelectedItem() { listView.setSelectedRowKeys(new RowKeySetTreeImpl()); } public void setForm(RichPanelFormLayout form) { this.form = form; } public RichPanelFormLayout getForm() { return form; } public void setListView(RichListView listView) { this.listView = listView; } public RichListView getListView() { return listView; } -
Save changes to AddressBookListenerBean and build the class.
A.3.6 Creating Address Book Detail Panel
-
From the Components palette, insert a Panel Tabbed component into the center facet of the outer Panel Stretch Layout.
-
On the Create Panel Tabbed form, set the Text column to Address Book and select the Selected radio button in the grid row.
-
Click the OK button to create the component.
-
From the Data Controls panel, drag the addressBookDetail member into the Show Detail Item of the Panel Tabbed component. You will be prompted to specify the type of component to add. Select ADF Form.
-
On the Create Form window, arrange the order of the fields and set the display labels as follows:
- addressNumber: Address Number
- alphaName: Name
- searchType: Search Type
- taxId: Tax Id
- businessUnit: Business Unit
- mailingName: Mailing Name
- address: Address
- city: City
- state: State
- zipCode: Zip Code
-
Click the OK button to add the component.
-
Set focus on the Panel Form Layout component and then select the Edit option next to the PartialTriggers property in the Properties panel.
-
On the Edit Property: PartialTriggers form, expand the start facet of the outer Panel Stretch Layout, expand the top facet and panel group layout components of the inner Panel Stretch Layout, and double-click button - b1 from the Available panel to move it to the Selected panel. Click the OK button to set the attribute value.
-
Set the following attribute:
binding='#{addressBookListenerBean.form}'
-
Set the Alta skin following the instructions in Section A.4.2, "Skinning".
-
The AddressBookList.jsff page fragment should look like the following:
<ui:composition xmlns:ui="http://java.sun.com/jsf/facelets" xmlns:af="http://xmlns.oracle.com/adf/faces/rich" xmlns:f="http://java.sun.com/jsf/core">
    <af:panelStretchLayout id="psl1" startWidth="350px" inlineStyle="margin: 10px;" dimensionsFrom="parent">
        <f:facet name="bottom"/>
        <f:facet name="center">
            <af:panelTabbed position="above" id="pt1">
                <af:showDetailItem id="tab1" text="Address Book" disclosed="true">
                    <af:panelFormLayout id="pfl1" binding="#{addressBookListenerBean.form}" partialTriggers="b1">
                        <af:inputText value="#{bindings.addressNumber.inputValue}" label="Address Number"
                                      required="#{bindings.addressNumber.hints.mandatory}" columns="#{bindings.addressNumber.hints.displayWidth}"
                                      maximumLength="#{bindings.addressNumber.hints.precision}" shortDesc="#{bindings.addressNumber.hints.tooltip}"
                                      id="it11">
                            <f:validator binding="#{bindings.addressNumber.validator}"/>
                        </af:inputText>
                        <af:inputText value="#{bindings.alphaName.inputValue}" label="Name" required="#{bindings.alphaName.hints.mandatory}"
                                      columns="#{bindings.alphaName.hints.displayWidth}" maximumLength="#{bindings.alphaName.hints.precision}"
                                      shortDesc="#{bindings.alphaName.hints.tooltip}" id="it2">
                            <f:validator binding="#{bindings.alphaName.validator}"/>
                        </af:inputText>
                        <af:inputText value="#{bindings.searchType.inputValue}" label="Search Type" required="#{bindings.searchType.hints.mandatory}"
                                      columns="#{bindings.searchType.hints.displayWidth}" maximumLength="#{bindings.searchType.hints.precision}"
                                      shortDesc="#{bindings.searchType.hints.tooltip}" id="it3">
                            <f:validator binding="#{bindings.searchType.validator}"/>
                        </af:inputText>
                        <af:inputText value="#{bindings.taxId.inputValue}" label="Tax Id" required="#{bindings.taxId.hints.mandatory}"
                                      columns="#{bindings.taxId.hints.displayWidth}" maximumLength="#{bindings.taxId.hints.precision}"
                                      shortDesc="#{bindings.taxId.hints.tooltip}" id="it4">
                            <f:validator binding="#{bindings.taxId.validator}"/>
                        </af:inputText>
                        <af:inputText value="#{bindings.businessUnit.inputValue}" label="Business Unit"
                                      required="#{bindings.businessUnit.hints.mandatory}" columns="#{bindings.businessUnit.hints.displayWidth}"
                                      maximumLength="#{bindings.businessUnit.hints.precision}" shortDesc="#{bindings.businessUnit.hints.tooltip}"
                                      id="it5">
                            <f:validator binding="#{bindings.businessUnit.validator}"/>
                        </af:inputText>
                        <af:inputText value="#{bindings.mailingName.inputValue}" label="Mailing Name"
                                      required="#{bindings.mailingName.hints.mandatory}" columns="#{bindings.mailingName.hints.displayWidth}"
                                      maximumLength="#{bindings.mailingName.hints.precision}" shortDesc="#{bindings.mailingName.hints.tooltip}"
                                      id="it6">
                            <f:validator binding="#{bindings.mailingName.validator}"/>
                        </af:inputText>
                        <af:inputText value="#{bindings.address.inputValue}" label="Address" required="#{bindings.address.hints.mandatory}"
                                      columns="#{bindings.address.hints.displayWidth}" maximumLength="#{bindings.address.hints.precision}"
                                      shortDesc="#{bindings.address.hints.tooltip}" id="it7">
                            <f:validator binding="#{bindings.address.validator}"/>
                        </af:inputText>
                        <af:inputText value="#{bindings.city.inputValue}" label="City" required="#{bindings.city.hints.mandatory}"
                                      columns="#{bindings.city.hints.displayWidth}" maximumLength="#{bindings.city.hints.precision}"
                                      shortDesc="#{bindings.city.hints.tooltip}" id="it8">
                            <f:validator binding="#{bindings.city.validator}"/>
                        </af:inputText>
                        <af:inputText value="#{bindings.state.inputValue}" label="State" required="#{bindings.state.hints.mandatory}"
                                      columns="#{bindings.state.hints.displayWidth}" maximumLength="#{bindings.state.hints.precision}"
                                      shortDesc="#{bindings.state.hints.tooltip}" id="it9">
                            <f:validator binding="#{bindings.state.validator}"/>
                        </af:inputText>
                        <af:inputText value="#{bindings.zipCode.inputValue}" label="Zip Code" required="#{bindings.zipCode.hints.mandatory}"
                                      columns="#{bindings.zipCode.hints.displayWidth}" maximumLength="#{bindings.zipCode.hints.precision}"
                                      shortDesc="#{bindings.zipCode.hints.tooltip}" id="it10">
                            <f:validator binding="#{bindings.zipCode.validator}"/>
                        </af:inputText>
                    </af:panelFormLayout>
                </af:showDetailItem>
            </af:panelTabbed>
        </f:facet>
        <f:facet name="start">
            <af:panelStretchLayout id="psl2" topHeight="40px">
                <f:facet name="bottom"/>
                <f:facet name="center">
                    <af:listView value="#{bindings.rowset.collectionModel}" var="item" binding="#{addressBookListenerBean.listView}"
                                 emptyText="#{bindings.rowset.viewable ? 'No data to display.' : 'Access Denied.'}"
                                 fetchSize="#{bindings.rowset.rangeSize}" id="lv2" selection="single"
                                 selectionListener="#{addressBookListenerBean.addressRecordSelected}" partialTriggers="::b1">
                        <af:listItem id="li2">
                            <af:panelGroupLayout layout="horizontal" id="pgl3">
                                <af:outputText value="#{item.mnAddressNumber_19.bindings.value.inputValue} - #{item.SAlphaName_20.bindings.value.inputValue}"
                                               id="ot1"/>
                            </af:panelGroupLayout>
                        </af:listItem>
                    </af:listView>
                </f:facet>
                <f:facet name="start"/>
                <f:facet name="end"/>
                <f:facet name="top">
                    <af:panelGroupLayout layout="horizontal" id="pgl1">
                        <af:inputText label="Name" value="#{pageFlowScope.alphaNameFilter}" id="it1" columns="22" maximumLength="25"/>
                        <af:spacer width="12px" id="s1"/>
                        <af:button actionListener="#{bindings.getAddressBookList.execute}" text="Search"
                                   disabled="#{!bindings.getAddressBookList.enabled}" id="b1"/>
                        <af:spacer width="8px" id="s2"/>
                        <af:button text="Close" action="exit" id="b2"/>
                    </af:panelGroupLayout>
                </f:facet>
            </af:panelStretchLayout>
        </f:facet>
        <f:facet name="end"/>
        <f:facet name="top"></f:facet>
    </af:panelStretchLayout>
</ui:composition>
A.3.7 Creating the ADF Test Page
-
In the Projects panel, right-click the ViewController project, select New, and then select Page.
-
On the Create JSF Page form, set the file name to E01012TestPage.jsf, verify the Facelets radio button is selected, and click the OK button. The new page will display in the main panel.
-
Change to source view.
-
Change the title attribute of the af:document tag to "E01012 Address Book."
-
From the Projects panel, select the E01012_AddressBook_BTF from the ViewController > Web Content > Page Flow folder and insert between the af:form tags. From the Create context menu that displays next, select Region.
-
The E01012TestPage.jsf should look like the following code:
A.3.8 Finding the ADF Bounded Task Flow ID
Each ADF bounded task flow has a unique ID composed of the task flow definition ID and the document name. This composite ID is used when creating EnterpriseOne menu tasks for ADF applications.
To find the ADF bounded task flow ID
-
Open the test page created in the previous section and select the Bindings tab in the Editor window.
-
On the Binding Definition page, select the taskflow binding from the Executables list and click the Edit button.
-
The task flow id is located at the top of the Edit Task Flow Binding form, as shown in the following graphic:
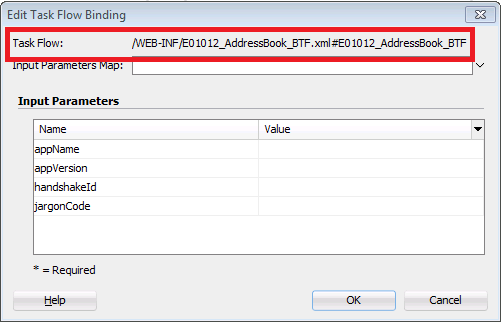
Description of the illustration taskflowidform.png
Record the task flow id value and enter it in the Path field for ADF Application menu tasks in the Solution Explorer Interactive Application (P9000).
A.3.9 Running the Test Page
-
In the Projects panel, expand the ViewController and Web Content nodes.
-
Right-click the E01012TestPage.jsf and select Run.
JDeveloper will start the Integrated WebLogic Server, deploy the web application, and display the test page in the default browser. If you have not yet created the default WLS domain, JDeveloper will prompt you for an admin id and password before starting the Integrated WLS.
A.3.10 Creating ADF Library JAR File
Once your ADF application is complete, it must be packaged in an ADF Library JAR file before it can be launched from an EnterpriseOne menu and run in the JDEADFContainer.
-
In the Projects panel, right-click the ViewController project, select Deployment, and then select New Deployment Profile.
-
On the Create Deployment Profile form, select ADF Library JAR File for the Profile Type and specify a Deployment Profile Name, like E01012, which will also be the name of the generated JAR file.
-
Click the OK button.
-
Right-click the ViewController project again, select Deployment, and select the new deployment profile.
-
Click Finish.
The new JAR file will be stored in the deploy folder in the ViewController directory. Review section Installing EnterpriseOne ADF Applications in the JD Edwards EnterpriseOne Application Developer Framework (ADF) Configuration Configuration Guide for instructions on building and deploying this JAR file within the EnterpriseOne ADF library WAR file.
A.4 Other Considerations
This section list additional considerations when creating and building ADF applications.
A.4.1 Translations
ADF applications are not translated so all labels must come from EnterpriseOne so that they can be translated. The following list describes two ways to accomplish this task:
-
Use Jargon service to get the values from the Data Dictionary. The Use Jargon for Labels.docx contains instructions for using Jargon. This is the recommended approach when you are using an existing EnterpriseOne application.
-
The second approach is recommended if you are creating a new EnterpriseOne application to support your ADF application. In your new EnterpriseOne application create a form (that will not be used by customers) and add Form Controls to it with the text values that need to be translated.
A.4.2 Skinning
When an ADF application is created, JDeveloper 12c assigns Skyros as the default skin. However, when the ADF application launches from an E1 menu and runs inside the JDEADFContainer, the ADF application is rendered using the Alta skin instead of Skyros. In order to use the Alta skin when running the test page locally on JDeveloper's Integrated WLS, you need to modify the trinidad-config.xml file under ViewController/Web Content/WEB-INF to match the following:
<?xml version="1.0" encoding="windows-1252"?>
<trinidad-config xmlns="http://myfaces.apache.org/trinidad/config">
<skin-family>alta</skin-family>
<skin-version>v1</skin-version>
</trinidad-config>
It is important to note that the JDEADFContainer has extended the Alta skin, so only the Calendar component renders using Skyros styles. If your ADF application uses this component and you have changed the trinidad-config.xml file to use Alta, then the Calendar component will render differently when run locally versus running inside the JDEADFContainer.
A.5 Steps to Perform for a New ADF Application
This section provides a list of steps to help you create a new ADF application. It also provides links to sections in this guide that discusses in more detail how those steps are executed.
-
Create a new ADF web application in JDeveloper.
-
Add the "about.properties" file.
-
Change the default skin from Skyros to Alta.
-
Create the EnterpriseOne proxy application and version.
See Section 7.1.1, "Understanding Processing Options in Proxy Applications".
-
Generate form service classes using the AIS Client Class Generator extension for JDeveloper.
See Appendix A, "Generating Form Service Foundation Classes for the Data Model".
-
Create the Data Control class.
SeeAppendix A, "Creating the Data Control Class" and Appendix A, "Populating Address Book List and Creating the Data Control".
-
Retrieve the EnterpriseOne proxy application's processing option values.
See Section 7.1.2, "Retrieving Proxy Application's Processing Options"and Example A-5.
-
Retrieve Jargon text from EnterpriseOne for component labels in ADF application.
-
Perform AIS service requests to retrieve data from or insert/update data to EnterpriseOne.
See Chapter 6, "Executing AIS Calls for Retrieving Data", and Example A-5 in Appendix A.
-
Create a bounded task flow.
-
Create view page fragments and bind the Data Control to ADF UI components.
See Section A.3.5, "Creating Address Book Search Panel", and Section A.3.6, "Creating Address Book Detail Panel".
-
Create and run test page for ADF application.
See Section A.3.7, "Creating the ADF Test Page", and Section A.3.9, "Running the Test Page".
-
Find the ADF Bounded Task Flow ID.
-
Package ADF bounded task flow into ADF Library JAR file.
-
Deploy application JAR in the ADF Library WAR on the ADF server.
-
Create an EnterpriseOne menu task to launch the ADF application.
See Creating a Task in the JD Edwards EnterpriseOne Tools Solution Explorer Guide.