4 Using the AIS Client Class Generator
This chapter contains the following topic:
-
Section 4.1, "Understanding Generating Objects with the AIS Client Class Generator"
-
Section 4.2, "Configuring the AIS Client Class Generator Preferences"
Important:
If you have not yet installed the AIS Client Class Generator, see Installing the AIS Client Class Generator Extension for JDeveloper in this guide.4.1 Understanding Generating Objects with the AIS Client Class Generator
A form service call to the AIS Server, otherwise referred to as a form service request, results in a response that contains a string in JSON format. In JDeveloper, you can access and use the AIS Client Class Generator to transform the response into object form because objects are easier to work with than strings. The AIS Client Class Generator generates classes matching the form.
4.2 Configuring the AIS Client Class Generator Preferences
The AIS Client Class Generator is available as a JDeveloper extension. You must install the extension before you can configure the preferences. See Chapter 2, "Getting Started" in this guide for instructions on how to install the extension.
To configure the AIS Client Class Generator:
-
In JDeveloper, access Preferences:
On Microsoft Windows, select the Tools menu, Preferences.
On Mac, select the JDeveloper menu, Preferences.
-
Select AIS Client Class Generator.
-
On Preferences, complete the following fields to specify the AIS Server location and AIS Server information:
-
AIS Server URL. This is a fully qualified URL to the AIS Server that includes the protocol, server, and port number. For example:
http://myaisserver.com:8474 -
JAS Server URL. (Optional) This is the URL to the EnterpriseOne HTML Server. Enter a URL only if you want to override the JAS Server URL configured on the AIS Server.
-
Username. Enter a JD Edwards EnterpriseOne user name.
-
Password. Enter a JD Edwards EnterpriseOne user password.
-
Environment. (Optional) Enter a value only if you want to override the environment configured on the AIS Server.
-
Role. (Optional) Enter a value only if you want to override the role configured on the AIS Server.
-
JSON Files Folder. The folder for storing the JSON files. The default location is the
AISClientClassGenerator\inputdirectory. -
Default Java Classes Folder. The folder for storing generated Java files.
The AIS Client Class Generator uses this folder only when it is run without a project open in JDeveloper. When a project is open in JDeveloper, the generator stores the Java files in the source directory for the project at the defined package path or the default package path which is
com.oracle.e1.formservicetypes. -
Java Package. The Java package name for the generated classes. The default is
com.oracle.e1.formservicetypes.
-
-
Click OK.
4.3 Generating Data Classes Based on a Form
Use the AIS Client Class Generator to generate data classes for an EnterpriseOne form. In the AIS Client Class Generator, you supply the service request information.
Note:
The AIS Client Class Generator supports form interconnects only; it does not support form events.To use the AIS Client Class Generator to generate data classes:
-
In JDeveloper, select the ApplicationController project.
JDeveloper will save the classes generated by the AIS Client Class Generator in this location.
-
Select the Tools menu, AIS Client Class Generator.
-
Click the Form Service radio button. (Available in AIS Client Class Generator v1.6.2.)
-
On AIS Client Class Generator, complete the following fields to supply the service request information:
-
Username. This contains the default value entered in the preferences.
-
Password. This contains the default value entered in the preferences.
-
Environment. This contains the default value entered in the preferences.
-
Role. This contains the default value entered in the preferences.
-
Application Name. Enter the name of the EnterpriseOne application.
-
Form Name. Enter the name of the EnterpriseOne application form.
-
Version. (Optional) Enter the version name. If you leave it blank, the generator will use ZJDE0001 by default.
-
MaxPageSize. (Optional)
-
ReturnControlIDs. (Optional) Use this field to specify the exact fields on the form that you want generated. The return control IDs can specify hidden fields or a subset of fields.
-
FormInputs. (Optional)
-
FormServiceAction. Enter the action to be performed. Valid values include: Create, Read, Update, Delete.
-
FindOnEntry. (Optional)
-
DemoMode. (Optional, but recommended) This ensures at least one grid row is present, so grid classes are generated even if there is no data in the database.
-
-
Make sure to select the Preview JSON Data and Keep JSON Files check boxes if you want to preview and keep the JSON files.
-
Click the Generate button to generate the JSON, and then in the preview, verify that it has the fields and records you need.
-
Click Continue to generate the Java files.
If successful, a confirmation message appears that shows the location of the JSON and Java class files.
-
Click OK and close the generator.
-
Highlight the Application Controller project and then click the "refresh" button to display the new files.
The AIS Client Class Generator displays a dialog box that shows where the classes are saved.
Example 4-1 Example of Classes Generated from the AIS Client Class Generator
This example shows the generated classes for form W01012B in application P01012.
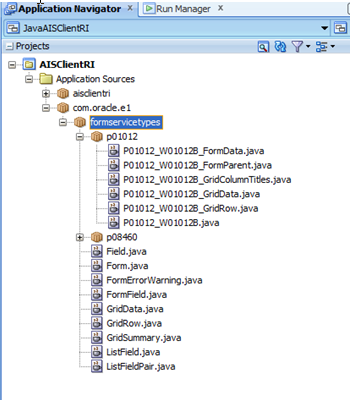
Notice that the structure of the generated classes in JDeveloper represent the EnterpriseOne form. The form fields are in the class P01012_W01012B_FormData; the grid data is also within that form. Inside the P01012_W01012B_GridData class is a rowset that contains the grid records. Each row in the rowset is from the P01012_W01012B_GridRow class, which is where all the columns are listed.
JSON string responses for the P01012_W01012B form can now be de-serialized into these classes.
If you need any fields on the form that have not been generated, you can add them manually. The code in Example 4-2 shows an example of additional hidden grid columns added to the _GridRow class.
Field sAddressLine1_40  = new Field();
Field sCity_44  = new Field();
Field SPrefix_81  = new Field();
Field sPhoneNumber_46  = new Field();

public void setsAddressLine1_40(Field sAddressLine1_40)
{
this.sAddressLine1_40 = sAddressLine1_40;
}
public Field getSAddressLine1_40()
{
return sAddressLine1_40;
}
public void setsCity_44(Field sCity_44)
{
this.sCity_44 = sCity_44;
}
public Field getSCity_44()
{
return sCity_44;
}
public void setsPrefix_81(Field SPrefix_81)
{
this.SPrefix_81 = SPrefix_81;
}
public Field getSPrefix_81()
{
return SPrefix_81;
}
public void setsPhoneNumber_46(Field sPhoneNumber_46)
{
this.sPhoneNumber_46 = sPhoneNumber_46;
}
public Field getSPhoneNumber_46()
{
return sPhoneNumber_46;
}
4.4 Generating Data Classes Based on a Data Request (Available in AIS Client Class Generator v1.6.2)
Starting with EnterpriseOne Tools 9.1.5.5, the dataservice endpoint is available to enable an AIS client to receive responses from EnterpriseOne that contain either a count or a list of records matching a query of a table or view. You can use the AIS Client Class Generator to generate data classes based on the data request.
To use the AIS Client Class Generator to generate data classes based on the data request:
-
In JDeveloper, select the ApplicationController project.
JDeveloper will save the classes generated by the AIS Client Class Generator in this location.
-
Select the Tools menu, AIS Client Class Generator.
-
Click the Data Service radio button. (Available in AIS Client Class Generator v1.6.2.)
-
On AIS Client Class Generator, complete the following fields to supply the service request information:
-
Username. This contains the default value entered in the preferences.
-
Password. This contains the default value entered in the preferences.
-
Environment. This contains the default value entered in the preferences.
-
Role. This contains the default value entered in the preferences.
-
Target Type. This is the table or view based on the object on which the query is performed.
-
Target Name. The object name to be queried, for example
F0101orV0101A. -
ReturnControlIDs. (Optional) Use this field to specify the exact fields on the form that you want generated. Specify fields by Table.Column, for example F0101.AN8 and F0101.ALPH.
-
MaxPageSize. (Optional)
-
FindOnEntry. (Optional)
-
DemoMode. (Optional, but recommended) This ensures at least one grid row is present, so grid classes are generated even if there is no data in the database.
-
-
Make sure to select the Preview JSON Data and Keep JSON Files check boxes if you want to preview and keep the JSON files.
-
Click the Generate button to generate the JSON, and then in the preview, verify that it has the fields and records you need.
-
Click Continue to generate the Java files.
If successful, a confirmation message appears that shows the location of the JSON and Java class files.
-
Click OK and close the generator.
-
Highlight the Application Controller project and then click the "refresh" button to display the new files.
The AIS Client Class Generator displays a dialog box that shows where the classes are saved.
Example 4-3 Example of Classes Generated from the AIS Client Class Generator Data Request
This example shows the generated classes for data in the F0101_AN8 and F0101_ALPH columns.
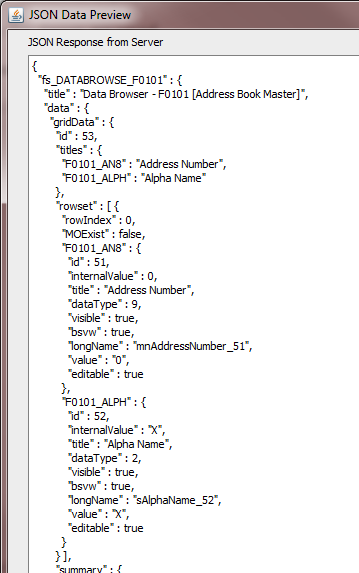
Description of the illustration ''classgenrtr_datareqst.png''