5 Working With SnapShot on the Deployment Server
Note:
Tools Release 9.1 Update 2. This entire chapter is revised to support a significantly enhanced version of SnapShot that is available with Tools Release 9.1 Update 2 and higher. For the version of SnapShot that was included with the base release of JD Edwards EnterpriseOne Tools Release 9.1, refer to the appendix of this guide entitled: Appendix D, "Working With SnapShot on the Deployment Server (Base Release of Tools Release 9.1)".This section discusses these topics:
5.1 Understanding SnapShot
The SnapShot program manages multiple instances of JD Edwards EnterpriseOne Deployment Servers or Development Clients on a single machine. Using this program you can save and restore copies of an installed Deployment Server or Development Client. For instructions on using SnapShot with the Development Client, refer to the JD Edwards EnterpriseOne Development Client Installation Guide.
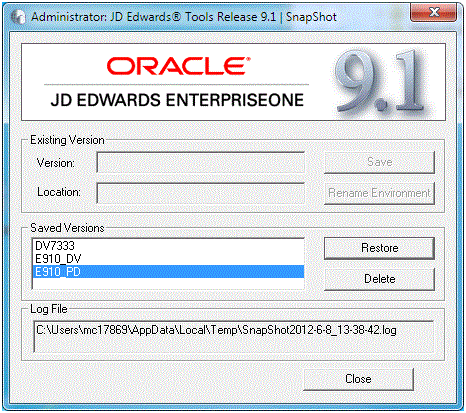
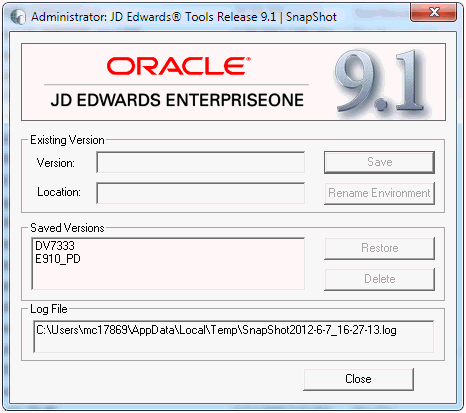
Below is an example of SnapShot managing multiple tools releases including B7333 (DV7333) and two installations of E910 (E910_DV and E910_PD).
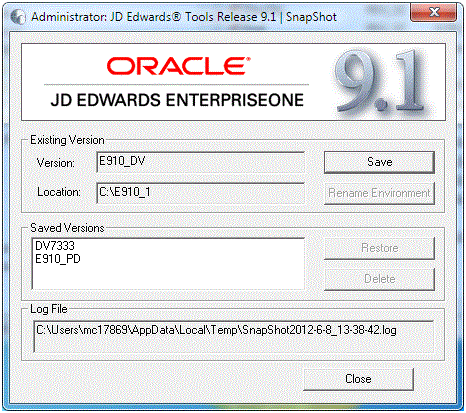
The preceding image shows the JD Edwards main SnapShot window. The main features of this window, from top to bottom, include:
-
Close (icon)
The Close icon is located in the upper right hand corner. Click this icon to exit
SnapShot.exe. -
System (icon)
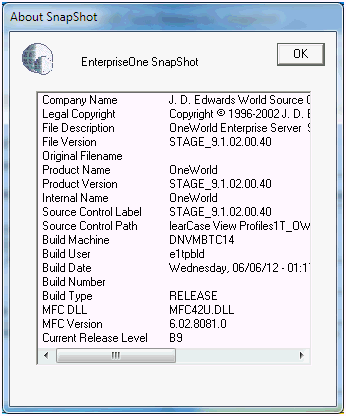
The System icon is located in the upper left hand corner. Click on this icon or right-click on the title bar to display a drop-down menu that contains "About EnterpriseOne SnapShot…." Selecting this item displays version and build information about SnapShot as shown below:
-
Existing Version
The Existing Version area contains these fields and buttons:
-
Version
The Version field lists the existing installed Deployment Server. Initially, this is the release specified in the installed package. After you save and then restore a SnapShot, this field will be the name that you gave the SnapShot when you saved it.
-
Location
The Location field shows the JD Edwards EnterpriseOne installation directory.
-
Save
Use the Save button to save the installed JD Edwards EnterpriseOne to a SnapShot.
-
Rename
Use the Rename Environment button to rename the path code and environment names of the installed JD Edwards EnterpriseOne. This function is not available on the Deployment Server.
-
-
Saved Versions
The Saved Versions area contains a field that lists saved versions (also called SnapShots). The example in this image shows the following versions: DV7333 and E910_PD.
-
Restore
Use the Restore button to restore a saved version (SnapShot) to a runnable JD Edwards EnterpriseOne installation.
-
Delete
Use the Delete button to remove a saved version (SnapShot).
-
Log File
The Log File area displays the log file path and name.
-
Close
Use the Close button to exit
SnapShot.exe.
5.2 Prerequisites
Before saving or restoring a JD Edwards EnterpriseOne installation using SnapShot, be sure that:
-
You are signed into Microsoft Windows using an account with sufficient privileges (for example: read, write, execute) to the registry and to the JD Edwards EnterpriseOne installation and saved directories.
-
All JD Edwards EnterpriseOne programs are closed.
-
No applications (for example, Windows Explorer) have a file or subfolder open in either the installation or the saved directory or one of their subdirectories.
-
The
SnapShot.exethat you are running is not in either the installation or the saved directory or one of their subdirectories. -
The database(s) that both the JD Edwards EnterpriseOne installation and the saved SnapShot use is installed and running.
-
Ensure that the Oracle product JDeveloper is not running.
Additional considerations:
-
Before installing a new Deployment Server into a new Oracle Home, make sure you do not have any previous versions in the Existing Version field of SnapShot. All versions must be saved and should appear in the Saved Versions field.
5.3 Using Snapshot on the Deployment Server
To use SnapShot with multiple releases of the JD Edwards EnterpriseOne applications, you must use the most current version of SnapShot when switching between different releases of JD Edwards EnterpriseOne. For example, if you install the foundation code for both JD Edwards EnterpriseOne Applications Release 9.1 and Applications Release 8.12, you must use the version of SnapShot corresponding to the most current JD Edwards EnterpriseOne tools release, in this case, Tools Release 9.1.
This section describes these tasks:
5.3.1 Starting SnapShot
Caution:
Be sure to follow the guidelines in the preceding sections of this guide entitled:-
Section 1.5, "Microsoft Windows Security"
As noted in this section, with the Tool Release 9.1 Update 2 and later version of SnapShot, you do not have to right click on the
SnapShot.exeicon and select "Run as administrator." This is because these versions ofSnapShot.exeare designed to automatically attempt to start with the elevated permissions. If you are not signed into Windows with an administrative account, you will be prompted to enter the credentials for an administrative account.
The SnapShot utility is delivered with the installation of both the JD Edwards EnterpriseOne Deployment Server and the Development Client workstations. It is located in this directory:
<JDE_dep_server_or_dev_client_installation_directory>\System\Bin32
To run the most current version of SnapShot for multiple releases, you must copy the SnapShot.exe program to a directory outside the Deployment Server installation directory. For example, the installation directory might be c:\E910. If you attempt to run SnapShot from within the Deployment Server installation directory (for example, c:\E910) the application will display an error message.
Tip:
You can create a shortcut toSnapShot.exe, but you still must copy SnapShot.exe to a location outside the original installation directory where it was delivered.5.3.2 Saving a SnapShot
To save a SnapShot:

-
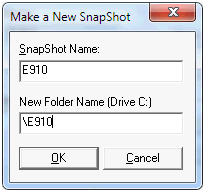
On the main SnapShot window, click the Save button.
-
On Make a New SnapShot, complete this field:
-
SnapShot Name
Enter a name for the SnapShot that will be saved. You may choose any name with the exceptions that the name cannot be empty and it cannot contain a backslash ( '\' ). A recommended scheme is to make it release specific, for example, Xe, B9, or E910.
-
New Folder Name
SnapShot does not rename or move the installed directory on the Deployment Server; therefore, you cannot change the value in the New Folder Name field.
-
-
Click the OK button.
SnapShot saves a snapshot of the Deployment Server.
5.3.3 Restoring a SnapShot
To restore a SnapShot:
-
On the main SnapShot window and in the Saved Versions section, highlight the saved instance that you want to restore.
-
Click the Restore button.
SnapShot restores the selected instance of JD Edwards EnterpriseOne and makes it active.
5.3.4 Deleting a SnapShot
To delete a SnapShot:
-
On the main SnapShot window and in the Saved Versions section, highlight the instance that you want to delete.
-
Click the Delete button.
SnapShot completely removes the saved instance from the JD Edwards EnterpriseOne Deployment Server.
5.4 Manually Backing Up Files and Settings
Once you have saved a SnapShot for the Deployment Server, it is a good idea to manually backup the files to ensure that your settings for that Deployment Server are secure.
The files and subdirectories that need to be backed up are found in the folder of each saved snapshot. You should backup these files and subdirectories only while the SnapShot.exe program is not running. These files contain the information necessary to restore registry values and settings for each SnapShot.
5.5 Set Logging for SnapShot Using the Registry
The version of SnapShot that is shipped with Tools Release 9.1 Update 2 and later always outputs the maximum amount of logging information. Furthermore, by design there is no way to turn off logging. You can specify the name and location of the log file that is generated by adjusting a single registry setting.
Caution:
Changes made to the Microsoft Windows registry happen immediately, and no backup is automatically made. Do not edit the Windows registry unless you are confident about doing so.Microsoft has issued the following warning with respect to the Registry Editor:
"Using Registry Editor incorrectly can cause serious, system-wide problems that may require you to re-install Windows to correct them. Microsoft cannot guarantee that any problems resulting from the use of Registry Editor can be solved. Use this tool at your own risk."
By default, the SnapShot log is located in the temp directory of the Microsoft Windows user. This is the directory pointed to by the TEMP environment variable. You can determine the value of this TEMP variable in a number of ways including:
-
Control Panel > System
-
In a command prompt window, enter this command:
echo %TEMP% -
In the Address Bar of Windows Explorer, enter this string:
%TEMP%
The default log file name is SnapShot_<date-time>.log.
Both the directory and name of the SnapShot log can be specified by editing the registry; however, the date-time stamp will always be inserted immediately before the period.
To change the log file directory and/or name:
-
Open the registry by clicking on Windows Start button and entering
regeditin the search field. -
Navigate to this node:
\HKEY_LOCAL_MACHINE\Software\Wow6432Node\JDEdwards\SnapshotThe first time that you run SnapShot, it creates a value (shown on the right-hand pane in regedit) called LogFileName with the default value SnapShot.log. You can change this value or, if it does not exist yet, you can add the value with name LogFileName, type string value, and the directory and/or file name of your choice.
-
The rules listed below are used for determining the final log file directory and name based on the value of LogFileName:
-
In all cases, the date and time that
SnapShot.exeis run will be inserted immediately before the period in the extension of the file name. -
If the value of LogFileName does not contain any backslashes, the name represents only the file name. The value of the Windows TEMP variable will be used as the directory.
-
If the value of LogFileName contains backslashes but does not start with a drive letter or a backslash, everything up to the last backslash represents a subdirectory or hierarchy of subdirectories below the directory designated by the Windows TEMP variable. Everything after the last backslash is the file name.
-
If the value of LogFileName starts with a backslash, it represents a subdirectory below the root directory of the drive (that is, directory "\"). The drive letter is derived from the drive specified in the Windows TEMP variable.
-
If the value of LogFileName starts with a letter followed by a colon and backslash, the letter is considered the drive letter where the log will reside. Any other applicable rule in the preceding rules above then apply.
The following are examples of values of the LogFileName registry entry and the resulting log file path and name. In these examples, the assumed value of the TEMP variable is
C:\Users\John\AppData\Local\Tempand assumes the log was created on June 5, 2012, at 3:46:9 PM.Value for LogFileName Resulting Log File SnapShot.logC:\Users\John\AppData\Local\Temp\SnapShot_2012-6-5_15-46-9.logMyFile.txtC:\Users\John\AppData\Local\Temp\MyFile_2012-6-5_15-46-9.txtMyTempDir\MyFile.txtC:\Users\John\AppData\Local\Temp\MyTempDir\MyFile_2012-6-5_15-46-9.txtMyTempDir\MyFile.txtC:\MyTempDir\MyFile_2012-6-5_15-46-9.txtD:\MyTempDir\MyFile.txtD:\MyTempDir\MyFile_2012-6-5_15-46-9.txt -
-
Save the changes and exit the registry.
5.6 Troubleshooting
If SnapShot encounters a problem when trying to perform an action, it is designed to attempt to rollback the actions performed up to the point of failure. This means that during a save operation, SnapShot attempts to restore the JD Edwards EnterpriseOne instance back to a runnable state. If a failure occurs during a restore action, SnapShot attempts to resave the JD Edwards EnterpriseOne snapshot so you can correct the problem and then retry the action.
Caution:
If a second error occurs when SnapShot is attempting to rollback changes, the error will likely result in either a non-runnable instance of JD Edwards EnterpriseOne or a saved snapshot that is corrupt. In either case, you will probably need to reinstall JD Edwards EnterpriseOne.This section describes these topics:
5.6.1 Examining the Log File
When an error is encountered in SnapShot, the first thing that you should do is to carefully examine any on screen error messages for an indication of what went wrong and why. If you are not able to determine the cause and possible resolution of an error by examining the error message on the screen, examine the log file. As shown in the preceding screen example, the location and name of the log file is specified in the Log File section near the bottom of the main SnapShot window.
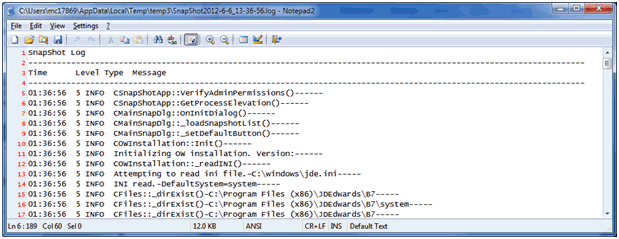
Above is an example of a SnapShot log file. When troubleshooting within the SnapShot log file, you should scan the Type column for a status of ERR, which indicates an error. If the error message itself is insufficient to isolate the cause of the problem, examine the messages immediately before and after the error for hints as to the root cause.
5.6.2 Remedial Actions
This section describes these topics:
5.6.2.1 Examples of Healthy Environments
This section illustrates a healthy JD Edwards EnterpriseOne installation and saved snapshot directories and registry settings.
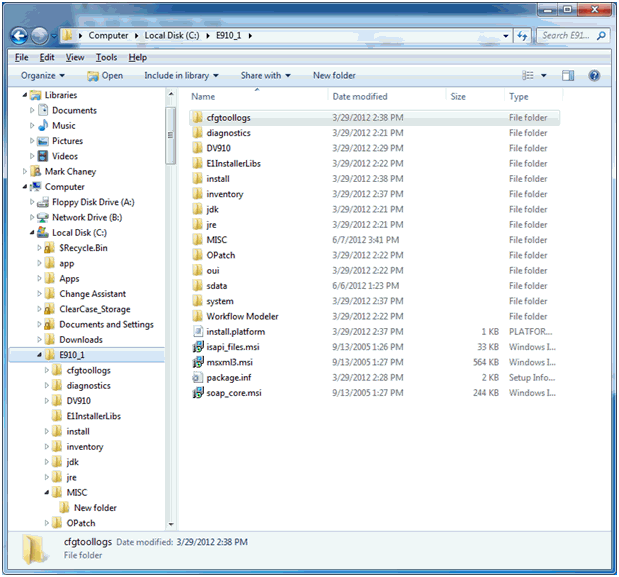
The preceding shows the installation directory of a healthy JD Edwards EnterpriseOne instance.
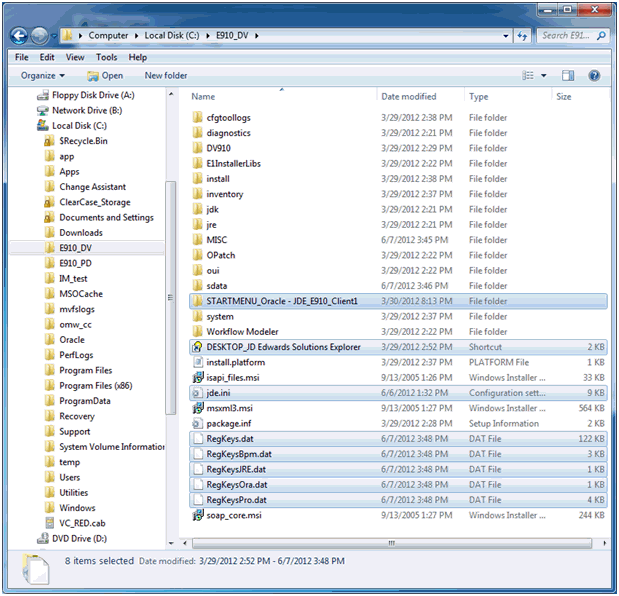
In the preceding example screen, note that when you save a snapshot of the JD Edwards EnterpriseOne installation, the highlighted files and subdirectory shown above are created. Here are brief descriptions of the new files and subdirectory.
-
STARTMENU*.*
The subdirectory that is prefixed with
STARTMENUis the folder in the Start menu for the original installation. -
DESKTOP*.*
The file that starts with
DESKTOPis the shortcut to JD Edwards EnterpriseOne that was on the desktop of the workstation. -
jde.ini
The
jde.inifile is the same file that was in thec:\Windowsdirectory. -
RegKeys*.*
The files that are prefixed with
RegKeysare binary files that contain the saved registry entries.
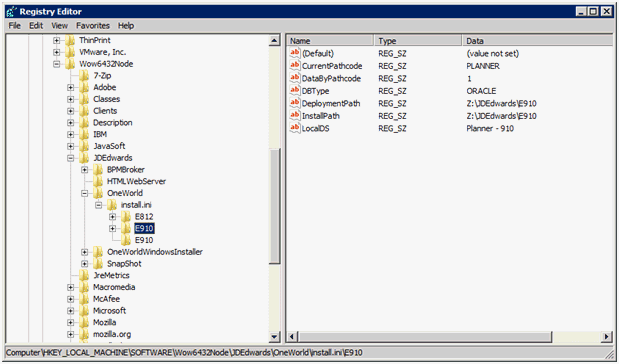
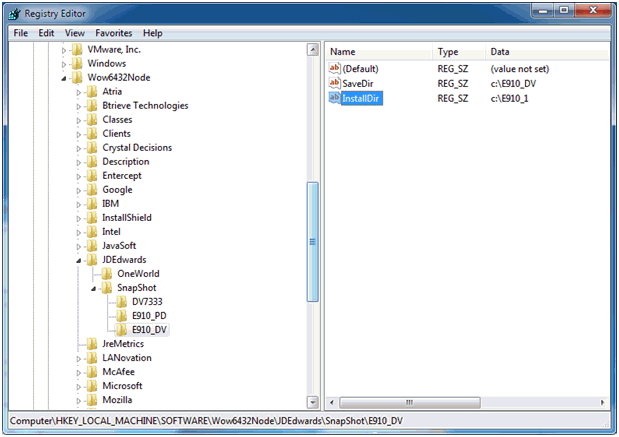
The preceding image shows the registry entries for a healthy JD Edwards EnterpriseOne Deployment Server installation.
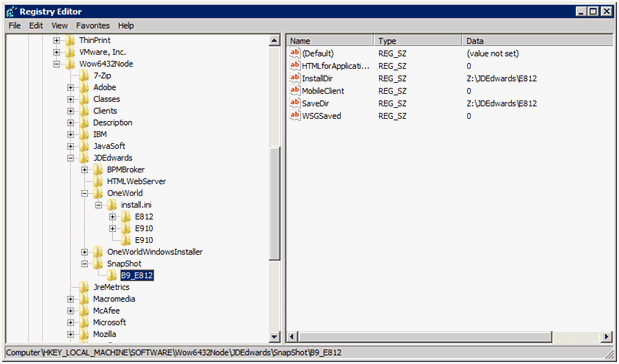
The preceding image shows the registry keys for a saved JD Edwards EnterpriseOne snapshot.
5.6.2.2 Simple Fixes
Not all issues can be resolved by simple steps. However this section describes a few simple fixes for these conditions:
5.6.2.2.1 Missing Version Information
If the Existing Version fields are empty when you run SnapShot.exe and you are certain that a JD Edwards EnterpriseOne instance is active, it is likely that this file is missing:
c:\Windows\jde.ini
If you happened to save a copy of the jde.ini file when you last saved a snapshot of this installation, you can copy that jde.ini file into the c:\Windows directory and rerun SnapShot.exe.
5.6.2.2.2 Missing Saved Version
If a saved snapshot is not listed in the Saved Versions field and you know that the saved snapshot exists, some registry entries are probably missing or pointing to the wrong directory.
To resolve this issue, perform these steps:
-
Edit the registry with
regedit.exe. -
Create a subkey under this path:
\HKEY_LOCAL_MACHINE\SOFTWARE\Wow6432Node\JDEdwards\SnapShotThe name that you give for the subkey should be the name of the saved snapshot.
-
Click on the subkey that you just created.
-
Create a string value called SaveDir.
-
Set the value data for this to the directory where the saved snapshot is stored.
-
Create a second string value called InstallDir.
-
Set the value data for this to the installation directory (that is, the directory in which the saved snapshot will be restored).
The following image illustrates properly configured registry entries.