24 Install an Oracle Configuration Manager (OCM) Instance
This chapter discusses:
24.1 Overview
Oracle Configuration Manager is an Oracle product that is used to collect data about your JD Edwards EnterpriseOne configuration and upload the data to a central repository at the Oracle site. It comes as part of Server Manager and can be installed and accessed from the Management Console in Server Manager.
Oracle Configuration Manager is included as part of the Management Agent installation. However, you must complete the installation by registering each Oracle Configuration Manager instance using your Oracle customer ID and MetaLink ID Number.
The Oracle Configuration Manager installation provides you with the option to set up a proxy server to use for communication between Oracle Configuration Manager and Oracle. If a proxy server is used to connect to the Internet, the proxy connection details must be supplied to Oracle Configuration Manager as part of the installation procedure.
Oracle Configuration Manager can be installed only on Microsoft Windows and Unix platforms; you cannot install Oracle Configuration Manager on IBM i.
Note:
Oracle Configuration Manager can be installed only by Oracle customers who have an Oracle Customer ID and an ID for My Oracle Support.Note:
You cannot remove an OCM instance. If you attempt to do so, the Management Console displays this error:
See Chapter 25, "Administer Oracle Configuration Manager (OCM)" for more information about Oracle Configuration Manager.
24.2 Prerequisites
Before you can install Oracle Configuration Manager on a managed home, you must:
-
Have an Oracle Customer Identification Number and Oracle MetaLink-ID Number.
Note:
JD Edwards EnterpriseOne customers who do not use Oracle database or application software cannot install Oracle Configuration Manager. -
Install a managed home.
24.3 Oracle Configuration Manager Manual Install
For Existing Installations of Server Manager. If previous to JD Edwards Enterprise Release 8.98.4 you have used Server Manager to install Oracle Configuration Manager, you must use the procedure in this section to manually deinstall your existing down-level version. Once the down-level OCM is deinstalled as described in this section, you can manually install the latest version as described in this section, or optionally you can install it using Server Manager as described in the next section of this guide entitled: Oracle Configuration Manager Install Using Server Manager.
For New Installations of Server Manager. The current release of Server Manager includes the current release of Oracle Configuration Manager. As a result, you must install Oracle Configuration Manager from Server Manager as described in the next section of this guide entitled: Oracle Configuration Manager Install Using Server Manager.
To install Oracle Configuration Manager:
-
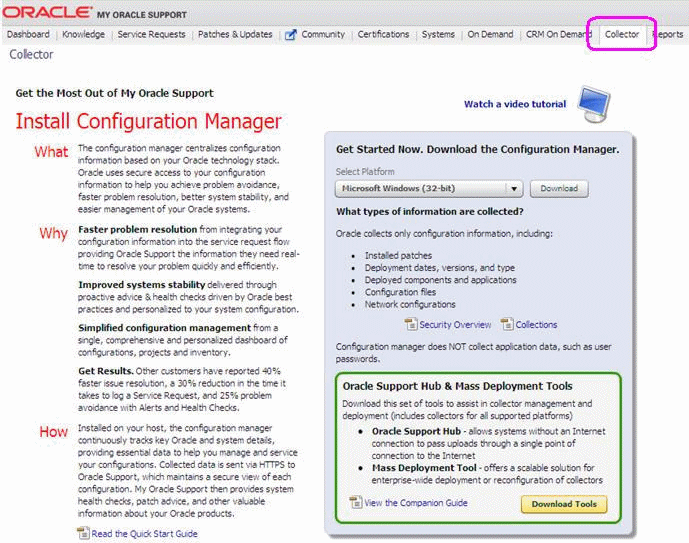
Navigate to My Oracle Support:
-
On My Oracle Support, select the Collector tab.
-
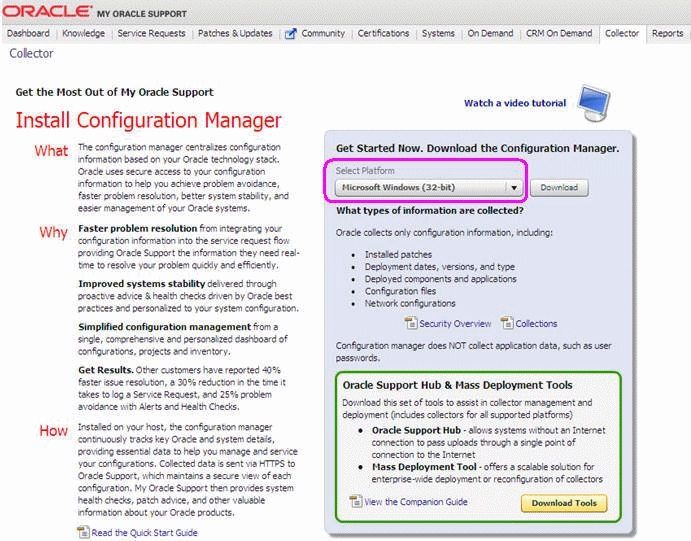
On Install Configuration Manager, in the pane for Get Started Now, select the platform on which the Oracle Configuration Manager will be installed. Typically this is your JD Edwards EnterpriseOne Deployment Server, which must run on a Microsoft Windows (32-bit) machine.

-
Once you have selected the platform, click the Download button.
-
On your Server Manager machine, navigate to the folder where Server Manager Agent is installed. For example:
C:\JDE_HOMENote:
If OCM (also called CCR at the code level) has never been installed, only put in place by a Server Manager Agent install, you can skip to Step 9. -
If Oracle Configuration Manager is running, navigate to the CCR bin folder. For example:
C:\JDE_HOME\ccr\bin -
Run this command to stop the Oracle Configuration Manager (CCR):
emCCR stop -
Once stopped, you must uninstall Oracle Configuration Manager (CCR) using this command:
configCCR -r -
Delete this folder:
ccr -
Extract downloaded zip file into agent folder:
C:\JDE_HOMEThis extracts a
ccrfolder andReadme.txtinto the Server Manager Agent installation folder.Note:
You can install the downloaded Oracle Configuration Manager (CCR) manually using the following step. Alternatively, you can install CCR from Server Manager Console. For the later method, refer to the next section in this chapter entitled: Oracle Configuration Manager Install Using Server Manager -
Navigate to the
ccr\binfolder. For example:C:\JDE_HOME\ccr\bin -
Run this command to manually install the Oracle Configuration Manager (CCR):
setupCCR -s Customer_Identification_Number MetaLink_ID Country_CodeNote:
You must supply valid values in place for theCustomer_Identification_NumberandMetaLink_IDparameters. The parameter forCountry_Codeis optional.The
-soption in the command indicates acceptance of the license agreement found at this link:See Administer Oracle Configuration Manager (OCM) for more information about log files and Oracle Configuration Manager configuration settings.
24.4 Oracle Configuration Manager Install Using Server Manager
For Existing Installations of Server Manager. If previous to JD Edwards Enterprise Release 8.98.4 you have installed OCM using Server Manager, you must use the procedure in the previous section of this guide to manually deinstall your existing down-level version. Once the down-level OCM is deinstalled as described in this section, you can manually install the latest version as described in the previous section, or optionally you can install it using Server Manager as described in this section.
For New Installations of Server Manager. The current release of Server Manager includes the current release of Oracle Configuration Manager. As a result, you must install Oracle Configuration Manager from Server Manager as described in this section.
To install Oracle Configuration Manager:
-
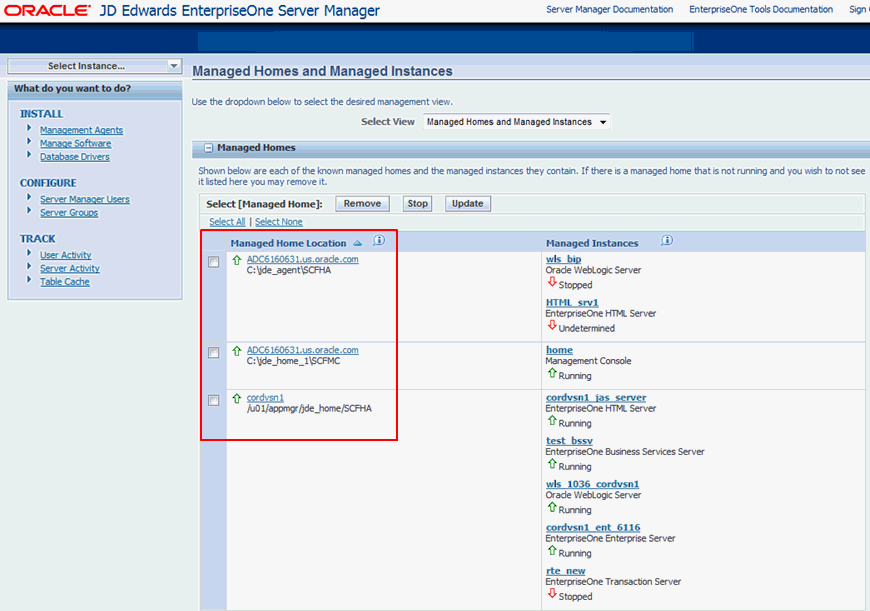
In the Management Console, select the managed home location where you want to install Oracle Configuration Manager.
-
Select the ”ocm” link in the instance.
Note:
You can also click a managed home link on the Management Console home page and install the Oracle Configuration Manager (ocm) instance from the managed home location.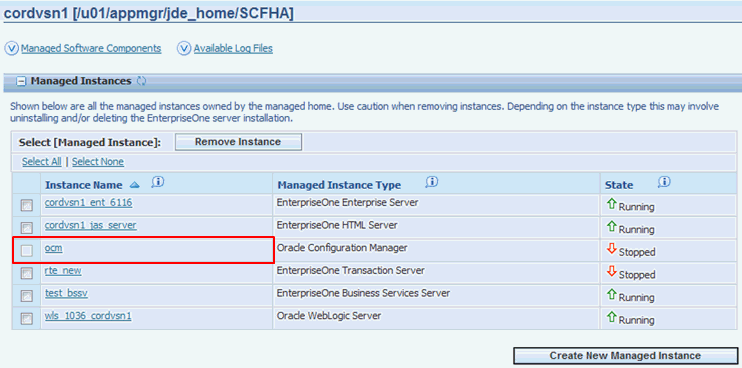
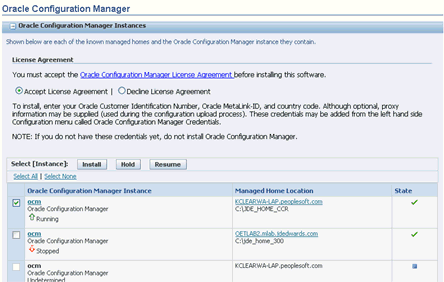
The Oracle Configuration Manager Instances page shows each Oracle Configuration Manager instance, the managed home it resides on, and the status of each instance, which include:
-
Running. The ocm instance is installed.
-
Stopped. The ocm instance is not installed.
-
Undetermined. Cannot install due to incompatibility with the managed home platform.
-
-
In the Management Console, select the managed home location where you want to install Oracle Configuration Manager click the Oracle Configuration Manager link in the Quick Links section.
Note:
You can also click a managed home link on the Management Console home page and install the Oracle Configuration Manager (ocm) instance from the managed home location.
The Oracle Configuration Manager Instances page shows each Oracle Configuration Manager instance, the managed home it resides on, and the status of each instance, which include:
-
Running. The ocm instance is installed.
-
Stopped. The ocm instance is not installed.
-
Undetermined. Cannot install due to incompatibility with the managed home platform.
-
-
In the License agreement section, click the Oracle Configuration Manager License Agreement link to read the license agreement and then click the Accept License Agreement option to proceed.
If you click the Decline License Agreement option, you cannot proceed with the installation.
-
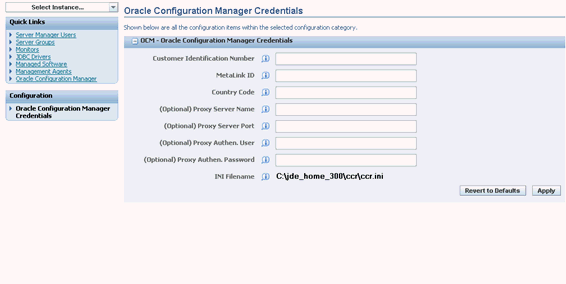
In the Configuration section, click the Oracle Configuration Manager Credentials link.
-
In the OCM Oracle Configuration Manager Credentials section, complete these fields and then click the Apply button:
-
Customer Identification Number
-
MetaLink ID
-
Country Code
-
(Optional) Proxy Server Name
-
(Optional) Proxy Server Port
-
(Optional) Proxy Authen. User
-
(Optional) Proxy Authe. Password
-
INI Filename. The system displays the physical file location where the credential information is stored. Sensitive data is encrypted.
You can click the Revert to Defaults button if you are modifying these fields and want to return to the original values that you entered.
Note:
If a proxy server is used to connect to the Internet, you must complete the proxy connection fields.
-
-
Click the check box next to the ocm instance that you want to install. You can install an Oracle Configuration Manager instance on multiple managed homes at the same time by clicking additional check boxes
Note:
If the status below the ocm link is Undetermined, you cannot install an Oracle Configuration Manager instance due to an incompatibility with the platform of the managed home, or if the managed home is down. -
Click the Install button. Once Oracle Configuration Manager is installed, the status below the ocm link changes to Running.
The Management Console verifies the credentials that you entered and automatically downloads the latest Oracle Configuration Manager from Oracle. If necessary, it runs its first collection and sends the data to the Oracle repository.
-
Click the ocm link of an instance that is running to view additional information about the Oracle Configuration Manager instance, such as status, log file settings, and so on.
See Administer Oracle Configuration Manager (OCM) for more information about log files and Oracle Configuration Manager configuration settings.