D Reconfiguring Copied EnterpriseOne OVM Images
This appendix contains the following topics:
D.1 Overview
The reconfig_e1_vm.sh script reconfigures copied EnterpriseOne OVM images. The reconfig_e1_vm.sh will request from the user the names and IP addresses for the original and new machine configurations. The reconfig_e1_vm.sh script will then reconfigure the copied images to run with the new names and IP address. The reconfig_e1_vm.sh is not use to configure original OVM images. The images must have been previously configured and be moved to a new OVM machine for this process to work.
Consider the following example. The following OVM images have been setup and configured:
The existing OVM E1 server is ovmsvrE1 at IP 10.145.160.10
The existing OBM E1 Database server is ovmsvrDB at IP 10.145.160.11
The existing OVM E1 Webs server is ovmscrWB at IP 10.145.160.12
These servers are configured and running. To copy these servers and reconfigure the E1 instance use the reconfig_e1_vm.sh script. To perform these tasks review the following process. (more details steps will follow.)
D.2 Overview of Steps
-
Create new server
-
First stop the virtual servers to be copied.
-
Create new OVS directories in the OVS running pool directory.
-
Copy the E1 and system image files and
vm.cfgfor each type of server E1, database and web to the new system. -
Edit the
vm.cfgto match the new servers.
-
-
Start the new servers
These servers will come up within OVM under the new running pool names.
Within the virtual machines the configuration is the same as the original servers. The name, ip addresses and E1 configuration is all the same.
-
Configure ssh keys for new servers
The
reconfig_e1_vm.shscript will use a remote shell command to send reconfiguration scripts to the servers. Without ssh key configuration the root password will have to be repeatedly (86 times) typed in to allow the scripts to run. In addition once the IP's are reconfigured the keys will not be valid and no longer work. -
Run the
reconfig_e1_vm.shscriptThe
reconfig_e1_vm.shscript will ask the user for which server will change. Next the script will prompt for the names of the original server and IPs. Then finally the scripts will prompt for the new server configurations.The script then uses ssh to send and execute reconfiguration scripts to the new servers and changes their settings.
-
The new servers must be rebooted
The
reconfig_e1_vm.shchanges the setting for IP but does not restart the network services. The servers must be rebooted. In addition if the database server is changed the emca system will be reconfigured when the server is rebooted.Once the new servers are rebooted the new IP are in use. This means the original servers can be started.
-
The Deployment Server must be manually reconfigured
The deployment server must be reconfigured for the new servers.
Caution:
It is important to note that this reconfiguration will only work if the IP address changes occur only within the same network segment. Thereconfig_e1_vm.sh script can be run from any Linux machine with can connect via ssh to the target machines.D.3 Create New Server
The user must stop the OVS target machine to be copied. Do not copy the img files of run servers. Stop the servers to be copied via xm commands
xm shutdown <old server>
Create a new directory in the running pool for the new OVM images.
cd /OVS/running_pool
mkdir <new server>
cd <new server>
cp ../<old server>/vm.cfg .
cp ../<old server>/*.img . &
The copy stop will take 10 to twenty minutes. While the cp command runs edit the vm.cfg scripts.
root@ovmserv1 ovmserv1]# vi vm.cfg
# Automatically generated xen config file
name = "old_server"
memory = "4096"
disk = [ 'file:/OVS/running_pool/old_server/system.img,hda,w',
         'file:/OVS/running_pool/old_server/E1_DB.img,hdb,w', ]
vif = [ '', ]
bootloader="/usr/bin/pygrub"
vcpus=4
vfb = [ 'type=vnc,vncunused=1,vnclisten=0.0.0.0' ]
on_reboot   = 'restart'
on_crash    = 'restart'
In this example change the value old_server to the name of the new_server name.
When the copy and file edits have been completed, then create the new OVM domain name. The domain name should match the running pool directory name used.
D.4 Create the New Servers
Run the xm create command to start the new server.
xm create <new_server>
Where <new_server> is the virtual manager configuration file defining the server.
Verify that the new xm domain has started. Repeat this process for each server you wish to copy. With this xm domain the name and IP are the same as the old server this was copied from.
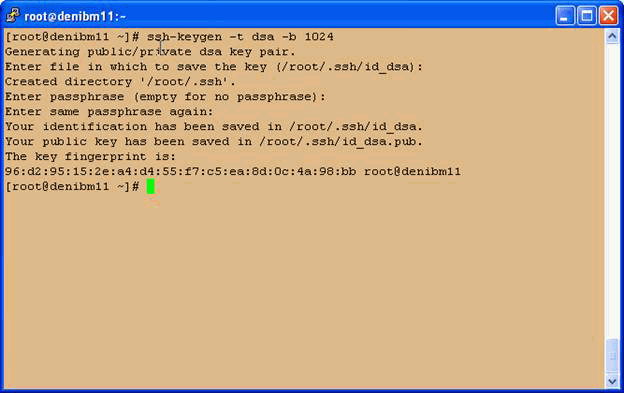
D.5 Configure ssh Keys for New Servers
The reconfig_e1_vm.sh script uses the ssh command to send reconfiguration scripts to the virtual machines. Without this step the reconfig_e1_vm.sh script will prompt for every ssh connection. To set up ssh keys the user will generate a public key from the machine that will run the reconfig_e1_vm.sh scripts. The public key is then sent to each machine to be reconfigured. After the machinse are reconfigured with new IP address the keys will no longer work.
-
From the root account on the machine that will run the
reconfig_e1_vm.shscript, do the following sets.ssh-keygen -t dsa -b 1024 -
Press the return key when prompted for a passphrase.
-
Now run the following commands when to send the public key to each of the running servers. Remember they will be up on the old server ip address still. Replace the <OLD_IP_ADR> with the proper value for each of your machine to be reconfigured.
ssh root@@<OLD_IP_ADR>  "mkdir .ssh"
ssh root@<OLD_IP_ADR> "touch .ssh/authorized_keys"
ssh root@<OLD_IP_ADR> "chmod 600 .ssh/authorized_keys"
cat /root/.ssh/id_dsa.pub | ssh root@<OLD_IP_ADR> "cat >> .ssh/authorized_keys"
ssh root@<OLD_IP_ADR> "uname -a;cat /etc/sysconfig/jdedwards"
The last step will not be prompted for a password and should display the server name and the jdedwards configure file.
D.6 Run the reconfig_e1_vm.sh Script
Start the reconfig_e1_vm.sh script. The user will be prompted for which of the E1 type server will be changes. In addition the changes to the deployment server will checked as well. Enter "yes" if the server prompted for will change (has been copied and need to be reconfigured).

Next user is prompted for the name and IP of the old server which should now be running.
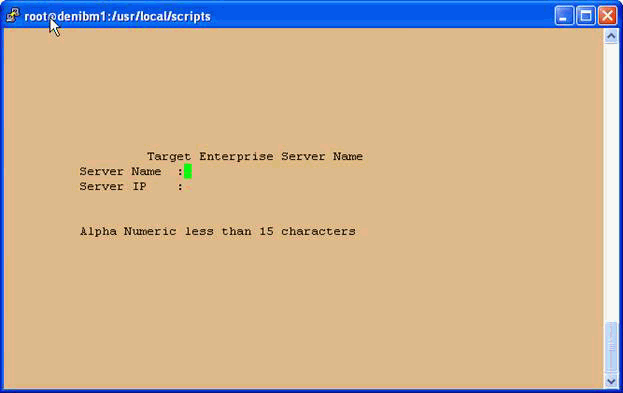
The server name and IP address will are requested. The IP address will be tested. If the reconfig_e1_vm.sh script cannot ping the IP address the entry will fail. If the server is not changing the next server information will be prompted for. If the server is changing the next screen prompts for the new entries.
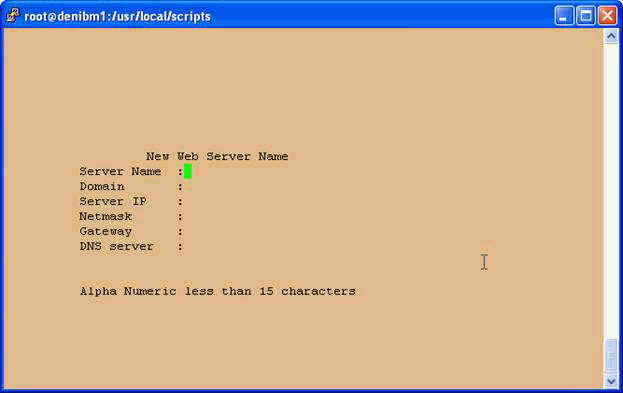
This will include the following items; new server name, new domain, new ip address, new net mask, new gatway and new DNS server. The new server IP address will be tested. If it can be ping the test fails. This has to be a new ip that is not currently in use. The gateway and DNS server are not tested.
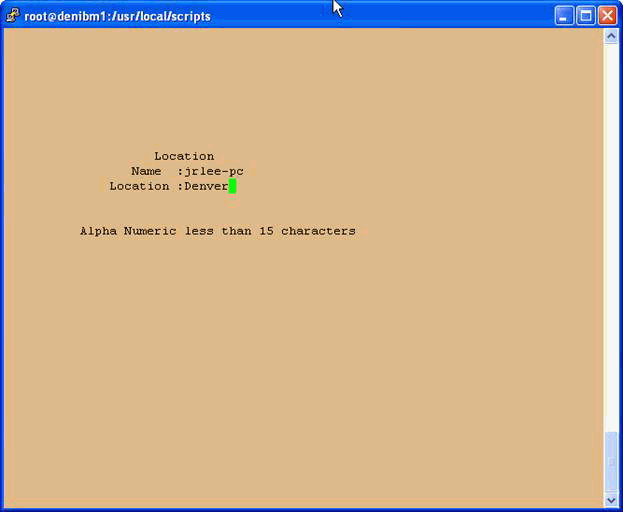
Finally if the deployment server is changing the server name and location are prompted for.
When all items are entered the script will display all values and prompt the user to valid the parameters correctness. If they are not correct the user enters "no" and the script stops. The user should then restart and re-enter the values. If the values are correct the user will enter "yes" the reconfig_e1_vm.sh will begin re-configuring the virtual servers.
D.7 Reboot New Servers
The reconfig_e1_vm.sh changes the network configuration files, but does not restart the network services. For the changes to take effect the user must reboot the systems. Either log in to the virtual server and issue the shutdown command or use the xm command.
xm reboot <server>
When the system comes back up it will be using the IP the user had assigned during the Reconfig_e1_vm.sh process. If there are any problems the backup configuration are stored in the /backup directory and log files for the change process are in the /tmp directory. The following chart list all possible scripts and logs that will run.
| Script Name | Log Name | Description |
|---|---|---|
| v4.ksh | V4.log | Update the /etc/sysconfig/jdedwards file based on user input |
| v7.ksh | V7.log | Test the ssh connection to remote machine and presence of remote machine's /etc/sysconfig/jdedwards file. |
| v8.ksh | V8.log | Backup the /etc/sysconfig/jdedwards file on the remote machine |
| v9.ksh | V9.log | Backup the network configuration files on the remote machine |
| v10.ksh | V10.log | Update network settings of remote machine based on settings in remote machine's /etc/sysconfig/jdedwards file. |
| v11.ksh | V11.log | Backup the JDE.INI configuration file on remote machine |
| v12.ksh | V12.log | Update the JDE.INI and server manager configuration based on remote machine's /etc/sysconfig/jdedwards file. |
| v14.ksh | V14.log | Update oracle database tnsnames.ora files. |
| v15.ksh | V15.log | Update JDE.INI for new database names. |
| v16.ksh | V16.log | Update web server files for new web server name and ip. |
| v17.ksh | V17.log | Update web server files for new enterprise server name |
| v18.ksh | V18.log | Update web server files for new database server name |
| v20.ksh | V20.log | Backup and update the database tnsnames file |
| gen_sql.ksh | gen_sql_DB.log gen_sql_E1.log gen_sql_WB.log gen_sql_DP.log gen_sql_DB.sql gen_sql_E1.sql gen_sql_WB.sql gen_sql_DP.sql | Generate the required sql to update the database for the given server change |
| v21.ksh | v21.log | Execute and check the generated sql |
| v22.ksh | v22.log | Convert /etc/sysconfig/jdedwards to new format |
| v23.ksh | v23.log | Reset the jdedward configuration file to old format (not used) |
| v24.ksh | v24.log | De-configure the emctl system |
| v25.ksh | V25.log | Create the emca_config.par file and emca_config.ksh scripts to reconfigure the emctl system |
It is entirely possible for log file to contain errors and yet the system will work correctly. This statement is particularly true of database errors. If the virtual system to be copies is not totally configured it is possible for the database tables to be change won't contain the entries which are being changed. The best things to check are the systems now have the correct name and IP address. In addition E1 starts and can be connected to correctly. If there are errors in the database changes where no rows where found to change this could be correct.
D.8 Manually Reconfiguring the Deployment Server (Mandatory)
The Deployment Server must manually be reconfigured using this procedure.
-
For versions of the JD Edwards EnterpriseOne releases pre-configured OVM templates newer than 8.98.4.1, skip to Step 2 of this procedure.
For the 8.98.4.1 version of the EnterpriseOne pre-configured OVM templates, the
PortablePlannerDB.batandPortablePlanner.sqlscripts are delivered in a separate download on edelivery.-
Navigate to this web site:
-
Download this zip file:
Portable_OVM.zip -
Unzip the downloaded file to this directory:
JDEdwards\E900\planner\data -
Copy the PortablePlannerDB.bat and PortablePlanner.sql scripts:
from: Deployment folder
to:
JDEdwards\E900\planner\data
-
-
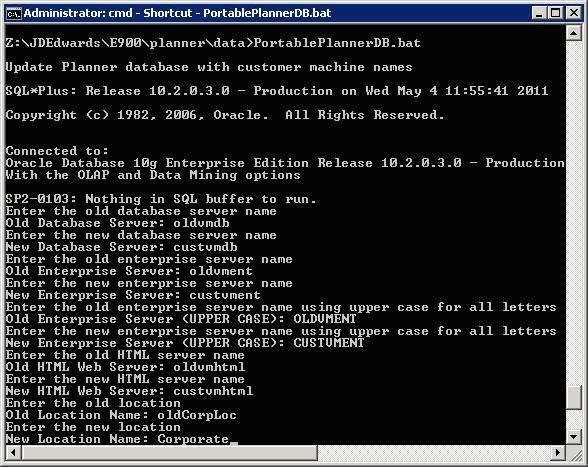
On the Deployment Server, open a command window and run this script:
PortablePlannerDB.batTypically the script is located in:
x:\JDEdwards\E900\planner\data\PortablePlannerDB.bat -
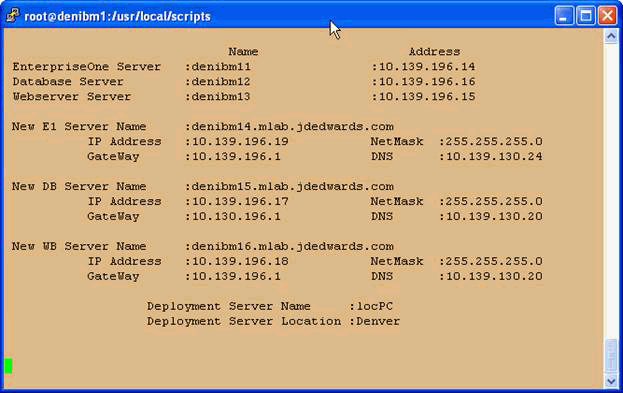
The script prompts for a set of old and new server names. Use the names from the Error! Reference source not found. to fill out the fields.
-
At the script prompts, enter the old and new server names for these fields:
Field Description Database Server Enter the name of the Oracle VM Database Server. For example: custvmdbEnterprise Server Enter the name of the Oracle VM Enterprise Server. For example: custvmentThe machine name must match the network ID, matching case (usually lower case).
UPPER CASE Enterprise Server Enter the name of the Oracle VM Enterprise Server in all UPPER CASE letters. For example: CUSTVMENTThis is the machine name in all UPPER CASE, regardless of what the actual case of the server name's network ID.
HTML Server Enter the name of the Oracle VM HTML Web Server. For example: custvmhtmlLocation Name Enter the location to which this Deployment Server applies. The location could be a city, company headquarters, or a division of a company. For example: CorporateImportant: When running the scripts to create VM Guest from the JD Edwards EnterpriseOne Database Server Template, you must supply the same value you enter here.
Caution:This value is case-sensitive and a maximum of 15 alphanumeric characters.
-
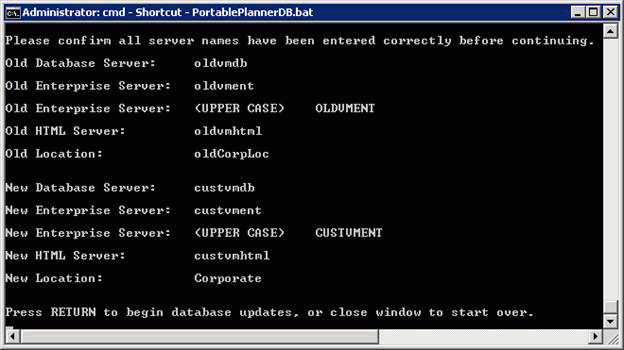
Confirm the names entered on this screen match the Oracle VM Templates entered in the Error! Reference source not found., which is located in the section of this guide entitled: Error! Reference source not found.
-
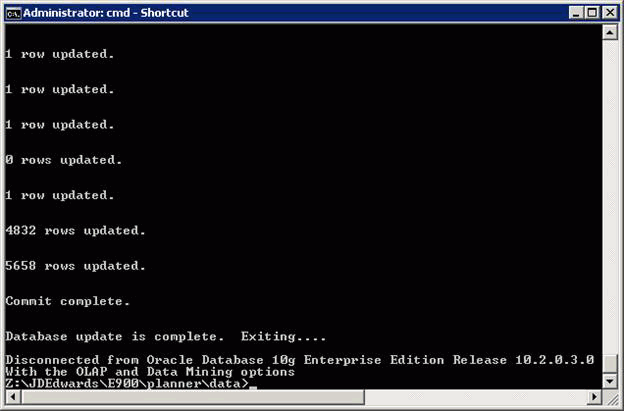
Verify the database update is complete and the
PortablePlannerDB.batexits and returns to the command prompt. -
Close the command window and check this log file for errors:
PortableUpdate.log
Tip:
Deployment Server Log Files:You should review the log file created by thePortablePlannerDB.sql script. The file is named PortableUpdate.log and is located in the Deployment Server installation directory. For example:
x:\JDEdwards\E900\planner\data\PortableUpdate.log