4 Working with Oracle VM Templates for JD Edwards EnterpriseOne
This chapter contains the following topics:
-
Section 4.2, "Extracting the Oracle VM Templates for JD Edwards EnterpriseOne to the seed_pool"
-
Section 4.3, "Creating a VM Guest from the JD Edwards EnterpriseOne Database Server Template"
-
Section 4.4, "Creating a VM Guest from the JD Edwards EnterpriseOne Enterprise Server Template"
-
Section 4.5, "Creating a VM Guest from the JD Edwards EnterpriseOne HTML Web Server Template"
4.1 Completing the Pre-Install Worksheet
You can use the Pre-Install Worksheet in this section to gather information required to answer the questions for which you will be prompted by the template installer as it executes. Prior to installing any template, it is highly recommended that you complete the Pre-Install Worksheet with the requisite information. By doing so you will reduce the potential for errors due to incorrect data entry information.
Caution:
Since the scripts are designed to execute only once, incorrect data entry may result in a corrupted install and the need to delete and restart the install process.Tip:
Contact your network administrator to attain valid network settings for your network prior to creating new VM Guests.The following image shows the Pre-Install Worksheet:
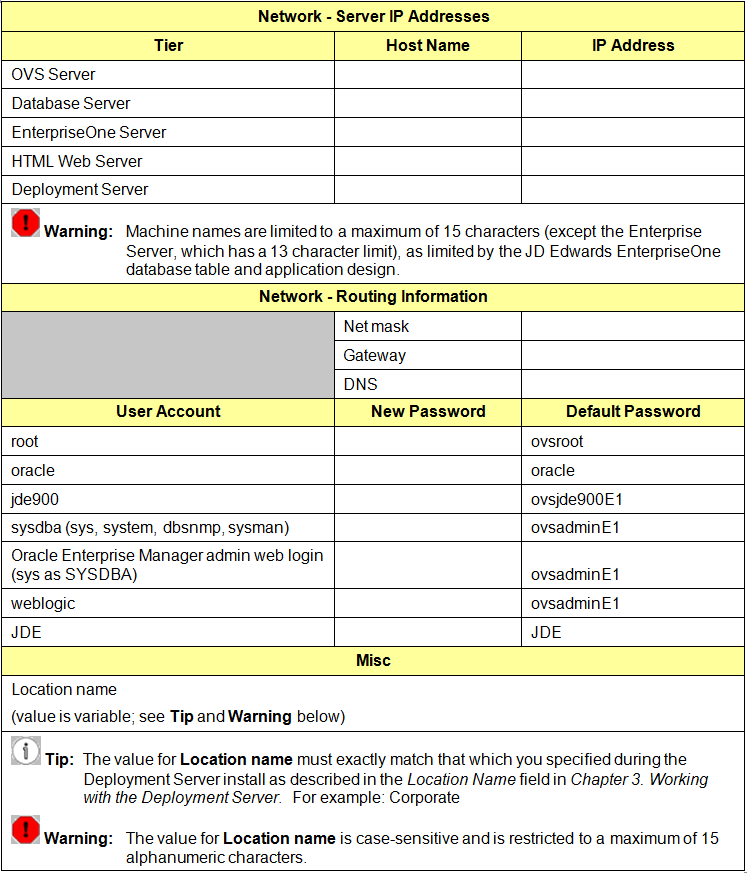
Description of the illustration pre_install_wksht.gif
4.2 Extracting the Oracle VM Templates for JD Edwards EnterpriseOne to the seed_pool
The EnterpriseOne VM templates are delivered in a set of zipped archive files that you must place on the OVS Server so that they can be uncompressed into a template image. These terms are used:
-
seed_pool
This is the directory on the OVS file system where templates are stored for later deployment.
-
running_pool
This is the directory used for deployed images and where the system created the actual virtual machine (VM).
The archive files have been tarred and compressed with bzip2 to reduce their overall size, which also reduces download time. An Oracle Enterprise Linux operating system image that is delivered with the templates also needs to be placed in the seed_pool directory. Only the version of the Oracle Enterprise Linux operating system that is delivered with the templates can be used.
Follow these steps to build the JDEdwards Oracle VM template images:
-
Log on to the OVS Host server as root.
-
Set the local time and date with the date command.
-
Create these OVS seed_pool and running_pool directories:
mkdir /OVS/seed_poolmkdir /OVS/running_pool -
In binary mode, you should ftp or transfer the zip files into the
/OVS/seed_pooldirectory and extract them with unzip. In the sample commands below, the variable (VXXXXX-01) will be different for each part, and for each release:cd /OVS/seed_poolunzip
VXXXXX-01.zipunzip
VXXXXX-01.zip...
Repeat until all zip files are extracted.
-
Some of the
tar.bz2files are divided into multiple parts over multiple zip files. After all the zip files are done extracting, use this command to reconnect the multi-part tar files and extract them in a single step. Where version is unique for each "part*" file and for each release of Oracle VM Templates. The E1_DB (database) and E1_ENT (Enterprise Server) images may be divided. For example:cat E1_DB_version.tar.bz2.part* | tar -xjvf - -
Extract the remaining
.bz2files using tar.This step creates a directory with the name of the template containing the files for the template. For example:
tar -xjvf E1_HTML_version.tar.bz2where version is unique for each "
.tar.bz2" file and for each release of Oracle VM Templates. Repeat for each remaining.tar.bz2file. If the E1_ENT file was not divided into multiple parts and extracted in step 5 above, extract the single E1_ENT image using tar using this example. -
Verify the correct four (4) files have been extracted, as shown in this example ls command and returned results with the version displayed. Once the
.bz2files have been successfully extracted, the.zipand.bz2files may be archived, moved off of the server, or deleted as desired.ls -lat /OVS/seed_pool drwxr-xr-x 2 root root 4096 May 17 18:33 E1_HTML_898.3.1_WLS_X86_64 drwxr-xr-x 2 root root 4096 May 17 18:33 E1_ENT_898.3.1_X86_64 drwxr-xr-x 2 root root 4096 May 17 18:33 E1_DB_898.3.1_11GR2_X86_64 drwxr-xr-x 2 root root 4096 May 17 18:33 E1_EL5U4_X86_64_PVM_4GB
Note:
This guide is designed for manually creating VM Guests from the command line directly on an Oracle VM Host Server. The JD Edwards EnterpriseOne VM Templates can also be imported into an Oracle VM Manager instance, and the JD Edwards EnterpriseOne VM Guests can be created on the OVM Manager following the Oracle VM Manager User's Guide. If this method of installation is chosen, place a copy of theE1_EL system.imgfile in each of the three JD Edwards EnterpriseOne template directories, while considering that doing so increases seed_pool disk requirements by as much as 40 GB. For example, if you chose this method of installation, use these commands to copy thesystem.imgto the appropriate directories:cp /OVS/seed_pool/E1_ELversion/system.img /OVS/seed_pool/E1_DB_version cp /OVS/seed_pool/E1_ELversion/system.img /OVS/seed_pool/E1_ENT_version cp /OVS/seed_pool/E1_ELversion/system.img /OVS/seed_pool/E1_HTML_version
Use OVM Manager to complete steps 2 through 5 in each of the next sections for the JD Edwards EnterpriseOne Database, Enterprise, and HTML servers. Continue with the configuration of the VM Guests in step 5 of each section.
4.3 Creating a VM Guest from the JD Edwards EnterpriseOne Database Server Template
To create a VM Guest for a JD Edwards EnterpriseOne Database Server from a template:
-
Log on to the OVS Host server as root.
-
Copy the
E1_DBtemplate and Linuxsystem.imgfrom the seed_pool to the running_pool under a directory with the name that will be used for the database server. The running_pool is the directory where active VM Guests are held. Use these commands where each command should be entered as a contiguous string with no line returns.cp -R /OVS/seed_pool/E1_DB_version OVS/running_pool/<database_server_name> cp /OVS/seed_pool/E1_ELversion/system.img /OVS/running_pool/<database_server_name>
where version is unique for each file and release of Oracle VM Templates.
Note:
It is recommended that the variable <database_server_name> match the name on the Pre-Install Worksheet (refer to Completing the Pre-Install Worksheet). This will reduce the potential for confusion in the event that more than one database is created. -
Change directories into the newly copied directory:
cd /OVS/running_pool/<database_server_name> -
Generate a new MAC address, and edit the
vm.cfgfile. Insert the MAC address and set the database server name and path to the template and system images.Enter this command on a single line to generate a new MAC address:
PYTHONPATH=/opt/ovs-agent-2.3 python -c "from OVSCommons import randomMAC; print randomMAC()"Use this command to view the
vm.cfgfile:vi vm.cfgEach VM Guest needs a unique MAC address which you define the
vm.cfgfile. In thevif=entry, within the empty quotes, add the keywordmac=followed by the new MAC address. This keyword is illustrated in the bolded segment below:# Automatically generated xen config file name = "<database_server_name>" memory = "4096" disk = [ 'file:/OVS/running_pool/<database_server_name>/system.img,hda,w', 'file:/OVS/running_pool/<database_server_name>/E1_DB.img,hdb,w', ] vif = ['mac=<New_MAC_address in format xx:xx:xx:xx:xx:xx>', ] bootloader="/usr/bin/pygrub" vcpus=2 vfb = [ 'type=vnc,vncunused=1,vnclisten=0.0.0.0' ] on_reboot = 'restart' on_crash = 'restart'Note:
This file contains the settings that set the virtual memory (memory=) and CPU setting (vcpus=) that the VM will be assigned when it is created.For additional information, refer to this web site:
http://www.oracle.com/technologies/virtualization/index.html -
Create the Database Server VM Guest by executing this command:
xm create vm.cfgThe first time an Oracle VM Guest is started, the
/u01/oracle-template.shscript is executed to set up the server. This interactive script is launched automatically to the virtual console session of the VM Guest. The virtual console must be accessed through a viewer such as vncviewer, which is an xterm application that requires an xterm connection and a valid DISPLAY environment variable setting. Use these commands to set the virtual console display where hostname is the host name or IP address of the system that you want to use to display the xterm window (your workstation or PC):export DISPLAY=hostname:0.0 xm list -l | egrep 'name|location' vncviewer localhost:5900 &
Tip:
If the port displayed byxm listis a number other than 5900 for this server, use the port number from thexm listcommand withvncviewer.Note:
The Ethernet network connection has not been set up yet at this point. As illustrated in the following screen shot, it is normal for the vncviewer window to pause while attempting to determine IP information for eth0 and eventually fail. The vncviewer may not be able to connect to the console session while this step is being run in the VM Guest. If vncviewer fails to connect, wait 2 minutes and retry. If vncviewer still cannot connect, there may be a problem with displaying xterm windows from the host from which vncviewer is running.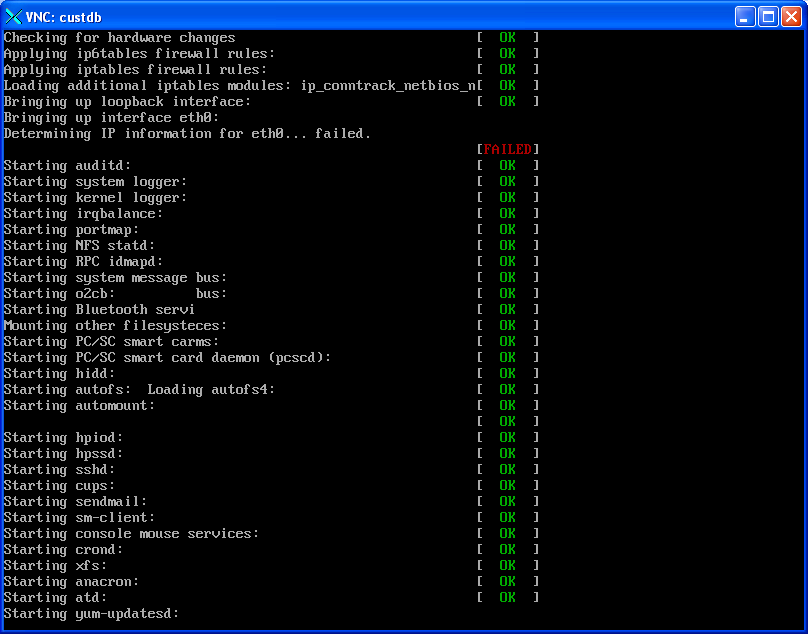
-
Configure the network in the vncviewer window by following the automatic script running in the console session. The /u01/oracle-template.sh script automatically runs one time on the console session the first time a new VM Guest is created. This script sets up a static IP address, and updates the database and system files with the server names that you specify.
Caution:
Theoracle-template.shscript is only designed to run once. If you make a mistake, or if this script is interrupted before completion, you must delete theE1_DB.imgandsystem.imgfiles and start again at Step 2. -
The oracle-template.sh script starts by setting up the network configuration.
Configuring network:
Configuration of a static IP address is required
-
The script begins to run and set up the pre-defined network connections, as shown in the sample screen output below. After entering the network settings, review the settings entered and at the prompt enter "yes" to continue if they are correct, or "no" to make any corrections.
New short hostname (15 character max): custvmdb Enter fully qualified long hostname: custvmdb.mydomain.com Enter static IP: 10.123.123.123 Enter netmask:[255.255.255.0] Enter default gateway IP: 10.123.123.1 Enter DNS server IP: 10.123.123.100 Confirm network configuration settings New short hostname = custvmdb Fully qualified long hostname = custvmdb.mydomain.com Static IP = 10.123.123.123 Default gateway IP = 10.123.123.1 DNS Server IP = 10.123.123.100 Do you want to continue using these settings? y/n [y] Restarting network... Shutting down interface eth0: [OK] Shutting down loopback interface: [OK] Bringing up loopback interface: [OK] Bringing up interface eth0: [OK] New network configuration: eth0 Link encap:Ethernet HWaddr 00:16:3E:09:E6:3F inet addr:10.123.123.123 Bcast:10.123.123.255 Mask:255.255.255.0 inet6 addr: fe80::216:3eff:fe09:e63f/64 Scope:Link UP BROADCAST RUNNING MULTICAST MTU:1500 Metric:1 RX packets:12 errors:0 dropped:0 overruns:0 frame:0 TX packets:19 errors:0 dropped:0 overruns:0 carrier:0 collisions:0 txqueuelen:1000 RX bytes:1329 (1.2 KiB) TX bytes:4092 (3.9 KiB) New hostname: custvmdb /etc/hosts config: # Do not remove the following line, or various programs # that require network functionality will fail. 127.0.0.1 Localhost.localdomain localhost ::1 localhost6.localdomain6 localhost6 10.123.123.123 custvmdb.mydomain.com custvmdb /etc/resolv.conf config: nameserver 10.123.123.100 search mydomain.com domain mydomain.com Specify the name of the JD Edwards ENTERPRISE server: custvment Specify the name of the JD Edwards WEB server: custvmhtml Specify the name of the JD Edwards DEPLOYMENT server: custdeploy Enter the JD Edwards deployment server Location name - This must match the location entered during the JD Edwards deployment server install: Corporate Confirm machine names and Location Enterprise Server = custvment HTML Server = custvmhtml Deployment Server = custdeploy Location = Corporate Do you want to continue using these machine names and Location? y/n [y] -
Once the network configuration is complete, the script prompts for a set of server names and a location. The server names and Location name has a 15 character limit (except the Enterprise Server, which has a 13 character limit). Review the names entered and enter "yes" to continue if they are correct, or "no" to make any corrections. The sample values in this example for each JD Edwards Enterprise Server, as populated by the Oracle VM version of the Deployment Server installer, are as listed below:
Value prompt in oracle-template.shscriptValue populated while running the Oracle VM Deployment Server Installer as described in Chapter 3, "Working with the Deployment Server" New hostname: custvmdb JD Edwards ENTERPRISE Server custvment JD Edwards WEB server custvmhtml JD Edwards DEPLOYMENT server Machine name of the Deployment Server, which is variable depending on your installation. The Oracle VM Deployment Server installer auto detects this value during installation. Location name This value must exactly match that which you specified during the Deployment Server install as described in the Location Name field in Chapter 3, "Working with the Deployment Server." You should have this value recorded in the pre-install worksheet. Refer to the Location name section.
Caution:
You must enter server and location names that exactly match the values entered during the Deployment Server installation. These values are case sensitive.NOTE: If you do not turn off the firewall, you will have to manually configure the ports needed for communication between your JD Edwards servers. Do you want to turn off the firewall? y/n [y] y
-
When prompted to choose whether to temporarily disable the firewall, or to manually configure the firewall after the VM Guest is started, select yes ('y').
Flushing firewall rules: [OK] Setting chains to policy ACCEPT: filter [OK] Unloading iptables modules: [OK] Running Oracle 11g root.sh script... The following environment variables are set as: ORACLE_OWNER= oracle ORACLE_HOME= /u01/app/oracle/product/11ovm/db_1 Enter the full pathname of the local bin directory: [/usr/local/bin]: -
The script prompts you for the full pathname for the local bin directory. Always accept this default value:
/usr/local/binAt this point the database setup script is launched. First it starts the database and executes a set of scripts to update the database with the new server names and Location name. This process may take a few minutes.
   Copying dbhome to /usr/local/bin ...
   Copying oraenv to /usr/local/bin ...
   Copying coraenv to /usr/local/bin ...

Entries will be added to the /etc/oratab file as needed by
Database Configuration Assistant when a database is created
Finished running generic part of root.sh script.
Now product-specific root actions will be performed.
Finished product-specific root actions.

SQL*Plus: Release 11.2.0.1.0 - Production on Wed Jun 10 13:38:55 2011

Copyright (c) 1982, 2009, Oracle.  All rights reserved.

Connected to an idle instance.

SQL> ORACLE instance started.

Total System Global Area 1720328192 bytes
Fixed Size                  2160392 bytes
Variable Size                       1291847928 bytes
Database Buffers          419430400 bytes
Redo Buffers                            6889472 bytes
Database mounted.
Database opened.
SQL>
3 rows updated.
1 row updated.
1 row updated.
6 rows updated.
1 row updated.
292 rows updated.
.
.
1 row updated.
1 row updated.

Disconnected from Oracle Database 11g Release 11.2.0.1.0 - 64bit Production
.
.

An optional step is to configure the Oracle Enterprise Manager now.
This not required by EnterpriseOne. This may take a number of minutes to complete.
Do you want to configure Oracle Enterprise Manager now? y/n [y]
-
The oracle-template.sh script has completed all required setups after the Oracle listener is started.
An optional step is to configure and start the Oracle Enterprise Manager Console. This may take a number of minutes to complete. This step is not required for the templates to function, and can be run at any time manually as the oracle userid after the template configuration is complete.
Press Enter to exit the script and go to a login prompt.
At this point the database is running and ready for connections, but there are some optional steps that should be considered.
Log in as root with the password ovsroot in lower case and perform these optional steps:
-
Change the passwords for the root and oracle users. Make sure to remember the new root password, as traditional lost root password recovery methods will not work on VM Guests.
-
Check the server time and date, and set if needed.
-
Make sure the network connections are functioning correctly.
-
Configure the firewall as desired.
-
Check the
/u01/jdeupdate.logfile for errors from the database table update. -
Tune the database to match the site-specific hardware and user load based upon any sizing recommendations from your hardware vendor. For reference, the database was pre-tuned for 250 users by this SQL script:
/
u01/scripts/oracle_perf_250Users.sqlNote:
At this point in the installation processing, this script has already been run, and does not need to be run again. -
If the optional step to configure and start the Oracle Enterprise Manager Console was not done in step 12, to start Oracle Enterprise Manager log in under the oracle userid and run this script:
/u01/scripts/EMconfig.shNote:
The database and listener must be up while runningEMconfig.sh script. -
Check the
/u01/oracle-template.logfile for errors. This log file logs the progress of creating the VM Guest. There are three levels of messages in this log file:-
Info
Provide status information
-
Error
Indicate the VM Guest configuration failed
-
Diagnostic
Explains why an Error message may have occurred
-
4.4 Creating a VM Guest from the JD Edwards EnterpriseOne Enterprise Server Template
To create a VM Guest for a JD Edwards EnterpriseOne Enterprise Server from a template:
-
Log on to the OVS Host server as root.
-
Copy the E1_ENT template and Linux system.img from the seed_pool to the running_pool under a directory with the name that will be used for the JD Edwards EnterpriseOne Enterprise Server. The running_pool is the directory where active VM Guests are held. Use these commands where each command should be entered as a contiguous string with no line returns:
cp -R /OVS/seed_pool/E1_ENT_version /OVS/running_pool/<enterprise_server_name>where version is unique for each file and release of Oracle VM Templates.
cp /OVS/seed_pool/E1_ELversion/system.img /OVS/running_pool/<enterprise_server_name> -
Change directories into the newly copied directory using this command:
cd /OVS/running_pool/<enterprise_server_name> -
Generate a new MAC address, and edit the vm.cfg file. Insert the MAC address and set the database server name and path to the template and system images.
Enter this command on a single line to generate a new MAC address:
PYTHONPATH=/opt/ovs-agent-2.3 python -c "from OVSCommons import randomMAC; print randomMAC()"Edit the
vm.cfgfile:vi vm.cfgEach VM Guest needs a unique MAC address which you define the
vm.cfgfile. In thevif=entry, within the empty quotes, add the keywordmac=followed by the new MAC address. This keyword is illustrated in the bolded segment below:# Automatically generated xen config file name = "<enterprise_server_name>" memory = "2048" disk = [ 'file:/OVS/running_pool/<enterprise_server_name>/system.img,hda,w', 'file:/OVS/running_pool/<enterprise_server_name>/E1_ENT.img,hdb,w', ] vif = ['mac=<New_MAC_address in format xx:xx:xx:xx:xx:xx>', ] bootloader="/usr/bin/pygrub" vcpus=2 vfb = [ 'type=vnc,vncunused=1,vnclisten=0.0.0.0' ] on_reboot = 'restart' on_crash = 'restart'Note:
This file contains the settings that set the virtual memory (memory=) and CPU setting (vcpus=) that the VM will be assigned when it is created. For additional information, refer to this web site:http://www.oracle.com/technologies/virtualization/index.html -
Create the Enterprise Server VM Guest by executing this command:
xm create vm.cfgThe first time an Oracle VM Guest is started, the
/u01/oracle-template.shscript is executed to set up the server. This interactive script is launched automatically to the virtual console session of the VM Guest.The virtual console must be accessed through a viewer such as vncviewer, which is an xterm application that requires an xterm connection and a valid DISPLAY environment variable setting. Use these commands to set the virtual console display where hostname is the host name or IP address of the system that you want to use to display the xterm window (your workstation or PC).
export DISPLAY=hostname:0.0
xm list -l | egrep 'name|location'
vncviewer localhost:5901 &
Tip:
If the port displayed byxm listis a number other than 5901 for this server, use the port number from thexm listcommand withvncviewer.Note:
The Ethernet network connection has not been set up yet at this point. It is normal for the vncviewer window to pause while attempting to determine IP information for eth0 and eventually fail. The vncviewer may not be able to connect to the console session while this step is being run in the VM Guest. If vncviewer fails to connect, wait 2 minutes and retry. If vncviewer still cannot connect, there may be a problem with displaying xterm windows from the host from which the vncviewer is running. -
Configure the network in the vncviewer window by following the automatic script running in the console session. The
/u01/oracle-template.shscript automatically runs one time on the console session the first time a new VM Guest is created. This script sets up a static IP address, updates the JDE.INI, database client, and system files with the server names that you specify.Caution:
Theoracle-template.shscript is only designed to run once. If you make a mistake, or if this script is interupted before completion, you must delete theE1_ENT.imgandsystem.imgfiles and start again at Step 2. -
The
oracle-template.shscript starts by setting up the network configuration.Configuring network: Configuration of a static IP address is required
-
The script begins to run and set up the pre-defined network connections, as shown in the sample screen output below. After entering the network settings, review the settings entered and enter `yes` to continue if they are correct, or `no` to make any corrections.
New short hostname (13 character max): custvment Enter fully qualified long hostname: custvment.mydomain.com Enter static IP: 10.123.123.124 Enter netmask:[255.255.255.0] Enter default gateway IP: 10.123.123.1 Enter DNS server IP: 10.123.123.100 Confirm network configuration settings New short hostname = custvment Fully qualified long hostname = custvment.mydomain.com Static IP = 10.123.123.124 Default gateway IP = 10.123.123.1 DNS Server IP = 10.123.123.100 Do you want to continue using these settings? y/n [y] Restarting network... Shutting down interface eth0: [OK] Shutting down loopback interface: [OK] Bringing up loopback interface: [OK] Bringing up interface eth0: [OK] New network configuration: eth0 Link encap:Ethernet HWaddr 00:16:3E:09:E6:3F inet addr:10.123.123.124 Bcast:10.123.123.255 Mask:255.255.255.0 inet6 addr: fe80::216:3eff:fe09:e63f/64 Scope:Link UP BROADCAST RUNNING MULTICAST MTU:1500 Metric:1 RX packets:12 errors:0 dropped:0 overruns:0 frame:0 TX packets:19 errors:0 dropped:0 overruns:0 carrier:0 collisions:0 txqueuelen:1000 RX bytes:1329 (1.2 KiB) TX bytes:4092 (3.9 KiB) New hostname: custvment /etc/hosts config: # Do not remove the following line, or various programs # that require network functionality will fail. 127.0.0.1 localhost.localdomain localhost ::1 Localhost6.localdomain6 localhost6 10.123.123.124 custvment.mydomain.com custvment /etc/resolv.conf config: nameserver 10.123.123.100 search mydomain.com domain mydomain.com Specify the name of the JDE DATABASE server: custvmdb Specify the name of the JDE DEPLOYMENT server: custdeploy Confirm machine names Database Server = custvmdb Deployment Server = custdeploy Do you want to continue using these machine names? y/n [y] -
Once the network configuration is complete, the script prompts for a set of server names and a location. The Server names have a 15 character limit (except the Enterprise Server, which has a 13 character limit).
The sample values in this example for each JD Edwards Enterprise Server, as populated by the Oracle VM version of the Deployment Server installer, are as listed below. Review the names entered and enter "yes" to continue if they are correct, or "no" to make any corrections.
Value prompt in oracle-template.shscriptValue populated while running the Oracle VM Deployment Server Installer as described in Chapter 3, "Working with the Deployment Server" New hostname: (JDE Enterprise Server) custvment JDE Database Server custvmdb JDE Deployment Server Machine name of where the Server Manager Management Console is installed, which typically is the same machine as the Deployment Server. See Section 1.2, "Understanding the Installation Process". Caution:
You must enter server names that exactly match the values entered during the Deployment Server installation as described in Chapter 3, "Working with the Deployment Server." These values are case sensitive.NOTE: If you do not turn off the firewall, you will have to manually configure the ports needed for communication between your JD Edwards servers. Do you want to turn off the firewall? y/n [y] y
-
When promted to choose whether to temporarily disable the firewall, or to manually configure the firewall after the VM Guest is started, select yes ('y').
Flushing firewall rules: [OK] Setting chains to policy ACCEPT: filter [OK] Unloading iptables modules: [OK] Running Oracle 11g root.sh script... The following environment variables are set as: ORACLE_OWNER= oracle ORACLE_HOME= /u01/app/oracle/product/11ovm/client_1 Enter the full pathname of the local bin directory: [/usr/local/bin]: -
The script prompts you for the full pathname for the local bin directory. You should always accept this default value:
/usr/local/binCopying dbhome to /usr/local/bin ... Copying oraenv to /usr/local/bin ... Copying coraenv to /usr/local/bin ... Entries will be added to the /etc/oratab file as needed by Database Configuration Assistant when a database is created Finished running generic part of root.sh script. Now product-specific root actions will be performed. The /u01/oracle_template.sh script has completed the server configuration press Enter to continue:
-
The
oracle-template.shscript ends.Press Enter to exit the script and go to a login prompt.
Tip:
The Enterprise Server has not been started yet at this point. To start the Enterprise Server, refer to Section 5.1, "Starting and Shutting Down Network Services on the Enterprise Server."
At this point the Enterprise Server is ready to start (see Chapter 5, "Working With the Enterprise Server"). However, you should consider these optional steps.
Log in as root with the password ovsroot in lower case and perform these optional steps:
-
Change the passwords for the root and jde900 users. Make sure to remember the new root password, as traditional lost root password recovery methods will not work on VM Guests.
-
Make sure the network and tns connections are functioning correctly, especially the connection to the database server. To test the connection, change to the jde900 user and use tnsping to check the database connection, as shown in this example:
[jde900@orclvment]$ tnsping jdevm

TNS Ping Utility for Linux: Version 11.2.0.1.0 - Production on 25-MAY-2011 11:55:27 Copyright (c) 1997, 2009, Oracle.  All rights reserved.

Used parameter files: /u01/app/oracle/product/11ovm/db_1/network/admin/sqlnet.ora

Used TNSNAMES adapter to resolve the alias

Attempting to contact (DESCRIPTION = (ADDRESS = (PROTOCOL = TCP)(HOST = custvmdb)(PORT = 1521)) (CONNECT_DATA = (SERVER = DEDICATED) (SERVICE_NAME = jdevm)))

OK (10 msec)
-
Configure the firewall as desired.
-
Tune the
$JDE_BASE/JDE.INIfile to match the site-specific hardware and user load based upon any sizing recommendations from your hardware vendor. -
Check the server time and date, and set if needed.
-
Check the
/u01/oracle-template.logfile for errors. This log file logs the progress of creating the VM Guest. There are three levels of messages in this log file:-
Info
Provide status information
-
Error
Indicate the VM Guest configuration failed
-
Diagnostic
Explains why an Error message may have occurred
-
4.5 Creating a VM Guest from the JD Edwards EnterpriseOne HTML Web Server Template
To create a VM Guest for a JD Edwards EnterpriseOne HTML Web Server from a template:
-
Log on to the OVS Host server as root.
-
Copy the E1_HTML template and Linux
system.imgfrom the seed_pool to the running_pool under a directory with the name that will be used for the JD Edwards EnterpriseOne HTML Web Server. The running_pool is the directory where active VM Guests are held. Use these commands where each command should be entered as a contiguous string with no line returns.cp -R /OVS/seed_pool/E1_HTML_version /OVS/running_pool/<web_server_name>where version is unique for each file and release of Oracle VM Templates.
cp /OVS/seed_pool/E1_EL_version/system.img /OVS/running_pool/<web_server_name> -
Change directories into the newly copied directory using this command:
cd /OVS/running_pool/<web_server_name> -
Generate a new MAC address, and edit the vm.cfg file. Insert the MAC address and set the database server name and path to the template and system images.
Enter this command on a single line to generate a new MAC address:
PYTHONPATH=/opt/ovs-agent-2.3 python -c "from OVSCommons import randomMAC; print randomMAC()"Edit the
vm.cfgfile:vi vm.cfgEach VM Guest needs a unique MAC address which you define the
vm.cfgfile. In thevif=entry, within the empty quotes, add the keywordmac=followed by the new MAC address. This keyword is illustrated in the bolded segment below:# Automatically generated xen config file name = "<web_server_name>" memory = "2048" disk = [ 'file:/OVS/running_pool/<web_server_name>/system.img,hda,w', 'file:/OVS/running_pool/<web_server_name>/E1_HTML.img,hdb,w', ] vif = ['mac=<New_MAC_address in format xx:xx:xx:xx:xx:xx>', ] bootloader="/usr/bin/pygrub" vcpus=2 vfb = [ 'type=vnc,vncunused=1,vnclisten=0.0.0.0' ] on_reboot = 'restart' on_crash = 'restart'Note:
This file contains the settings that set the virtual memory (memory=) and CPU setting (vcpus=) that the VM will be assigned when it is created. For additional information, refer to this web site:http://www.oracle.com/technologies/virtualization/index.html -
Create the Enterprise Server VM Guest by executing this command:
xm create vm.cfgThe first time an Oracle VM Guest is started, the
/u01/oracle-template.shscript is executed to set up the server. This is an interactive script that is launched automatically to the virtual console session of the VM Guest. The virtual console must be accessed through a viewer such as vncviewer, which is an xterm application that requires an xterm connection and a valid DISPLAY environment variable setting. Use these commands to set the virtual console display where hostname is the host name or IP address of the system that you want to use to display the xterm window (your workstation or PC):export DISPLAY=hostname:0.0 xm list -l | egrep 'name|location' vncviewer localhost:5902
Tip:
If the port displayed by xm list is a number other than 5902 for this server, you should use that number with vncviewer.Note:
The Ethernet network connection has not been set up yet at this point. It is normal for the vncviewer window to pause while attempting to determine IP information for eth0 and eventually fail. The vncviewer may not be able to connect to the console session while this step is being run in the VM Guest. If vncviewer fails to connect, wait 2 minutes and retry. If vncviewer still cannot connect, there may be a problem with displaying xterm windows from the host from which the vncviewer is running. -
Configure the network in the vncviewer window by following the automatic script running in the console session. The
/u01/oracle-template.shscript will automatically run one time on the console session the first time a new VM Guest is created. This script will set up a static IP address, and update the HTML and system files with the server names that are entered.Caution:
The oracle-template.sh script is only designed to run once. If you make a mistake, or if this script is interupted before completion, you must delete theE1_HTML.imgandsystem.imgfiles and start again at Step 2. -
The
oracle-template.shscript starts by setting up the network configuration.Configuring network: Configuration of a static IP address is required
-
The script begins to run and set up the pre-defined network connections, as shown in the sample screen output below. After entering the network settings, review the settings entered and enter "yes" to continue if they are correct, or "no" to make any corrections.
New short hostname (15 character max): custvmhtml Enter fully qualified long hostname: custvmhtml.mydomain.com Enter static IP: 10.123.123.125 Enter netmask:[255.255.255.0] Enter default gateway IP: 10.123.123.1 Enter DNS server IP: 10.123.123.100 Confirm network configuration settings New short hostname = custvmhtml Fully qualified long hostname = custvmhtml.mydomain.com Static IP = 10.123.123.125 Default gateway IP = 10.123.123.1 DNS Server IP = 10.123.123.100 Do you want to continue using these settings? y/n [y] Restarting network... Shutting down interface eth0: [OK] Shutting down loopback interface: [OK] Bringing up loopback interface: [OK] Bringing up interface eth0: [OK] New network configuration: eth0 Link encap:Ethernet HWaddr 00:16:3E:09:E6:3F inet addr:10.123.123.125 Bcast:10.123.123.255 Mask:255.255.255.0 inet6 addr: fe80::216:3eff:fe09:e63f/64 Scope:Link UP BROADCAST RUNNING MULTICAST MTU:1500 Metric:1 RX packets:12 errors:0 dropped:0 overruns:0 frame:0 TX packets:19 errors:0 dropped:0 overruns:0 carrier:0 collisions:0 txqueuelen:1000 RX bytes:1329 (1.2 KiB) TX bytes:4092 (3.9 KiB) New hostname: custvmhtml /etc/hosts config: # Do not remove the following line, or various programs # that require network functionality will fail. 127.0.0.1 localhost.localdomain localhost ::1 localhost6.localdomain6 localhost6 10.123.123.125 custvmhtml.mydomain.com custvmhtml /etc/resolv.conf config: nameserver 10.123.123.100 search mydomain.com domain mydomain.com Specify the name of the JDE database server: custvmdb Specify the name of the JDE enterprise server: custvment Specify the name of the JDE deployment server: custdeploy Confirm machine names Database Server = custvmdb Enterprise Server = custvment Deployment Server = custdeploy Do you want to continue using these machine names and Location? y/n [y] -
Once the network configuration is complete, the script prompts for a set of server names. The Server names have a 15 character limit.
The sample values in this example for each JD Edwards Enterprise Server, as populated by the Oracle VM version of the Deployment Server installer, are as listed below. Review the names entered and enter "yes" to continue if they are correct, or "no" to make any corrections.
Value prompt in oracle-template.shscriptValue populated by Oracle VM Deployment Server Installer New hostname: (JDE HTML Server) custvmhtml JDE Database Server custvmdb JDE Enterprise Server custvment JDE Deployment Server Machine name of where the Server Manager Management Console is installed, which typically is the same machine as the Deployment Server. See Understanding the Installation Process. Caution:
You must enter server and location names that exactly match the values entered during the Deployment Server installation as described in Chapter 3, "Working with the Deployment Server". These values are case sensitive.NOTE: If you do not turn off the firewall, you will have to manually configure the ports needed for communication between your JD Edwards servers. Do you want to turn off the firewall? y/n [y] y
-
When promted to choose whether to temporarily disable the firewall, or to manually configure the firewall after the VM Guest is started, select yes ('y').
Flushing firewall rules:                [OK]
Changing the hostname, IP address, and Managed Server for the EnterpriseOne HTML installation:
Renaming is complete.

Press Enter to continue:
-
The
oracle-template.shscript ends.Press Enter to exit the script and go to a login prompt.
Tip:
The HTML Web Server has not been started yet at this point. To start the HTML Web Server, refer to the chapter in this guide entitled: Chapter 6, "Starting the HTML Server"
At this point the HTML Web Server is ready to start (see Chapter 6, "Starting the HTML Server"). However, you should consider these optional steps.
Log in as root with the password ovsroot in lower case and perform this optional steps:
-
Change the passwords for the root, oracle, and weblogic users. Make sure to remember the new root password, as traditional lost root password recovery methods will not work on VM Guests.
-
Check the server time and date, and reset if desired.
-
Make sure the network connections are functioning correctly, especially the connection to the JD Edwards EnterpriseOne Database Server and Enterprise Server.
-
Configure the firewall as desired.
-
Tune the
jas.iniandjdbj.inifiles to match the site-specific hardware and user load requirements using JD Edwards EnterpriseOne Server Manager based upon any sizing recommendations from your hardware vendor. -
Check the
/etc/sysconfig/jdedwardsfile to make sure the correct entries were made when creating the server. This file contains the server names that were entered in Step 9 above. If there are any typos in these names, the server will not be set up correctly. To recover, you must uninstall and re-install the server. -
Create a certificate to replace the DEMO certificate, and turn on SSL. Once the new certificate has been created, set SecureListnener=true in nodemanager.properties. Start WebLogic Administration Console, and set the NodeManager Type=SSL.
-
Check the
/u01/oracle-template.logfile for errors. This log file logs the progress of creating the VM Guest. There are three levels of messages in this log file:-
Info
Provide status information
-
Error
Indicate the VM Guest configuration failed
-
Diagnostic
Explains why an Error message may have occurred
-