4 Working with the Platform Pack
This chapter discusses:
-
Section 4.3, "Configuring the Enterprise Server Prior to Installing the Platform Pack"
-
Section 4.7, "Manually Running the Database Creation Scripts - Windows with Oracle"
-
Section 4.9, "Rerunning the JD Edwards EnterpriseOne Platform Pack Installer"
4.1 Understanding the Platform Pack
The Platform Pack installs these major components:
-
JD Edwards EnterpriseOne Server code
-
JD Edwards EnterpriseOne database files
Note:
If you are installing the database components of JD Edwards EnterpriseOne on Oracle Real Application Clusters (Oracle RAC) with Automatic Store Management (Oracle ASM) configuration, refer to the appendix of this guide entitled: Oracle RAC with Oracle ASM Configuration.
Note:
Assuming the installation programs are run on different machines, you can concurrently install these JD Edwards EnterpriseOne servers:-
Deployment Server
-
Platform Pack on Enterprise Server and/or Database Server
-
HTML Server
This can decrease the overall time it takes to complete the installation.
Note:
To reinstall any Enterprise Server components, refer to Section 4.9, "Rerunning the JD Edwards EnterpriseOne Platform Pack Installer".This table lists the mandatory and optional components of the Platform Pack installation:
| Server | Mandatory Component | Optional Components |
|---|---|---|
| Enterprise Server | JD Edwards EnterpriseOne Foundation | ES Production
ES Prototype ES Development ES Pristine |
| Database Server | System Database | Production Databases
Prototype Databases Development Databases Pristine Databases |
Note:
Microsoft Windows Considerations. Microsoft clustering is supported for system failover protection.As detailed in the Minimum Technical Requirements, install any Microsoft Windows server upgrades that are required to support Release 9.1.
Before you install Release 9.1 software on the Microsoft Windows Enterprise Server, you must create the Release 9.1 administrator user, verify disk space, and set up and verify the hosts file.
4.2 Platform Pack Process Flow
The Platform Pack installation process installs Release 9.1 system and path code files.
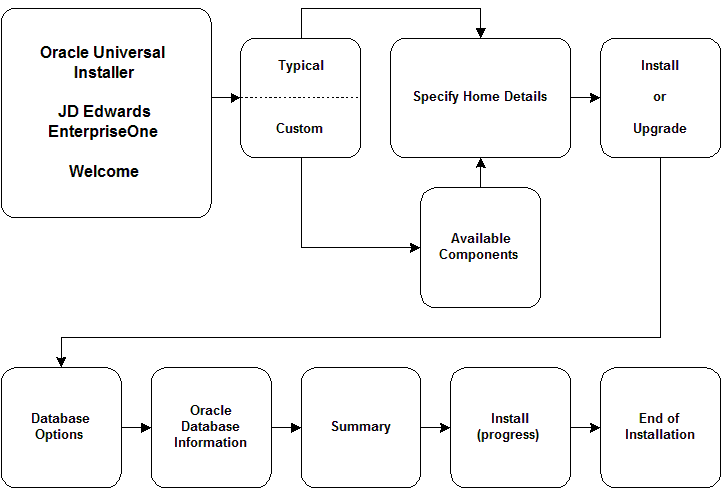
The diagram below illustrates the process flow for the Oracle Universal Installer for the JD Edwards EnterpriseOne Platform Pack.
/usr/lib/sysctl.d/00-system.conf
4.3 Configuring the Enterprise Server Prior to Installing the Platform Pack
This section discusses:
See Also
Section 2.1, "Verifying Software and Hardware Requirements" for more information about software requirements.
Microsoft Cluster Administrator Guide or Microsoft Windows Server 4 Second Edition for more information on using cluster software.
Release 9.1 on a Cluster section in JD Edwards EnterpriseOne Tools Server and Workstation Administration Guide for more information about clustering.
4.3.1 Setting Up NLS_LANG Parameter for Oracle
You can add or edit the NLS_LANG parameter by accessing the System dialog from the Control Panel. You may need to add the NLS_LANG variable, if it does not exist.
The system variable name is NLS_LANG and the variable value (prefixed by a period) should be equal to the code page value set for the NLS_CHARACTERSET in the Oracle database.
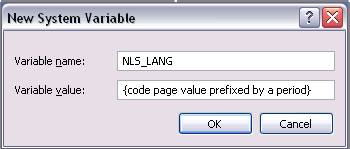
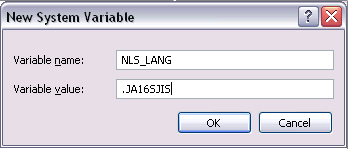
For example, if your database is using the code page JA16SJIS (Japanese), the NLS_LANG variable parameter setting would look like this:
Caution:
Remember to add a period in front of the NLS_LANG variable value for the given code page.See Also
Refer to Section 1.6, "Language Process Overview" for these values and additional information regarding the National Language Support tables.
4.3.2 Enabling Remote Connections for Oracle
If you are having trouble running the JD Edwards EnterpriseOne Platform Pack Installer against your Oracle database, you may need to enable your Oracle database to enable the system to remote connect. Oracle treats the connection established by the JD Edwards EnterpriseOne Platform Pack Installer as a remote connection because the SID is specified within the SQLPLUS command. For example, the JD Edwards EnterpriseOne Platform Pack Installer issues this sqlplus command:
system/manager@orcl
To enable remote connections for your Oracle database:
-
Edit the
init.orafile, and set the remote condition by adding this line:REMOTE_LOGIN_PASSWORDFILE=SHARED
-
After the utility runs, you must shut down and restart Oracle.
-
If you are not supplying "system" as the Oracle user, you must then grant your Oracle user the permissions they need to do all the functions in the supplied Oracle scripts. Below is a listing of these functions as seen in Oracle Enterprise Manager.
Role Admin Option Default
AQ_ADMINISTRATOR_ROLE Y Y
CONNECT Y Y
DBA Y Y
MGMT_USER Y Y
RESOURCE Y Y
System Privilege Admin Option
ANALYZE ANY N
CREATE MATERIALIZED VIEW N
CREATE TABLE N
GLOBAL QUERY REWRITE N
SELECT ANY DICTIONARY N
SELECT ANY TABLE N
UNLIMITED TABLESPACE Y
Object Privilege Schema Object Grant Option
EXECUTE SYS CHECK_UPGRADE N
READ SYS DPUMP_DIR1 Y
WRITE SYS DPUMP_DIR1 Y
READ SYS LOG_DIR1 Y
WRITE SYS LOG_DIR1 Y
EXECUTE SYS SYS_GROUP Y
Consumer Group Admin Option
SYS_GROUP Y
-
Verify the password parameter.
For example, you can issue this sqlplus command:
SQL> show parameter password
The sqlplus command produces these results:
NAME TYPE VALUE remote_login_passwordfile string EXCLUSIVE -
Verify the user is listed in the password file. For example, you could issue this sqlplus command:
SQL> select * from v$pwfile_users;
The sqlplus command produces these results:
USERNAME SYSDBA SYSOPER
SYS TRUE TRUE
SYSTEM TRUE FALSE
4.3.3 Setting Up and Verifying the Hosts File
If you use the Domain Naming Service (DNS) or the Microsoft Windows Internet Naming Service (WINS), you do not need to set up and verify the hosts file.
To set up and verify the Hosts file:
-
Using Microsoft Windows Explorer, access this directory:
\Windows\System32\Drivers\Etc\Hosts -
For each Enterprise Server on your network, you will need a machine IP address, and a machine name.
-
Verify that the address and name are each on a separate line, and that there is a return character at the end of each line.
A pound sign (#) marks the start of a comment, and the end-of-line (return) character marks the end of a comment.
-
If clustering is being used, verify that the cluster name is used as the machine name, not one of the server names.
4.4 Understanding the Oracle Installation
This section describes these topics:
-
Section 4.4.1, "Prerequisites for the Oracle Database Installation"
-
Section 4.4.2, "Pluggable Databases in Oracle 12cR1 and Higher"
4.4.1 Prerequisites for the Oracle Database Installation
Before beginning the steps in this section:
-
Install Oracle according to Oracle's Optimal Flexible Architecture rules.
-
Verify that you have an acceptable SQL environment (such as SQL Plus) in which to run the provided scripts.
-
Log on as a user with database administrator privileges.
-
If installing a language, verify that the code page settings are accurate.
4.4.2 Pluggable Databases in Oracle 12cR1 and Higher
In order to install JD Edwards EnterpriseOne into pluggable databases in Oracle 12cR1 and higher, the tnsnames.ora file used by the JD Edwards EnterpriseOne Platform Pack installer must be configured to run against the PDB (pluggable database) instead of the CDB root (container database). Consider these factors:
-
The
tnsnames.orafile must include a connection to a PDB, which includes the PDB-unique Service Name and the Connect String. -
The PDB connection can exist alone or alongside a CDB connection within the
tnsnames.orafile.
If you do not make this configuration change, the Platform Pack installer will fail if it runs against the container database, because the root (container database) is not designed for use as the production database.
Caution:
For a fully functional JD Edwards EnterpriseOne system, in addition to configuring the Oracle database client on the Enterprise Server to connect to the PDB, you must also ensure the same configuration is made for the Oracle database client on the Deployment Server.4.5 Verifying Code Page Settings for Oracle
Release 9.1 requires that the national character set of an Oracle database be set to AL16UTF16. Make sure AL16UTF16 is chosen for a new Oracle database install. This setting cannot be changed after the database is created without potential data loss depending on what it's being changed to and from.
The correct code page parameters must be set in the Oracle database and on the operating systems; the setting is the same for Microsoft Windows or UNIX. These settings apply to the Oracle database and the Oracle client:
-
NLS_NCHAR_CHARACTERSET
This parameter must always be set to AL16UTF16 for all languages (the only alternative is AL32UTF8, which is not supported by JD Edwards EnterpriseOne).
JD Edwards EnterpriseOne uses this parameter for columns such as NCHAR, NVARCHAR2, and NCLOB. JD Edwards EnterpriseOne requires that content stored in these columns is in fact in AL16UTF16.
-
NLS_CHARACTERSET
This setting defines the database character set. This setting is determined at database creation time. This setting depends on the language you want to use. For example, most Western European languages use the setting WE8MSWIN1252
This setting only affects your specified language. If all your data sources have the Unicode box checked, this setting will never be used.
JD Edwards EnterpriseOne uses this parameter for columns such as CHAR and VARCHAR2.
-
NLS_LANG
This sets the locale. The value can be changed by setting the NLS_LANG environment variable on UNIX and the registry on Microsoft Windows.
Caution:
Set the NLS_ CHARACTERSET and NLS_NCHAR_CHARACTERSET parameters for the appropriate language before loading your central objects specification objects for Release 9.1.To verify the code page settings for Oracle:
-
Verify the code page setting of the Oracle database by executing this single-line SQL command from SQL Plus:
SELECT VALUE FROM NLS_DATABASE_PARAMETERS WHERE PARAMETER = 'NLS_CHARACTERSET'; -
Verify the Unicode code page setting of the Oracle database by executing this single-line SQL command from SQL Plus:
SELECT VALUE FROM NLS_DATABASE_PARAMETERS WHERE PARAMETER = 'NLS_NCHAR_CHARACTERSET';If the setting is incorrect, set the NLS_NCHAR_CHARACTERSET value to AL16UTF16, using the Oracle documentation to change the setting.
-
Set up NLS_LANG parameter for Oracle.
For JD Edwards EnterpriseOne environments with languages to function properly, the NLS_LANG parameter must be set correctly for Oracle. These settings must be set for your Oracle client workstations and Oracle database server.
Caution:
Remember to add a period before the NLS_LANG variable value for the given code page.See Also
Refer to Section 1.6, "Language Process Overview" for the National Language Support tables and other information related to multilingual installations.
4.6 Installing the Platform Pack
This section discusses:
4.6.1 Running the JD Edwards EnterpriseOne Platform Pack Installer
Caution:
If you are installing the Enterprise Server and the Database Server on different machines, you cannot run the installer on the Enterprise Server and install the Database Server remotely. You must copy the installer images to the Database Server and run the installer on that machine. For the Enterprise Server only, you will need the image for disk1. For a Database Server, you will need the disk1 image plus the database disk images.To run the JD Edwards EnterpriseOne Platform Pack Installer:
-
Log on to the Enterprise Server as a user with Administrative rights.
Caution:
Ensure that the Administrator account name that you use does not contain any special characters. -
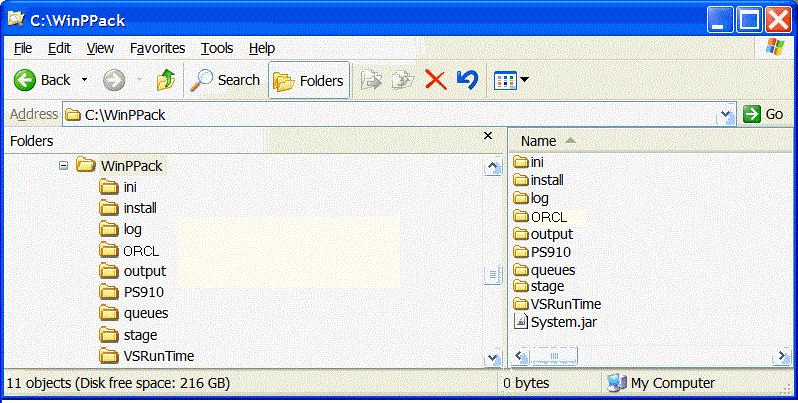
Create a folder into which you will copy the .zip file of the Platform Pack image. In addition to the Platform Package image, you will copy one .zip file image of the Oracle database into this same directory. The directory can be any name but cannot contain spaces or special characters in the directory path. For example, the folder might be named:
c:\WinPPackCaution:
Do not extract the database files into a directory other than the same base directory for the Platform Pack installation. You cannot end up with a functional installation with a structure such as:c:\WinPPack\ORCL\ORCL -
Extract the two zip files within the root of the folder created above. Using the example in this guide, a correctly extracted structure is:
-
In the above extracted structure, locate the
setup.exefile under the\installsubdirectory, right-click on it, and select Run as Administrator.Note:
The Oracle Universal Installer takes a few minutes to start up.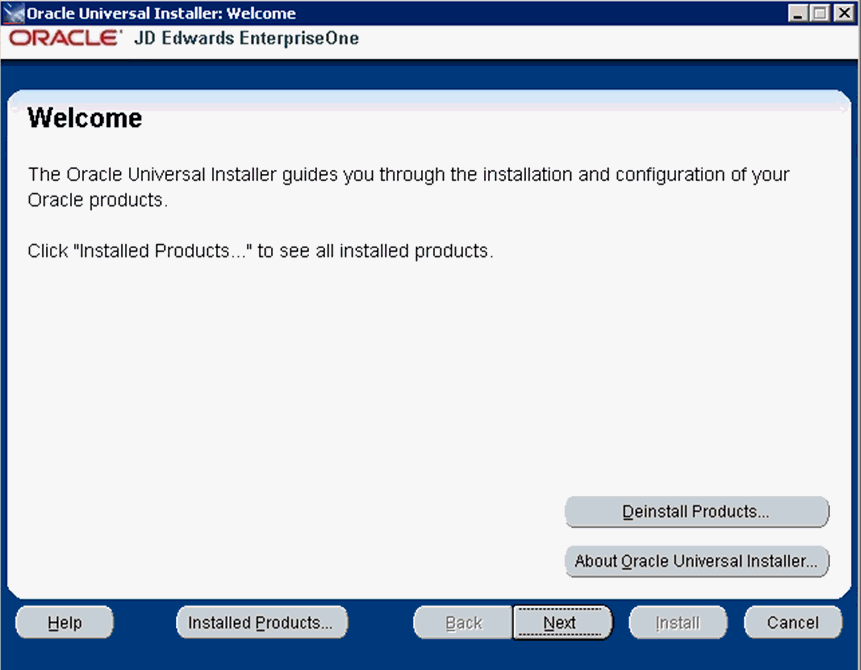
-
On Welcome, click the Next button.
-
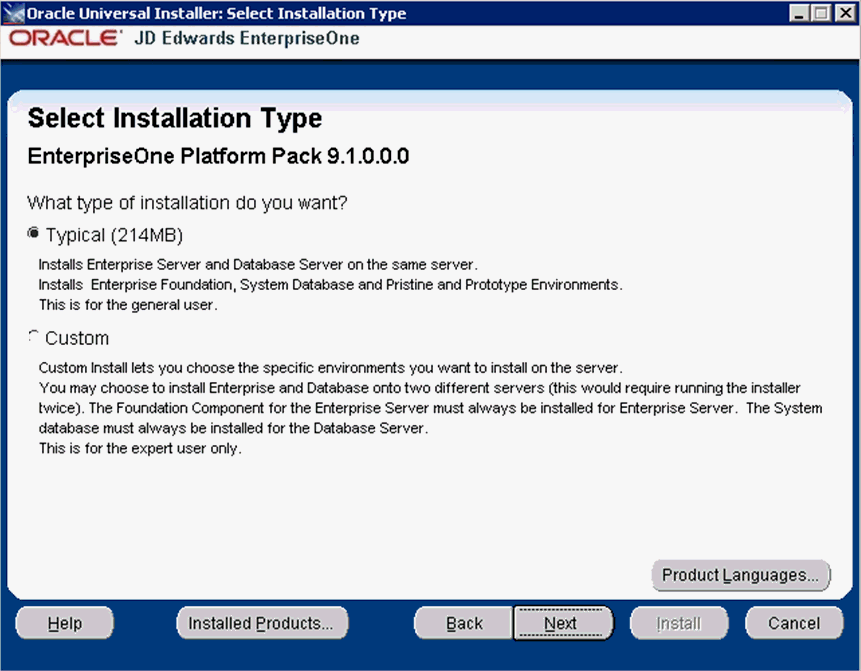
On Select Installation Type, choose your installation type:
-
Typical
Choose this setup type if you wish to complete the Platform Pack installation with no further specifications. This installation option is recommended for most users and includes the required logic and database components for the Foundation (System) and the Prototype and Pristine environments.
-
Custom
This mode is recommended for experienced users, choose this setup type if you wish to complete the Platform Pack installation by specifying the installation of a subset of pre-defined environments.
-
-
Click the Next button.
-
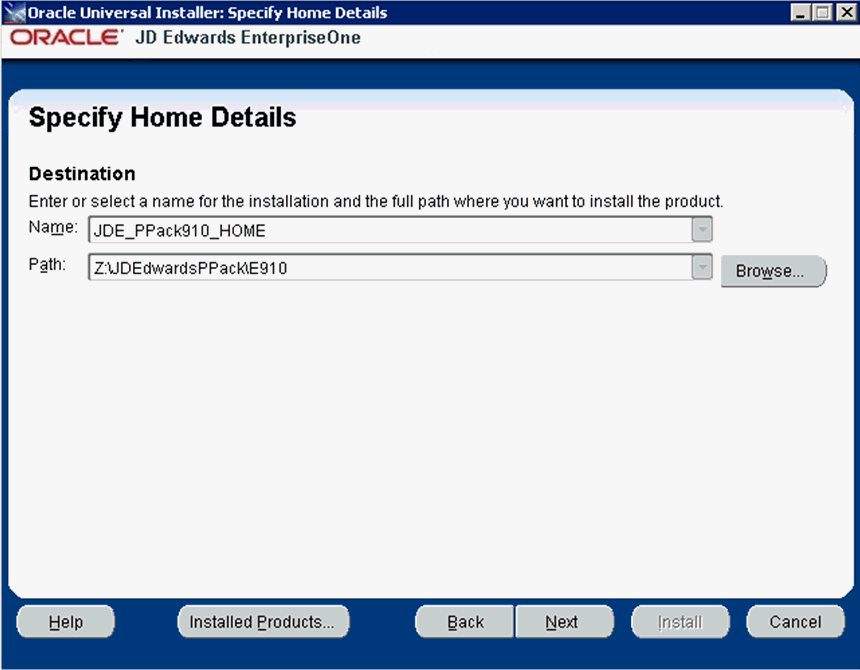
On Specify Home Details, complete these fields:
-
Name
Caution:
Do not accept the default value for this field. If any Oracle product is already installed, the installer automatically populates this field with the existing ORACLE_HOME values, which will be incorrect for JD Edwards EnterpriseOne.Enter a unique name for the JD Edwards EnterpriseOne Platform Pack installation. For example:
JDE_PPack_910_HOME
Caution:
Due to Java file and directory naming conventions, the directory name you specify here cannot contain special characters or blank (space) characters. -
Path
Caution:
Do not accept the default value for this field. If any Oracle product is already installed the installer automatically populates this field with the value corresponding to the home for the ORACLE_HOME of the installed product, which will be incorrect for JD Edwards EnterpriseOne.Enter the drive and directory where you want the files installed on your Enterprise Server. For example:
Z:\JDEdwardsPPack\E910Caution:
Make sure to choose a disk or drive with enough space to accommodate required space for the mandatory logic server components and optionally the database components. If desired, later in the installation you can specify to install the database components on a different disk and/or machine.If you are rerunning the JD Edwards EnterpriseOne Platform Pack Installer, refer to Section 4.9, "Rerunning the JD Edwards EnterpriseOne Platform Pack Installer".
-
-
Click the Next button.
If you chose the Typical installation type, the Available Products screen will not display; you can skip to the Step 11.
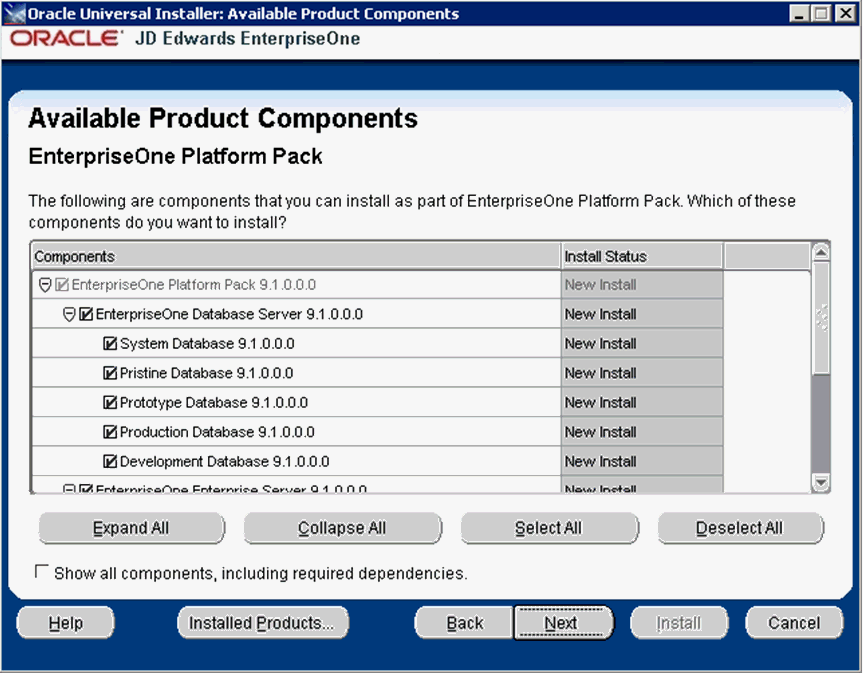
If you chose the Custom installation type, the Oracle Universal Installer displays a list of available JD Edwards EnterpriseOne product components, as shown in the example below:
Tip:
Use the scroll bar to on the right hand side of the screen to view the complete list of available components.On Available Product Components, select from these choices:
JD Edwards EnterpriseOne Database Server
-
System Database
Note:
This selection includes mandatory system tables. If you do not select this box and the OUI installer does not detect that the component was previously installed, it selects this component automatically. Likewise, if you rerun the JD Edwards EnterpriseOne Platform Pack Installer to add an environment it will check to ensure that this component has already been installed and you will not be given an option to install the environment on a machine, drive, or directory that is different from that which contains the JD Edwards EnterpriseOne System Database. -
Production Databases
-
Prototype Databases
-
Development Databases
-
Pristine Databases
JD Edwards EnterpriseOne Enterprise Server
-
JD Edwards EnterpriseOne Foundation
Note:
This selection includes system files. You must choose this feature for all initial installations of the Enterprise Server. If you do not select this feature, the JD Edwards EnterpriseOne Platform Pack Installer automatically selects it for installation. -
ES Production
-
ES Prototype
-
ES Development
-
ES Pristine
-
-
After you have verified your selection of components, click the Next button.
-
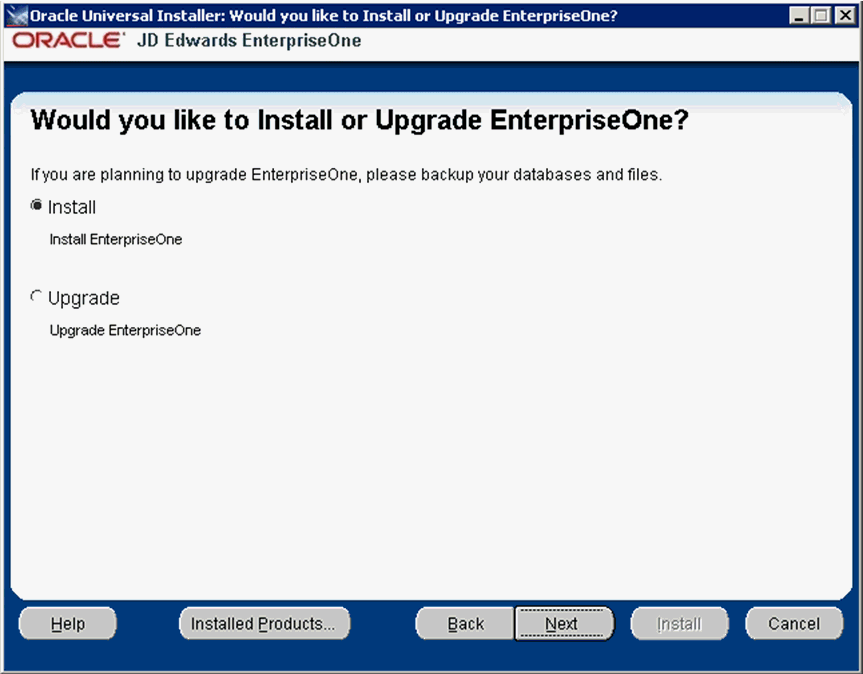
On Would you like to Install or Upgrade EnterpriseOne?, choose whether you want to install or upgrade JD Edwards EnterpriseOne. The list below describes each run mode.
-
Install (Install EnterpriseOne)
In this mode, the JD Edwards EnterpriseOne Platform Pack Installer checks for the existence of JD Edwards EnterpriseOne business data and control tables; if either exists, the JD Edwards EnterpriseOne Platform Pack Installer aborts. This prevents the inadvertent overwriting of existing critical business data and control tables. If the JD Edwards EnterpriseOne Platform Pack Installer does not detect pre-existing JD Edwards EnterpriseOne data or control tables, the installation process continues normally.
Caution:
You should always back up all databases that you want to preserve. -
Upgrade (Upgrade EnterpriseOne)
In this mode, the JD Edwards EnterpriseOne Platform Pack Installer checks for the existence of JD Edwards EnterpriseOne business data and control tables which are prerequisites to an upgrade of JD Edwards EnterpriseOne.
Caution:
You should always back up all databases that you want to preserve.
-
-
Click the Next button.
-
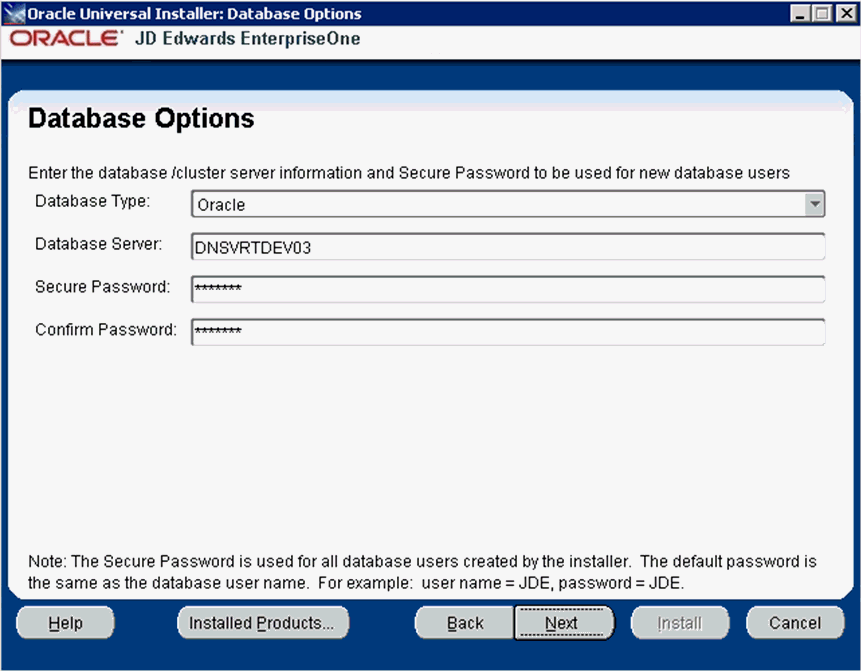
On Database Options, complete these fields:
-
Database Type
Use the pulldown to choose Oracle.
-
Database Server
By default, the JD Edwards EnterpriseOne Platform Pack Installer automatically detects and populates this field with the machine name on which it is running. The JD Edwards EnterpriseOne Platform Pack Installer validates the Database Server name and compares it against the name of the local computer. If these values are different (for example, if you manually change the value of this field), the JD Edwards EnterpriseOne Platform Pack Installer assumes the Database Server is either a clustered or remote server. If you have selected to install databases, and the database server name that you entered cannot be validated, an error dialog is displayed with resolution instructions. Refer to the section of this chapter entitled: Section 4.8.3, "Warning - Database Server Name Does Not Match".
For additional details on all Platform Pack error conditions, refer to the section of this guide entitled: Section 4.8, "Troubleshooting Platform Pack Installation".
Caution:
If you are installing the Enterprise Server and the Database Server on different machines, you cannot run the installer on the Enterprise Server and install the Database Server remotely. You must copy the installer images to the Database Server and run the installer on that machine. For the Enterprise Server only, you will need the image for disk1. For a Database Server, you will need the disk1 image plus the database disk images. -
Secure Password
If you wish to change the default password that the JD Edwards EnterpriseOne installer uses when creating Oracle users, you can enter a Secure Password. The maximum length of the Secure Password is 10 characters and cannot contain any of these special characters: @ $ / \
Caution:
The non-encrypted value for the Secure Password is stored in the ORCL_set.bat file. This password is used to load the database components. Oracle strongly recommends that you erase this value once the database scripts have run successfully.Note: If you subsequently add an additional database component, you must set the value in the set script back to the Secure Password before running the scripts or the OUI installer (which calls the scripts) for the additional components.
Note:
If you do not change the default value (DEFAULT), the system creates a password for each user where the password is the same as their user ID. For example, if a user ID is JDE, then by default the system creates a corresponding password of JDE for that user.Caution:
If you change the default password in the Platform Pack installation for your Enterprise Server, you must also manually change the[DSPWD]section in thejde.inion the Deployment Server and specify the new secure password that you are using. If you fail to synchronize these database password settings, the various Installation Workbenches will not be able to connect to the database. -
Confirm Password
Re-enter the password.
-
-
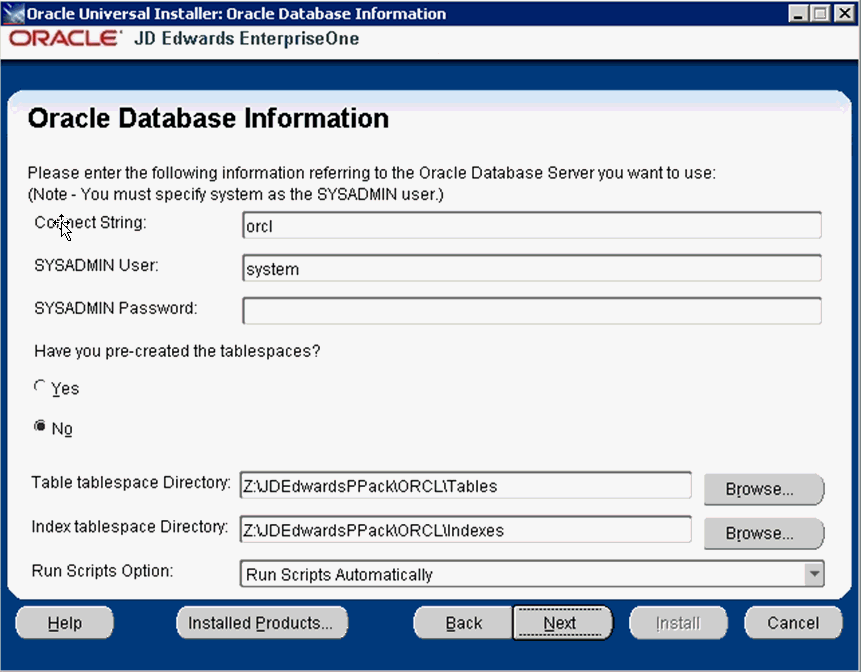
On Oracle Database Information, complete these fields referring to the Oracle Database Server that you want to use:
Note:
You must specify the SYSADMIN user as system. The Oracle portion of the install will fail if you supply sys or any other user that must connect with "as SYSDBA".-
Connect String
Enter a valid value for your Oracle connect string. You may need to obtain this value from your Oracle DBA. You cannot proceed with the installation until this value can be validated by the JD Edwards EnterpriseOne Platform Pack Installer; that is, the Installer will not allow you to proceed if it cannot connect to the database.
-
SYSADMIN User
The value system (or equivalent) identifies the system administration user for your Oracle installation. This user must have full DBA privileges which are standard for Oracle installations. The OUI installer uses the Oracle export / import tool (data pump).
Caution:
Unlike versions of the JD Edwards EnterpriseOne Platform Pack installer for Oracle databases which were previous to Release 9.1, you cannot use the value sys here. Oracle recommends you use the default value of system. -
SYSADMIN Password
Enter a valid password for the system administration (SYSADMIN) user under which you will be installing the JD Edwards EnterpriseOne Oracle databases.
Caution:
The non-encrypted value for the SYSADMIN Password is stored in the ORCL_set.shORCL_set.bat file. This password is used to load the database components. Oracle strongly recommends that you erase this value once the database scripts have run successfully.Note: If you subsequently add an additional database component, you must set the value in the set script back to the SYSADMIN Password before running the scripts or the OUI installer (which calls the scripts) for the additional components.
-
Have you pre-created the tablespaces?
Choose the radio button applicable to your installation:
-
Yes
-
No
Note:
Use the Yes option if you wish to do anything other than creating the tablespaces in the most basic fashion. If you select Yes, the installer will not create the tablespaces. In this case, you should also choose to the Run Scripts Manually option, and then edit the tablespace creation scripts to your specifications before running the scripts yourself. Refer to the section of this guide entitled: Manually Running the Database Creation Steps. -
-
Tablespace Directory
Enter the path where you want the JD Edwards EnterpriseOne Platform Pack Installer to create your Oracle database tables. For example:
z:\JDEdwardsPPack\ORCL\Tables -
Index Tablespace Directory
Enter the path where you want the JD Edwards EnterpriseOne Platform Pack Installer to create your Oracle database indexes. For example:
z:\JDEdwardsPPack\ORCL\Indexes -
Run Scripts Option
The default value is Run Scripts Automatically.
Optionally, you can use the pulldown to choose Run Scripts Manually. If you choose this option, refers to a later section in the chapter entitled: Manually Running the Database Creation Scripts.
The following Oracle connect information screen only appears if you did not select any database components. Usually this is the case because you are installing the database components and the logic components on separate machines.
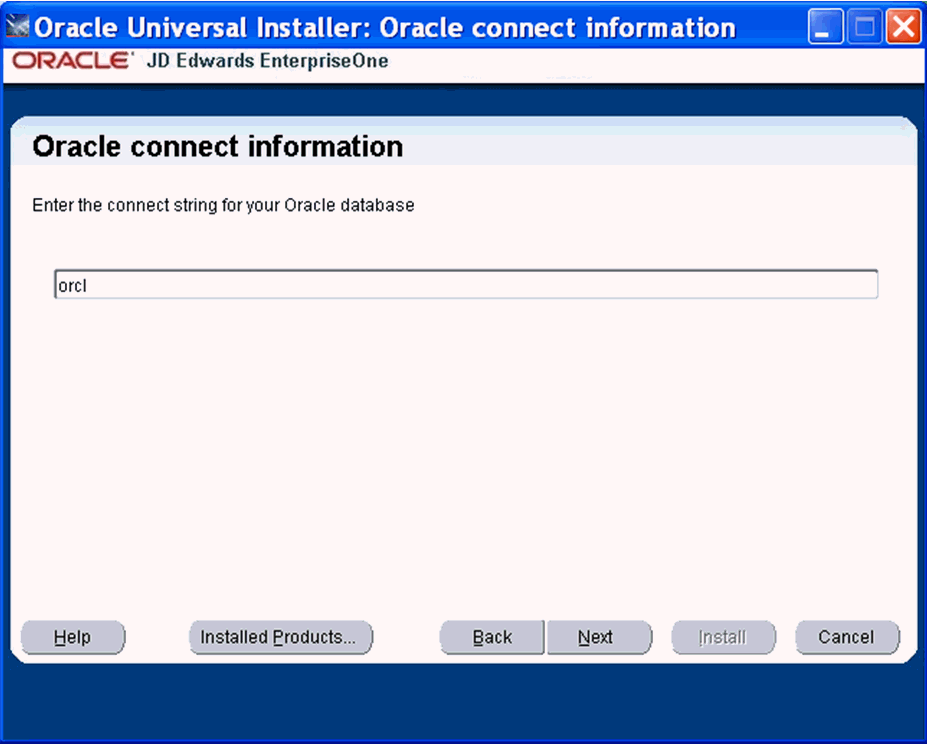
On Oracle connect information, enter the connect string for your Oracle database and click the Next button. The installer continues with the next screen as described below.
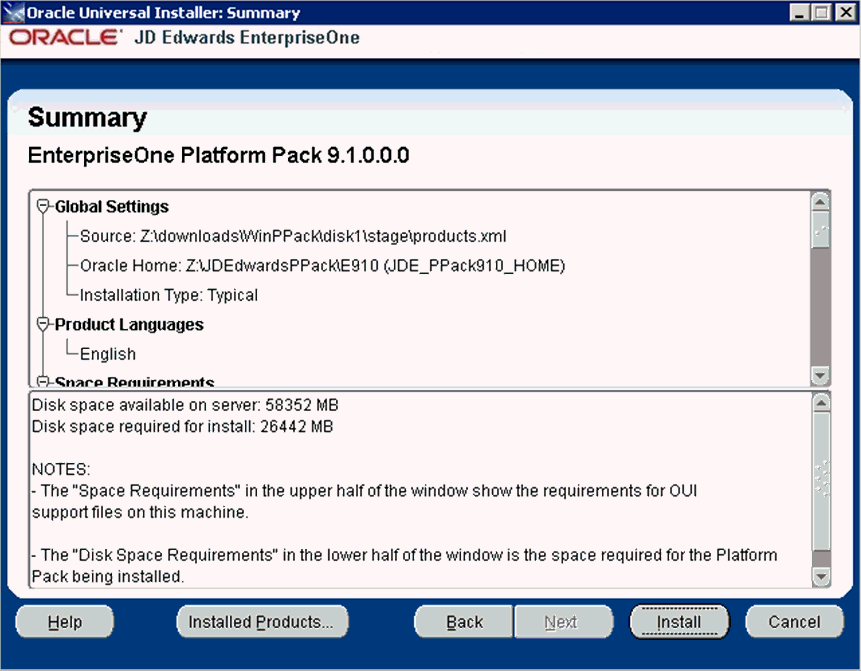
If you did not select any database components, the installer will not show the Oracle connect information screen and will proceed to install both the logic and the database components on this machine. In this case, the installer shows the below screen.
-
-
On Summary, in the top half of the screen, review your selections and in the bottom half of the screen review the NOTES, which detail the disk space requirements for OUI support files and also for the Platform Pack being installed on this machine.
-
Click the Install button.
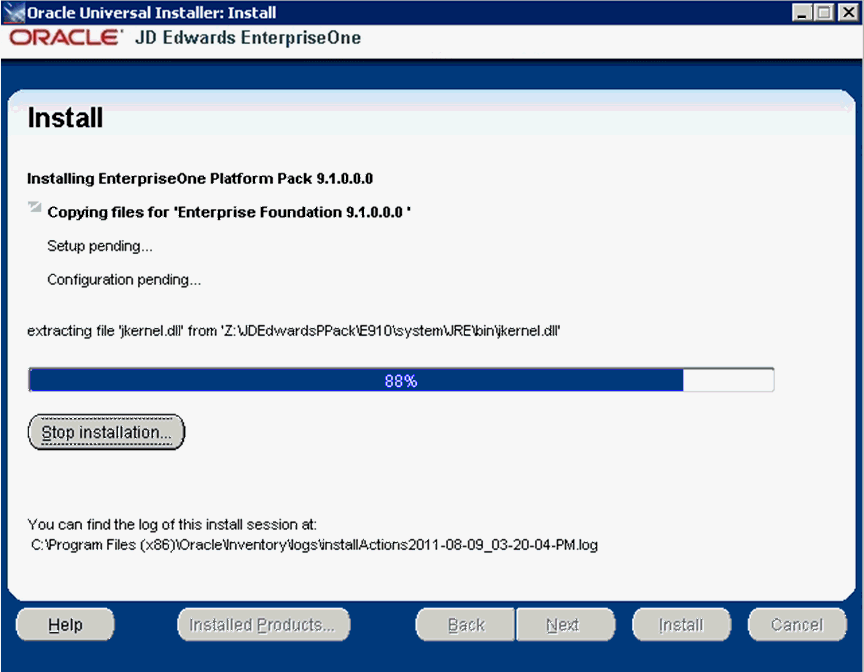
As the installer runs it displays the Install progress, as shown in the following example.
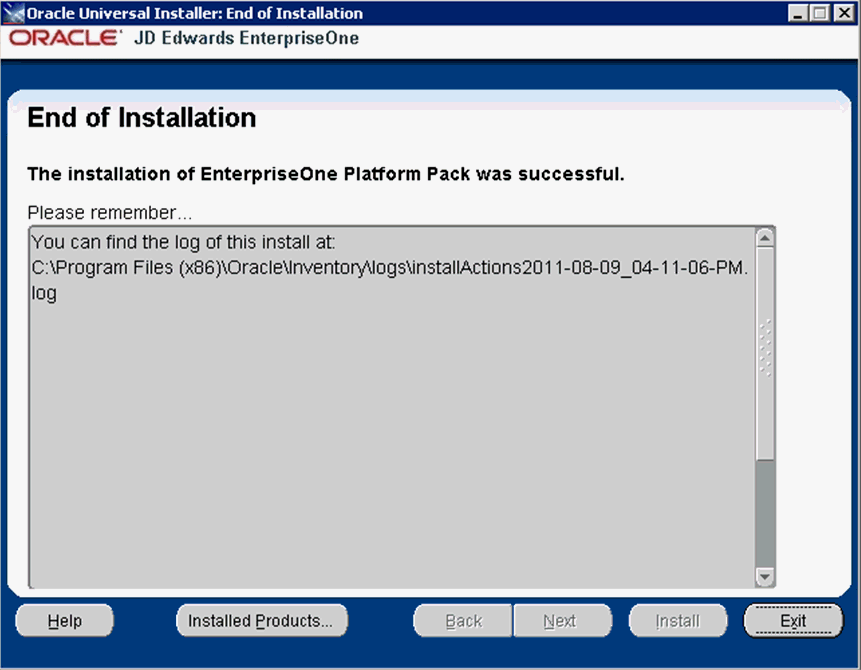
After the installation is complete, the following End of Installation screen is displayed.
-
On End of Installation, verify the installation of the EnterpriseOne Platform Pack was successful.
Review the Please remember ... portion for the installer log file location. The log file name is specified with the date and stamp when the installer ran. For example:
c:\Program Files (x86)\Oracle\Inventory\logs\installActions2011-08-09_04-11-06-PM.log -
Click the Exit button to exit OUI.

-
On Exit, click the Yes button.
4.6.2 Verifying the Platform Pack Log File
You can verify that the Platform Pack Installer ran properly by viewing the log file. The log file name is specified with the date and stamp when the installer ran. For example:
c:\Program Files (x86)\Oracle\Inventory\logs\installActions2011-08-09_04-11-06-PM.log
4.7 Manually Running the Database Creation Scripts - Windows with Oracle
Once the Platform Pack install has successfully completed on your Windows-based Enterprise Server, the Oracle database creation scripts and dump files are located in the EnterpriseOne install location on the Enterprise Server. For example:
Z:\JDEdwardsPPack\E910\ORCL
As it runs, the Platform Pack installer edits the script that sets the environment variables. You can review this script for accuracy:
ORCL_set.BAT
To manually run the Oracle database creation scripts:
-
Sign on to the Enterprise Server as an Oracle user with a Windows account that is part of the ora_dba group.
-
You can review and change the tablespace scripts if desired. Do not change the tablespace names.
The tablespace creation scripts are called:
-
CRTABSP_SH.nt -
CRTABSP_CO.nt -
CRTABSP_ENV.nt
-
-
If you chose to pre-create the tablespaces in order to use a feature such as ASM, before proceeding you first need to create the tablespaces. Note that you must use the standard tablespace names. For example:
proddtat proddtai prodctlt prodctli pd910t pd910iTip:
To determine tablespace disk space requirements, you can inspect the supplied tablespace creation scripts to see those values. -
Start a Command window with Run As Administrator and navigate to the ORCL folder within the install location. For example:
z:\JDEdwardsPPack\E910\ORCL -
Verify that DATABASE_INSTALL_PATH in the
InstallOracleDatabase.batfile is set to the current directory. For example:@cd \d Z:\JDEdwardsPPack\E910\ORCL -
Run the
InstallOracleDatabase.batscript. -
Check the logs in the logs directory.
4.8 Troubleshooting Platform Pack Installation
This section discusses these potential error or warning conditions and their probable causes and resolutions when running the JD Edwards EnterpriseOne Platform Pack Installer:
-
Section 4.8.1, "Error: Prototype Environment Already Exists"
-
Section 4.8.3, "Warning - Database Server Name Does Not Match"
4.8.1 Error: Prototype Environment Already Exists
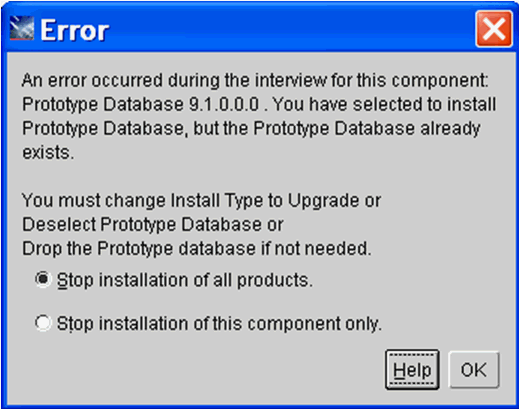
This Error occurs if you have selected to install the Prototype Database, but the Prototype database already exists:
-
To remedy, your options are:
-
If your Install type is Install, you can change it to Upgrade.
-
If you are using the Custom install, you can deselect the Prototype Database.
-
If you do not need the Prototype database, you can skip the installation of it on this screen and manually drop the database later.
-
-
In order for the installer to proceed or abort, you must choose one of these radio buttons:
-
Stop installation of all products.
Choose this option if you want to exit the installer in order to make changes and then rerun the installer at a later time.
-
Stop the installation of this component only.
Choose this option if you want to skip the installation of the Prototype database and continue running the installer.
-
-
Click the OK button to close the error dialog.
4.8.2 Development Environment Warning
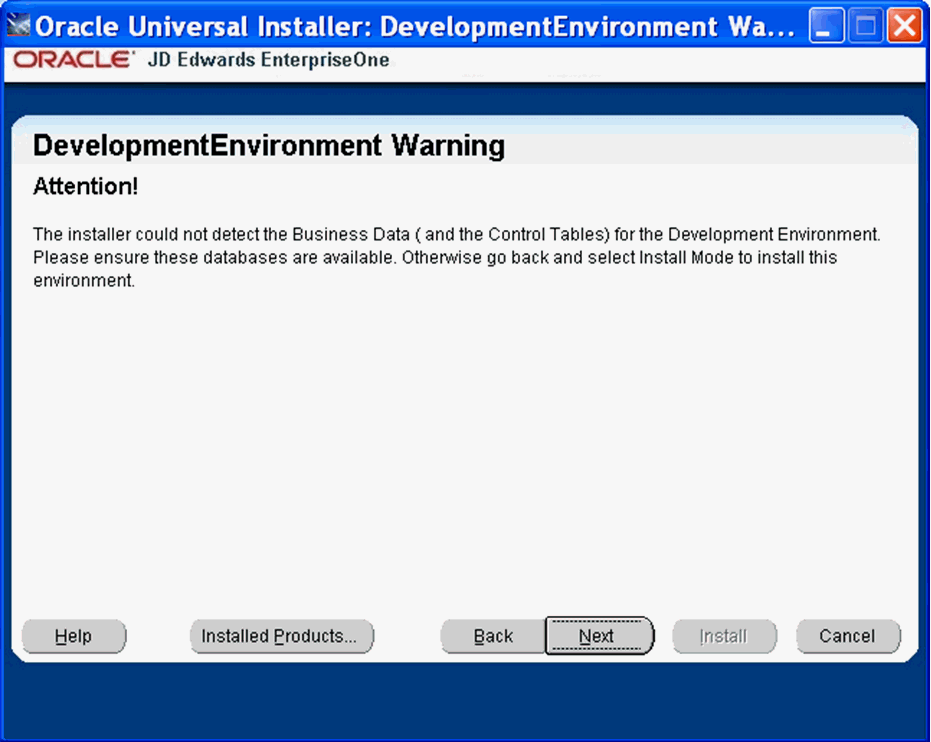
This Warning indicates the installer could not detect Business Data (and the Control Tables) for the Development Environment and you have chosen the Upgrade option. If you do not want the Installer to create the Business Data and Control Tables, you can click on Next and ignore this error. Otherwise go back and change your options to use the Installer in Install and Custom mode to select and install it.
4.8.3 Warning - Database Server Name Does Not Match
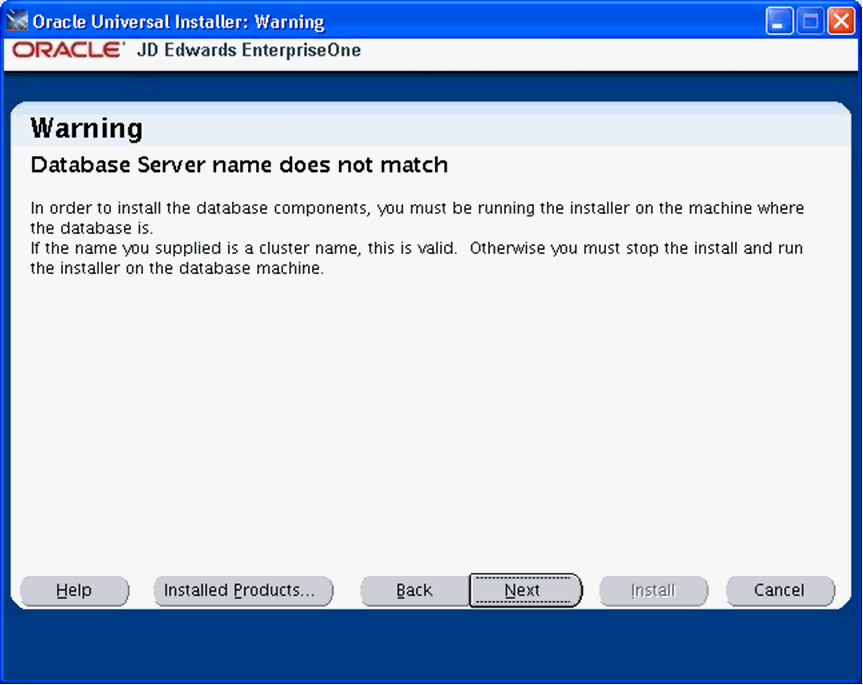
The Platform Pack installer displays the following error message if the machine name you specified on Database Options does not match the machine name on which the installer is being run. In order to install the database components, you must run the Platform Pack installer on the machine on which the database resides. Unless the machine name you specified is a known-good cluster name, you must cancel the installation and run the installer on the database machine.
4.9 Rerunning the JD Edwards EnterpriseOne Platform Pack Installer
You must rerun the JD Edwards EnterpriseOne Platform Pack Installer to support these scenarios:
-
You want to install the Enterprise Server and the Database Server on physically different machines.
-
You want to add an Enterprise Server environment to the Enterprise Server.
-
You want to add a Database Server database to the Database Server.
-
You want to reinstall the JD Edwards EnterpriseOne Foundation on the Enterprise Server.
-
You want to reinstall the System Database on the Database Server.
You should never reinstall any optional components without first deinstalling the components. If you select to deinstall the mandatory components you must also select to deinstall or have already deinstalled all related optional components. This table lists the mandatory and related optional components:
| Server | Mandatory Component | Optional Components |
|---|---|---|
| Enterprise Server | JD Edwards EnterpriseOne Foundation | ES Production
ES Prototype ES Development ES Pristine |
| Database Server | System Database | Production Databases
Prototype Databases Development Databases Pristine Databases |
4.10 Installing the Latest Tools Release and Latest Tools Release Patch to the Enterprise Server
Caution:
The Tools Release level must match what was installed on the Deployment Server.For instructions on installing the tools release on the Deployment Server, refer to the JD Edwards EnterpriseOne Deployment Server Reference Guide.
To install the latest tools release and latest tools release patch:
-
From the Update Center homepage, download the latest Tools Release Patch (for example, 9.1.1.0) and Tools Release documentation.
-
Using Server Manager, install the Tools Release Patch to the Enterprise Server.
4.11 Working with Database Security
In order to maximize your database security, you should change the passwords on all table owners created during the Platform Pack installation; these are created with the user and password equal to the same value. Such a user and password relationship could expose you to worms and viruses aimed at gaining access to your database. Consult with your DBA for advice on changing passwords to meet the security requirements of your database installation.
The Installation Workbench assumes that the table owner 's password is the same as the table owner, unless it finds this override in the jde.ini file on the Deployment Server. Once the database passwords have been changed, you will need to add this section to the jde.ini file:
[DSPWD]
Datasource_owner=new_password
Note:
Microsoft Windows 2008. For a Deployment Server running on a Microsoft Windows 2008 platform, navigate toNOTEPAD.EXE in c:\WINDOWS directory. Right click on the executable and select "Run as Administrator". Then click on File and open this file for editing:
c:\WINDOWS\JDE.INI
For example, if you changed the passwords for PRODDTA and PRODCTL to alaska5 and nevada6 your section would look like this:
[DSPWD]
PRODDTA=alaska5
PRODCTL=nevada6
The Installation Workbench assumes that the database user is JDE and that the password is the same, unless it finds this override in the jde.ini file on the Deployment Server. As a security precaution, you should also change the password on the JDE user and add an override in the [DSPWD] section of the jde.ini file. Once the database passwords have been changed, you will need to add this section to the jde.ini file:
[DSPWD]
JDE=new_password
For example, if you are changing the JDE user's password to apples, your section would look like this:
[DSPWD]
JDE=apples
Note:
You must also logon to JDEPLAN using the changed password, otherwise database connections will fail. Using the above example of a changed password, you would logon using these credentials:User = JDE
Password = apples
Environment = JDEPLAN
Caution:
The Installation Workbench can only process passwords equal to or less than 10 characters in length. Therefore, you cannot use passwords greater than 10 characters even if your RDBMS allows it.After you change the [DSPWD] section of the jde.ini file, logon to OneWorld in the JDEPLAN environment on the Deployment Server with the new password in the correct case.
Whenever you change the password on your database, as recommended for security purposes, you must also ensure that your security settings in the Enterprise Server jde.ini file match that of your database. Refer to Chapter 11, "Working With Signon Security" in this guide for applicable instructions.
You should secure the jde.ini file on the Deployment Server to prevent unauthorized access.
You should delete the [DSPWD] section once the install or upgrade is complete.
Note:
If you are upgrading from JD Edwards EnterpriseOne Releases 8.10 or 8.11, you should consider disabling the legacy user, which is PSFT.