4 Working with the Platform Pack on the IBM i
This chapter discusses:
-
Section 4.3, "Configuring the Enterprise Server Prior to Installing the Platform Pack"
-
Section 4.4, "Understanding the Platform Pack Installation on the IBM i"
-
Section 4.5, "Running the JD Edwards EnterpriseOne Platform Pack Installer for the IBM i"
-
Section 4.6, "Troubleshooting the IBM i Platform Pack Installation"
-
Section 4.7, "Rerunning the JD Edwards EnterpriseOne Platform Pack Installer"
4.1 Understanding the Platform Pack
The Platform Pack installs these major components:
-
JD Edwards EnterpriseOne Server code
-
JD Edwards EnterpriseOne database tables
Note:
To reinstall any Enterprise Server components, refer to Section 4.7, "Rerunning the JD Edwards EnterpriseOne Platform Pack Installer".This table lists the mandatory and optional components of the Platform Pack installation:
| Server | Mandatory Component | Optional Components |
|---|---|---|
| Enterprise Server | JD Edwards EnterpriseOne Foundation | ES Production
ES Prototype ES Development ES Pristine |
| Database Server | System Database | Production Databases
Prototype Databases Development Databases Pristine Databases |
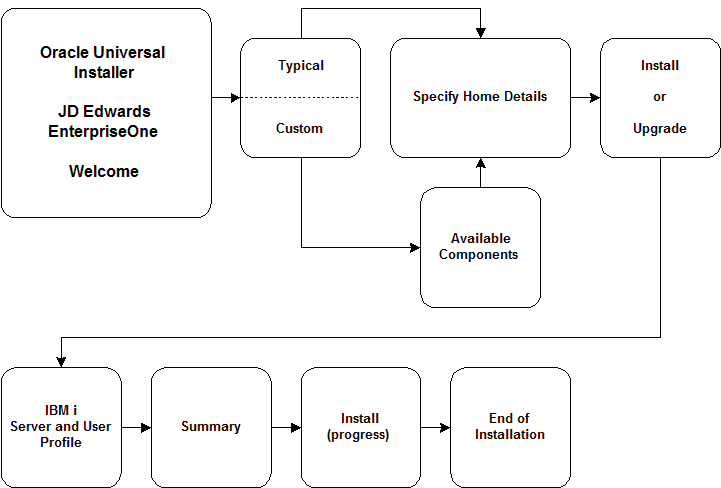
4.2 Platform Pack Process Flow
The Platform Pack installation process installs Release 9.1 system and path code files.
The diagram below illustrates the process flow for the Oracle Universal Installer for the JD Edwards EnterpriseOne Platform Pack.
4.3 Configuring the Enterprise Server Prior to Installing the Platform Pack
Install any IBM i server upgrades that are required to support Release 9.1.
Before you install Release 9.1 software on the Microsoft Windows Enterprise Server, you must create the Release 9.1 administrator user, verify disk space, and set up and verify the hosts file.
This section discusses:
-
Section 4.3.2, "Understanding Security for the Platform Pack Installer"
-
Section 4.3.4, "Setting up the TCP\IP Protocol for Enterprise Server"
-
Section 4.3.5, "Setting up IBM i Access on your Enterprise Server"
-
Section 4.3.6, "Starting the Remote Database TCP\IP Service (Optional)"
-
Section 4.3.12, "Rebuilding Cross Reference Tables on the IBM i"
4.3.1 Understanding the Prerequisites
Verify this list of prerequisites is met prior to installing the JD Edwards EnterpriseOne Platform Pack on your IBM i-based Enterprise Server:
-
Refer to the Language Process Overview for the National Language Support tables and other information related to multilingual installations.
-
Install the requisite IBM i upgrades.
-
Verify that you have met the hardware and software requirements for the Release 9.1 release you are installing. See Release 9.1 Hardware and Software Requirements.
-
If you prefer to perform the configuration tasks in this chapter (set up TCP\IP and IBM i Access) in a language other than the language for which the IBM i is currently configured, change the value for the code character set ID. For example, to perform these configuration tasks in English, set the code character set ID to 37. After completing these configuration tasks, reset the code character set ID to its original value.
4.3.2 Understanding Security for the Platform Pack Installer
The following is a list of security actions performed by the JD Edwards EnterpriseOne Installer:
-
Recreates the ONEWORLD job description.
-
Creates the user profiles for JDE and ONEWORLD, each with user class *PGMR.
-
Grants the JDE user rights to the ONEWORLD user profile.
-
Grant rights to QRECOVERY library for users JDE and ONEWORLD so that they can create SQL Packages in there for UBEs and CALLOBJ kernels.
-
If the PSFT user profile exists, for each environment that you are upgrading, uses GRTOBJAUT to grant authority for all tables in business data and control tables for JDE.
4.3.3 Setting the System Values
Because the JD Edwards EnterpriseOne Platform Pack Installer cannot run with the default QJOBMSGQFL system value, you may need to change it.
To verify the existing QJOBMSGQFL system value, and change if necessary:
-
Enter this command:
WRKSYSVAL QJOBMSGQFL -
Enter option 5.
If the value displayed is *NOWRAP, you must change it to *WRAP or *PRTWRAP. Be sure to note the existing value so you can reset it after you complete the JD Edwards EnterpriseOne Platform Pack installation.
To allow the JD Edwards EnterpriseOne services to run, you must change the value for QUSEADPAUT to *NONE before installing the Enterprise Services. Then once the JD Edwards EnterpriseOne Platform Pack installation is complete, you can change this value back to its original setting.
To set the system values:
-
Enter this command:
WRKSYSVAL QUSEADPAUT
-
Enter option 5.
If the value displayed is anything other than *NONE, you must change from that value to *NONE. Be sure and note the existing value so you can reset it after you complete the installation of the JD Edwards EnterpriseOne Platform Pack.
4.3.4 Setting up the TCP\IP Protocol for Enterprise Server
Note:
Set up the TCP\IP service to start automatically each time you IPL the IBM i. For more information about setting it up, contact your system administrator or see the appropriate IBM documentation.To set up the TCP\IP protocol for your IBM i Enterprise Server:
-
Log on to the Enterprise Server as QSECOFR (or as any user who can access the Configure TCP\IP menu).
-
On Current OneWorld Versions, choose the version of the software for which you are setting up the TCP\IP protocol.
-
To access the Configure TCP\IP menu, enter
CFGTCP. -
Select Work With TCP\IP Host Table Entries.
-
On Work With TCP\IP Host Table Entries, find the network (Internet) address for the Enterprise Server.
A single machine could have more than one entry for the same network address. Verify that an entry exists for the Enterprise Server network address and that it matches the format that follows. Search for the Enterprise Server network address by entering the Enterprise Server name only (for example, SYS1). If one does not exist, you must add one by choosing Add.
In the Host Name field, your Enterprise Server (machine) name should appear in this format:
hostname.domainnamewhere
hostnameis the name of your machine anddomainnameis the local domain of the machine on the network. For example,SYS1.MFG.ABC.COM, in which SYS1 is the Enterprise Server name andMFG.ABC.COMis the domain name. The combined Enterprise Server name and local domain name represent the location of the Enterprise Server on the network.Note:
Network Considerations. To avoid problems when applications running on separate machines need to communicate with applications running on other machines on the same network, make sure that each machine name (host name) has a single unique dot decimal address. For example, SYS1 could have a dot decimal address of, for instance, 140.252.13.33, but you could not assign any other address to it. -
To verify that the local domain and Enterprise Server names represent the correct location of the IBM i, choose Change Local Domain and Host Names from the Work With TCP\IP Host Table Entries form.
Verify that the Local Domain Name and Local Host Name fields match the combined
hostname.domainnamenetwork address.Following the example in this task, the local domain name would be
MFG.ABC.COMand the local host name would beSYS1.
4.3.5 Setting up IBM i Access on your Enterprise Server
The IBM i Access terminal emulation program enables workstations to communicate with IBM i servers. This task describes the procedure to set up the component of IBM i Access that runs on the IBM i server.
To set up IBM i Access on your JD Edwards EnterpriseOne Enterprise Server:
-
To determine the number of prestart jobs that are available and have been submitted for program QZDASOINIT, enter this command:
DSPACTPJ QUSRWRK QSYS\QZDASOINITInformation about the number of your system's prestart jobs, prestart jobs submitted, and program start requests appears.
The number of prestart jobs depends on the number of concurrent and active ODBC user connections. This change is iterative as users or applications are added or removed. If you do not have enough prestart jobs, your system could be slow to make connections. If connections fail, they could be successful with the second attempt. If too many prestart jobs are waiting, the system will end some of them automatically. Also, the system initiates prestart jobs as additional ones are submitted.
Note:
Troubleshooting. To determine the number of prestart jobs you should set up, be aware that each OneWorld user typically uses three to five ODBC connections. Each ODBC connection uses one QZDASOINIT program. Therefore, the initial value for QZDASOINIT could be set to four times the number of expected concurrent connected users.The current maximum number of prestart jobs is 9,999. If more jobs are needed, they will be created as necessary.
-
To see the current settings, enter this command:
DSPSBSD QUSRWRK -
Choose option 10, and then choose option 5 for program QSYS\QZDASOINIT.
-
To access the form on which you can change the number of prestart jobs, enter this command and press F4 to prompt:
CHGPJE -
Change the number of prestart jobs as needed, and then press Enter.
-
Restart the QUSRWRK subsystem for your changes to take effect.
4.3.6 Starting the Remote Database TCP\IP Service (Optional)
If your installation will have separate IBM i machines for the Enterprise Server and the Data Server, you will need to start the remote database TCP\IP service on the Enterprise Server.
To start the remote database TCP\IP service:
-
Enter this command:
STRTCPSVR SERVER(*EDRSQL)
-
In order to change the attribute of this server to autostart when TCPIP starts, you will need to use IBM i Navigator from a Microsoft Windows client:
-
Open the node for your IBM i machine.
-
Open the Network node.
-
Open the Servers node.
-
Double click on TCPIP.
A list of TCPIP servers is displayed in the right hand pane.
-
Right click on EDRSQL, select Properties, and enable the option Start when TCP\IP Starts.
Tip:
You can also start and stop this server from this screen.
-
4.3.7 Optimizing Machine Resources
Ideally you should run the Platform Pack Installer when the machine is not busy. However, if there are other processes running on the same IBM i as the Installer, their performance will be impacted by the Platform Pack installation.
The Platform pack install uses a prestart job in the QUSRWRK subsystem (program QZRCSRVS) which does Restores. This job runs at priority 20. In order to reduce the performance impact of this job, you can change its run priority during the install.
To change the run priority of the install job running in the QUSRWRK subsystem and optimize machine resources:
-
Enter this command:
WRKACTJOB SBS(QUSRWRK) -
Look for the job running program QZRCSRVS, type option 5 next to it, and press Enter.
If there is more than one job running QZRCSRVS, the one using the most machine resources is most likely the one running the Platform Pack Installer. You can also check the job logs to find jobs unique to the Platform Pack Installer. Examples of such jobs are restores and CHGOBJOWN.
-
For the job you selected in the previous step, enter option 40 (change job) press Enter.
-
Enter 51 as the Run Priority and press Enter.
4.3.8 Cleaning Up From Prior Installations
If you have previously run the Platform Pack installer on your IBM i machine, prior to re-running it you must ensure that all QACX ' files are cleared from this folder:
\tmp\
4.3.9 Testing Long File Names on the IBM i
Before running Installation Workbench, you may need to rebuild the cross-reference table. This table enables tables of long (more than 10 characters) file names to be created on the IBM i. Rebuilding the table causes your system to be in a restrictive state. Coordinate this activity with the system administrator.
To test long file names on the IBM i:
-
Log on to the IBM i as QSECOFR.
-
On the command line, enter STRSQL.
This command will start a SQL session on the IBM i.
-
To test a long file name, enter this SQL statement:
CREATE TABLE QGPL\LONGFILENAME (FIELD CHAR(10))where LONGFILENAME is the name of your file.
Your system is ready if the file is created in the QGPL library. You can ignore the journal setting.
-
To remove the file that you just created in the QGPL library, enter the following SQL statement:
DROP TABLE QGPL\LONGFILENAMENote:
If you are unable to create the table with a long name, likely your system cross reference tables are corrupt. You must rebuild them before proceeding. Refer to Rebuilding Cross Reference Tables on the IBM i.
4.3.10 Checking for Co-existence Tables
Before running the Table Conversion Workbench, you must check whether any of your tables are in Co-Existence (DDS) format. If you run Table Conversions against DDS format tables it will lead to data corruption and cause TCs to fail.
Use this procedure to check for co-existence tables:
-
Log on to the IBMi as QSECOFR.
-
On the command line, start a SQL session by entering this command:
STRSQL -
Run the following SQL statement, substituting in your Control Tables and Business Data library names
SELECT TABLE_SCHEMA, TABLE_NAME, TABLE_TYPE FROM SYSTABLES WHERE TABLE_SCHEMA
IN ('PRODCTL','PRODDTA') AND TABLE_TYPE = 'P'
where
TABLE_TYPE='P'is DDS (World-created) tablesTABLE_TYPE='T'is SQL (EnterpriseOne created) tablesIf there are DDS created tables in these libraries, you must follow the additional procedures in the Co-Existence Upgrade Guide (Doc ID: 702770.1), which is located on My Oracle Support.
4.3.11 Adding Entries to the System Reply List
To add entries to the System Reply List:
-
Verify the existing entries in the Reply List with this command:
WRKRPYLE -
Verify that this entry does not exist and that the sequence number 3283 has not been used:
ADDRPYLE SEQNBR(3283) MSGID(CPA32B2) RPY('I') -
If the above entry does not exist, you can add it using this command:
ADDRPYLE SEQNBR(3283) MSGID(CPA32B2) RPY('I')
4.3.12 Rebuilding Cross Reference Tables on the IBM i
To rebuild cross reference tables on the IBM i:
-
Stop all subsystems using this command:
ENDSBS *ALL *IMMED -
After the jobs have successfully stopped, run the following command:
RCLSTG SELECT(*DBXREF)Note that this command may run for as much as several hours.
-
Restart all subsystems using this command:
STRSBS QCTLThe cross-reference table is now rebuilt and ready for use.
4.4 Understanding the Platform Pack Installation on the IBM i
The Platform Pack installation process installs Release 9.1 system and database files on the IBM i. The Platform Pack installer does not run on the IBM i machine; it can only run on a Microsoft Windows machine. Oracle recommends that you run the installer from the JD Edwards EnterpriseOne Deployment Server so that the Oracle Inventory and install history will be preserved. As a prerequisite to running the installer, IBM i Access for Windows must be installed on the Deployment Server.
Caution:
In some cases the JDEOW library may not be properly updated with the new JD Edwards EnterpriseOne programs as expected during the JD Edwards EnterpriseOne Upgrade process. To ensure the new JD Edwards EnterpriseOne programs are properly installed, rename your existing JDEOW library prior to running the JD Edwards EnterpriseOne Platform Pack Installer.To rename JDEOW, run the following command while signed onto your IBM i JD Edwards EnterpriseOne server:
RNMOBJ OBJ(QSYS\JDEOW) OBJTYPE(*LIB) NEWOBJ(JDEOW_SAVE)
Note:
If you are installing any JD Edwards EnterpriseOne component on multiple IBM i machines (for example, if you are installing multiple logic servers), you must run the Platform Pack installer from a different Microsoft Windows machine for each separate machine you install. Otherwise, the installer detects that some components (for example Foundation for a logic server) have already been installed, and by design ignores subsequent requests to install the same component, regardless of whether the installation is intended for a different target machine.4.5 Running the JD Edwards EnterpriseOne Platform Pack Installer for the IBM i
The user profile you specify during the Platform Pack install must not be limited by network security. Most of the Platform Pack install is done through commands and JAVA code that uses TCP\IP to send work between various OS\400 service jobs. To find out whether there are network security limitations in place:
-
Enter the WRKREGINF command.
-
Page down to the QIBM_QZ* entries which are for the IBM i Access Host Servers.
-
Use Option 8 on any of these to see if an exit program is in place.
In addition, a Platform Pack installer failure can occur if any of the RSTxxx commands have been changed from the IBM defaults relative to the environments in which they can run.
To run the JD Edwards EnterpriseOne Platform Pack Installer for the IBM i Enterprise Server:
-
Log on to the Microsoft Windows machine where you will be running the Platform Pack installer for IBM i. If you follow the recommendation, this will be the JD Edwards EnterpriseOne Deployment Server.
Caution:
Ensure that the Administrator account name that you use does not contain any special characters. -
Create a folder into which you will copy the two .zip files that comprise the Platform Pack image. For example, the folder might be named:
c:\IBMPPack -
Extract the two zip files within the root of the folder created above. Using the example in this guide, a correctly extracted structure is:
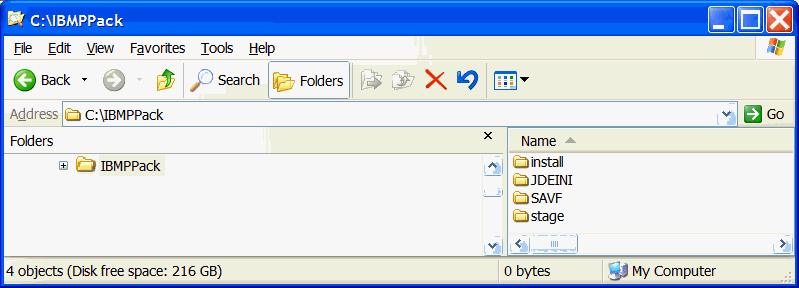
-
Locate the
jt400.jarandutil400.jarfrom the location where you installed IBM i Access for Windows. For example, the location might be:c:\Program Files\IBM\Client Access\jt400\lib -
Copy these two
.jarfiles to this structure in your install image:..\stage\ext\jlib -
In the above extracted structure, locate the
setup.exefile under the\installsubdirectory, right-click on it, and select Run as Administrator.Note:
The Oracle Universal Installer takes a few minutes to start up.
-
On Welcome, click the Next button.

-
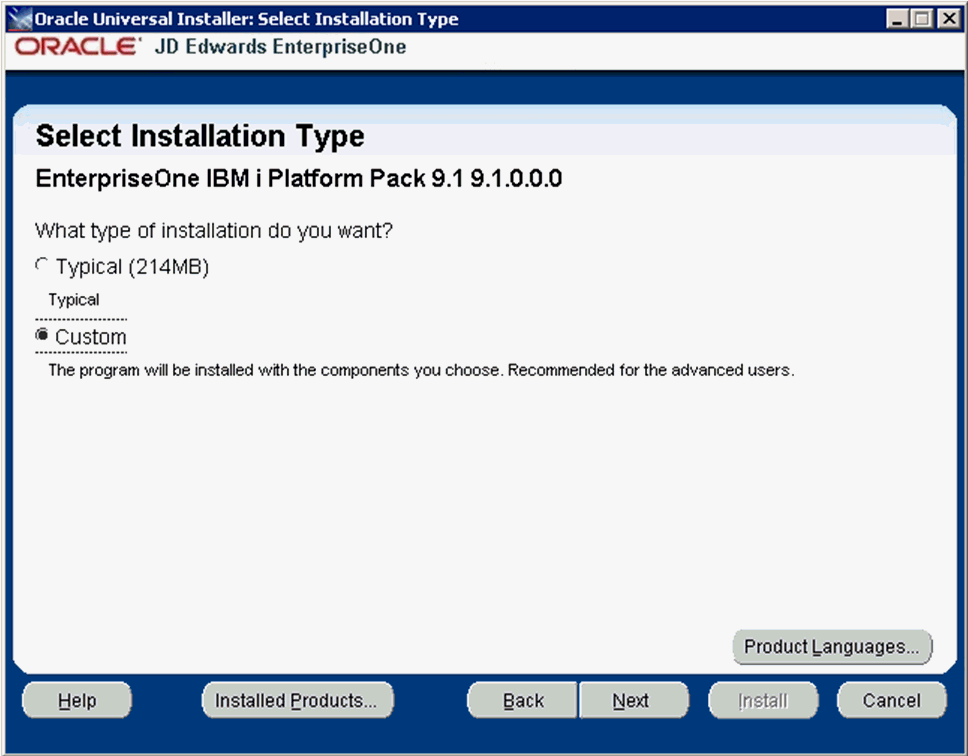
On Select Installation Type, choose your installation type:
-
Typical
Choose this setup type if you wish to complete the Platform Pack installation with no further specifications. This installation option is recommended for most users and includes the required JD Edwards EnterpriseOne files for the Prototype and Pristine environments.
-
Custom
This mode is recommended for experienced users, choose this setup type if you wish to complete the Platform Pack installation by specifying the installation of a subset of pre-defined environments.
-
Custom
In most cases this is the mode you should choose for Upgrades.
This mode is recommended for experienced users, choose this setup type if you wish to complete the Platform Pack installation by specifying the installation of a subset of pre-defined environments.
Tip:
If you choose Custom installation, continue with the steps below in this task which immediately follow. -
Typical
Choose this setup type if you wish to complete the Platform Pack installation with no further specifications. This installation option includes the required JD Edwards EnterpriseOne files for the Prototype and Pristine environments.
-
Click the Next button.

-
-
On Specify Home Details, complete these fields:
-
Name
Enter a unique name for the JD Edwards EnterpriseOne Platform Pack installation. For example:
JDE_PPack910_HOME
By default, the installer populates the values on this screen with _1 suffix. The _1 suffix can be removed, if desired. The actual value between Name and Path need not be consistent. It is only used by the Oracle Universal Installer.
If desired, change the install location from the c: drive. During the installation process itself, only a small amount of disk space is required on the Microsoft Windows machine for the Oracle Inventory for this install and a few temporary text files like
jde.ini. -
Path
Enter the drive and directory where you want the installer files installed on your Deployment Server (from where you are running the Platform Pack installer). For example:
Z:\JDEdwardsPPack\E910This process will store files directly related to the OUI installer (for example, the OUI inventory) in this location. This does not affect where libraries and paths are created on the IBMi.
-
-
Click the Next button.
If you chose the Typical installation type, the Available Products screen will not display; you can skip to the Step 12.
If you chose the Custom installation type, the Oracle Universal Installer displays a list of available JD Edwards EnterpriseOne product components, as shown in the example below:
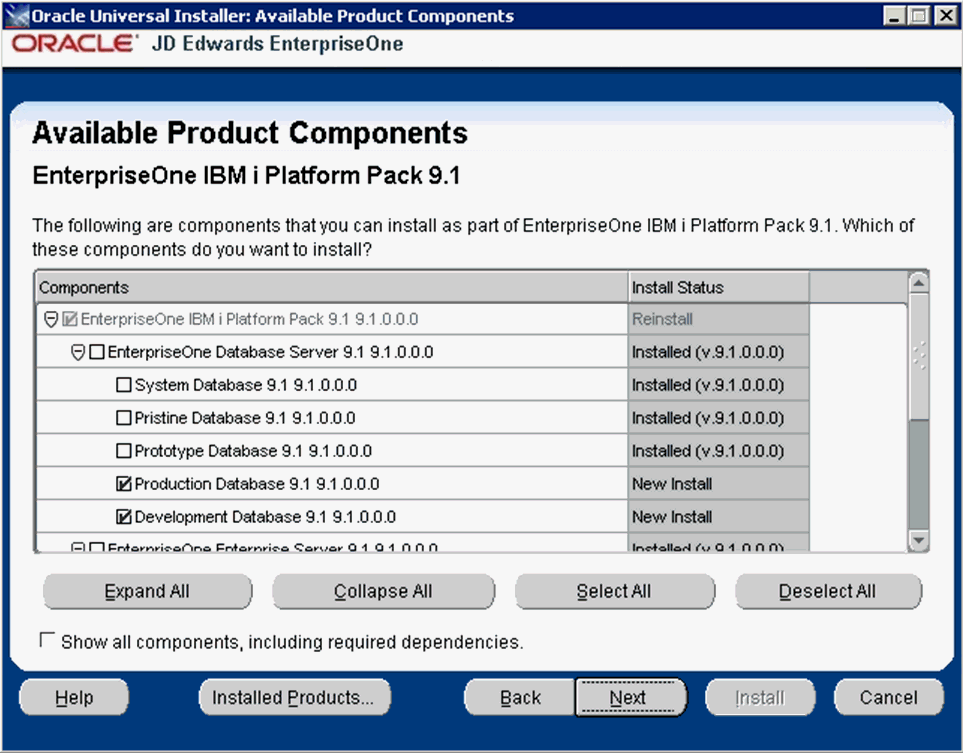
Tip:
Use the scroll bar to on the right hand side of the screen to view the complete list of available components. This is shown in the following screen sample.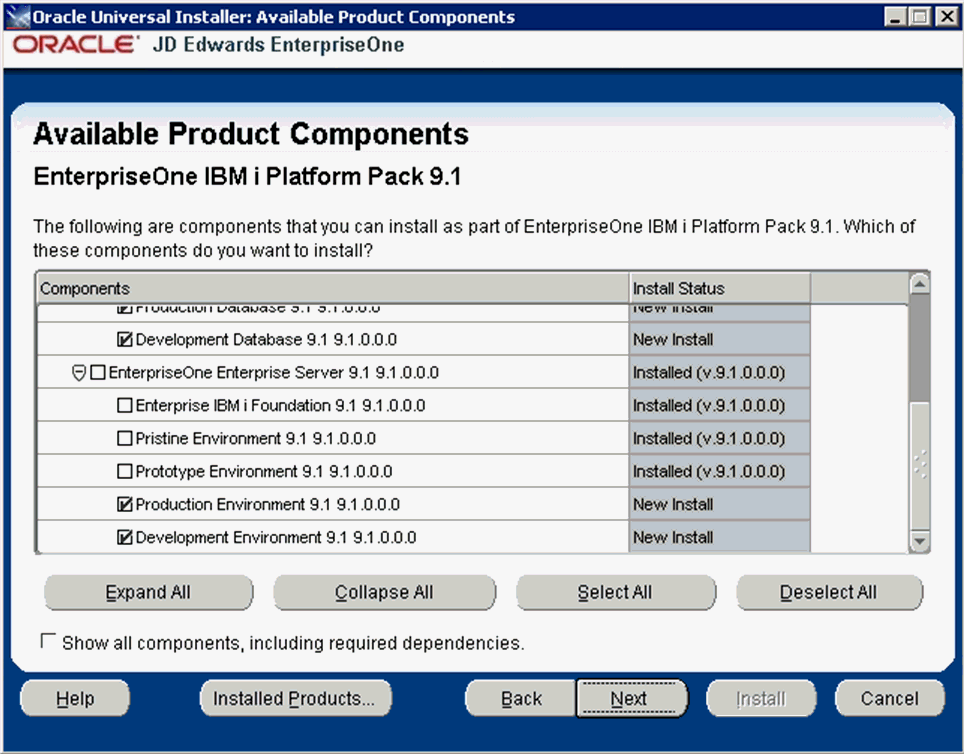
On Available Product Components, select from these choices:
JD Edwards EnterpriseOne Database Server
-
System Database
Note:
This selection includes mandatory system files. If you do not select this box, the JD Edwards EnterpriseOne Platform Pack Installer will select this component. Likewise, if you rerun the JD Edwards EnterpriseOne Platform Pack Installer to add an environment it will check to ensure that this component is already installed. Also if rerunning, you will not be given an option to install the environment in a different ORACLE_HOME. -
Production Databases
-
Prototype Databases
-
Development Databases
-
Pristine Databases
JD Edwards EnterpriseOne Enterprise Server
-
JD Edwards EnterpriseOne Foundation
Note:
This selection includes system files. You must choose this feature for all initial installations of the Enterprise Server. If you do not select this feature, the JD Edwards EnterpriseOne Platform Pack Installer automatically selects it for installation. -
ES Production
-
ES Prototype
-
ES Development
-
ES Pristine
Note:
For Upgrades, you should always select the Pristine environment. Otherwise, Table Conversions may not process correctly. -
-
After you have verified your selection of components, click the Next button.

-
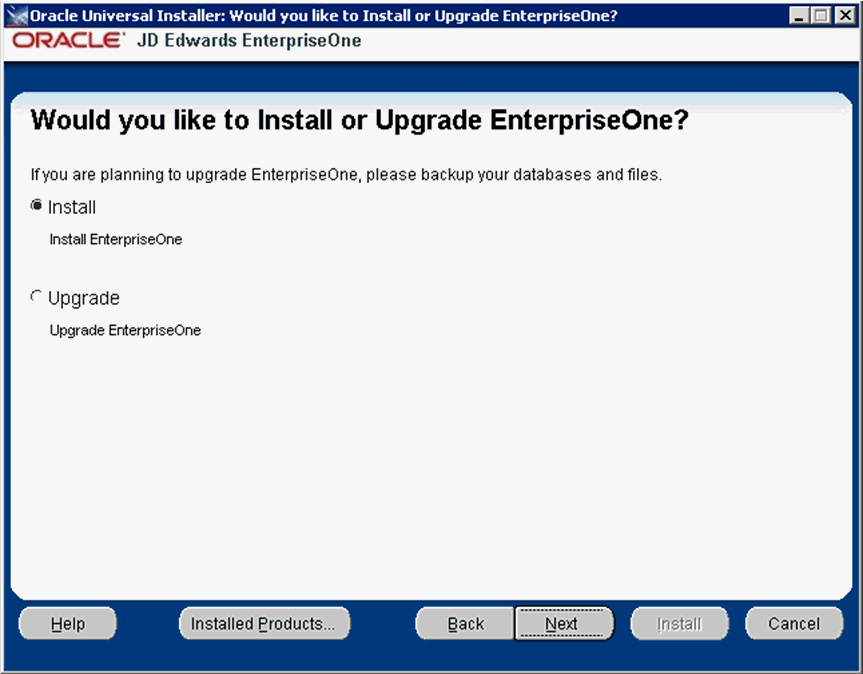
On Would you like to Install or Upgrade EnterpriseOne?, choose whether you want to install or upgrade JD Edwards EnterpriseOne. The list below describes each run mode.
-
Install (Install EnterpriseOne)
This selection installs Central Objects and Business Data / Control Tables for the selected environments.
Note that the installer checks for the existence of the Business Data and Control Tables libraries and will not proceed if any of these libraries already exist:
-
DV910
-
PD910
-
PY910
-
TESTDTA
-
PRODDTA
-
CRPDTA
-
TESTCTL
-
PRODCTL
-
CRPCTL
-
-
Upgrade (Upgrade EnterpriseOne)
In this mode, the JD Edwards EnterpriseOne Platform Pack Installer checks for the existence of the Business Data and Control Tables libraries which are prerequisites to an upgrade of JD Edwards EnterpriseOne.
Caution:
You should always back up all databases that you want to preserve.
-
-
Click the Next button.
-
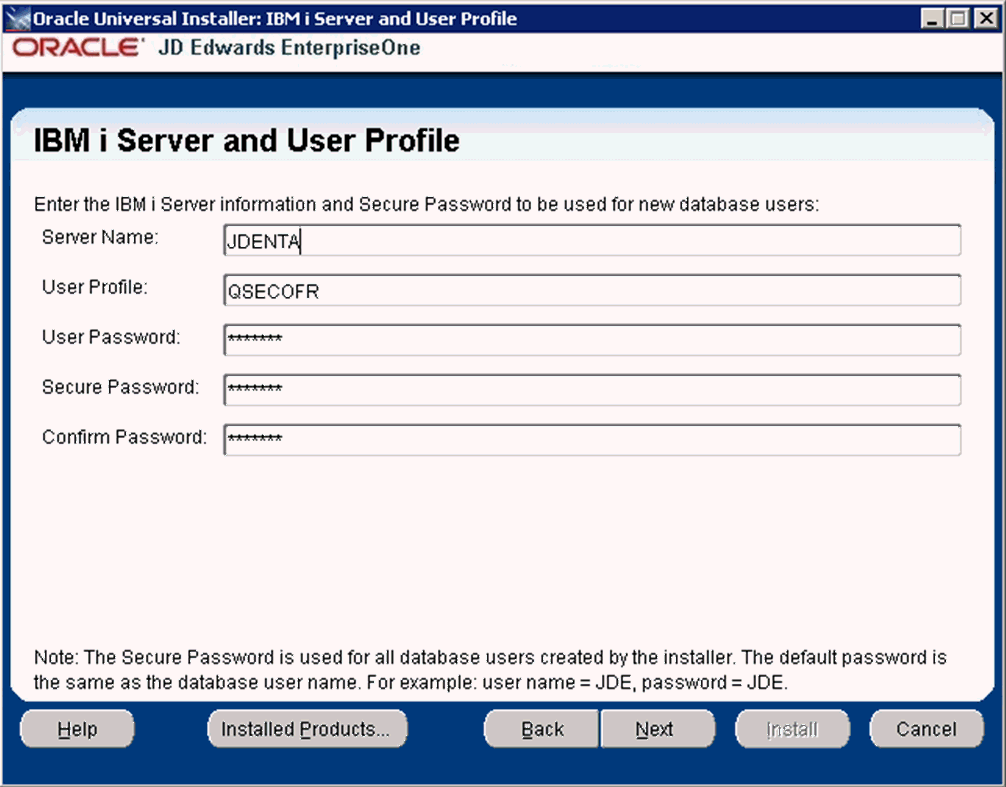
On IBM i Server and User Profile, complete these fields:
-
Server Name
Enter the name of the IBM i machine.
-
IBM i User Profile
Enter QSECOFR or another user on the host that has *ALLOBJ *SECADM *SAVSYS *IOSYSCFG *JOBCTL rights.
-
IBM i Password
Enter the password for the User Profile above.
-
Enter Secure Password
This password allows you to change the password for users created on the IBM i. The default creates user profiles with password = user (for example, JDE JDE). If this violates the password rules on your IBM i machine, supply a secure password that will pass your password rules, then change the INI files and change the JD Edwards EnterpriseOne security definitions using JD Edwards EnterpriseOne applications P980001 and P98OWSEC before starting services.
Leaving this as the default password, will allow the JD Edwards EnterpriseOne services to be started immediately after the installation.
-
Confirm Password
Leave this as the default unless the Secure Password has been entered.
-
-
Click the Next button.
If the installer begins with no errors, you can proceed to the Step 16. Otherwise, refer to the next section of this guide entilted: Section 4.6, "Troubleshooting the IBM i Platform Pack Installation".
If all specified conditions are valid, the installer displays the Summary screen.
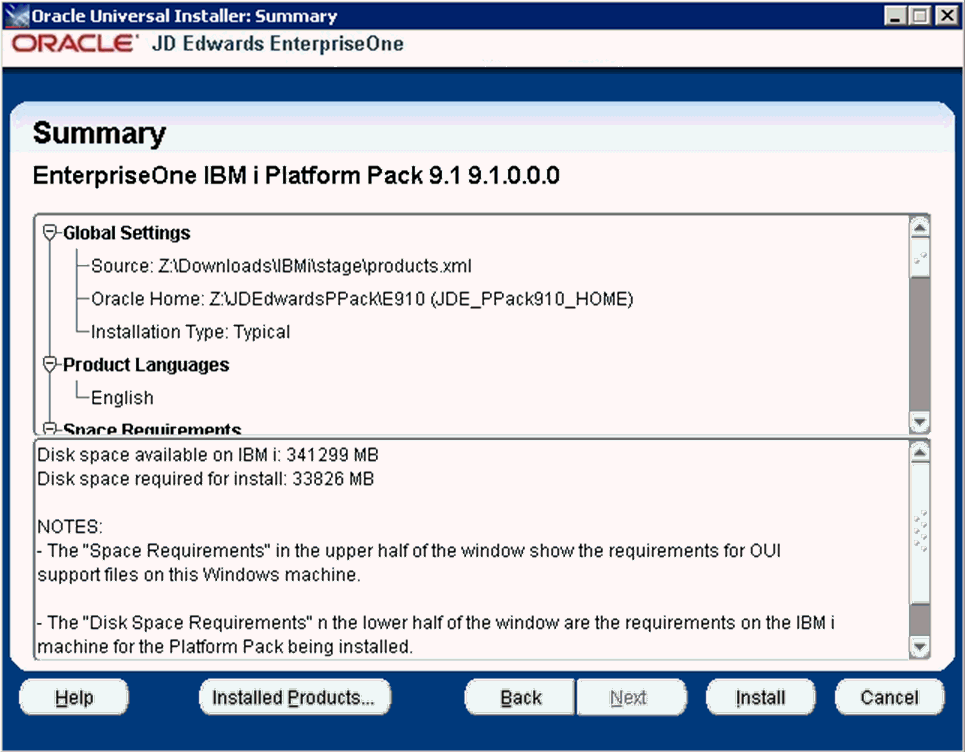
-
On Summary, in the top half of the screen review your selections and in the bottom half of the screen review the NOTES, which detail the disk space requirements for OUI support files and also for the Platform Pack being installed on the IBM i machine.
-
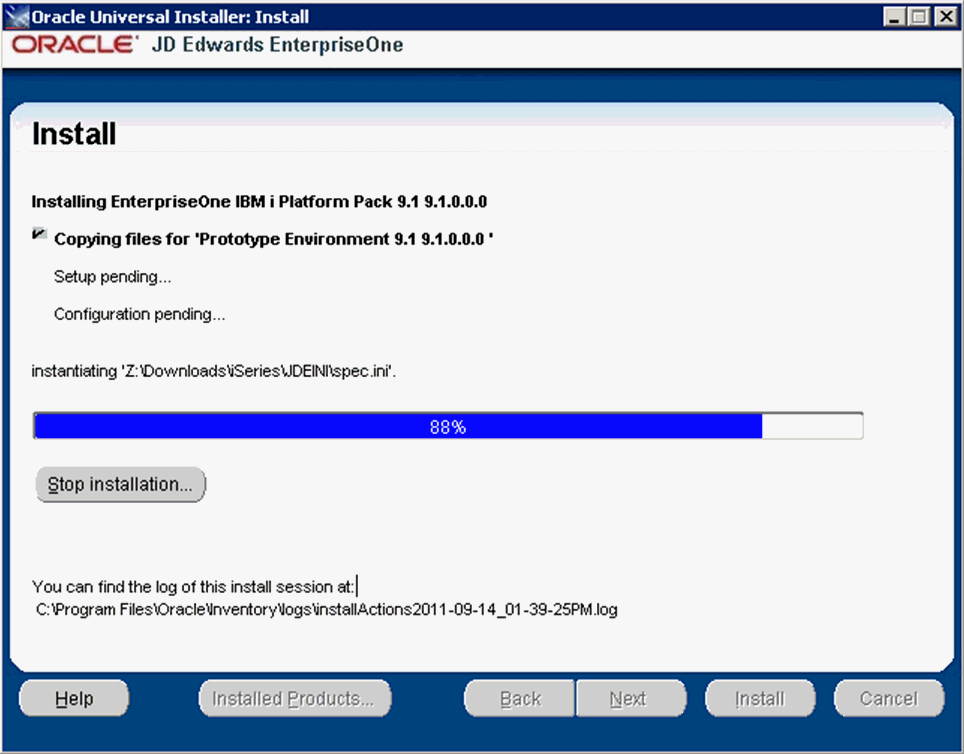
Click the Install button.
As the installer runs it displays the Install progress, as shown in the following example.
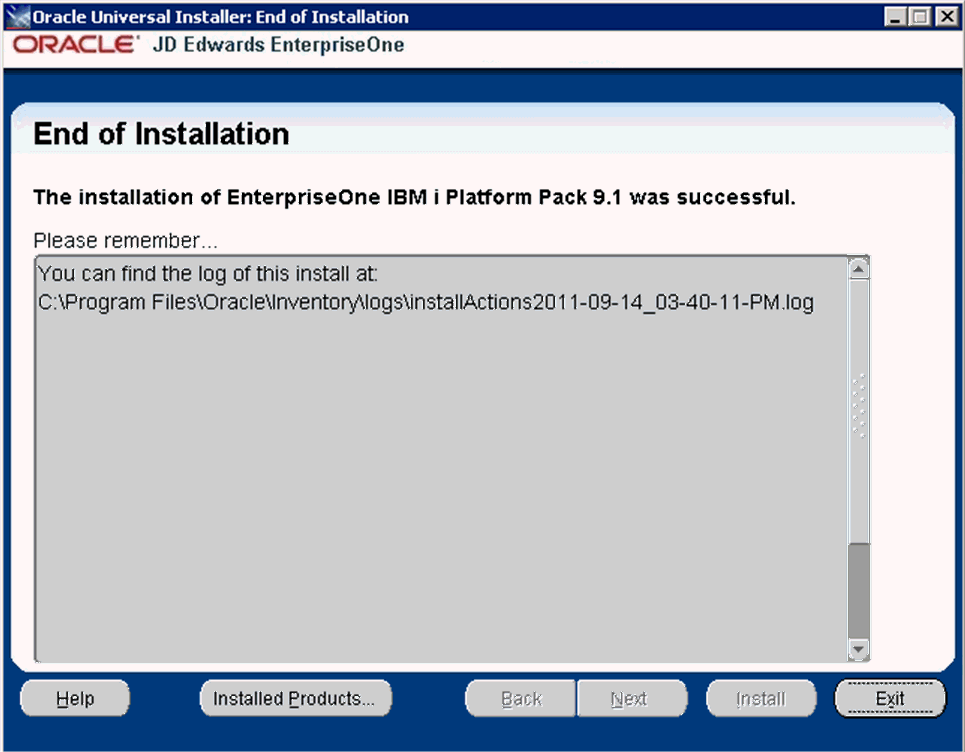
After the installation is complete, the following End of Installation screen is displayed.
-
On End of Installation, verify the installation of the EnterpriseOne Platform Pack was successful.
Review the Please remember ... portion for the installer log file location. The log file name is specified with the date and stamp when the installer ran. For example:
c:\Program Files (x86)\Oracle\Inventory\logs\installActions2011-09-14_03-40-11-PM.log -
Click the Exit button to exit OUI.

-
On Exit, click the Yes button.
4.6 Troubleshooting the IBM i Platform Pack Installation
This section discusses these potential error or warning conditions and their probable causes and resolutions when running the JD Edwards EnterpriseOne Platform Pack Installer:
-
Section 4.6.2, "Abnormal Program Termination - jt400.jar and/or utill.jar Missing"
-
Section 4.6.3, "Business Data or Control Tables Already Exist"
-
Section 4.6.4, "Business Data or Control Tables Do Not Exist"
4.6.1 Invalid User or Password
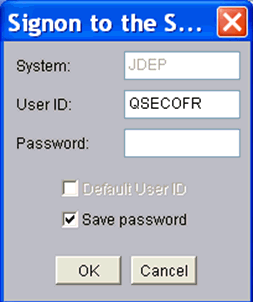
If you enter an invalid user or password, you will see the following screen pop up multiple times. At this point you should start the Windows Task Manager, find the OUI process (javaw.exe) and end it. Then start the installer again.
4.6.2 Abnormal Program Termination - jt400.jar and/or utill.jar Missing
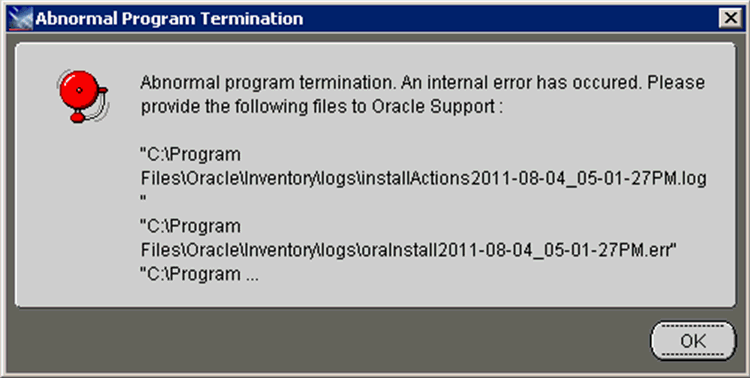
If you receive the following message, it indicates that you have failed to correctly copy the jt400.jar and util400.jar into the ..\stage\ext\jlib directory. To remedy, you must copy these files to the appropriate directory, exit from the installer, and restart the installer.
4.6.3 Business Data or Control Tables Already Exist
If you select Install Mode and the Business Data or Control Tables already exist, the installer displays the following error:
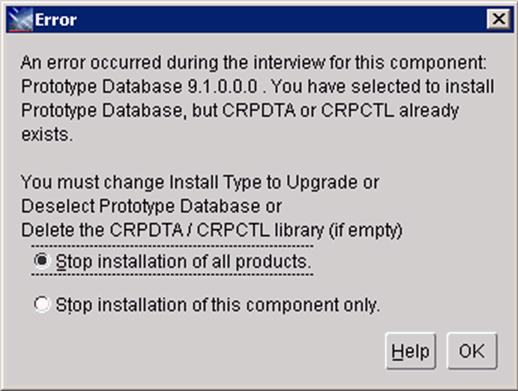
To remedy the above error, your choices are: must: or Deselect the Prototype Database or
-
Change the Install Type to Upgrade
-
Deselect the Prototype Database
-
Delete the CRPDTA and CRPCTL library (if they are empty)
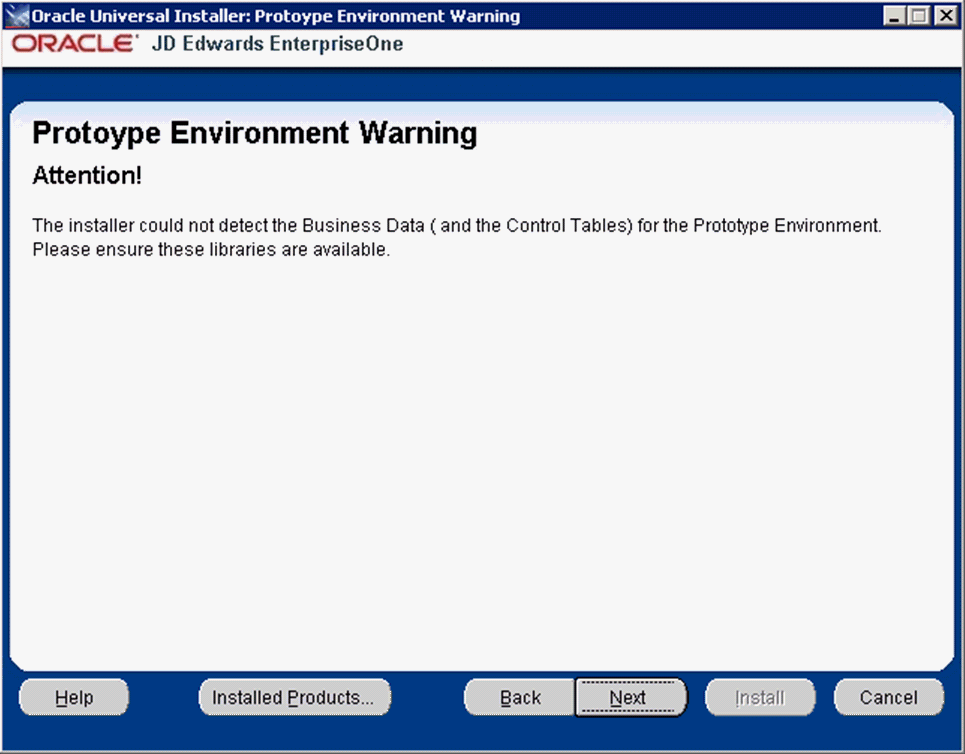
4.6.4 Business Data or Control Tables Do Not Exist
The following is displayed if you selected the Upgrade mode but the Business Data or Control Tables do not exist:
4.7 Rerunning the JD Edwards EnterpriseOne Platform Pack Installer
You must rerun the JD Edwards EnterpriseOne Platform Pack Installer to support these scenarios:
-
You want to install the Enterprise Server and the Database Server on physically different machines.
-
You want to add an Enterprise Server environment to the Enterprise Server.
-
You want to add a Database Server database to the Database Server.
-
You want to reinstall the JD Edwards EnterpriseOne Foundation on the Enterprise Server.
-
You want to reinstall the System Database on the Database Server.
You should never reinstall any optional components without first uninstalling the components. If you select to uninstall the mandatory components you must also select to uninstall or have already uninstalled all related optional components. This table lists the mandatory and related optional components:
| Server | Mandatory Component | Optional Components |
|---|---|---|
| Enterprise Server | JD Edwards EnterpriseOne Foundation | ES Production
ES Prototype ES Development ES Pristine |
| Database Server | System Database | Production Databases
Prototype Databases Development Databases Pristine Databases |
4.7.1 Enterprise Server
If you are rerunning the JD Edwards EnterpriseOne Platform Pack Installer in order to add environments, you must specify the same DB2/400 instance as that which you selected for JD Edwards EnterpriseOne Foundation during the initial installation of the Platform Pack.
Note:
If you are installing any JD Edwards EnterpriseOne component on multiple IBM i machines (for example, if you are installing multiple logic servers), you must run the Platform Pack installer from a different Microsoft Windows machine for each separate machine you install. Otherwise, the installer detects that some components (for example Foundation for a logic server) have already been installed, and by design ignores subsequent requests to install the same component, regardless of whether the installation is intended for a different target machine.4.8 Installing the Latest Tools Release and Latest Tools Release Patch to the Enterprise Server
Caution:
The Tools Release level must match what was installed on the Deployment Server.For instructions on installing the tools release, refer to JD Edwards EnterpriseOne Tools Release 8.98 Installation Guide, which is available by platform.
To install the latest tools release and latest tools release patch:
-
From the Update Center home page, download the latest Tools Release Patch (for example, 9.1.A1) and Tools Release documentation.
-
Using the Tools Release documentation, install the Tools Release Patch to the Enterprise Server.
4.9 Working with Database Security
The libraries and tables delivered by the Platform Pack installation are not secured. In order to provide sufficient security, you should run the tool SETOWAUT which allows you to 'lock down ' libraries and IFS directories delivered by the Platform Pack installation. You can obtain the latest version of the SETOWAUT tool from the Update Center using the Change Assistant.
In order to maximize your database security, you should change the passwords on all table owners created during the Platform Pack installation; these are created with the user and password equal to the same value. Such a user and password relationship could expose you to worms and viruses aimed at gaining access to your database. Consult with your DBA for advice on changing passwords to meet the security requirements of your database installation.
The Installation Workbench assumes that the database user is JDE and that the password is the same, unless it finds this override in the jde.ini file on the Deployment Server. Once the database passwords have been changed, you will need to add this section to the jde.ini file:
[DSPWD]
JDE=new_password
For example, if you changed the password for JDE to alaska5, your section would look like this:
[DSPWD]
JDE=alaska5
Caution:
The Installation Workbench can only process passwords equal to or less than 10 characters in length. Therefore, you cannot use passwords greater than 10 characters even if your RDMS allows it.After you change the [DSPWD] section of the jde.ini file, logon to OneWorld in the JDEPLAN environment on the Deployment Server with the new password in the correct case.
Caution:
Whenever you change the password on your database, as recommended for security purposes, you must also ensure that your security settings in the Enterprise Serverjde.ini file match that of your database. Refer to Chapter 11, "Working With Signon Security" in this guide for applicable instructions.
You should secure the jde.ini file on the Deployment Server to prevent unauthorized access.
You should delete the [DSPWD] section once the install or upgrade is complete.
Note:
If you are upgrading from JD Edwards EnterpriseOne Releases 8.10 or 8.11, you should consider disabling the legacy user, which is PSFT.