5 Working with Installation Planner for an Install
This chapter discusses:
-
Section 5.2, "Working with JD Edwards EnterpriseOne Software Requirements"
-
Section 5.3, "Reviewing Installation Planner Processing Options"
See Also
-
A separate chapter in this guide entitled: Chapter 15, "Creating a Remote Installation Plan"
-
A separate chapter in this guide entitled: Chapter 16, "Adding a Server to an Existing Configuration"
-
A separate chapter in this guide entitled: Chapter 17, "Creating a Language-Only Installation Plan,"
5.1 Understanding Installation Planner
Installation Planner is a Release 9.1 application that runs on the Deployment Server. It is a system administration tool to guide through the process of configuring the machines on which you will run Release 9.1.
Installation Planner guides you through setting up:
5.1.1 Language Information
Installation Planner enables you to create a plan for installing an alternate language or multiple languages as you create your master plan.
-
You should follow the system prompts to choose which languages will be installed for each environment.
-
For initial installations, you can complete your master plan and install languages later by creating a language-only plan. Refer to Chapter 17, "Creating a Language-Only Installation Plan" for more information about setting up an alternate language after the master plan.
5.1.2 Location Information
Locations are user-defined groups of machines, databases, and environments. The use of multiple locations is recommended for configurations across a wide area network (WAN).
Two types of locations exist: base locations and remote locations. Each installation plan can have only one base location. It is the central point for planning and executing the deployment process. The base location does not have a parent location and does not use a location code. You can have any number of tiered locations; each has a parent location and a location code.
To set up locations for installation plans, you must provide the installation program with the location, location description, location code (if there is a secondary location), and parent location (if there is a secondary location).
The location code is a three-character alphanumeric code that you specify. This location code is used as part of the name of the data sources for secondary locations in the plan. Locations are stored in the Deployment Locations Definition table (F9654).
See Also
Refer to Chapter 15, "Creating a Remote Installation Plan" for information about setting up remote locations.
5.1.3 Deployment Server Information
To set up the plan information for the Deployment Server, you must provide the installation program with the machine name and the directory share name. This information populates the Release Master (F00945) and Path Code (F00942) tables, and stores additional Deployment Server information in the Machine Master (F9650) and Machine Detail (F9651) tables.
Note:
If you installed JD EnterpriseOne files to a remote Deployment Server, the deployment server name is the remote machine name by default.5.1.4 Enterprise Server Information
To set up the plan for the Enterprise Server, you must provide Installation Planner with the name of the Enterprise Server, its platform type, and the database it uses. Installation Planner populates the F9650 and F9651 Enterprise Server tables and defines the data sources for the Enterprise Server. The Data Source information is stored in the Data Source Master table (F98611).
5.1.5 JD Edwards EnterpriseOne HTML Web Server Information
To set up the plan for the JD Edwards EnterpriseOne HTML Web Server, you must provide Installation Planner with the name of the HTML Web Server machine, its platform type, and other information. Installation Planner populates the F9650 and F9651 Enterprise Server tables.
5.1.6 Data Source Information
When you run Installation Planner, these data sources are set up once and shared across all environments:
-
Server Map
Server Map data sources are specific to each Enterprise Server, so you must create one for each server.
-
Data Dictionary
This is the data source for the Release 9.1 Data Dictionary tables. It is identified by the Release 9.1 release (for example, Data Dictionary - 910).
-
Object Librarian
This is the data source for the Object Librarian tables. It is identified by the Release 9.1 release (for example, Object Librarian - 910).
-
System
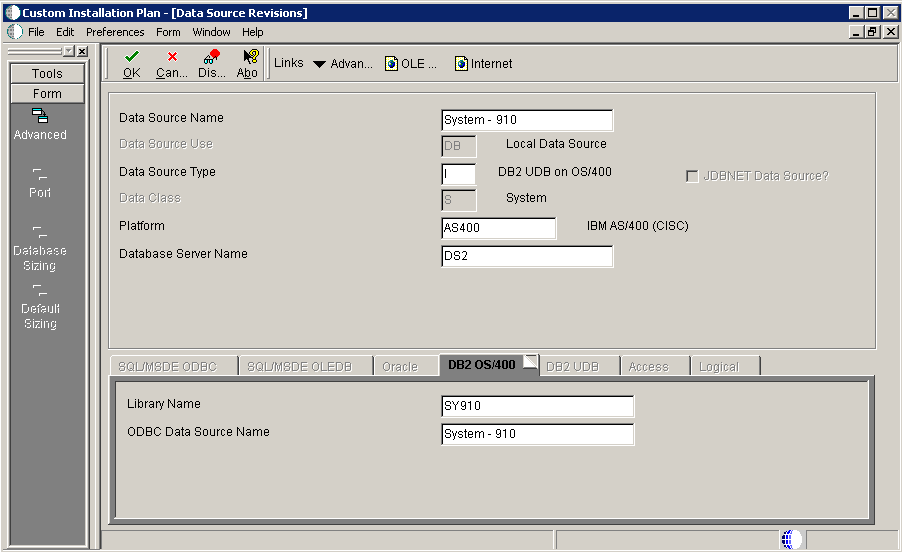
The data source for the System tables. It is identified by the Release 9.1 release (for example, System - 910).
You must also set up these data sources for each environment:
-
Control Tables
This is the data source for the Control Tables. You can have multiples (for example, Control Tables - Prod, Control Tables - Test, and Control Tables - CRP).
-
Central Objects
The data source for the Central Objects specification tables is identified by the type and version number of the software. You can have multiple sets of Central Objects specifications (for example, Central Objects - PD910, Central Objects - PS910, Central Objects - DV910, and Central Objects - PY910). However, you can have only one Central Objects data source for each path code.
-
Business Data
This is the data source for the Business Data tables. You can have multiple sets of Business Data data sources (for example, Business Data - CRP, Business Data - PROD, Business Data - TEST, and Business Data - PS910).
Depending on the environment you create, the Business Data data source can be your test, production, or any other data library that resides on your IBM i. When prompted for the Business Data data source during Installation Planner, modify this data source to call the library on the IBM i for this environment. You can also create a new Business Data library on your IBM i. This new Business Data data source might or might not have data, depending on the type of Release 9.1 environment you create. If you build additional environments on your IBM i to use with Release 9.1, you will create one or more of these libraries before running Installation Workbench:
-
PS910DTA
-
CRPDTA
-
TESTDTA
-
PRODDTA
-
-
Versions
The data source for the Versions List table (F983051). You can have multiple sets of versions tables (for example, Versions - PD910, Versions - PS910, Versions - DV910, and Versions - PY910). However, you can have only one Versions data source for each path code.
See Also
Chapter 21, "Major Technical Tables" for more information about individual tables and their uses
5.1.7 Environment Information
Installation Planner enables you to select default environments for your installation that are predefined, or you can choose to define them manually. Likewise, Installation Planner enables data load using default data load options, or you can choose to define them manually and override the default data load options.
5.2 Working with JD Edwards EnterpriseOne Software Requirements
The goal of the JD Edwards EnterpriseOne Release 9.1 Installation is to include the most current tools releases and updates at the time the installation image is mastered. However, subsequent to that time it is possible that critical fixes may become necessary and available. You should check Section 1.3.1, "Accessing Minimum Technical Requirements (Certifications)" to verify if any such JD Edwards EnterpriseOne Release 9.1 Installation fixes are required.
5.3 Reviewing Installation Planner Processing Options
Processing options control how Installation Planner responds as you set up plans and options you see as you work through the custom planner. If processing options are not set up correctly, you will not see the appropriate options as you work through the planner. You set up these processing options to control replication functions and business functions mapping.
You should review the default processing options for the Installation Planner application prerequisite to create the plan. First-time users can set up the processing options to step through the planner with informational messages. If you do not want to see these messages, you can turn them off.
5.3.1 Assumptions About Reviewing Installation Planner Processing Options
This table lists the assumptions about reviewing the processing options for the installation planner.
| Personnel | Installer |
|---|---|
| Logon Status | On the Deployment Server, logged on as user JDE with the database password for user JDE, in the Planner environment. |
| Prerequisites | The Deployment Server must be installed. |
| Concurrent Tasks | The Platform Pack installer can be running. |
5.3.2 Accessing Processing Options
To access processing options, you must first log on to Release 9.1 and specify your installation plan type.
-
Log on to Release 9.1 as user JDE with the database password for user JDE.
-
Access the planner environment (JDEPLAN).
-
From the System Installation Tools menu (GH961), right-click either Typical Installation Plan or Custom Installation Plan.
-
Choose Prompt for Values.
The Processing Options form appears.
5.3.3 Choosing Processing Option Values
Once you have accessed processing options, perform the following tasks to choose the processing option values:
5.3.3.1 Specifying the Prompt Mode
To specify the prompt mode:
-
Select the Prompt Mode tab.

-
On the Prompt Mode tab, select a prompt mode:
Value Model Description 0 Silent Installation Planner displays only the data entry forms. 1 Additions Prompt Installation Planner prompts you to add servers. 2 Verbose Installation Planner directs you through creating a plan with a series of prompting forms.
5.3.3.2 Specifying the Process Mode
To specify the process mode:
-
Select the Process Mode tab.
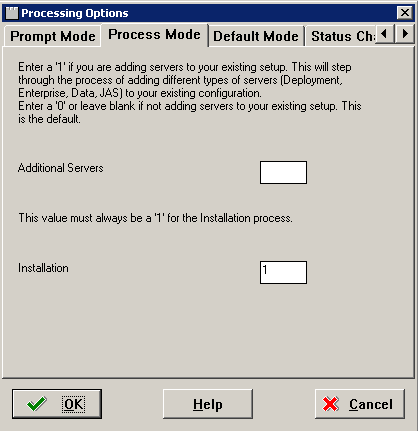
-
On the Process Mode tab, select the options for the processes that you want to run when you create your plan:
-
Additional Servers
Enter 1 to add servers to your existing setup (Deployment Server, Enterprise Server, Database Server, HTML Web Server). Enter 0 or leave blank for regular plans.
-
Installation
Enter 1 to run the JD Edwards EnterpriseOne installation automatically.
-
5.3.3.3 Specifying the Default Mode
To specify the default mode:
-
Select the Default Mode tab.

-
On the Default Mode tab, enter these values into the processing option fields:
Value Description 0 Do not use default values and do not prompt. 1 Prompt for default options at run-time. 2 Default mode. Always use defaults without prompting. -
Default Data Source Information
Select whether you want the ability to modify data source information or just take the default values.
-
Default Environments
Select whether you want the ability to select environments or take the default values.
-
Default Data Load
Select whether you want the ability to modify data load parameters or take the default values.
-
Default Advanced Parameters
Select whether you want the ability to modify advanced parameters or take the default values.
-
Default Languages
Select whether you want the ability to select an alternate language or take the default values.
-
Upgrade/Update Plan Generation
Select whether you want the ability to generate a plan automatically from locations and machines defined in a previous version of the software.
-
5.3.3.4 Verifying Status Change Values Have Not Changed
On the Status Change tab, this tab form appears.
Note:
Do not make any changes on this tab. These values are hard coded in the application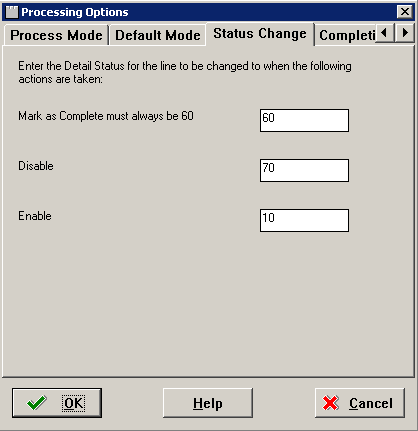
5.3.3.5 Specifying Plan Completion Processes
To specify plan completion processes:
-
Select the Completion tab.
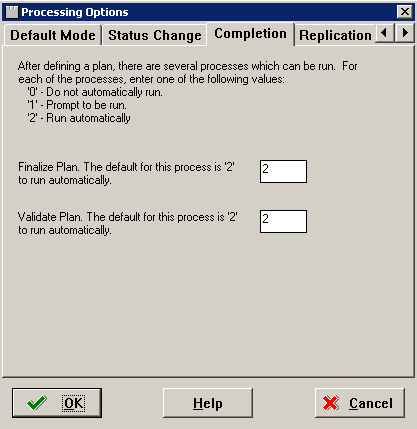
-
On the Completion tab, complete the fields using these values:
After defining the plan, the options on this tab specify which processes are run. one of the following values:
Value Description 0 Do not run automatically. 1 Prompt to be run. 2 Run automatically. -
Finalize Plan
Enter the default option 2 to run automatically.
-
Validate Plan
Enter the default option 2 to run automatically.
-
5.3.3.6 Specifying Replication Options
To specify replication options:
-
Select the Replication tab.
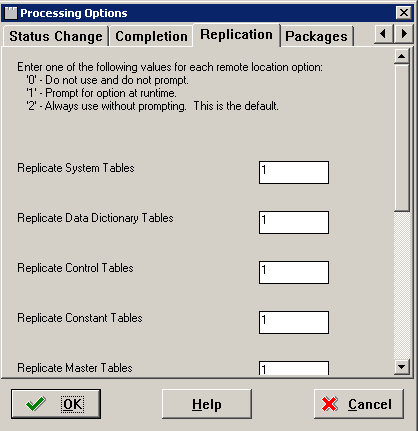
-
On the Replication tab, complete the fields using these values:
Value Description 0 Do not use and do not prompt. 1 Prompt for option at run-time. 2 Always use without prompting . -
Replicate System Tables
Select whether you have the option to replicate system tables automatically for remote locations.
-
Replicate Data Dictionary Tables
Select whether you have the option to replicate data dictionary tables automatically for remote locations.
-
Replicate Control Tables
Select whether you have the option to replicate control tables, menus, and user defined codes automatically for remote locations.
-
Replicate Constant Tables
Select whether you have the option to replicate constant tables automatically for remote locations. Business data tables are Object Librarian type 280.
-
Replicate Master Tables
Select whether you have the option to replicate master tables automatically for remote locations. Business data tables are Object Librarian type 210 and 211.
-
5.4 Working with a Typical Installation Plan
This section discusses:
-
Section 5.4.1, "Assumptions About Defining a Typical Installation Plan"
-
Section 5.4.7, "Enter Data Source Information for Server Map"
5.4.1 Assumptions About Defining a Typical Installation Plan
This table outlines assumptions for the Installation Planner phase.
| Personnel | Installer |
|---|---|
| Logon Status | On the Deployment Server, log on to Release 9.1 as user JDE in the JDEPLAN environment. |
| Prerequisites | Because the Planner applications runs on the Deployment Server, you must verify that the Deployment Server is installed and the correct Tools Release, Tools Release Patch, and Planner Update have been installed on it, in that order.
The Platform Pack installation on the Enterprise Server at the corresponding release level iwth the Deployment Server must be completed and you should verify that it completely installed the Pristine database and loaded the Pristine Central Objects. |
| Concurrent Tasks | None. |
5.4.2 Starting Installation Planner
To start Installation Planner from within JD Edwards EnterpriseOne:
-
Access the System Installation Tools Menu (GH961).
-
On the System Installation Tools menu, double-click Typical Installation Plan.
-
On Work with Installation Plans, click Add.

The Installation Planner form appears.
-
Enter a Plan description.
5.4.3 Entering a Plan Description
To enter a plan description:
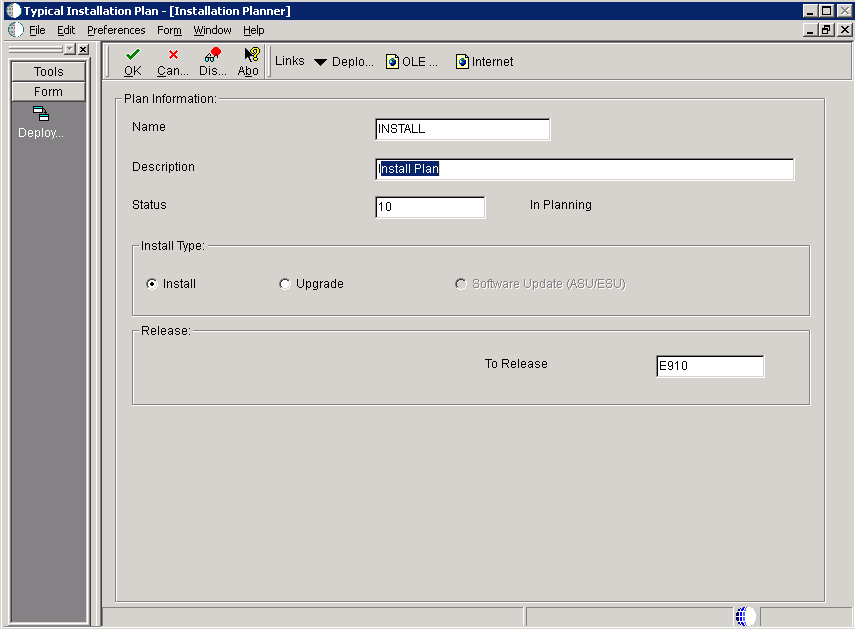
-
On Installation Planner, complete these fields:
Field Description Name Enter the name of the installation plan. Description Enter the description of the installation plan. Status Choose 10 (the default value) as the status of the installation plan. Install Type Click the Install (the default value) radio button. To Release Verify that the release number is E910 (default value). -
Click OK to continue.
5.4.4 Entering Location Information
A location groups related Deployment Servers for use in a multi-tier environment.
To enter location information:
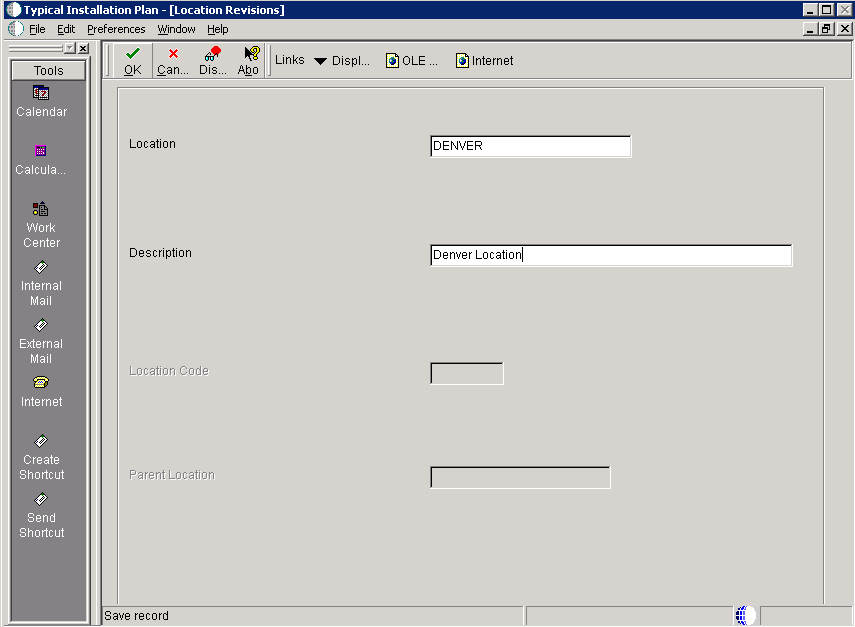
-
On Location Revisions, complete these fields:
Field Description Location Enter the location to which this plan applies; the location can be a city, company headquarters, or a division of the company. Description Enter a description for this location. Location Code If this is the base location, this field is only available when you are adding the base location. If you are editing an existing base location, the field is unavailable. Parent Location If this is the base location, this field is only available when you are adding the base location. If you are editing an existing base location, the field is unavailable. -
Click OK.
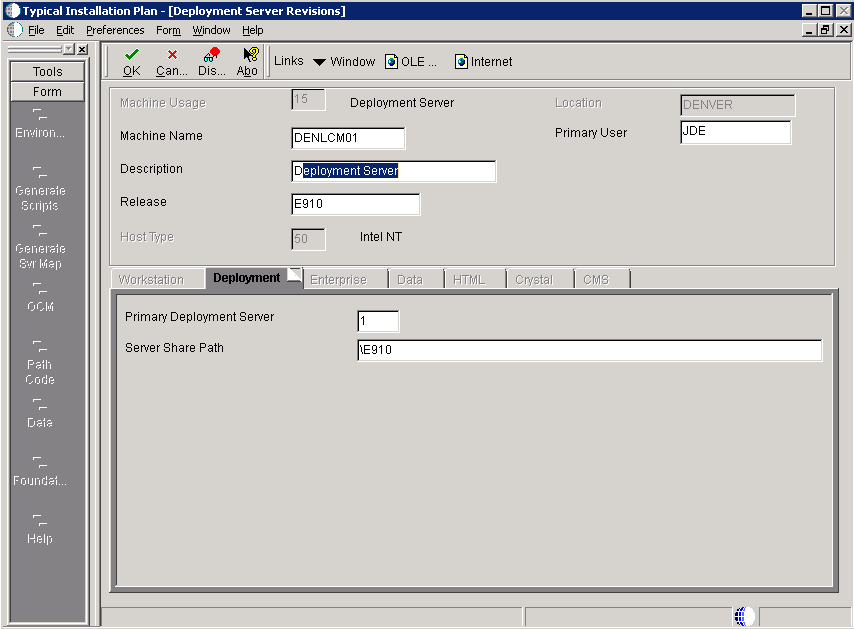
5.4.5 Entering Deployment Server Information
While Release 9.1 enables more than one Deployment Server to be defined, only the primary Deployment Server is defined at this time. You can choose a primary Deployment Server from the list of existing servers or you can enter information for a new server.
Note:
If you installed JD EnterpriseOne files to a remote Deployment Server, the deployment server name is the remote machine name by default.To enter Deployment Server information:
-
On Deployment Server Revisions, complete or verify these fields:
Field Description Machine Usage The value 15 appears by default, indicating that this is a Deployment Server. Machine Name The name of the Deployment Server appears by default. The name is case sensitive, should not exceed 15 characters, and should not contain any special characters. Remote Deployment Server. If you installed JD EnterpriseOne files to a remote Deployment Server, the deployment server name is the remote machine name by default.
Description Enter a long description for the machine. This description should include the location with which this Deployment Server is associated and whether or not it is the primary server. Release Enter the JD Edwards EnterpriseOne release number you are installing or use the visual assist button to choose one from the list. The default value is E910. Host Type The value 50 appears by default, indicating that the server type is Intel NT. Location Your current location is the default value. Primary User The user to whom an email is sent when a package is deployed. The default value for Primary User is listed in the jde.ini. -
On the Deployment tab, complete this field:
Field Description Primary Deployment Server The hierarchy of the servers. Valid values are: 1- Primary Deployment Server (default value)
0 - Secondary Deployment Server
The server share name of the directory to which you installed Release 9.1 on your Deployment Server. Verify that the server share name for Release 9.1 is:
\E910 -
Click OK.
Tip:
If you enter invalid information into a field on a tab, a stop sign symbol appears next to the tab name, such as Workstation. Click the stop sign icon in the bottom right of the form to see more info about the error.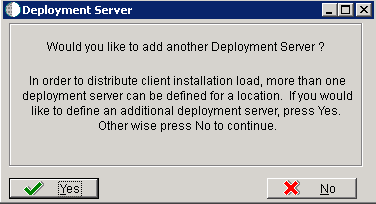
-
On Deployment Server, to add another Deployment Server, click Yes and repeat steps 1 through 3.
-
To continue with Installation Planner setup, click No.
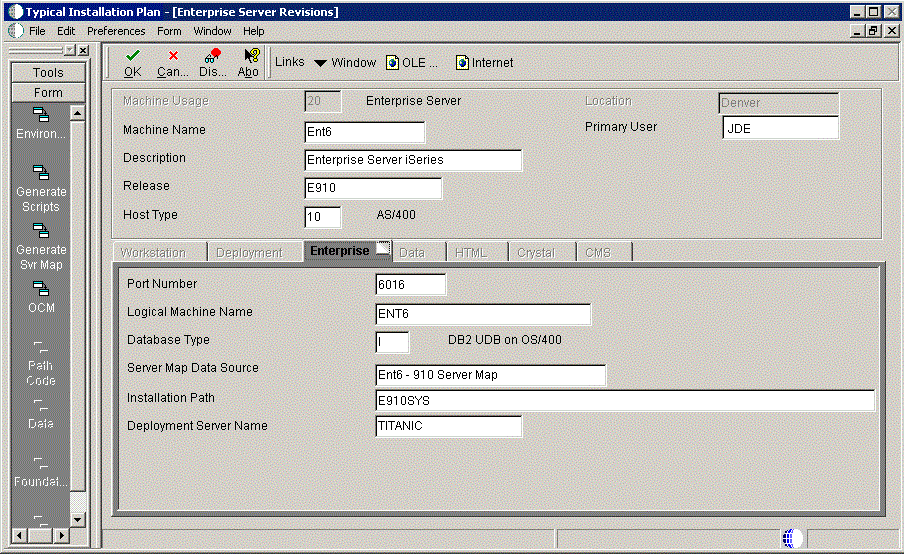
5.4.6 Entering Enterprise Server Information
Note:
During the definition of the Enterprise Server, a port number must be defined. While Enterprise Servers running the same release can use the same port number, an Enterprise Server running two different versions of software must use two different port numbers.To enter Enterprise Server information:
-
On Enterprise Server Revisions, verify or complete these fields:
Field Description Machine Name The name of the primary Enterprise Server. The name is case sensitive and should not contain any special characters. Because the machine name is used to create the Server Map datasource name, and because the Platform Pack Installer does not restrict you from entering a machine name that results in a datasource name greater than 30 characters; if the machine name for the Enterprise Server is longer than 13 characters, the resulting datasource name will be longer than the allowed 30 characters. For example, if your machine name is 15 characters (A23456789012345), the base datasource name in the server
jde.iniwill be:A23456789012345 - 910 Server MapNote: The field in table F98611 is a hard restriction; the field only allows 30 characters. The actual field size cannot be modified or changed.
When the Planner runs it truncates the value to 30 characters because that is the restriction in the F98611 table. The Platform Pack does not truncate the value when it builds the
jde.inifor the Enterprise Server. Therefore, any value greater than 30 characters will result in a mismatch between thejde.iniand the F98611 table. That is, using the previous example, thejde.iniwould have the full length valueA23456789012345 - 910 Server Map(which is 32 characters) while the F98611 populated by the Planner would have a value ofA23456789012345 - 910 Server M.To remedy, you could do any one of the following:
-
Manually modify values in table F98611 to match the truncated value in the
jde.inifile. -
Ensure that the value is not truncated by limiting the datasource name to 30 characters (this would mean limiting the machine name for the Enterprise Server to 13 characters).
-
Manually truncate the value in the F98611 table (for example,
A23456789012345 - 910 Svr Map.
In any case, you must ensure that the values for Server Map datasource names in the F98611 table exactly match those in the
jde.inifile on the Enterprise Server.Description Enter a description for the machine. Release Enter the release number to which this plan applies, or use the visual assist button to choose one from the list. The default value is E910. Host Type Click the visual assist button and select the type of Enterprise Server you are adding to the plan. In this case, iSeries. Location The location chosen for this plan appears by default. Primary User The user to whom an email is sent when a package is deployed. The default value for Primary User is listed in the jde.ini.Note:
The case of machine name must also match the network ID for that machine.Caution:
For information on supported clustering environments, see Release 9.1 on a Cluster in JD Edwards EnterpriseOne Tools Server and Workstation Administration Guide and the clustering vendor's software documentation. -
-
On Enterprise Server Revisions, select the Enterprise tab, and complete or verify these fields:
Field Description Port Number The port number value (6016) for this Enterprise Server as supplied from the jde.ini.Logical Machine Name The Installation Planner detects and provides a default value based on the current machine name on which the program is running. The name is case sensitive, should not exceed 15 characters, and should not contain any special characters. Database Type Enter the value for your database: I - DB2 400
Server Map Data Source Whenever you enter a host type, the Installation Planner populates this field with a default value: machinename - 910 Server Map
where machinename is the name of your machine.
Installation Path Verify that the default value is the installation directory path to which you want to install Release 9.1 on the Enterprise Server. Make sure the value is specific to your version of the release. For example, for Release 9.1 the default path is: \JDEdwards\PPack\E910SYSThis is the system library.
Caution: You must change the value that defaults into the Installation Path field as shown in the screen capture above.
Deployment Server Name Using the visual assist button, choose the name of the Deployment Server to which this Enterprise Server is attached. A Deployment Server name appears in this field by default, but it can be changed if necessary. Note:
If you change the port number to a value other than 6016, you must also change this setting in both the Enterprise Server and clientjde.ini. -
Click OK.
5.4.7 Enter Data Source Information for Server Map
To enter information for the Server Map data source:

-
On Data Source, click OK to continue entering unique data source information, or click Take Defaults to select the default data. If you select the default data, you can skip to Section 5.4.8, "Entering HTML Web Server Information".

-
On Data Source Revisions, verify the accuracy of the Server Map data source.
-
Click OK.
-
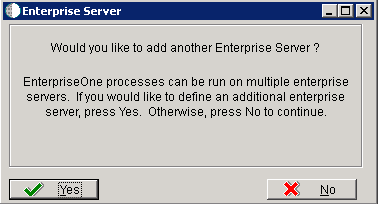
On the Would you like to add another Enterprise Server? dialog, click the Yes or No button.
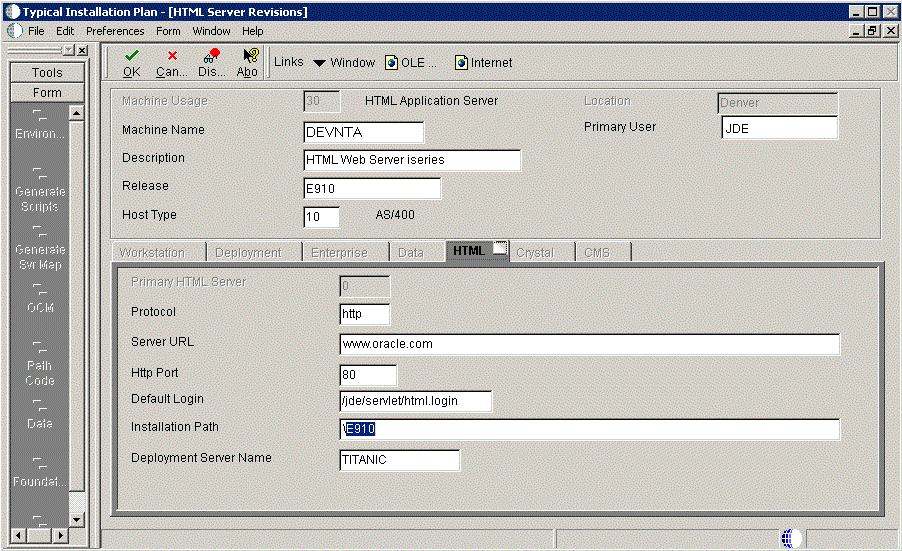
5.4.8 Entering HTML Web Server Information
Note:
For Release 9.1 the current terminology and that used in this guide is to refer to the machine running the JD Edwards EnterpriseOne Java Application Server (JAS) as the HTML Web Server. Functionally, these terms are all synonymous. However, this guide only uses the terms JAS or Java Server when explicitly labeled as such by the software.Caution:
The HTML Web Server is mandatory for the majority of JD Edwards EnterpriseOne applications because the end-user applications are only accessible through a web interface.To enter HTML Web Server information:
-
On HTML Server Revisions, complete these fields:
Field Description Machine Usage The default value of 30 indicates that this is a HTML Web Server. Machine Name Enter the name of your HTML Web Server. The name is case sensitive, should not exceed 15 characters, and should not contain any special characters. Description Enter a description of the HTML Web Server machine. Release Enter E910 to indicate the release number that you are installing. Host Type The default value of 50 specifies the server type as Intel NT. Select the correct server type. Location The location chosen for this plan appears in this field by default. Primary User The user to whom an email is sent when a package is deployed. The default for Primary User is listed in the jde.ini. -
On the HTML tab, complete these fields:
Field Description Primary HTML Server When the system code generates an email message with a web shortcut pointing to a form, the web shortcut generated points to the "Primary" HTML Web Server. Only one of all the HTML Web Servers defined in installation planner can be defined as primary ("1"). Protocol This is the protocol used by the HTML Web Server. Valid values are http or https. Server URL This is the Domain Name System (DNS) host name of the HTML Web Server. For example: www.oracle.com
HTTP Port This is the port number the HTML Web Server is listening to. For HTTP, the typical port number is 80.
For HTTPS, the typical port number is 443.
Note: You can choose to implement a HTML Web Server using a different port number.
JDENET Listen Port This is the port on which the JDENET communications protocol communicates with the JD Edwards EnterpriseOne Enterprise Server. The value is dependent on the release of JD Edwards EnterpriseOne. For JD Edwards EnterpriseOne Release 9.1, the value is 6016.
Default Login Defines how shortcuts to a web form are generated by the system code. Values are either a reserved value or an explicit servlet name. Reserved values are: -
Standard
The URL generated will point to a servlet on the Primary HTML Web Server.
-
Redirector
The URL generated will point to redirector in the Primary HTML Web Server, and redirector will point to a servlet on another HTML Web Server for load balancing. The servlet name to use is generated by the system.
-
Explicit Servlet Name
The user can specify an explicit servlet name in this field. In this case, the redirector functionality cannot be used. The URL generated will point to the specified servlet in the Primary HTML Web Server.
Usage of Explicit servlet name is for backward compatibility only. You should not use it unless you have a direct need.
Installation Path Enter the installation directory path to which you are installing Release 9.1 on your HTML Web Server. Make sure this is specific to your version of the release, and also the platform and application server on which your HTML Web Server is running. For default paths, refer to the applicable platform- and application server-dependent version of the JD Edwards EnterpriseOne HTML Web Server Reference Guide ( WebSphere for IBM i). Otherwise, you must obtain this value from the HTML Web Server machine itself, or its administrator.
Deployment Server Name Using the visual assist button, choose the name of the Deployment Server to which this HTML Web Server is attached. A Deployment Server name appears in this field by default, but you can change it if necessary. -
-
Click OK.

-
To add another HTML Web Server, click Yes and repeat steps 1 through 4 to define another HTML Web Server.
5.4.9 Verify the Data Sources
On Data Source, click the OK button to verify these data sources for your installation.o select default environments:
-
Section 5.4.9.1, "Verifying the Data Source for Data Dictionary"
-
Section 5.4.9.2, "Verifying the Object Librarian Data Source"
5.4.9.1 Verifying the Data Source for Data Dictionary
To verify the data source for Data Dictionary:

-
On Data Source Revisions, verify the accuracy of the settings for the Data Dictionary data source.
The library name in the Library Name field is the Release 9.1 data dictionary library (DD910).
-
Click OK.
5.4.9.2 Verifying the Object Librarian Data Source
To verify the Object Librarian data source:

-
On Data Source Revisions, verify the accuracy of the settings for the Object Librarian data source.
-
Click OK.
5.4.9.3 Verifying the OWJRNL Data Source
To verify the OWJRNL data source:
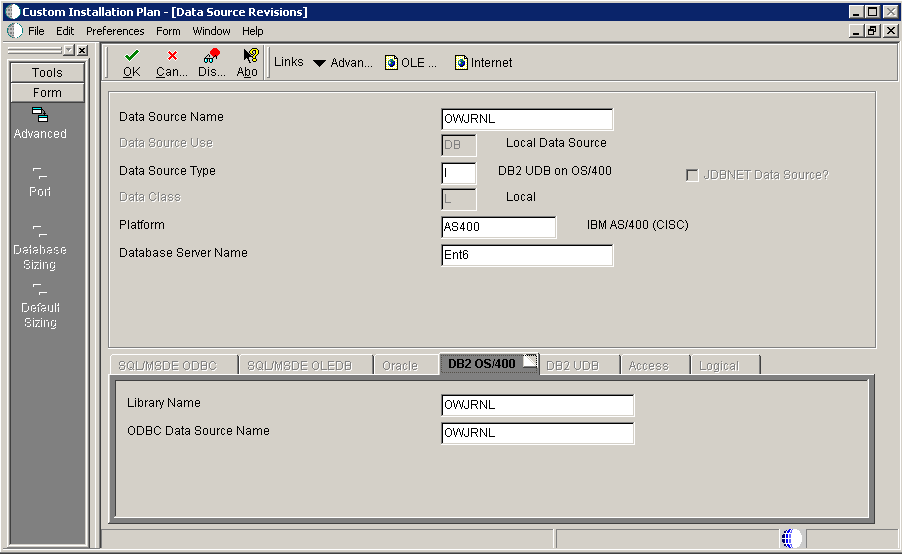
-
On Data Source Revisions, verify the accuracy of the settings for the OWJRNL data source.
-
Click OK.
5.4.9.4 Verifying the System Data Source
To verify the System data source:
-
On Data Source Revisions, verify the accuracy of the settings for the System data source.
-
Click OK.
5.4.10 Selecting Default Environments
The Environment Selection screen is displayed.
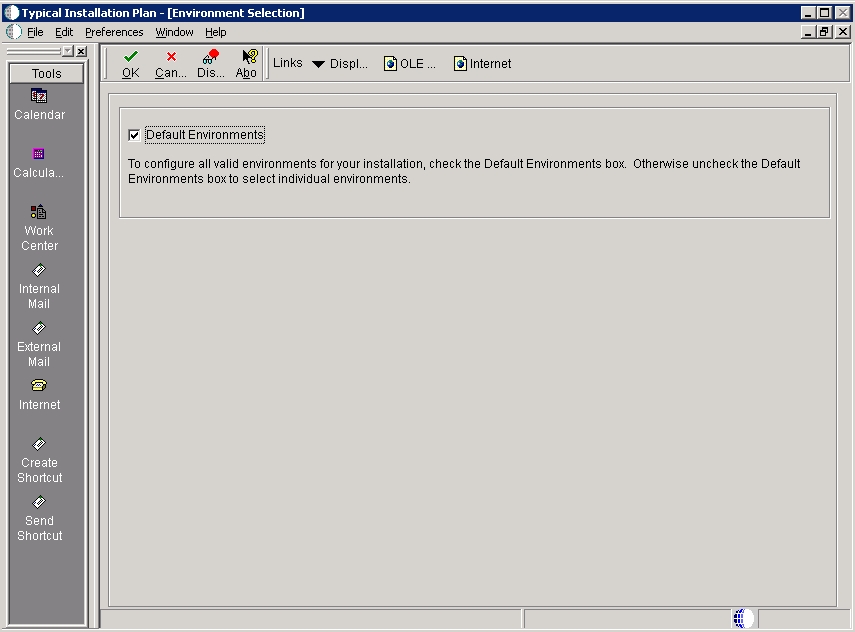
-
To configure all valid environments for your installation, check the Default Environments box. Otherwise, uncheck the Default Environments box to select and verify individual environments.
-
Click OK.
-
Click the OK button to verify your environments.
Caution When Choosing Take Defaults
In order to ensure the validity of all subsequent plan information, it is strongly recommended that even advanced users should not choose the Take Defaults option. Instead, you should step through plan and verify that the Planner is populating information exactly as you expect to match your requirements.:
You can verify these default environments:
-
Section 5.4.10.1, "Verifying the Data Source for Business Data"
-
Section 5.4.10.2, "Verifying the Data Source for Central Objects"
-
Section 5.4.10.3, "Verifying the Data Source for Control Tables"
-
Section 5.4.10.4, "Verifying the Data Source for Data Dictionary"
5.4.10.1 Verifying the Data Source for Business Data
To verify the data source for business data:

-
On Data Source Revisions, verify the data source for your Business Data.
-
Click OK.
5.4.10.2 Verifying the Data Source for Central Objects
Caution:
You should change the data source if Central Objects are not on an IBM i machine.To verify the data source for central objects:
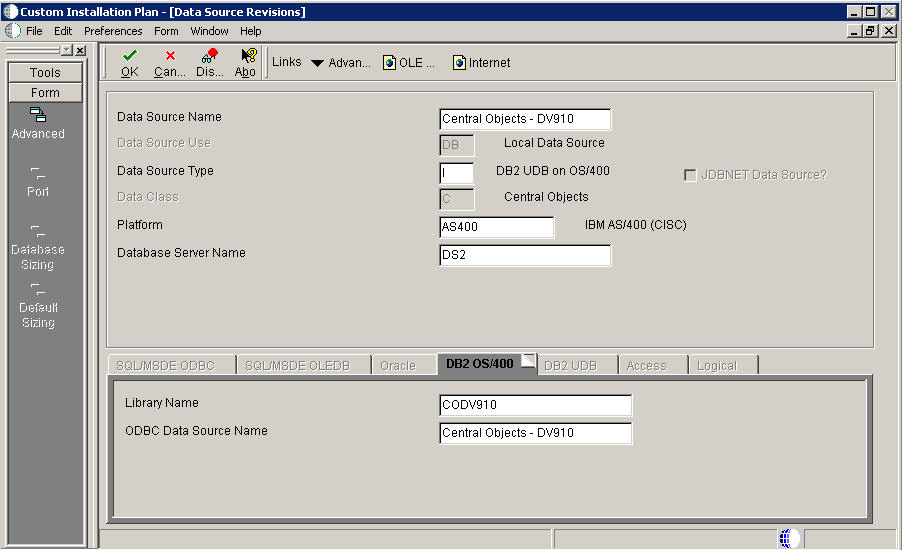
-
On Data Source Revisions, verify the information for your central objects data source.
Caution:
If you are putting central objects on the IBM i, verify that the data library name isCO pathcode. For example:COPY910 -
Click OK.
5.4.10.3 Verifying the Data Source for Control Tables
To verify the data source for control tables:
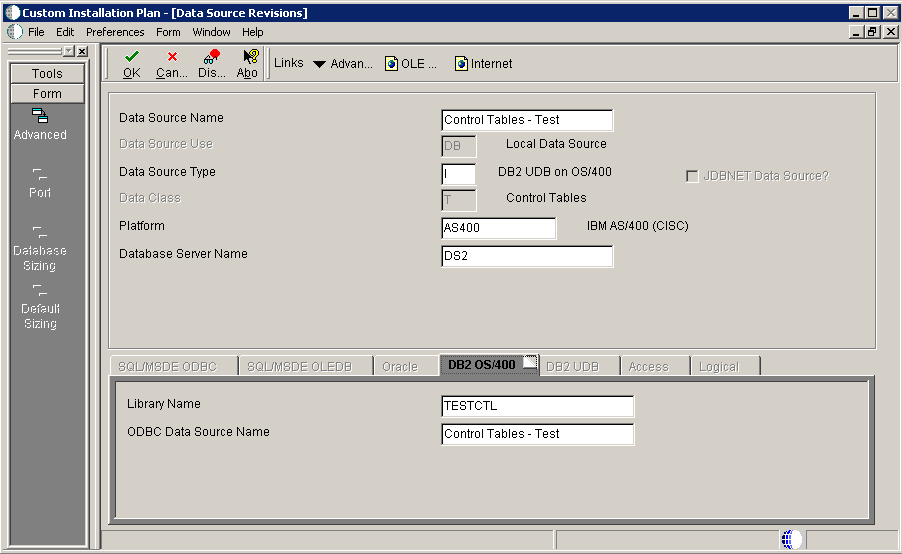
-
On Data Source Revisions, verify the accuracy of the Control Tables data source.
Field Description Data Source Name Verify the name of the data source. Server Name Verify the name of the Enterprise Server. Library Name Enter the name of the library housing your Control Tables for the selected environment. ODBC Data Source Name Enter the name of the data source. For example, Control Tables - Test. Note:
Control tables data sources are specific to the environment and pathcode. -
Click OK.
5.4.10.4 Verifying the Data Source for Data Dictionary
To verify the data source for Data Dictionary:
-
On Data Source Revisions, verify the accuracy of the settings for the Data Dictionary data source.
The library name in the Library Name field is the Release 9.1 data dictionary library (DD910).
-
Click OK.
5.4.10.5 Verifying the Data Source for Versions
To verify the data source for versions:
-
On Data Source Revisions, verify the accuracy of the versions data source.
Note:
Versions data sources are specific to the pathcode, and the Unicode flag on the Advanced form must be selected. -
Click OK.
Note:
When you click OK at this point, the Plan begins to finalize; the below screen is displayed with progress indicated in the lower left-hand portion.
When the plan complete the finalization process, the following dialog is displayed:
5.4.11 Finalizing the Installation Plan
When the plan is finalized:
-
The status is set to 20, signaling that several adjustments to OCM mappings and tables are made according to your plan.
-
The system creates the OCM mappings and the .
jde.ini -
These tables are updated:
-
Release Master table (F00945).
-
Path Code Master table (F00942).
-
Package Plan table (F98404).
-
Machine Detail table (F9651).
-
Language table (F984031), if you are installing a language.
-
To finalize the Installation Plan:
-
On the Information Prompt that indicates Installation Planner has concluded, click OK to exit the message box and initiate the Planner Validation Report.
-
If the processing option default was selected, Planner Validation Report automatically prompts you to run this report.
-
If the processing option default was not selected, click Validate on the tree view of your plan to initiate the Planner Validation Report.
-
5.4.12 Concluding the Planner Validation Report
To conclude the planner validation report:
-
On Report Output Destination, select On Screen or To Printer.
-
Click OK.
-
Review the report to confirm that all records were validated.
For more information about Section 22.1, "Installation Planner Validation Report (R9840B)", refer to Chapter 22, "Working with Reports".
-
On Work With Installation Plans, click Expand to review the plan you created.
See Also
-
A separate chapter in this guide entitled: Chapter 15, "Creating a Remote Installation Plan"
-
A separate chapter in this guide entitled: Chapter 16, "Adding a Server to an Existing Configuration"
-
A separate chapter in this guide entitled: Chapter 17, "Creating a Language-Only Installation Plan"
5.5 Creating a Custom Installation Plan
This chapter includes the following processes for creating a custom installation plan:
See Also
-
A separate chapter in this guide entitled: Chapter 15, "Creating a Remote Installation Plan"
-
A separate chapter in this guide entitled: Chapter 16, "Adding a Server to an Existing Configuration"
-
A separate chapter in this guide entitled: Chapter 17, "Creating a Language-Only Installation Plan"
5.5.1 Understanding a Custom Installation Plan
Note:
After installing the Deployment Server, you must define and run the installation plan. You must either define and run a Typical or a Custom Installation Plan -- do not do both.Note:
If you installed JD EnterpriseOne files to a remote Deployment Server, the deployment server name is the remote machine name by default.Within a custom installation plan, the information you provide on the Installation Planner forms, such as database type and Enterprise Server type, determines the information displayed on the remaining forms. The Installation Planner processing options also determine which choices are available while setting up your plan. For a complete description of the processing options, refer to Section 5.3, "Reviewing Installation Planner Processing Options".
JD Edwards EnterpriseOne configures your Release 9.1 data sources as completely as possible. However, when you run Installation Planner, you might need to modify some data source information to reflect your system-specific configuration.
5.5.2 Starting Installation Planner
To start Installation Planner from within JD Edwards EnterpriseOne:
-
Access the System Installation Tools Menu (GH961).
-
On the System Installation Tools menu, double-click Custom Installation Plan.
-
On Work with Installation Plans, click Add.
The Installation Planner form appears.
-
Enter a Plan description.
5.5.3 Entering a Plan Description
To enter a plan description:

-
On Installation Planner, complete the following fields:
Field Description Name Enter the name of the plan. Description Enter the description of the plan. Status Choose 10 (the default value). Install Type Click the Install (the default value). To Release Verify that the release number is E910 (the default value). Include Languages This is an optional selection that is only available if you have a language installation image installed on the Deployment Server. Select Yes if you are installing an alternate language. Note: If you prefer, you can install an alternate language after you complete your master plan. To do so, select the Language Only option on this form. For more information, refer to Chapter 17, "Creating a Language-Only Installation Plan"
-
Click OK.
-
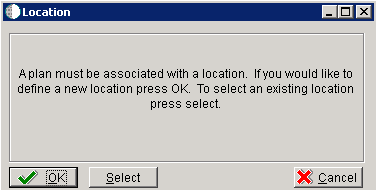
On the Location dialog, click OK.
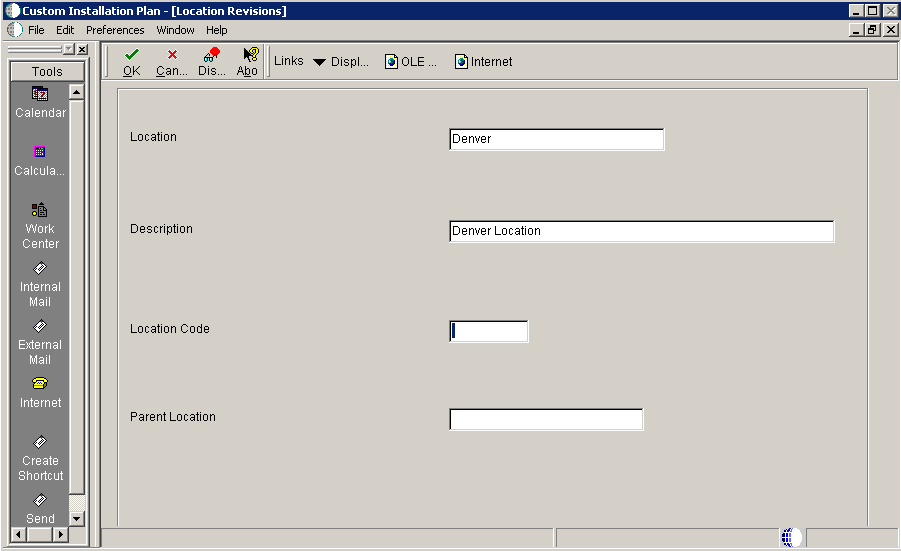
5.5.4 Entering Location Information
A location groups related Deployment Servers for use in a multi-tier environment.
To enter location information:
-
On Location Revisions, complete these fields:
Field Description Location Enter the location to which this plan applies; the location can be a city, company headquarters, or a division of the company. Description Enter a description for this location. Location Code If this is the base location, this field will be grayed out. Parent Location For the base location, this field will be grayed out. -
Click OK.
5.5.5 Entering Deployment Server Information
While Release 9.1 enables more than one Deployment Server to be defined, only the primary Deployment Server is defined at this time. You can choose a primary Deployment Server from the list of existing servers or you can enter information for a new server.
To enter Deployment Server information:
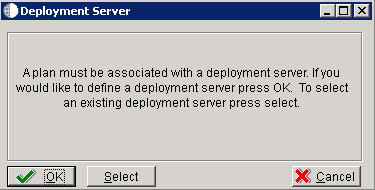
-
Click OK to add a Deployment Server.
-
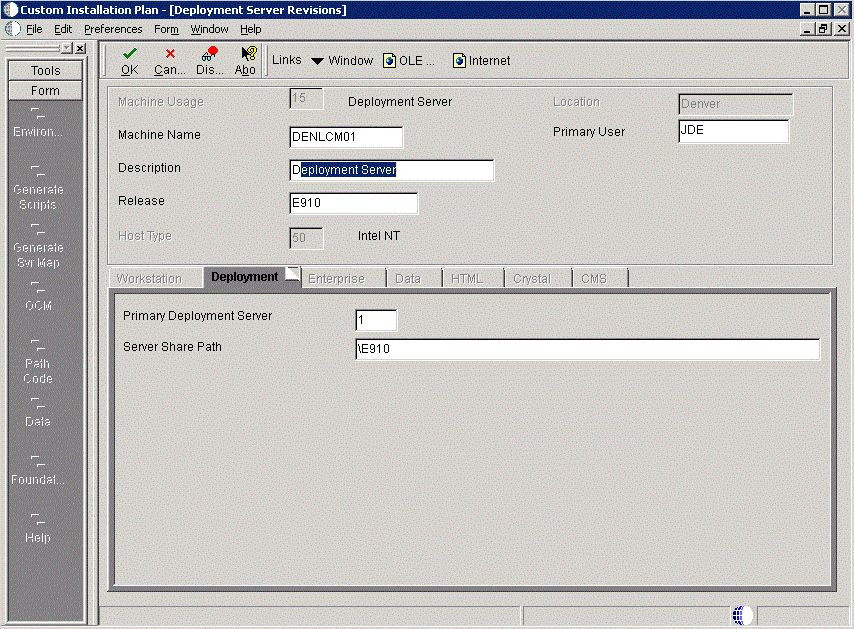
On Deployment Server Revisions, complete or verify these fields:
Field Description Machine Usage Displays the value 15 by default to indicate that this is a Deployment Server. Machine Name The name of the Deployment Server appears by default. The name is case sensitive, should not exceed 15 characters, and should not contain any special characters. Description Enter a long description for the machine. This description should include the location with which this Deployment Server is associated and whether or not it is the primary server. Release Enter the release number you are installing or use the visual assist button to choose one from the list. The default value is E910. Host Type Displays the value 50 appears by default, indicating that the server type is Intel NT. Location Displays the current location. Primary User Displays the user to whom an email is sent when a package is deployed. The default value for Primary User is JDE. -
On the Deployment tab, complete this field:
Field Description Primary Deployment Server Enter the hierarchy of the servers. Values are: 1- Primary Deployment Server (default value)
0 - Secondary Deployment Server
The server share name of the directory to which you installed Release 9.1 on your Deployment Server. Verify that the server share name for Release 9.1 is:
\E910 -
Click OK.
Tip:
If you enter invalid information into a tab field, a stop sign symbol appears next to the tab name, such as Deployment Server. For more information about the error, click the stop sign icon in the bottom right-hand corner of the form. -
To add another Deployment Server, click Yes and repeat steps 1 through 3.
-
To continue with Installation Planner setup, click No.
5.5.6 Entering Enterprise Server Information
Note:
During the definition of the Enterprise Server, a port number must be defined. While Enterprise Servers running the same release can use the same port number, an Enterprise Server running two different versions of software must use two different port numbers.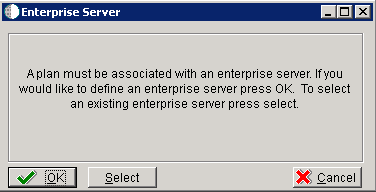
On Enterprise Server, click the OK button to define a new Enterprise Server, or click the Select button to choose an existing Enterprise Server.

-
On Enterprise Server Revisions, verify or complete these fields:
Field Description Machine Name The name of the primary Enterprise Server. The name is case sensitive and should not contain any special characters. Because the machine name is used to create the Server Map datasource name, and because the Platform Pack Installer does not restrict you from entering a machine name that results in a datasource name greater than 30 characters; if the machine name for the Enterprise Server is longer than 13 characters, the resulting datasource name will be longer than the allowed 30 characters. For example, if your machine name is 15 characters (A23456789012345), the base datasource name in the server jde.ini will be:
A23456789012345 - 910 Server MapNote: The field in table F98611 is a hard restriction; the field only allows 30 characters. The actual field size cannot be modified or changed.
When the Planner runs it truncates the value to 30 characters because that is the restriction in the F98611 table. The Platform Pack does not truncate the value when it builds the jde.ini for the Enterprise Server. Therefore, any value greater than 30 characters will result in a mismatch between the
jde.iniand the F98611 table. That is, using the previous example, thejde.iniwould have the full length valueA23456789012345 - 910 Server Map(which is 32 characters) while the F98611 populated by the Planner would have a value ofA23456789012345 - 910 Server M.To remedy, you could do any one of the following:
-
Manually modify values in table F98611 to match the truncated value in the
jde.inifile. -
Ensure that the value is not truncated by limiting the datasource name to 30 characters (this would mean limiting the machine name for the Enterprise Server to 13 characters).
-
Manually truncate the value in the F98611 table (for example,
A23456789012345 - 910 Svr Map.
In any case, you must ensure that the values for Server Map datasource names in the F98611 table exactly match those in the
jde.inifile on the Enterprise Server.Description Enter a description for the machine. Release Enter the release number to which this plan applies, or use the visual assist button to choose one from the list. The default value is E910. Host Type Click the visual assist button and choose the type of Enterprise Server you are adding to the plan. In this case, IBM i. Location The location chosen for this plan appears by default. Primary User The user to whom an email is sent when a package is deployed. The default value for Primary User is JDE. Note:
The case of machine name must also match the network ID for that machine. -
-
Continuing on Enterprise Server Revisions, select the Enterprise tab, and complete or verify these fields:
Field Description Port Number The port number value (6016) for this Enterprise Server appears by default from the jde.ini. Logical Machine Name The Installation Planner detects and provides a default value based on the current machine name on which the program is running. The name is case sensitive, should not exceed 15 characters, and should not contain any special characters. Database Type Enter the value for your database: I - DB2 400
Server Map Data Source Whenever you enter a host type, the Installation Planner populates this field with a default value: machinename - 910 Server Map
where machinename is the name of your machine.
Installation Path Verify that the default value is the installation directory path to which you want to install Release 9.1 on the Enterprise Server. Make sure the value is specific to your version of the release. For example, for Release 9.1 the default path is: \JDEdwards\PPack\E910SYSThis is the system library.
Caution: You must change the value that defaults into the Installation Path field as shown in the screen capture above.
Deployment Server Name Using the visual assist button, choose the name of the Deployment Server to which this Enterprise Server is attached. A Deployment Server name appears in this field by default, but it can be changed if necessary. Note:
If you change the port number to a value other than 6016, you must also change this setting in both the Enterprise Server and workstation JDE.INIjde.ini. -
Click OK.
5.5.7 Enter Data Source Information for Server Map
To enter information for the Server Map data source:
-
On Data Source, click OK to continue entering unique data source information, or click Take Defaults to select the default data. If you select the default data, you can skip to Section 5.5.8, "Entering HTML Web Server Information".
-
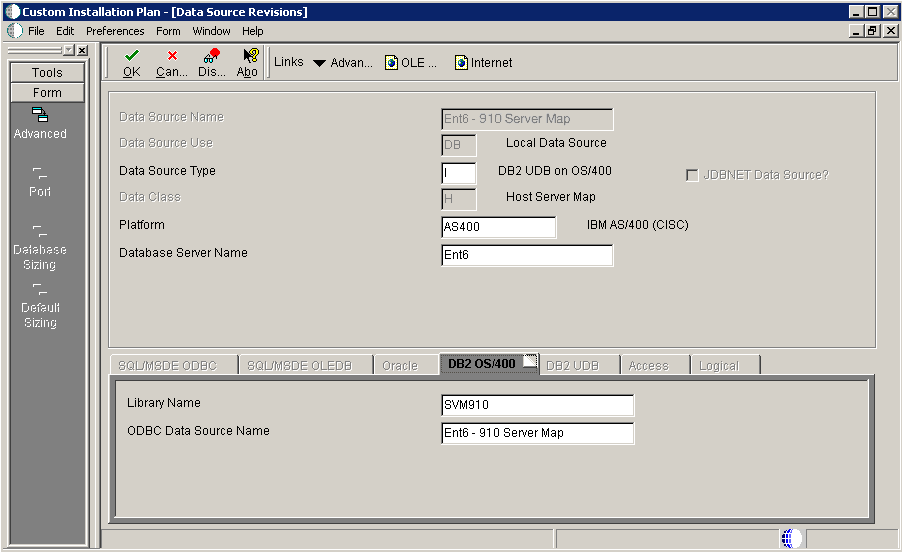
On Data Source Revisions, verify the accuracy of the Server Map data source.
-
Click OK.
-
On the Would you like to add another Enterprise Server? dialog, click the Yes or No button.
5.5.8 Entering HTML Web Server Information
Note:
For Release 9.1, the current terminology and that used in this guide is to refer to the machine running the JD Edwards EnterpriseOne Java Application Server (JAS) as the HTML Web Server. Functionally, these terms are all synonymous. However, this guide only uses the terms JAS or Java Server when explicitly labeled as such by the software.Caution:
The HTML Web Server is mandatory for the majority of JD Edwards EnterpriseOne applications because the end-user applications are only accessible through a web interface.To enter HTML Web Server information:
-
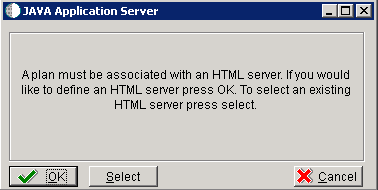
Click OK to define a new HTML Server, or click Select to choose from a list of existing HTML Servers.
If you choose Select, you are presented with the Machine Search table, from which you can make your selection.
-
On HTML Server Revisions, complete these fields:
Field Description Machine Usage The default value of 30 indicates that this is a HTML Web Server. Machine Name Enter the name of your HTML Web Server. The name is case sensitive, should not exceed 15 characters, and should not contain any special characters. Description Enter a description of the HTML Web Server machine. Release Enter E910 to indicate the release number that you are installing. Host Type The default value of 50 specifies the server type as Intel NT. Select the correct server type. Location The location chosen for this plan appears in this field by default. Primary User The user to whom an email is sent when a package is deployed. The default for Primary User is listed in the jde.ini. -
On the HTML tab, complete these fields:
Field Description Primary HTML Server When the system code generates an email message with a web shortcut pointing to a form, the web shortcut generated points to the "Primary" HTML Web Server. Only one of all the HTML Web Servers defined in installation planner can be defined as primary ("1"). Protocol This is the protocol used by the HTML Web Server. Valid values are http or https. Server URL This is the Domain Name System (DNS) host name of the HTML Web Server. The syntax is:
server_name:port\jde\owhtmlFor example:
DEVNTA:81\jde\owhtmlHttp Port This is the port number the HTML Web Server is listening to. For HTTP, the typical port number is 80.
For HTTPS, the typical port number is 443.
However, you can choose to implement a HTML Web Server using a different port number.
Default Login Defines how shortcuts to a web form are generated by the system code. Values are either a reserved value or an explicit servlet name. Reserved values are: -
Standard
The URL generated will point to a servlet on the Primary HTML Web Server.
-
Redirector
The URL generated will point to redirector in the Primary HTML Web Server, and redirector will point to a servlet on another HTML Web Server for load balancing. The servlet name to use is generated by the system.
-
Explicit Servlet Name
The user can specify an explicit servlet name in this field. In this case, the redirector functionality cannot be used. The URL generated will point to the specified servlet in the Primary HTML Web Server.
Usage of Explicit servlet name is for backward compatibility only. You should not use it unless you have a direct need.
Installation Path Enter the installation directory path to which you are installing Release 9.1 on your HTML Web Server.Make sure this is specific to your version of the release, and also the platform and application server on which your HTML Web Server is running. For default paths, refer to the applicable platform- and application server-dependent version of the JD Edwards EnterpriseOne HTML Web Server Reference Guide (WebLogic for Windows, WebLogic for UNIX, WebSphere for Windows, WebSphere for UNIX, WebSphere for IBM i. Otherwise, you must obtain this value from the HTML Web Server machine itself, or its administrator.
Deployment Server Name Using the visual assist button, choose the name of the DeploymentServer to which this HTML Web Server is attached. A DeploymentServer name appears in this field by default, but you can change it ifnecessary. -
-
Click OK.
-
To add another HTML Web Server, click Yes and repeat steps 1 through 4 to define another HTML Web Server.
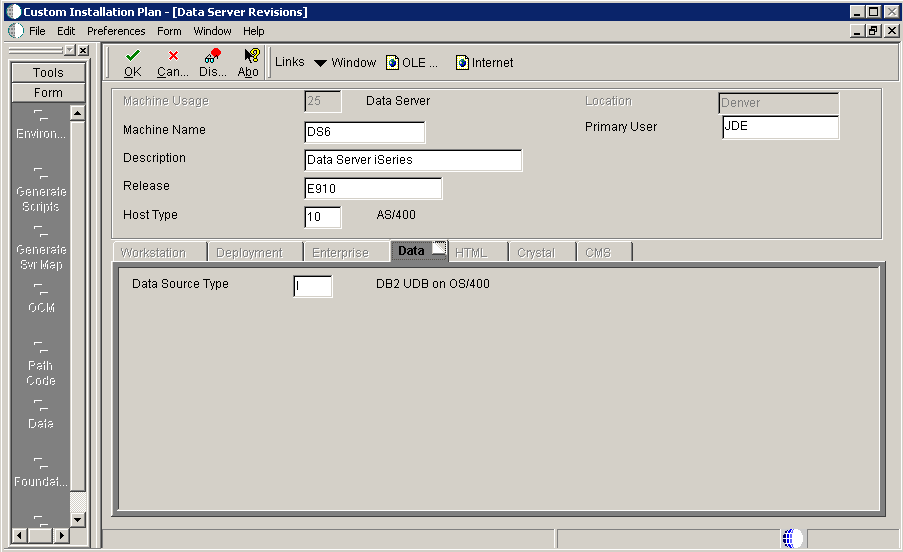
5.5.9 Entering Data Server Information
-
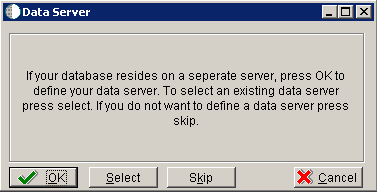
On Data Server, choose one of these options:
-
OK
If your database resides on a separate server, choose click OK to continue entering unique Data Server information.
-
Select
Click this option to select an existing Data Server.
-
Skip
Click this option if you do not want to define a Data Server. Continue with the Planner using the environment selection in step 6 of this task.
-
On Data Source, click OK to continue entering unique data source information, or click Take Defaults to select the default data.
-
-
On Data Server Revisions, complete these fields:
Field Description Machine Usage The default value of 25 indicates that this is a Database Server. Machine Name Enter the name of the Database Server where your central objects reside. If you are using the IBM i to store your central objects, enter the name of this server. The name is case sensitive, should not exceed 15 characters, and should not contain any special characters. Description Enter a description of the Database Server machine. Release Enter the release number you are installing, for example, E910. Host Type Select the type of Database Server that you are adding to the plan. Values are: -
10 — IBM i
-
25 — Sun Solaris
-
30 — RS\6000
-
35 — Linux
-
50 — Microsoft Windows (Intel)
-
80— Client - Microsoft Windows
-
90 — Client - Microsoft Windows
Location The Installation Planner populates this field by default, based on previous selections. Primary User The user to whom an email is sent once a package is deployed. The default for Primary User is JDE. -
-
On the Data tab, complete the following field:
Field Description Data Source Type Choose the type of data source. For example: -
I - IBM i
-
-
Click OK.
-
To add another Data Server, click Yes and repeat steps 1 through 4 to define another Data Server.
-
On Data Source, click OK to entering and verify unique shared data source information as described in the next section of this guide entitled: Section 5.5.10, "Entering Shared Data Source Information".
5.5.10 Entering Shared Data Source Information
This section discusses:
-
Section 5.5.10.1, "Specifying (Custom or Default) Shared Data Source Setup Information"
-
Section 5.5.10.2, "Verifying the Data Source for Data Dictionary"
-
Section 5.5.10.3, "Verifying the Object Librarian Data Source"
5.5.10.1 Specifying (Custom or Default) Shared Data Source Setup Information
When you are prompted to enter the data source information for the shared data sources, to use the Release 9.1 data sources, click Take Defaults, or click OK to specifically enter the data source information.
See Also
For more information about System data source fields or fields for other data sources mentioned in this process, refer to Chapter 19, "Understanding Data Source Charts".
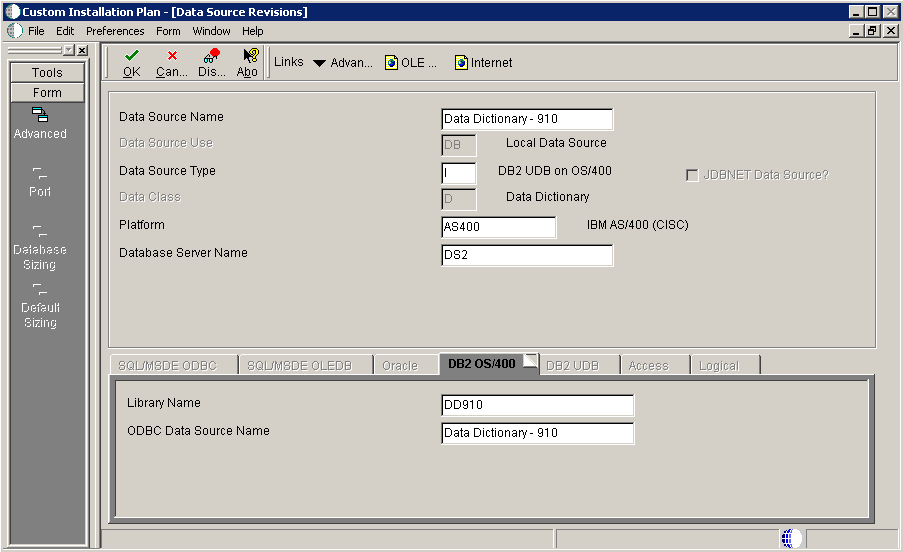
5.5.10.2 Verifying the Data Source for Data Dictionary
To verify the data source for Data Dictionary:
-
On Data Source Revisions, verify the accuracy of the settings for the Data Dictionary data source.
The library name in the Library Name field is the Release 9.1 data dictionary library (DD910).
-
Click OK.
5.5.10.3 Verifying the Object Librarian Data Source
To verify the Object Librarian data source:

-
On Data Source Revisions, verify the accuracy of the settings for the Object Librarian data source.
-
Click OK.
5.5.10.4 Verifying the OWJRNL Data Source
To verify the OWJRNL data source:
-
On Data Source Revisions, verify the accuracy of the settings for the OWJRNL data source.
-
Click OK.
5.5.10.5 Verifying the System Data Source
To verify the System data source:
-
On Data Source Revisions, verify the accuracy of the settings for the System data source.
-
Click OK.
The Environment Selection screen appears.
5.5.11 Working with Environment Setup
This section discusses:
5.5.11.1 Understanding Environment Setup
By default, Installation Planner configures your system using values for typical environments. Depending on the options chosen when you set up your plan, Release 9.1 displays one or more of the following parameters, which you can customize in the following tasks:
-
Environments
-
Data load options
You can customize any of these parameters by turning off the default option on the Environment Selection form. As you move through the plan, Installation Planner displays a customization form for each parameter that you clear.
5.5.11.2 Setting Up Environments
To set up environments:
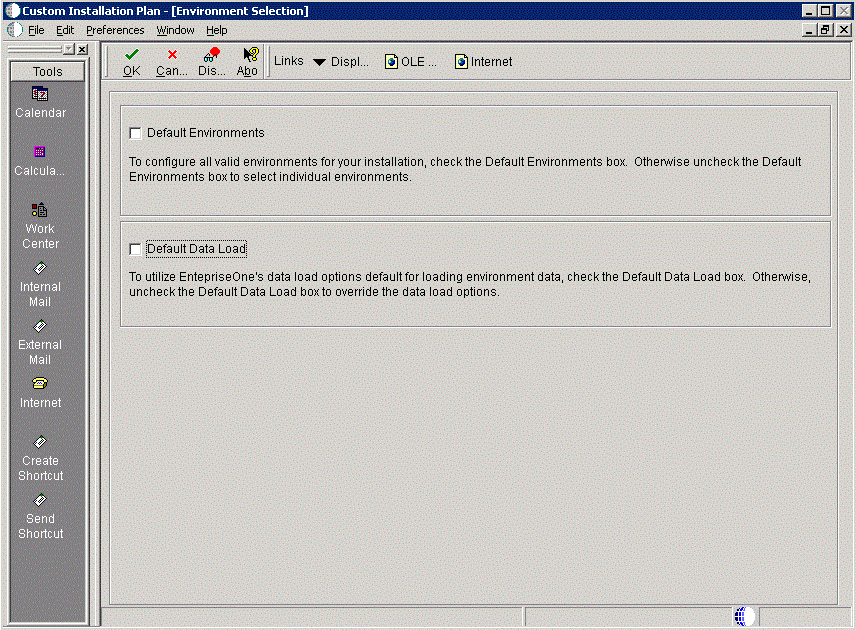
-
On Environment Selection, clear the options that you do not want to customize.
Note:
Different parameters appear depending on the options that you chose at the beginning of the planning process. -
Click OK.
Note:
If you selected the default option, which is to include all parameters, skip to Section 5.5.11.3, "Working with Environment Data Sources".Skip the tasks for those parameters that you did not clear. Otherwise, this section discusses these topics:
Note:
Adding a Custom Environment. Previous releases of JD Edwards EnterpriseOne allowed you to add a custom environment using P98410 to Add or Copy a custom Environment. Beginning with Release 9.0, you should instead use P989400 Environment Copy from GH961 > Advanced Operations. Refer to the section of this guide entitled: Chapter 13, "Copying an Environment to Another Environment".5.5.11.2.1 Selecting an Environment
To select an environment:
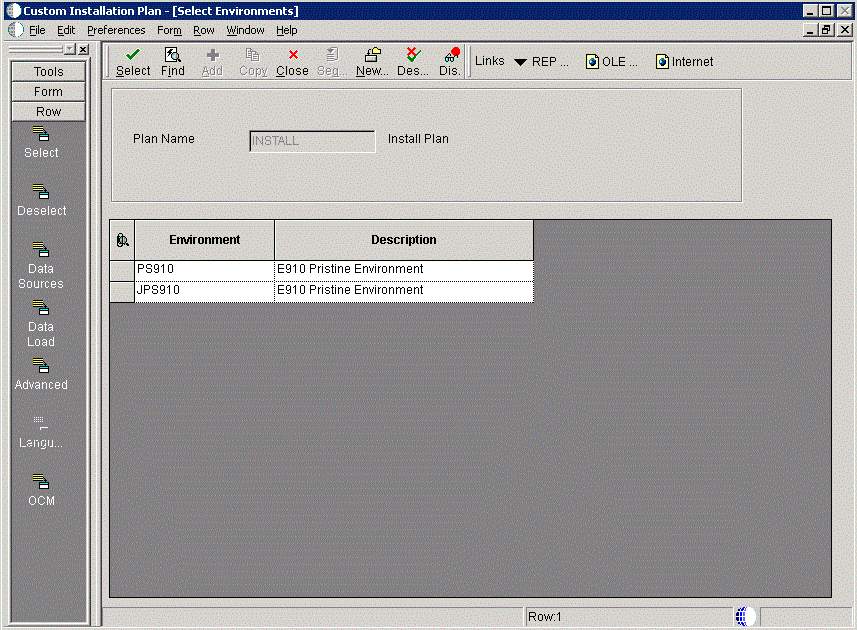
-
On Select Environments, double-click the environment that you want to define. Selected environments are indicated with a green checkmark in the left-most column of the grid.
Note:
J xx environments are required for the HTML Web Server.To set up multiple environments, select and define them one at a time.
-
Click the Close button to exit the Select Environments screen.
5.5.11.2.2 Specifying Environment Data Load Parameters
If you turned off Default Data Load on the Environment Selection form, the Data Load Parameters form appears. For example, if you chose the PS910 environment, this Data Load Parameters screen is displayed:
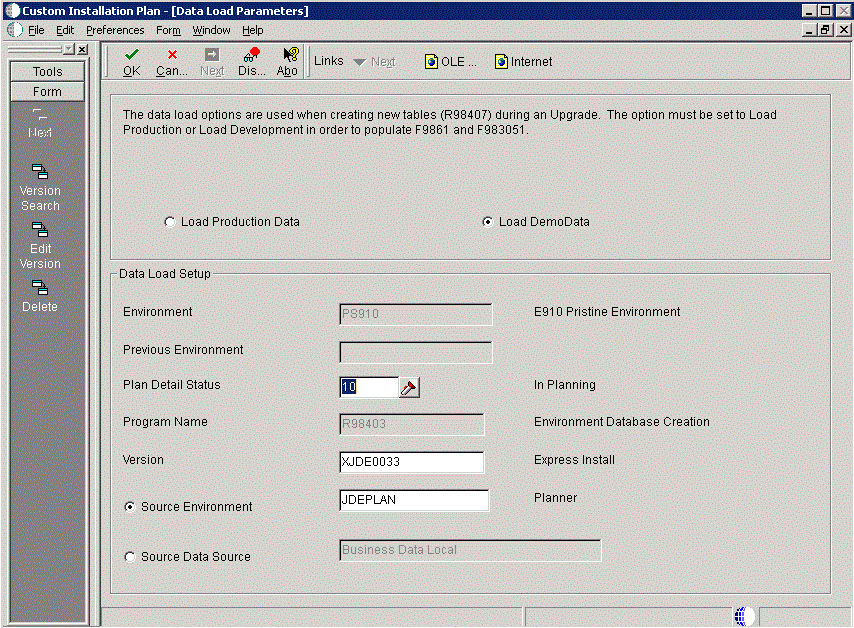
Note:
The data load radio buttons on this form are no longer applicable as of JD Edwards EnterpriseOne Release 9.1 because data is automatically loaded by the Platform Pack Installer.For additional details, refer to Section 6.1.2, "Loading Data (Demo Data and Production Data)".
5.5.11.3 Working with Environment Data Sources
This section discusses:
-
Section 5.5.11.3.1, "Understanding Environment Data Sources"
-
Section 5.5.11.3.2, "Selecting an Environment Data Source Setup Option"
-
Section 5.5.11.3.3, "Setting Up the Data Source for Business Data"
-
Section 5.5.11.3.4, "Setting Up the Data Source for Central Objects"
-
Section 5.5.11.3.5, "Setting Up the Data Source for Control Tables"
-
Section 5.5.11.3.6, "Verifying the Data Source for Data Dictionary (Pristine Only - PS910)"
-
Section 5.5.11.3.7, "Verifying the Data Source for Versions"
5.5.11.3.1 Understanding Environment Data Sources
Once you have set up the environments, you must set up the data sources for those environments. If you created a custom environment, data source information is generated from the data source template provided by JD Edwards EnterpriseOne.
See Also
To modify this template, refer to the JD Edwards EnterpriseOne Configurable Network Computing Implementation Guide.
5.5.11.3.2 Selecting an Environment Data Source Setup Option
Installer Planner prompts you to set up data sources for the environment you just configured.
To select an environment data source setup option:
-
On Data Source, click OK to manually enter the data sources and continue with the following task, or click Take Defaults to accept the Release 9.1 default data sources.
5.5.11.3.3 Setting Up the Data Source for Business Data
To set up the data source for business data:
-
On Data Source Revisions, verify the data source for your Business Data.
-
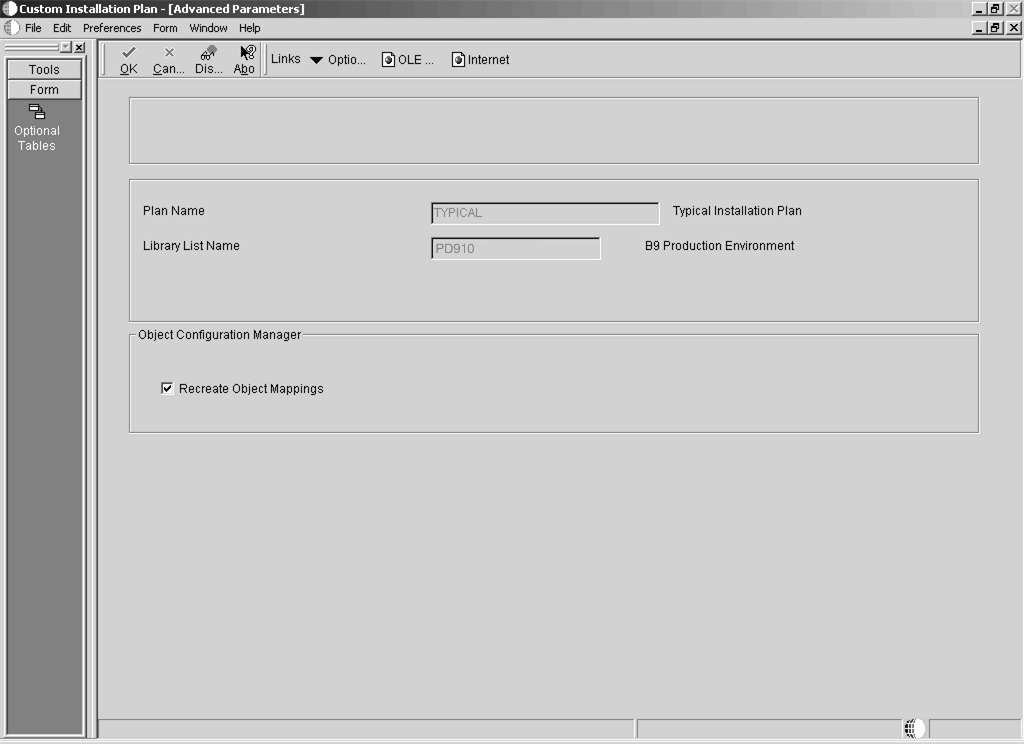
From the Form menu, click Advanced.
-
Click OK.
5.5.11.3.4 Setting Up the Data Source for Central Objects
Caution:
You should change the data source if Central Objects are not on an IBM i machine.To set up the data source for central objects:
-
On Data Source Revisions, verify the information for your central objects data source.
Caution:
If you are putting central objects on the IBM i, verify that the data library name isCO pathcode. For example:COPY910 -
Click OK.
-
On Data Source Revisions, click the Advanced form option.
-
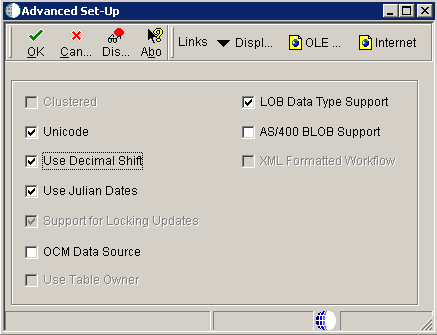
On Advanced Set-Up, because the central objects data source must be Unicode, verify the Unicode setting is checked.
For IBM i, ensure the AS/400 BLOB Support setting is checked.
5.5.11.3.5 Setting Up the Data Source for Control Tables
To setup the data source for control tables:
-
On Data Source Revisions, verify the accuracy of the Control Tables data source.
Field Description Data Source Name Verify the name of the data source. Server Name Verify the name of the Enterprise Server. Library Name Enter the name of the library housing your Control Tables for the selected environment. ODBC Data Source Name Enter the name of the data source. For example, Control Tables - Test. Note:
Control tables data sources are specific to the environment and pathcode. -
Click OK.
5.5.11.3.6 Verifying the Data Source for Data Dictionary (Pristine Only - PS910)
To verify the data source for Data Dictionary:
Caution:
This task is only applicable to the Pristine Environment (PS910)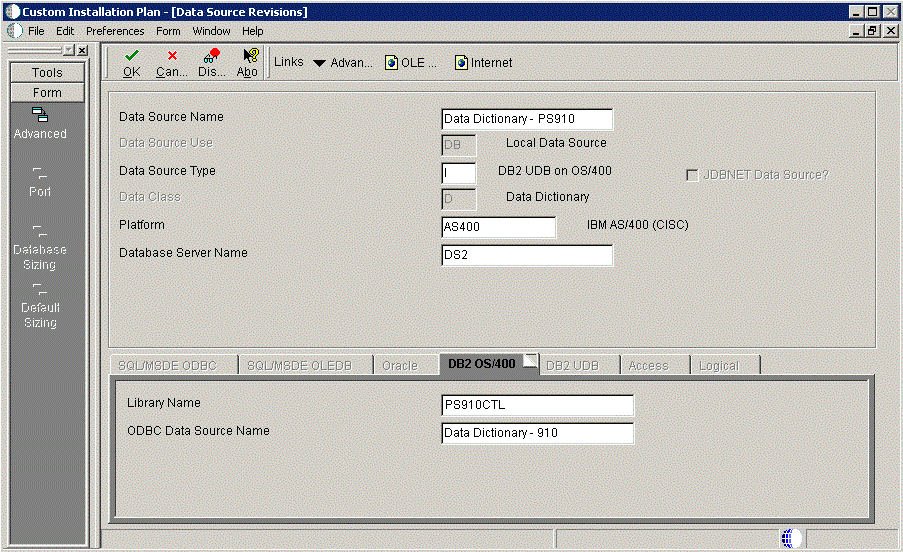
-
On Data Source Revisions, verify the accuracy of the settings for the Data Dictionary data source for the Pristine Environment.
The library name in the Library Name field is the Release 9.1 data dictionary library (DD910).
-
Click OK.
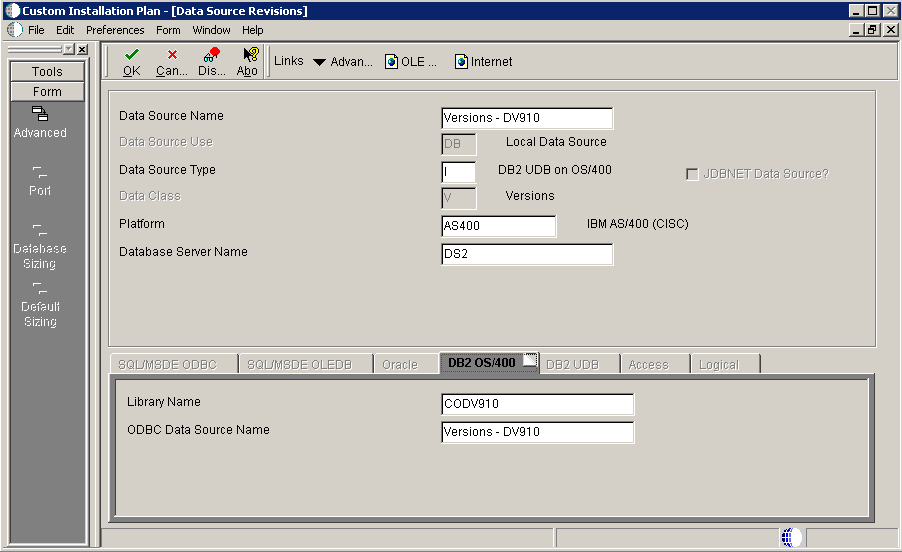
5.5.11.3.7 Verifying the Data Source for Versions
To verify the data source for versions:
-
On Data Source Revisions, verify the accuracy of the versions data source.
Note:
Versions data sources are specific to the pathcode, and the Unicode flag on the Advanced form must be selected. -
Click OK.

-
On Select Environments, click the Close button to exit the form.
5.5.12 Adding a Remote Location
To add a remote location:
-
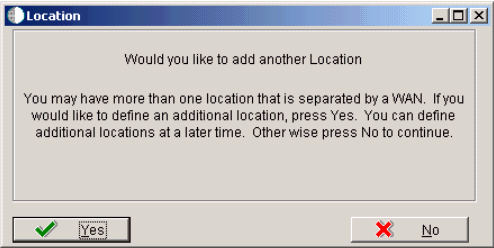
On Location, choose one of the following options:
-
Click Yes to add a remote location.
Repeat all processes for adding a location starting with Section 5.5.4, "Entering Location Information". Refer to the Creating a Remote Installation Plan for information about adding remote locations to your plan.
-
Click No to conclude the Installation Plan setup.
-
-
Continue with Section 5.5.13, "Finalizing the Installation Plan" task.
5.5.13 Finalizing the Installation Plan
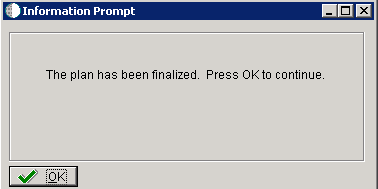
When you click No on the Location dialog, the Planner begins to finalize the plan, as indicated by a status message in the lower left-hand portion of the screen:
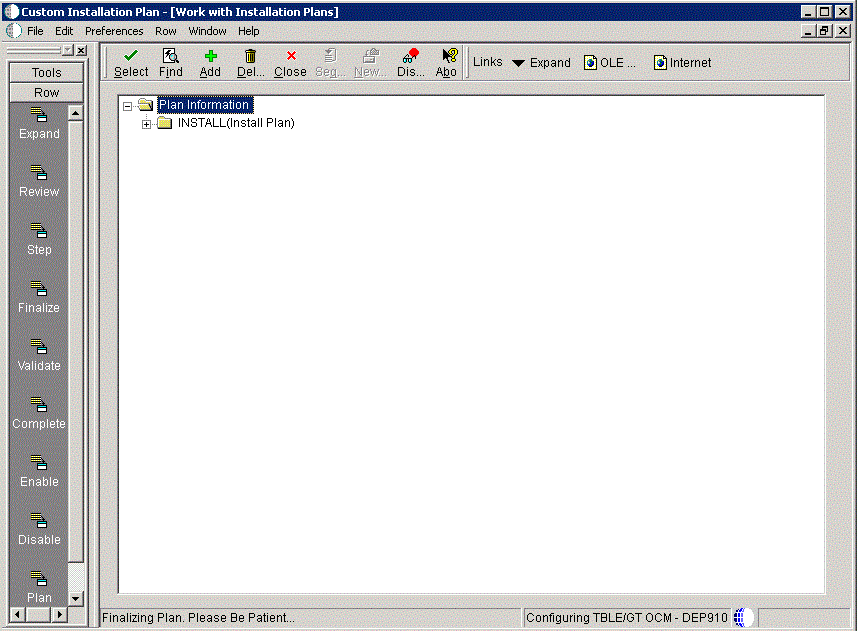
Installation Planner displays a message to let you know that the installation plan has been finalized.
On the Information Prompt that indicates Installation Planner has concluded, click OK to exit the message box and initiate the Planner Validation Report.
-
-
If the processing option default was selected, Planner Validation Report automatically prompts you to run this report.
-
If the processing option default was not selected, click Validate on the tree view of your plan to initiate the Planner Validation Report.
-
When the plan is finalized:
-
The status is set to 20, which signals that several adjustments to tables were made according to your plan.
-
The OCM is created.
-
The jde.ini is modified.
-
The following tables are upgraded:
-
Release Master table (F00945).
-
Path Code Master table (F00942).
-
Package Plan table (F98404).
-
Machine Detail table (F9651).
-
Language table (F984031), if you are installing an alternate language.
-
5.5.14 Concluding the Planner Validation Report
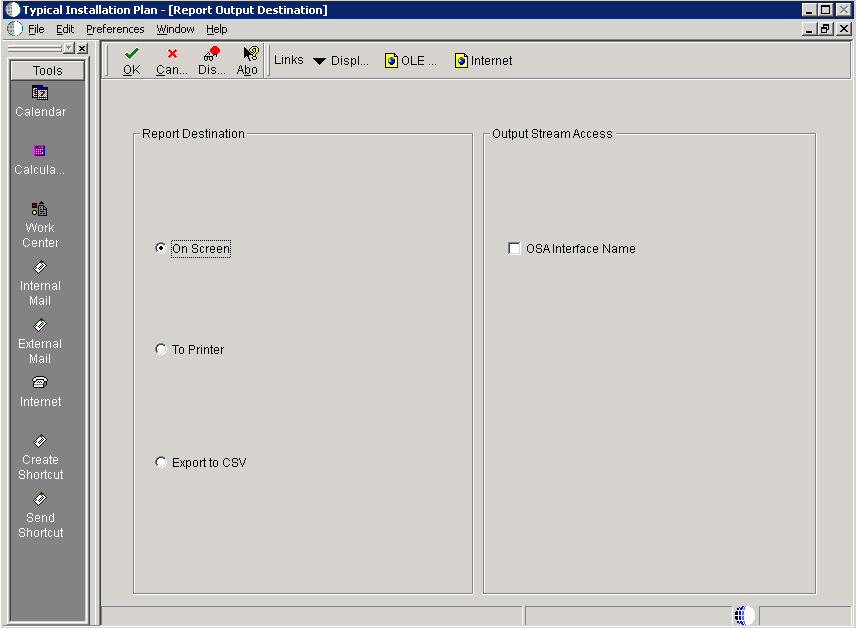
To conclude the planner validation report:
-
On Report Output Destination, select On Screen or To Printer.
-
Click OK.
-
Review the report to confirm that all records were validated.
For more information about Section 22.1, "Installation Planner Validation Report (R9840B)", refer to Chapter 22, "Working with Reports".
-
On Work With Installation Plans, click Expand to review the plan you created.
See Also
-
A separate chapter in this guide entitled: Chapter 15, "Creating a Remote Installation Plan"
-
A separate chapter in this guide entitled: Chapter 16, "Adding a Server to an Existing Configuration"
-
A separate chapter in this guide entitled: Chapter 17, "Creating a Language-Only Installation Plan"
5.6 Deleting Machines from an Installation Plan
As you work through the Installation Planner application, you might find that you need to delete a server or machine that you have created. You can use Installation Planner to delete machines as needed; however, doing so can affect related databases, shared Enterprise Servers and Deployment Servers, and associated records.
To delete machines from an installation plan:
-
In the Release 9.1 planner environment, enter P9654A in the Fast Path field and press Enter.
-
On Work With Locations and Machines, click Find.
-
Expand the location.
A list of your locations, machines, or servers appears for the base location in the tree view.
-
Select the location, machine, or server that you want to delete.
-
Click Delete.
-
To close the application, click Close.