20 Adding a Server to an Existing Configuration
This section contains the procedures for adding additional servers to your configuration. Use these procedures only if you have already defined and run your initial installation plan and set up your environments.
This section discusses:
20.1 Assumptions about Adding a Server to an Existing Installation Plan
This table outlines assumptions for adding a server to an existing Installation Plan phase as a whole.
| Personnel | Installer |
|---|---|
| Logon Status | On the Deployment Server, logged on as user JDE with the database password for user JDE, in the planner environment. |
| Prerequisites | Verify that the Deployment Server is installed and theRelease 9.1 directory is shared.
In order to run EnterpriseOne on an additional server, you must deploy JD Edwards EnterpriseOne to the server using either:
|
| Concurrent Tasks | None. |
20.2 Starting Installation Planner
Caution:
In order to run EnterpriseOne on an additional server, you must deploy JD Edwards EnterpriseOne to the server using either:-
Server Manager
-
Platform Pack installer
Begin your installation plan by logging on to Release 9.1 and starting Installation Planner.
To start the Installation Planner:
-
Log on to Release 9.1 as user JDE with the database password for user JDE.
-
Access the planner environment (JDEPLAN).
-
From the System Installation Tools menu (GH961), double-click Add-on Servers Plan.
-
On Work with Installation Plans, click Add.
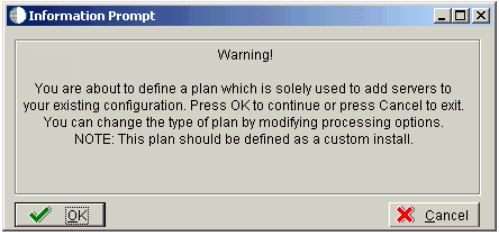
Release 9.1 displays the following warning:
-
Click OK.
The Installation Planner form appears.
20.3 Entering a Plan Description
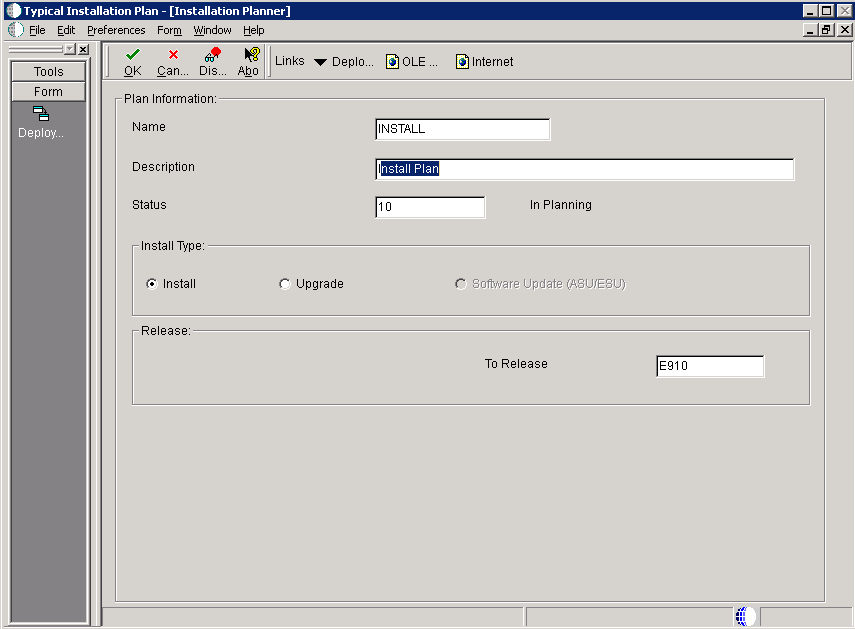
After starting Installation Planner, enter basic plan information, such as plan name and description.
To enter a plan description:
-
On Installation Planner, complete the following fields:
-
Name
Enter the name of your installation plan.
-
Description
Enter the description of your installation plan.
-
Status
Select 10 as the status of your installation plan.
-
To
Verify that the release number is E910.
-
-
Click OK.
The Location Search form appears.
20.4 Entering a Plan Location
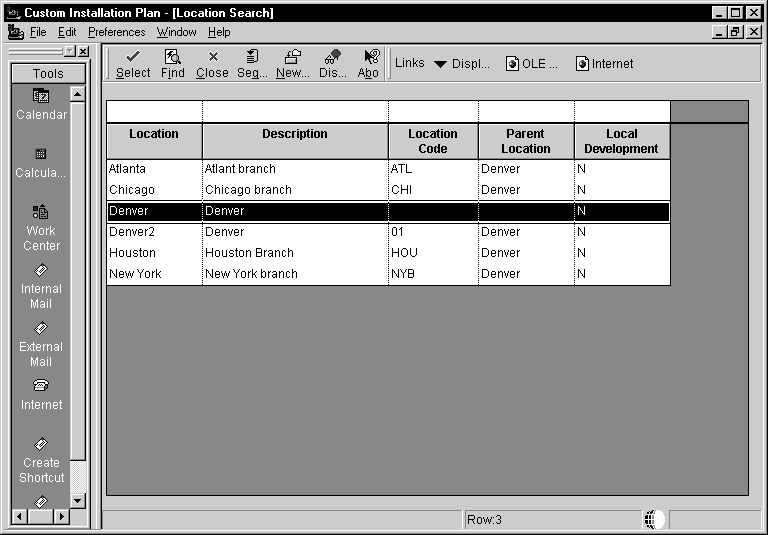
Once basic plan installation information is entered, you must choose an existing plan location. For most instances, choose the location defined during your base installation.
To enter a plan location:
-
On Location Search, choose a location and click Select.
-
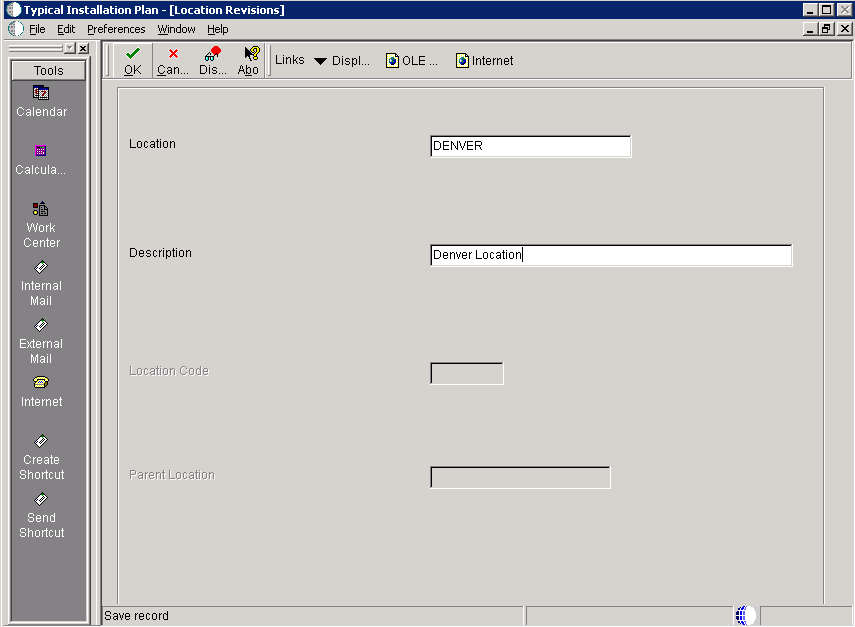
On Location Revisions, click OK.
20.5 Selecting Additional Server Types
Once a plan location is specified, specify the types of servers you want to add to your installation plan.
To select additional server types:
-
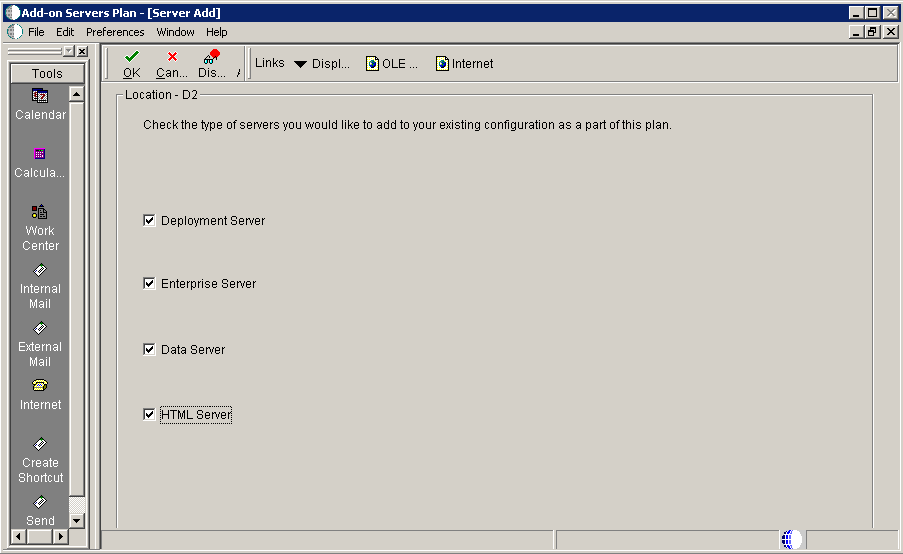
On Server Add, check the types of servers that you want to add to your configuration.
-
Click OK.
A Server Revisions form appears in the order listed on the Server Add form for each type of server that you chose.
-
Continue with the relevant sections that follow.
20.6 Entering Deployment Server Information
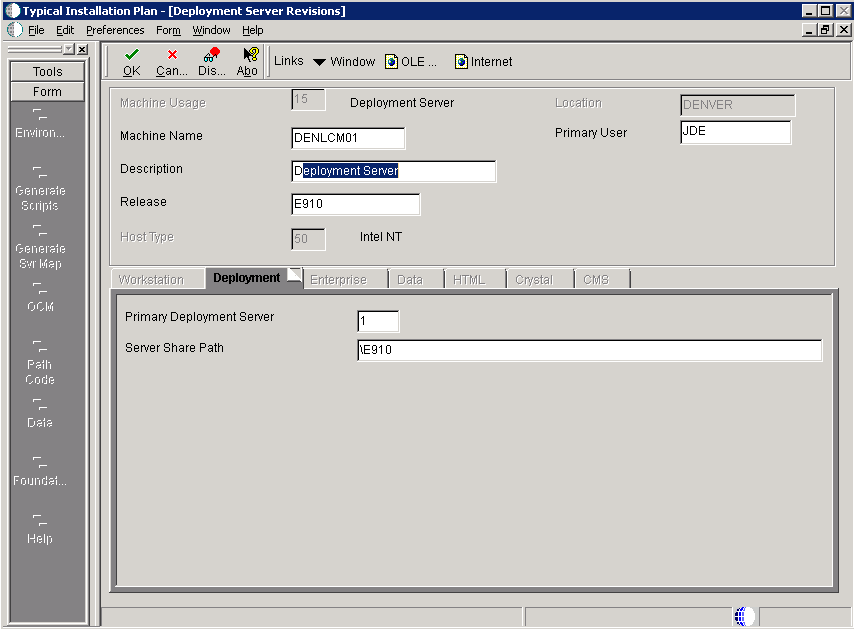
When choosing to add an additional Deployment Server to your plan, the Deployment Server Revisions form appears.
To enter Deployment Server information:
-
On Deployment Server Revisions, complete the following fields:
Field Description Machine Name Enter the name of your additional Deployment Server. The name is case sensitive, should not exceed 15 characters, and should not contain any special characters. Description Enter a description of the machine. Release Enter E910. Location Displays the system-provided default value chosen for this plan. Primary User This identifies the user to whom email is sent when a package is deployed. The default for Primary User is The default value for Primary User. This is also the UNIX user ID that is used to install Release 9.1 on the Enterprise Server. For example, JDE.
-
On the Deployment tab, verify or complete the following fields:
Field Description Primary Deployment Server This field indicates the hierarchy of the servers. The default value for a secondary Deployment Server is 0. Server Share Path Enter the server share path where you installedRelease 9.1 on your Deployment Server. Verify that this path matches your version of the release; for example, for Release 9.1, the server share path is \E910. -
Click OK.
Tip:
If you enter invalid information into a tab field, a stop sign icon appears next to the tab name, such as Deployment Server. For more information about the error, click on the stop sign icon in the bottom right-hand corner of the form. -
You are prompted to add another Deployment Server.
-
To add another Deployment Server, click Yes.
Repeat Section 20.6, "Entering Deployment Server Information".
-
To continue with the additional server plan, click No.
Continue with the relevant sections that follow.
-
20.7 Specifying an Enterprise Server
This section discusses:
20.7.1 Entering Enterprise Server Information
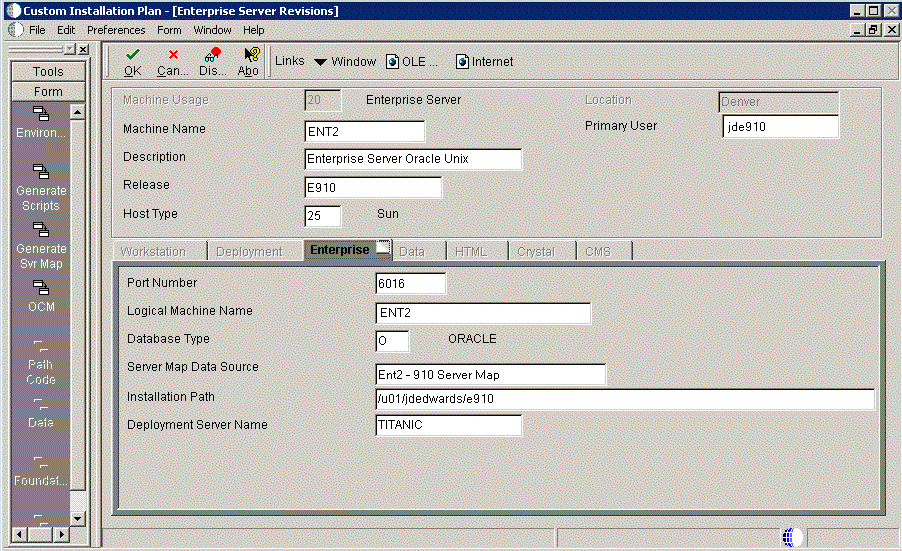
To enter the base information for the Enterprise Server that you use in this plan:
-
On Enterprise Server Revisions, complete or verify the following fields:
Field Description Machine Usage Displays the default value of 20 to indicate that this is an Enterprise Server. Machine Name This name is not case-sensitive in the Installation Planner. Therefore, regardless of underlying UNIX operating system considerations, you cannot name multiple Database Servers with the same name but with different cases. For example, you cannot name multiple Database Servers ORACLE and oracle. When using cluster software, use the cluster name, not the machine name. Use the cluster name as the server name when installing Release 9.1. One copy of Release 9.1 will run and be shared by both nodes.
The name of the primary Enterprise Server. The name is case sensitive and should not contain any special characters.
Because the machine name is used to create the Server Map datasource name, and because the Platform Pack Installer does not restrict you from entering a machine name that results in a datasource name greater than 30 characters; if the machine name for the Enterprise Server is longer than 13 characters, the resulting datasource name will be longer than the allowed 30 characters. For example, if your machine name is 15 characters (A23456789012345), the base datasource name input into the Planner would be:
A23456789012345 - 910 Server Map.Note: The field in table F98611 is a hard restriction; the field only allows 30 characters. The actual field size cannot be modified or changed.
When the Planner runs it truncates the value to 30 characters because that is the restriction in the F98611 table. The Platform Pack does not truncate the value when it builds the
jde.inifor the Enterprise Server. Therefore, any value greater than 30 characters will result in a mismatch between thejde.iniand the F98611 table. That is, using the previous example, thejde.iniwould have the full length valueA23456789012345 - 910 Server Map(which is 32 characters) while the F98611 populated by the Planner would have a value ofA23456789012345 - 910 Server M.To remedy, you could do any one of the following:
-
Manually modify values in table F98611 to match the truncated value in the
jde.inifile. -
Ensure that the value is not truncated by limiting the datasource name to 30 characters (this would mean limiting the machine name for the Enterprise Server to 13 characters).
-
Manually truncate the value in the F98611 table (for example,
A23456789012345 - 910 Svr Map.
In any case, you must ensure that the values for Server Map datasource names in the F98611 table exactly match those in the
jde.inifile on the Enterprise Server.This name is not case-sensitive in the Installation Planner. Therefore, regardless of underlying UNIX operating system considerations, you cannot name multiple Database Servers with the same name but with different cases. For example, you cannot name multiple Database Servers ORACLE and oracle.
When using cluster software, use the cluster name, not the machine name. Use the cluster name as the server name when installing Release 9.1. One copy of Release 9.1 will run and be shared by both nodes.
Description Enter a description of the machine. Release Enter the release number to which this plan applies, or use the visual assist button to choose one from the list, such as E910. Host Type Click the visual assist button and choose the type of Enterprise Server that you are adding to the plan, such as RS\6000 or Sun Solaris. Location Enter the default location chosen for this plan. Primary User Enter the user to whom email is sent when a package is deployed. The default for Primary User is jde910. This is also the UNIX user ID that is used to install Release 9.1 on the Enterprise Server, such as JDE.
-
-
On the Enterprise tab, complete these fields:
Field Description Port Number Displays the default value for this field, which is supplied the JDE.INI. Change the port number for this Enterprise Server to a unique value, for example, 6016.Logical Machine Name Displays the system-supplied default value when you enter the host type. The name is case sensitive, should not exceed 15 characters, and should not contain any special characters. Database Type Enter the type of database that you want to use for data sources on the Enterprise Server. Value is: O is for Oracle
Server Map Data Source Displays the system-supplied default value when you enter the host type. Installation Path Verify that the default value is the installation directory path to which you want to install Release 9.1 on the Enterprise Server. Make sure the value is specific to your version of the release. For example, for Release 9.1 the default path is: /JDEdwardsPPack/E910You might need to prepend the mount point to the path. For example:
u01/JDEdwardsPPack/E910Deployment Server Name Using the visual assist button, choose the name of the Deployment Server to which this Enterprise Server is attached. The system provides a default value for this field, but you can change it. -
Click OK.
A message box appears prompting you to enter custom data sources or take the default data sources. Proceed to Section 20.10, "Entering Shared Data Source Information".
20.7.2 Entering Enterprise Server Data Source Information
After specifying Enterprise Server information, enter the data source information for the Enterprise Server you will use in this plan. The server data source holds the system configuration files that enable the server to run UBEs.
This section discusses:
-
Section 20.7.2.1, "Specifying Custom or Default Data Source Information"
-
Section 20.7.2.2, "Verifying Custom Server Map Data Source Information"
20.7.2.1 Specifying Custom or Default Data Source Information
You are prompted to enter custom data sources or take the default data sources for the Enterprise Server you just added. Choose one of the following options:
-
To enter custom data sources, click OK.
Skip to Section 20.7.2.2, "Verifying Custom Server Map Data Source Information".
-
To accept default data sources, click Take Defaults.
This option limits your customization choices.
Note:
The following screen that prompts you to enter the Oracle connect string is only displayed if you choose Take Defaults. That is, if you choose to define your own data source, you will be prompted to enter the oracle connect string on a different screen.
20.7.2.2 Verifying Custom Server Map Data Source Information
To verify custom Server Map data source information:
-
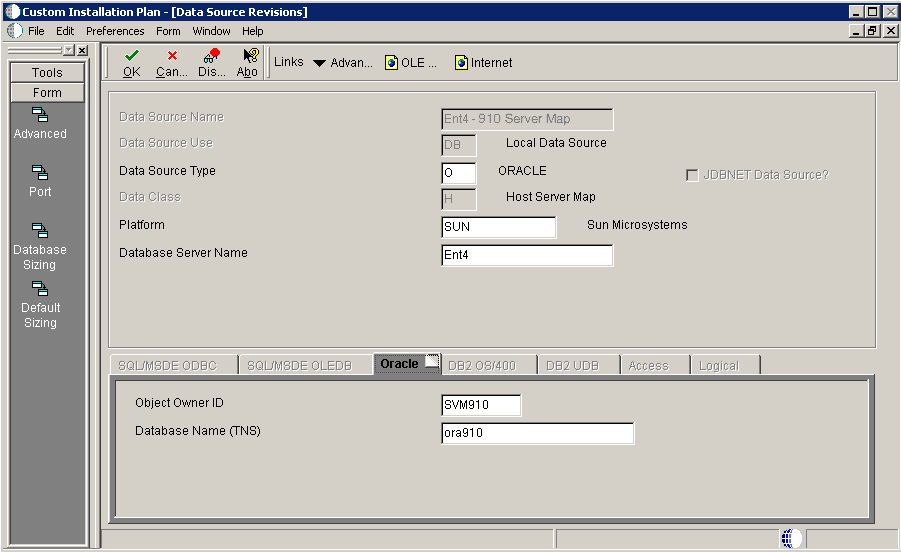
On Data Source Revisions, verify your Server Map data source information.
Tip:
Default data sources are configured as completely as possible. However, when you run Installation Planner, you might need to modify some data source information to reflect your system-specific configuration. -
Click OK.
20.7.2.3 Adding another Enterprise Server
On the prompt to add another Enterprise Server, choose one of the following options:
-
To add another Enterprise Server, click Yes.
Repeat processes, starting with Section 20.7.1, "Entering Enterprise Server Information".
-
To continue with Installation Planner setup, click No.
The Machine\Server Types form appears.
20.8 Entering HTML Web Server Information
To enter HTML Web Server information:
-
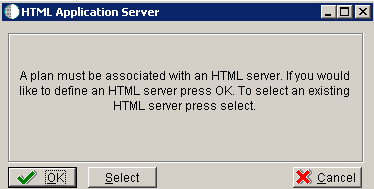
On the HTML Application Server dialog, click OK to continue entering HTML Web Server information, or click Select to select an existing HTML Web Server.
-
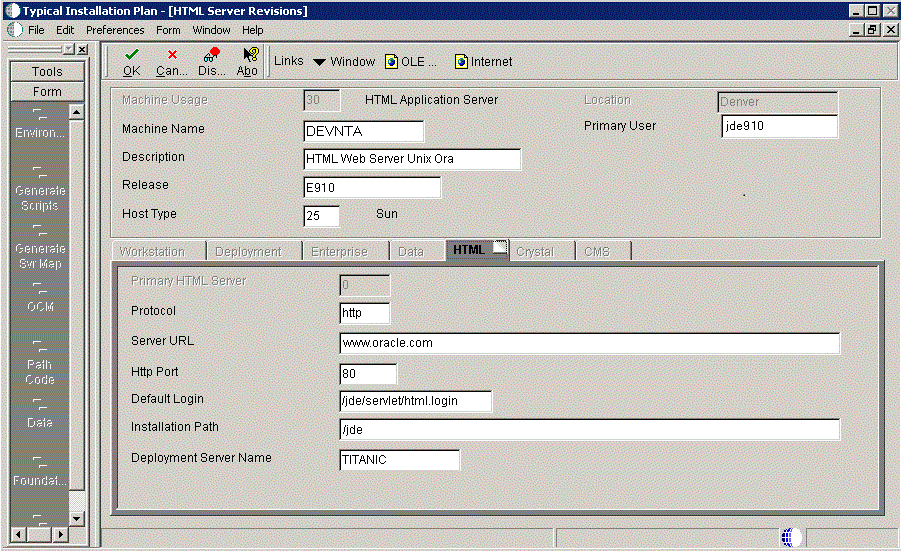
On HTML Server Revisions, complete these fields:
Field Description Machine Usage The default value of 30 indicates that this is a HTML Web Server. Machine Name Enter the name of your HTML Web Server. The name is case sensitive, should not exceed 15 characters, and should not contain any special characters. This name is not case-sensitive in the Installation Planner. Therefore, regardless of underlying UNIX operating system considerations, you cannot name multiple HTML Web Servers with the same name but with different cases. For example, you cannot name multiple HTML Web Servers ORACLE and oracle.
Description Enter a description of the HTML Web Server machine. Release Enter E910 to indicate the release number that you are installing. Host Type The default value of 50 specifies the server type as Intel NT. Select the correct server type. Location The location chosen for this plan appears in this field by default. Primary User The user to whom an email is sent when a package is deployed. The default for Primary User is listed in the JDE.INI. -
On the HTML tab, complete these fields:
Field Description Primary HTML Server When the system code generates an email message with a web shortcut pointing to a form, the web shortcut generated points to the "Primary" HTML Web Server. Only one of all the HTML Web Servers defined in installation planner can be defined as primary ("1"). Protocol This is the protocol used by the HTML Web Server. Valid values are http or https. Server URL This is the Domain Name System (DNS) host name of the HTML Web Server. For example: www.oracle.com
HTTP Port This is the port number the HTML Web Server is listening to. For HTTP, the typical port number is 80.
For HTTPS, the typical port number is 443.
Note: You can choose to implement a HTML Web Server using a different port number.
JDENET Listen Port This is the port on which the JDENET communications protocol communicates with the JD Edwards EnterpriseOne Enterprise Server. The value is dependent on the release of JD Edwards EnterpriseOne. For JD Edwards EnterpriseOne Release 9.1, the value is 6016.
Default Login Defines how shortcuts to a web form are generated by the system code. Values are either a reserved value or an explicit servlet name. Reserved values are: -
Standard
The URL generated will point to a servlet on the Primary HTML Web Server.
-
Redirector
The URL generated will point to redirector in the Primary HTML Web Server, and redirector will point to a servlet on another HTML Web Server for load balancing. The servlet name to use is generated by the system.
-
Explicit Servlet Name
The user can specify an explicit servlet name in this field. In this case, the redirector functionality cannot be used. The URL generated will point to the specified servlet in the Primary HTML Web Server.
Usage of Explicit servlet name is for backward compatibility only. You should not use it unless you have a direct need.
Installation Path Enter the installation directory path to which you are installing Release 9.1 on your HTML Web Server. Make sure this is specific to your version of the release, and also the platform and application server on which your HTML Web Server is running. For default paths, refer to the applicable platform- and application server-dependent version of the JD Edwards EnterpriseOne HTML Web Server Reference Guide (WebLogic for Windows, WebLogic for UNIX, WebSphere for Windows, WebSphere for UNIX, WebSphere for IBM i. Otherwise, you must obtain this value from the HTML Web Server machine itself, or its administrator.
-
-
Click OK.
-
To add another HTML Web Server, click Yes and repeat steps 1 through 4 to define another HTML Web Server.
20.9 Entering Data Server Information
-
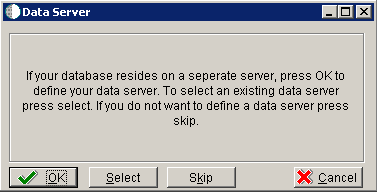
On Data Server, choose one of these options:
-
OK
If your database resides on a separate server, choose click OK to continue entering unique Data Server information.
-
Select
Click this option to select an existing Data Server.
-
Skip
Click this option if you do not want to define a Data Server. Continue with the Planner using the environment selection in Step 6 of this task.
-
-
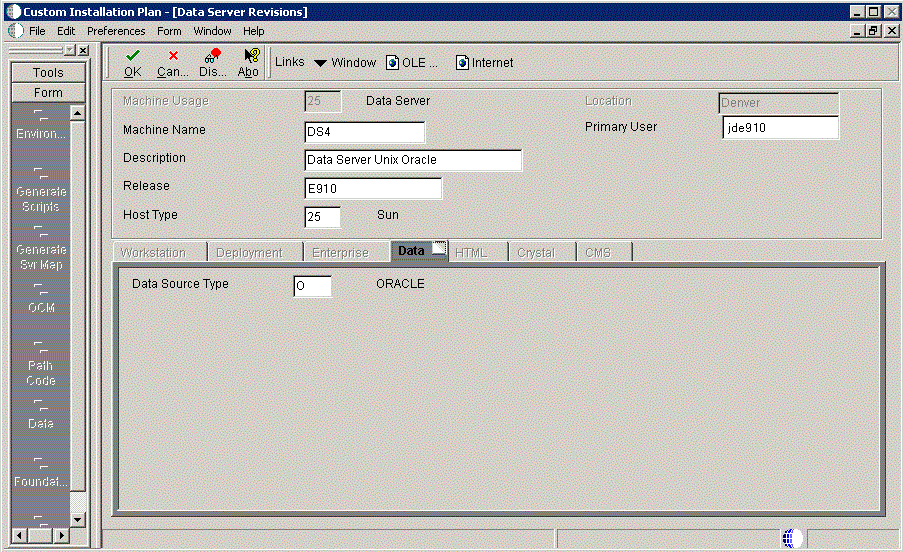
On Data Server Revisions, complete these fields:
Field Description Machine Usage The default value of 25 indicates that this is a Database Server. Machine Name Enter the name of your Database Server. The name is case sensitive, should not exceed 15 characters, and should not contain any special characters. This name is not case-sensitive in the Installation Planner. Therefore, regardless of underlying UNIX operating system considerations, you cannot name multiple Database Servers with the same name but with different cases. For example, you cannot name multiple Database Servers ORACLE and oracle.
Description Enter a description of the Database Server machine. Release Enter the release number you are installing, for example, E910. Host Type Select the type of Database Server that you are adding to the plan. Values are: -
10 — IBM i
-
25 — Sun Solaris
-
30 — RS\6000
-
35 — Linux
-
50 — Microsoft Windows (Intel)
-
80— Client - Microsoft Windows
-
90 — Client - Microsoft Windows
Location The Installation Planner populates this field by default, based on previous selections. Primary User The user to whom an email is sent once a package is deployed. The default for Primary User is jde910. This is also the UNIX user ID that is used to install Release 9.1 on the Enterprise Server. For example, JDE.
-
-
On the Data tab, complete the following field:
Field Description Data Source Type Choose the type of data source. For example: -
O - Oracle
-
-
Click OK.
-
To add another Data Server, click Yes and repeat steps 1 through 4 to define another Data Server.
-
On Data Source, click OK to continue entering unique shared data source information, or click Take Defaults to select the default data for the shared data sources.
-
On Location, select Yes to add another location, or click No to continue with Installation Planner.
20.10 Entering Shared Data Source Information
This section discusses:
-
Section 20.10.1, "Specifying (Custom or Default) Shared Data Source Setup Information"
-
Section 20.10.2, "Verifying the Data Source for Data Dictionary"
-
Section 20.10.3, "Verifying the Object Librarian Data Source"
20.10.1 Specifying (Custom or Default) Shared Data Source Setup Information
When you are prompted to enter the data source information for the shared data sources, to use the Release 9.1 data sources, click Take Defaults, or click OK to specifically enter the data source information.
See Also
For more information about System data source fields or fields for other data sources mentioned in this process, refer to Chapter 19, "Understanding Data Source Charts".
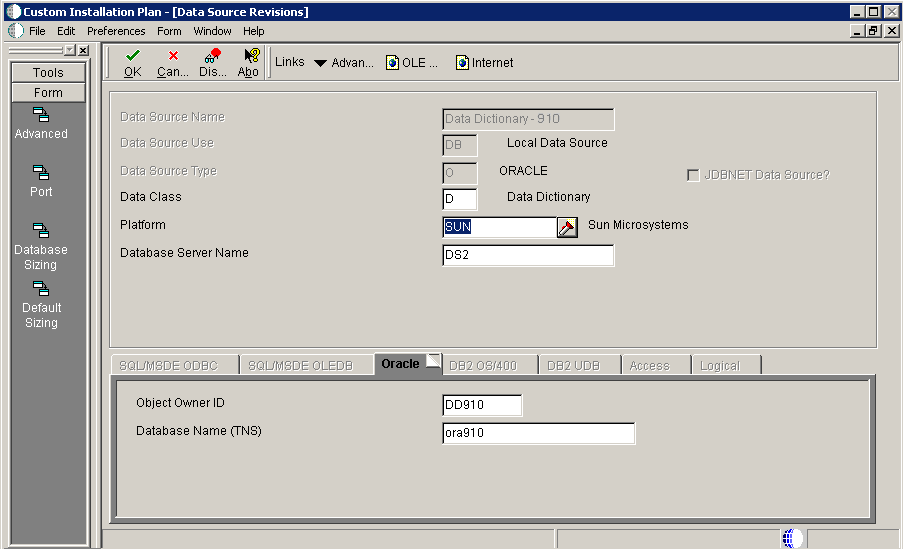
20.10.2 Verifying the Data Source for Data Dictionary
To verify the data source for Data Dictionary:
-
On Data Source Revisions, verify the accuracy of the settings for the Data Dictionary data source.
-
Click OK.
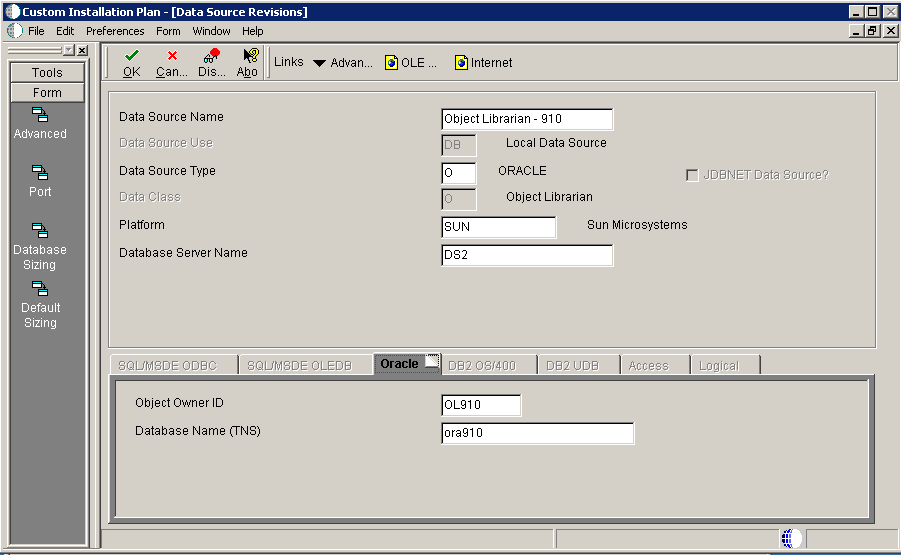
20.10.3 Verifying the Object Librarian Data Source
To verify the Object Librarian data source:
-
On Data Source Revisions, verify the accuracy of the settings for the Object Librarian data source.
-
Click OK.
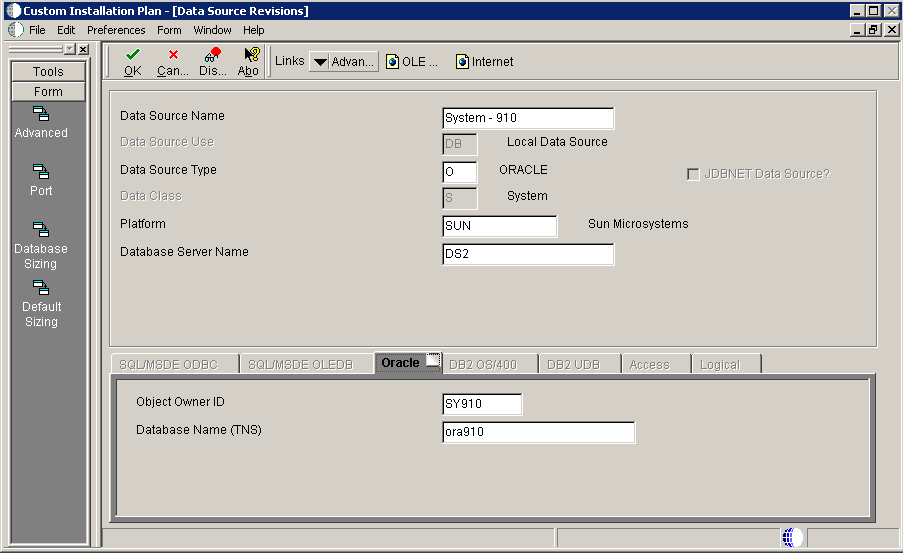
20.10.4 Verifying the System Data Source
To verify the System data source:
-
On Data Source Revisions, verify the accuracy of the settings for the System data source.
-
Click OK.
The Environment Selection screen appears.
See Also
For more information about System data source fields or fields for other data sources mentioned in this process, refer to Chapter 19, "Understanding Data Source Charts".
20.11 Setting Up Environments
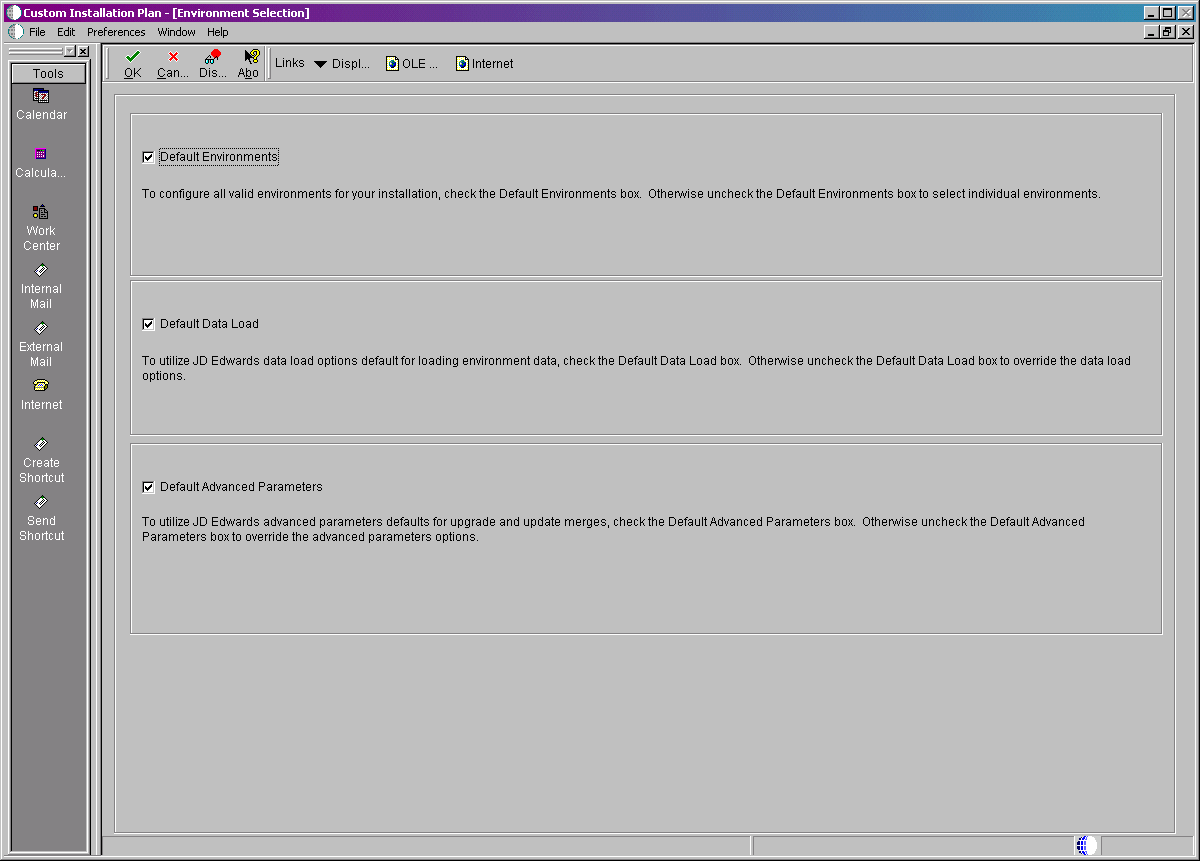
By default, Release 9.1 configures your system using values for typical environments. Depending on the options chosen when you set up your plan, Release 9.1 displays one or more of the following parameters, which you can customize in these tasks:
-
Environments
-
Data load options
-
Advanced parameters
-
Languages
You can customize any of these parameters by turning off the default option on the Environment Selection form. As you move through the plan, Release 9.1 displays a customization form for each parameter that you turn off.
-
On Environment Selection, clear the options for those parameters that you want to customize.
Note:
The parameters that are available vary depending on the options that you selected at the beginning of the planning process. -
Click OK.
Note:
If you selected the default option for all parameters, skip to Section 20.12, "Setting Up Environment Data Sources".Use the following tasks to customize each of the parameters listed above. Release 9.1 displays customization forms only for those parameters for which were cleared of the default options. Skip the tasks for those parameters that were selected.
-
Continue with the following relevant tasks:
20.11.1 Selecting an Environment
The Select Environment form appears. Environments prefixed with J are required for the HTML Web Server.
To select an environment:
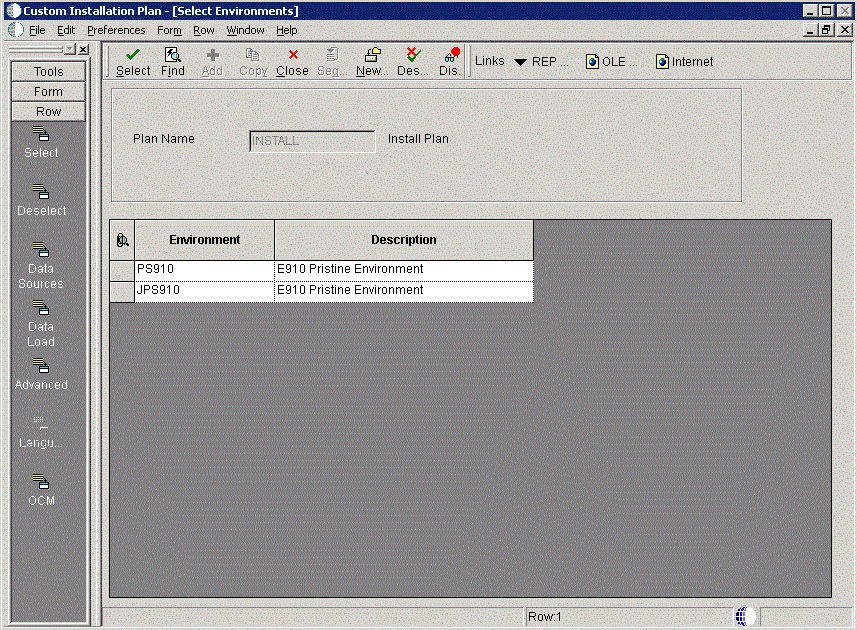
On Select Environments, double-click the environment that you want to define.
To set up multiple environments, choose and define them one at a time. This screen appears after the following tasks are completed.
20.11.2 Specifying Environment Data Load Parameters
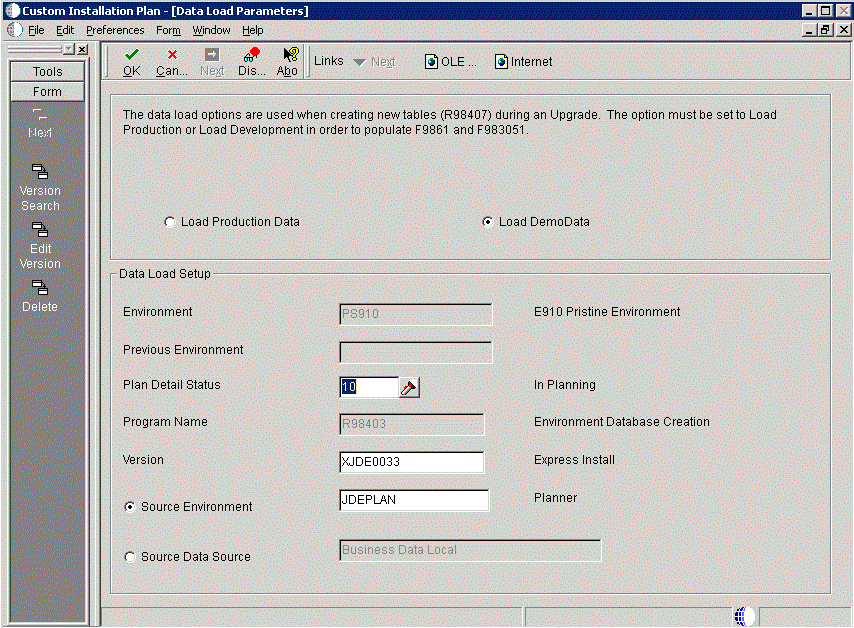
If you cleared Default Data Load on the Environment Selection form, the Data Load Parameters form appears.
To specify environment data load parameters:
Note:
The data load radio buttons on this form are no longer applicable as of JD Edwards EnterpriseOne Release 9.1 because data is automatically loaded by the Platform Pack Installer.For additional details, refer to Section 6.1.2, "Loading Data (Demo Data and Production Data)".
20.11.3 Verifying Advanced Parameters
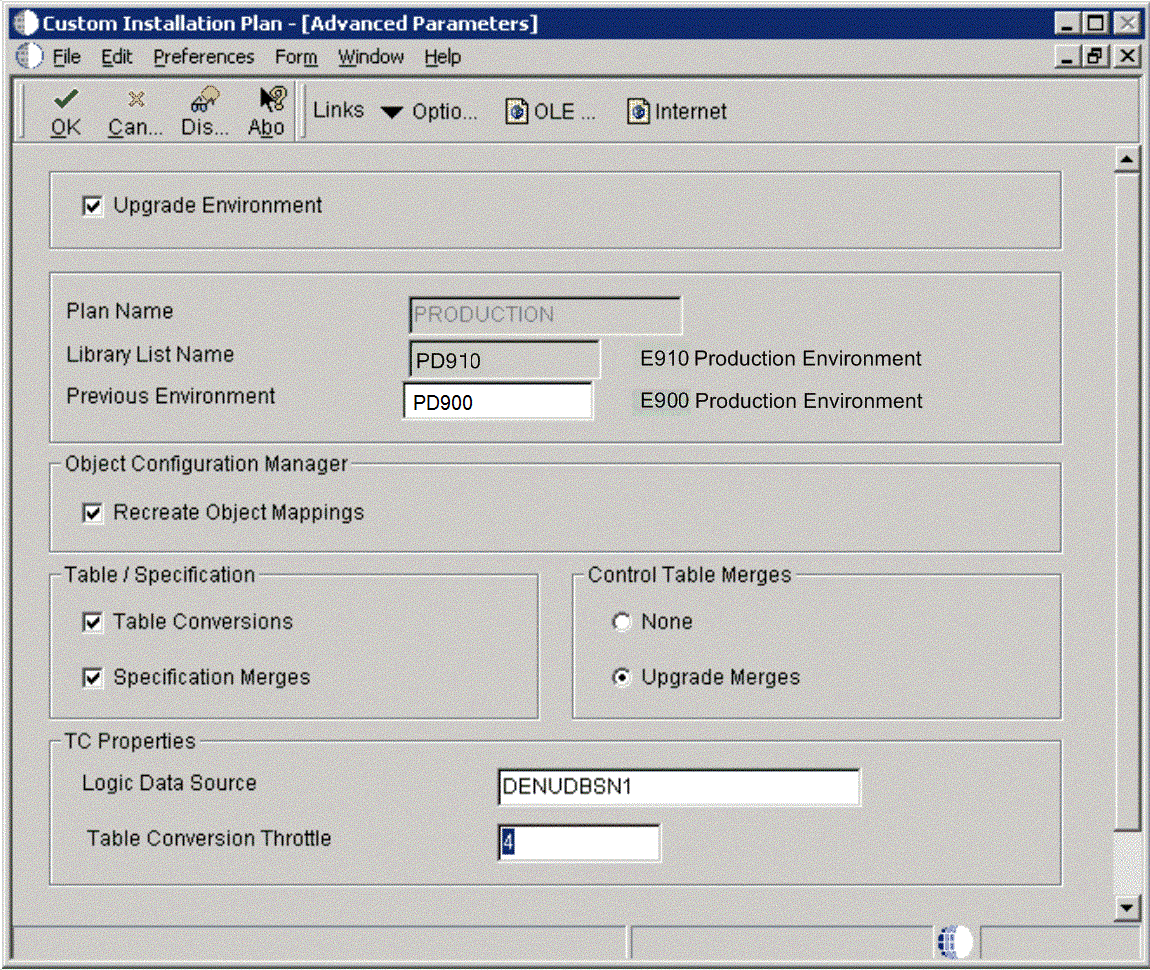
If you turned off Default Advanced Parameters on the Environment selection form, the Advanced Parameters form appears.
To verify advanced parameters:
-
On Advanced Parameters, complete the following fields and turn on the following options:
Field Description Logic Data Source Displays the server data source where the table conversions will run Table Conversion Throttle Displays the number of table conversions to be run concurrently on the server Note:
The Table Conversion Workbench checks the maximum jobs for the default job queue for the logic server. It will only submit up to the number of maximum jobs on the queue to run at once. If the throttle is set higher than the queue, it uses the queue maximum number of jobs. If the queue is set higher than the throttle, it uses the throttle. -
Click OK.
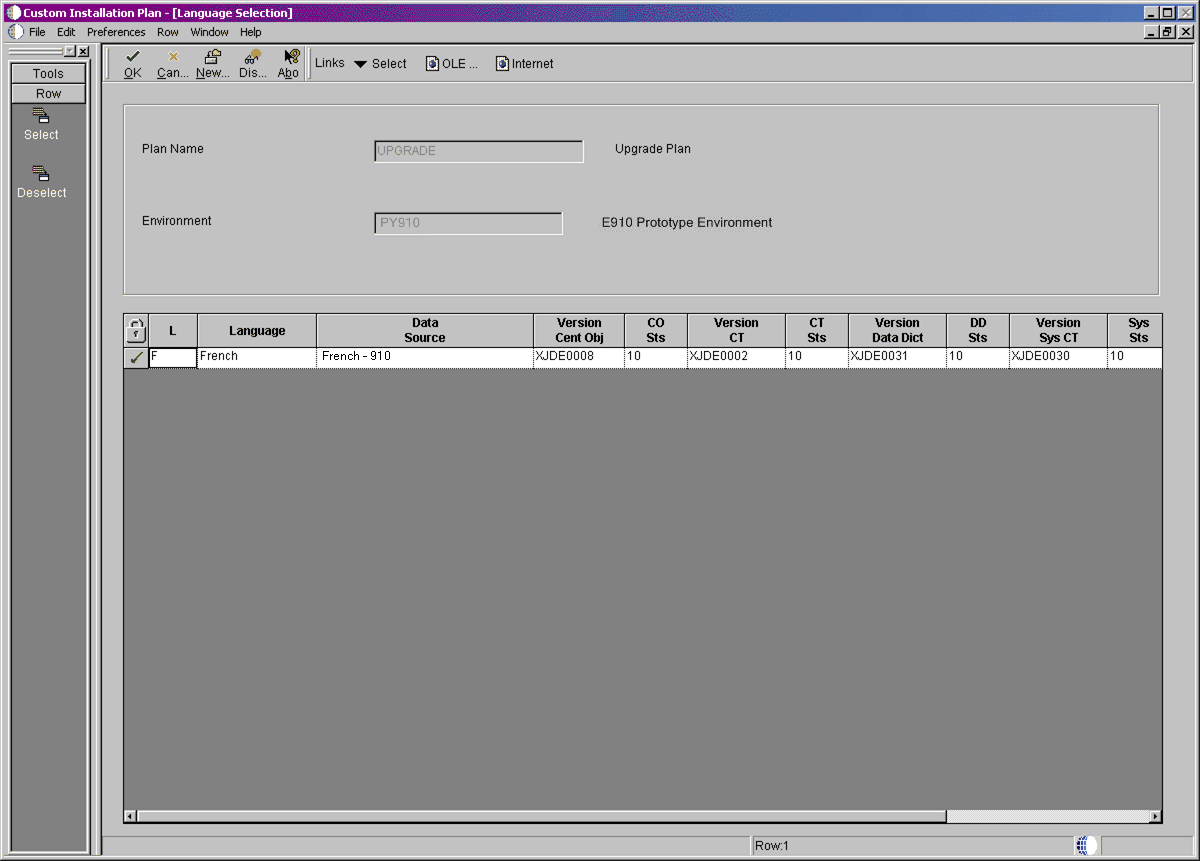
If you turned off Default Languages on the Select Environments selection form, continue with Selecting Languages.
20.11.4 Selecting Languages
To select languages:
-
On Language Selection, to set up a language for the selected environment, choose the appropriate language.
-
From the Row menu, click Select.
-
Repeat the above steps until all your languages have been selected.
-
Click OK.
Tip:
Customization Considerations. If you have customizations that you do not want to merge, you can prevent individual conversions and merges from running by changing their status or deleting the appropriate records from the plan before you run the Installation Workbench.
20.12 Setting Up Environment Data Sources
Once the Environments have been set up, it is necessary to set up the data sources for those environments. If you created a custom environment, data source information is generated from the data source template provided with JD Edwards EnterpriseOne.
See Also
To modify this template, see the JD Edwards EnterpriseOne Configurable Network Computing Implementation Guide.
20.12.1 Selecting an Environment Data Source Setup Option
When you are prompted to set up data sources for the environment you just configured, click OK to manually enter the data sources, continue with the following task, or click Take Defaults to accept the Release 9.1 default data sources.
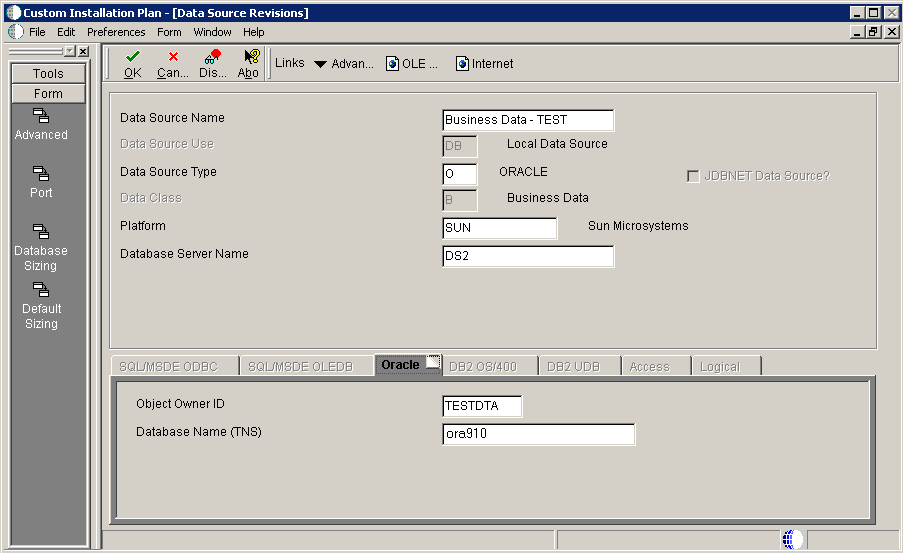
20.12.2 Setting Up the Data Source for Business Data
To set up the data source for business data:
-
From the Form menu, click Advanced.
Verify the UNICODE flag is off. If your Business Data was not set to Unicode in a previous release and the data source had not yet been converted to Unicode, the Unicode flag must match the contents of the data source.

-
Click OK.
-
On Data Source Revisions, verify the data source for your Business Data.
Be sure this data source points either to the existing production data source you want to upgrade or to a copy of it.
Note:
Business Data data sources are specific to the environment and pathcode. -
Click OK.
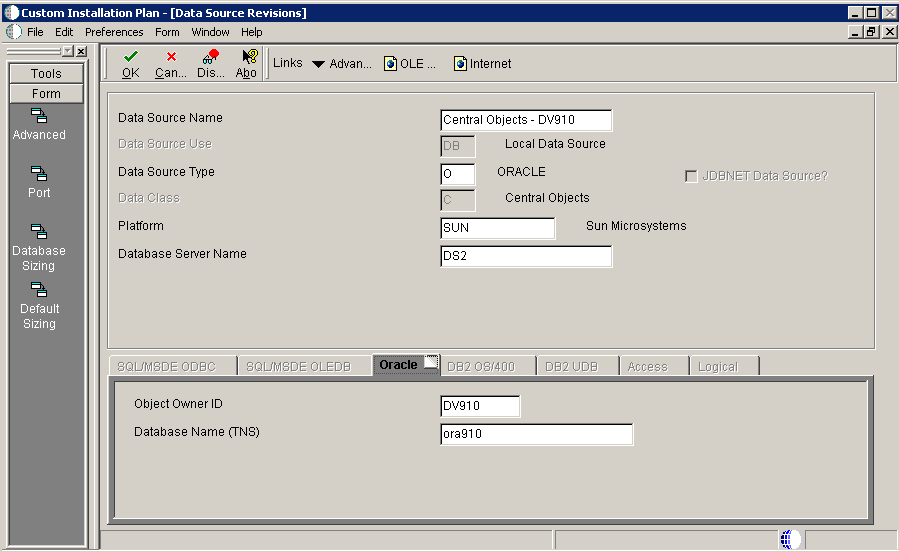
20.12.3 Setting Up the Data Source for Central Objects
To set up the data source for central objects:
-
On Data Source Revisions, verify the information for your Central Objects data source.
Verify that your Central Objects data source is Central Objects - <Path Code>.
-
Click OK.
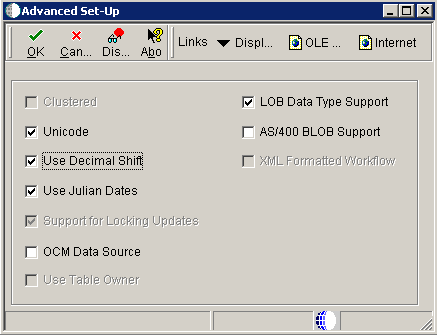
-
On Advanced Set-Up, because the central objects data source must be Unicode, verify the Unicode setting is checked.
For Oracle databases, ensure the LOB Data Type Support setting is checked.
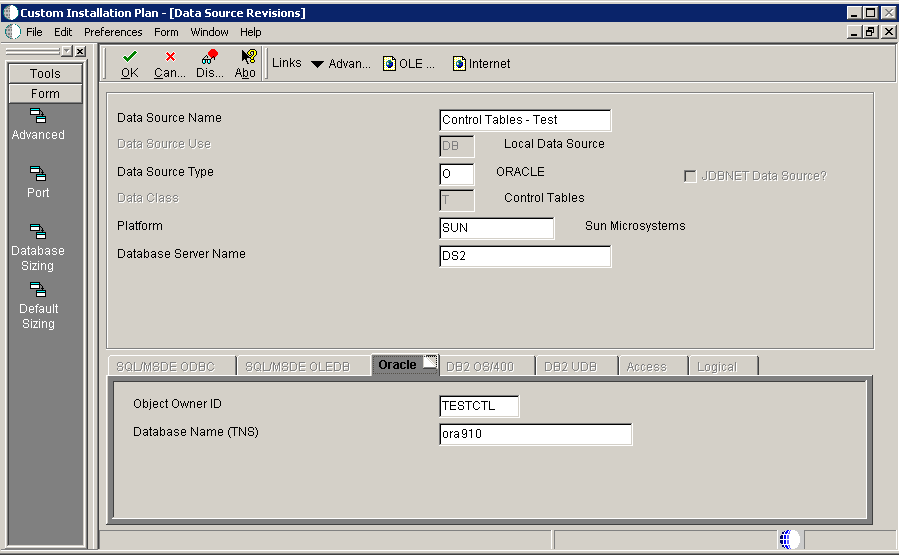
20.12.4 Setting Up the Data Source for Control Tables
To set up the data source for control tables:
-
On Data Source Revisions, verify the accuracy of the Control Tables data source.
Field Description Data Source Name Verify the name of the data source. Server Name Verify the name of the Enterprise Server. Object Owner ID Enter the name of the owner of this object. Note:
Control Tables data sources are specific to the environment and pathcode. -
Click Advanced and verify that UNICODE is off only if the Control Tables are not set to Unicode in a previous release.
Note:
If you upgrade from Release 8.9 the Unicode flag is on. -
Click OK.
20.12.5 Verifying the Data Source for Versions
To verify the data source for versions:
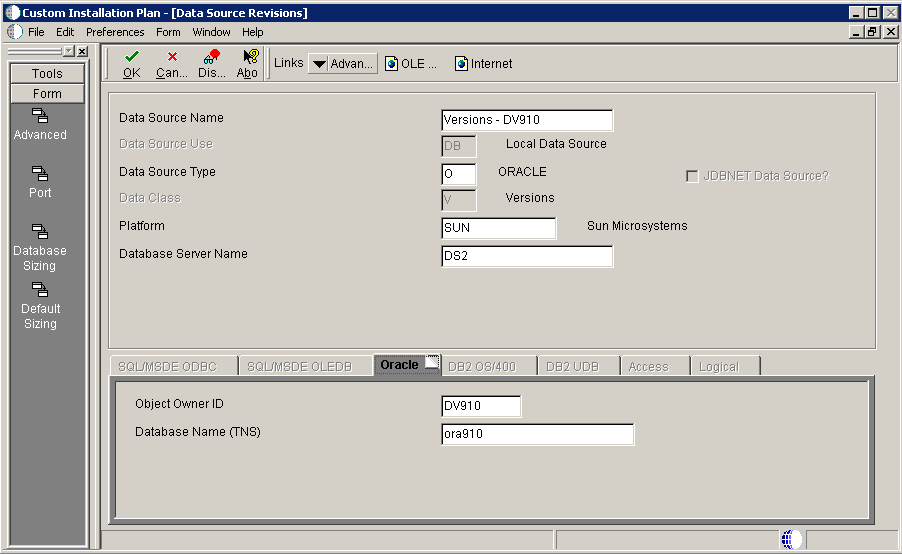
-
On Data Source Revisions, verify the accuracy of the Versions data source.
-
Click OK.
Note:
Versions data sources are specific to the pathcode, and the Unicode flag on the Advanced Form must be checked.
20.13 Finalizing the Installation Plan
Installation Planner finalizes your installation plan automatically. A message appears to let you know that the installation plan is finalized.
When the plan is finalized:
-
The \JD Edwards\E910\hosts\hosttype\hostname directory is created on the Deployment Server. This contains the JDE.INI and the configuration files used by the JD Edwards EnterpriseOne Platform Pack Installer.
Note:
The JD Edwards EnterpriseOne Platform Pack Installer cannot be run until the Installation Plan is finalized. -
The status is set to 20, which signals that several adjustments to tables were made according to your plan.
-
Create the OCM.
-
Modify the JDE.INI .
-
The following tables are upgraded:
-
Release Master table (F00945)
-
Path Code Master table (F00942)
-
Package Plan table (F98404)
-
Machine Detail table (F9651)
-
Language table (F984031), if you are installing an alternate language
-
To finalize the installation plan:
-
Click OK to exit the concluding message box and initiate the Planner Validation Report.
-
If you chose the default processing option, Planner Validation Report automatically prompts you to run this report.
-
If you did not choose the default processing option, on the tree view of your plan, click Validate to initiate the Planner Validation Report.
-
20.14 Concluding the Validation Planner Report
To conclude the validation planner report:
-
On Report Output Destination, choose On Screen or To Printer, and then click OK.
-
Review the report to confirm that all records were validated.
-
After reviewing the report, on the Batch Versions form, click Close.
For more information about Section 25.1, "Installation Planner Validation Report (R9840B)", refer to Section 25, "Working with Reports".
-
On Work With Installation Plans, click Expand to review the plan that you created.
-
Run Installation Workbench for this installation plan.
For more information about Installation Workbench, refer to Chapter 6, "Working With Installation Workbench".
20.15 Configuring Additional Servers
To configure any additional servers that you have added:
-
Create the tablespace (SVM910) for the Server Map data source.
-
Set up owner (JDE910) on additional Enterprise Servers.
-
After configuring your database and server, use Installation Workbench to allocate and configure software and resources.
When using the Installation Workbench for adding servers, the Table Conversion and the Specification Merge workbenches do not appear because they are not needed.
-
When adding a server plan for a HTML Web Server, using the P9654A program, you must add all environments prefixed with J to the Enterprise Server and generate a Server Map data source.