E Clustering Real Time Events on WebSphere
This appendix contains the following topics:
E.1 Understanding WebSphere Clustering
The implementation of WebSphere clustering permits the deployment of application components and services to several machines with a single face to the client. When a client requests a service, it should make no difference if the service runs on a single server or across a number of servers. The clustering abstraction provides you with a clear route to improving the performance and scalability of the applications with increased administration of hardware and network resources. WebSphere clustering provides these benefits:
-
Scalability
A clustered solution allows you to create additional capacity by introducing more servers to the cluster, thereby reducing the load on existing servers. For the JD Edwards EnterpriseOne Transaction Server with the Real Time (RTE) Application, you can add as many servers and messaging engines as you like to meet the performance requirement. The RTE application on WebSphere achieves scalability with the implementation of a messaging engine policy.
-
Load balancing
The ability to distribute requests across all members of the cluster, according to the workload on each server. WebSphere handles load balancing as defined by the Load Balancing Algorithm that you configure on cluster setup. The Transaction Server with RTE on WebSphere only supports round-robin load balancing policy for the RTE application.
-
High availability
A mix of features that ensure applications and services are available even if a server or machine fails. Clients can continue to work with little or no disruption in a highly available environment. RTE on WebSphere achieves high availability with the implementation of a messaging engine policy.
E.2 Creating a Cluster on the IBM WebSphere Application Server
To create a cluster on the WebSphere Application Server:
-
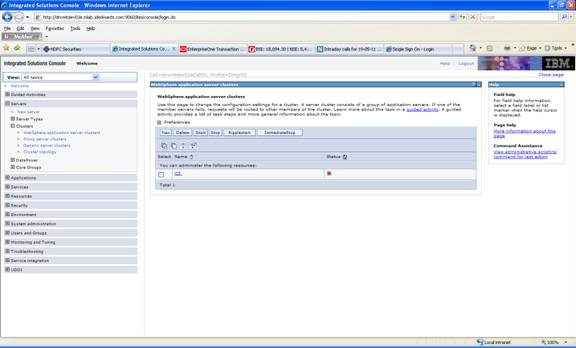
Go to Servers > Clusters > WebSphere application server clusters.
-
On WebSphere application server clusters, click the New button.
-
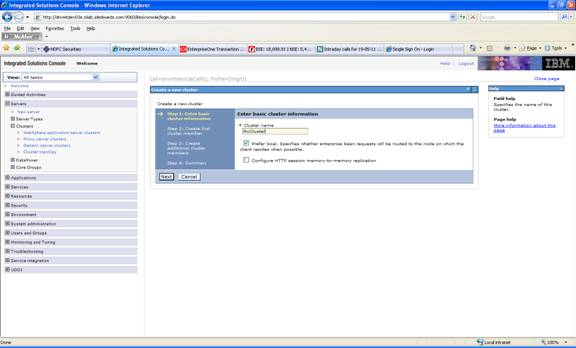
On the Create a new cluster dialog, enter the name of the cluster.
-
Click the Next button.
-
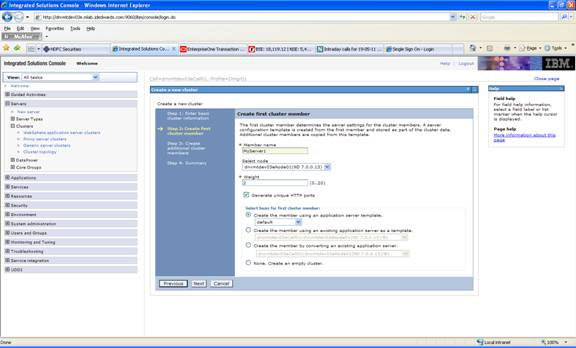
On Create first cluster member, in the Member name field, enter a name for the first cluster member.
-
Click the Next button.
-
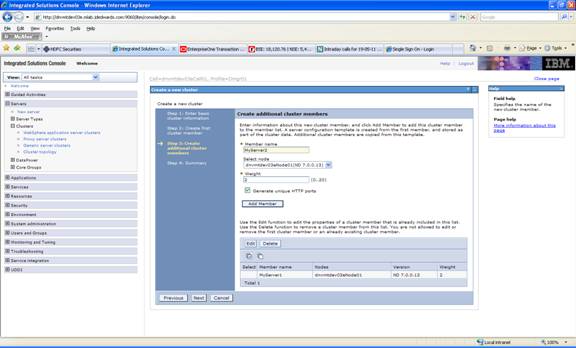
On Create a new cluster, click the Add Member button.
Continue this step to add your additional cluster members.
Note:
When creating a horizontal cluster, you must add a server with the available node targeted to the remote host name.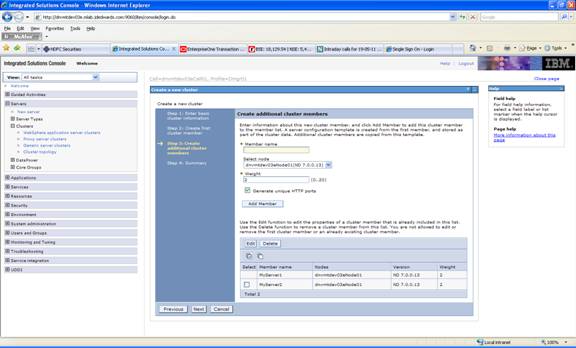
-
When you have finished adding members, click the Cancel button to exit the Create additional cluster members part of the wizard.
-
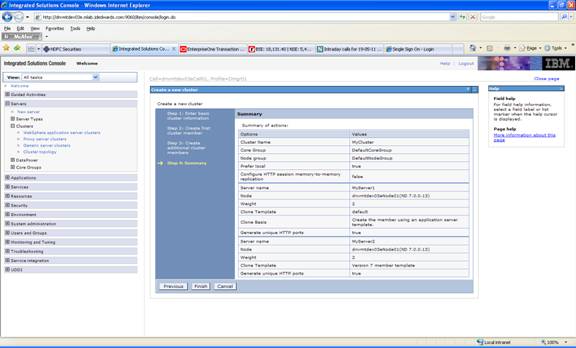
On Create a new cluster, click the Finish button.
-
Save the cluster configuration.
E.3 Installing the Transaction Server RTE Component on the WebSphere Application Server using Server Manager
-
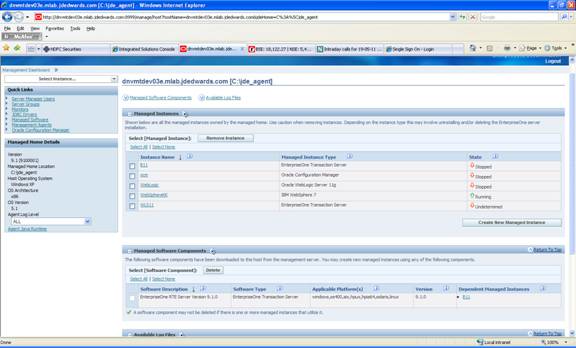
Go to the Server Manager Console.
-
On the Server Manager Console, with the Managed Instances displayed, click the Create New Managed Instance button.
-
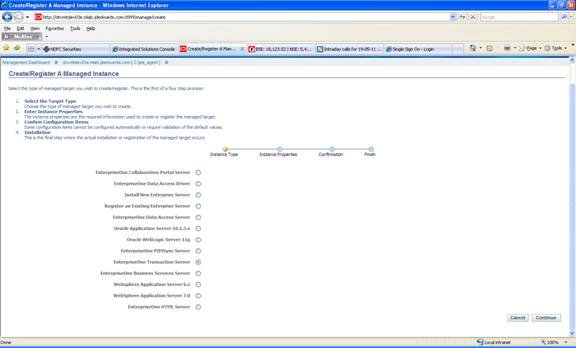
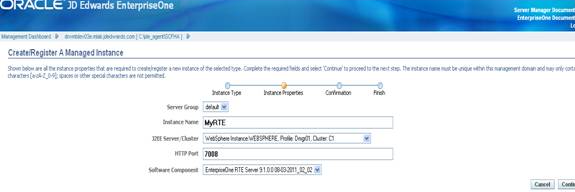
On Create/Register A Managed Instance, Instance Type, select the EnterpriseOne Transaction Server radio button.
-
Click the Continue button.
-
On Create/Register A Managed Instance, Instance Properties, complete these fields:
-
Instance Name
Enter a value for your installation.
-
J2EE Server/Cluster
Use the pulldown to select your cluster from the list of automatically detected clusters.
-
HTTP Port
You must specify an unused port number.
-
Software Component
Use the pulldown to select the desired version of the EnterpriseOne RTE Server software component.
-
-
Click the Continue button.
-
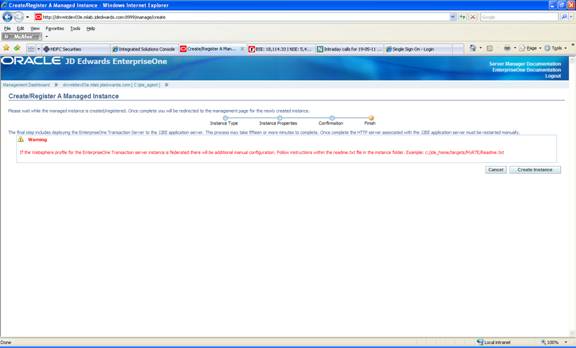
On Create/Register A Managed Instance, Confirmation, click the Continue button.
-
On Create/Register A Managed Instance, Finish, click the Create Instance button.
E.4 Using JDBC Store
To use JDBC Store:
-
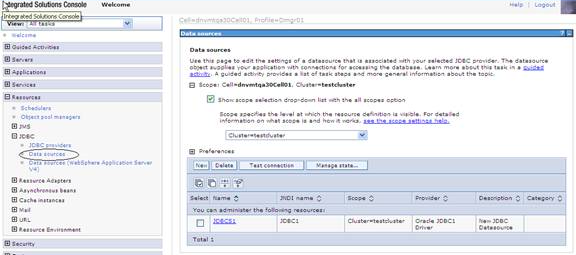
Login to WAS admin console.
-
Select Resources ->JDBC ->Data Sources from left panel of the console and choose the cluster scope.
-
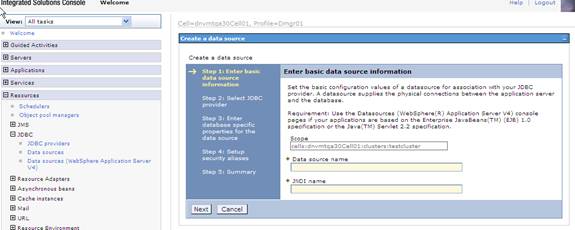
Click New and navigate to Create Data Source screen
-
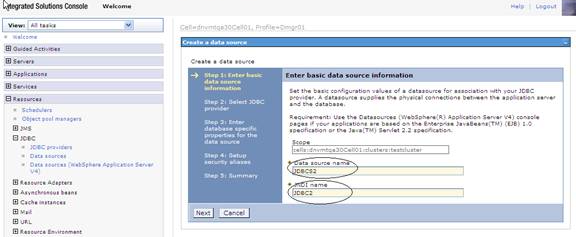
Enter the Data Source name and JNDI name as shown in below screen shot and click Next
-
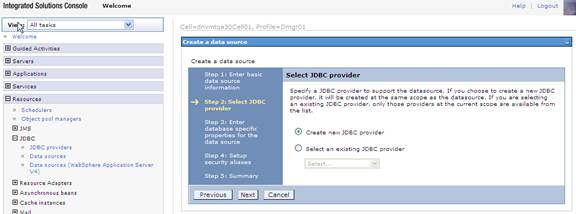
Select "Create new JDBC provider and click Next as shown in below screen
-
Fill in all the details as shown in the below screen shot and proceed to next screen clicking Next
Note:
Other Database types may be selected and similar configuration parameters may be selected.
-
Give the directory location for ojdbc6.jar as seen in the below screen shot and Click Next.
Note:
This is a typical example for using Oracle database. For other database similar type 4 JDBC driver location is provided.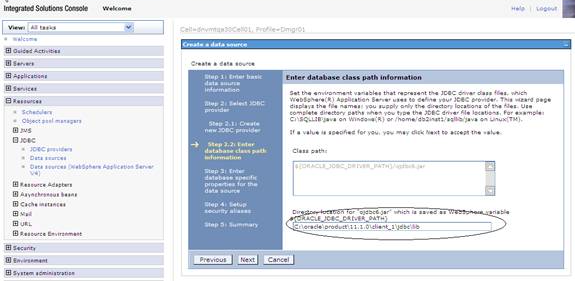
-
Fill in the appropriate URL for the database from which the data source obtains the connection and data store helper class name as shown in below screen shot and click the Next button.
The URL should be similar to this:
jdbc:oracle:thin:@localhost:1521:sample" for thin driver
Note:
The URL for other databases will differ.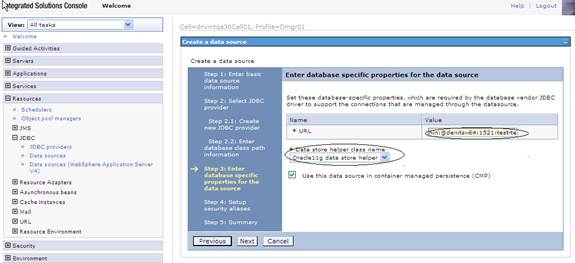
-
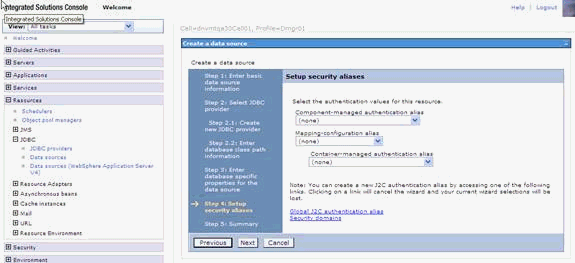
Click the Next button on setup security aliases screen as you would lose your current wizard selections by setting them up now. This can be set later.
-
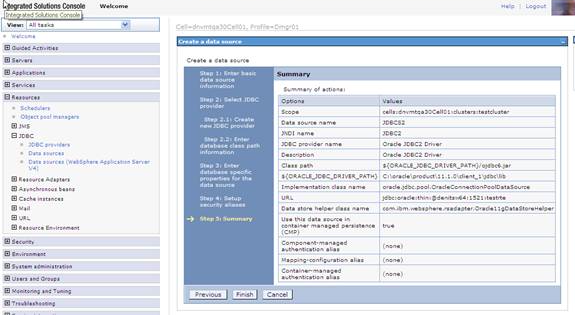
Click Finish and navigate to the Create data sources screen.
-
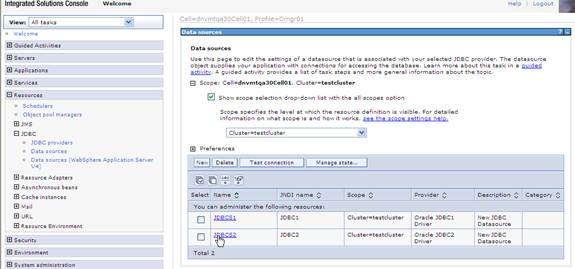
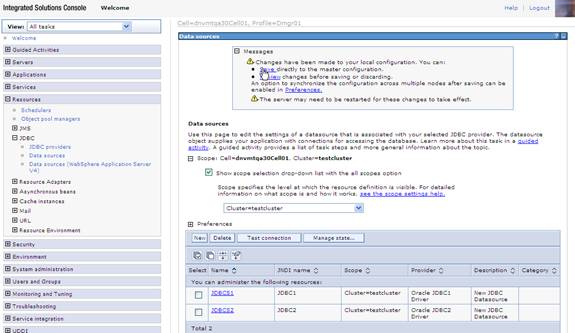
Select the newly created Datasource and navigate to Test connection screen
-
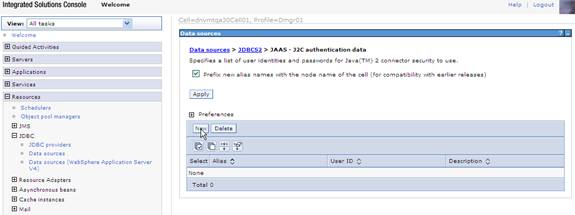
On this screen select JAAS -J2C authentication data under "Related Items" as shown in below screen shot.
-
Select the New button.
-
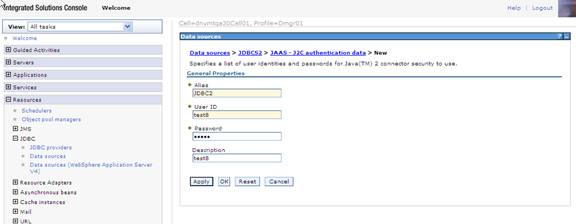
Fill in appropriate values for all the fields of this screen as shown in below screen where User ID specifies the J2C authentication data for database connection.
-
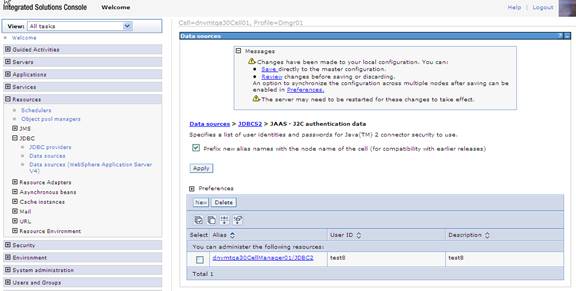
Click the OK button to save changes to master configuration.
-
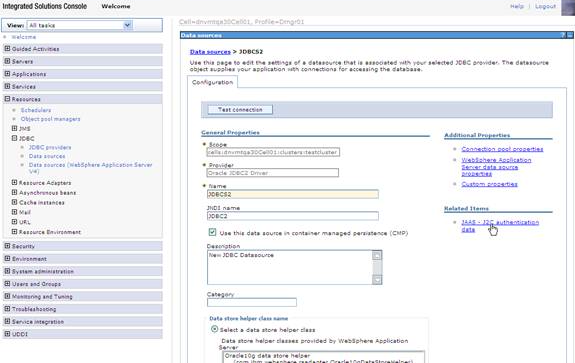
Again select the data source from top of this screen as shown below.
-
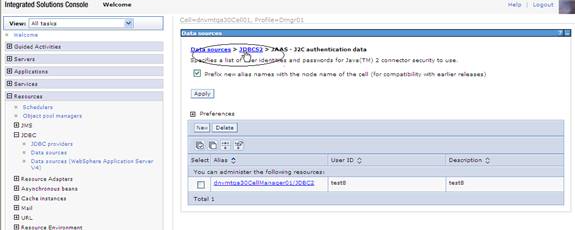
Go back to Data Source screen by clicking on the data source name from top of the screen.
-
On this screen chose the security settings newly created as shown in below screen shot and click the OK button.

-
Save changes to master configuration.
-
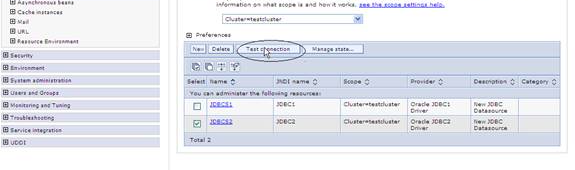
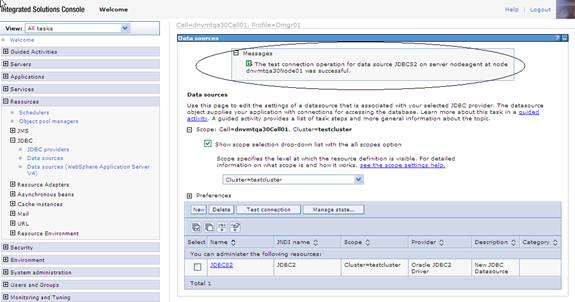
Check the newly created data source and click the Test Connection button.
-
If prompted, save changes to master configuration, then synchronize the changes and repeat the above step.
-
The test connection should be successful.
-
Repeat the steps in this section to create any number of data sources in the cluster scope.
E.5 Using Horizontal Clusters on WebSphere
The JD Edwards EnterpriseOne Transaction Server installation is configured with filestore for the messaging engines by default. If you use Horizontal cluster it is mandatory that you use the JDBC store.
To use horizontal clusters on WebSphere:
-
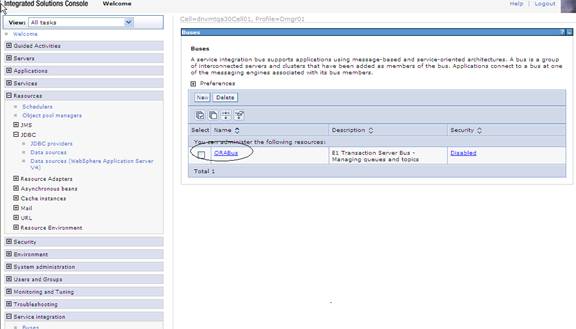
Go to Service Integration > Buses.
-
On Buses, select ORABus.
-
On Buses, select the Bus Members.
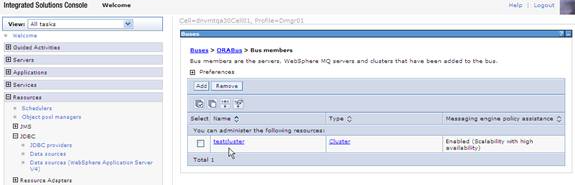
-
On Buses, Bus members, click on the link for the cluster.
-
On Bus members, click Additional Properties > Messaging engines.
-
Select the messaging engines created by default with the RTE installation.
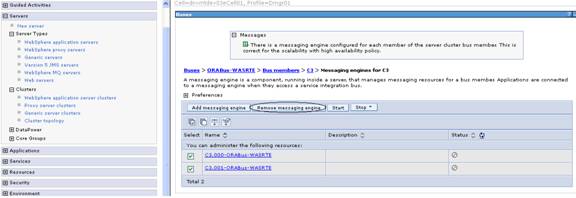
-
Click the Remove messaging engine button to delete them.
-
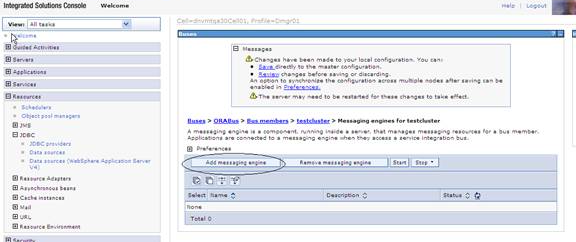
On Buses, OraBus, Bus members, testcluster, Messaging engines for testcluster, click the Add messaging engine button.
-
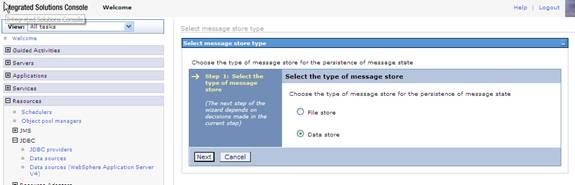
On Select message store type, select the radio button for Data store.
-
Click the Next button.
-
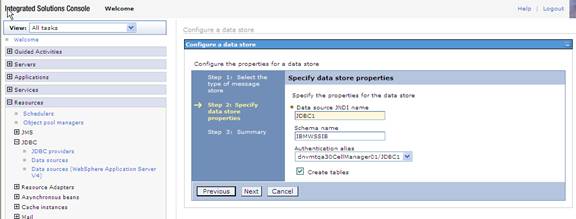
On Specify data store properties, complete these fields:
-
Data source JNDI name
Enter a name for the JNDI. For example, JDBC1.
-
Schema name
Enter a name for the schema. For example, IBMWSSIB.
-
Authentication alias
Enter an authentication alias. For example, <machine>CallManager01/JDBC1.
-
-
Click the Finish button.
-
Save changes to master configuration.
-
Repeat the same for creating Message Engines for other members of the cluster.
-
On deleting the default message engines created during the installation of the RTE application, all the Queues are also deleted. As a result, you must re-add these queues manually or you can run the rte.py script passing the required parameters.
-
Run this wsadmin command before starting the clustered servers/RTE instance.
Go to the <WAS_DMGR_PROFILE_LOC>\bin on command prompt.
Run the following command on the prompt:
wsadmin -lang jython -f <JDE_AGENT_HOME>\bin\rte.py createSIBDestination <Bus-name> <Nodename> <Server_name> <Cluster_Name> <profilepath> <queue_names>For example:
Z:\IBM\WebSphere\AppServer\profiles\Dmgr01\bin>wsadmin -lang jython -f Z:\JDE_HOME_WAS7\bin\rte.py createSIBDestination ORABus dnvmtqa30Node01 MyServer1 MyCluster1 Z:\IBM\WebSphere\AppServer\profiles\Dmgr01 SubQueue00,SubQueue01,SubQueue02,SubQueue03,SubQueue04,SubQueue05,SubQueue06,SubQueue07,SubQueue08,SubQueue09,SubQueue10,SubQueue11,SubQueue12,SubQueue13,SubQueue14,SubQueue15,EventQueue00,EventQueue01,EventQueue02,EventQueue03,TriggerQueue,SourceRouteQueue,ESBQueue00Pass input as NULL where not applicable. For a cluster, input for Nodename and Server_name can be passed as NULL.