| Oracle® Application Testing Suite Getting Started Guide Version 9.00 for Microsoft Windows (32-Bit) Part Number E15487-01 |
|
|
View PDF |
| Oracle® Application Testing Suite Getting Started Guide Version 9.00 for Microsoft Windows (32-Bit) Part Number E15487-01 |
|
|
View PDF |
This chapter explains how to get started using Oracle Functional Testing for Web Applications. It explains how to install and start the program, and the features of the main window.
There are two ways that you can install Oracle Application Testing Suite:
Go to: http://www.oracle.com/technology/software/products/app-testing/index.html.
Download the Oracle Application Testing Suite product from the Oracle Web site and save it to a temporary directory on your hard disk.
Unzip the the download file and then run oats###.exe.
Follow the setup instructions to install the Oracle Application Testing Suite. The install program will install the WebLogic web server and the Oracle 10g Express Edition Database by default. If you chose to have the install program use an existing Oracle database, follow the instructions for using an existing database below.
Select Oracle Load Testing for Web Applications from the Oracle Application Testing Suite start menu to start the Oracle Load Testing for Web Applications user interface.
Oracle Load Testing for Web Applications starts in an existing browser if one is available. To set Oracle Load Testing for Web Applications to always start in a new browser window, change the Reuse windows for launching shortcuts setting in Internet Explorer to be deselected. In IE, select Internet Options from the Tools menu then click the Advanced tab to change the setting under Browsing from the Advanced tab to access this setting.
If you choose to use an Oracle Database 11g Enterprise Edition existing database during the installation procedure, use the following instructions to setup the database for use with the Oracle Application Testing Suite.
Install the Oracle Database 11g Enterprise Edition and create a user with a minimum of the following privileges:
Create/Alter/Drop Tables
Create/Drop Views
Create/Alter/Drop Sequences
Create/Alter/Drop Triggers
Create/Alter/Drop Indexes
If you are performing the database administration yourself, use the following steps:
Log Into Database Control
Install the Oracle Database 11g Enterprise Edition and launch Database Control.
Login to Database Control as a user with "system" privileges.
Create a Tablespace
Click the Server tab.
Click Tablespaces.
Click Create.
On the General tab, give the tablespace a name.
Under Datafiles, click Add. Specify a file for the new tablespace. Set the file size to 1000 MB.
Click Continue.
Click OK to create the new tablespace
Create a User
Return to the database instance, Server tab and click Users
Create a new user ("ATSuser"). During user creation, designate the user's default tablespace to the one created above. On the Roles tab, assign the user the RESOURCE role. On the System Privileges tab, add the required system privileges defined above to that user.
Click OK to create the new user.
The following instructions explain how to setup an exsiting Oracle database for use with the Oracle Application Testing Suite.
Oracle Test Manager for Web Applications
Install the Oracle Database 11g Enterprise Edition Client OR
The Oracle Database Instant Client:
Basic Package, AND
ODBC Supplement
Note:
Read the ODBC Release Notes for specific configuration instructions, including the need to add the Instant Client directory to the PATH environment variable and the creation of the TNS_ADMIN environment variable.Create a text file called tnsnames.ora inside the folder defined by the TNS_ADMIN environment variable. The text file should contain the following text (to connect to an Oracle DB on a system with the name oracledbsys):
oracledbsys =


  (DESCRIPTION =

    (ADDRESS_LIST =

      (ADDRESS = (PROTOCOL = TCP)(HOST = oracledbsys.example.com)(PORT = 1521))

    )

    (CONNECT_DATA =

      (SID = ORCL)
Create a DSN pointing to the Oracle DB Server, as follows:
Open the Control Panel from the Start menu.
Open the Administrative Tools and select Data Sources (ODBC)
Double-click Data Sources (ODBC) and select System DSN
Click Add and select the Oracle DB driver
Click Finish to select this DB driver
In the "Oracle ODBC Driver Configuration" dialog box enter the following information:
Data Source Name: <ANY name of your choice>
Description: optional
TNS Server Name: oracledbsys (correlating to the contents of tnsnames.ora. Use the appropriate TNS name you have given.)
User Id: the username assigned to you on the DB server
Click Test, enter the password for your username and click OK
If the test is successful, you can proceed.
Oracle Load Testing for Web Applications
Log into OLT http://systemname:8088/olt
Select Databases from the Manage menu then select New
Select Oracle from the drop-down list.
If you wish to create new tables in a schema, select the radio button for Create tables in the Database . If you wish to connect to an existing schema that has OLT tables in it, select the User existing database (default).
Enter the relevant database connection information in the fields.
Click OK
Note:
An SQL file is available on the Oracle Application Testing Suite system that can be used, if necessary, to delete the database components created by the product. (This will result in loss of data!) The file is delete tables.sql and is located in the <installdir>\OTM\Files\Oracle directory. This SQL can be executed in SQL Developer or similar utility for Oracle DB management.The Oracle Functional Testing for Web Applications main window is where you develop the Visual Scripts used for functional/regression testing, performance testing, and operational monitoring of your Web site or application. The Visual Scripts you develop using Oracle Functional Testing for Web Applications are also used by Job Scheduler, and Oracle Load Testing for Web Applications.
Visual Scripts represent a sequence of actions and tests performed on a Web site or application. Visual Scripts are used by Oracle Functional Testing for Web Applications and Job Scheduler for regression testing, Oracle Load Testing for Web Applications for performance (load and scalability) testing.
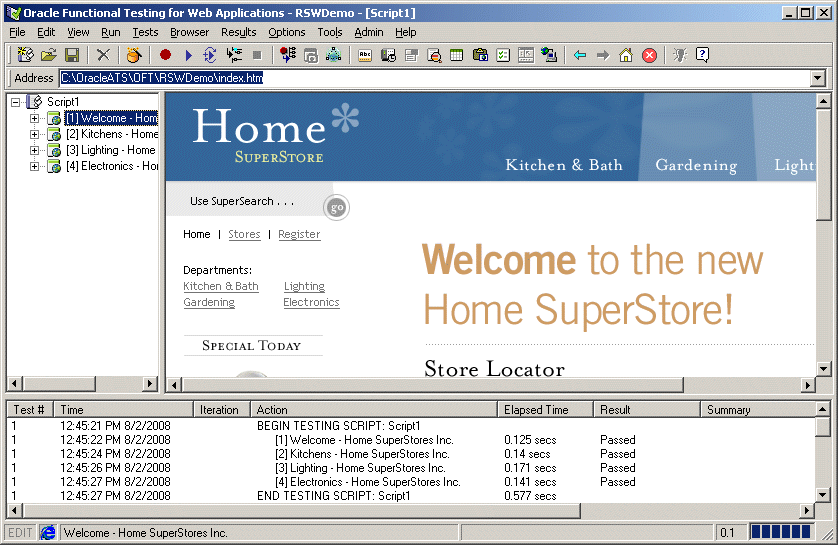
The Oracle Functional Testing for Web Applications main window consists of the menu bar, toolbar, and three panes: the Visual Script pane, Browser pane, and Playback Results Log pane.
Figure 2-1 Oracle Fuctional Testing for Web Applications Main Window

The Title bar of the window shows the program name followed by the current Workspace and Visual Script name.
The Address box directly above the Web browser pane is where you enter the URL or file location of the Web page(s) to test. The bottom of the main window includes a status line.
The Visual Script pane shows the tree hierarchy of recorded Web sites and pages. When you first start Oracle Functional Testing for Web Applications, the Visual Script pane is empty. When you record Web pages (either manually or using the e-Spider), Oracle Functional Testing for Web Applications creates the Visual Script tree for you.
Click the Plus icon to expand a branch or the Minus icon to collapse a branch.
The Visual Script tree will include any test cases you insert into the Visual Script. Each item in the tree is identified by an icon and a text description.
You can toggle the Visual Script pane width by selecting Resize Visual Script View from the View menu or by dragging the border between the Browser pane and the Visual Script pane.
The Visual Script uses additional icons in the tree to represent the following:
Yellow flag: skip test.
Red flag: test case failure.
Red and yellow flags: ignore test failure.
The browser pane contains a seamlessly integrated Web browser that you use to select the Web pages to test. It provides full navigation and Web access.
Enter the full path and file name of the URL or local file, or drop down the list to select from recently accessed Web pages.
The Playback Results pane shows a summary of the Visual Script test playback.
You can adjust the widths of the individual columns by dragging the dividers.
Icons in the Visual Script show the location of any specific failures of default tests or test cases. Resource Validation test results are listed in a separate window after playback of the script.
You can turn on and off the display of the Playback Results pane by selecting Resize Results Window from the View menu.
Job Scheduler is a regression testing tool used for running multiple Oracle Functional Testing for Web Applications Visual Scripts as a single job. The Job Scheduler main window is where you perform immediate or scheduled playback of a set of Oracle Functional Testing for Web Applications Visual Scripts.
The main window consists of the menu bar and toolbar. Job Scheduler has three windows that run within the main window: Current Schedule window, Current Job window, and Job Editor window.
You can open the Job Scheduler application from the Start menu or by selecting Job Scheduler from the Tools menu in Oracle Functional Testing for Web Applications.
The Visual Script job pane list the Visual Scripts in an Job Scheduler job and the real-time playback results. You create Job Scheduler jobs and schedules using the Job Scheduler Wizard.
The Results pane shows any log messages generated during playback of the job.
You can customize log messages as required using the Job Scheduler Wizard.
The Job Scheduler Wizard provides a convenient way to build and schedule Job Scheduler jobs. The Wizard includes steps for selecting Visual Scripts, setting notification options, and scheduling playback times.
The successive steps of the Wizard provide options for setting results notifications. When the Wizard finishes, you can add the job to any schedule.
Schedules can be used with the current job or other saved jobs.
The Oracle Load Testing for Web Applications main window is where you perform the majority of your load/performance testing activities. Oracle Load Testing for Web Applications uses the same Visual Scripts that you develop using Oracle Functional Testing for Web Applications.
The main window consists of the menu bar, toolbar, and the controller tab dialogs.
Figure 2-10 Oracle Load Testing for Web Applications Main Window

You can open the Oracle Load Testing for Web Applications application from the Start menu or by selecting Oracle Load Testing for Web Applications from the Tools menu in Oracle Functional Testing for Web Applications.
The Build Scenario tab is where you specify information about the virtual users to include in the load test and the attributes for each set of virtual users.
You can define user profiles that specify which visual scripts the users playback to emulate real users and how many virtual users to emulate.
The Autopilot tab is where you specify the information needed to control how the scenario starts and runs. The Autopilot controls the starting and stopping of the scenario, the rate at which new virtual users are started, and shows the total number of virtual users and the number of running virtual users.
You specify the session, start and stop times, and the virtual user rampup specifications for the Submitted Scenario Profile. It also shows the list of virtual user profiles submitted in the Oracle Load Testing for Web Applications scenario.
The Watch Virtual User Grid tab lists the currently running virtual users and the profile and playback details associated with each.
The View Run Graphs tab lets you define graphs and view the graphs at run-time.
You can also view the Performance Statistics report from the View Run Graphs tab. The Performance Statistics window shows a summary of the performance data for the running virtual users.
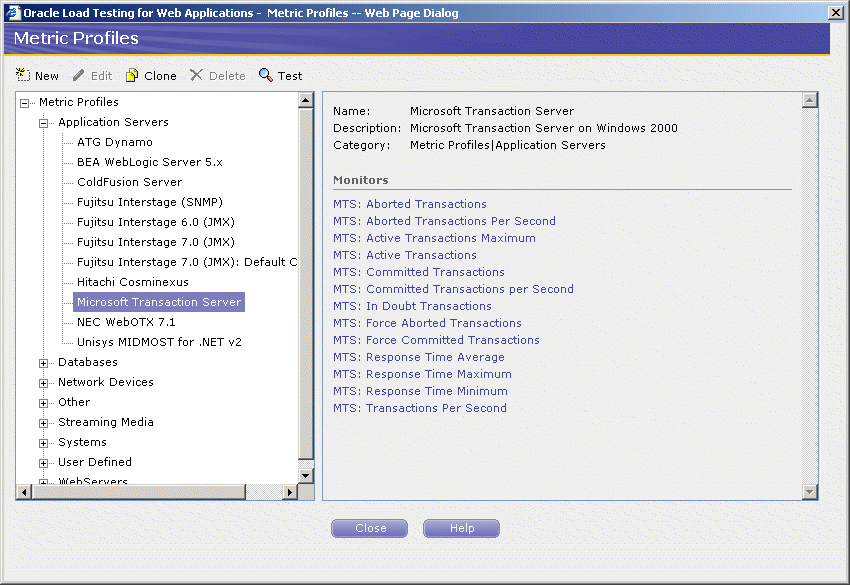
The ServerStats component of Oracle Load Testing for Web Applications lets you monitor a variety of server-side application, database, system, and Web server statistics. You can configure ServerStats to display real-time performance statistics for the various hosts and services available from the server such as, percentage of CPU usage, memory usage, Web server statistics, etc.
Figure 2-16 ServerStats Metric Profiles Window

You can monitor specific counters in real time using the visual indicator gauges or using graphs. In addition to performance monitoring, ServerStats let you define scripts that can log warnings or alarms if a server's counter performance goes outside a defined range.