60 Work with Bank Statements
This chapter contains these topics:
-
Use processing options to set the default credit and debit transaction types, bank account, and transit account.
-
Clear, create, and post any receipts or drafts collected. See About Automatic Receipts Processing and About A/R Draft Processing in the JD Edwards World Accounts Receivable Guide.
-
Clear, write, and post any payments or drafts paid. See About Automatic Payment Processing and About A/P Draft Processing in the JD Edwards World Accounts Payable Guide.
60.1 Entering Bank Statements
You can enter information from your bank statements to track all banking activity, such as electronic fund transfers.
Entering bank statements consists of:
-
Entering bank statement information
-
Entering detail information (optional)
60.1.1 What Should You Consider For Multi-Currency Bank Statements?
When you enter bank statements for multi-currency, you can enter transactions for up to three different currencies. The system calculates the gain or loss.
The Enter Statement form contains fields for a domestic amount, a foreign amount, and a currency code. The value you enter in each field depends on the currencies. The currency code is always the currency of the transaction.
When you process the transaction, the system creates an AA ledger entry and a CA ledger entry. You must use a non-monetary transit account for any transaction with three currencies.
Additionally, you can create foreign journal entries when you process your bank statement.
Examples: Using Different Currencies
Example 1: Different currencies for company, bank account, and transaction
| Object | Currency |
|---|---|
| Company Currency Code | EUR (Euro) |
| Bank Account (monetary) | USD (U.S. Dollar) |
| Transit Account (required) | Non-monetary |
| Transaction | GBP (British Pound Sterling) |
The currency is different for the company, the bank account, and the transaction. On Enter Statement, enter amounts and the currency code as follows:
-
Amount in U.S. dollars in the Amount field
-
Amount in British Pounds in the Foreign Amount field
-
GBP in the Currency Code field
When you process the transaction, the system creates an AA ledger entry in Euros and a CA ledger entry in British Pound Sterling. You must use a non-monetary transit account for any transaction with three currencies.
Example 2: Different currency for the transaction
| Object | Currency |
|---|---|
| Company Currency Code | EUR (Euro) |
| Bank Account (monetary) | EUR (Euro) |
| Transit Account (required) | Non-monetary |
| Transaction | USD (U.S. Dollar) |
The currency is the same for the company and the bank account but different for the transaction. On Enter Statement, enter amounts and the currency code as follows:
-
Amount Euros in the Amount field
-
Amount in U.S. dollars in the Foreign Amount field
-
USD in the Currency Code field
A non-monetary transit account is optional for transactions where the currency for the company and bank account is the same.
Example 3: Different currency for the company
| Object | Currency |
|---|---|
| Company Currency Code | EUR (Euro) |
| Bank Account (monetary) | USD (U.S. Dollar) |
| Transit Account (required) | Non-monetary |
| Transaction | USD (U.S. Dollar) |
The currency is the same for the bank account and the transaction but different for the company. On Enter Statement, enter amounts and the currency code as follows:
-
Amount in U.S. dollars in the Amount field
-
Blank in the Foreign Amount field
-
Blank in the Currency Code field (because the transaction is in the currency of the bank account)
The system uses the currency code of the bank account. A non-monetary transit account is optional.
Example 4: Different currency for the bank account
| Object | Currency |
|---|---|
| Company Currency Code | EUR (Euro) |
| Bank Account (monetary) | USD (U.S. Dollar) |
| Transit Account (required) | Non-monetary |
| Transaction | EUR (Euro) |
The currency is the same for the company and the transaction but different for the bank account. On Enter Statement, enter amounts and the currency code as follows:
-
Amount in U.S. dollars in the Amount field
-
Amount in Euros in the Foreign Amount field
-
EUR in the Currency Code field
A non-monetary transit account is required.
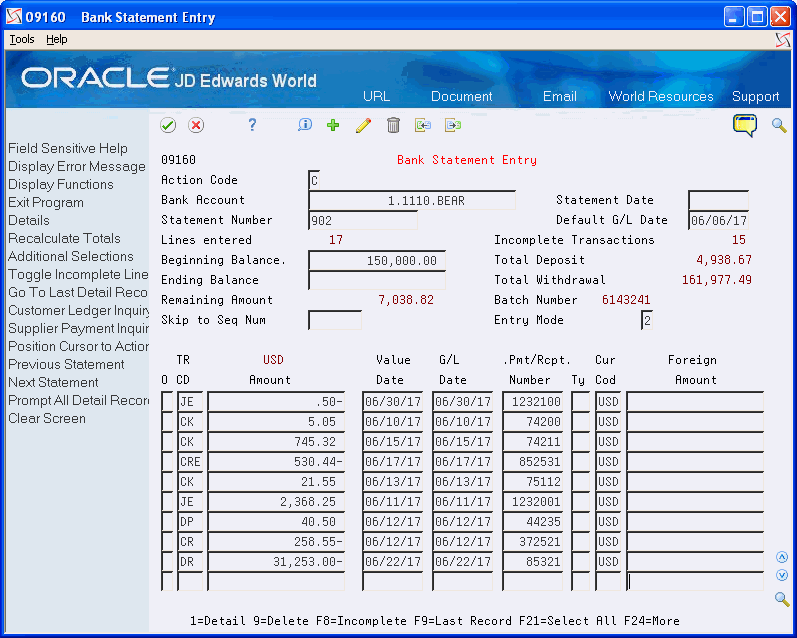
60.1.2 Entering Bank Statement Information
From General Accounting (G09), choose Account Reconciliation
From Account Reconciliation (G0921), choose Bank Statement Processing
From Bank Statement Processing (G09211), choose Enter Statement
You must enter general information from your bank statement, such as the statement date and beginning and ending balances. Then, you enter one summary line for each transaction on the statement. You might need to enter additional information to specify how to reconcile each entry.
As you enter this information, the system displays a remaining amount. The remaining amount changes as you enter each transaction. When the remaining amount is zero, the statement is in balance.
If the statement is out-of-balance, you have the option to display only the incomplete lines to make it easier to see where information is missing.
To enter bank statement information
-
Complete the following fields:
-
Bank Account
-
Statement Date
-
Statement Number
-
Default G/L Date
-
Beginning Balance
-
Ending Balance
-
Entry Mode
-
-
Complete the following fields for each transaction line:
-
TR CD (Transaction Code)
-
Amount
-
Value Date
-
G/L Date
-
Pmt/Rcpt Number
-
TY (Document Type) (optional)
-
Cur Cod (optional)
-
Foreign Amount (optional)
-
-
Access the fold area.
Figure 60-2 Bank Statement Entry screen (Fold area)
Description of "Figure 60-2 Bank Statement Entry screen (Fold area)"
-
Complete the following fields (optional):
-
Remark
-
Sequence
-
-
To add the record, press Enter.
-
Complete one or more of the detail forms which appear after you enter all transaction lines.
| Field | Explanation |
|---|---|
| Bank Account | Identifies an account in the general ledger. You can use one of the following formats for account numbers:
1 – Standard account number (business unit.object.subsidiary or flexible format) 2 – Third G/L number (maximum of 25 digits) 3 – 8-digit short account ID number 4 – Speed code The first character of the account indicates the format of the account number. You define the account format in the General Accounting Constants program (P000909). |
| Statement Date | The date of the bank statement. It is used as the G/L date when processing bank statements. |
| Statement Number | The statement number assigned by the bank for the bank account. |
| Default G/L Date | A date that identifies the financial period to which the transaction is to post. The company constants table for general accounting specifies the date range for each financial period. You can have up to 14 periods. Generally, period 14 is for audit adjustments. |
| Beginning Balance | The beginning balance amount. |
| Ending Balance | The ending balance amount. |
| Entry Mode | This code designates how the window and editing will be handled.
0 – will not display the window when adding new lines and no editing will be done 1 – will display the window when adding new lines and no editing will be done 2 – will display the window when adding new lines and full editing will be done |
| TR CD (Transaction Code) | A code that identifies the type of transaction entered from a bank statement.
Form-specific information This is required only if you want a code other than the default transaction type. The system uses the following default transaction types from the processing options:
|
| Amount | The gross amount of an invoice or voucher pay item, including tax but not including discounts. The total amount for a voucher or invoice is the accumulation of the open pay items. The accounting distributions must balance to the net amount of a voucher or invoice, not to the gross amount. |
| Value Date | The date that the item was debited or credited to the bank account. |
| Foreign Amount | The foreign currency amount entered on the transaction. If the Multi-Currency Conversion option on the Set Multi-Currency Option form is set to Y, the foreign amount is multiplied by the exchange rate to arrive at the domestic amount. If the Multi-Currency Conversion option is set to Z, the foreign amount is divided by the exchange rate. |
60.1.3 Entering Detail Information
From General Accounting (G09), choose Account Reconciliation
From Account Reconciliation (G0921), choose Bank Statement Processing
From Bank Statement Processing (G09211), choose Enter Statement
You must first enter bank statement information before you can enter detail information.
The appearance of detail forms depends on the type of transactions that you entered from your bank statement. Detail forms correspond to the individual transaction codes. They appear in the same order as the transaction lines and provide additional transaction information.
Entering detail information consists of:
-
Entering detail for journal entries
-
Entering Value Added Tax (VAT) detail for journal entries
-
Entering detail for automatic receipts
-
Entering detail for manual receipts
-
Entering manual payments with voucher match
-
Entering manual payments without voucher match
-
Entering detail for clear receipts
-
Entering detail for clear draft receipts
-
Entering detail for clear draft payments
-
Entering detail for clear payments
To enter detail for journal entries
After entering bank statement information, you can enter transaction detail.
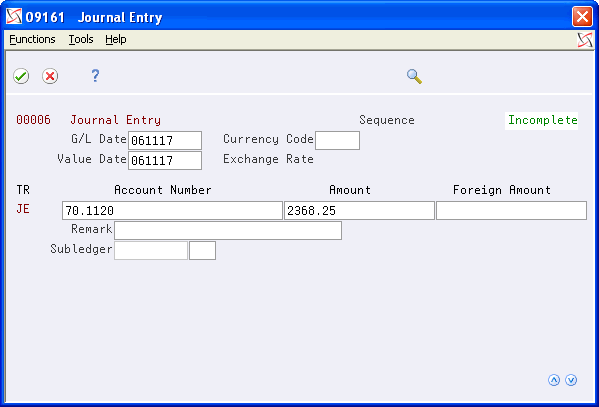
Complete the following fields:
-
G/L Date
-
Value Date
-
Account Number
-
Amount
-
Remark
To enter VAT detail for journal entries
After entering bank statement information, you can enter transaction detail.
On Journal Entry (detail)
-
Figure 60-4 Journal Entry Detail screen (Tax Format)
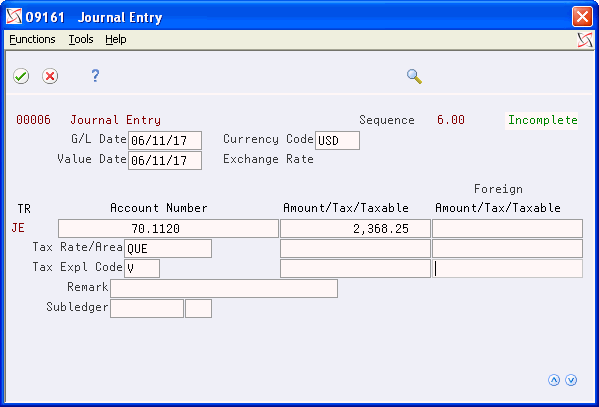
Description of "Figure 60-4 Journal Entry Detail screen (Tax Format)"
-
Complete the following fields:
-
G/L Date
-
Value Date
-
Account Number
-
Amount/Tax/Taxable
-
Remark
-
To enter detail for automatic receipts
After entering bank statement information, you can enter transaction detail.
Figure 60-5 Automatic Receipts Entry screen
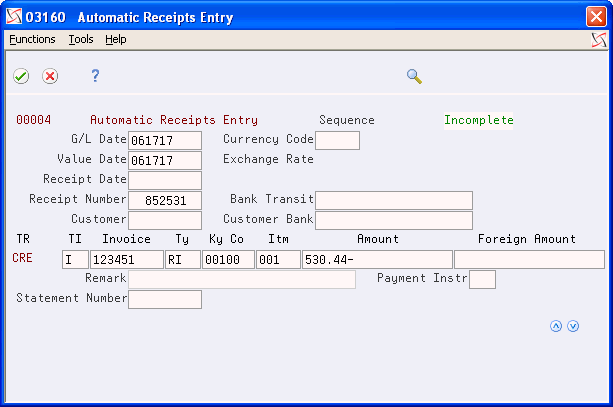
Description of "Figure 60-5 Automatic Receipts Entry screen"
-
Complete the following fields:
-
G/L Date
-
Value Date
-
Receipt Date
-
Receipt Number
-
Customer
-
TI
-
Amount
-
-
Complete the following optional fields, depending on the TI code (auto receipt algorithm method, which specifies how receipts are applied):
-
Invoice
-
Type
-
Key Company
-
Item
-
To enter detail for manual receipts
After entering bank statement information, you can enter transaction detail.
Figure 60-6 Receipts Entry (Heads Up) screen
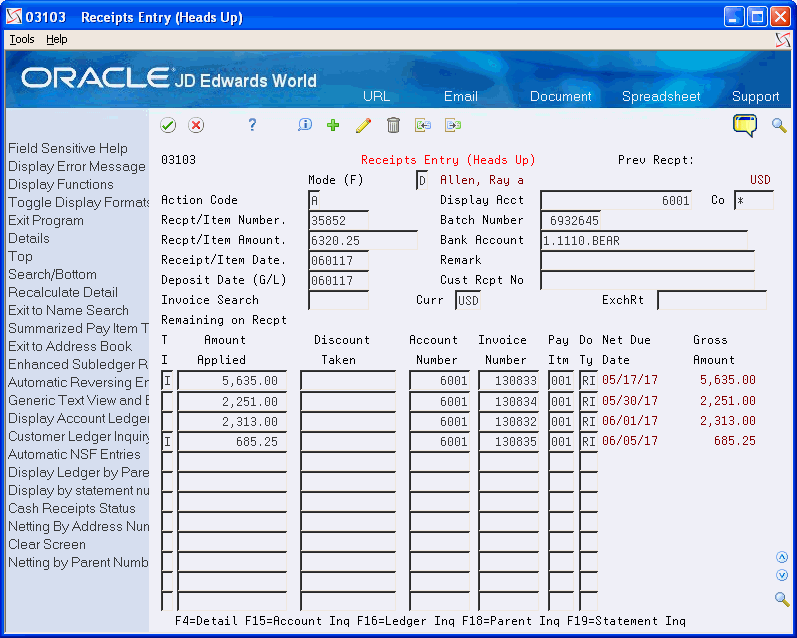
Description of "Figure 60-6 Receipts Entry (Heads Up) screen"
Enter manual receipts.
The system applies these receipts directly to the Accounts Receivable Ledger table (F0311).
To enter detail for clear receipts
After entering bank statement information, you can enter transaction detail.
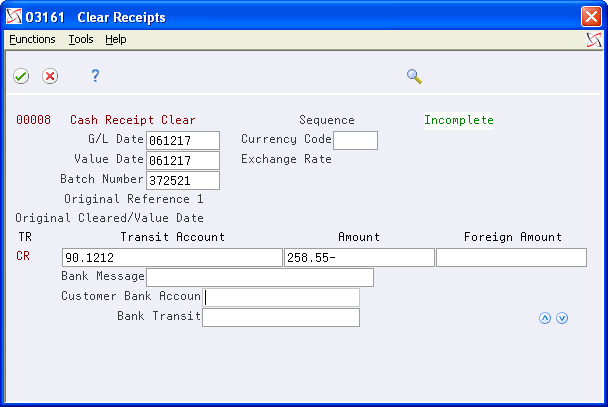
Complete the following fields:
-
G/L Date
-
Value Date
-
Batch Number
-
Amount
| Field | Explanation |
|---|---|
| Draft | The number of the matching document, such as a receipt, payment, adjustment, or credit. You apply a matching document (DOCM) against an original document (DOC), such as an invoice or voucher.
Form-specific information When you make a bank deposit, JD Edwards World recommends that you use the draft receipts batch number as the bank deposit number. When you later enter the bank deposit number from your bank statement in the Draft field of the Clear Draft Receipt form, this identifies the batch. |
To enter detail for clear draft receipts
After entering bank statement information, you can enter transaction detail.
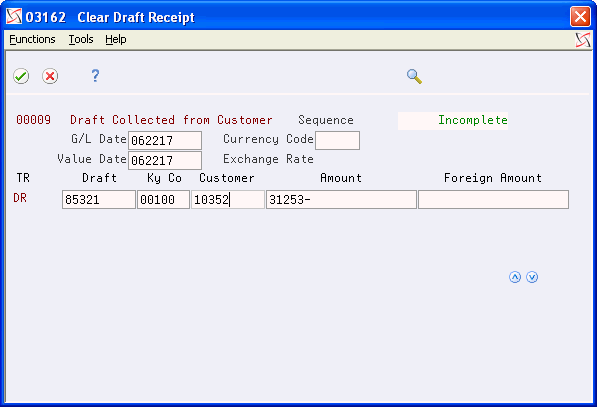
Complete the following fields:
-
G/L Date
-
Value Date
-
Draft
-
Ky Co
-
Customer
-
Amount
| Field | Explanation |
|---|---|
| Batch Number | The number of the matching document, such as a receipt, payment, adjustment, or credit. You apply a matching document (DOCM) against an original document (DOC), such as an invoice or voucher. |
To enter detail for clear draft payments
After entering bank statement information, you can enter transaction detail.
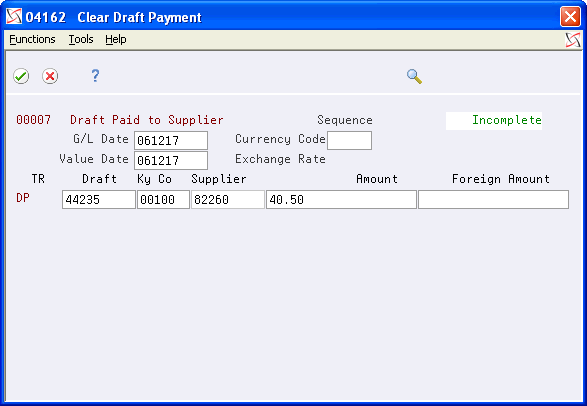
Complete the following fields:
-
G/L Date
-
Value Date
-
Draft
-
Key Company
-
Supplier
-
Amount
To enter detail for clear payments
After entering bank statement information, you can enter transaction detail.
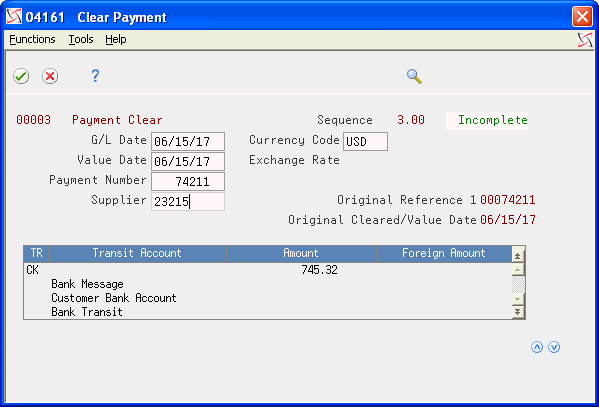
Complete the following fields:
-
G/L Date
-
Value Date
-
Payment Number
-
Amount
To enter detail for manual payments with voucher match
After entering bank statement information, you can enter transaction detail.
On Manual Payment with Voucher Match
Figure 60-11 Payment with Voucher Match screen
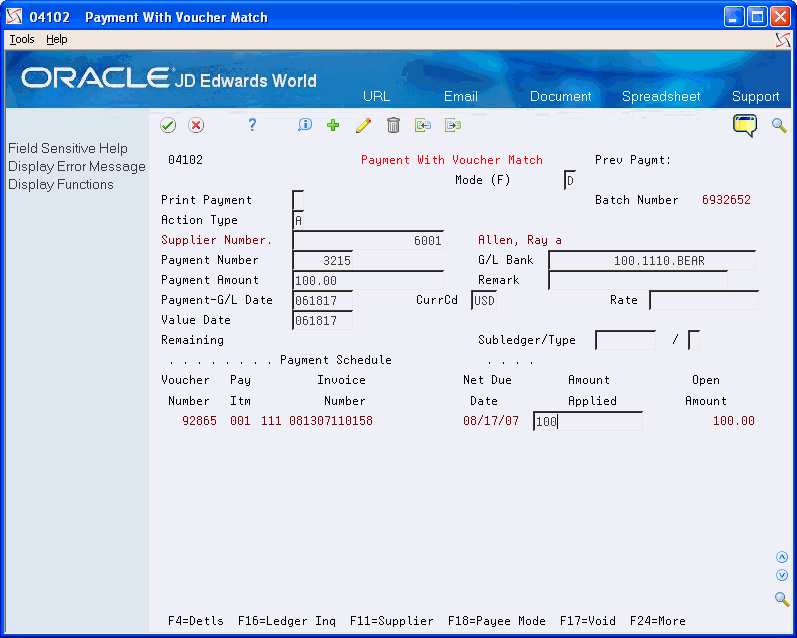
Description of "Figure 60-11 Payment with Voucher Match screen"
Enter manual payments.
The system applies these payments directly to the Accounts Payable Ledger table (F0411).
To enter detail for manual payments without voucher match
After entering bank statement information, you can enter transaction detail.
On Manual Payment without Voucher Match
Figure 60-12 Payment without Voucher Match screen
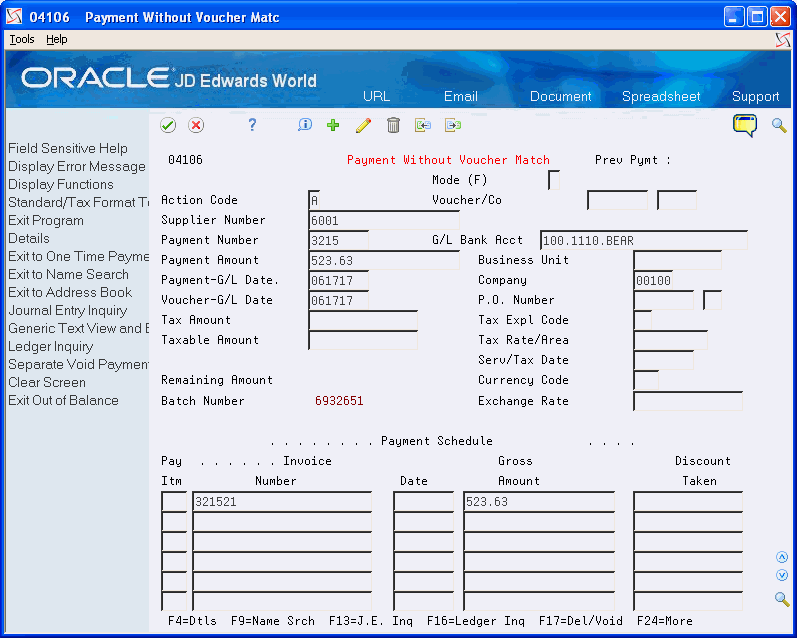
Description of "Figure 60-12 Payment without Voucher Match screen"
Enter manual payments.
The system applies these payments directly to the Accounts Payable Ledger table (F0411).
60.2 Locating and Revising Bank Statements
From General Accounting (G09), choose Account Reconciliation
From Account Reconciliation (G0921), choose Bank Statement Processing
From Bank Statement Processing (G09211), choose Enter Statement
After you enter a bank statement, you might need to revise it. This consists of the following tasks:
-
Locating a bank statement
-
Revising bank statement transactions
On Enter Statement
-
Complete the following fields:
-
Bank Account
-
Statement Date (optional)
-
Statement Number (optional)
Scroll through the statements until the appropriate statement appears, if necessary.
-
-
To limit your selection, press F6 to access Additional Selections.
Figure 60-13 Additional Selections screen
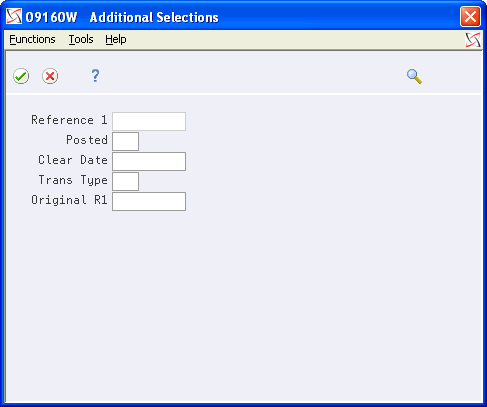
Description of "Figure 60-13 Additional Selections screen"
-
On Additional Selections, complete any of the following fields to limit your selection:
-
Reference 1
-
Posted
-
Clear Date
-
Trans Type
-
Original R1 (Original Reference)
-
| Field | Explanation |
|---|---|
| Reference 1 - JE, Voucher, Invoice, etc | A number that provides an audit trail for specific transactions, such as a payment number for payment processing.
Form-specific information This is the payment number of a payment or the batch number of a receipt. The system reconciles against this field. |
| Clear Date | The date that the item was debited or credited to the bank account. |
| Trans Type | A reference field for use when bank statements are loaded by tape.
Form-specific information A one-character code that your company can set up to identify transactions. The system uses this code only on this selection form. This is not the same as the transaction code. |
| Original R1 | The Original Reference 1 value.
Form-specific information The first value entered in the Reference 1 field. |
To revise bank statement transactions
After locating a bank statement, make the following revisions as necessary:
-
To add a new transaction, enter the information on a blank line. The system displays the appropriate detail form so that you can enter additional information.
-
To change a transaction, replace the existing information. The system displays the appropriate detail form so that you can revise information as necessary.
60.2.1 What You Should Know About
60.3 Reviewing Bank Statements
From General Accounting (G09), choose Account Reconciliation
From Account Reconciliation (G0921), choose Bank Statement Processing
From Bank Statement Processing (G09211), choose Review Statement
After you enter information from your bank statements, you can review it to make any necessary corrections to the bank statement transactions and approve batches.
The batch review program is standard throughout the JD Edwards World system.
Reviewing bank statements consists of:
-
Reviewing bank statement information
-
Reviewing a batch
60.3.1 What You Should Know About
| Topic | Description |
|---|---|
| Account Number | This field refers to the bank account number. |
| Statement Number | This field refers to the bank statement number. |
See Also:
-
Review and Approve Journal Entries in the JD Edwards World General Accounting I Guide for information about reviewing and approving entries
To review bank statement information
On Review Statement
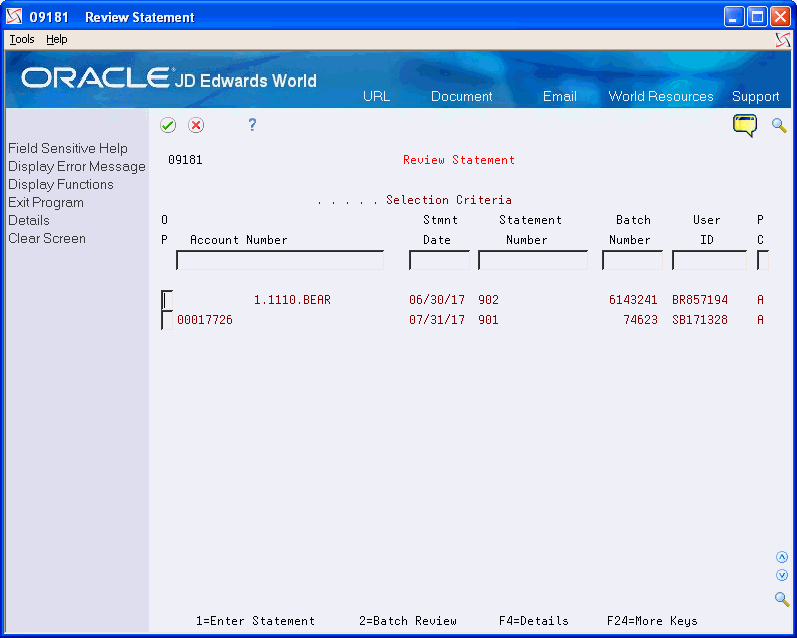
-
Complete any of the following fields:
-
Account Number
-
Stmnt Date (Statement Date)
-
Statement Number
-
Batch Number
-
User ID
-
PC (Posted Code)
-
-
For the statement you want to review, choose Enter Statement.
See Also:
-
Locating and Revising Bank Statements (P09160)
-
Complete any of the following fields:
-
Account Number
-
Stmnt Date (Statement Date)
-
Statement Number
-
Batch Number
-
User ID
-
PC (Posted Code)
-
-
For the batch you want to review, choose Batch Review.