4 Enter Branch/Plant Information
This chapter contains these topics:
-
Section 4.7, "Entering Item Branch/Plant Manufacturing Information,"
-
Section 4.8, "Duplicating Item Information for Multiple Branch/Plants."
4.1 Entering Branch/Plant Information
Information about an item might differ from warehouse to warehouse. For example, taxes might be applicable to an item in one warehouse, but not in another. You might also have different quantity requirements for each item based on the warehouse.
After you enter master information for an item, you can assign the item to different warehouses or branch/plants. You can then customize the item information for each branch/plant. You can also specify the locations in the branch/plant in which the item is stored.
Figure 4-1 Customizing Item Information for a Branch/Plant
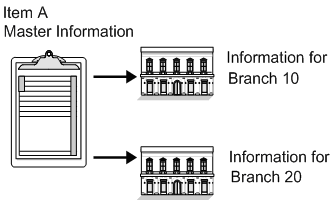
Description of "Figure 4-1 Customizing Item Information for a Branch/Plant"
Every JD Edwards World system that retrieves item information searches for an item's branch/plant information before using an item's master information.
You can enter item information for a single branch/plant or copy existing item information and duplicate it for multiple branch/plants.
Figure 4-2 Entering Item Information for a Single Branch/Plant
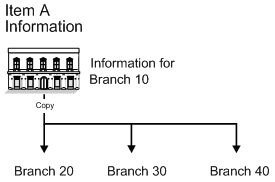
Description of "Figure 4-2 Entering Item Information for a Single Branch/Plant"
To enter item branch/plant information, complete the following tasks:
-
Assigning an Item to a Branch/Plant
-
Working with Item Locations
-
Entering Item Tax Information
-
Locating Item Sources
-
Entering Item Reorder Quantities
-
Entering Item Branch/Plant Manufacturing Information
-
Duplicating Item Information for Multiple Branch/Plants
After you enter item information for a specific branch/plant, the system creates a record in the Item Branch table (F4102).
4.1.1 What You Should Know About
4.2 Assigning an Item to a Branch/Plant
From Inventory Management (G41), choose Inventory Master/Transactions
From Inventory Master/Transactions (G4111), choose Item Branch/Plant Information
After you enter master information for an item, you must assign the item to a specific branch/plant. After assigning the branch/plant, you can locate the item and branch/plant to customize the master information.
To assign an item to a branch/plant
On Item Branch/Plant Information
Figure 4-3 Item Branch/Plant Information screen
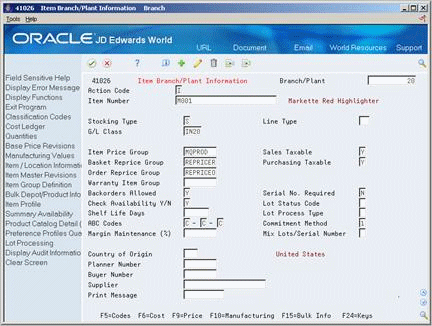
Description of "Figure 4-3 Item Branch/Plant Information screen"
Complete the following fields:
-
Branch/Plant
-
Item Number
| Field | Explanation |
|---|---|
| Branch/Plant | A code that identifies a separate entity within a business for which you want to track items and costs. This entity might be a warehouse location, job, project, work center, or branch/plant. The Business Unit field is alphanumeric.
Form-specific information This is the branch/plant or warehouse to which this item information is applicable. |
4.3 Working with Item Locations
From Inventory Management (G41), choose Inventory Master/Transactions
From Inventory Master/Transactions (G4111), choose Item Branch/Plant Information
After you assign an item to a branch/plant, you can indicate multiple locations in which the item resides. For each branch/plant, you can assign:
-
A primary location
-
Multiple secondary locations
The system usually processes an item through its primary location. For example, when you receive an item, the system assigns the item to its primary location, unless you specify a secondary location.
The system prompts you for the primary location immediately after you assign an item to a branch/plant. You can assign secondary locations to an item when you enter branch/plant information. The system automatically assigns a secondary location if you enter a location other than the primary location for an item when you receive it.
If you specify location control on System Constants, you can assign an item to only those locations set up on Branch/Plant Location Master. If you do not specify location control, you can assign an item to any location.
Each time you enter a location for an item, the system creates a record in the Item Location table (F41021).
In addition to assigning locations to an item and branch/plant, you can assign multiple lot numbers to each location. You can enter lot numbers manually when you enter item locations or when you receive the items.
You can prevent the assignment of an item that belongs to multiple lots and has multiple statuses within a lot to a single location. For example, assume that a pharmaceutical company receives a portion of a lot, approves the received portion, and stores it in a warehouse. The remainder of the lot arrives but needs to be approved. The pharmaceutical company stores the unapproved portion of the lot in a staging location, rather than storing the unapproved portion with the approved portion.
Complete the following tasks:
-
Assign a primary location to an item
-
Assign a secondary location to an item
-
Change the primary location for an item
4.3.1 What You Should Know About
| Topic | Description |
|---|---|
| Creating a lot | When you assign locations, you might be able to create a lot if you have set the branch/plant constants appropriately.
For more information, see Setting Up Constants in the JD Edwards World Sales Order Management Guide. |
See Also:
To assign a primary location to an item
On Item Branch/Plant Information
-
Assign a branch/plant to an item.
-
On Primary Location, complete the following fields:
-
Location
-
Lot/SN (Lot/Serial Number)
-
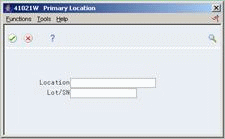
Note:
For integrity reasons, JD Edwards World recommends that you leave the primary blank as an imaginary location, and add your physical locations as secondary locations.To assign a secondary location to an item
On Item Branch/Plant Information
-
Access Item/Location Information.
Figure 4-5 Item/Location Information screen
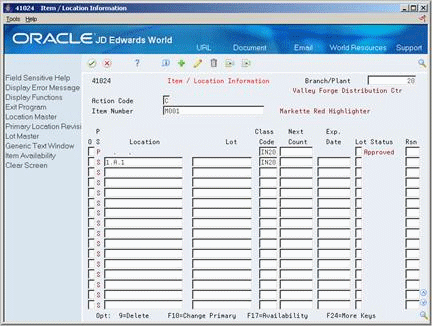
Description of "Figure 4-5 Item/Location Information screen"
-
Enter S in the following field to identify the secondary (S) locations for an item:
-
P/S (Primary/Secondary Location)
-
-
For each secondary location and lot, complete the following fields:
-
Location
-
Lot
-
Lot Status
-
To change the primary location for an item
On Item Branch/Plant Information
-
Access Item/Location Information.
-
On Item/Location Information, enter P in the following field to identify the primary (P) location for the item:
-
P/S (Primary/Secondary Location)
-
-
Access Primary Location.
-
On Primary Location, complete the following fields:
-
Location
-
Lot
-
-
Return to Item/Location Information.
-
On Item/Location Information, complete the following field:
-
P/S (Primary/Secondary Location)
After you change the primary location for an item, the previous primary location becomes a secondary location.
-
| Field | Explanation |
|---|---|
| Location | A code that identifies inventory locations in a branch/plant. You define the format of the location identifier by branch/plant.
Form-specific information If you do not specify a location in this field, the system uses the blank location set up for the branch/plant in Branch/Plant Location Master. |
| Lot/SN | A number that identifies a lot or a serial number. A lot is a group of items with similar characteristics. |
| P S | A value that indicates if this is the primary or secondary location for this item within this stocking location. Valid values are:
P – Primary storage location S – Secondary storage location Note: You can only have one storage area within each branch or warehouse marked as primary. In some cases, the system uses the primary storage area as the default. |
| Lot Status | A user defined code (table 41/L) that indicates the status of the lot. If you leave this field blank, it indicates that the lot is approved. All other codes indicate that the lot is on hold.
You can assign a different status code to each location in which a lot resides on Item/Location Information or Location Lot Status Change. Form-specific information The default for this field comes from the lot status code (including a blank value) that you assign to the item on Item Master Information or Item Branch/Plant Information. The code that you enter here serves as the lot status default when you assign an item to a secondary location. |
4.3.2 What You Should Know About
| Topic | Description |
|---|---|
| Effects on quantities | If you change an item's primary location and any of the following quantities exist, the quantities transfer to the new primary location:
|
| Deleting a primary location | To delete a primary location, you must first change it to a secondary location. No quantities can exist in the locations that you delete. |
| Reviewing lot information | To display more specific information about the lot, access the Lot Information screen. This screen displays the item that belongs to the lot, the branch/plant to which the lot is assigned, the lot expiration date, the lot status, and so on.
For more information, see Viewing Lot Availability JD Edwards World Inventory Management Guide. |
4.4 Entering Item Tax Information
From Inventory Management (G41), choose Inventory Master/Transactions
From Inventory Master/Transactions (G4111), choose Item Branch/Plant Information
You can specify whether an item is subject to tax when you enter branch/plant information. The system uses the values that you enter as default information in the Sales Order Management and Procurement systems.
-
Working With Detail Information (P42114) in the Sales Order Management Guide and Entering Tax Information for a Purchase Order Detail Line (P4311) in the Procurement Guide
On Item Branch/Plant Information
Complete the following fields:
-
Sales Taxable
-
Purchasing Taxable
| Field | Explanation |
|---|---|
| Sales Taxable | A code that indicates whether the item is subject to sales tax when you sell it. The system calculates tax on the item only if the customer is also taxable. |
| Purchasing Taxable | A code that indicates whether the item is subject to sales tax when you purchase it. The system calculates tax on the item only if the supplier is also taxable. |
4.5 Locating Item Sources
From Inventory Management (G41), choose Inventory Master/Transactions
From Inventory Master/Transactions (G4111), choose Item Branch/Plant Information
You can locate the country in which an item originates and the preferred supplier for an item. Locating these sources allows you to distinguish items based on a country or supplier. You specify this information when you enter branch/plant information for an item.
On Item Branch/Plant Information
Complete the following fields:
-
Country of Origin
-
Supplier
| Field | Explanation |
|---|---|
| Country of Origin | A code (system 00/type CN) that identifies the country in which the item originates. This is useful for organizations that must periodically separate their inventory by source. |
| Supplier | The address book number of the preferred provider of this item.
You can enter the number for the supplier or you can have the system enter it each time that you receive the item from a supplier. You specify whether the system enters the supplier using processing options for Enter Receipts. |
4.6 Entering Item Reorder Quantities
From Inventory Management (G41), choose Inventory Master/Transactions
From Inventory Master/Transactions (G4111), choose Item Branch/Plant Information
You can specify the minimum, maximum, and normal reorder quantities for an item during your entry of branch/plant information. You can also specify the level of stock at which reordering takes place. The system uses these values for the Enterprise Requirements Planning and Execution system.
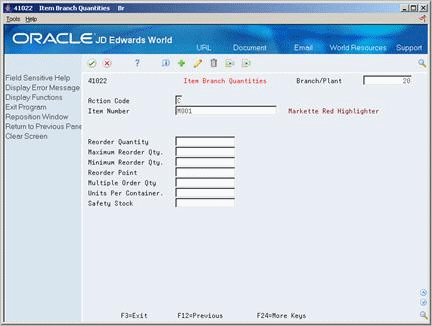
To enter item reorder quantities
On Item Branch/Plant Information
-
Access Quantities.
-
On Item Branch Quantities, complete the following fields:
-
Reorder Quantity
-
Maximum Reorder Qty
-
Minimum Reorder Qty
-
Reorder Point
-
Multiple Order Qty
-
Units Per Container
-
Safety Stock
-
| Field | Explanation |
|---|---|
| Reorder Quantity | The estimated reorder quantity for an item. You can enter this quantity if there is not enough sales history available for the system to accurately calculate a reorder quantity. |
| Maximum Reorder Qty | The maximum order quantity for an item. You can base the quantity on factors other than usage, such as perishability, storage capacity, and so forth. |
| Minimum Reorder Qty | The minimum order quantity for an item. You can base the quantity on factors other than usage, such as perishability, storage capacity, and so forth. |
| Reorder Point | A quantity for an item that specifies when replenishment occurs. Typically, this occurs when the total quantity on-hand plus the quantity on order equal or do not meet a specified quantity. You can enter this quantity or the system can calculate it if there is sufficient sales history.
If there is no safety stock quantity defined, the system first calculates the safety stock by multiplying the square root of the average leadtime quantity. Then, the system adds the calculated safety stock quantity to the average leadtime quantity to determine the reorder point. Form-specific information Define the quantity that specifies when replenishment occurs. If you leave this field blank, the system calculates the replenishment quantity by adding the safety stock quantity (defined in the Item Location table (F41021)) to the average leadtime quantity. |
| Multiple Order Qty | A multiple for rounding up planned order quantities in MPS/MRP. The system rounds up the planned order quantity to the nearest multiple that you enter in this field. |
| Units Per Container | The standard quantity of containers that you use in the manufacturing process (typically, in a repetitive manufacturing environment). The quantity that you enter determines the number of bar code labels that you will need for shipping. It also modifies order release quantities. |
| Safety Stock | The quantity of stock kept on hand to cover high-side variations in demand. |
4.7 Entering Item Branch/Plant Manufacturing Information
From Inventory Management (G41), choose Inventory Master/Transactions
From Inventory Master/Transactions (G4111), choose Item Branch/Plant Information
You can define manufacturing information for an item that is specific to each branch/plant. This information includes:
| Information | Description |
|---|---|
| Requirements planning information | You enter information about inventory shrinkage for the item to plan for the quantity you need to replace due to shrinkage. |
| Lead time information | You enter lead time information to calculate the time frames that are necessary to assemble or manufacture an item. |
| Engineering information | You enter reference information about the drawing plans for an item, so that you can refer back to the plans. |
Complete the following tasks:
-
Enter requirements planning information
-
Enter leadtime information
-
Enter engineering information
4.7.1 What You Should Know About
To enter requirements planning information
On Item Branch/Plant Information
-
Access Manufacturing Values (F10).
Figure 4-7 Plant Manufacturing Data screen

Description of "Figure 4-7 Plant Manufacturing Data screen"
-
On Plant Manufacturing Data, complete the following fields:
-
Shrink Factor
-
Shrink Factor Method
-
On Item Branch/Plant Information
-
Access Manufacturing Values (F10).
-
On Plant Manufacturing Data, complete the following fields:
-
Time Basis
-
Queue Hours
-
Standard Setup Hours
-
To enter engineering information
On Item Branch/Plant Information
-
Access Manufacturing Values (F10).
-
On Plant Manufacturing Data, complete the following fields:
-
ECO Reason
-
ECO Number
-
ECO Date
-
Item Revision Level
-
| Field | Explanation |
|---|---|
| Order Policy Code | The purpose of this field is to designate the rules for reordering inventory in the MPS/DRP/MRP system. See detailed table below. |
| Shrink Factor | A fixed quantity or percentage that the system uses to determine inventory shrinkage for an item. The system increases the planned order quantity by this amount in MPS/MRP/DRP generation. The shrink factor method you specify for the item determines whether the shrink factor is a percentage or a fixed quantity.
If you are entering a percentage, enter 5% as 5.00 and 50% as 50.00. |
| Shrink Factor Method | A value that determines whether the shrink factor you enter for this item is a percentage or a fixed quantity. Valid values are:
% – Percentage of order or requested quantity F – Fixed amount to be added to quantity |
| Time Basis | A user defined code (system 30, type TB) that identifies the time basis or rate for machine or labor hours entered for any routing step. You can set rates per unit, per 10, per 1000, and so on.
The system uses the values in the Description-2 field on the User Defined Codes screen for costing and scheduling calculations. The description is what the code represents, but is not used in calculations. |
| Total Queue/Move Hours | The total time (in hours) that an order is expected to be in queue at work centers and moving between work centers.
The system stores this value in the Item Branch table (F4102). You can calculate this value using the Leadtime Rollup program or you can enter it manually. When you run the Leadtime Rollup program, the system overrides manual entries with calculated values. |
| Setup Labor | The standard setup hours you expect to incur in the normal completion of this item. |
| ECO Reason | A code (table 40/CR) that identifies the reason for the engineering change order. |
| ECO Number | The number assigned to an engineering change order. |
| ECO Date | The date of the engineering change order. |
| Item Revision Level | The revision level for an item. If you enter a revision level, verify that the revision level of the routing for an item matches the revision level on the bill of material for the item. |
| Code | Description |
|---|---|
| 0 | Reorder point - If an item has an order policy code of zero then the MRP/MPS/DRP system will not plan this item. Component demand will only show up in the MRP system if there are active work orders (WOs) for the parent item that have parts lists attached. |
| 1 | Lot-for-lot or as required - If an item has an order policy code of one, then the system will create messages for either WOs or POs (purchase orders), for the exact amount needed - no more, no less. However, if you use this order policy code in conjunction with the Item Branch Quantities (P41022), the user can specify quantities like minimum and maximum reorder quantities, multiple order quantities, etc. |
| 2 | Fixed order quantity (FOQ) - If an item has an order policy code of two, the system will create messages for either WOs or POs based on the value entered in the Value Order Policy (OPV) in the Plant Manufacturing Data (P41027). This value (OPV) is in the primary unit of measure, and becomes the FOQ. If demand exceeds the FOQ, then the system will create another PLO for the FOQ.
Example: demand for period 1 is 25, FOQ = 10, then three different PLOs for a quantity of 10 each will be created. |
| 3 | Economic Order Quantity (EOQ) - If an item has an order policy code of three, then the system will create messages for POs (EOQ is valid for purchased items only) based on the following formula:
EOQ = Division of [2(POCS)/(INCS)] * [(SQ01+SQ02+…SQ12)/(CSTA)]
If demand for any given period is greater than the EOQ then the system will only generate PLO's in multiples of the EOQ. Example: demand in period 1 is 100, EOQ = 75, then the system creates two different PLOs for a quantity of 75 each. |
| 4 | Periods of supply - If an item has a planning code of four then the system will generate messages for either WOs or POs based on the value entered in the Value Order Policy (field OPV). The number of days in the Value Order Policy is based on the Shop Floor Calendar (P00071) for manufactured items and calendar days for purchased items, and is the number of additional days after an unsatisfied demand is encountered that PLO's will plan for.
Example: demand on October 15th of 150 and demand on October 22 of 150. Value Order Policy of 5 days, MRP will plan one PLO for October 15th of 300. JD Edwards World designed this order policy code to be used with high-use/low cost items for which the user is not concerned about carrying excess inventory. The system does not create decrease messages for an item with this order policy code. |
| 5 | This is a rate-scheduled item. If an item has a planning code of 5, then the system will generate messages based on existing rates and rate generation rules. This order policy code is for parent rate-scheduled items only - components of rate items should not use this policy code. Order policy code 5 is also used in conjunction with the Value Order Policy field. The value entered in the Value Order Policy code with rate scheduled items behaves much like a safety stock. If the ending available is below or above this number, then the MRP system will create "increase rate to" or "decrease rate to" messages for the rate scheduled item. |
4.8 Duplicating Item Information for Multiple Branch/Plants
From Inventory Management (G41), enter 27
From Inventory Advanced and Technical Operations (G4131), choose Item/Branch Duplication
You might have items for which the same information applies across multiple branch/plants. You can enter item information for one branch/plant and then duplicate that information for up to ten other branch/plants by doing the following:
-
Use Item Branch Duplication to select individual items for duplication
-
Use the Item Branch Duplication batch program to define criteria for items that you want to duplicate
For both procedures, you use processing options to specify the branches for which you are duplicating information. You can also specify additional information to duplicate, such as costs, prices, units of measure, and so on.
If you use Item Branch Duplication to select individual items for duplication, you can set processing options to display up to four search fields that allow you to locate items for a particular branch/plant.
To duplicate item information for multiple branch/plants
Figure 4-8 Item/Branch Duplication screen
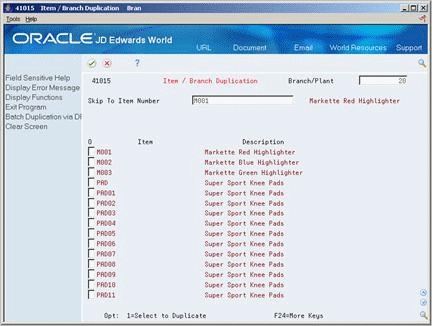
Description of "Figure 4-8 Item/Branch Duplication screen"
-
To specify the branch/plant from which you are duplicating information, complete the following field:
-
Branch Plant
-
-
To locate the appropriate items, enter search criteria.
-
Select the appropriate items to duplicate.
-
To activate the batch job, exit the screen.