3 Enter Employee Information
This chapter contains these topics:
Before you can enter timecard information for an employee, you must create a master record for each employee you want to include in your payroll. The system uses the master and timecard information to produce employee payments.
(Release A9.3 Update) As an alternative to entering data manually, you can use the Basic Employee ---- Initial Entry Z File program (P060101Z) to import an extensive amount of data into your system. See Import Mass Data into Payroll in the JD Edwards World U.S. Payroll II Guide for more information.
3.1 Entering Employee Master Information
From Payroll Master (G07), choose Employee Information From Employee Information (G0711), choose Employee Entry
Employee master information consists of three categories:
-
Employee identification
-
Job-related information
-
Pay rate information
You can set the Employee Entry processing options and the payroll company constants to display additional forms when you enter employee information.
Complete the following tasks:
-
Enter employee master information
-
Enter employee information in the Address Book
-
Enter history and turnover information
-
Enter tax withholding and override information
-
Enter tax information
Some examples of employee identification include name and social security number. By entering location identification, you can classify employees by common company factors, such as home business unit and home company.
System constants enable you to track history and turnover information when you enter a record for a new employee or change existing employee information. The system updates the Employee History table (F08042) with any changes to the data items you choose to track. When you enter change reasons for turnover, the system updates the Employee Turnover table (F08045). For example, you can enter a code to denote that an employee has been promoted.
Job-related information identifies characteristics about an employee's work assignment. You can assign employees to a tax area, union, or benefit group. For example, you can assign the same union code to all employees who belong to the same union.
The system uses pay rate information to determine when and how much to pay an employee. Some examples of payroll-specific information include salary and pay frequency.
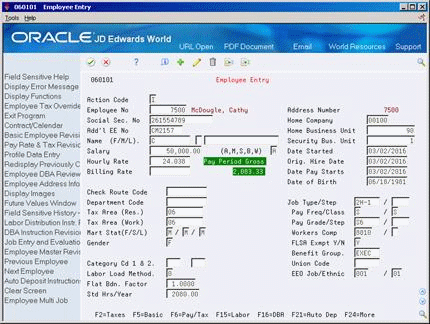
To enter employee master information
-
To assign a specific employee number, complete the following field:
-
Employee number
-
-
To enter employee identification, complete the following fields:
-
Social Security Number
-
Home Company
-
Home Business Unit
-
Name
-
Security Business Unit
-
Date Started
-
Original Hire Date
-
Date Pay Starts
-
Date of Birth
-
Tax Area (Residence)
-
Tax Area (Work)
-
Marital Status
-
Gender
-
EEO Category
-
Ethnic Category
-
-
To include additional identification, complete the following optional fields:
-
Additional Employee Number
-
Check Route Code
-
Category Code 1
-
Category Code 2
-
-
To identify job-related information, complete the following fields:
-
Pay Frequency
-
Pay Class
-
FLSA Exempt Y/N
-
FLSA Exempt
-
Exempt
-
-
To include additional job-related information, complete the following optional fields:
-
Standard Hours per Year
-
Job Type
-
Job Step
-
Pay Grade
-
Pay Step
-
Workers Compensation
-
Benefit Group
-
Labor Load Method
-
Union Code
-
Flat Burden Factor
-
-
To enter pay rate information, complete one of the following fields:
-
Salary
-
Hourly Rate
-
Billing Rate
-
-
To enter tax credit information, complete the following fields:
After you enter master information for an employee, you can enter information in the Address Book.
| Field | Explanation |
|---|---|
| Home Company | The company to which the employee is assigned. This code is used to store historical payroll information and to determine accounts for some journal entries.
Form-specific information If you leave this field blank, the system enters the home company code associated with the home business unit. |
| Home Business Unit | The number of the business unit in which the employee generally resides. |
| Security Bus. Unit | An alphanumeric field that identifies a separate entity within a business for which you want to track costs. For example, a business unit might be a warehouse location, job, project, work center, or branch/plant.
You can assign a business unit to a voucher, invoice, fixed asset, and so on, for purposes of responsibility reporting. For example, the system provides reports of open accounts payable and accounts receivable by business units to track equipment by responsible department. Security for this field can prevent you from locating business units for which you have no authority. Note: The system uses this value for Journal Entries if you do not enter a value in the AAI table. Form-specific information A business unit number that secures the employee's record from unauthorized access. Any user not authorized to access this business unit cannot access this employee's record. |
| Date Started | The date on which the employee actually reported to work for the most recent period of hire. When an employee initially begins working, the default is the original hire date. If no original hire date exists, the system uses the current date. This field can be updated multiple times if, for example, an employee is a seasonal worker.
For the calculation tables in Payroll and the eligibility tables and date codes in Human Resources, the system also uses this date as a start date when it calculates deductions, benefits, and accruals. |
| Orig. Hire Date | The date on which the employee was originally hired by the company. If the employee was terminated and subsequently rehired, the new start date will be represented by data field Date Started (DST). |
| Date Pay Starts | The date that an employee may begin participating in the company's benefit plans or may be included in payroll processing.
You can also use this field to provide a beginning date for seasonal employees or for employees who work only part of the year (such as a teacher who works only nine months of the year). |
| Tax Area (Res.) | A code that identifies a geographical location and the tax authorities for the employee's residence. Authorities include both employee and employer statutory requirements. In Vertex payroll number tax terminology, this code is synonymous with GeoCode. Refer to Vertex System's Master GeoCode List for valid codes for your locations.
Form-specific information You can use either the two-digit state code or the nine-digit locality code. It is recommended that you use the two-digit state code if no state or city code is required. |
| Tax Area (Work) | A code that identifies a geographical location and the tax authorities for the employee's work site. Authorities include both employee and employer statutory requirements. In Vertex payroll tax terminology, this code is synonymous with GeoCode. Refer to Vertex System's Master GeoCode List for valid codes for your locations.
Form-specific information You can use either the two-digit state code or the nine-digit locality code. It is recommended that you use the two-digit code if no state or city code is required. |
| EEO Job/Ethnic | A user defined code (07/J) that specifies classifications established by the U.S. Equal Employment Opportunity Commission (EEOC), or the Canadian Employment Equity Occupational Group (EEOG) for use in reporting levels of minority employment. Do not change any of the codes provided by JD Edwards World and Company. You can add codes if needed. |
| Ethnic Code | A user defined code (07/M) that designates minority classifications according to U.S. Equal Employment Opportunity Commission (EEOC) and Canadian Employment Equity standards. The predefined codes provided by JD Edwards World are hard coded and are used by the system to generate EEO reports. Do not change these values. You can add codes if needed. |
| Add'l EE No | An alternate employee number, typically the number from the employee tracking system that your organization used prior to converting to the JD Edwards World system.
When you search using this number, preface the number with a slash (/). |
| Check Route Code | A user defined code (07/CR) that specifies the check routing or mail stop code. Use this code to sequence the printing of payroll checks to facilitate their handling and delivery. |
| Category Cd 1 & 2 | Use this category code to fit the needs of your organization. For example, you can set up a category code for any of the following categories:
Category Code 1 is used for time entry. You can use this category code for reporting purposes on timecard and human resources job information. The JD Edwards World Payroll, Human Resources, and Time Accounting systems use this category code. If your company uses more than one of these systems, coordinate the use of this category code. |
| Pay Freq/Class | A user defined code (07/PF) that indicates how often an employee is paid. Codes are:
B – Bi-weekly W – Weekly S – Semi-monthly M – Monthly A – Annually C – European Annualized The system uses the value in the Description-2 field on user defined codes to calculate the amount per pay period for a salaried employee. |
| Pay Class (H/S/P) | A code that indicates how an employee is paid. Valid codes are:
" " – Blank H – Hourly S – Salaried P – Piecework |
| FLSA Exmpt Y/N | A code that indicates whether the employee fits the rules of the Fair Labor Standards Act and thus does not have to be paid for working overtime. Valid codes are:
Y – Yes, the employee fits the rules and does not have to be paid for working overtime. N – No, the employee does not fit the rules and is to be paid for working overtime. |
| Exempt Y/N | A code that indicates whether the employee fits the rules of the Fair Labor Standards Act and thus does not have to be paid for working overtime. Valid codes are:
Y – Yes, the employee fits the rules and does not have to be paid for working overtime. N – No, the employee does not fit the rules and is to be paid for working overtime. |
| Std Hrs/Year | The number of work hours in the year. When you do not set your payroll company constants to use the Pay Grade Step table as the pay rate source, the system uses this number to compute the hourly rate when you supply the annual salary (or to compute the annual salary when you supply the hourly rate).
When you set your constants to use the Pay Grade Step table as the pay rate source, the system uses the following sequence to search for the standard number of hours that it uses to calculate the salary or hourly rate per pay period:
|
| Job Type/Step | A user defined code (07/G) that defines the jobs within your organization. You can associate pay and benefit information with a job type and apply that information to the employees who are linked to that job type. |
| Job Step | A user defined code (07/GS) that designates a specific level within a particular job type. The system uses this code in conjunction with job type to determine pay rates by job in the Pay Rates Table. |
| Pay Grade/Step | A code that designates a category for grouping employees according to pay ranges. For each pay grade, you enter a pay range that includes a minimum, a midpoint, and a maximum pay rate. The system uses these pay ranges to calculate compa-ratios for the employees that you assign to pay grades. After you enter a pay grade for an employee, the system displays an error or warning message if you enter a rate for the employee that is not within the pay range for the employee's pay grade.
To set up pay grades, use Pay Grades by Class (P082001). Form-specific information In the Payroll system, this field is for information only. The Human Resources system performs all calculations on pay grade and step. |
| Pay Grade Step | A code that identifies a pay grade and pay step. You can use this code to determine an employee's pay rate.
If you have set your constants to use rates in the Pay Grade Step table as the default pay rates for employees, changing an employee's pay grade step causes the system to automatically update the following fields:
|
| Workers Comp | A user defined code (00/W) that represents a workers compensation insurance (WCI) code. This code should correspond to the classifications on your periodic workers compensation insurance reports. |
| Benefit Group | The benefit group to which the employee is assigned. Benefit groups facilitate employee enrollment by categorizing benefit plans and allowing enrollment rules for those categories. For example, assigning an employee to an executive (EXEC) benefit group automatically links the employee to the benefits available to executives in your organization. This feature is only applicable if your benefit plans are linked to benefit categories which, in turn, are linked to benefit groups.
Form-specific information Note: If you are not using the JD Edwards World Human Resources system, this field is for information only. |
| Labor Load Method | A code indicating that flat burden is to be calculated. Valid codes are:
0 – Flat burden percentage will always be 1.000 and, therefore, the flat burden amount will equal zero. Basically, this means that there is no distribution. 1 – Flat burden percentage will always be greater than 1.000. Choose this option when distributing the percentage. There are various places within the Payroll system where flat burden rules and percentages can be defined, such as: Business Unit Pay Rates table Employee level |
| Union Code | A user defined code (07/UN) that represents the union or plan in which the employee or group of employees work or participate. |
| Flat Bdn. Factor | A multiplier to load direct labor costs with burden. For example, a factor of 1.32 loads every dollar of labor cost with 32 cents worth of burden. |
| Salary | The amount that an employee is paid in one year, provided that the employee is paid every pay period of the year. For the employee's primary job, the system stores the annual salary in both the Employee Master table (F060116) and the Employee Multiple Job table (F060118). For secondary jobs, the system stores the annual salary in the Employee Multiple Job table (F060118).
Depending on how the Display Salary (Annual/Effective) field is set in the History Constants table (F08040), this field displays one of the following:
For employees whose jobs are associated with a contract calendar, the system recalculates the effective salary if you enter a mid-calendar salary adjustment for the employee. After you enter a mid-calendar adjustment, the effective salary equals the salary that is to be paid to the employee from the time of the adjustment to the end of the contract. Form-specific information When you enter a value in this field for a salaried employee, the system calculates the hourly rate based on one of the following:
|
| Hourly Rate | The employee's hourly rate, which is retrieved during time entry. If you enter a rate in this field on any other form, that rate can override the value in the Employee Master table.
In the Employee Master table, this is the employee's base hourly rate. In the Union Rates table, this is the straight time rate. Note: If you change the number of the data display decimal digits for this field, you must also change fields Rate - Base Hourly (BHRT) and Rate - Hourly (SHRT) so that they have exactly the same number of data display decimal digits. |
| Billing Rate | A rate used for the billing of labor services. This rate is often referred to as the billing or recharge rate. The extended amount based on this rate will be charged to the primary distribution account on the timecard with an offset being made to an account derived from the Accounting Rules table. This rate will not affect the employee's payroll. To allow billing rates in time entry, you must set the employee's record type as either 2 or 3 on the Basic Employee Entry form.
A rate entered on any of the following forms overrides the rate in the Employee Primary Job table:
|
3.1.1 What You Should Know About
3.1.2 Entering Employee Information in the Address Book
To enter employee information in the Address Book
After you enter the master information for an employee, you can enter the employee's address information.
The system updates the Search Type field with an E for employee. It also updates the Employee Y/N field with a Y on Address Book Information. If you have not assigned an employee (address) number on Employee Entry, the system assigns one using the next numbers feature.
The employee's address that displays on the employee's W-2 form comes from the last three non-blank Address lines plus the City, State, and Postal Code fields. For U.S. magnetic media, only the mailing name, the last non-blank line, and the City, State, and Postal Code fields are used.
You can enter a maximum of five lines that you can use to print such items as Employee Master Labels of W-2 forms. These are the name, as many as three address lines, and the city, state, and postal code line. There is a maximum of 30 characters per line.
On Address Window
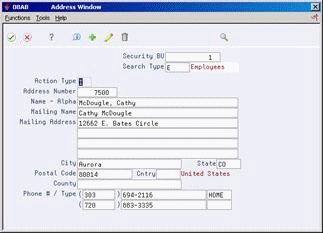
Complete the following fields:
-
Mailing Address
-
Phone Number
After you enter the employee's address, you enter history and turnover information.
3.1.3 What You Should Know About
See Also:
-
The JD Edwards EnterpriseOne US Payroll Year-End Processing Guide for information on W-2 reporting.
3.1.4 Entering History and Turnover Information
To enter history and turnover information
After you enter the employee's master and address information, you can enter history and turnover information.
System constants enable you to track history and turnover information when you enter a record for a new employee or change existing employee information. You specify the data items for which you want to track history. Then, each time you change the information in those data items, the system updates the Human Resources History table (F08042). When you enter change reasons for turnover, the system updates the Employee Turnover Analysis table (F08045). For example, you can enter a code to denote that an employee has been promoted.
On History and Turnover Information
Figure 3-3 History and Turnover Information screen
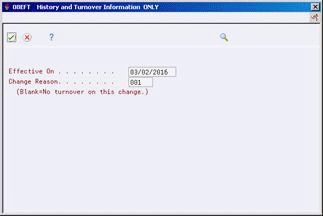
Description of ''Figure 3-3 History and Turnover Information screen''
Complete the following fields:
-
Effective On
-
Change Reason
After you enter history and turnover information, you can enter tax information.
| Field | Explanation |
|---|---|
| Date - Effective On | The date that you want all the changes to take effect, or the date that the changes went into effect. If you are entering data and you do not enter a date in this field, the system uses the current date as the effective date.
Form-specific information The effective date that you want to record all the changes to the HR History table (F08042) and the Employee Turnover Analysis table (F08045). The changes you make to the Employee Master table take effective immediately. If you are adding an employee record and you do not enter a date in this field, the system uses the Date Started as the effective date. |
| Change Reason | To record a reason for the change in the Employee Turnover Analysis table (F08045) and the HR History table (F08042), enter a value in this field. Completing this field also updates the Employee Master table (F060116) and the Employee Multiple Job table (F060118) with the new change reason. The change reason code indicates the following:
When the HR Monitor reads the information on this form, it creates a turnover record only if you enter a change reason in this field. If you do not want to create turnover records for a data change, leave this field blank. Form-specific information Whenever you make a change and you want to record the reason for the change in the HR History table (F08042), you must enter a value in this field. When you enter a new employee, a default value of 001, New Hire, appears in the field. |
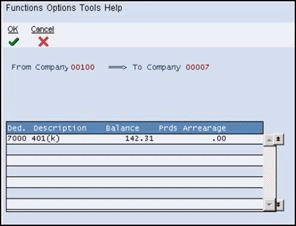
3.1.5 Transferring Employees to Another Company
When employees move from one company to another, the payroll system allows you to change their company designation while maintaining prior company information. For employees who have contributed to a 401k plan, the employee transfer program considers those balances. When an employee transfers from one company to another you can select to transfer the employee's 401k balance to the new company.
When you change the employee's home company through Employee Entry, the Balance Transfer window displays if the employee has 401 k history. This window gives transfer information such as "From" and "To" company numbers, 401k balance, and arrearage information, if any. You can continue with the 401k balance transfer or canceling to exit the window and return to the employee master record.
To transfer an employee's 401k balance to a different company
-
Enter employee number in the Employee No field
-
Complete the following fields:
-
Home Company
-
Home Business Unit
-
-
Change other information, as needed and press Enter.
The Balance Transfer window displays if the Employee has contributed to a 401k plan. The window displays information such as From Company number, To Company number, 401k deduction number, 401k balance, and arrearage information, if any.
-
Click OK to complete the 401k balance transfer, or click Cancel to return to the Employee Entry screen without transferring the balance.
3.1.6 Entering Tax Withholding and Override Information
From Payroll Master (G07), choose Employee Information From Employee Information (G0711), choose Tax Withholding/ Overrides
3.1.7 Set up a Federal Supplemental Tax Override
For Federal Supplemental Override records (*FS), the Withholding Exemption field is used to specify the method to calculate federal supplemental taxes. Depending on the type of tax calculation you want, complete the W/H Exm field on Tax Withholding Overrides with a value 1-4. The codes 1-4 are translated to Vertex as follows:
-
Flat Percentage Method (Default)
-
Concurrent Aggregation
-
Previous Aggregation
-
Cumulative Aggregation
To enter tax withholding and override information
After you enter history and turnover information, use the employee's W-4 form to enter an employee's tax withholding. The system provides the tax area and tax type for Federal income tax (tax type A) with no exemptions and no override withholding amount. If the employee's number of exemptions is any number other than zero, you must enter the number of exemptions. The system uses the number of federal exemptions to calculate all taxes, unless you enter separate records for state and local taxes.
Caution:
If you use a flat dollar override of zero for the Federal A tax, the system marks the employee's W-2 as statutory exempt. To prevent the calculation of federal income taxes without indicating that the employee is exempt from the tax, change the employee's exemption to 99.On Tax Withholding/Overrides
Figure 3-5 Tax Withholding/Overrides screen
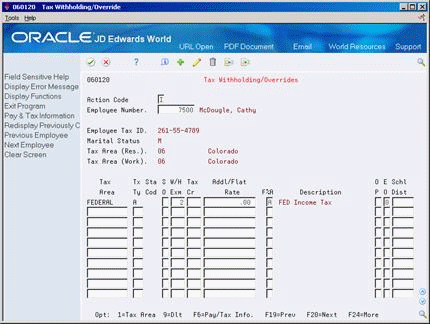
Description of ''Figure 3-5 Tax Withholding/Overrides screen''
-
-
Withholding Exemptions
-
-
For state or local taxes, complete the following optional field:
-
Tax Credit
-
-
Enter any additional withholding for federal and state income taxes as needed.
| Field | Explanation |
|---|---|
| W/H Exm | The number of payroll tax withholding exemptions claimed on the employee's W4. If this field is left blank on Federal exemptions, zero exemptions will be used. The number of Federal exemptions will also be used for State and Local tax calculations unless separate entries are created for State and Local tax areas.
SPECIAL CONDITIONS: For the state of Arizona, this field is used to specify the level of tax: (Percentages of Federal Income Tax) For the state of Connecticut, leave this field blank. For the state of Louisiana, enter the number of credits. For more information about requirements for the states of Arizona, Connecticut, and Louisiana, see the documentation for the Payroll Tax Calculation System. For Federal Supplemental Override records (*FS) this field is used to specify the method to calculate federal supplemental taxes: 1) – Flat Percentage Method (Default) 2) – Concurrent Aggregation 3) – Previous Aggregation 4) – Cumulative Aggregation |
| Tax Cr | U.S.A. Payroll:
For the state of New Jersey, this field is used to specify which withholding table to use: 0 – table B 1 – table A 2 – table C 3 – table D 4 – table E For the state of Mississippi, this field represents the number of dependents claimed on form 62-420. You must enter 25 in the Tax Area field and F in the Tax Type field for this deduction to work. Note: If secondary credits are used in any other state, you may put a value here in combination with the state code and F tax type. |
3.1.8 What You Should Know About
3.2 Attaching a Contract Calendar
From Payroll Master (G07), choose Employee Information From Employee Information (G0711), choose Employee Entry
For an employee whose work days are specified by contract, such as a public school teacher, you can use the contract calendar feature to track the specific days that the employee works during the course of the contract. You can set up a calendar so that some days count as more than one full day. For example, days on which teachers have parent-teacher conferences might count as 1.5 days.
You can set up separate contract calendars for each of your employees, or you can attach the same contract calendar to multiple employees. Employees who have multiple jobs can have a different contract calendar for each job.
You can also specify how an employee receives payments for each job. For example, for an employee who works only part of a year but wants to receive a payment each pay period throughout the entire year, you can set up the system to withhold part of the employee's salary each pay period and deposit it in an accumulated wages account. The system uses the money in the accumulated wages account to pay the employee during the pay periods when the employee is not working.
You can also account for an employee who begins working after the beginning date of the contract, or for an employee who receives a salary increase in the middle of a contract.
3.2.1 Before You Begin
-
Ensure that the contract/calendar selection has been activated on Constants Information. See Setting Up Position Control Information in the JD Edwards World Human Resources Guide.
-
Set up a contract calendar. See Setting Up a Contract Calendar in the JD Edwards World Human Resources Guide.
On Employee Entry
On HR Employee Entry or Employee Entry
-
Complete the steps to enter employee master information.
Figure 3-6 Contract/Calendar Window screen
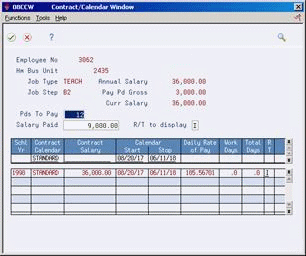
Description of ''Figure 3-6 Contract/Calendar Window screen''
-
On Contract Calendar, complete the following fields and press Enter:
-
Periods to Pay
-
Contract Calendar
-
Contract Salary
-
Calendar Start
-
Stop
-
-
Review the information in the following fields:
-
Daily Rate of Pay
-
Pay Period Gross
-
-
Choose the Update function
| Field | Explanation |
|---|---|
| Pds To Pay | The number of periods in the year during which the employee will be paid the salary amount. The system uses this number to calculate the annual salary and pay period gross amount for a job that lasts for only part of a year.
Form-specific information When you change contract calendar information for an employee, enter the number of pay periods remaining in the contract calendar for which the employee will be paid. |
| Contract Calendar | A code that identifies a yearly contract that specifies the number of days that employees work. After you create a contract calendar, you can attach it to employee and position records. |
| Contract Salary | The annual salary an employee earns for a job attached to a Contract/Calendar. |
| Calendar Start | The date that an employee may begin participating in the company's benefit plans or may be included in payroll processing.
You can also use this field to provide a beginning date for seasonal employees or for employees who work only part of the year (such as a teacher who works only nine months of the year). Form-specific information When you assign an employee a contract calendar enter one of the following;
|
| Stop | The date that an employee's pay stops. This date is used to provide for employees who are seasonal or for employees who work only part of the year (such as a teacher who works only nine months of the year). See also data item PSDT.
It may also be the date that a deduction, benefit, or instruction stops. Form-specific information When you assign an employee a contract calendar enter one of the following;
|
| Daily Rate Of Pay | The daily rate of pay earned by an employee attached to a Contract/Calendar.
The system calculates the daily rate of pay as follows: Contract Salary / Number of work days in the contract calendar that fall between the start and stop dates |
| Pay Pd Gross | The actual gross pay amount for an employee. This is to be distinguished from the distributed gross pay amount used for labor distribution. See data item DPAY.
When using Work Order Time Entry, this field is used to record miscellaneous pay for an employee, (i.e. piece rate bonus). Form-specific information To calculate the pay period gross amount, the system divides the annual salary by the pay frequency. For example, assume that:
The system calculates the following: (3000 divided by 3) x 12 = 12000 = annualized salary 12000 divided by 12 = 1000 = pay period gross salary For employees whose records are attached to contract calendars, payments are not based on the pay period gross amount. |