24 Work with Payments
This chapter contains these topics:
-
Section 24.4, "Reviewing the Automatic Deposits Bank Register,"
-
Section 24.6, "Reviewing the Positive Pay Work File Report."
Payments are the forms employees receive when they get paid.
You can set up employees to receive any of the following types of payments:
Employees who are set up to receive different types of payments can be included in the same payroll ID. For example, a payroll ID might include some employees who are paid by check and some who are paid by automatic deposit.
After you process pre-payroll, you can print payments for employees.
The following graphic illustrates the location of the payments step in the cycle of payroll processing.
Figure 24-1 Payments in the Payroll Cycle
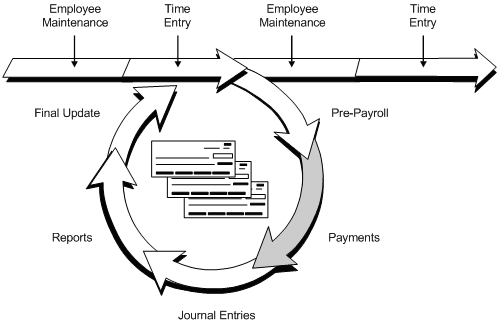
Description of ''Figure 24-1 Payments in the Payroll Cycle''
See Also:
24.1 Printing Payments
A payroll ID can include employees who are set up to receive any of the following types of payments:
-
Paychecks
-
Automatic deposit advice slips
-
Pay slips
Typical tasks you perform when you print payments include:
-
Printing checks only
-
Printing checks and automatic deposits
-
Correcting printer errors
Employees who are set up to receive different types of payments can be included in the same payroll ID. For example, a payroll ID might include some employees who are paid by check and some who are paid by autodeposit.
You use the Print Paychecks program to print all types of payments. When a payroll ID includes employees who are set up for different types of payments, the Print Paychecks program prompts you to print each type of payment.
When your payroll ID includes autodeposit employees, you must also instruct the system to generate an autodeposit external workfile, which contains the information that the bank needs to transfer funds to the employees' bank accounts. You can generate the autodeposit workfile when you print payments, or you can generate the workfile separately.
While printing payments, if the payroll ID has paycheck transparency details in F063502, then the Print Paychecks program will also print the paycheck transparency weekly detail stub lines at the bottom of the paystub.
After you print a type of payment, and before you either continue to the next type of payment or exit the Print Paychecks program, you should inspect the payments to verify that they printed correctly. If printer problems, such as a paper jam, prevented one or more payments from printing correctly, you can reprint them.
24.1.1 Before You Begin
-
Verify that your system timeout value is set high enough to allow enough time for all payments to print before the terminal times out
24.1.2 What You Should Know About
24.1.3 Printing Checks Only
From Payroll Master (G07), choose Pay Cycle Processing
From Pay Cycle Processing (G0713), choose Print Paychecks
You use the Print Paychecks program to print all types of payments. When all of the employees included in a payroll ID are paid by check, the Print Paychecks program prompts you to print checks only.
On the first Print Paychecks form
-
Complete the following field:
-
Payroll ID
-
-
Choose the Submit Job function.
Figure 24-2 Print Checks Parameters screen

Description of ''Figure 24-2 Print Checks Parameters screen''
-
On the first Print Checks Parameters form, complete the following field:
-
Beginning Check Number
-
-
Choose the Submit Job function.
Figure 24-3 Print Checks Parameters (Beginning Check Number) screen

Description of ''Figure 24-3 Print Checks Parameters (Beginning Check Number) screen''
-
On the second Print Checks Parameters form, initiate an additional session to access the message queue.
-
Load the forms and verify that they are aligned properly.
-
Respond to the messages in the operator message queue.
-
Review the checks to verify that they printed correctly.
-
On the second Print Checks Parameters form, complete the following field:
-
Have All Checks Been Printed
To correct printer errors, enter N.
-
| Field | Explanation |
|---|---|
| Beginning Check Number | Enter the beginning payment number for the payment run. If the system restarts, a new payment number is assigned from the first run. |
| Have ALL Checks been Printed (Y/N)? | You must respond to the system operator's message queue before responding to this question. Enter Y if all checks have printed correctly. Enter N if one or more checks did not print correctly because the printer was misaligned, has jammed, or has damaged a check. If you enter N, the system allows you to reprint the checks. You can reprint a single check, a range of checks, or all checks. You must manually track any unusable checks, because the system does not write them to history. |
24.1.4 Printing Checks and Automatic Deposits
From Payroll Master (G07), choose Pay Cycle Processing
From Pay Cycle Processing (G0713), choose Print Paychecks
You use the Print Paychecks program to print all types of payments. When a payroll ID includes some employees who are set up to receive checks, and others who are set up for automatic deposit, the Print Paychecks program prompts you to print each of these types of payments separately. The program creates separate spool files for checks, automatic deposit advice forms, pay slips, and attachments.
When your payroll ID includes automatic deposit employees, you must also instruct the system to generate an automatic deposit external workfile, which contains the information that the bank needs to transfer funds to the employees' bank accounts. You use Print Paychecks to generate this file.
You can generate the automatic deposit workfile when you print payments, or you can generate the workfile separately. You must generate the workfile before you process final update for this payroll cycle.
The automatic deposit workfile build remains on hold until you release it from the job queue. After you generate the automatic deposit workfile, you (or someone in your MIS department) must copy the workfile to tape and send it to the bank.
The following steps describe how to create the automatic deposit workfile, as well as how to print checks and automatic deposits.
To print checks and automatic deposits
On the first Print Paychecks form
-
Complete the following field:
-
Payroll ID
-
-
Choose the Submit Job function.
Figure 24-5 Print Paychecks (Payroll ID) screen
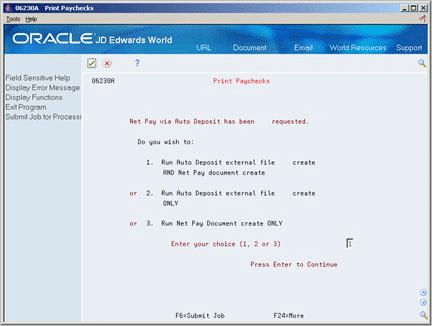
Description of ''Figure 24-5 Print Paychecks (Payroll ID) screen''
-
On the second Print Paychecks form, choose Run Auto Deposit external file create AND Net Pay Document create.
-
On the Version Selection form, choose the Run option.
Figure 24-7 Processing Options Revisions screen
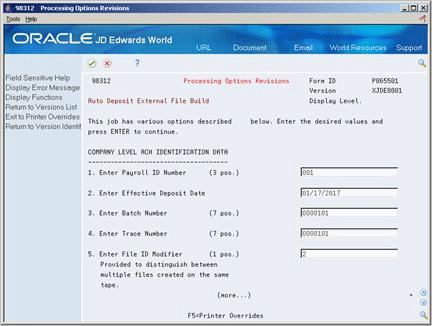
Description of ''Figure 24-7 Processing Options Revisions screen''
-
Update the processing options.
-
Press Enter to submit the version.
-
Exit from Version Selection.
Figure 24-8 Print Checks Parameters (Detail) screen

Description of ''Figure 24-8 Print Checks Parameters (Detail) screen''
-
On the Print Checks Parameters screen, enter the Beginning Check Number and a Check Message, if applicable, and choose the Submit Job function.
Figure 24-9 Print Checks Parameters (Check Message) screen
Description of ''Figure 24-9 Print Checks Parameters (Check Message) screen''
-
On the first Print Checks Parameters form, complete the fields for printing checks.
Caution:
After you complete the steps to print checks, the system displays the Check Print Parameters form again with information for automatic deposits displayed. Do not exit from the program until you print the automatic deposit forms. -
Complete the steps for printing automatic deposits. These steps are the same as those for printing checks.
-
From the Payroll Cycle Processing Menu, use hidden selection 33 to release the automatic deposit external workfile build program (J065501) from your job queue.
24.1.4.1 What You Should Know About
24.1.5 Correcting Printer Errors
From Payroll Master (G07), choose Pay Cycle Processing
From Pay Cycle Processing (G0713), choose Print Paychecks
After you print a type of payment, and before you either continue to the next type of payment or complete the Print Paychecks program, you should inspect the payments to verify that they printed correctly. If printer problems, such as a paper jam, prevented one or more payments from printing correctly, you can reprint them.
If you have completed the Print Paychecks program and need to reprint payments, you must reset the paycheck workfile before you can reprint the payments.
On the second Print Checks Parameters form
-
Complete the following fields:
-
Void Check Numbers Beginning With
-
Ending With
-
-
Choose the Submit Job function.
-
Complete the steps for printing payments.
| Field | Explanation |
|---|---|
| Void Check Numbers Beginning With | A range of check numbers may be entered to void when restarting the check run. The value entered in this field must be less than the beginning check number and represents the beginning of the range of check numbers to be voided. |
| Ending With | A range of payment numbers may be entered to void when restarting the payment run. If this field is left blank, all payments processed after the beginning payment number will be voided. This represents the end of the range of payment numbers to be voided. |
24.2 Positive Pay Processing
From Payroll Master (G07), choose Pay Cycle Processing
From Pay Cycle Processing (G0713), choose Positive Pay Processing Menu
The positive pay process is initiated by selecting this option on the Check Print Parameters and Interim Check Print Parameters screens. The positive pay process is designed to help you minimize the risk of check-cashing fraud.
Note:
The term "work file" appears as one word or two based on menu, program, or screen headings, as well as usage in other JD Edwards World documentation.During the print payment process, you can choose to generate a positive pay workfile that contains data about every check printed by the payroll system. This workfile data is then used to create a bank transmittal file that can be sent to financial institutions. Banks use this information to verify the validity of checks before they are cashed.
Tasks you perform as part of the positive pay process include:
-
Updating the payor bank account information, if necessary.
-
Submitting the positive pay workfile build process after printing checks
-
Building the positive pay workfile
-
Generating and reviewing the positive pay workfile report
-
Building the positive pay bank transmittal workfile
-
Generating and reviewing the positive pay bank file build report
-
Copying positive pay bank file transmittal data to an external media
-
Purging the positive pay workfile
24.2.1 Before You Begin
-
Verify that the Bank Transit Number and Bank Account information on the Bank Account Information screen (P04130) from menu G03111 are correct. The positive pay workfile identifies the payor bank using the Bank Transit Number, which is located in the Bank Transit Number Master file (F0030).
24.2.2 Submitting the Positive Pay Work File Build Process After Printing Checks
When you print regular or interim payroll checks, the system displays a Yes/No (Y/N) option to submit (build) a positive pay workfile. This option displays on the Print Checks Parameters and Print Interim Checks Parameters screens. When submitted, the positive pay workfile is built in a batch job from the print checks program.
If you choose to bypass (not to submit) the positive pay workfile submission, a warning message will display stating that the checks just printed will not be captured in the Positive Pay Work File.
24.2.3 Building the Positive Pay Work File
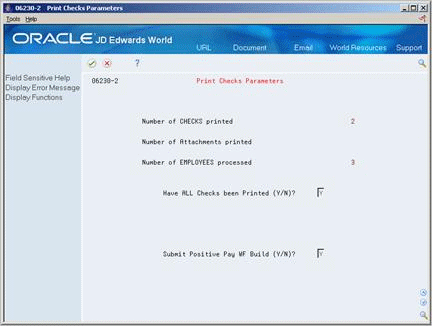
The positive pay workfile is built as a batch when you enter Yes (Y) to the Submit Positive Pay WF Build (Y/N)? option on the Check Print Parameters and Print Interim Checks Parameters screens. The workfile contains information about all regular, interim, and void paper checks that were printed.
Note:
Autodeposits are not included in the positive pay workfile.Figure 24-10 Print Checks Parameters (Positive Pay) screen
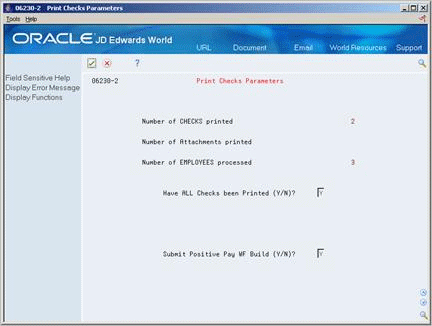
Description of ''Figure 24-10 Print Checks Parameters (Positive Pay) screen''
The positive pay workfile build program determines if a record should be written to the file using the check control number as a unique identifier.
The positive pay workfile is the source for the positive pay bank transmittal file, and it includes the check types listed below with their ICC/ICS indicators:
-
N, C - Computer check
-
Y, C - Interim computer check
-
Y, M - Interim manual check
-
Y, M - Interim manual voids
-
Y, V - Void paycheck
Note:
Computer and interim checks should only be included in the positive pay workfile if they have been printed. However, since interim manual checks, interim manual voids, and voids are not printed, they should always be included in the positive pay workfileSystem and user steps required to build the positive pay workfile include:
-
The person who prints the checks will be prompted to submit positive pay information as part of the normal check-printing parameters step during payroll processing.
-
When you respond Yes (Y) to the positive pay option, paycheck records are written to the positive pay workfile, and the Positive Pay Work File Report is generated.
-
Positive pay records are created as unprocessed with a blank value in both the Processed Code and Member ID fields.
-
Once the positive pay workfile is created, you can build the bank transmittal workfile and review the related Positive Pay Bank File Build Report.
To reset the positive pay workfile
If it becomes necessary to reset/reprint checks after the bank transmittal file has been created, it is recommended that the Positive Pay Work File be reset as well.
When you reset back to pre-payroll after checks are printed, records in the positive pay workfile will be cleared for that payroll ID. If paychecks are reset, and then rerun, the system updates the positive pay workfile automatically.
Option 5 directs the system to reset all records that were loaded to the bank transmittal file back to an unprocessed status. It will also delete the physical file member and the corresponding record in the Positive Pay Tape Attributes File table (F062362).
Then, you can submit the bank file build process again, after the check print rerun has been completed. This will ensure that any changes are captured before the bank transmittal file is sent to the financial institution.
24.2.4 Generating the Positive Pay Work File Report
Based on the results of the positive pay workfile build process, this report will be generated every time the batch process runs. There is also a standalone version of the report available on the Payroll Positive Pay Processing menu for you to run this report on demand, as needed.
You can create alternative DREAM Writer versions of the report to allow more data selection options, such as:
-
Check number
-
Check date
-
Net pay
-
Payee number
-
Member ID
-
Processed flag
-
Check type (ICC/ICS)
-
G/L bank account
-
Creation User ID
Caution:
It is not recommended to change the data sequencing, as unpredictable report formatting and totaling results may occur.To generate the positive pay work file report
On Positive Pay Work File Report
Figure 24-11 Positive Pay Work File Report screen
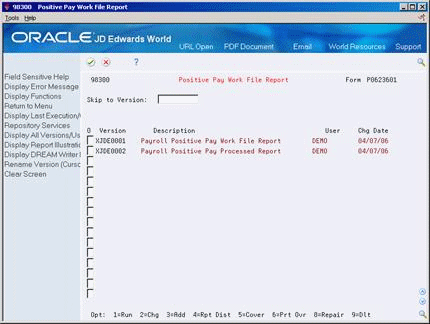
Description of ''Figure 24-11 Positive Pay Work File Report screen''
-
Enter 1 (Run) next to the appropriate version, and press Enter to display the processing options.
-
Accept or change the default processing option values, as necessary:
-
Payment Information
-
Header/Trailer Records
-
Report Option
-
Bank Tape
-
-
Press Enter to build the bank file and print the report.
24.2.5 Building the Positive Pay Bank Transmittal Work File
Once unprocessed records have been added to the positive pay workfile, you can run the Positive Pay Bank File Build program to create a bank transmittal workfile.
System and user steps to build the positive pay bank transmittal workfile include:
-
The system uses unprocessed records to create a new physical file member, which contains check data formatted for the bank.
-
You can set up a DREAM Writer version with data selection that is based on the positive pay workfile.
-
The system enters Member ID values and updates the Processed Code for all corresponding records in the positive pay workfile, so that they display as processed.
-
The system determines which records are already processed and should be excluded from the workfile.
You can review the Positive Pay Bank File Build report in summary or detail mode. This report contains processed data along with the name of the newly created file member in the report heading. Be sure to verify the processing options before running the report.
After you review bank transmittal data, you can submit it to the bank via modem, an external media, or a File Transfer Protocol (FTP) process, if an FTP standard is available at your company.
Note:
Because financial institutions use a variety of positive pay formats, the bank transmittal data generated by the JD Edwards World system is designed to fulfill the formatting requirements of most banks. If you use modem and email methods to submit positive pay data to a bank, you are responsible for the encryption.If it becomes necessary to reset/reprint checks after the bank transmittal file has been created, it is recommended that the Positive Pay Work File be reset as well.
After the check print rerun has been completed, you can submit the bank file build process again. This will ensure that any changes are captured before the bank transmittal file is sent to the financial institution.
24.3 Reviewing the Payroll Check Register
Depending on the type of payments you run and the information in your payroll, the system prints various reports. You should review these reports to verify that the information is correct. For internal audit purposes, you should save these reports at least until the end of the calendar year.
When you print payments, the system prints a register. Use this report to review payment numbers and amounts. If you reprint any payments during the print payments step, the register indicates that the original payment was voided.
Figure 24-12 Payroll Check Register report

Description of ''Figure 24-12 Payroll Check Register report''
24.4 Reviewing the Automatic Deposits Bank Register
Depending on the type of payments you run and the information in your payroll, the system prints various reports. You should review these reports to verify that the information is correct. For internal audit purposes, you should save these reports at least until the end of the calendar year.
When you generate an automatic deposit workfile, the system prints the Automatic Deposits Bank Register. Use the register as an audit trail of the deposit information you send to the bank clearing house. The register contains key information about the payroll transactions that are copied to magnetic media for direct deposit. There is no setup for this report.
Figure 24-13 Automatic Deposits Bank Register report
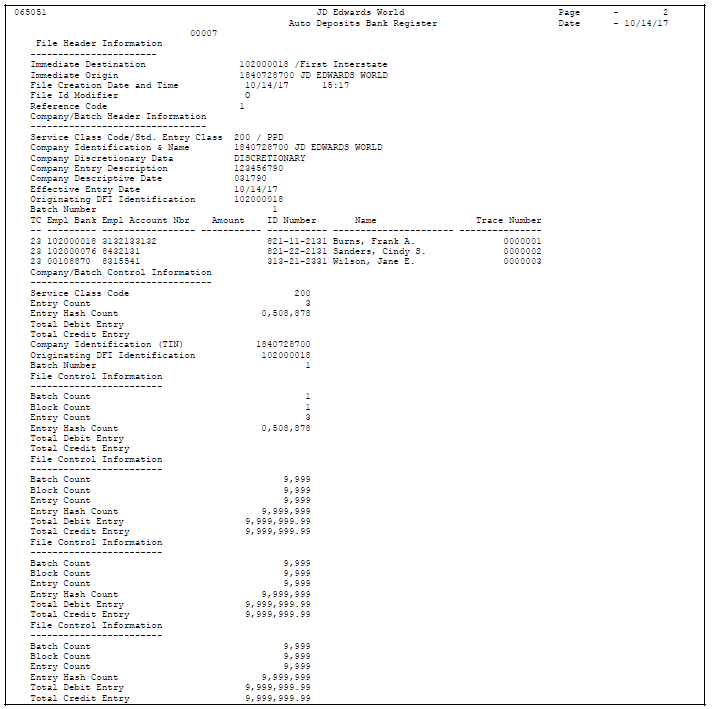
Description of ''Figure 24-13 Automatic Deposits Bank Register report''
24.5 Reviewing the Denominations Report
Depending on the type of payments you run and the information in your payroll, the system prints various reports. You should review these reports to verify that the information is correct. For internal audit purposes, you should save these reports at least until the end of the calendar year.
When the payroll ID includes employees who are paid in cash, the system prints the Denominations report. This report lists the quantity of each type of bill and coin (such as dollars and cents) that each employee received.
24.6 Reviewing the Positive Pay Work File Report
The Positive Pay Work File Report provides information about regular, interim, and void checks that have been printed for each payroll cycle. This report is generated whenever the batch process runs. A standalone report version is available on the Payroll Positive Pay Processing menu for you to run this report on demand, as needed.
You can reconcile information written to the positive pay workfile with other payroll process reports using the Positive Pay Work File Report, which is sorted by:
-
G/L bank account
-
Member ID
-
Check number
-
Subtotal and total on G/L bank account
Make sure all paycheck records are correct and should be included. You can delete records from the positive pay workfile, if necessary.
Note:
To delete specific records from the positive pay workfile, create your own version of P00PURGE, and change the data selection to permit the deletion of specific records. See Purging Processed Positive Pay Information in the JD Edwards World Accounts Payable Guide for details.Figure 24-14 Positive Pay Work File report

Description of ''Figure 24-14 Positive Pay Work File report''

