4 Process Retroactive Payroll
This chapter contains these topics:
4.1 Processing Retroactive Payroll
Processing retroactive payroll allows you to set up rate adjustments, apply the adjustments to historical timecards, and automatically create new timecards for pay adjustments that affect time periods prior to the one in which you are currently working. For example, if you accept a labor contract after its effective start date, your organization might have to retroactively pay employees in that union to cover an increase in the rates of pay.
Processing retroactive payroll consists of the following tasks:
-
Setting Up Pay Rate Revisions
-
Setting Up Retroactive Pay Type Tables
-
Creating the Retroactive Pay Workfile
-
Calculating Retroactive Pay
-
Reviewing Retroactive Pay Workfile Records Online
-
Reviewing Retroactive Pay Workfile Reports
-
Revising Retroactive Pay Workfile Records
-
Approving the Retroactive Timecard Workfile
-
Creating Retroactive Timecards
-
Correcting Rejected Timecards
4.2 Setting Up Pay Rate Revisions
You set up pay rate revisions to adjust pay that affects time periods prior to the one in which you are currently working. When you set up pay rate revisions, you can simplify the process of adjusting pay rates for a group of employees. You are not required to manually calculate the adjustments and enter timecards for each employee.
Setting up pay rate revisions includes the following tasks:
-
Setting up pay rate revisions by union
-
Setting up pay rate revisions by employee
-
Setting up pay rate revisions by pay type
Rate revisions are adjustments that signify the difference between the rate that was paid and the rate that should have been paid (the net increase or decrease in the rate).
You can set up pay rate revisions by:
-
Union - You can set up pay rate revisions by union to enter rate adjustments for all job types and steps associated with an existing union rates table. Enter rate adjustments for all affected job types and steps in the union.
-
Employee - You can set up pay rate revisions by employee for rate adjustments that apply to specific employees, or those who are not included in the union.
-
Pay type - You can set up pay rate revisions by pay type to apply the same rate revisions to all timecards having the same pay type.
You specify the sequence the system uses to retrieve rate revisions in the processing options for the rate extension program. When you enter rate revisions, you must indicate how the system will apply, or extend, the rate on the associated timecards in history.
You can use the following three rate extension methods:
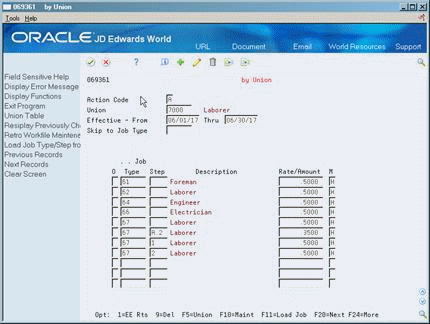
4.2.1 Setting Up Pay Rate Revisions by Union
From Payroll Master (G07), choose Retroactive Processing
From Retroactive Payroll Processing (G0725), choose by Union
Set up pay rate revisions by union to enter rate adjustments for all job types and steps associated with an existing union rates table. Enter rate adjustments for all affected job types and steps in the union. You can use hourly amounts, percentages, or flat dollar amounts. During retroactive payroll processing the system applies these rates to specified timecards in the history tables, resulting in retroactive pay.
To set up pay rate revisions by union
-
Complete the following fields:
-
Union Code
-
Effective Date From
-
Effective Date Thru
-
Job Type
-
Retroactive Amount or Rate
-
Retroactive Rate Extension Method (M)
-
-
Complete the following optional field:
-
Job Step
-
| Field | Explanation |
|---|---|
| Rate/Amount | A code to indicate what method is to be used for the Retro Rate Extension.
% – Percent of Gross Pay - Any rate using this method will be multiplied by the Gross Pay on the original timecard to create the Retro Gross Pay amount. H – Rate per Hour Worked - Any rate using this method will be multiplied by the Pay Type Multiplier and then be multiplied by the number of hours worked on the original timecard to create the Retro Gross Pay amount. A – Flat Dollar Amount - Any rate using this method will be treated as a flat dollar adjustment to the original timecard. The Retro Gross Pay amount for each timecard will be the same as the flat dollar amount specified. |
4.2.2 What You Should Know About
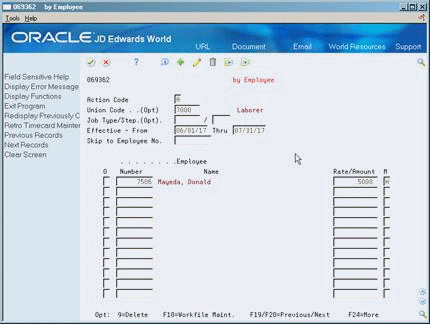
4.2.3 Setting Up Pay Rate Revisions by Employee
From Payroll Master (G07), choose Retroactive Processing
From Retroactive Payroll Processing (G0725), choose by Employee
Set up pay rate revisions by employee for rate adjustments that apply to specific employees, or those who are not included in the union. You can also include other employees who are not covered by the union or pay type tables in the retroactive calculations.
In addition, you can set a processing option on the rate extension program to create a rate revision table that lists those employees for whom it does not find pay rate revisions. This occurs if the employee was included in the data selection and had timecard history that did not match the existing rate revision tables. Those employees can have a rate set up here or be excluded from the selection.
To set up pay rate revisions by employee
-
Complete the following fields:
-
Effective Date From
-
Effective Date Thru
-
Employee Number
-
Retroactive Amount or Rate
-
Retroactive Rate Extension Method
-
-
Complete the following optional fields:
-
Union Code
-
Job Type
-
Job Step
-
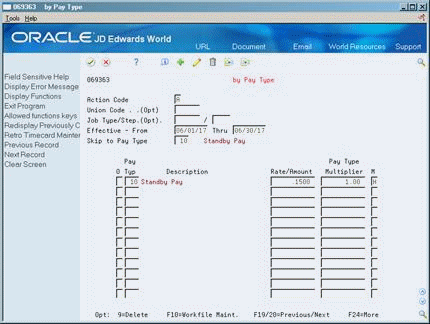
4.2.4 Setting Up Pay Rate Revisions by Pay Type
From Payroll Master (G07), choose Retroactive Processing
From Retroactive Payroll Processing (G0725), choose by Pay Type
Set up pay rate revisions by pay type to apply the same rate revisions to all timecards having the same pay type. You can enter rates for hours worked as percentages or as flat dollar amounts.
When you use a rate from the Rate Revisions by Pay Type table to calculate retroactive pay amounts, you can enter a pay type multiplier to override the pay type multiplier in the Pay Type Specifications table (F069116).
To set up pay rate revisions by pay type
On Rate Revisions by Pay Type
-
Complete the following fields:
-
Effective Dates
-
Pay Type
-
Retroactive Amount or Rate
-
Pay Type Multiplier
-
Retroactive Rate Extension Method
-
-
Complete the following optional fields:
-
Union Code
-
Job Type
-
Job Step
-
| Field | Explanation |
|---|---|
| Multiplier | A factor by which the base hourly rate is multiplied to obtain the actual payment hourly rate. For example, you could use 1.5 to designate time-and-one-half for overtime pay. Zero (0) is not a valid multiplier. |
4.3 Setting Up Retroactive Pay Type Tables
From Payroll Master (G07), choose Retroactive Processing
From Retroactive Payroll Processing (G0725), choose Retro Pay Type Table
You set up retroactive pay type tables to assign pay types for the new timecards created for retroactive payroll processing.
You must associate each pay type in the history table with a target pay type that the system uses when it creates the actual retroactive timecards. JD Edwards World recommends that you use pay types for retroactive pay that differ from those you use in other payroll processing.
During the timecard creation process, the system bypasses any timecard in the extracted history table with a pay type for which no target pay type is found. The system displays an error code of R (rejected) on the corresponding entry form when you are revising workfile records.
To set up retroactive pay type tables
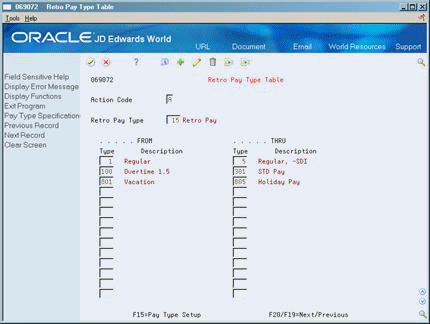
Complete the following fields:
-
Retro Pay Type
-
From Pay Type
-
Thru Pay Type
| Field | Explanation |
|---|---|
| Retro Pay Type | A code to define the type of pay for Retro Pay Processing. |
4.3.1 What You Should Know About
4.4 Creating the Retroactive Pay Workfile
From Payroll Master (G07), choose Retroactive Processing
From Retroactive Payroll Processing (G0725), choose Record Selection
To generate the retroactive pay processing workfile, you must select the appropriate timecards from the history table. The system requires two different versions of selection information to generate the workfile.
-
History extraction
-
Record selection
When you set up the data selection for the history extraction, you define the records you want the system to retrieve, or extract, from the Payroll Transaction History table (F0618). When you set up the data selection for the record selection version, you further define the records based on employee master data, such as pay status and termination date. This allows you to exclude timecards for terminated employees.
Use history extraction only to set the data selection and name the extraction version. Then, you must include this version in the processing options of the record selection version. If you do not specify a version for the history extraction, the system creates an error report because it cannot retrieve the records from the history table.
You can also choose to calculate the retroactive pay and create pro forma timecards when you select the records. Alternatively, you can perform this process separately.
4.5 Calculating Retroactive Pay
From Payroll Master (G07), choose Retroactive Processing
From Retroactive Payroll Processing (G0725), choose Rate Extension
If you did not include the rate extension calculation when you generated the retroactive pay workfile, you can run it separately to calculate retroactive pay. For example, you might want to run rate extension as a separate program if you changed the rate revision amounts.
The system retrieves the pay rate revisions from the appropriate retroactive rate revisions tables and calculates the retroactive gross pay amount for each pro forma timecard in the workfile (F06278). If the computed retroactive gross pay for a pro forma timecard is zero or negative, or if the system does not find a rate in any of the tables, the system creates an exception report that lists the timecard record and the type of error. Voided hours or negative rate revisions can cause negative retroactive pay amounts.
4.5.1 What You Should Know About
4.6 Reviewing Retroactive Pay Workfile Records Online
From Payroll Master (G07), choose Retroactive Processing
From Retroactive Payroll Processing (G0725), choose Workfile Review
You can review each employee's cumulative hours and retroactive gross pay online. You can also review individual workfile retroactive pay pro forma timecards for all the employees that were selected when you generated the retroactive pay workfile.
To review retroactive pay workfile records online
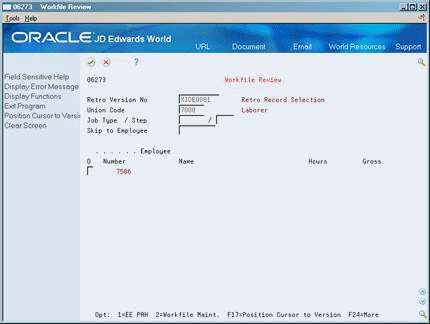
-
Enter the version number you used to generate the retroactive pay workfile in the following field:
-
Retro Version Number
-
-
To narrow the search, complete any of the following optional fields:
-
Union Code
-
Job Type
-
Job Step
-
-
To review the totals by pay type for an employee, choose the Retro Pay Amount/Hours option for an employee.
-
On Pay Type Amounts/Hours, review the information for accuracy.
-
On Workfile Review, choose the Workfile Maintenance option to review an individual's pro forma timecards for retroactive pay.
-
On Workfile Maintenance, review the information for accuracy.
4.7 Reviewing Retroactive Pay Workfile Reports
From Payroll Master (G07), choose Retroactive Processing
From Retroactive Payroll Processing (G0725), choose Retro Time & Pay Register
The system calculates the pro forma timecards from the data you selected in the history extraction and rate extension programs. The Retro Time and Pay Register provides a print copy of the work files' pro forma timecards. You review retroactive pay workfile reports to verify that the information you defined to generate the workfile is correct.
You can create either a detailed or a summary version of this report. The detail report lists each timecard by employee and pay type and a summary of each pay type.
The system prints the Rate Extension Exception report only if any records have a zero or negative amount or if there is no rate revision.
Figure 4-6 Retro Time and Pay Register report
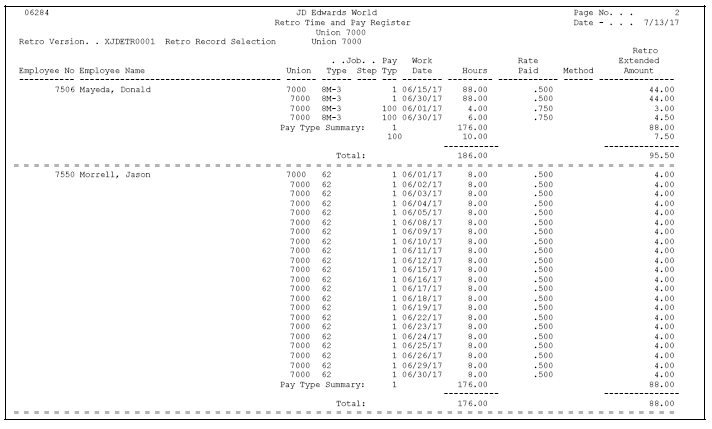
Description of ''Figure 4-6 Retro Time and Pay Register report''
Figure 4-7 Retro Rate Extension Exception report

Description of ''Figure 4-7 Retro Rate Extension Exception report''
4.8 Revising Retroactive Pay Workfile Records
From Payroll Master (G07), choose Retroactive Processing
From Retroactive Payroll Processing (G0725), choose Workfile Revisions
After you review the records in the retroactive pay work file for accuracy, you revise any timecards that require changes. Each detail line represents one timecard from the employee's history table. When you revise a work file record, you change only the retroactive pro forma timecard in the work file. You do not change the payroll history tables.
You cannot change the percentage and have the system automatically calculate a new gross amount. You can either manually calculate and enter the new amount or change the appropriate rate revisions table and rerun the rate extension.
Before the system can create actual timecards, you must approve each record. You can manually approve, remove the approval code (reset), or delete a record as you revise it.
To revise retroactive pay workfile records
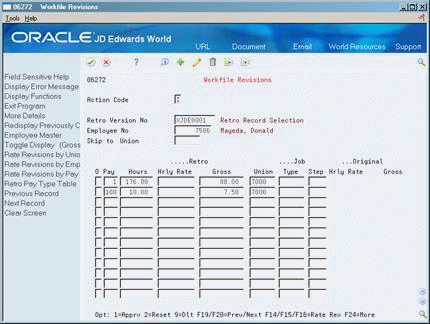
-
Complete the following field:
-
Retro Version Number
-
-
To select a specific employee, complete the following field:
-
Employee Number
-
-
Make changes to any of the following fields:
-
Pay Type Code
-
Hours Worked
-
Retroactive Hourly Rate
-
Retroactive Gross
-
Union
-
Job Type
-
Job Step
-
-
Press F4 to access the detail area.
-
Review the values in the following fields:
-
Account Number
-
Date Worked
-
-
To approve a record, choose the Approve option.
-
To change a previously approved or rejected record, choose the Reset option.
-
To delete a record, choose the Delete option.
-
Review the result on the record line in the following field:
-
Retro Timecard Indicator (not labeled)
-
| Field | Explanation |
|---|---|
| Retro | A code that indicates the status of the timecard. Valid values are:
A – Approved Timecard B – Approved Manual Changed Timecard M – Manual Changed Timecard R – Rejected Timecard If you reset and change a previously approved or rejected record, the indicator code changes.
|
| Hrly Rate | The rate the system used to calculate an employee's retroactive pay.
If you enter an hourly rate, the system multiplies this amount by the hours and the pay type multiplier to create a new retroactive gross amount. Therefore, the system recalculates any hourly rate you enter on a pay type that has a multiplier greater than 1.0. For example, if you enter an hourly rate of .50 on an overtime pay type that has a multiplier of 1.5, the system changes the rate to .75 before multiplying the hours by the rate. If you enter the rate as a percentage, the system does not consider the pay type multiplier. Instead, the system multiplies the regular gross amount by the percentage to calculate the retroactive gross amount. If you enter a flat dollar amount, the system applies the amount as the total retroactive gross amount. Flat dollar amounts do not force a calculation. |
| Gross | The amount of wages to be paid the employee for retroactive pay. |
4.8.1 What You Should Know About
| Topic | Description |
|---|---|
| Correcting blank values | If the Retro Hourly Rate and Retro Gross fields are blank, one of the following occurred:
To correct this situation, verify that you have set up a valid union, employee, or pay type retroactive table and that the work dates for the employee falls on or between the dates specified in the table. |
| Correcting unextended records | If the system failed to extend only a few records for an employee, the work date in the table was outside the date ranges specified in the retroactive rate revisions table.
To correct this situation, either manually extend the gross pay on Workfile Revisions or verify that the correct table is being used and rerun the Rate Extension program. |
| Approving and resetting a record | When you choose either the Approve or the Reset option, it is not necessary to use the Change action. |
| Adding a record | Use the Change action to add a record. Enter the account number and work date in the detail area. The system retrieves the remaining required information from the employee master record. |
| Adding a record without an account number | If you add a record and do not provide an account number, the system assigns an account number following the rules established in the automatic accounting instructions for business unit, object, and subsidiary. |
| Correcting account number or date worked | If an account number or date worked has been incorrectly assigned to a record, you must delete the entire record and re-enter it with the correct information. |
| Deleting a record | To delete a record, choose the Delete option and use the Change action. The system deletes the record from the Retroactive Timecard workfile (F06278), but not from the Payroll Transaction History table (F0618).
If you delete a record, rerunning the Rate Extension program does not re-create the deleted record in the workfile. To retrieve the deleted record, you must rerun the Record Selection program or manually add the record on Workfile Revisions. |
| Revising records in batch | You can run a batch program to approve, reset, or delete all or selected retroactive pay records.
See Section 4.9, "Approving the Retroactive Timecard Workfile." |
4.9 Approving the Retroactive Timecard Workfile
From Payroll Master (G07), choose Retroactive Processing
From Retroactive Payroll Processing (G0725), choose Workfile Approval/Reset
If you want to create actual retroactive timecards to use in payroll processing, you must approve the pro forma timecards in the workfile. You can run a batch program to approve all or selected pro forma timecards in the Retroactive Timecard Workfile (F06278).
This program does not generate a report.
4.9.1 What You Should Know About
| Topic | Description |
|---|---|
| Resetting or deleting records by batch | You can also create versions of this program to reset or delete the records in the workfile. |
| Approving records manually | You can manually approve one or more records.
See Section 4.8, "Revising Retroactive Pay Workfile Records." |
4.10 Creating Retroactive Timecards
From Payroll Master (G07), choose Retroactive Processing
From Retroactive Payroll Processing (G0725), choose Create Retro Timecards
To include the retroactive payments in a payroll cycle, you must create actual retroactive timecards for all approved records. When you create retroactive timecards, the system summarizes the pro forma timecard records and creates the following retroactive information for standard payroll processing:
-
Timecards (F06116)
-
DBAs (F0609)
-
Interim checks and associated timecards
You can create retroactive timecards as often as necessary.
When you create retroactive timecards, the system generates a report. Depending on how you set the associated processing option, the system generates either a posting report or an exception report.
The Retro Timecard Posting report lists all records processed from the workfile depending on the data selection of Create Retro Timecards. The system uses transaction numbers to identify the successfully processed records. If the system did not create a timecard, the record includes a transaction number of zero (0) with associated error messages.
The Retro Timecard Exception report lists only the records in error with an associated error message.
Figure 4-9 Retro Timecard Posting report
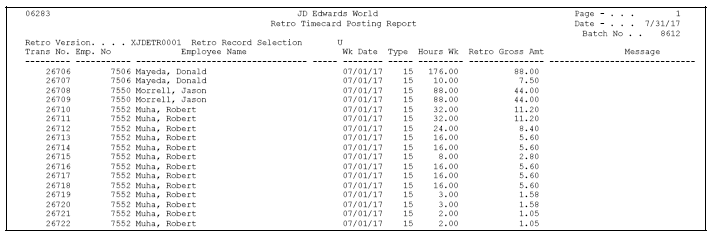
Description of ''Figure 4-9 Retro Timecard Posting report''
Figure 4-10 Retro Timecard Exception report
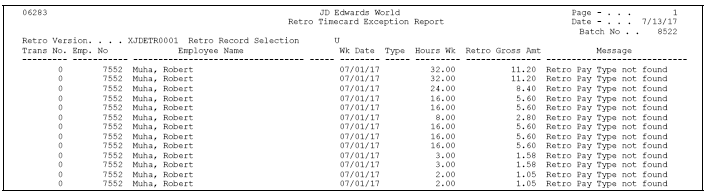
Description of ''Figure 4-10 Retro Timecard Exception report''
4.10.1 What You Should Know About
| Topic | Description |
|---|---|
| Negative gross pay | If the total of all gross pay records for the employee, pay type, and account information is a negative amount (that is, negative retroactive pay), the system does not create a timecard. The result depends on whether you specified a valid benefit number (DBA) in the associated processing option, as follows:
See Section 4.11, "Correcting Rejected Timecards." If all employees in the workfile have negative gross pay, JD Edwards World recommends that you set the processing options to create standard timecards. The system creates DBA one-time overrides which can then be processed with regular pay only during a normal payroll. |
| Zero gross pay | If the gross pay amount for the combination of employee, pay type, and account information is zero (0), the system removes the record from the workfile without creating a timecard. |
| Employee master information | During timecard creation, the system retrieves information from the Employee Master table (F060116). If necessary, update the actual retroactive timecard in a time entry program. |
| Business unit security | The system verifies all menu selections on the Retroactive Payroll Processing menu for business unit security. If a user is not authorized to access a record, the record prints on the exception report. The system resets the record with a blank indicator code and leaves it in the workfile. You must approve these records again and rerun the Create Retro Timecards program. |
4.11 Correcting Rejected Timecards
Before creating a timecard, the system verifies all information in the workfile pro forma records. When the program successfully verifies a record, it performs the following:
-
Creates a timecard, one-time-override, or interim check to be used for payroll processing
-
Removes the verified record from the workfile
After all records are processed, the only records remaining in the workfile are rejected records and records not previously approved. The system marks the rejected records with the appropriate error codes preventing the pro forma timecards from further processing.
Reasons for rejecting retroactive timecards include the following:
-
The history pay type is not associated with a target pay type in the Retro Pay Type table, or the target pay type is not found in the Pay Type Specifications table (F069116)
-
The account number in the workfile does not pass the account number test for posting account numbers, for validity of account number, or for posting business unit
-
For negative pay, the benefit code that is specified in the processing options is not valid
Based on the reason the system rejected the timecard, you might need to:
-
Repeat any or all of the tasks to process retroactive payroll
-
Change the processing options before you create the retroactive payroll so that the system includes the rejected timecards